Archive for November, 2011
Tuesday, November 29th, 2011 The classical way to keep a process running in background after log out of a shell is using screen
Anyways using screen is not the only way to detach a running process , GNU / Linux and BSDs (Free, Open, Net BSDs) had a command nohup which aim is to run a command immune to hangups, with output to a non-tty
Let’s say one wants to keep track (log) constantly ICMP traffic to a certain host with ping command on a UNIX server / desktop which doesn’t have the screen manager … terminal emulation program installed. Achieving this task is possible with nohup cmd by backgrounding the ping process, like so:
guoi@host:~$ nohup ping google.com >ping.log &[1] 45931hipo@host:~$ nohup: ignoring input and redirecting stderr to stdout
Afterwards even after closing up the opened ssh session or console (tty) / terminal (pts) on which the ping process is background nohup prevents the ping to be sent kill SIGNAL so the process continues running in the background.
Later on to check in real time the statistics of the continuous ICMP ping requests tail, less, or cat can be used for example watching the tail:
hipo@host:~$ tail -f ping.log

64 bytes from fx-in-f106.1e100.net (74.125.39.106): icmp_req=562 ttl=51 time=44.0 ms

64 bytes from fx-in-f106.1e100.net (74.125.39.106): icmp_req=563 ttl=51 time=43.8 ms

64 bytes from fx-in-f106.1e100.net (74.125.39.106): icmp_req=564 ttl=51 time=43.3 ms

64 bytes from fx-in-f106.1e100.net (74.125.39.106): icmp_req=565 ttl=51 time=43.1 ms

64 bytes from fx-in-f106.1e100.net (74.125.39.106): icmp_req=566 ttl=51 time=43.4 ms

64 bytes from fx-in-f106.1e100.net (74.125.39.106): icmp_req=567 ttl=51 time=43.6 ms
I’m using Linux / BSD for quite a lot of time and never before put in use the nohup cmd I guess there are more ppl who never heard of this handy UNIX basic command. Hope I’m not the only one who never heard about it and its useful knowledge to someone out. Cheers 😉
Tags: aim, BSDs, cheer, Cheers, cmd, com, Desktop, detach, Free, fx, gnu linux, google, Hope, host, ICMP, icmp ping, log amp, manager, msi, net, nohup, Open, ping, ping command, ppl, real time, req, screen, server desktop, Shell, someone, ssh, ssh session, stderr, terminal, terminal emulation program, time, tty, unix server, useful knowledge
Posted in FreeBSD, Linux, System Administration | 1 Comment »
Tuesday, November 29th, 2011 I guess everyone has ended up with problems into a script files written under Windows using some text editor which incorrectly placed into the end of lines Windows (rn) end of lines instead of the UNIX (r).
Those who have have already take advantage of the nice tiny utility dos2unix which is capable of convert the Windows end of lines to UNIX. However some older UNIXes, like SunOS or HP-UX does not have the dos2unix utility into the list of packages one can install or even if its possible to install dos2unix it takes quite a hassle.
In that cases its good to say convertion of end of lines can be done without using external end programs by simply using UNIX sed .
The way to remove the incorrect Windows ^M (as seen in unix text editors) is by using the sed one liner:
server# sed 's/.$//' file-with-wrong-windows-eol.txt > file-with-fixed-unix-eol.txt
Tags: Advantage, Convert, convertion, cr lf, dos2unix, editor, hassle, hp, HP-UX, line, liner, list, MS-DOS, script, server, sunos, text, tiny utility, TXT, unix, unix text editors, UNIXes, using unix, utility, way, Windows
Posted in FreeBSD, Linux, System Administration | No Comments »
Monday, November 28th, 2011 
Have you looked for a universal physical check up tool to check up any filesystem type existing on your hard drive partitions?
I did! and was more than happy to just recently find out that the small UNIX program dd is capable to check any file system which is red by the Linux or *BSD kernel.
I’ll give an example, I have few partitions on my laptop computer with linux ext3 filesystem and NTFS partition.
My partitions looks like so:
noah:/home/hipo# fdisk -l

Disk /dev/sda: 160.0 GB, 160041885696 bytes

255 heads, 63 sectors/track, 19457 cylinders

Units = cylinders of 16065 * 512 = 8225280 bytes

Sector size (logical/physical): 512 bytes / 512 bytes

I/O size (minimum/optimal): 512 bytes / 512 bytes

Disk identifier: 0x2d92834c

Device Boot Start End Blocks Id System

/dev/sda1 1 721 5786624 27 Unknown

Partition 1 does not end on cylinder boundary.

/dev/sda2 * 721 9839 73237024 7 HPFS/NTFS

/dev/sda3 9839 19457 77263200 5 Extended

/dev/sda5 9839 12474 21167968+ 83 Linux

/dev/sda6 12474 16407 31593208+ 83 Linux

/dev/sda7 16407 16650 1950448+ 82 Linux swap / Solaris

/dev/sda8 16650 19457 22551448+ 83 Linux
For all those unfamiliar with dd – dd – convert and copy a file this tiny program is capable of copying data from (if) input file to an output file as in UNIX , the basic philosophy is that everything is a file partitions themselves are also files.
The most common use of dd is to make image copies of a partition with any type of filesystem on it and move it to another system
Looking from a Windows user perspective dd is the command line Norton Ghost equivalent for Linux and BSD systems.
The classic way dd is used to copy let’s say my /dev/sda1 partition to another hard drive /dev/hdc1 is by cmds:
noah:/home/hipo# dd if=/dev/sda1 of=/dev/hdc1 bs=16065b
Even though the basic use of dd is to copy files, its flexibility allows a “trick” through which dd can be used to check any partition readable by the operating system kernel for bad blocks
In order to check any of the partitions listed, let’s say the one listed with filesystem HPFS/NTFS on /dev/sda2 using dd
noah:/home/hipo# dd if=/dev/sda2 of=/dev/null bs=1M
As you can see the of (output file) for dd is set to /dev/null in order to prevent dd to write out any output red by /dev/sda2 partition. bs=1M instructs dd to read from /dev/sda2 by chunks of 1 Megabyte in order to accelerate the speed of checking the whole drive.
Decreasing the bs=1M to less will take more time but will make the bad block checking be more precise.
Anyhow in most cases bs of 1 Megabyte will be a good value.
After some minutes (depending on the partition size), dd if, of operations outputs a statistics informing on how dd operations went.
Hence ff some of the blocks on the partition failed to be red by dd this will be shown in the final stats on its operation completion.
The drive, I’m checking does not have any bad blocks and dd statistics for my checked partition does not show any hard drive bad block problems:
71520+1 records in

71520+1 records out

74994712576 bytes (75 GB) copied, 1964.75 s, 38.2 MB/s
The statistics is quite self explanatory my partition of s size 75 GB was scanned for 1964 seconds roughly 32 minutes 46 seconds. The number of records red and written are 71520+1 e.g. (records in / records out). This means that all the records were properly red and wrote to /dev/null and therefore no BAD blocks on my NTFS partition 😉
Tags: bad blocks, Blocks, boundary, bsd systems, bytesDisk, copying, cylinder boundary, dd, device boot, Disk, drive, drive partitions, end, everything, ext, fdisk, file, filesystem type, freebsd, gnu linux, hipo, image copies, input file, kernel, laptop, laptop computer, lDisk, linux dev, noah, norton ghost, NTFS, optimal, partition, perspective, quot, sda, sector, sector size, Solaris, tiny program, tool, type, unix program, windows user
Posted in Computer Security, FreeBSD, Linux, System Administration, Various | No Comments »
Saturday, November 26th, 2011 
SSH tunneling allows to send and receive traffic using a dedicated port. Using an ssh traffic can have many reasons one most common usage reason is to protect the traffic from a host to a remote server or to access port numbers which are by other means blocked by firewall, e.g.: (get around firewall filtering)
SSH tunneling works only with TCP traffic. The way to make ssh tunnel is with cmds:
host:/root# ssh -L localhost:deshost:destport username@remote-server.net

host:/root# ssh -R restport:desthost:localport username@remote-server.net

host:/root# ssh -X username@remote-server.net
This command will make ssh to bind a port on localhost of the host host:/root# machine to the host desthost:destport (destination host : destinationport). Important to say deshost is the host destination visible from the remote-server.net therefore if the connection is originating from remote-server.net this means desthost will be localhost.
Mutiple ssh tunnels to multiple ports using the above example commands is possible. Here is one example of ssh tunneling
Let’s say its necessery to access an FTP port (21) and an http port (80), listening on remote-server.net In that case desthost will be localhost , we can use locally the port (8080) insetad of 80, so it will be no necessery to make the ssh tunnel with root (admin privileges). After the ssh session gets opened both services will be accessible on the local ports.
host:/home/user$ ssh -L 21:localhost:21 -L 8080:localhost:80 user@remote-server.net
That’s all enjoy 😉
Tags: command, connection, deshost, destination host, destport, example, firewall, Ftp, ftp port, home, host, host host, host root, How to, Important, Linux, localhost, machine, make, Mutiple, necessery, net, nethost, netThat, port, port 8080, port numbers, ports, Privileges, reason, remote server, restport, root, root admin, server, ssh, ssh session, ssh tunneling, traffic, tunnels, username, way
Posted in Computer Security, FreeBSD, Linux, System Administration | 3 Comments »
Friday, November 25th, 2011 
I have just recently found out that it is possible to use openssl to encrypt files to tighten your security.
Why would I want to encrypt files? Well very simple, I have plain text files where I write down my passwords for servers or account logins for services I use on the internet.
Before this very day I use gpg to encrypt and decrypt my sensitive information files and archives. The way to encrypt files with GPG is very simple, here is an example:
server:~# ls -al test.txt

-rw-r--r-- 1 root root 12 Nov 25 16:50 test.txt

server:~# gpg -c test.txt > test.txt.gpg

Enter passphrase:

Repeat passphrase:
Typing twice the same password produces the encrypted file test.txt.gpg . In order to later decrypt the gpg password protected file I use cmd:
server:~# gpg -d test.txt.gpg >test.txt

Enter passphrase:

Repeat passphrase:

gpg: CAST5 encrypted data

gpg: encrypted with 1 passphrase

gpg: WARNING: message was not integrity protected
As one can see from above output by default gpg uses the CAST5 algorithm to encrypt the data. For all those curious on what kind of encryption does CAST5 provide and where the CAST5 origins are, in short CAST5 is a GNU invented cryptographic algorithm, the short description of the algorithm is as follows:
“…a DES-like Substitution-Permutation Network (SPN) cryptosystem which appears to have good resistance to differential cryptanalysis, linear cryptanalysis, and related-key cryptanalysis. This cipher also possesses a number of other desirable cryptographic properties, including avalanche, Strict Avalanche Criterion (SAC), Bit Independence Criterion (BIC), no complementation property, and an absence of weak and semi-weak keys.”
Anyways, for all those who trust more the DES128 encryption as an encryption algorithm to keep your data secret, the openssl command tool provides another mean to encrypt sensitive data.
To encrypt a file using the openssl’s DES encryption capabilities:
server:~# openssl des -salt -in test.txt -out test.txt.des

enter des-cbc encryption password:

Verifying - enter des-cbc encryption password:
As you can see to encrypt with the DES-CBC its necessery to type twice the secret password “salt” keyword which will be used as an encryption key.
To decrypt later on the DES encrypted file the cmd is:
server:~# openssl des -d -salt -in file.des -out file
In order to encrypt a whole directory earlier compressed with tar zip:
server:~# tar -czf - directory | openssl des -salt -out directory.tar.gz.des
Where directory is the name of directory which will be tarred and crypted.
To later decrypt with openssl the above encrypted tar.gz.des file:
server:~# openssl des -d -salt -in directory.tar.gzdes | tar -x
Tags: avalanche, c test, CAST, command tool, complementation, Criterion, cryptographic algorithm, cryptosystem, d test, datagpg, DES, DES-like, description, differential, encrypt, encrypted data, encryption, encryption algorithm, encryption capabilities, example server, file, file test, gnu linux, GPG, how to encrypt files, information files, integrity, linear cryptanalysis, logins, openssl, password, quot, Repeat, resistance, root, root root, sensitive data, SPN, strict avalanche criterion, test
Posted in Business Management, Computer Security, System Administration, Various | No Comments »
Friday, November 25th, 2011 There are two handy Windows commands which can be used to renew IP address or flush prior cached DNS records which often create problems with resolving hosts.
1. To renew the IP address (fetch address from DHCP server)
C:> ipconfig /release

C:> ipconfig /renew
In above cmd ipconfig /release will de-assign the IP address configured on all Windows LAN and Wireless interfaces, whether ipconfig /renew will send request for IP address to the DNS server.
To unassign and assign again IP address from DHCP server only for a particular LAN or WLAN card:
C:> ipconfig /release LAN

C:> ipconfig /renew LAN

C:> ipconfig /release WLAN

C:> ipconfig /renew WLAN
2. Adding specific routing to Windows
Windows has a Route command similar by syntax to Linux’s route command.
To add routing via a specific predefined IP addresses on Windows the commands should be something like:
C:> Route add 192.168.40.0 mask 255.255.255.0 192.168.41.253

C:> Route add 0.0.0.0 mask 0.0.0.0 192.168.41.254
The first command adds IP 192.168.40.0 in the network of 255 hosts to be routed via 192.168.41.253
The second one adds 192.168.41.254 as a default gateway for all outbound traffic from the Windows host.
To make permanent routing -p switch is used.
3. To clear Windows DNS cache (flush DNS cached records)
C:> ipconfig /flushdns
This will clear all IP records corresponding to hostnames previously cached on the Windows host. Using ipconfig /flushdns is especially handy when IP address for a specific DNS host is changed. Flushing the Windows DNS cache can save us a lot of waiting before the domain example.com starts resolving to the new IP address let’s say 1.2.3.4 instead of the old one 2.2.2.2
Tags: Cache, card, card c, com, command, configured, default gateway, DHCP, DNS, dns host, dns server, domain, domain example, first command, flush dns cache, flushdns, gateway, host, hosts, how to renew ip address, ipconfig, ipconfig flushdns, ipconfig release, mask, network, outbound, outbound traffic, predefined, records c, release c, request, Route, routing, server c, something, switch, unassign, Vista, windows commands, windows lan, WLAN, WLANC
Posted in System Administration, Windows | 1 Comment »
Thursday, November 24th, 2011 
As a System Administrator I need to check daily the log files produced on various GNU / Linux distributions or FreeBSD. This can sometimes take too much time if the old fashioned way using the normal system tools cat, less and tail etc. is used.
Reading logs one by one eats too much of my time and often as logs are reviewed in a hurry some crucial system irregularities, failed ssh or POP3 / Imap logins, filling disk spaces etc. are missed.
Therefore I decided to implement automated log parsing programs which will summary and give me an overview (helicopter view) on what were the system activities from the previous day (24h) until the moment I logged the system and issued the log analyzer program.
There are plenty of programs available out there that does “wide scale” log analysis, however there are two applications which on most GNU / Linux and BSD systems had become a de-facto standard programs to scan system log files for interesting lines.
These are:
- 1. logwatch – system log analyzer and reporter
- 2. logcheck – program to scan system log files for interesting lines
1. logwatch is by default installed on most of the Redhat based Linux systems (Fedora, RHEL, CentOS etc.). On Debian distributions and as far as I know (Ubuntu) and the other deb based distros logwatch is not installed by default. Most of the servers I manage these days are running Debian GNU / Linux so, to use logwatch I needed to install it from the available repository package, e.g.:
debian:~# apt-get install logwatch

...
logwatch is written in perl and with some big files to analyze, parsing them might take hell a lot of time. It does use a bunch of configuration scripts which defines how logwatch should read and parse the various services logwatch support by default. These conf scripts are also easily extensible, so if one has to analyze some undefined service in the conf files he can easily come up with a new conf script that will support the service/daemon of choice.Using logwatch is very easy, to get an overview about server system activity invoke the logwatch command:
debian:~# logwatch

################### Logwatch 7.3.6+cvs20080702-debian (07/02/08) ####################

Processing Initiated: Thu Nov 24 05:22:07 2011

Date Range Processed: yesterday

( 2011-Nov-23 )

Period is day.

Detail Level of Output: 0

Type of Output/Format: stdout / text

Logfiles for Host: debian

 #################################################
——————— dpkg status changes Begin ————-
Upgraded:
libfreetype6 2.3.7-2+lenny7 => 2.3.7-2+lenny8
libfreetype6-dev 2.3.7-2+lenny7 => 2.3.7-2+lenny8
———————- dpkg status changes End ————————-
——————— httpd Begin ————————
Requests with error response codes
400 Bad Request
HTTP/1.1: 2 Time(s)
admin/scripts/setup.php: 2 Time(s)
401 Unauthorized
…
…
———————- vpopmail End ————————-
——————— Disk Space Begin ————————
Filesystem Size Used Avail Use% Mounted on
/dev/md0 222G 58G 154G 28% /
———————- Disk Space End ————————-
###################### Logwatch End #########################
The execution might take up from 10 to 20 seconds up to 10 or 20 minutes depending on the log files size and the CPU / RAM hardware on the machine where /var/log/… logs will be analyzed.
logwatch output can be easily mailed to a custom mail address using a crontab if the server runs a properly configured SMTP server. Using a cron like:
00 5 * * * /usr/sbin/logwatch | mail -s "$(hostname) log files for $(date)"
Here is time to make a note that logwatch is ported also to FreeBSD and is available from BSD’s port tree, from a port with path:
/usr/ports/security/logcheck
2. logcheck is another handy program, which does very similar job to logwatch . The “interesting” information it returns is a bit less than compared to logwatch
The good thing about logcheck is that by default it is made to mail every 1 hour a brief data summary which might be of an interest to the sys admin.
Logcheck is available for install on RedHat distros via yum and has existing package for Debian as well as a port for FreeBSD under the port location /usr/ports/security/logcheck
To install on logcheck on Debian:
debian:~# apt-get install logcheck

...
After installation I found it wise to change the default mailing time from each and every hour to just once per day to prevent my email from overfilling with “useless” mails.
This is done by editting the default cron tab installed by the package located in /etc/cron.d/logcheck
The default file looks like so:
# /etc/cron.d/logcheck: crontab entries for the logcheck package

PATH=/usr/local/sbin:/usr/local/bin:/sbin:/bin:/usr/sbin:/usr/bin

MAILTO=root

@reboot logcheck if [ -x /usr/sbin/logcheck ]; then nice -n10 /usr/sbin/logcheck -R; fi

2 * * * * logcheck if [ -x /usr/sbin/logcheck ]; then nice -n10 /usr/sbin/logcheck; fi

# EOF
To change it run only once per day its content should looks something like:
# /etc/cron.d/logcheck: crontab entries for the logcheck package

PATH=/usr/local/sbin:/usr/local/bin:/sbin:/bin:/usr/sbin:/usr/bin

MAILTO=root

@reboot logcheck if [ -x /usr/sbin/logcheck ]; then nice -n10 /usr/sbin/logcheck -R; fi

2 5 * * * logcheck if [ -x /usr/sbin/logcheck ]; then nice -n10 /usr/sbin/logcheck; fi

# EOF
Altering it that way the log summary interesting info analysis will be sent on mail every day in 05:02 a.m.
Changing the default email logcheck will ship its log analyzer report emails on deb based distros is done via editting the file:
/etc/logcheck/logcheck.conf
And changing the SENDMAILTO=”” variable to point to the appropriate admin email email addr.
Tags: Begin, bsd systems, CentOS, configuration scripts, cron, Date, deb, debian distributions, debian gnu, Disk, dpkg, end, fedora, freebsd, gnu linux, helicopter view, hurry, imap, irregularities, libfreetype, linux distributions, linux systems, logcheck, logwatch, nbsp, Output, package, quot, reading, reading log files, reading logs, reporter, repository, Space, ssh, summary, system administrator, system tools, time, Ubuntu
Posted in FreeBSD, Linux, System Administration, Various | 1 Comment »
Wednesday, November 23rd, 2011 One of my friends Windows 7 started returning errors while trying to open from My Computer the local Windows C, D and E drives.
This error appeared immediately, after malware and registry fix up programs were run on the PC. The exact programs that lead his PC into the state of returning an error:
This file does not have a program associated with it for performing this action. Create an association in the Set Associations control panel

are:
- a-squared
- Registry Booster
This two programs by the way are doing quite a good job on fixing Windows XP and Windows Vista PCs which were cleaned up earlier with Malware Bytes and Avira , however it seems they’re not 100% still compatible with the Windows 7 registry database or some uncleaned malware or virus on the PC has post-messed up the registry file associations. As its always the case with Windows you don’t have a clear idea what’s going …
Anyways as said the PC was in a bad situation, where neither Windows Explorer nor in any mean the disk drives can be opened or red, hence there was need for a quick way to revert back the default Windows file association registry settings After some quick research online, I’ve found an archive containing default Windows registry values for file associations
Therefore to revert back all Windows 7 file extensions from Windows install time, I had to download the file All_Default_File_Extensions.zip , extract the archive with WinZip or WinRar and run each of archive contained .reg extension files. The .reg files had to be run with Administrator account. It takes a while and its a bit irritating until all of the .reg files are run and all the file association default Windows settings are reverted back but thankfully in the end the C drive opening error:
This file does not have a program associated with it for performing this action … is resolved. Cheers 😉
Tags: action, administrator, administrator account, association, Avira, bad situation, bit, Booster, c drive, Cheers, Computer, control, control panel, default windows, Disk, download, drive, drive c, explorer, explorer error, file, file associations, file extensions, fixing windows xp, good job, job, Malware, nbsp, necessery, need, panelare, reg files, registry database, registry settings, registry values, Set, time, windows c, windows explorer, windows registry, winrar, WinZip
Posted in System Administration, Various, Windows | 1 Comment »
Wednesday, November 23rd, 2011 I needed to show the Administrator user on one Windows 7 install.
Achieving this is done through command prompt – cmd.exe where the command prompt with the exclusive option of Run as Administrator .
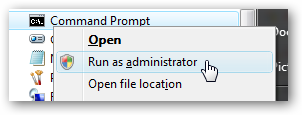
The exact command that unhides the Administrator user so further on on next windows login screen one sees Administrator user ready for use is:
C:> net user administrator /active:yes
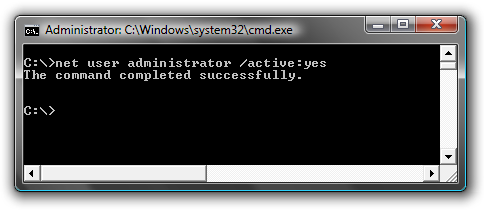
Unhiding Administrator user is always handy whether one needs to do some bunch of operations with Super User. After finishing all my required tasks with administrator I reverted back and hid the Administrator user once again like so:
C:> net user administrator /active:no
This commands also works fine on Vista and presumably on Windows XP.
Tags: Achieving, administrator, bunch, cmd, command, command prompt, exact command, exe, fine, login, option, run, screen, show, Super, unhide, Unhiding, use, User, Vista, Windows, windows xp
Posted in System Administration, Various, Windows | No Comments »
Tuesday, November 22nd, 2011 
Yesterday I watched Star Trek (2009) , the movie was recommended to me by a friend as a worthy one to be seen even for people who are not fans of Sci-Fi
I’m a fan of sci-fi but lately I’m not that keen as in the short past. So I thought let’s see if this movie is worthy from the perspective of an ex-sci-fi maniac 😉
I should also say that I was a bit skeptical in the beginning as I’ve never been a big fan ot Star Trek , neither too much impressed by Star Wars
To sum it up the movie is a nice enjoyable one to take up 2 hours on watching good visual effects and human stories. There is an evil guy like with most sci-fi movies. Which prankly is a funny one 😉
The general movie plot is not much, neither its easy to grasp some of the moments of the movie, but this should be part of the cyberpunk part of it I guess.
Generally I enjoyed the movie and I would recommend it to my dear readers to have a look if they’re bored and they want to have 2 hrs of enjoyment 😉
Tags: beginning, bit, cyberpunk, dear readers, enjoyment, evil guy, fan, feedback, fii, friend, future, guy, keen, look, maniac, movie, Part, past, perspective, plot, Sci, sci fi movies, Star, star trek, star wars, Trek, visual effects, worthy one, yesterday
Posted in Movie Reviews, Various | No Comments »


