Archive for August, 2014

Fix random reboots of ZTE Blade 3 Android and other chineese smartphones – Fix battery strange discharge after reboot

Monday, August 25th, 2014

fix-solve-random-mobile-reboots-on-chineese-Android-mobile-phones-Android_greenman_logo
I'm owning ZTE Blade 3 chineese brand mobile phone. I thought there is not a big deal to buy chineese mobile phone as it saves money but the good old saying: "The Cheap always is more expensive" came true to proof the old wisdom.

The phone runs some Android port of version 4.0.4 and generally it runs well for a couple of days, but after the increase of application the battery started discharging too quickly, I have to charge almost daily … also occasionally since I have turned synchronization of mobile phone numbers with Google  from settings the ZTE Andorid phone started to randomly loose its contacts (after which I had to restore with proprietary application Dr. Fone). After a while I realized there is another fix, sometimes Contacts restore was also possible through using free application Contacts Sync Fix, but most of the times the only thing that could resolve the contacts is to dig for lost phonebook contacts with Dr. Fone …. Eventually I realized the Lost PhoneBook Contacts issue can be resolved by itself on a random principle so the missing phones issue sometimes solved by itself just by switching off complete the phone for some time and switching it on again after 12 hours?! Recently I found another alternative way to restore sudden (deleted) disappered phone numbers by:

Settings -> Profiles and Synchronization -> (Go to configured gmail account settings) -> Settings of Profile

Then

(Frequency of syncrhonization, messaging etc.) -> (click over the email address) -> Frequency of email check (every 4 hours) 

Set the every 4 hours settings to Never and then after a minute or 2 (interval), set back the Never (opt) to every 4 hours

Since some time I started facing another more severe problem – random phone reboots after which the battery often kept at a critically low charged. The batter often fall to 40% or 50% charge from 99% / 100% charge, and after some time of talking over the phone the battery fall down to as low as 18% and in a short random time it fall to 9%, then after a reboot it uppered the charge to 35% or 45% and the oddities continued. My first guess was it could be the battery being broken, some colleagues at work advised me to completely discharge the battery so the phone couldn't boot and then try to charge it with Battery Doctor free Android Application. Battery Doctor has a special 3 stage charging:
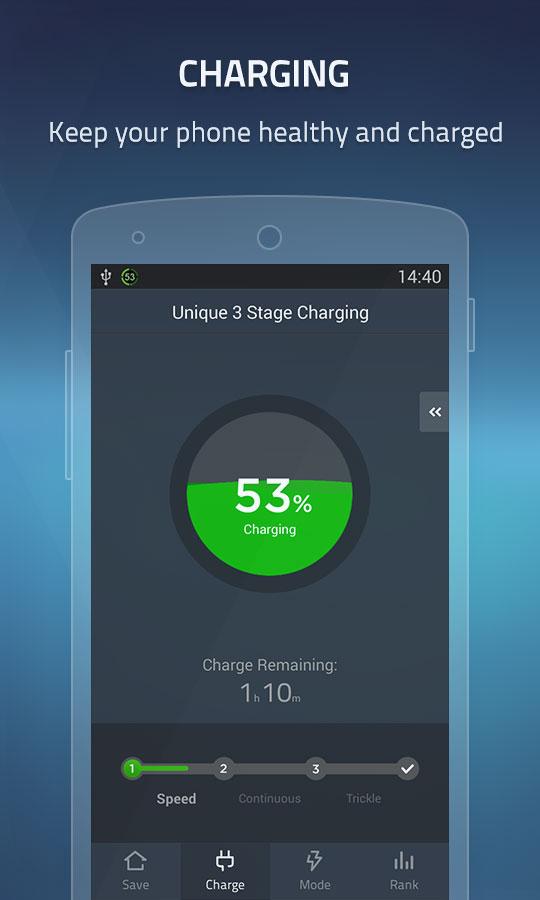
battery-doctor-android-revolutionary-battery-3-stage-charging-or-recovering-deat-dried-out-batteries-calibrating-broken-android-phone-battery-application

1. Bulk Charge

The primary purpose of a battery charger is to recharge a battery. This first stage is typically where the highest voltage and amperage the charger is rated for will actually be used. The level of charge that can be applied without overheating the battery is known as the battery's natural absorption rate. For a typical 12 volt AGM battery, the charging voltage going into a battery will reach 14.6-14.8 volts.

Where first 80% of the battery are charged with a rapid electricity influx to battery once 80% of battery charge is reached charging is moved to the so Absorption Battery Charge

2. Absorption Charge

Smart chargers will detect voltage and resistance from the battery prior to charging. After reading the battery the charger determines which stage to properly charge at. Once the battery has reached 80%* state of charge, the charger will enter the absorption stage. At this point most chargers will maintain a steady voltage, while the amperage declines. The lower current going into the battery safely brings up the charge on the battery without overheating it. This charge phase takes much longer time to charge.
Then comes the final charging state Float Charge

3. Float Charge

Some chargers enter float mode as early as 85% state of charge but others begin closer to 95%. Either way, the float stage brings the battery all the way through and maintains the 100% state of charge. The voltage will taper down and maintain at a steady 13.2-13.4 volts, which is the maximum voltage a 12 volt battery can hold. This charging is also known as "trickle charging". Float Charging battery electricity influx is so small that you can leave the phone to charge in this mode for days (if you like).

But guess what, after I tried to completely discharge the battery, it discharged to a state where it auto rebooted just before Android boots and reboots again and again, after nothing happened for about 2 hours of leaving the phone to automatically rebooted I decided to try the Battery Doctor 3 stage charging without having my battery completely dried out. The 3 Stage Charging is also known as Android Battery Calibration process and as I heard it helped fix many people's battery which for some reason got their Android battery in a broken state without physically substituting it.

Unfortunately In my case using Battery Doctor didn't help … so after spending time to read on some forum threads finally found this one. There many Bulgarians complained for buying ZTE Blade III and Huawei variations from the 3 major stream bulgarian mobile phone operatorsM-Tel, Vivacom and Globul and shortly after experiencing the strange random chineese smart phone reboots.  Some suggested that the Android Kernel is causing the issues or the firmware and suggested Phone Software Reset, however as I red most people that tried to solve it that way reported this doesn't solve it. Many People said to have shipped the phone as it was in a warranty back to services and phones were given back often with flushed firmware and in a little while the problem re-occured, some reported of another strange fix – a tiny sticky thing which kept the battery more stable?!! 🙂

zte-blade-3-and-huawei-and-other-android-chineese-phone-random-reboot-problem-fix-picture

Yes I know it looks kinda of insane … as this little holder could be any piece of paper and many reported to have fix the random battery charge drop down by sticking a tiny piece of paper between the battery and mobile shell I try it myself and GUESS WHAT?? IT WORKED !!! :)))

zteblade3_and-other-android-based-mobile-phone-brands-resolve-restart-fix-solution-screenshot

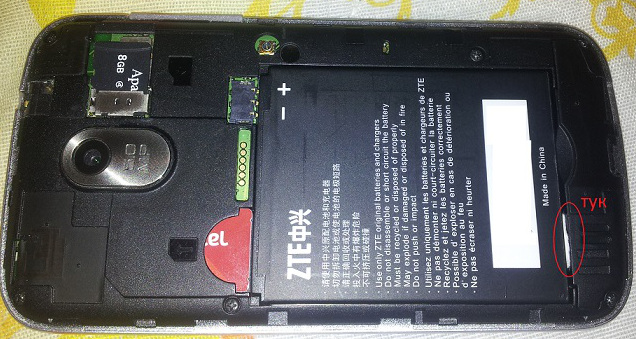
This is pretty much the Bulgarian and Russian primitive way to fix things but it works 🙂 I was exceedingly happy as I already have spend plenty of money for this mobile and I really was unwilling to buy another phone and it was out of warranty. I guess the whole issues started after I have occasionally dropped my phone on a couple of times on the ground and some little piece of plastic holding the battery eroded or whatever … Anyways the PAPER WAY WORKS! Cheers and hope this saves someone else out there from having to spend on new mobile!

Hooray !!! Thanks goes to the Lord Jesus Christ for Everything, for helping me solve it ! 🙂

Linux find files while excluding / ignoring some files – Show all files on UNIX excluding hidden . (dot) files

Friday, August 22nd, 2014

linux-find-files-while-excluding-ignoring-some-files-show-all-files-on-unix-excluding-hidden-dot-files
A colleague of mine (Vasil) asked me today, how he can recursively chmod to all files in a directory while exclude unreadable files for chmod (returning permission denied). He was supposed to fix a small script which was supposed to change permissions like :

chmod 777 ./
chmod: cannot access `./directory': Permission denied
chmod: cannot access `./directory/file': Permission denied
chmod: cannot access `./directory/onenote': Permission denied

First thing that came to my mind was to loop over it with for loop and grep out only /directory/ and files returning permissioned denied.

for i in $(find . -print | grep -v 'permission denied'); do echo chmod 777 $i; done

This works but if chmod has to be done to few million of files, this could be a real resource / cpu eater.

The better way to do it is by only using Linux find command native syntax to omit files.

find . -type f ( -iname "*" ! -iname "onenote" ! -iname "file" )

Above find will print all files in . – current directory from where find is started, except files: onenote and file.
To exclude
 

Search and show all files in Linux / UNIX except hidden . (dot) files

Another thing he wanted to do is ignore printing of hidden . (dot) files like .bashrc, .profile and .bash_history while searching for files – there are plenty of annoying .* files.

To ignore printing with find all filesystem hidden files from directory:

find . -type f ( -iname "*" ! -iname ".*" )

on web hosting webservers most common files which is required to be omitted on file searches is .htaccess

find . -type f ( -iname "*" ! -iname ".htaccess" )

  In order to print only all hidden files in directory except .bashrc and .bash_profile:

find . -type f ( -iname '.*' ! -iname '.bashrc' ! -iname '.bash_profile' )

Another useful Linux find use for scripting purposes is listing only all files presented in current directory (simulating ls), in case if you wonder why on earth to use find and not a regular ls command?, this is useful for scripts which has to walk through millions of files (for reference see how to delete million of files in same folder with Linux find):

find . ! -name . -prune

./packages
./bin
./package

"! -name . " –  means any file other than current directory

prune – prunes all the directories other than the current directory.

A more readable way to list only files in current folder with find is – identical to what above cmd:

find ./* -prune

./packages
./bin
./mnt

If you want to exclude /mnt folder and its sub-directories and files with find by using prune option:

find . -name tmp -prune -o -print


Create video from linux console / terminal – Record ssh terminal session as video with asciinema, showterm, termrecord

Thursday, August 21st, 2014

/var/www/images/asciinema-create-and-upload-ascii-terminal-console-videos-debian-gnu-linux-screenshot
You probably already know of existence of two Linux commands available by default across all Linux distributions scriptwhich makes a text based save of all commands executed on console and scriptreplay – which playbacks saved script command typescripts. Using this two you can save terminal sessions without problem, but in order to play them you need to have a Linux / UNIX computer at hand.
However If you want to make a short video record displaying what you have done on Linux console / terminal, you have few other options with which you can share your Linux terminal sessions on the web. In this short article I will go through 3 popular tools to do that – asciinema, showterm and termrecord.

1. Asciinema Current most popular tool to create video from Linux terminal

Here is how ASCIINEMA's website describes it:

"Asciinema is a free and open source solution for recording the terminal sessions and sharing them on the web."

apt-get –yes install python-pip

To install it with pip python package installer

pip install asciinema

Or if the machine is in DMZ secured zone and have access to the internet over a Proxy:

pip install –proxy=http://internet-proxy-host.com:8080 asciinema

It will get installed in /usr/local/bin/asciinema to make a terminal screen video capture just launch it (nomatter if it is privileged or non-privileged user):

asciinema

To finalize and upload the recorded terminal session, just type exit (to exit the shell), hopefully it will get you an upload link.

exit

You can claim authorship on video you issue:

asciinema auth

Use can then embed the new Linux terminal session video to your website.
 

2. ShowTerm – "It's showtime in a terminal near you!"

ShowTerm have same features as AsciiNema. Just like AsciiNema, what it does is it creates a record of your terminal session and then uploads it to showterm.io website, providing you a link over which you can share your terminal lesson / ascii art video / whatever with your friends. ShowTerm is written in, the world famous Ruby on Railsruby web development framework, so you will need to have ruby programming language installed before use. As showterm uses the Internet to upload video, so it is not really an option to create videos from remote terminal session on servers which are in DMZ with no access to the internet, I will explain in a little while how to create video of your terminal / console for private purpose on local server and then share it online on your own site.

a) To install ShowTerm:

– First be sure to have ruby installed:

On Debian / Ubuntu and derives deb Linux, as supersuser:

apt-get install –yes ruby curl

On CentOS / RHEL / Fedora Linux

yum -y install ruby curl

NB! curl is real requirement but as showterm.io website recommends downloading the script with it and later same curl tool is used to upload the created showterm file to http://showterm.io .

– Then to finalize install, download showterm script and make it executable

curl showterm.io/showterm > ~/bin/showterm

% Total    % Received % Xferd  Average Speed   Time    Time     Time  Current
                                       Dload  Upload   Total   Spent    Left  Speed
100  2007  100  2007    0     0   2908      0 –:–:– –:–:– –:–:–  8468

mkdir ~/bin
chmod +x ~/bin/showterm

This will save the script into your home folder ~/bin/showterm

b) Using showterm

To run it to create video from your terminal simply start it and do whatver you will in terminal.

~/bin/showterm

After you're done with the video you like type exit

exit

create-video-from-your-linux-console-terminal-with-showterm-screenshot

Note that if your server is behind a proxy curl will not understand proxy set inside Linux shell variable with http_proxy var, to upload the file if you're behind a proxy you will have to pass to curl –proxy setting, once you get the curl line invoked after failure to upload use something like:

curl –proxy $(echo $http_proxy)  https://showterm.herokuapp.com/scripts –data-urlencode cols=80 –data-urlencode lines=24 –data-urlencode scriptfile@/tmp/yCudk.script –data-urlencode timingfile@/tmp/lkiXP.timing

Where assuming proxy is defined already inside http_proxy shell variable.


3. Creating video from your terminal / console on Linux for local (private) use with TermRecord

In my humble view TermRecord is the most awesome of all the 3, as it allows you to make records with an own generated Javascript based video player and allows you to keep the videos on your own side, guaranteeing you independence of external services. Its
 

pip install TermRecord

TermRecord -o /tmp/session.html


You can further access the video in a local browser in Firefox / Chrome / Epiphany type in URL address bar:

/tmp/session.html to play the video

create-video-from-terminal-console-on-gnu-linux-howto-screenshot-with-termrecord

TermRecord uses term.js javascript to create the video web player and play the video which is directly encoded inside session.html.
If you want to share the video online, place it on your webserver and you're done 🙂
Check out my TermRecord generated video terminal sample session here.
 

How to check who is flooding your Apache, NGinx Webserver – Real time Monitor statistics about IPs doing most URL requests and Stopping DoS attacks with Fail2Ban

Wednesday, August 20th, 2014

check-who-is-flooding-your-apache-nginx-webserver-real-time-monitoring-ips-doing-most-url-requests-to-webserver-and-protecting-your-webserver-with-fail2ban

If you're Linux ystem administrator in Webhosting company providing WordPress / Joomla / Drupal web-sites hosting and your UNIX servers suffer from periodic denial of service attacks, because some of the site customers business is a target of competitor company who is trying to ruin your client business sites through DoS or DDOS attacks, then the best thing you can do is to identify who and how is the Linux server being hammered. If you find out DoS is not on a network level but Apache gets crashing because of memory leaks and connections to Apache are so much that the CPU is being stoned, the best thing to do is to check which IP addresses are causing the excessive GET / POST / HEAD requests in logged.
 

There is the Apachetop tool that can give you the most accessed webserver URLs in a refreshed screen like UNIX top command, however Apachetop does not show which IP does most URL hits on Apache / Nginx webserver. 


1. Get basic information on which IPs accesses Apache / Nginx the most using shell cmds


Before examining the Webserver logs it is useful to get a general picture on who is flooding you on a TCP / IP network level, with netstat like so:
 

# here is howto check clients count connected to your server
netstat -ntu | awk '{print $5}' | cut -d: -f1 | sort | uniq -c | sort -n


If you get an extensive number of connected various IPs / hosts (like 10000 or something huge as a number), depending on the type of hardware the server is running and the previous scaling planned for the system you can determine whether the count as huge as this can be handled normally by server, if like in most cases the server is planned to serve a couple of hundreds or thousands of clients and you get over 10000 connections hanging, then your server is under attack or if its Internet server suddenly your website become famous like someone posted an article on some major website and you suddenly received a tons of hits.


There is a way using standard shell tools, to get some basic information on which IP accesses the webserver the most with:

tail -n 500 /var/log/apache2/access.log | cut -d' ' -f1 | sort | uniq -c | sort -gr

Or if you want to keep it refreshing periodically every few seconds run it through watch command:

watch "tail -n 500 /var/log/apache2/access.log | cut -d' ' -f1 | sort | uniq -c | sort -gr"

monioring-access-hits-to-webserver-by-ip-show-most-visiting-apache-nginx-ip-with-shell-tools-tail-cut-uniq-sort-tools-refreshed-with-watch-cmd


Another useful combination of shell commands is to Monitor POST / GET / HEAD requests number in access.log :
 

 awk '{print $6}' access.log | sort | uniq -c | sort -n

     1 "alihack<%eval
      1 "CONNECT
      1 "fhxeaxb0xeex97x0fxe2-x19Fx87xd1xa0x9axf5x^xd0x125x0fx88x19"x84xc1xb3^v2xe9xpx98`X'dxcd.7ix8fx8fxd6_xcdx834x0c"
      1 "x16x03x01"
      1 "xe2
      2 "mgmanager&file=imgmanager&version=1576&cid=20
      6 "4–"
      7 "PUT
     22 "–"
     22 "OPTIONS
     38 "PROPFIND
   1476 "HEAD
   1539 "-"
  65113 "POST
 537122 "GET


However using shell commands combination is plenty of typing and hard to remember, plus above tools does not show you, approximately how frequenty IP hits the webserver


2. Real-time monitoring IP addresses with highest URL reqests with logtop


Real-time monitoring on IP addresses with highest URL requests is possible with no need of "console ninja skills"  through – logtop.


2.1 Install logtop on Debian / Ubuntu and deb derivatives Linux


a) Installing Logtop the debian way

LogTop is easily installable on Debian and Ubuntu in newer releases of Debian – Debian 7.0 and Ubuntu 13/14 Linux it is part of default package repositories and can be straightly apt-get-ed with:

apt-get install –yes logtop

b) Installing Logtop from source code (install on older deb based Linuxes)

On older Debian – Debian 6 and Ubuntu 7-12 servers to install logtop compile from source code – read the README installation instructions or if lazy copy / paste below:

cd /usr/local/src
wget https://github.com/JulienPalard/logtop/tarball/master
mv master JulienPalard-logtop.tar.gz
tar -zxf JulienPalard-logtop.tar.gz

cd JulienPalard-logtop-*/
aptitude install libncurses5-dev uthash-dev

aptitude install python-dev swig

make python-module

python setup.py install

make

make install


mkdir -p /usr/bin/
cp logtop /usr/bin/


2.2 Install Logtop on CentOS 6.5 / 7.0 / Fedora / RHEL and rest of RPM based Linux-es

b) Install logtop on CentOS 6.5 and CentOS 7 Linux

– For CentOS 6.5 you need to rpm install epel-release-6-8.noarch.rpm
 

wget http://dl.fedoraproject.org/pub/epel/6/x86_64/epel-release-6-8.noarch.rpm
rpm -ivh epel-release-6-8.noarch.rpm
links http://dl.fedoraproject.org/pub/epel/6/SRPMS/uthash-1.9.9-6.el6.src.rpm
rpmbuild –rebuild
uthash-1.9.9-6.el6.src.rpm
cd /root/rpmbuild/RPMS/noarch
rpm -ivh uthash-devel-1.9.9-6.el6.noarch.rpm


– For CentOS 7 you need to rpm install epel-release-7-0.2.noarch.rpm


links http://download.fedoraproject.org/pub/epel/beta/7/x86_64/repoview/epel-release.html
 

Click on and download epel-release-7-0.2.noarch.rpm

rpm -ivh epel-release-7-0.2.noarch
rpm –import /etc/pki/rpm-gpg/RPM-GPG-KEY-EPEL-7
yum -y install git ncurses-devel uthash-devel
git clone https://github.com/JulienPalard/logtop.git
cd logtop
make
make install


2.3 Some Logtop use examples and short explanation


logtop shows 4 columns as follows – Line number, Count, Frequency, and Actual line


The quickest way to visualize which IP is stoning your Apache / Nginx webserver on Debian?


tail -f access.log | awk {'print $1; fflush();'} | logtop


logtop-check-which-ip-is-making-most-requests-to-your-apache-nginx-webserver-linux-screenshot

On CentOS / RHEL

tail -f /var/log/httpd/access_log | awk {'print $1; fflush();'} | logtop


Using LogTop even Squid Proxy caching server access.log can be monitored.
To get squid Top users by IP listed:


tail -f /var/log/squid/access.log | awk {'print $1; fflush();'} | logtop


logtop-visualizing-top-users-using-squid-proxy-cache
 

Or you might visualize in real-time squid cache top requested URLs
 

tail -f /var/log/squid/access.log | awk {'print $7; fflush();'} | logtop


visualizing-top-requested-urls-in-squid-proxy-cache-howto-screenshot


3. Automatically Filter IP addresses causing Apache / Nginx Webservices Denial of Service with fail2ban
 

Once you identify the problem if the sites hosted on server are target of Distributed DoS, probably your best thing to do is to use fail2ban to automatically filter (ban) IP addresses doing excessive queries to system services. Assuming that you have already installed fail2ban as explained in above link (On Debian / Ubuntu Linux) with:
 

apt-get install –yes fail2ban


To make fail2ban start filtering DoS attack IP addresses, you will have to set the following configurations:
 

vim /etc/fail2ban/jail.conf


Paste in file:
 

[http-get-dos]
 
enabled = true
port = http,https
filter = http-get-dos
logpath = /var/log/apache2/WEB_SERVER-access.log
# maxretry is how many GETs we can have in the findtime period before getting narky
maxretry = 300
# findtime is the time period in seconds in which we're counting "retries" (300 seconds = 5 mins)
findtime = 300
# bantime is how long we should drop incoming GET requests for a given IP for, in this case it's 5 minutes
bantime = 300
action = iptables[name=HTTP, port=http, protocol=tcp]


Before you paste make sure you put the proper logpath = location of webserver (default one is /var/log/apache2/access.log), if you're using multiple logs for each and every of hosted websites, you will probably want to write a script to automatically loop through all logs directory get log file names and automatically add auto-modified version of above [http-get-dos] configuration. Also configure maxtretry per IP, findtime and bantime, in above example values are a bit low and for heavy loaded websites which has to serve thousands of simultaneous connections originating from office networks using Network address translation (NAT), this might be low and tuned to prevent situations, where even the customer of yours can't access there websites 🙂

To finalize fail2ban configuration, you have to create fail2ban filter file:

vim /etc/fail2ban/filters.d/http-get-dos.conf


Paste:
 

# Fail2Ban configuration file
#
# Author: http://www.go2linux.org
#
[Definition]
 
# Option: failregex
# Note: This regex will match any GET entry in your logs, so basically all valid and not valid entries are a match.
# You should set up in the jail.conf file, the maxretry and findtime carefully in order to avoid false positives.
 
failregex = ^<HOST> -.*"(GET|POST).*
 
# Option: ignoreregex
# Notes.: regex to ignore. If this regex matches, the line is ignored.
# Values: TEXT
#
ignoreregex =


To make fail2ban load new created configs restart it:
 

/etc/init.d/fail2ban restart


If you want to test whether it is working you can use Apache webserver Benchmark tools such as ab or siege.
The quickest way to test, whether excessive IP requests get filtered – and make your IP banned temporary:
 

ab -n 1000 -c 20 http://your-web-site-dot-com/

This will make 1000 page loads in 20 concurrent connections and will add your IP to temporary be banned for (300 seconds) = 5 minutes. The ban will be logged in /var/log/fail2ban.log, there you will get smth like:

2014-08-20 10:40:11,943 fail2ban.actions: WARNING [http-get-dos] Ban 192.168.100.5
2013-08-20 10:44:12,341 fail2ban.actions: WARNING [http-get-dos] Unban 192.168.100.5

How to check Windows server installed Tomcat and Java version

Tuesday, August 19th, 2014

how-to-check-get-java_and-tomcat-version-on-windows-java-and-tomcat-logo
I'm filling up a TOP (Turn to Production) form for a project where my part as Web and Middleware Engineer included install of Tomcat 7 and Java 1.7 on Windows server 2008 R2 standard. TOP is required Excel sheet standard document used by many large companies to fill in together with Project Manager before the server is to be launched into Production mode.

Therefore I needed to find out previously installed Tomcat and Java version, here is how:

1. Go to Tomcat install directory and (click twice) run twice Tomcat7w

As tomcat is installed in Custom location in D:webdienste in this case I had to run:
 
D:webdiensteapplication-jsptomcatapplication-namecurrentbinTomcat7w.exe

I run it using command line (cmd.exe), however you can run it via Windows Explorer, if you're lazy typing.
You will get a window pop up like on below screenshot:

In this case Installed Tomcat version was 7.0.55

If you need to check the version on older Tomcat application server install you can run instead Tomcat6w – whether its Tomcat version 6 or Tomcat5w – for Tomcat ver. 5

In order to Check the java version the quickest way is via command line, again run cmd.exe from

Start -> Run -> cmd.exe

how-to-see-find-get-check-tomcat-version-on-windows-server-install-screenshot

Then cd to whenever is Java VM installed the usual location where it gets installed for Java 1.7 on Windows is:

C:Program FilesJavajre7bin

Java 8 common location is:

C:Program FilesJavajre8bin

Java would automatically add PATH to Windows default PATH definitions during install, hence to find out exactly where java is installed on Windows server, type in cmd:

where java

Then to check the exact installed Java version on Win host is by invoking java (jre) cli with -version parameter:

java -version

how-to-check-get-java-version-info-on-windows-server-screenshot

If you're lazy to type in commands, you can also check Java version in Windows from GUI by using:

Java Control Panel

To launch it in:

Start -> (Search Program and Files)

field type:

Java Conf and click on Java Control Panel

Then click on

General (tab) -> About

java-control-panel-gui-about-version-windows-server-screenshot


Fix “tar: Error exit delayed from previous errors” and its cause and solution

Monday, August 18th, 2014

fix-solve-tar-error-delayed-exit-from-previous-errors-tarball-error

tar: Error exit delayed from previous errors

error is a very common error encountered when creating archives (or backing up server configurations / websites / sql binary data). The error is quite unexplanatory and whenever creating files verbose in order to see the files added to archve in "real time" with lets say:

tar -czvf /tmp/filename_backup_date-of-backup.tar.gz /home/websites /home/sql


its pretty hard to track on exactly which file is the backup producing the Error exit delayed from previous errors, this is especially the case whenever adding to archive directories containing millions of tiny few kilobyte sized files. Many novice on uncautious Linux admins , might simply ignore the warning if they're in a hurry / are having excessive work to be done as there will be .tar.gz backup produced and whenever uncompressed most of the files are there and the backup error would seem not of a big issue.

However as backuping files is vital stuff, especially when moving the files from a server to be decomissioned you have to be extra careful and make the backup properly, e.g. figure out the cause of the error, to do so log the full output of tar operations with tee command, like so:

tar -czvf /tmp/filename_backup_date-of-backup.tar.gz /home/websites/ /home/sql | tee /tmp/backup_tar_full_output.log

Then you will have to review the file and lookup for errors with less search string – / (slash) – look for "error" and "permission den" keywords and this should point you to what is causing the error. In cases when millions of files are to be archived, the log might grow really big and hard to process, therefore a much quicker way to understand what's happening is to only log and show in shell standard output last file error with > (shell redirect):
 

tar -czvf /tmp/filename_backup_date-of-backup.tar.gz /home/websites /home/sql > /tmp/backup_failure-cause.log


tar: www.ur-website.com-http/2.0.63/conf/tnsnames.ora.20080918: Cannot open: Permission denied
tar: Removing leading `/' from member names

The error indicates clearly the cause of error is lack of Permissions to read the file tnsnames.ora.20080918 so solution is to either grant permissions to non-root user with (chmod / chown) cmds, in my case grant perms to user hipo with which tar is ran, or run again the website backup with superuser, I usually just run with root user to prevent tampering with original permissions, e.g. to solve the error, either:

$ su root
# tar -czvf /tmp/filename_backup_date-of-backup.tar.gz /home/websites /home/sql

Or even better if sudo is installed and user is added to /etc/sudoers file

$ sudo tar -czvf /tmp/filename_backup_date-of-backup.tar.gz /home/websites /home/sql


Though permission errors is the most often reason for:

tar: Error exit delayed from previous errors, you should keep in mind that in some cases the error might be caused due to failing RAID membered disk drive or single hdd failure on systems that are not in some RAID array


Monitoring Disk use, CPU Load, Memory use and Network in one console ncurses interface – Glance

Thursday, August 14th, 2014

monitoring-disk-use-memory-cpu-load-and-network-in-one-common-interfaces-with-glances-Linux-BSD-UNIX
If you're Linux / UNIX / BSD system administrator you already have experience with basic admin's system monitoring:

  •     CPU load
  •     OS Name/Kernel version
  •     System load avarage and Uptime
  •     Disk and Network Input/Output I/O operations by interface
  •     Process statistics / Top loading processes etc.
  •     Memory / SWAP usage and free memory
  •     Mounted partitions


Such info is provided by command line tools such as:

top, df, free, sensors, ifconfig, iotop, hddtemp, mount, nfsstat, nfsiostat, dstat, uptime, nethogs iptraf

etc.

There are plenty of others advanced tools also Web based server monitoring visualization  tools, such as Monit, Icanga, PHPSysInfo, Cacti which provide you statistics on computer hardware and network utilization

So far so good, if you already are used to convenience of web *NIX based monitoring but you don't want to put load on the servers with such and you're lazy to write custom scripts that show most important monitoring information – necessery for daily system administration monitoring and prevention from downtimes and tracking bottlenecks you will be glad to hear about Glances
 

Glances is a free (LGPL) cross-platform curses-based monitoring tool which aims to present a maximum of information in a minimum of space, ideally to fit in a classical 80×24 terminal or higher to have additionnal information. Glances can adapt dynamically the displayed information depending on the terminal size. It can also work in a client/server mode for remote monitoring.


1. Installing Glances curses-based monitoring tool on Debian 7 / Ubuntu 13+ / Mint  Linux

We have to install python-pip (python package installer tool) to later install Glances

apt-get install –yes 'python-dev' 'python-jinja2' 'python-psutil'
                        'python-setuptools' 'hddtemp' 'python-pip' 'lm-sensors'


Before proceeding to install Glances to make Thermal sensors working (if supported by hardware) run:


 sensors-detect

Glances is written in Python and uses psutil library to obtain monitoring statistic values, thus it is necessery to install few more Python libraries:

pip install 'batinfo' 'pysensors'

If you're about to use pip – Python package installer tool, behind a proxy server use instead:
 

pip install –proxy=http://your-proxy-host.com:8080 'batinfo' 'pysensors'

Then install Glances script itself again using pip
 

pip install 'Glances'

Downloading/unpacking Glances
  Downloading Glances-2.0.1.tar.gz (3.3Mb): 3.3Mb downloaded
  Running setup.py egg_info for package Glances
    
Downloading/unpacking psutil>=2.0.0 (from Glances)
  Downloading psutil-2.1.1.tar.gz (216Kb): 216Kb downloaded
  Running setup.py egg_info for package psutil

Successfully installed Glances psutil


Then run glances from terminal
 

glances -t 3

-t 3 option tells glances to refresh collected statistics every 3 seconds

glances-console-monitoring-tool-every-systemad-ministrator-should-know-and-use-show-memory-disk-cpu-mount-point-statistics-in-common-shared-screen-linux-freebsd-unix


2. Installing Glances monitoring console tool on CentOS / RHEL / Fedora / Scientific Linux

Installing glances on CentOS 7 / Fedora and rest of RPM based distributions can be done by adding external RPM repositories, cause glances is not available in default yum repositories.

To enable Extra-packages repositories:
 

rpm -ivh http://dl.fedoraproject.org/pub/epel/6/x86_64/epel-release-6-8.noarch.rpm


Then update yum to include new repository's packages into package list and install python-pip and python-devel rpms
 

yum update
yum install python-pip python-devel


Glances-console-server-stateScreenhot-on-CentOS-Linux-monitoring-in-ncurses-Linux-BSD

There is also FreeBSD port to install Glances on FreeBSD:
 

cd /usr/sysutils/py-glances
make install


Enjoy 🙂 !


Cannot Delete file on Desktop on Windows XP – The process cannot access the file because it is being used by another process.

Wednesday, August 13th, 2014

delete-locked-file-in-windows-xp-7-cannot-delete-file-on-desktop-windows-xp-file-used-by-another-process-solution-fix
I had to fix recently another Windows XP infected with plenty of malicious malware. I've used tips from http://malwaretips.com/blogs/ and launch all suggested tools to cleanup the PC. Some few thousands of infections were cleaned and the PC started working much better than earlier, however still there was one weird issue on the Windows XP desktop there was an .exe file hanging with 0 bytes size and whenever I tried to delete the file either from GUI or command line with (del command) it refused to delete with error:
 

The process cannot access the file because it is being used by another process.


Well the message clearly shows, the file can't be deleted because some program was using it however I couldn't see any program that has locked the .exe file. I've checked that in (Windows Task Manager) run from

Start -> Run:

taskmgr


I've done a quick search online to see, whether someone has fixed the issues, and saw many threads talking about the issue suggesting that the issue got solved Windows XP OS re-install, as this was not an option for me because the PC's reinstall would be at least a 2 day time work, plus it contains some programs which will probably be hard to freshly install, because they're no longed supported.

Finally I've seen in this thread suggestion to try to kill Windows Explorer after you have opened windows with windows cmd.exe because this will prevent the .exe file being locked by Windows Explorer and will allow it to be deleted with del command. This actually worked. I've launched

Start -> Run

taskmgr

windows-kill-explorer-process-to-delete-explorer-locked-file-on-windows-xp-desktop

and

cmd.exe

Found explorer.exe process and killed it, this makes the whole desktop (icons, start menu etc. disappear) – as Windows Explorer is main managing Windows app. Then using Alt+Tab to switch to Command Prompt window deleted it with:
 

del  Process_that_cannot_be_killed.exe


And finally succesfully deleted it 🙂

Trip to Troyan Bulgaria and Troyan Monastery – Third monastery by size in Bulgaria

Tuesday, August 12th, 2014

Troan Monastery Church - Trip to Troyan Monastery from 16th century Bulgaria - 3rd monastery by size in Bulgaria
This weekend I went with my wife for a Trip To Troyan monastery from Sofia – bus ticket currently costs 12 lv (6 euro) and the distance is rawly 160 km.

Troyan is a remarkable mountain city situated in the center (heart) of Bulgaria, famous with being one of the main places where opposition and preparation for the Turkish Bulgarian war occured. Troyan monastery situated near Oreshaka village was one of the places where the idea of liberation of Bulgaria originated. Troyan was often visited by the remarkable revolutionaries and greatest Bulgarian heroes of all times like Vasil Levski and Hristo Botev.

Troyan Monastery - ancient orthodox monastery in Bulgaria from 16th century

Here in Troyan there was existing one of the many secret commitees in period (1869 – 1876) – Central Secret Revolutionary Committee (BRCK – as widely known in Bulgaria), creation of this commitee become reality thanks to the Deacon Vasil Levsky who saw there is no awakened Bulgarians to fight for national freedom.
Efforts of CSRC later lead to Liberation of Bulgarian from 500 years Bulgarians being under the yoke of Turkish Slavery.

Eco path in the steps of the Apostle of Freedom Vasil Levsky Bulgaria

Our first impressions from Troyan were quite negative, the bus station looks post communistic and a little bit like a horror movie, near the bus station there was a lot of criminal looking gipsies.
Just 5 minutes walk from there is a small beautiful park with children playground, what impressed me most in the park is a bush cutted in the form of ancient amphora and next to the park is the city center surrounded by a river Beli Osym, all from the city center you can see the beatiful mountains all around. There are two historical museums filled with archaelogical remains from early ages, national dresses, weapons from the Liberation war, explanation with chunks of history and Bulgarian national heroes connected to Troyan, there are beautiful expoisitions on how locals used to live through the ages museums, famous paintings original of local artistsBulgaria is a unique country, because of it combines outstanding nature and rich history remains of which is well preserved and standing firm testifying about the Bulgaria glorious past.

Entrance door of The Troyan Monastery - Troianska sveta obitel uspenie Bogorodichno

After taking a walk in the city center, we went to a local city bus station to take a bus to Oreshaka village – at the end of which is located Troyan Monastery. His Beuaitutide Patriarch Maxim who passed away 98 years old was born in Oreshaka village and become monk in Troyan monastery and was a brother of Troan monastery. Currently his holy body is buried in the monastery which is titled "The Dormition of the most Holy Theotokos".  One can feel the place is graceful even from reaching near Oreshaka village, the near view is also stunningly beautiful. The bus from Troyan has a bus stop right in front of the monastery and is cheap (costed only 1.90 lv per person 0.80 euro cents). Bus to the monastery travels 4 times a day, so it was convenient to reach the monastery.
Oreshaka and Troyan region is well famous since ancient times with its skillful craftsman and all kind of crafts developing.

Tryoan monastery mamut and lion - monuments from ancient God creation

Near the monastery there is small chapel from which the monastery started, the history of Troyan monastery, all revives around the miraculous icon of Holy Theotokos (Troeruchica – The Tree Handed Virgin).

Miracle making icon in Troyan Monastery Holy Virgin (Theotokos) Troeruchica - Tree Handed

The monastery story revives around this icon, a monk from holy Mount Athos was travelling to Vlashko (nowadays situated in Carpathians – Romania near border with Moldova), on his way he heard about a hermit with his pupil living near Oreshaka region and spend some time in fasting and prayer with the hermit local people heard about the miracle making icon and come from near and distant regions to venerate the Holy Virgin and pray. When the time come and he decided to move further in his trip to Vlashko he put the icon on his settled horse, made the sign of the cross and walked after few steps the horse stumbled and break his leg, in this event the monk understand it is not God's will to travel and he returned back to the hermit. After spending some time with the hermit, he settled again his horse but on exactly the same place the horse fall again – in that the monk understood this happens because the icon wants to stay on that place. The hermit offered to the monk that he stay there and they service God together, but traveling monk rejected, he venerated the holy icon for a last time and continued his travel to Vlashko. A small brotherhood formed by God's providence near the hermit and they decided to make a small wooden Church for Troeruchica and started servicing God there. This is how Troyan monastery started in the XVI century. The Glory of the Holy icon of Virgin Mary (Troeruchica) quickly spread all around enslaved Bulgarian lands and people come from all regions to pray to the Virgin to cure them, grant them good fortune, good health, solve spritual and family problems … The notes over the last 400 years shows that everyone that come with faith and prayed in front of the Virgin icon found confort, healing, numb started talking, deaf started hearing, paralytics walked.

Sveta_Bogorodica-Troeruchica-Holy-Theotokos-miracle-making-icon-Troyan

Monastery chronicles say that thanks to the Theotokos Troeruruchica in year 1837 the icon saved the locals from the black death which was taking its toll in the region, nobody that came to the monastery to ask for protection from the plague didn't suffered plague, everyone that decided to stay in the monastery during the plague survived, even though people from all around were coming to confess and take the sacraments, no one in the monastery wasn't infected by plague.

We arrived in Troyan Monastery around 16:30 and by arriving were hospitally accepted by our marriage godfather Galin and his sister Denica and were threated with fresh watermelon and even 50 grams of Bulgarian traditional drink Rakia. They're currently painting walls in the monastery dining room in 18:00 we had the blessing to attend the evening Church service. The service was deep and unique experience that moves you to the Kingdom of heaven. After the Church service we went to nearby Mehana Kaizer (Old Bulgarian Dining Inn – Krychma whole made to look in Old Bulgarian Style – there is plenty of traditional food to choose and food was super delicious 🙂

kaizer-krychma-traditional-inn-pub-near-Troyan-monastery

On Sunday 10.08.2014 we were for the Holy Liturgy service and after that we walked through the monastic Church and saw near the Church the bell tower and next to it the old monks monastic graveyard. We visited also the museum of the monastery which contains various religious use objects dating back from year 1700+, old  craftmen instruments, old icons, potirs, priest clothes, old coins from all around the world and Bulgaria. There was a lot of information about historical facts regarding the monastery brotherhood, as well as some chronicles and documents explaining participation of the monastery in the fight for national freedom of Bulgaria. The musem is made of two rooms one of which was the same room where the Apostle of Freedom Vasil Levsky – one can see there the exact hiding place which Vasil Levsky was using to sleep secretly – the hiding place looks like a normal wardrobe.

Scyth saint Nicolas near Troan Monastery Oreshaka Bulgaria - revolutionary city led to freedom of Bulgaria

After seeing the museum, we went to see the monastic Scyth – "Saint Nicola", which was used earlier by the monks, whenever they wanted to have period of seclusion to raise their spiritual life. The Scyth has a large Church in honor of Saint Nicolas, most likely this Church was visited by people from the village, in times when Christians in Bulgaria was forbidden to attend Church services by Turkish Empire – and this is why it was build in such a secluded place. Near the scyth is the grave of a famous rebel for Bulgarian Freedom, and there is a cave with a spring.

Graveyard and skeleton of haidut - rebel Velko fighter for Bulgarian freedom Schyth near Troyan Monastery

Then we walked back the road to Troan Monastery and near the monastery, we went to see workshop of a carpenter lady who makes wooden ornaments for Churches in the region and the monastery.

The lady give us some herbs as a blessing. We had the chance to also take the blessing from the current Abbot Biship Sionij who was earlier rector of Sofia's Seminary Saint "John of Rila".

Extracting pages and page ranges, protect with password and remove password from PDF on GNU / Linux with QPDF – Linux Manipulating PDF files from command line

Friday, August 8th, 2014

qpdf-logo-extract-pages-page-ranges-protect-pdf-with-password-remove-password-from-pdf-linux-qpdf-manipulating-pdf-files-on-gnu-linux-and-bsd
If're a Linux user and you need to script certain page extraction from PDF files, crypt protect with password a PDF file or decrypt (remote password protection from PDF) or do some kind of structural transformation of existing PDF file you can use a QPDF command line utility. qpdf is in active development and very convenient tool for Website developers (PHP / Perl / Python), as often on websites its necessery to write code to cut / tailer / restructure PDFs.

1. Install QPDF from deb / rpm package

qpdf is instalalble by default in deb repositories on Debian / Ubuntu GNU / (deb derivative) Linux-es to install it apt-get it

apt-get install –yes qpdf

On RPM based distribution CentOS / SuSE / RHEL / Fedora Linux to install qpdf, fetch the respective distribution binary from rpmfind.net or to install latest version of qpdf build it from source code.

2. Install QPDF from source

To build latest qpdf from source

  • on RPM based distributions install with yum fullowing packages:

yum -y install zlib-devel pcre-devel gcc gcc-c++

  • on Deb based Linuces, you will need to install

apt-get install –yes build-essential gcc dpkg-dev g++ zlib1g-dev


Then to build gather latest qpdf source from here


cd /usr/local/src
wget -q https://www.pc-freak.net/files/qpdf-5.1.2.tar.gz
tar -zxvf qpdf-5.1.2.tar.gz
cd qpdf-5.1.2/
./configure
make
make install


Once it is installed, if you get error on qpdf runtime:
 

/usr/local/bin/qpdf: error while loading shared libraries: libqpdf.so.13: cannot open shared object file: No such file or directory

To solve the error find in your compile directory libqpdf.so.13 and copy it to /usr/lib or /usr/local/lib

 cp -rpf ./libqpdf/build/.libs/libqpdf.so.13 /usr/local/lib


3. Decrypt password encrypted (protected) PDF file

if you have time and you like reading be sure to check the extensive qpdf-manual.

To remove password from a PDF file protected with a password with qpdf

qpdf –password=SECRET-PASSWORD –decrypt input-file.pdf output-file.pdf

QPDF has a vast range of split and merge features. It can combine all the files in a folder (*.pdf), you can use it to try to recover damaged pdf files, extract individual pages from PDF, dump and reverse page range, make new created PDF with old PDF's reversed pages (pages 1,2,3,4 to become in order 4,3,2,1), apply some single pdf file metadata to multiple files.

4. Try to Recover damaged PDF file


To try to recover some damaged file with qpdf:
 

qpdf file-to-repair.pdf repaired-file.pdf

5. Extract certain pages or page range from PDF

It is recommended to use the version built from source to extract certain page range from PDF
 

/usr/local/bin/qpdf –empty –pages input-file.pdf 1-5 — outfile-file.pdf


If you wanted to take pages 1–5 from file1.pdf and pages 11–15 from file2.pdf in reverse, you would run
 

qpdf file1.pdf –pages file1.pdf 1-5 file2.pdf 15-11 — outfile.pdf