Archive for December, 2014

Configure Linux users to see only their own user processes with Hidepid – Stop users to see what others are doing

Tuesday, December 23rd, 2014

configure-Linux-users-to-see-only-ther-own-processes-with-hidepid-ps-aux-stop-system-users-to-see-what-others-are-doing
If you administer a university shared free shell Linux server, have a small community of *NIX users offering free accounts for them, or responsible for Linux software company with development servers, where programmers login and use daily to program software / websites its necessery to have tightened security rules with a major goal to keep the different user accounts processes separate one from other (hide all system and user processes from single logged in user).

Preventing users to see other users processes is essential for Linux servers which are at high risk to be hacked. At earlier times to achieve hiding all processes besides own ones from a logged in user was possible by using A kernel security module Grsecurity.
In latest currenlt Linux kernel version 3.2+ (on both Debian (unstable) / Ubuntu 14.04 / RHEL/CentOS v6.5+ above) you can hide process from other user so only root (useruser) can see all running process with (ps auxwwf) with a native kernel option hidepid. 

Configuring Hidepid

To enable hidepid option you have to remount the /proc filesystem with the Linux kernel hardening hidepid option, to make it one time setting on already running server issue:
 

 mount -o remount,rw,hidepid=2 /proc


To make the hidepid setting permanently active its necessery to modify /proc filesystem settings in /etc/fstab


vim /etc/fstab

proc    /proc    proc    defaults,hidepid=2     0     0
 

  • hidepid=0 – Anybody may read all world-readable /proc/PID/* files (default).
  • hidepid=1 – Means users may not access any /proc/ / directories, but only ones owned by them.Important  files like cmdline, sched*, status are now protected to read from other other users.
  • hidepid=2 – Means hidepid=1 plus all /proc/PID/ will be invisible to other users besides logged in. Using this options stops Cracker's from gathering info about running processes, indication of daemon (services) which runs with elevated privileges, other user running processes (some might contain password) passed as argument or some sensitive data. Revealing such data is frequently used to get versions of local / remote running services that can be exploited.
     

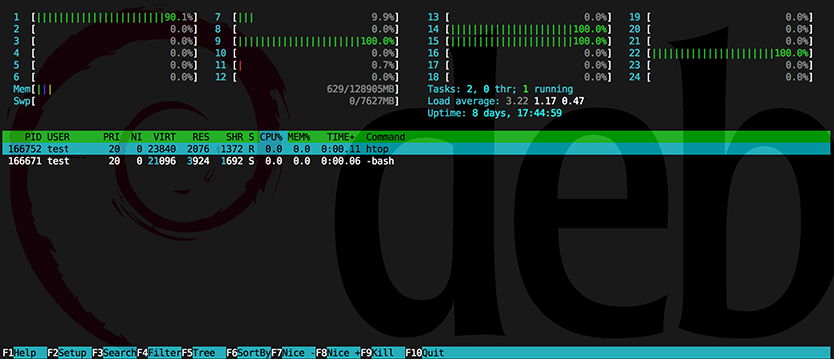
Below is output of htop of a logged in user on hidepid activated server:

:htop_screenshot_on_hideid_showing-only-own-user-credentials-gnu-linux-debian

Improve Website Apache Webserver SEO without Website source code moficitations with Google PageSpeed module on Debian, Ubuntu, CentOS, Fedora and SuSE Linux

Thursday, December 18th, 2014

Improve-website-apache-webserver-seo-without-website-source-code-modifications-with-Google-PageSpeed-Apache-module

For hosting companies and even personal website speed performance becomes increasingly important factor that gives higher and higher weight on overall PageRank and is one of the key things for Successful Site Search Engine Optimization (positioning) in Search Engines of a not specially SEO friendly crafted website.

Virtually all Google / Yahoo / Bing,  Yahoo  etc. Search Engines give better pagerank to websites which load faster and has little or no downtimes, for the reason a faster loading time of a website pages means better user experience and is indicator that the website is well maintained. 

Often websites deployed written for purpose of a business-es or just community CMS / Blog Website Open Source systems such as Joomla, Drupal and WordPress by default are not made to provide fantastic speed right after deploy without install of custom plugins and website tuning, i.e.:

  • Content size optimization (gzipping)
  • More efficient way to deliver CSS / Javascript (MinifyJS / CSS files into single ones
  • HTML optimization
  • Stripping (useful) page Comments
  • Adding <head> if missing on pages etc.

. Therefore as I said in many of my previous LAMP Optimization articles page  (opening) speed could make really Bad Users / Clients experience when the site grows too big or is badly optimized it gives degraded page speed times (often page loads 20 / 30 seconds waiting for the page to load!). Having Pages lagging on big information sites or EShos has both Ruining Company's Image on the market and quickly convinces the user to use another service from the already thosands available and thus drives out (potential) customers.

As Programming code maintainance and improvement is usually very costly, companies that want to save money or can't afford it (because of the shrinking budgets dictacted by the global economic crisis), the best thing to do is to ask your sysadmin to Squeeze the Best out of the WebService and Servers without major (Backend Code) infrastructural changes.

To  Speed up Apache and create Proper Page Caching without installing on server external PHP Caching modules such as Eaccelerator  / PHP APC caching and without
extra CMS modules
such as lets say WordPress W3 Total Cache there is Google Develop Apache Webserver external module – PageSpeed.

Here is Google Pagespeed Module overview :
 

PageSpeed speeds up your site and reduces page load time. This open-source webserver module automatically applies web performance best practices to pages and associated assets (CSS, JavaScript, images) without requiring that you modify your existing content or workflow.


What does Apache Google PageSpeed actually does?
 

  • Automatic website and asset optimization
  • Latest web optimization techniques
  • 40+ configurable optimization filters
  • Free, open-source, and frequently updated
  • Deployed by individual sites, hosting providers, CDNs


1. Install PageSpeed on Debian / Ubuntu, deb derivatives) Linux

a) Download and install module 

On 64 bit deb based Linux:

cd /usr/local/src
wget https://dl-ssl.google.com/dl/linux/direct/mod-pagespeed-stable_current_amd64.deb 
dpkg -i mod-pagespeed-stable_current_amd64.deb
apt-get -f install


On 32 bit Linux:

cd /usr/local/src
wget https://dl-ssl.google.com/dl/linux/direct/mod-pagespeed-stable_current_i386.deb
dpkg -i 
direct/mod-pagespeed-stable_current_i386.deb
apt-get -f install


b) Restart Apache
 

sudo /etc/init.d/apache2 restart

Important files and folders placed on server by deb installer are:

/usr/bin/pagespeed_js_minify – binary that does Javascript minification
/etc/apache2/mods-available/pagespeed.conf – Pagespeed config
/etc/apache2/mods-available/pagespeed.load – Load module directives in Apache
/etc/cron.daily/mod-pagespeed – mod_pagespeed cron script for checking and installing latest updates.
/var/cache/mod_pagespeed – Mod Pagespeed cahing folder (useful to install memcached to increase even further caching performance)
/var/log/pagespeed – Directory to store pagespeed log files


2. Install PageSpeed on (RPM based CentOS, Fedora, RHEL / SuSE Linux)


RPM 64 bit package install:
 

rpm -Uvh https://dl-ssl.google.com/dl/linux/direct/mod-pagespeed-beta_current_x86_64.rpm


32 bit pack version:
 

rpm -Uvh https://dl-ssl.google.com/dl/linux/direct/mod-pagespeed-stable_current_i386.rpm


Modify pagespeed mod config 

Restart Apache

sudo /etc/init.d/httpd restart


Important config files and folders created during RPM install are:

  • /etc/cron.daily/mod-pagespeed : mod_pagespeed cron script for checking and installing latest updates.
  • /etc/httpd/conf.d/pagespeed.conf : The main configuration file for Apache.
  • /usr/lib/httpd/modules/mod_pagespeed.so : mod_pagespeed module for Apache.
  • /var/www/mod_pagespeed/cache : File caching direcotry for web sites.
  • /var/www/mod_pagespeed/files : File generate prefix for web sites.

3. Configuring Google PageSpeed module


To configure PageSpeed you can either edit the package installed bundled pagespeed.conf (/etc/apache2/mods-available/pagspeed.conf,  /etc/httpd/conf.d/pagespeed.conf) or insert configuration items inside Apache VirtualHosts config files or even if you need flexibility and you don't have straight access to Apache config files (on shared hosting servers where module is available) through .htaccess.
Anyways try to avoid adding pagespeed directives to .htaccess as it will be too slow and inefficient.

Configuration is managed by setting different so-called "Rewrite Levels". Default behavior is to use Level of "Corefilters.", a set of filters (module behavior configs) which according to Google is safe for use. PageSpeed Filters is a set of actions applied to Web Delivered files.

Default config setting is hence:
 

ModPagespeedRewriteLevel CoreFilters

Disabling default set of filters is done with:
 

ModPagespeedRewriteLevel PassThrough

"Corefilters" default filter set as of time of writting this article:
 

add_head
combine_css
convert_jpeg_to_progressive
convert_meta_tags
extend_cache
flatten_css_imports
inline_css
inline_import_to_link
inline_javascript
rewrite_css
rewrite_images
rewrite_javascript
rewrite_style_attributes_with_url

Complete documentation on Configuring PageSpeed Filters is here.

If caching is turned on, default PageSped caching is configured in /var/cache/mod_pagespeed/
Enabling someof the non-Corefilters that sometimes are useful for SEO (reduce of served / returned pagesize) are:
 

ModPagespeedEnableFilters pedantic,remove_comments

By default pagespeed does some things (such as inline_css, inline_javascript and rewrite_images (Optimize, removing Excess pixels).  My litle experience with pagespeed shows in some cases this could break websites), so I found for my case useful to disable some of the filters:


vim /etc/apache2/mods-available/pagespeed.conf


ModPagespeedDisableFilters rewrite_images,convert_jpeg_to_progressive,inline_css,inline_javascript


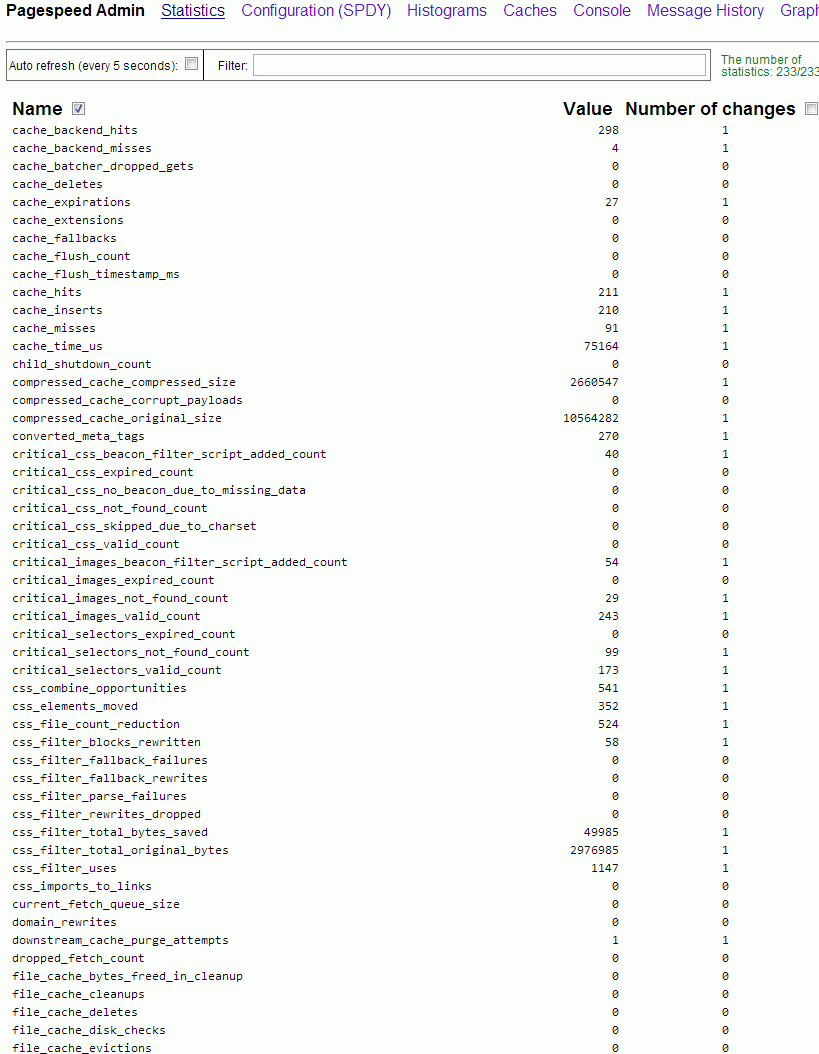
4. Testing if PageSpeed is Enabled pagespeed_admin

By default PageSpeed has Admin which by default is only allowed to be accessed from server localhost (127.0.0.1) to get basic statistics either install text browser like lynx / elinks or add more access IPs again in pagespeed config / vhosts pagespeed.conf include more Allow lines like below:


    <Location /pagespeed_admin>
        Order allow,deny
        Allow from localhost
        Allow from 127.0.0.1
        Allow from 192.168.1.1
        Allow from xxx.xxx.xxx.xxx

        #Allow from All
        SetHandler pagespeed_admin
    </Location>
    <Location /pagespeed_global_admin>
        Order allow,deny
        Allow from localhost
        Allow from 127.0.0.1

        Allow from 192.168.1.1
        Allow from xxx.xxx.xxx.xxx
        SetHandler pagespeed_global_admin
    </Location>


Once configured pagespeed_admin access it with favourite browser on:

http://127.0.0.1/pagespeed_admin
http://127.0.0.1/pagespeed_global_admin

improve-website-apache-webserver-seo-without-source-code-modifications-google-pagespeed_admin_panel

Other way to test it is enabled is by creating php file with good old <? phpinfo(); ?> – PHP stats enabled / disabled features code:

pagespeed-in-phpinfo-x-mod-pagespeed-output-screenshot-apache-webserver

I've also tested also pagespeed unstable release, but experienced some segmentation faults in both error.log and access.log so finally decided to keep using stable release.

PageSpeed is a great way to boost your server sites performance, however it comes on certain costs as expect your server CPU Load to jump drastically, (in my case it jumped more than twice), there are Linux servers where enabling the module could totally stone the servers, so before implementing the module on a Production system environment, always first test thouroughfully with loaded pagespeed on UAT (testing) environment with AB or Siege (Apache Benchmarking Tools).

How to View Mail (Full Headers) in Outlook 97 / 98 / 2003 / 2007 / 2010 and Outlook 2013 Mail client on Windows and Mac OS

Tuesday, December 16th, 2014

View-Full-Mail-headers-in-Outlook-97-98-2003-2007-2010-2013-on-Windows-Mac-OSX

Being able to see the headers is very important if you have to administer Microsoft Exchange mail server / Windows Active directory in case whether mails have some issues not being received within a Corporate Outlook MS Clients because of being mistakenly flagged as spam, or just to track the route of the mail. By default Outlook displays only few fields of the headers: From, Sent (date and time), To, and CCs. This gives too little info and is often irritating, as you can't really see important info such as:

  • Mail Carriers (Mail SMTPs) through which Mail has been passed
  • Mail MIME Header / Type (specifics)
  • Any extra written by mail server Anvirus
  • Anti-Malware check headers etc
  • Pyzor / Razor / Blacklisting check pass / fail headers etc.


1. How to view Mail headers in Outlook 2010 / 2013
 

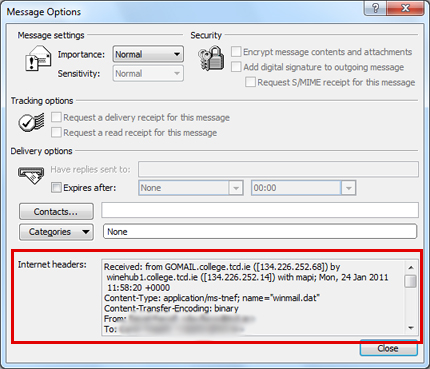
In Outlook 2010 / 2013  when you use the default settings, you need to OPEN the message (Double Click on some random Mail) and either go to the Tags section of the ribbon or go to File, Properties.

message-property-tag-microsoft-outlook-2010-2013-screenshot 

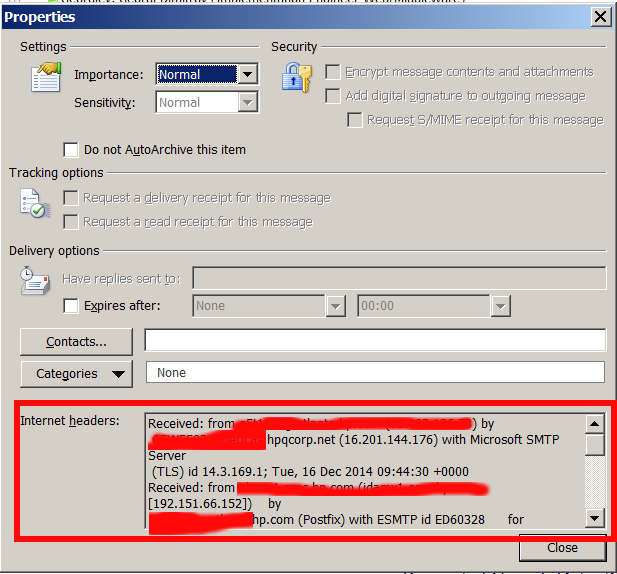
Click on the Expand button (highlighted in yellow) in the lower right corner to show the Message options dialog. Voila You will have the Properties dialog with the (Mail) Internet headers in the bottom (see screenshot)


One thing to mention is when you have a Mail Message Headers visible through the Properties dialog in Outlook, it is very unpleasent there is no way to search inside Visualized Mail headers ..
 

2. How to access Outlook Full Mail Headers using a shortcut

For those who had to regularly check Mail headers, it is very useful to make Outlook View Headers accessible through a key shortcut.

Here is how:

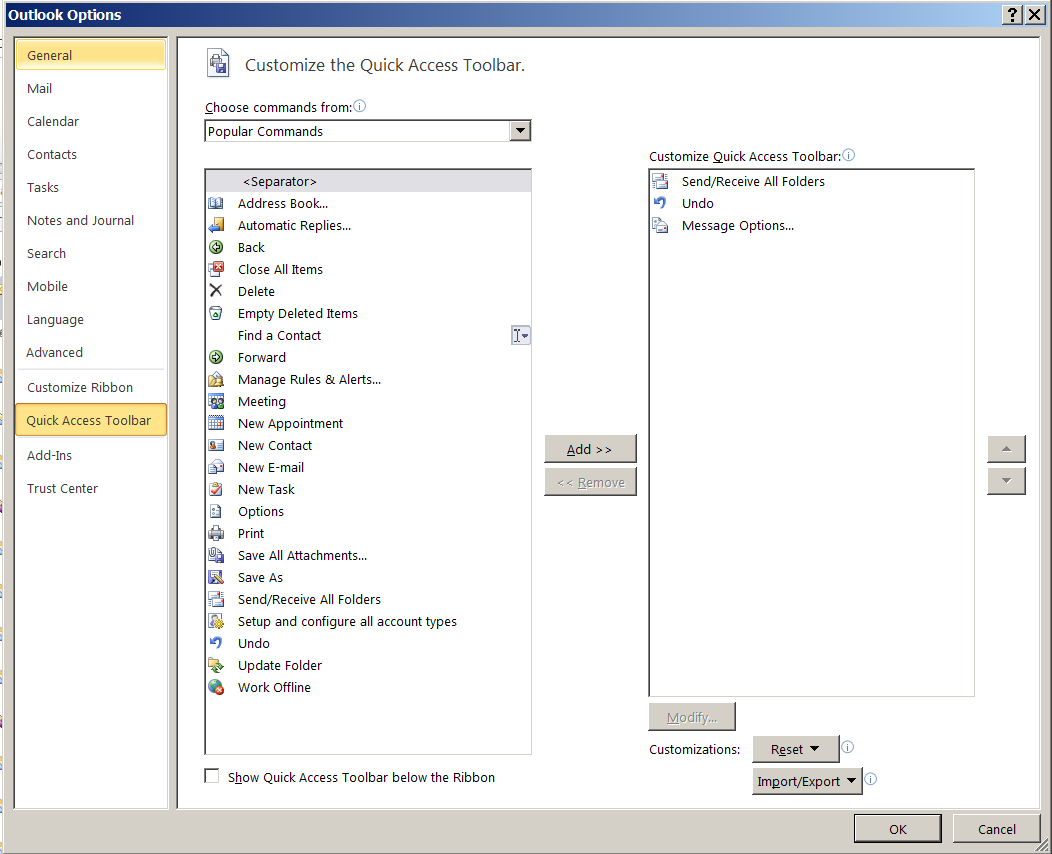
a) Go to File > Options > Quick Access Toolbar.
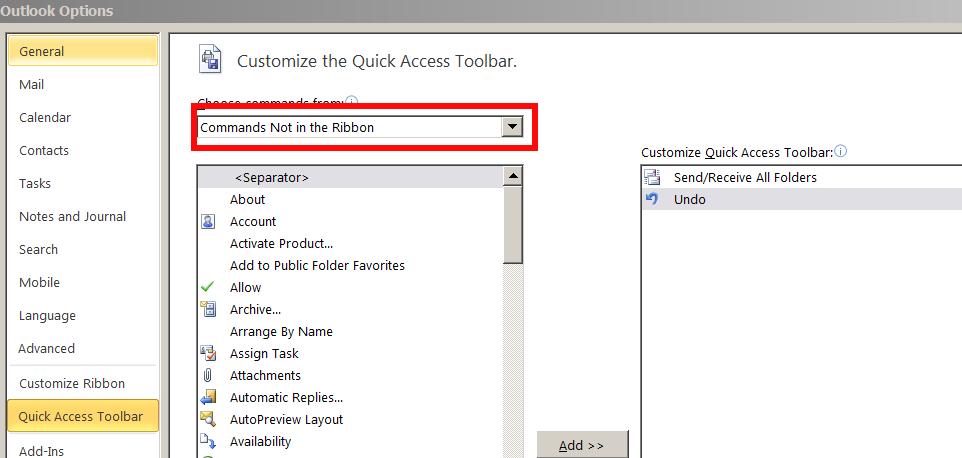
b) In Choose Commands From, select
Commands Not in the Ribbon

commands-not-in-the-ribbon-screenshot-ms-outlook-2010-2013

c) Click in the list of commands and press M on the keyboard

d) Scroll to find Message Options

e) Click Add > (button) to add it to the QAT.

Outlook-Options-Quick_Access_Toolbar_screenshot-ms-windows-add-QAT-shortcut-to-message-options
 

To Quickly Access New added "Message Options" / View headers QAT, the shortcut to use is something like ALT + 3, or ALT + number (depending on the number of QATs already existing in the mailbox, the position of the Message Options on the QAT bar determines the exact nr. to be used.)

On older versions of Microsoft Outlook Mail Clients 97 / 98 / 2003 / 2007 to View Mail Headers

Right-click on Mail message in the folder view, then choose Options.

Or

In an Opened Mail Message, choose View -> Options.
 

3. Viewing Mail Headers on MS Outlook running on Mac OS 

If you happen to need use MS Outlook on Mac OS X (hope you'll not 🙂 ) to View Complete Mail Headers

Select the message whose headers you want to view.
Right-click (or Control-click) on the message and choose View Source.
Message headers appear at the top of the text document that opens.

Linux Bond network interfaces to merge multiple interfaces ISPs traffic – Combine many interfaces NIC into one on Debian / Ubuntu / CentOS / Fedora / RHEL Linux

Tuesday, December 16th, 2014

how-to-create-bond-linux-agregated-network-interfaces-for-increased-network-thoroughput-debian-ubuntu-centos-fedora-rhel
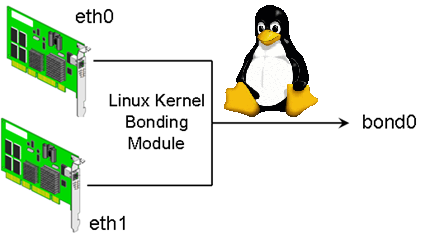
Bonding Network Traffic
 (link aggregation) or NIC teaming is used to increase connection thoroughput and as a way to provide redundancy for a services / applications in case of some of the network connection (eth interfaces) fail. Networking Bonding is mostly used in large computer network providers (ISPs), infrastructures, university labs or big  computer network accessible infrastructures or even by enthusiatst to run home-server assuring its >= ~99% connectivity to the internet by bonding few Internet Providers links into single Bonded Network interface. One of most common use of Link Aggreegation nowadays is of course in Cloud environments.  

 Boding Network Traffic is a must know and (daily use) skill for the sys-admin of both Small Company Office network environment up to the large Professional Distributed Computing networks, as novice GNU /  Linux sys-admins would probably have never heard it and sooner or later they will have to, I've created this article as a quick and dirty guide on configuring Linux bonding across most common used Linux distributions.

It is assumed that the server where you need network boding to be configured has at least 2 or more PCI Gigabyte NICs with hardware driver for Linux supporting Jumbo Frames and some relatively fresh up2date Debian Linux >=6.0.*, Ubuntu 10+ distro, CentOS 6.4, RHEL 5.1, SuSE etc.
 

1. Bond Network ethernet interfaces on Debian / Ubutnu and Deb based distributions

To make network bonding possible on Debian and derivatives you need to install support for it through ifenslave package (command).

apt-cache show ifenslave-2.6|grep -i descript -A 8
Description: Attach and detach slave interfaces to a bonding device
 This is a tool to attach and detach slave network interfaces to a bonding
 device. A bonding device will act like a normal Ethernet network device to
 the kernel, but will send out the packets via the slave devices using a simple
 round-robin scheduler. This allows for simple load-balancing, identical to
 "channel bonding" or "trunking" techniques used in switches.
 .
 The kernel must have support for bonding devices for ifenslave to be useful.
 This package supports 2.6.x kernels and the most recent 2.4.x kernels.


apt-get –yes install ifenslave-2.6


Bonding interface works by creating a "Virtual" network interface on a Linux kernel level, it sends and receives packages via special
slave devices using simple round-robin scheduler. This makes possible a very simple network load balancing also known as "channel bonding" and "trunking"
supported by all Intelligent network switches

Below is a text diagram showing tiny Linux office network router configured to bond ISPs interfaces for increased thoroughput:


Internet
 |                  204.58.3.10 (eth0)
ISP Router/Firewall 10.10.10.254 (eth1)
   
                              | -----+------ Server 1 (Debian FTP file server w/ eth0 & eth1) 10.10.10.1
      +------------------+ --- |
      | Gigabit Ethernet       |------+------ Server 2 (MySQL) 10.10.10.2
      | with Jumbo Frame       |
      +------------------+     |------+------ Server 3 (Apache Webserver) 10.10.10.3
                               |
                               |------+-----  Server 4 (Squid Proxy / Qmail SMTP / DHCP) 10.10.10.4
                               |
                               |------+-----  Server 5 (Nginx CDN static content Webserver) 10.10.10.5
                               |
                               |------+-----  WINDOWS Desktop PCs / Printers & Scanners, Other network devices 


Next to configure just installed ifenslave Bonding  
 

vim /etc/modprobe.d/bonding.conf

alias bond0 bonding
  options bonding mode=0 arp_interval=100 arp_ip_target=10.10.10.254, 10.10.10.2, 10.10.10.3, 10.10.10.4, 10.10.10.5


Where:

  1. mode=0 : Set the bonding policies to balance-rr (round robin). This is default mode, provides load balancing and fault tolerance.
  2. arp_interval=100 : Set the ARP link monitoring frequency to 100 milliseconds. Without option you will get various warning when start bond0 via /etc/network/interfaces
  3. arp_ip_target=10.10.10.254, 10.10.10.2, … : Use the 10.10.10.254 (router ip) and 10.10.10.2-5 IP addresses to use as ARP monitoring peers when arp_interval is > 0. This is used determine the health of the link to the targets. Multiple IP addresses must be separated by a comma. At least one IP address must be given (usually I set it to router IP) for ARP monitoring to function. The maximum number of targets that can be specified is 16.

Next to make bonding work its necessery to load the bonding kernel module:

modprobe -v bonding mode=0 arp_interval=100 arp_ip_target=10.10.10.254, 10.10.10.2, 10.10.10.3, 10.10.10.4, 10.10.10.5


Loading the bonding module should spit some good output in /var/log/messages (check it out with tail -f /var/log/messages)

Now to make bonding active it is necessery to reload networking (this is extremely risky if you don't have some way of Console Web Java / VPN Access such as IPKVM / ILO / IDRAC), so reloading the network be absolutely sure to either do it through a cronjob which will automatically do the network restart with new settings and revert back to old configuration whether network is inaccessible or assure physical access to the server console if the server is at your disposal.

Whatever the case make sure you backup:

 cp /etc/network/interfaces /etc/network/interfaces.bak

vim /etc/network/interfaces

############ WARNING ####################
# You do not need an "iface eth0" nor an "iface eth1" stanza.
# Setup IP address / netmask / gateway as per your requirements.
#######################################
auto lo
iface lo inet loopback
 
# The primary network interface
auto bond0
iface bond0 inet static
    address 10.10.10.1
    netmask 255.255.255.0
    network 192.168.1.0
    gateway 10.10.10.254
    slaves eth0 eth1
    # jumbo frame support
    mtu 9000
    # Load balancing and fault tolerance
    bond-mode balance-rr
    bond-miimon 100
    bond-downdelay 200
    bond-updelay 200
    dns-nameservers 10.10.10.254
    dns-search nixcraft.net.in


As you can see from config there are some bond specific configuration variables that can be tuned, they can have positive / negative impact in some cases on network thoroughput. As you can see bonding interfaces has slaves (this are all other ethXX) interfaces. Bonded traffic will be available via one single interface, such configuration is great for webhosting providers with multiple hosted sites as usually hosting thousand websites on the same server or one single big news site requires a lot of bandwidth and of course requires a redundancy of data (guarantee it is up if possible 7/24h.

Here is what of configs stand for

 
  • mtu 9000 : Set MTU size to 9000. This is related to Jumbo Frames.
  • bond-mode balance-rr : Set bounding mode profiles to "Load balancing and fault tolerance". See below for more information.
  • bond-miimon 100 : Set the MII link monitoring frequency to 100 milliseconds. This determines how often the link state of each slave is inspected for link failures.
  • bond-downdelay 200 : Set the time, t0 200 milliseconds, to wait before disabling a slave after a link failure has been detected. This option is only valid for the bond-miimon.
  • bond-updelay 200 : Set the time, to 200 milliseconds, to wait before enabling a slave after a link recovery has been detected. This option is only valid for the bond-miimon.
  • dns-nameservers 192.168.1.254 : Use 192.168.1.254 as dns server.
  • dns-search nixcraft.net.in : Use nixcraft.net.in as default host-name lookup (optional).

To get the best network thorougput you might want to play with different bounding policies. To learn more and get the list of all bounding policies check out Linux ethernet Bounding driver howto

To make the new bounding active restart network:
 

/etc/init.d/networking stop
sleep 5;
/etc/init.d/networking start


2. Fedora / CentOS RHEL Linux network Bond 

Configuring eth0, eth1, eth2 into single bond0 NIC network virtual device is with few easy steps:

a) Create following bond0 configuration file:
 

vim /etc/sysconfig/network-scripts/ifcfg-bond0


DEVICE=bond0
IPADDR=10.10.10.20
NETWORK=10.10.10.0
NETMASK=255.255.255.0
GATEWAY=10.10.10.1
USERCTL=no
BOOTPROTO=none
ONBOOT=yes


b) Modify ifcfg-eth0 and ifcfg-eth0 files /etc/sysconfig/network-scripts/

– Edit ifcfg-eth0

vim /etc/sysconfig/network-scripts/ifcfg-eth0

DEVICE=eth0
USERCTL=no
ONBOOT=yes
MASTER=bond0
SLAVE=yes
BOOTPROTO=none

– Edit ifcfg-eth1

vim /etc/sysconfig/network-scripts/ifcfg-eth1

DEVICE=eth0
USERCTL=no
ONBOOT=yes
MASTER=bond0
SLAVE=yes
BOOTPROTO=none


c) Load bond driver through modprobe.conf

vim /etc/modprobe.conf

alias bond0 bonding
options bond0 mode=balance-alb miimon=100


Manually load the bonding kernel driver to make it affective without server reboot:
 

modprobe bonding

d) Restart networking to load just configured bonding 
 

service network restart


3. Testing Bond Success / Fail status

Periodically if you have to administrate a bonded interface Linux server it is useful to check Bonds Link Status:

cat /proc/net/bonding/bond0
 

Ethernet Channel Bonding Driver: v3.5.0 (November 4, 2008)

Bonding Mode: fault-tolerance (active-backup)
Primary Slave: None
Currently Active Slave: eth0
MII Status: up
MII Polling Interval (ms): 100
Up Delay (ms): 0
Down Delay (ms): 0

Slave Interface: eth0
MII Status: up
Link Failure Count: 0
Permanent HW addr: 00:1e:0b:d6:6c:8f

Slave Interface: eth1
MII Status: up
Link Failure Count: 0
Permanent HW addr: 00:1e:0b:d6:6c:8c

To check out which interfaces are bonded you can either use (on older Linux kernels)
 

/sbin/ifconfig -a


If ifconfig is not returning IP addresses / interfaces of teamed up eths, to check NICs / IPs:

/bin/ip a show
1: lo: <LOOPBACK,UP,LOWER_UP> mtu 16436 qdisc noqueue state UNKNOWN
    link/loopback 00:00:00:00:00:00 brd 00:00:00:00:00:00
    inet 127.0.0.1/8 brd 127.255.255.255 scope host lo
    inet 127.0.0.2/8 brd 127.255.255.255 scope host secondary lo
    inet6 ::1/128 scope host
       valid_lft forever preferred_lft forever
2: eth0: <BROADCAST,MULTICAST,SLAVE,UP,LOWER_UP> mtu 1500 qdisc mq master bond0 state UP qlen 1000
    link/ether 00:1e:0b:d6:6c:8c brd ff:ff:ff:ff:ff:ff
3: eth1: <BROADCAST,MULTICAST,SLAVE,UP,LOWER_UP> mtu 1500 qdisc mq master bond0 state UP qlen 1000
    link/ether 00:1e:0b:d6:6c:8c brd ff:ff:ff:ff:ff:ff
7: bond0: <BROADCAST,MULTICAST,MASTER,UP,LOWER_UP> mtu 1500 qdisc noqueue state UP
    link/ether 00:1e:0b:d6:6c:8c brd ff:ff:ff:ff:ff:ff
    inet 10.239.15.173/27 brd 10.239.15.191 scope global bond0
    inet 10.239.15.181/27 brd 10.239.15.191 scope global secondary bond0:7156web
    inet6 fe80::21e:bff:fed6:6c8c/64 scope link
       valid_lft forever preferred_lft forever


In case of Bonding interface failure you will get output like:

Ethernet Channel Bonding Driver: v3.5.0 (November 4, 2008)
Bonding Mode: load balancing (round-robin)
MII Status: up
MII Polling Interval (ms): 100
Up Delay (ms): 200
Down Delay (ms): 200
Slave Interface: eth0
MII Status: up
Link Failure Count: 0
Permanent HW addr: 00:xx:yy:zz:tt:31
Slave Interface: eth1
MII Status: down
Link Failure Count: 1
Permanent HW addr: 00:xx:yy:zz:tt:30

Failure to start / stop bonding is also logged in /var/log/messages so its a good idea to check there too once launched:
 

tail -f /var/log/messages
Dec  15 07:18:15 nas01 kernel: [ 6271.468218] e1000e: eth1 NIC Link is Down
Dec 15 07:18:15 nas01 kernel: [ 6271.548027] bonding: bond0: link status down for interface eth1, disabling it in 200 ms.
Dec  15 07:18:15 nas01 kernel: [ 6271.748018] bonding: bond0: link status definitely down for interface eth1, disabling it

On bond failure you will get smthing like:

Dec  15 04:19:15 micah01 kernel: [ 6271.468218] e1000e: eth1 NIC Link is Down
Dec  15 04:19:15 micah01 kernel: [ 6271.548027] bonding: bond0: link status down for interface eth1, disabling it in 200 ms.
Dec  15 04:19:15 micah01 kernel: [ 6271.748018] bonding: bond0: link status definitely down for interface eth1, disabling it


4. Adding removing interfaces to the bond interactively
 

You can set the mode through sysfs virtual filesystem with:

echo active-backup > /sys/class/net/bond0/bonding/mode

If you want to try adding an ethernet interface to the bond, type:

echo +ethN > /sys/class/net/bond0/bonding/slaves

To remove an interface type:

echo -ethN > /sys/class/net/bond0/bonding/slaves


In case if you're wondering how many bonding devices you can have, well the "sky is the limit" you can have, it is only limited by the number of NIC cards Linux kernel / distro support and ofcourse how many physical NIC slots are on your server.

To monitor (in real time) adding  / removal of new ifaces to the bond use:
 

watch -n 1 ‘cat /proc/net.bonding/bond0′


How to remove parameters from URL on Apache (Reverse Proxy) with .htaccess and mod_rewrite – Remove query string from Link

Thursday, December 11th, 2014

Desktop/How_to_remove_parameters_from_URL_on_Apache_with_htaccess_and_SAP
Recently I had a task to delete number of set variables (listed parameters) from URL address on a Apache webserver serving as Reverse Proxy. 
To make it more clear exact task was when customers call the URL https://companywebsite-url.com (all subdomains included) the following URL parameters should always be deleted by the reverse proxy

– ebppMode 
– ebppObjectKey 
– ebppObjectType 
– ebppSystem 
– logSys 

The paramets are part of SAP Biller Direct in a Portal (based on the famous SAP database) which is often deployed as a component of Internet Sales (ISA) / Supplier Relationship Management (SRM) / CRM
, if a user is logged in with his Credentials (KID (Key ID) / Admin KID)  into the system. The EBPP part of most variables stands for (Electronic Bill Presentment and Payment).

 By passing above parameters to Website, modes of use, user accounts switched with which user is logged into the system system logs read and other stuff which can turn to be a severe security hole.
As most of Big Companies, does pass there web traffic via a "transparent" Reverse Proxy,it is a good security practice for SAP Biller Direct (including CRM systems( to wipe out this variables

Here is the mod_rewrite working rules that I used to achieve the delete variable from URL address task:
 

   RewriteEngine On
   RewriteCond %{QUERY_STRING} ^(.*)bebppMode=(w*)b(.*)
   RewriteRule (.*) $1?%1%3

   RewriteCond %{QUERY_STRING} ^(.*)bebppObjectKey=(w*)b(.*)
   RewriteRule (.*) $1?%1%3

   RewriteCond %{QUERY_STRING} ^(.*)bebppObjectType=(w*)b(.*)
   RewriteRule (.*) $1?%1%3

   RewriteCond %{QUERY_STRING} ^(.*)bebppSystem=(w*)b(.*)
   RewriteRule (.*) $1?%1%3

   RewriteCond %{QUERY_STRING} ^(.*)logSys=(w*)b(.*)
   RewriteRule (.*) $1?%1%3

   RewriteCond %{QUERY_STRING} ^(.*)&&(.*)
   RewriteRule (.*) $1?%1%3


P.S. I've implemented above Rewrite rules into all Virtualhosts of Applications (in that case all living in the same httpd.conf on SuSE (SLES) 11 SP1 Enterprise Linux server).
To make changes affective, restarted HTTPD Webserver:
 

/etc/init.d/httpd restart


The sesult is:

https://companywebsite-url.com/start.html?page=start&ebppMode=A&ebppSystem=Test

leads to a internal URL redirection

https://companywebsite-url.com/start.html?page=start

without parameters ebppSystem, ebppMode, ebppObjectKey, ebppSystem,   logSys .

Other mod_rewrite rule that works but is too ugly and when I tried it on Debian Linux host was behaving strange (including in the rewrited URL address the directory address of the PHP twice):

RewriteCond %{QUERY_STRING} (.*)(^|&|%26|%20)ebppMode(=|%3D)([^&]+)(.*)$ [OR]
RewriteCond %{QUERY_STRING} (.*)(^|&|%26|%20)ebppObjectKey(=|%3D)([^&]+)(.*)$ [OR]
RewriteCond %{QUERY_STRING} (.*)(^|&|%26|%20)ebppObjectType(=|%3D)([^&]+)(.*)$ [OR]
RewriteCond %{QUERY_STRING} (.*)(^|&|%26|%20)ebppSystem(=|%3D)([^&]+)(.*)$ [OR]
RewriteCond %{QUERY_STRING} (.*)(^|&|%26|%20)logSys(=|%3D)([^&]+)(.*)$

RewriteRule (.*) /$1?%1%5 [R=307]

 Well anyways, with the first bunch of mod_rewrite rule it works fine.

Thanks God Problem Solved 🙂

Optimize WordPress Pictures with EWWW Image Optimizer, Async JS and CSS and Autoptimize for better Search Engine Ranking

Tuesday, December 9th, 2014


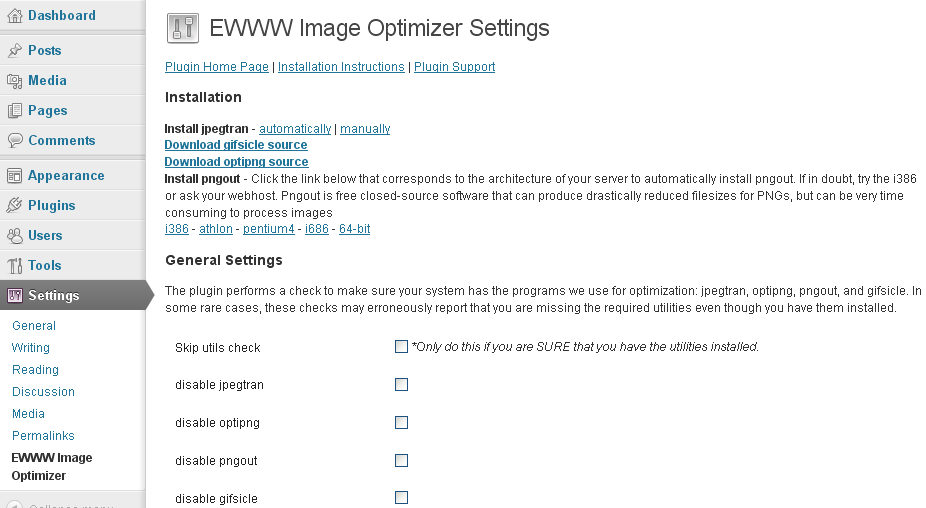
wordpress-ewww-image-optimizer_settings_screenshot-plugin-seo-for-images-wp_3

While optimizing picture performance with console tools optipng, jpegoptin, jpegtran, pngcrush (could save you a lot of server space and make pictures downloads faster (and hence increase your website responsiveness and SEO – check out), still for Blogs and WebSites based on WordPress its not worthy to loose time with console acrobatics but simply use EWWW Image Optimizer to Optimize all old or new uploaded Images.

To work EWWW Image Optimizer needs jpegtran, optipng, pngout and gifsicle to be installed on the Linux / BSD server. EWWW Image Optimizer can load the command line tools also from a Cloud, if a cloud service is running on the server. Once installed the plugin does scan all the imported WordPress Media files and can be run to optimize picture files on present blog psot / pages.

EWWW Image Opitimizer plugin does a good job in reducing file size on  NextGEN, GRAND FlAGallery galleries.

wordpress-ewww-image-optimizer_settings_screenshot-plugin-seo-for-images-wp

Here is how EWWW Image Optimizer works taken from plugin's website:
How are JPGs optimized?

Lossless optimization is done with the command jpegtran -copy all -optimize -progressive -outfile optimized-file original-file. Optionally, the -copy switch gets the 'none' parameter if you choose to strip metadata from your JPGs on the options page. Lossy optimization is done using the outstanding JPEGmini utility.
It is better if the server has not the jpegtran, pngout, gifsicle utilities installed as the plugin provides an uptodate static compiled Linux binaries.

How are PNGs optimized?

There are three parts (and all are optional). First, using the command pngquant original-file, then using the commands pngout-static -s2 original-file and optipng -o2 original-file. You can adjust the optimization levels for both tools on the settings page. Optipng is an automated derivative of pngcrush, which is another widely used png optimization utility.

How are GIFs optimized?

Using the command gifsicle -b -O3 –careful original file. This is particularly useful for animated GIFs, and can also streamline your color palette. That said, if your GIF is not animated, you should strongly consider converting it to a PNG. PNG files are almost always smaller, they just don't do animations. The following command would do this for you on a Linux system with imagemagickconvert somefile.gif somefile.png

wordpress-ewww-image-optimizer_settings_screenshot-plugin-seo-for-images-wp

Some othe plugins that could strenghten your WordPress Search Engine Optimization ranking worthy to check are:
 

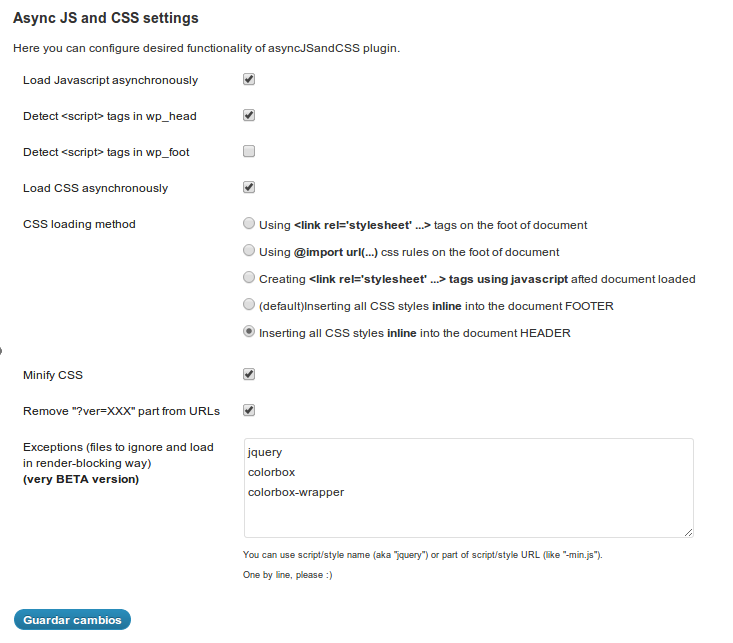
  • Async JS and CSS
     

Most importantly plugin solves "Render-blocking JavaScript and CSS" warning shown during site audit with  Google Developers PageSpeed InsightBy the way Google PageSpeed Insight is a precious tool so I recommend you check if you already haven't, Google's suggestions could often double or triple daily site visitors 

What Async JS and CSS does is:

Converts render-blocking CSS and JS files into NON-render-blocking, improving performance of web page

async_js_and_css_wordpress-plugin_configuration_menu

The plugin makes ALL scripts loaded by other plugins to be loaded in asynchronous. All CSS files will be inserted inline into the document code or moved from the document beginning to the end, just before closing BODY tag (or just where you placed wp_foot() function). There are various methods to do that via plugin configuration page.
 

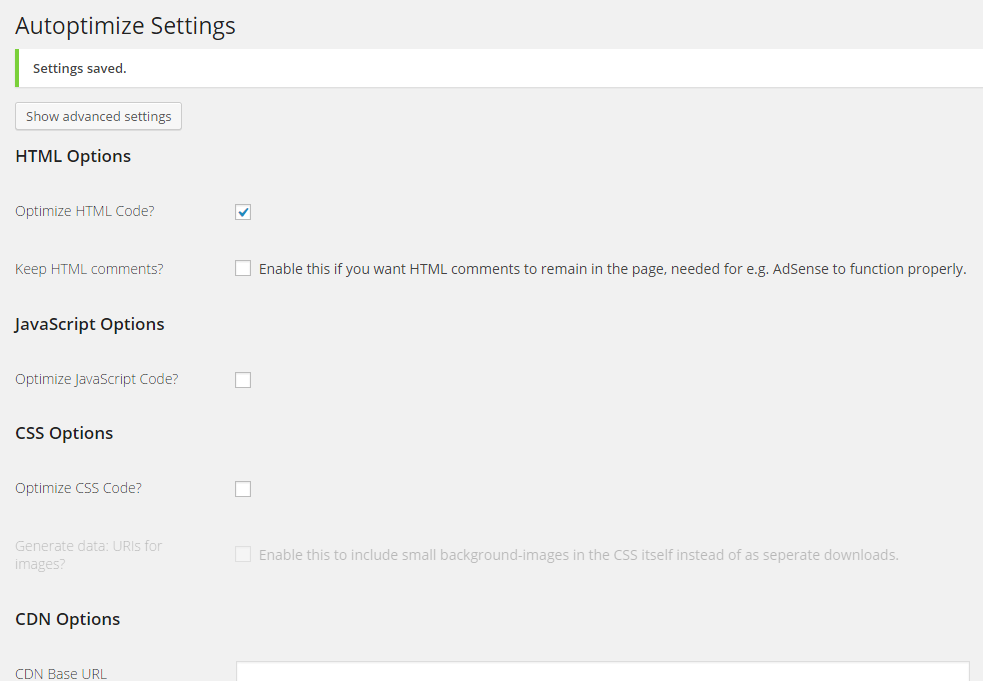
  • Autoptimize


    Wordpress-Autoptimize-screenshot-a-plugin-to-minify-wordpress-html-js-and-css-scripts

Autoptimize speeds up your website and helps you save bandwidth by aggregating and minimizing JS, CSS and HTML.

What does the plugin do to help speed up site?

It concatenates all scripts and styles, minifies and compresses them, adds expires headers, caches them, and moves styles to the page head, and scripts to the footer. It also minifies the HTML code itself, making your page really lightweight. Autoptimize is very much like WP Mnify (CSS / JS) minifaction WP plugin. The only difference and reason why you might want to use WP Mnify is it does HTML minification – something that WP Minify does not. Both plugins play nice together the only thing to be careful is not to configure CSS / JS minification in both Autoptimize and WP Minifyas this might slower instead of fasten the WP site.

A great bunch of other useful WP plugins to make a WordPress Blog friendly to Search Engines is here.

Improve Websites SEO: Optimize images to Increase website loading performance on Linux server – Image Compress tools

Friday, December 5th, 2014

Optimize-website-images-pictures-to-Increase-website-loading-performance-on-Linux-server_Image_Compress_tools-Improve-Websites_SEO
Part of our daily life as Web hosting system adminstrators is to constantly strive to better utilize our Linux / Windows hosting servers hardware.
Therefore it is our constant task to look for new better ways to optimize our Apache Sites and Webservers in order to return served application content light fast to keep the Boss and customers happy 🙂

There are things to tune up for better server performance and better CPU / memory utilization on both server Application server side as well as the website programming code backend, html and pictures / images

Thus it is critically important to not only keep the Webserver / PHP engine optimized but keep hosted sites  stored images and source code clean and efficient.

We as admins usually couldn't directly interfere with clearning the source code and often we have to host a crappy written sites with picture upload forms with un-optimized Image files that was  produced on old Photo Cameras, "Ancient" Mobile Mobiles, Win XP MS Paint, various versions Photoshop, Gimp etc.).

It is a well known fact that a big part from a Website User Experience is how fast the user loads a page, thus if HTML / CSS loaded images loads slow has a negative impact on user look & feel about website

Therefore by optimizing the size of hosted sites Images, you Save Network bandwidth and in some cases when Large Gallery sites HDD disk space.

On Linux, there are already a many command line tools to inspect and optimize (compress) the size of PNG, JPEG, GIF, BMP, PNM, Tiff Images, most famous ones are:

  • optipng – PNG optimizer that recompresses image files to a smaller size, without losing any information.
  • jpegoptim –   lossless JPEG optimization (based on optimizing the Huffman tables) and "lossy" optimization based on setting a maximum quality factor.
  • pngcrush – Recommended tool to use by Stoyan Stefanov (Yahoo Yslow Developer)
  • jpegtran – Recommended to use by Google 
  • gifsicle –  command-line tool for creating, editing, and getting information about GIF images and animations. 

It is hence useful to first run manually availale Linux image optimization tools (to get an idea what they do) and later automate them to run as scripts to optimize server stored images size and make pictures load faster on websites and thus improve End Users Experience and speed up Image content delivery to GoogleBot / YahooBot / Bing Crawlers which will make Search Engines to position server hosted sites better (more SEO Friendly).


  • How much percents of  space (Mega / Gigabytes ) Pictures compress can save you?

If you run it on 500MB image directory, you can probably save about 20 to 50MB of size, so don't expect extraordinary file reduce, however 5% to 10% reduce in size is not bad too. If you host 100 sites each with half gigas of data this would mean saving of 5GB of data and some 5GB from backups 🙂 At extraordinary cases you can expect 20% to 30% of storage reduce. For even better image compression you can try out GIMP's – Save for Web option.
 

  • Installing jpegtran, optpng, jpegoptim, pngcrush gifsicle on Debian / Ubuntu (deb based) Linux
     

apt-get install –yes libjpeg-progs optipng jpegoptim pngcrush gifsicle


  • Installing  jpegtran, optpng, jpegoptim, pngcrush, gifsicle on Fedora / CentOS / RHEL (RPM based distros)
     

yum -y install pngcrush libjpeg-turbo-utils opt-jpg opt-png opt-gif


gifsicle is not availale by default on Redhacks 🙂 but there is a RPM package for fedora from http://pkgs.repoforge.org/gifsicle/


Some examples of running image compression on GNU / Linux

  • optipng and jpegoptim optimize for all files in directory
     

cd /home/sites/

find . -iname '*.png' -print0 | xargs -0 optipng -o7 -preserve
find . -iname '*.jpg' -print0 |
 xargs -0 jpegoptim –max=90 –strip-all –preserve –totals


In jpegoptim command, the option –strip-all will strip any metadata including Exif data from images. For websites JPEG metadata is usually not needed, so usually its ok to strip them.

Above jpegoptim example will decrease slightly JPEG image quality to 90%. quality level of 90 is still high enough and website visitors are unlikely to spot any visible quality reduction / defects in the image.


  • pngcrush all files in a directory example
     

cd /home/sites/

for png in `find $IMG_DIR -iname "*.png"`; do
    echo "crushing $png …"
        pngcrush -rem alla -reduce -brute "$png" temp.png


    # preserve original on error
    if [ $? = 0 ]; then
        mv -f temp.png $png
        else
        rm temp.png
        fi
done

  • Run jpegtran on sites directory
     

find /home/sites -name "*.jpg" -type f -exec jpegtran -copy none -optimize -outfile {} {} ;


  • Set a script to compress / reduce size of Sites Images


Here is a basic optimize_images.sh which I used earlier before and was reducing the overall images size just 5 to 10%, then I found the much improved version of optimize images shell script  (useful to  clear up EXIF picture data / And Comments from JPG / PNG files). The script execution could take very long time on large image directories and thus could cause a high HDD disk I/O, however if ran once a week at night time its not such a big deal. 

To set it to run on your server as a cronjob:
 

cd /usr/sbin/
wget -q https://www.pc-freak.net/bshscr/optimize_images2.sh
crontab -u root -e 


Sample cron job to run once a month on 10th and 27th in 3 o'clock AM:
 

 00 3 10,27 * * /usr/sbin/optimize_images2.sh 2>&1 >/dev/null


Also if you need to further optimize million of tiny sized PNG files Yahoo Smush.it service could be helpful. For compression maniacs its worthy to check out also TinyPNG Service (however be awre that this service compresses files with significant quality loss) making picture quality visibly deteriorated.

Besides optimizing server stored Pictures, here are some other stuff that helps in increasing server utilization / lower webpages loading time.

Starting up with the installation (when site is to use Apache + PHP) for its backend, the first thing to on the freshlyinstalled Linux server is to implement the following list of Apache common Timeout variables that help better scale the webserver for the CMS-es hosted, enable Webserver caching with (mod_deflate), enable eAccelerator tune PHP common php variable etc.

Other thing  I sometimes use to speed-up performance of Apache child responce time up to 20-30  is to Include into Virtualhost / httpd.conf Apache configuration any htacces mod_rewrite rules.

On too heavily loaded sites On-line stores / Large Company website portals with more than 60 000 – 100 000 unique IP visitors a day it is useful tip to disable completely Apache logging in access.log / error.log.

Often when old architecture websites are moved from older Linux OS version to a newer one with newer versions of Apache / PHP often sites are working without major code rework, but use many functions which are already obsolete and thus many WARNING messages crap is logged into php_error.log / error.log. Thus to save disk space and decrease hard disk I/O operations it is good to Disable PHP Notices and Warnings messages
 

Protect NGINX webserver with password – Nginx basic HTTP htaccess authentication

Tuesday, December 2nd, 2014

Protect-nginx-webserver-with-password_migrate_apache_password_protect_to_Nginx_basic_HTTP_htaccess_authentication
If you're migrating a website from Apache Webserver to Nginx to boost performance and better Utilize your servers hardware and the websites (Virtualhosts) has sections with implemented Apache .htaccess / .htaccess password authentication, you will have to migrate also Apache directory password protection to Nginx.

This is not a hard task as NginX's password protection uses same password format as Apache and Nginx password protection files are generated with standard htpasswd part of apache2-utils package (on Debian / Ubuntu servers) and httpd-tools on CentOS / Fedora / RHEL. If you're migrating the Apache websites to Nginx on a fresh new installed server and website developers are missing htpasswd tool to install it depending on Linux distro:

On Debian / Ubuntu deb based servers, install htpasswd with:

apt-get install –yes apache2-utils


On CentOS / Fedora … other RPM based servers:


yum -y install httpd-tools

Once installed if you need to protect new section site still being in development with password with Nginx, do it as usual with htpasswd
 

htpasswd -c /home/site/nginx-websitecom/.htpaswd admin


Note that if .htpasswd file has already exist and has other user records, to not overwritted multiple users / passes and  let all users in file login to Nginx HTTP auth with separate passwords, do:

htpasswd /var/www/nginx-websietcom/.htpasswd elijah


Now open config file of Nginx Vhost and modify it to include configuration like this:


server {
       listen 80;
       server_name www.nginx-website.com nginx-website.com;
       root /var/www/www.nginx-website.com/www;
[…]
       location /test {
                auth_basic "Restricted";
                auth_basic_user_file /var/www/www.example.com/.htpasswd;
       }
[…]
}


Do it for as many Vhosts as you have and to make the new settings take affect restart Nginx:

/etc/init.d/nginx restart

Enjoy 🙂