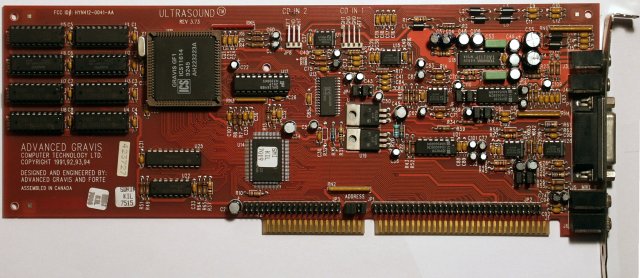
Archive for October 31st, 2017

How to enable Gravis UltraSound in DOSBox for enhanced music experience in DOS programs and Games

Tuesday, October 31st, 2017

DOSBox

Gravis UltraSound Classic


Gravis UltraSound

Gravis UltraSound or GUS is a sound card for the IBM PC compatible systems.
It was lunched in 1992 and is notable for it's ability to use real-world sound recordings (wavetable) of a musical instruments rather than artificial computer-generated waveforms.
As one of my friends used to say back then: "it sounds like a CD".

To enable GUS in DOSBox all you need to do is:

1. Download the archive with the GUS files from https://alex.www.pc-freak.net/files/GUS/ULTRASND.zip. Extract the archive (there is already a directory in it so you don't have to create one) preferably where you keep your DOSBox stuff (like Games).

2. Find your DOSBox config file. Depending on the version or host OS, the dosbox conf file is located either inside the user profile folder or inside the same folder as dosbox.exe. In Windows 7 the config file is located at

"C:\Users\Fred\AppData\Local\VirtualStore\Program Files (x86)\dosbox.conf"

where "Fred" is your username.

In GNU/Linux it's in "/home/Fred/.dosbox/dosbox.conf" where "Fred" is your username.

The name of the conf file may also have dosbox version (for example –

"dosbox-0.74.conf").

Open it with a text editor like notepad (Windows) or equvalent for GNU/Linux (vi, Kate, gedit…). Locate "[gus]" section (without the quotes) and edit it so it looks like this:

[gus]
#      gus: Enable the Gravis Ultrasound emulation.
#  gusrate: Sample rate of Ultrasound emulation.
#           Possible values: 44100, 48000, 32000, 22050, 16000, 11025, 8000, 49716.
#  gusbase: The IO base address of the Gravis Ultrasound.
#           Possible values: 240, 220, 260, 280, 2a0, 2c0, 2e0, 300.
#   gusirq: The IRQ number of the Gravis Ultrasound.
#           Possible values: 5, 3, 7, 9, 10, 11, 12.
#   gusdma: The DMA channel of the Gravis Ultrasound.
#           Possible values: 3, 0, 1, 5, 6, 7.
# ultradir: Path to Ultrasound directory. In this directory
#           there should be a MIDI directory that contains
#           the patch files for GUS playback. Patch sets used
#           with Timidity should work fine.

gus=true
gusrate=44100
gusbase=240
gusirq=5
gusdma=3
ultradir=C:\ULTRASND

Then save the dosbox conf file.

3. Start DOSBox and mount "ULTRASND" directory to "C:".

You can do that with

mount c (directory to ULTRASND)

For example if you have extracted the archive in "C:\Games" it has created "C:\Games\ULTRASND" and the command you will have to write in DOSBox is

mount c c:\Games

(example: if your game is in "C:\Games\Heroes2" and your GUS directory is "C:\Games\ULTRSND" (if you have extracted the archive "C:\Games\") then you "mount c c:\Games" and you are set)

or for GNU/Linux if you have extracted the archive in "/home/Fred/Games" it has created "/home/Fred/Games/ULTRASND" and the command you will have to write in DOSBox is

mount c /home/Fred/Games (where "Fred" is your user name).

(example: if your game is in "/home/Fred/Games/Heroes2" and your GUS directory is "/home/Fred/Games/ULTRSND" (if you have extracted the archive" /home/Fred/Games/") in  then you "mount c /home/Fred/Games" and you are set)

You can make this automatic so you don't have to write it everytime by adding this command in the end (bottom) part of your dosbox conf file and save it.

You're practicly ready. All you need to do now is set Gravis UltraSound in your game or application setup (for example with the file "setup.exe") with IO: 240, IRQ 5 and DMA 3. If you prefer you previous sound card you can do that by selecting it again from the setup without disabling GUS from the dosbox conf file.

Happy listening!

Gravis Ultrasound


Article written by Alex

Install TeamViewer on latest Debian, Ubuntu, Fedora, CentOS Linux quick how to

Tuesday, October 31st, 2017

teamviewer-howto-install-on-gnu-linux-teamviewer-and-tux-penguin-logo

If you're a sysadmin who uses GNU / Linux as a Desktop as me you will certainly need to have TeamViewer installed and ready for use on your Linux desktop.

Even though TeamViewer is a proprietary application and I prefer not to use it I'm forced to have it installed because of every now and then a friend or customer would require you to login remotely to his Windows server and clean up the system either from spyware or viruses or just deploy some new software.

Nowdays most of people are running 64 bit ( amd64 ) built operating system and the problem with TeamViewer on Linux 64bit is that it doesn't have an actual full featured 64 port of the application but only have a 32 bits install, besides that big part of components of TeamViewer are running using wine windows emulation and hencing making it work on Linux is sometimes not so trivial as we might have desired.

Because TeamViewer is a 32 bit application, it has a number of dependency libraries that are 32 bit in Linux that's the so called (i386) built libraries (packages).

Hence to make TeamViewer work on modern GNU / Linux operating systems such as Debian / Ubuntu / Mint Linux / Fedora / CentOS etc. it is necessery to have some i386 libraries and other 32 bit things pre-installed and only then you can have a working copy of teamviewer on your Linux.

1. Installing i386 applications required for TeamViewer operation

– On Debian / Ubuntu / Kubuntu / Xubuntu Linux run below commands:

First we need to add the i386 architecture to be supported by Linux


dpkg –add-architecture i386
apt update


Then on Debian and other deb based Linux we need to install following libraries
 

# apt install libjpeg62-turbo:i386 wget gdebi-core


2. Download latest teamviewer version from TeamViewer website

– On Debian, Ubuntu and other deb based Linux distros.

Download latest teamviewer version and install it:


# wget https://download.teamviewer.com/download/teamviewer_i386.deb


On CentOS, Fedora, OpenSuSE other RPM based distros:

Download the Teamviewer package and package signature using wget


# wget https://download.teamviewer.com/download/linux/signature/TeamViewer2017.asc
# wget https://download.teamviewer.com/download/teamviewer.i686.rpm


3. Insteall teamviewer with gdebi (Simple Tool to install deb files)


# gdebi teamviewer_i386.deb


Remote control and meeting solution.
 TeamViewer provides easy, fast and secure remote access and meeting solutions
 to Linux, Windows PCs, Apple PCs and various other platforms,
 including Android and iPhone.
 .
 TeamViewer is free for personal use.
 You can use TeamViewer completely free of charge to access your private
 computers or to help your friends with their computer problems.
 .
 To buy a license for commercial use, please visit http://www.teamviewer.com
 .
 This package contains Free Software components.
 For details, see /opt/teamviewer/doc/license_foss.txt
Do you want to install the software package? [y/N]:y


On Fedora, CentOS, SuSE RPM based ones:


# rpm –import TeamViewer_Linux_PubKey.asc


# rpm -i teamviewer_12.0.xxxxx.i686.rpm


or if you face some failed dependencies you better use zypper that will download any missing teamviewer dependencies.


# zypper install teamviewer_12.0.xxxxx.i686.rpm


4. Start Teamviewer


teamviewer-running-on-linux-screenshot


linux:~$ teamviewer
Init…
CheckCPU: SSE2 support: yes
XRandRWait: No value set. Using default.
XRandRWait: Started by user.
Checking setup…
wine: configuration in '/home/hipo/.local/share/teamviewer12' has been updated.
Launching TeamViewer …
Launching TeamViewer GUI …