Archive for the ‘Java’ Category

How to install jcmd on CentOS 7 to diagnose running Java Virtual Machine crashing applications

Tuesday, January 14th, 2020

how-to-install-jcmd-centos-jcdm-java-logo-1

jcmd utility is well known in the Brane New wonderful world of Java but if you're like me a classical old school sysadmins and non-java developer you probably never heard it hence before going straight into how to install it on CentOS 7 Linux servers, I'll shortly say few words on what it is.
jcmd is used to send diagnostic requests to running Java Virtual Machine (JVM) it is available in both in Oracle Java as well as OpenJDK.
The requests jcmd sends to VM are based on the running Java PID ID and are pretty useful for controlling Java Flight Recordings, troubleshoot, and diagnose JVM and Java Applications. It must be used on the same machine where the JVM is running.

 Used without arguments or with the -l option, jcmd prints the list of running Java processes with their process id, their main class and their command line arguments.
When a main class is specified on the command line, jcmd sends the diagnostic command request to all Java processes for which the command line argument is a substring of the Java process' main class.
jcmd could be useful if the JConsoleJMX (Java Management Extensions) can't be used for some reason on the server or together with Java Visual VM (visual interface for viewing detailed info about Java App).

In most Linux distributionsas as  of year 2020 jcmd is found in  java-*-openjdk-headless.

To have jcmd on lets say Debian GNU / Linux, you're up to something like:


apt-get install –yes openjdk-12-jdk-headless
 

or

apt-get install openjdk-11-jdk-headless
however in CentOS
7 jcmd is not found in java*openjdk*headless but instead to have it on server, thus it take me a while to look up where it is foundso after hearing
from some online post it is part of package java*openjdk*devel* to make sure this so true, I've used the  –download-only option
 

 yum install –downloadonly –downloaddir=/tmp java-1.8.0-openjdk-devel


So the next question was how to inspect the downloaded rpm package into /tmp usually, this is possible via Midnight Commander (mc) easily to view contents, however as this
server did not have installed mc due to security policies I had to do it differently after pondering a while on how to to list the RPM package file content come up using following command


 rpm2cpio java-1.8.0-openjdk-devel-1.8.0.232.b09-0.el7_7.x86_64.rpm |cpio -idmv|grep -i jcmd|less


To then install  java-1.8.0-openjdk-devel-1.8.0.232.b09-0.el7_7.x86_64.rpm to do so run:


yum -y install  java-1.8.0-openjdk-devel-1.8.0*


Once the jcmd, I've created the following bash script  that was set that was tracking for application errors and checking whether the JBoss application server pool-available-count is not filled up and hence jboss refuses to serve connections  through jboss-cli.sh query automatically launching jcmd to get various diagnostic data about Java Virtual Machine (e.g. a running snapshot) – think of it like the UNIX top for debugging or Windows System Monitor but run one time. 


# PID_OF_JAVA=$(pgrep -l java)
# jcmd $PID_OF_JAVA GC.heap_dump GC.heap_dump_file-$(date '+%Y-%m-%d_%H-%M-%S').jfr
# jcmd $PID_OF_JAVA Thread.print > Thread.print-$(date '+%Y-%m-%d_%H-%M-%S').jfr


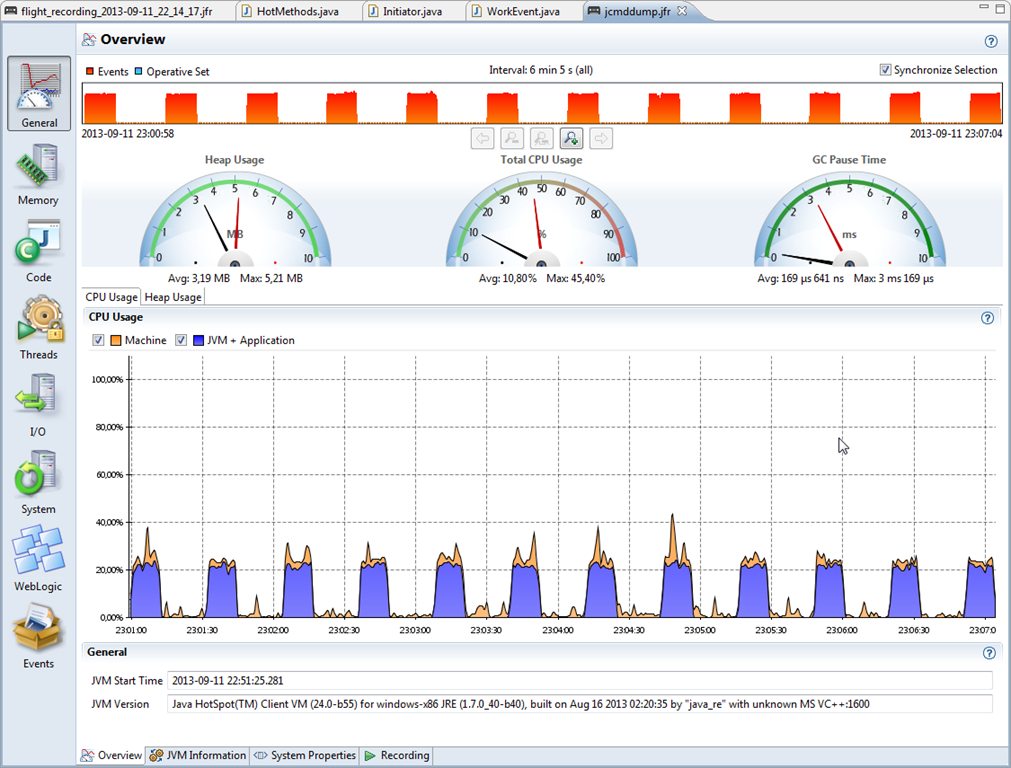
The produced log files can then be used by the developer to visualize some Java specific stuff "Flight recordings" like in below screenshot:

jcmd-java-tool-dump-jfr-flight-recordings-visualized-java 

If you're interested on some other interesting tools that can be used to Monitor  and Debug a Running Java VM take a look at Java's official documentation Monitoring Tools.
So that's all Mission Accomplished 🙂 Now the Java Application developer could observe the log and tell why exactly the application crashed after the multitude of thrown Exceptions in the JBoss server.log.

Install Java on Debian 9 Linux howto

Saturday, September 29th, 2018

java_on-debian-gnu-linux-oracle-virtual-machine-logo

As most system administrators and perhaps most people :), I dislike Java Virtual Machine. However because of its multi-platform support it is largely adopted and so many things are already written in java, even though I hate it I need it to run things every now and then on my personal desktop machine with Debian Linux 9 (Stretch).

From a programmer point of view Java applications are scalable and flexible and from a point of view a person who had to support computers and servers iwth Java it sucks.
To have a running Java Virtual Machine and run Java applications on your Linux PC you could use JRE (the Java Runtime Environment) and JDK (Java Development Kit) which is a set of Java tools and compilers to translate Java code to a .JAR .WAR and the rest of the Java Machine running formats.
openjdk-free-software-java-implementation-for-linux-bsd

OpenJDK (Open JDK) is free (open source) implementation of Oracle Sun Microsystems of Java SE 7 mostly licensed under GPLv2 (but with some linking to a Java class library that is not truly free. OpenJDK includes as components the backend Virtual Machine (HotSpot), the Java Class Library, javac (the java compiler) and IcedTea (which is Redhat's free implementation of Java Web Start plugin.

Install OpenJDK 8 JDK and JRE

OpenJDK is installable by default on Debian and most other distros, to install it on Debian:


linux:~# apt-get install –yes -qq default-jdk
linux:~# apt-get install –yes -qq default-jre


That would provide your system with support for  java-sdk, java2-sdk, java5-sdk, java6-sdk, java7-sdk, java8-sdk's free implementation.


linux:~#  java -version


linux:~# java version "1.8.0_181"
Java(TM) SE Runtime Environment (build 1.8.0_181-b13)
Java HotSpot(TM) 64-Bit Server VM (build 25.181-b13, mixed mode)


I have used openjdk but as there are issues with some Java programs because of Java compitability issues. Nowadays most of the timeI choose to usually install the Official Latest Oracle Java 8. The reason is I often have to install on servers application servers such as:

  •  Tomcat
  • JBoss
  • WildFly
  • Jetty
  • Glassfish
  • WebLogic
  • Cassandra
  • Jenkins
     

Install Latest Official Oracle Java 8

java_oracle-virtual-machine-logo

1. Download Oracle Java installable binary

To download latest official release check out Oracle's download page and copy the link to latest Java archive and select the appropriate architecture x64 / 32 bit / arm etc., as of time of writting this article latest Stable Java version is JDK-8U181.


linux:~# curl -L -b "oraclelicense=a" -O http://download.oracle.com/otn-pub/java/jdk/8u181-b13/96a7b8442fe848ef90c96a2fad6ed6d1/jdk-8u181-linux-x64.tar.gz


Notice the -b "oraclelicense=a" which will pass on to the remote web server accept Oracle's license which is a prerequirement to continue to download.

2. Create directory for Java


linux:~# mkdir -p /usr/local/oracle-java-8


3. Extract the Java .tar.gz to /usr/local/oracle/java-8 or another directory
where java will live


linux:~# tar -zxf jdk-8u181-linux-x64.tar.gz -C /usr/local/oracle-java-8


If you have used Java OpenJDK beforehand and installed Oracle Java according to the instructions above you might end up with multiple Javas installed by default, however Debian Linux will have a symlinks to java javac (java compiler), javaws (Java web start).
Thus just executed java will return


linux:~# java -version


java version "1.8.0_181"
Java(TM) SE Runtime Environment (build 1.8.0_181-b13)
Java HotSpot(TM) 64-Bit Server VM (build 25.181-b13, mixed mode)


4. Set Oracle Java to be default for the Debian system


linux:~# update-alternatives –install "/usr/bin/java" "java" "/usr/local/oracle-java-8/jdk1.8.0_181/bin/java" 1500
linux:~# update-alternatives –install "/usr/bin/javac" "javac" "/usr/local/oracle-java-8/jdk1.8.0_181/bin/javac" 1500
linux:~# update-alternatives –install "/usr/bin/javaws" "javaws" "/usr/local/oracle-java-8/jdk1.8.0_181/bin/javaws" 1500


An alternative way to set Java to point to Oracle Java instead of OpenJDK is


linux:~# update-alternatives –config java


There are 2 choices for the alternative java (providing /usr/bin/java).


  Selection    Path                                            Priority   Status
————————————————————
* 0            /usr/local/oracle-java-8/jdk1.8.0_181/bin/java   1500      auto mode
  1            /usr/lib/jvm/java-8-openjdk-amd64/jre/bin/java   1081      manual mode
  2            /usr/local/oracle-java-8/jdk1.8.0_181/bin/java   1500      manual mode


Press <enter> to keep the current choice[*], or type selection number:

Install Latest Official Oracle Java 10

To install Oracle Java the process is the same:
 

linux:~# wget –header "Cookie: oraclelicense=accept-securebackup-cookie" <paste the download link here> linux:~# mkdir /usr/local/oracle-java-10/ linux:~# tar xvzf jdk-10.0.1_linux-x64_bin.tar.gz -C/usr/local/oracle-java-10 linux:~# update-alternatives –install "/usr/bin/java" "java" "/usr/local/oracle-java-10/jdk-10.0.1/bin/java" 1500 linux:~# update-alternatives –install "/usr/bin/javac" "javac" "/usr/local/oracle-java-10/jdk-10.0.1/bin/javac" 1500 linux:~# update-alternatives –install "/usr/bin/javaws" "javaws" "/usr/local/oracle-java-10/jdk-10.0.1/bin/javaws" 1500


Uninstall OpenJDK previous installation

If you choose to use Oracle Java in favor of OpenJDK you might want to also remove the openjdk not to take space on your Hard disk, to so so:
 

linux:~# apt-get remove default-jre

Install Jenkins software development automation server on GNU / Linux

Tuesday, September 18th, 2018

jenkins-automate-installation-on-logo-title

As I have gone through a hiring procedures for Dev Ops system administration (Senior System Engineer) positions in the largest IT company in Belarus EPAM (A Global provider for software engineering and IT consulting.one of the Dev Ops test tasks to do was to automate installation of Jenkins software development automation server on a Virtual Machine running Linust Guest of choice (VMWare / VirtualBox) with Ansible / Docker or Pure Shell Script as I love simplicity I choose to do it via Bash Shell script.

As Dev Ops position is more and more transforming into a programmer job into the New Age of non-sense Cloud Computing (I hate Clouds guys – I share Richard Stallman opinion that "Clouds are clouding your minds" !!! ) … the need for environments such as Jenkins allowing multiple pseudo "sys admins" (mostly copy / paste new age coders) to write and build there programs in Go Language / Python / Perl / Bash with a single environment for Continuous Integration (CI) that could deploy and keep software versionings in GitHub / Mercurial / SVN is exponentionally raising.

Old School Computer Geeks would definitely be amazed (reasonably) on why on earth would someone need a Web Based Java Crazy environment that Jenkins is to build a multiple language code and submit it to a source repository system
But as the people like to hype and make easy things harder adding more and more layers of complexity, the product is the new buziness hype terms Continuous Integration / Continuous Integration raise exponentially together with the softwares to do stuff.
As IT people are becoming more and more lazy and illitetelarete things like Jenkins is the next web development CI environment that is about to die in the coming 5 to 10 years.

Jenkins doesn't really cut the need for writting scrpits to make your application (Makefiles), for the Business Corporate world it is heavily used nowadays, because it is used to building projects using Web UI, running tests, doing static code analysis, and deploying.

What makes Jenkins in terms of IT architecture design solution is that every project that it builds is build via its Java Virtuam Machine Processor backend (the server itself runs in the background of the OS runs it through Java VM as a WAR file (Web Application Resource) with the help of Few Ruby and other scripted files.
Besides that JNS has in the moment of writting more than 1400 years spanning across platforms, UI, administration, source code management, and, most frequently, build management.

Jenkins is either used as a standalone server or as a servlet in Java app servers such as Tomcat.

This is the short script I came up with in bash that when executed installs Jenkins on the remote VM host server that ran Debian 9 Linux, the install_jenkins.sh script is downloadable here.

#!/bin/bash
# Install jenkins and test whether it runs prints password on prompt or send via email
# if email variable is set Jenkins password will be set to your email of choice using mail command
# NOTE: bsd-mailx package should be installed in order for email sent to work and local machine should be running a properly configured
# relay SMTP
# Author: Georgi Georgiev 
# hipo@www.pc-freak.net
email='hipo@mail.com';

add_repos_install_jenkins () {
apt-get install –yes -qq apt-transport-https git curl

wget -q -O – https://pkg.jenkins.io/debian/jenkins.io.key | sudo apt-key add –

if [ “$(sed -n ‘/jenkins/p’ /etc/apt/sources.list|wc -l)” -eq 0 ]; then
echo 'deb https://pkg.jenkins.io/debian binary/' >> /etc/apt/sources.list
fi

apt-get update -qq && apt-get install –yes -qq jenkins
}

check_j_install () {
if [ “$(dpkg –get-selections | cut -f1|grep -i jenkins)” ]; then echo 'succesfully installed'; 

else printf 'Problem in installing please check'; 
exit 1; 

fi

}

check_j_running_s_pass () {
if [ $(ps -e -o command|grep -i jenkins) ]; then 
echo 'Jenkins process working.'; 
echo ‘… do more here if necessery with some more commands’; 
else 
echo 'not working log to file' >> jenkins.log 
exit 1; 
fi

JENKINS_PASSWORD=`cat /var/lib/jenkins/secrets/initialAdminPassword`;
echo "Jenkins Admin password is $JENKINS_PASSWORD" | tee -a "jenkins_credentials.log";
if [ ! -z $email ]; then
echo $JENKINS_PASSWORD | mail -s "NEW Jenkins password" $email


fi

}

main () {
        add_repos_install_jenkins;
        check_j_install;
        check_j_running_s_pass;

}

main;

To run the script on the remote VM server started for the purpose I created a passwordless ssh key authentication with
 

ssh-keygen -t rsa


and 


ssh-copy-id -i ~/.ssh/id_dsa.pub root@remote-vm-host.com


command … for more check out my previous article "How to execute command to Multiple Servers / Establishing passwordless SSH key authentication on 50+ servers"

Once the passwordless authentication was established to remote Private Virtual Server I've used scp command to upload my install_jenkins.sh script with:


# scp -v install_jenkins.sh root@remote-vm-host.com:/root/install_jenkins.sh

Sending file modes: C0644 726 install_jenkins.sh
Sink: C0644 726 install_jenkins.sh
install_jenkins.sh              


Next to run the install_jenkins.sh on remote host I used remote SSH run command capability, the syntax goes like this:


ssh [USER-NAME]@[REMOTE-HOST] [command or script]


In that case the command I used was:


ssh root@remote-vm-host.com "chmod +x; /root/jenkins.sh"


Next I launched Firefox browser and accessed http://localhost:8080 on the VM host and used the long password generated from the script by command:


JENKINS_PASSWORD=`cat cat /var/lib/jenkins/secrets/initialAdminPassword`;


echo $JENKINS_PASSWORD

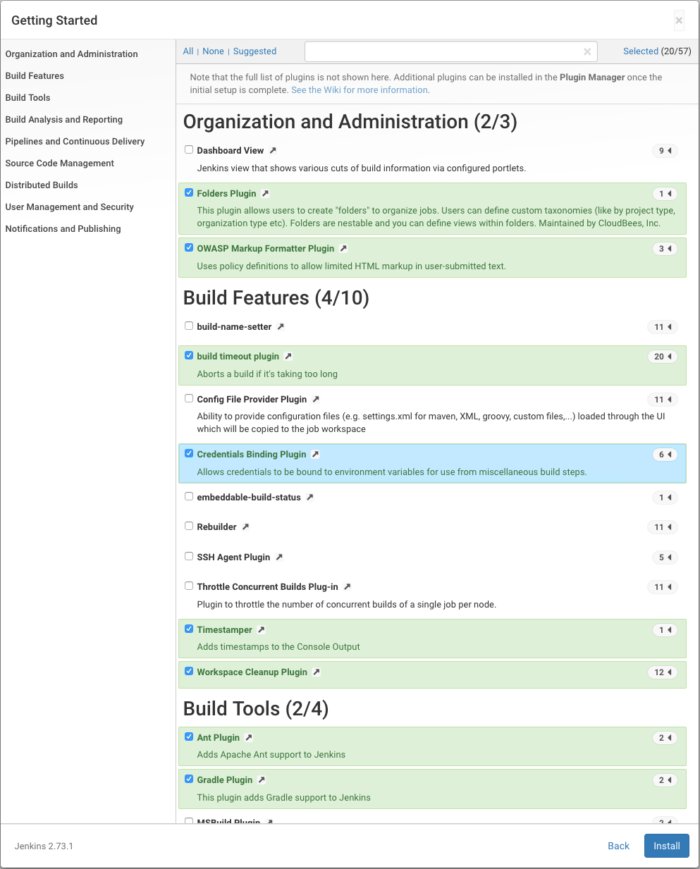
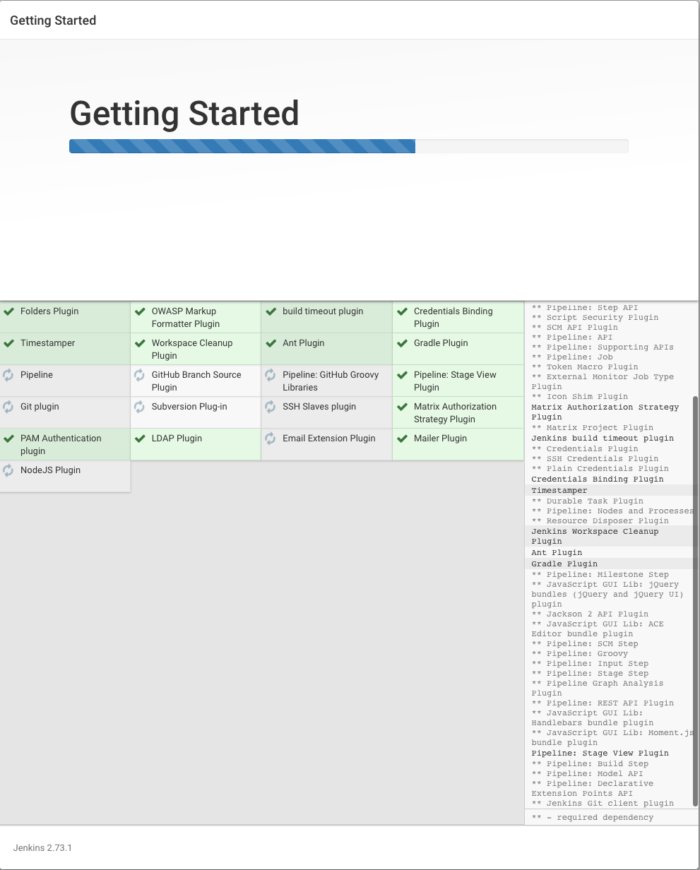
In the process of Initial Jenkins setup I selected the GitHub plugins necessery for me to connect Jenkins with GitHub WebHooks (for that perhaps I will write another article when I have time).

jenkins-plugin-installer-screenshot-linux-large

Jenkins Getting Started Initial Screen

jenkins-selecting-plugins-to-use-getting-started

Jenkins Selecting Plugins Screen

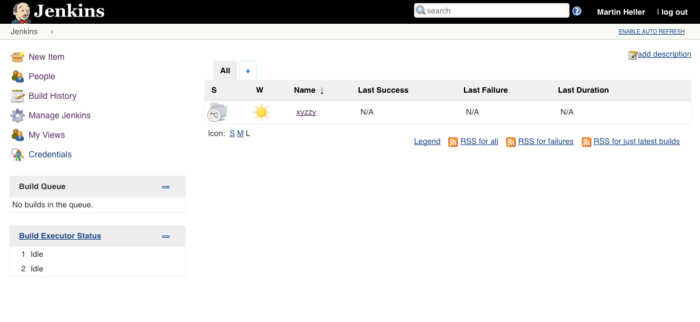
Once successfully set-up Jenkins Initial Project creation / Configuration ( Control Panel ) screen looks like so

jenkins-main-screen-successfully-deployed-on-gnu-linux

There was also a task to create a simple print Jenkins and Shell environment variables with a sample Jenkins Free Style Project.
Following 
the New Item menu and setting it to Execute Shell commands as a Build Parameters, the parameters set for the Jenkins Free Style Project to Print the Environment Varibles were like so:


#!/bin/sh

echo “Jenskins Environment Variables”

echo "BUILD_NUMBER" :: $BUILD_NUMBER

echo "BUILD_ID" :: $BUILD_ID

echo "BUILD_DISPLAY_NAME" :: $BUILD_DISPLAY_NAME

echo "JOB_NAME" :: $JOB_NAME

echo "JOB_BASE_NAME" :: $JOB_BASE_NAME

echo "BUILD_TAG" :: $BUILD_TAG

echo "EXECUTOR_NUMBER" :: $EXECUTOR_NUMBER

echo "NODE_NAME" :: $NODE_NAME

echo "NODE_LABELS" :: $NODE_LABELS

echo "WORKSPACE" :: $WORKSPACE

echo "JENKINS_HOME" :: $JENKINS_HOME

echo "JENKINS_URL" :: $JENKINS_URL

echo "BUILD_URL" ::$BUILD_URL

echo "JOB_URL" :: $JOB_URL

echo “===Linux Shell Variables ===”
env


Well, it wasn't really a rocket science was it?! 🙂

That's all folks, see you soon.

How to turn keyboard backlight on GNU / Linux, keyboard no backlight solution

Friday, October 20th, 2017

how-to-make-CM_Storm_Devastator-keyboard_backlight-work-on-linux-enabled-disable-keyboard-glowing-gnu-linux

If you're a GNU / Linux user and you happen to buy a backlighted keyboard, some nice new laptop whose keyboard supports the more and more modern keyboard growing or if you happen to install a GNU / Linux for a Gamer friend no matter the Linux distribution, you might encounter sometimes  problem even in major Linux distributions Debian / Ubuntu / Mint / Fedora with keyboard backlight not working.

Lets say you buy a Devastator II backlighted keyboard or any other modern keyboard you plug it into the Linux machine and there is no nice blinking light coming out of the keyboard, all the joy is gone yes I know. The free software coolness would have been even more grandiose if your keyboard was shiny and glowing in color / colors 🙂

But wait, there is hope for your joy to be made complete.

To make the keyboard backlight switch on Just issue commands:


xmodmap -e 'add mod3 = Screen_Lock'


# Turn on the keyboard bright lamps
xset led on

# Turns off the keyboard bright lamps
xset led off


If you want to make the keyboard backlight be enabled permanent the easiest solution is to

– add the 3 command lines to /etc/rc.local

E.g. to do so open /etc/rc.local and before exit 0 command just add the lines:


vim /etc/rc.local


xmodmap -e 'add mod3 = Screen_Lock'

# Turn on the keyboard bright lamps
xset led on

# Turns off the keyboard bright lamps
xset led off


If you prefer to have the keyboard colorful backlight enable and disabled from X environment on lets say GNOME , here is how to make yourself an icon that enabled and disables the colors.

That's handy because at day time it is a kind of meaningless for the keyboard to glow.

Here is the shell script:

#!/bin/bash
sleep 1
xset led 3
xmodmap -e 'add mod3 = Scroll_Lock'


I saved it as /home/hipo/scripts/backlight.sh

(don't forget to make it executable!, to do so run):


chmod +x /home/hipo/scripts/backlight.sh


Then create  the .desktop file at /etc/xdg/autostart/backlight.desktop so that it runs the new shell script, like so:

[Desktop Entry]
Type=Application
Name=Devastator Backlight
Exec=/home/hipo/scripts/backlight.sh
Icon=system-run
X-GNOME-Autostart-enabled=true

Install and Run Multiple Tomcat and JAVA server instances on single Windows server Howto

Friday, June 17th, 2016

tomcat-windows-install-multiple-tomcats-on-one-single-windows-logo
I've had a task at my work place to install Multiple Tomcat servers on Windows 2012 Server R2 the task seems trivial however I've faced few minor issues and the few searches in Google returned very few articles discussing the topic and this give me the idea that it might be helpful to others to come up with my own article as this might save time for those Linux guys who need to install Multiple Tomcat instances on the same Windows server without spending too much time to dig into the arcane winblows.

I stumbled on some issues during installation  thus took the time to systemize below shortly how I managed to run 2 Tomcat servers on One Windows 2012 R2 machine.
 

First thing to do is to obtain latest compiled Tomcat server archive from Tomcat's official download page here.

Latest Tomcat stable release as of time of writting this article is 7.0.69, so I've downloaded 64 Bit archive (as the server is running X64 Operating system) and unarchived it twice on the Install server under 2 separate directory locations under:


D:\Tomcat\Tomcat_Instance-1


and


D:\Tomcat\Tomcat_Instance-2


Copy of the 7.0.69 X86 tomcat zip archive is here and X64 bit tomcat 7.0.69 is here

Once the files are properly untarred I also needed to download also Java as the WAR application supposed to run on the Windows machine had as requirement Java JDK 8.

Downloading Java is a trivial task, however in my case the server used to be in DMZ (Demiliterized Zone) / Firewalled network and hence instead of using the default Java installer provided from Oracle website which is trying to download from Internet, I had instead to download and use the Offline current JAVA 8u91 version.
Just for sake of some convenience I've made a mirrored version of X86 JAVA 8 (8u91) is here and JAVA 8u91 X64 version here
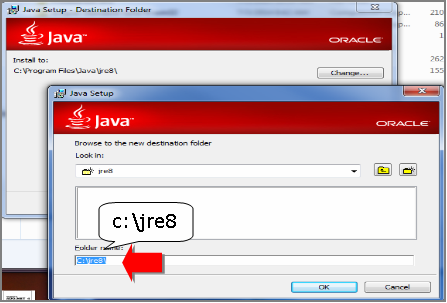
 

install-Java-JDK-and-JRE-8-on-Microsoft-Windows-howto

JAVA JDK install is a trivial task just run the isntaller set the proper locations initially for JDK base folder in my case this was:


D:\Java\jdk


and later throughout during install, I was asked also to fill in full path location for JRE, in my case this was


D:\Java\jre


It was a little bit surprising for me that JRE install path had to be entered and because I was not careful enough I had twice entered the same path for both JRE and JDK, i.e. entered on both prompts:


D:\Java


This caused issues and a messed Java install but I realized that after the 3rd re-install of Java when I decided to also read instead of by habit click Next / Next and Complete the install as used to be in the good old days of Windows XP and Windows 98 🙂

Once Java set up correctly I've tested it with:


C:\Users\georgi> java -version
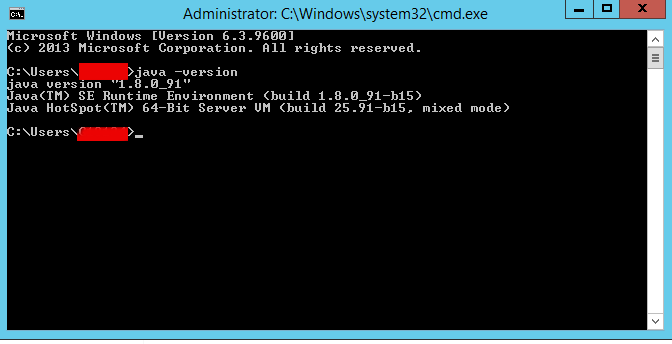


test-java-version-on-microsoft-windows-command-howto-screenshot


It is also necessery to set properly following 2 JAVA command line environment variables:
 

JAVA_HOME
JRE_HOME


On the logged in user Environment Variables with which Tomcat will be running on how to do that check my previous article how to add Environment Variables on Windows


Make sure you have the following 2 environment variables set upped:


JAVA_HOME=D:\Java\jdk


JRE_HOME=D:\Java\jre


For one time set (assuming Java is installed) under D:Javajre and D:Javajdk, you will need to type in command prompt:

set JAVA_HOME=D:\Java\jdk

set JRE_HOME=D:\Java\jre

Once assured Java is running fine I proceeded to run the Tomcat serevrs, in order to make them working it was necessery to change all coinciding Port names under:


conf/server.xml


because if there are coinciding ports (assuming that like me you're trying to run both Tomcat under the same IP address), the servers will fail to run because they're trying to bind under the same Port TCP addresses.

Assuming that the tomcat archive files are copied from .zip into D:TomcatTomcat_Instance-1 and D:TomcatTomcat_Instance-2 folders and you have in each of the 2 the following directory structure:


    /bin : This directory contains the startup and shutdown scripts for both Windows and Linux.
    /conf : This directory contains the main configuration files for Tomcat. The two most important are the server.xml and the global web.xml .
    /server : This directory contains the Tomcat Java Archive files.
    /lib : This directory contains Java Archive files that Tomcat is dependent upon.
    /logs : This directory contains Tomcat’s log files.
    /src : This directory contains the source code used by the Tomcat server. Once Tomcat is released, it will probably contain interfaces and abstract classes only.
    /webapps : All web applications are deployed in this directory; it contains the WAR file.
    /work : This is the directory in which Tomcat will place all servlets that are generated from JSPs. If you want to see exactly how a particular JSP is interpreted, look in this directory.


You will need to edit server.xml in both of the Tomcats and make sure the configuration for ports is not coinciding, i.e., I've changed the following configurations for Tomcat_Instance-2 installation:


    Connector Port : This is the port where Apache Tomcat listen for the HTTP requests. Default port is 8080, I've changed this to 8089 for second Tomcat server
    Shutdown Port : This port is used when we try to shutdown the Apache Tomcat Server. Default port is 8005 so changed that to 8006 in Tomcat_Instance-2
    AJP (Apache JServ Protocol) Connector Port : The Apache JServ Protocol (AJP) is a binary protocol that can conduct inbound requests from a web server through to an application server that sits behind the web server.
I've commented out the configuration for AJP completely and used for my custom needs the following server.xml configuration:

<Connector port="11111" address="10.251.27.24" protocol="AJP/1.3" enableLookups="false"/>

    Redirect Port : Any redirection happening inside Apache Tomcat will happen through this port. In Apache TOMCAT there are two instance where redirect Port is mentioned. First one is for the Apache TOMCAT server and other one is for the AJP port. Default here is port 8443 so changed that one to to listen to 8444 instead.


Another thing necessery to do is to create setenv.bat file under both D:\TomcatTomcat_Instance-1\bin and D:\Tomcat\Tomcat_Instance-2\bin with following content:
 

set JRE_HOME=D:\java\jre
set JAVA_HOME=d:\java\jdk
exit /b 0


The quickest way to do it without bothering with Notepad text editor is by issuing:


cd tomcat\Tomcat_Instance1\bin
echo set JRE_HOME=D:\java\jre > setenv.bat
echo set JAVA_HOME=D:javajdk >> setenv.bat


cd tomcat\Tomcat_Instance2\bin
echo set JRE_HOME=D:\java\jre > setenv.bat
echo set JAVA_HOME=D:\java\jdk >> setenv.bat


The setenv.sh is a standard variables file read by Tomcat on Instance start up time
 

Next part of Tomcat installation is to install each of the 2 instances after defining CATALINA_BASE to point to first and second Tomcat instance directories, e.g open a Command Prompt (cmd.exe) and run there:


set CATALINA_BASE=D:\Tomcat\Tomcat_Instance-1

C:|> d:

D:|> cd Tomcat\Tomcat_Instance-1\bin


D:Tomcat\Tomcat_Instance-1\bin> service install Tomcat_Instance-1


You will get output like:


Using CATALINA_BASE:   " D:\Tomcat\Tomcat_Instance-1"
Using CATALINA_HOME:   " D:\Tomcat\Tomcat_Instance-1"
Using CATALINA_TMPDIR: " D:\TomcatTomcat_Instance-1\temp"
Using JRE_HOME:        "D:\java\jre"
Using CLASSPATH:       "D:\Tomcat\Tomcat_Instance-1\bin\bootstrap.jar; D:\Tomcat\Tomcat_Instance-1\bin\tomcat-juli.jar"


Then for the second Tomcat server instance run in command prompt:


set CATALINA_BASE=D:\Tomcat\Tomcat_Instance-2

d:

cd Tomcat\Tomcat_Instance-2\bin
service install Tomcat_Instance-2

Using CATALINA_BASE:   " D:\Tomcat\Tomcat_Instance-2"
Using CATALINA_HOME:   " D:\Tomcat\Tomcat_Instance-2"
Using CATALINA_TMPDIR: " D:\Tomcat\Tomcat_Instance-2\temp"
Using JRE_HOME:        "D:\java\jre"
Using CLASSPATH:       "D:\Tomcat\Tomcat_Instance-1\bin\bootstrap.jar; D:\TomcatTomcat_Instance-2\bin\tomcat-juli.jar"
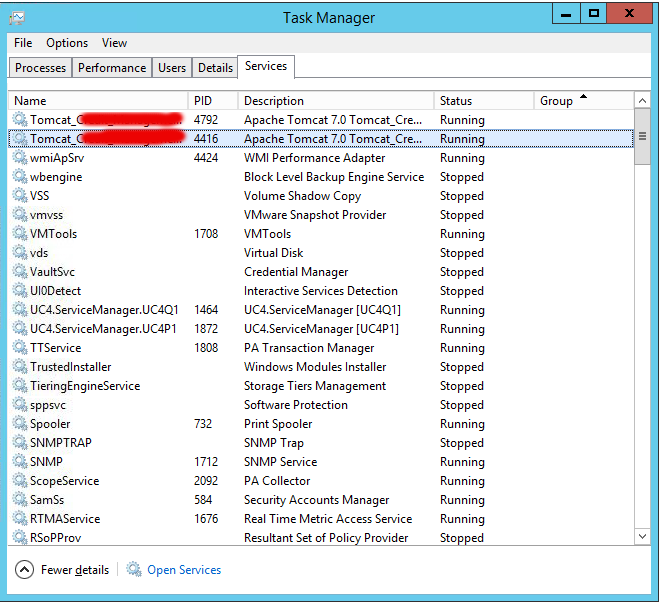
windows-running-two-tomcat-instances-on-the-same-single-server-screenshot


Here is all the service.bat batch file parameters:


D:\Tomcat\Tomcat_Instance-11\bin>service.bat /
?
Unknown parameter "/?"


Usage: service.bat install/remove [service_name] [/user username]


To test both Tomcat servers where they run simultaneously without issues, I run in 2 separate command prompts – opened (cmd.exe) two times and run in each of them:

What this little command does is uses Tomcat7.exe command to Add / Remove / Modify the Tomcat instance into Windows Services, the same can be happily done also with the good old
sc (service configure) windows command.


D:

cd Tomcat\Tomcat_Instance-1\bin\startup.bat

D:

cd Tomcat\Tomcat_Instance-2\bin\startup.bat
 

Both executed without errors in command line and to stop them I've pressed the usual CTRL+C.
To make sure once again both server instances ran wihtout errors, I've checked in D:TomcatTomcat_Instance-{1,2}logs/catalina*.log and in both of them all looked fine.
Another good check if you want to be 10000% sure Tomcat is running is to look up for Tomcat listening on above configured ports, for example run below in cmd:


D:Tomcat> netstat -a|findstr "8080"


I've also used the 2 following command to set up proper Services description for both of services:


D:\Tomcat\Tomcat_Instance-1\tomcat7 //US//Tomcat_Instance1 –Description="Apache Tomcat Server – Tomcat-Instance1.my-site.com"

D:\Tomcat\Instance_Instance-2\tomcat7 //US//Tomcat_Instance2 –Description="Apache Tomcat Server – Tomcat-Instance2.my-site.com "


A very helpful resource during the Apache (Windows Service) instance install / setup /modification that helped me is on Tomcat's official site here
 

N! B! Very important note to make here for anyone experiencing strange issues when trying to add multiple issues is below:

I've experienced some issues while trying to add the 2 Tomcat servers into Windows services initially with tomcat7.exe command like so:

Trying installing Tomcat71 service with cmd:
 

 tomcat7 //IS//Tomcat71 –DisplayName="Apache Tomcat 7" ^
     –Install="D:\Tomcat\Tomcat_Instance-1\bin\tomcat7.exe" –Jvm=auto ^
     –StartMode=jvm –StopMode=jvm ^
     –StartClass=org.apache.catalina.startup.Bootstrap –StartParams=start ^
     –StopClass=org.apache.catalina.startup.Bootstrap –StopParams=stop


And Tomcat72 instance with cmd:
 

 tomcat7 //IS//Tomcat71 –DisplayName="Apache Tomcat 7" ^
     –Install="D:\Tomcat\Tomcat_Instance-2\bin\tomcat7.exe" –Jvm=auto ^
     –StartMode=jvm –StopMode=jvm ^
     –StartClass=org.apache.catalina.startup.Bootstrap –StartParams=start ^
     –StopClass=org.apache.catalina.startup.Bootstrap –StopParams=stop


I've tried multiplet imes to Add and remove the Tomcat71 and Tomcat72 Windows service names (with) Tomcat DS (Delete Service)
 

tomcat7 //DS/Tomcat71
tomcat7 //DS/Tomcat72


And strangely the two instances were continuously crashing when I tried to start them (with Properties button and Start instruction) from Windows Task Manager (taskmgr.exe) -> Services

Finally I realized the issue is caused by some problems that somehow occured with Windows Service Names Tomcat71 and Tomcat72 by simply readding the two instances under another name the instances stopped crashing and all worked thanks to help of colleague Anatoliy who pointed me tot he problem by trying to install his own instances under a different service name).

Thanks God finally the 2 instances run fine !
 

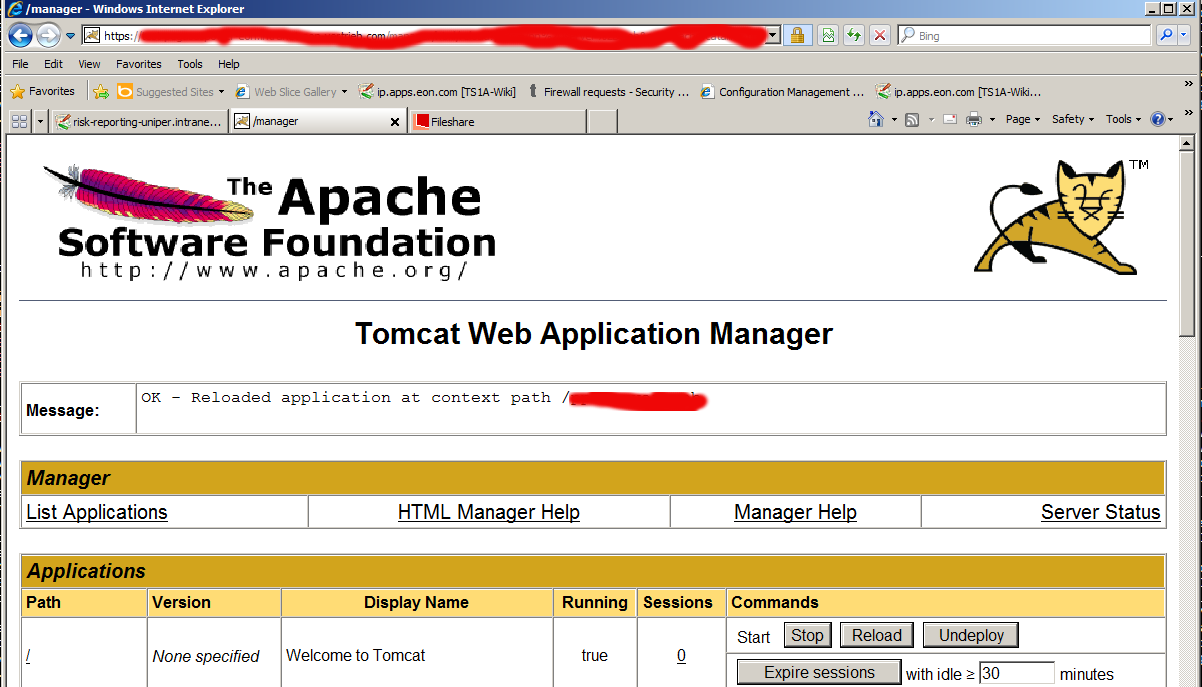
Fix “FAIL – Application at context path /application-name could not be started” deployment error in Tomcat manager

Thursday, October 1st, 2015

tomcat-manager-FAIL-Application-at-context-path-application-name-could-not-be-started-fix-solution-error

While deploying an environment called "Interim" which is pretty much like a testing Java application deployed from a Java EAR (Enterprise Archive) file from within a Tomcat Manager GUI web interface after stopping the application and trying to start it, the developers come across the error:


FAIL – Application at context path /application-name could not be started


The error puzzled me for a while until I checked the catalina.out I've seen a number of thrown Java Eceptions errors like:

Okt 01, 2015 10:48:46 AM org.springframework.web.context.ContextLoader initWebApplicationContext

Schwerwiegend: Context initialization failed

org.springframework.beans.factory.BeanCreationException: Error creating bean with name 'com.sun.xml.ws.transport.http.servlet.SpringBinding#2' defined in ServletContex

t resource [/WEB-INF/pp-server-beans.xml]: Cannot create inner bean ‘(inner bean)’ of type [org.jvnet.jax_ws_commons.spring.SpringService] while setting bean property

'service'; nested exception is org.springframework.beans.factory.BeanCreationException: Error creating bean with name '(inner bean)#33': FactoryBean threw exception on

 object creation; nested exception is java.lang.OutOfMemoryError: PermGen space

I've googled a bit about the error:

"FAIL – Application at context path /application-name could not be started"

and come across this Stackoverflow thread and followed suggested solution to fix web.xml tag closing error but it seems there was no such error in my case, I then also tried solution suggested by this thread (e.g. adding in logging.properties) file:
 

org.apache.catalina.core.ContainerBase.[Catalina].level = INFO
org.apache.catalina.core.ContainerBase.[Catalina].handlers = java.util.logging.ConsoleHandler

unfortunately this helped neither to solve the error when it is tried to be started from tomcat manager.

After asking for help a colleague Kostadin, he pointed me to take a closer look in the error (which is a clear indication) that the reserved space is not enough (see below err):
 

java.lang.OutOfMemoryError: PermGen space

And he pointed me then to Solution (which is to modify the present tomcat setenv.sh) settings which looked like this:

# Heap size settings

export JAVA_OPTS="-Xms2048M -Xmx2048M"


# SSCO test page parameter

export JAVA_OPTS="$JAVA_OPTS -DTS1A_TESTSEITE_CONFIG_PATH=test-myapplication.com"

# Default garbage collector settings

export JAVA_OPTS="$JAVA_OPTS -XX:MaxPermSize=128M"


# Aggressive garbage collector settings.

# Do not use! For testing purposes only!

#export JAVA_OPTS="$JAVA_OPTS -Xss128k -XX:ParallelGCThreads=20 -XX:+UseConcMarkSweepGC -XX:+UseParNewGC -XX:SurvivorRatio=8 -XX:TargetSurvivorRatio=90 -XX:MaxTenuringThreshold=31 -XX:+AggressiveOpts -XX:MaxPermSize=128M"


####### DO NOT CHANGE BELOW HERE #######

# Disable X11 usage

unset DISPLAY

export JAVA_OPTS="$JAVA_OPTS -Djava.awt.headless=true"


# Garbage collection log settings

export JAVA_OPTS="$JAVA_OPTS -verbose:gc -XX:+PrintGCTimeStamps -XX:+PrintGCDetails -Xloggc:/web/tomcat/current/logs/gc.log -XX:-TraceClassUnloading"


# Enable JMX console

export JAVA_OPTS="$JAVA_OPTS -Dcom.sun.management.jmxremote"


The solution is to to add following two options to export JAVA_OPTS (above options):

-XX:PermSize=512m -XX:MaxPermSize=512m


After modifications, my new line within setenv.sh looked like so:


JAVA_OPTS="-Xms2048M -Xmx2048M -XX:PermSize=512m -XX:MaxPermSize=512m"


Finally to make new JAVA_OPTS settings, I've restarted Tomcat with:


cd /web/tomcat/bin/
./shutdown.sh
sleep 5; ./startup.sh


And hooray it works fine thanks God! 🙂

How to check Java JAR JDBC / ODBC version on Linux / Unix and Windows server

Tuesday, March 31st, 2015

how-to-check-java-jar-odbc-jdbc-version-linux-unix-windows-server
If you're forced to update some Java based Web application using Java + Tomcat / WebSphere / Weblogic it is a common thing that the Java App developer handed to you will ask you which version is the Oracle JDBC / ODBC driver on current Java Virtual Machine version installed.


Actually there are few methods to check Java JDBC / ODBC version:

1. Check Java ODBC version greeping it in  WEB-INF/MANIFEST.MF

Usually the .jar file comes archived in a .ZIP – i.e.  application-name5 .zip
 

server:~# unzip application-name5.zip


Then if the .zip file contains the OJDBC as a .JAR extension – (Java Archive), inflate it with jar tool.
 

server:~# jar -xvf ojdbc7.jar META-INF/MANIFEST.MF
inflated: META-INF/MANIFEST.MF

server:~# grep Implementation META-INF/MANIFEST.MF
Implementation-Vendor: Oracle Corporation
Implementation-Title: JDBC
Implementation-Version: 12.1.0.1.0


Alternative way to check the info (if you don't have java or jar installed on the Linux / Unix machine) is simply with unzip + grep like so:


server:~# unzip -p ojdbc14.jar META-INF/MANIFEST.MF | grep -C 1 version

Manifest-Version: 1.0
Implementation-Version: "Oracle JDBC Driver version – 10.1.0.5.0"
Specification-Title: "Oracle JDBC driver classes for use with JDK1.4"
Specification-Version: "Oracle JDBC Driver version – 10.1.0.5.0"
Implementation-Title: "ojdbc14.jar"


If you're on a Windows (and you have Windows server grep.exe installed), use instead:


C:\jar> unzip -p ojdbc14.jar META-INF/MANIFEST.MF | grep -C version


2. Getting some info with Java JRE tool

You can check some useful Java version info also just with Java Runtime Environment (java) tool
 

server:~# java -jar ojdbc5.jar

Oracle 11.1.0.7.0-Production JDBC 3.0 compiled with JDK5

Weblogic – How to change / remove IP/hostname quick and dirty howto

Wednesday, March 11th, 2015

Oracle-Weblogic-Server-logo-how-to-change-ip-hostname-weblogic-quick-and-dirty-howto

This is just quick & dirty doc on how to change/remove IP/host on Oracle WebLogic Application server

– In logs the Error message will be message like:


<Oct 21, 2013 1:06:51 AM SGT> <Warning> <Security> <BEA-090504> <Certificate chain received from cluster2.yourdomain.com – 192.168.1.41 failed hostname verification check. Certificate contained cluster1.yourdomain.com but check expected cluster2.yourdomain.com>


Solution:

On web console – change/remove IP/hostname


As root / admin supersuser:


– Stop Weblogic Webserver 

As this is RHEL Linux, to stop WLS use standard init script start / stop service command


service wls stop


– As Application user create directory where new key will be created


mkdir /home/uwls11pp/tmp_key
cd /home/uwls11pp/tmp_key


– Make backup of current JKS (Keystore File)


cp /WLS/app/oracle/wls1036/wlserver_10.3/server/lib/DemoIdentity.jks /WLS/app/oracle/wls1036/wlserver_10.3/server/lib/DemoIdentity.jks_11032015


– Execute set env . script


/WLS/app/oracle/wls1036/wlserver_10.3/server/bin/setWLSEnv.sh


– Copy & paste output from script above and export variables


export CLASSPATH;
export PATH;


– Check old certificate in keystore


/WLS/app/oracle/jdk1.7.0_25/bin/keytool -list -v -keystore /WLS/app/oracle/wls1036/wlserver_10.3/server/lib/DemoIdentity.jks  -storepass DemoIdentityKeyStorePassPhrase


– Delete old Weblogic keystore JKS file


/WLS/app/oracle/jdk1.7.0_25/bin/keytool -delete -alias demoidentity -keystore /WLS/app/oracle/wls1036/wlserver_10.3/server/lib/DemoIdentity.jks -storepass DemoIdentityKeyStorePassPhrase


– Check wether proper Java version is used


java -version


– Get hostname from hosts file


cat /etc/hosts


#Replace weblogic1 with your FQDN (Fully Qualified Domain Name) – this step will create new certificate with new hostname


java utils.CertGen -cn weblogic1 -keyfilepass DemoIdentityPassPhrase -certfile newcert -keyfile newkey


#Import certificate to “official” keystore


java utils.ImportPrivateKey -keystore /WLS/app/oracle/wls1036/wlserver_10.3/server/lib/DemoIdentity.jks -storepass DemoIdentityKeyStorePassPhrase -keyfile newkey.pem -keyfilepass DemoIdentityPassPhrase -certfile newcert.pem -alias demoidentity


#Recheck once again if correct certificate is in use


/WLS/app/oracle/jdk1.7.0_25/bin/keytool -list -v -keystore /WLS/app/oracle/wls1036/wlserver_10.3/server/lib/DemoIdentity.jks  -storepass DemoIdentityKeyStorePassPhrase


– Finally issue as root user restart Weblogic server again


service wls start

How to install Java Virtual Machine on Debian 7 GNU / Linux

Wednesday, July 23rd, 2014

install-java-on-debian-gnu-linux-logo
Debian 7 stable as most stable Debian releases includes custom Open Source Oracle Java Virtual Machine version called IcedTea OpenJDK, just like with sun's proprietary java, open sourced icedtea fork is made of two components:
 

JREJava Runtime Environment

and


JDKJava Development Kit).


1. installing OpenJDK Open Source Java Virtual Machine on Debian GNU / Linux

openjdk_java_open_source_virtual_machine_linux-logo
The default meta-package for install java-jre is default-jre meta package which by default on Debian Wheezy points to openjdk:


apt-cache depends default-jdk
default-jdk
  Depends: default-jre
  Depends: openjdk-6-jdk

If you want to install default Open Source Java Debian package implementation run:
 

apt-get –yes install default-jre

apt-get –yes install default-jdk


2. Installing Oracle Java VM 7 on Debian / Ubuntu Linux and deb derivatives
/images/oracle_java_logo-linux-install-debian
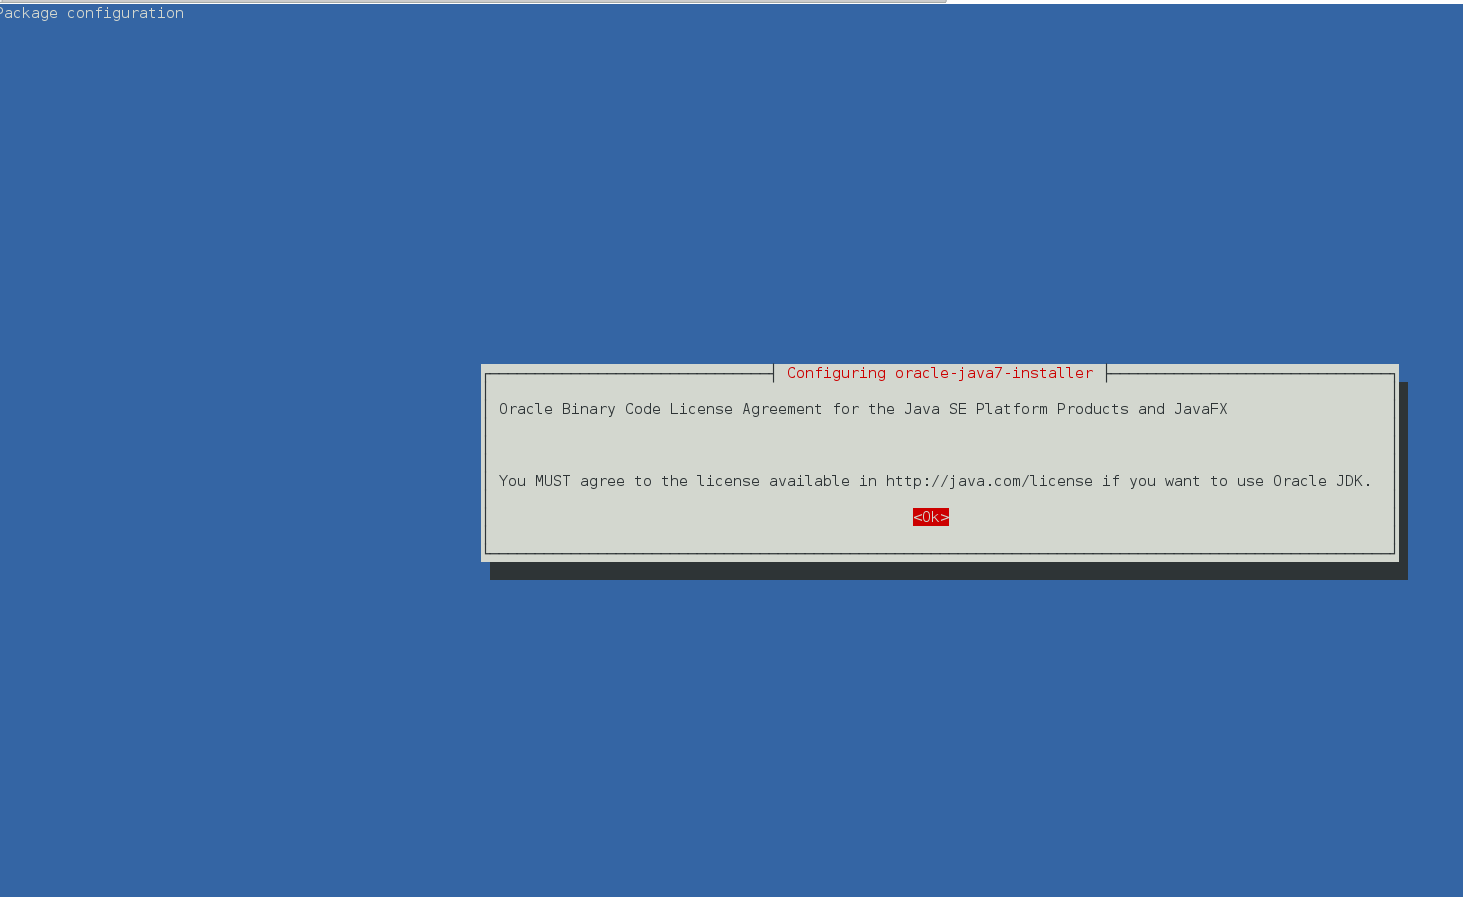
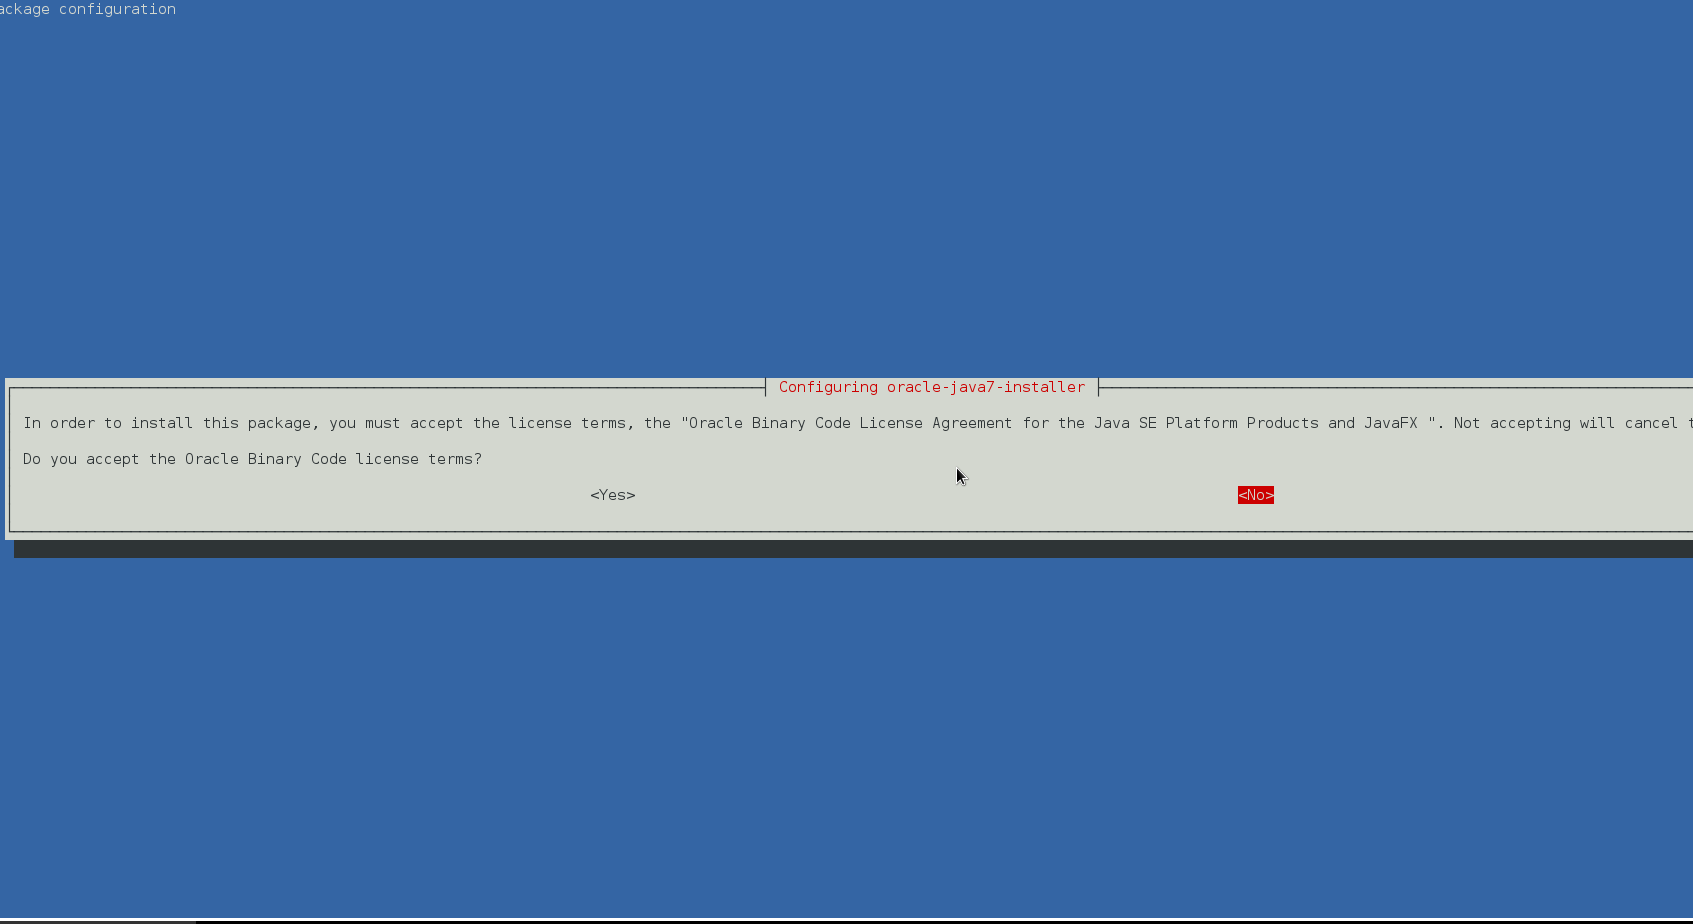
Also it is possible to install Oracle Java 7 from binary via apt-get by adding a custom Ubuntu repository containing deb Oracle proprietary java install package called oracle-java7-installer:
 

echo "deb http://ppa.launchpad.net/webupd8team/java/ubuntu precise main" | tee -a /etc/apt/sources.list
echo "deb-src http://ppa.launchpad.net/webupd8team/java/ubuntu precise main" | tee -a /etc/apt/sources.list
apt-key adv –keyserver hkp://keyserver.ubuntu.com:80 –recv-keys EEA14886
apt-get update
apt-get install –yes oracle-java7-installer


 Above apt-get command can be used also to install Oracle Sun Java on Ubuntu Linux and other Debian derivatives, for example you can install it like this on Linux Mint and rest of deb based Desktop oriented Linuces …

installing-java-debian-7-linux-install-oracle-java-7-screenshot-1

installing-java-debian-7-linux-install-oracle-java-7-screenshot-2

If you already have the openjdk installed together with oracle java jdk, to make oracle jdk the default Virtual Machine install also oracle-java7-set-default:

apt-get install oracle-java7-set-default


3. Installing Oracle Java 8 the debian way on Debian and Ubuntu Linux

echo "deb http://ppa.launchpad.net/webupd8team/java/ubuntu trusty main" | tee /etc/apt/sources.list.d/webupd8team-java.list
echo "deb-src http://ppa.launchpad.net/webupd8team/java/ubuntu trusty main" | tee -a /etc/apt/sources.list.d/webupd8team-java.list
apt-key adv –keyserver keyserver.ubuntu.com –recv-keys EEA14886
apt-get update
apt-get install oracle-java8-installer


4. Install Oracle Proprietary Java on Debian Linux using any version from Oracle website

As some written software requires custom ex-SUN Microsystems and currently owned by Oracle Java proprietary non-free binaries to install them on Debian Linux 7, there is a way to download any sun java jdk version, create .deb package and install the package with dpkg.

Here is how:

a.) Install java-package meta-package

apt-get –yes install java-package


Building dependency tree       
Reading state information… Done
The following extra packages will be installed:
  autopoint debhelper gettext git git-man html2text intltool-debian liberror-perl libgettextpo0 libmail-sendmail-perl libsys-hostname-long-perl po-debconf rsync
Suggested packages:
  dh-make gettext-doc git-daemon-run git-daemon-sysvinit git-doc git-el git-arch git-cvs git-svn git-email git-gui gitk gitweb libmail-box-perl
The following NEW packages will be installed:
  autopoint debhelper gettext git git-man html2text intltool-debian java-package liberror-perl libgettextpo0 libmail-sendmail-perl libsys-hostname-long-perl po-debconf rsync
0 upgraded, 14 newly installed, 0 to remove and 112 not upgraded.
Need to get 11.8 MB of archives.
After this operation, 24.7 MB of additional disk space will be used.

b.) Download your desiresd Oracle Java version


Then according to your Debian Linux platform install (32-bit x86 or 64-bit amd64) go in a browser to:

http://www.oracle.com/technetwork/java/javase/downloads/index.html

Accept the agreement and download latest Java release, if you need to install some specific Oracle Java version check out there Old Java download versions (archives) page

Note that in order to download, either you will need some text-browser like elinks or you will need to have a GUI environment with IceWeasel / Epiphany etc. If you're already using the Linux as a desktop environment with GNOME and you used IceWeasel to download java jdk it will be downloaded into /tmp

cd /tmp
make-jpkg <downloaded_jdk_file>

Install the binary package created:

dpkg -i oracle-j2sdk1.7_1.7.0+update44_amd64.deb

Enjoy 🙂