Archive for the ‘Networking’ Category

Send TCP / UDP strings and commands to Local and Remote Applications without netcat with Bash

Friday, July 24th, 2020

bash-open-network-tcp-udp-connections-from-shell-gnu-bash-shell-shell-logo

Did you ever needed to send TCP / UDP packets manually to send commands to local or remote applications, having a fully functional BASH Shell but not having the luxury to have NC (Netcat Swiss Army Knife of Networking) tool?
This happens if you have some Linux based embeded device as Arduino or a Linux server with a high security PCI requirement which can't affort to have Netcat in place or another portable hardware with a Linux kernel, that needs to communicate in UDP for any reason but you don't want to waste additional 28KB or physically you have access to a Linux device that doesn't have netcat but you want to be able to send UDP externally …

SInce some time in newer GNU Bash's releases support for TCP / UDP data sending is described in Bash's Manual and should be working it is not as good as you might expect but for a small things it could save you the day.

The syntax to use it is:
 

 /dev/protocol/IP/PORT


To open new socket connection to a UDP / TCP protocol with bash you have to simply open a new Shell handler (lets say 3) to:


/dev/tcp/your-url.com/80


or

/dev/udp/83.228.93.76/53


1. Get GOOGLE HTML Source with simple BASH / Getting URL Index with bash sockets


If you happen to have access to a machine where no network downloader tool or a text browser such as curl, wget, lynx, links is available but you want to dump the content of a index.html or any other URL with simply bash you can do it like so:
 

exec 3<>/dev/tcp/www.google.com/80
echo -e "GET / HTTP/1.1\r\n\r\n" >&3 

cat <&3

If you need to open a connection to a Internet Domain with bash and store the output into a separate .html file:

exec 3<>/dev/tcp/www.google.com/80
echo -e "GET / HTTP/1.1\r\n\r\n" >&3 

cat <&3 | tee -a output.html


Note that this will work only if you're logged into into an interactive shell.
If you want instead do it from a shell script (and omit usage) of wget etc. use something like bash_sockets_google_connect.sh basic script :

#!/bin/bash
exec 3<>/dev/tcp/www.google.com/80
printf "GET /\r\n\r\n" >&3
while IFS= read -r -u3 -t2 line || [[ -n “$line” ]]; do echo "$line"; done
exec 3>&-
exec 3<&-


2. Sending UDP protocol data via bash socket


To send test  variables or commands data to localhost (127.0.0.1) UDP listening service:
 

echo 'TEST COMMAND' > /dev/udp/127.0.0.1/538


echo "Any UDP data" > /dev/udp/127.0.0.1/3000


If you happent to have netcat or running on a bash shell that doesn't properly support TCP / UDP sending you can always do it netcat way:

echo "Command" | nc -u -w0 127.0.0.1 3000


Of course this little hack is useful just for simple things and eventually for more comlex stuff and scripting you would like to use a fully functional HTML reader ( W3C compliant Web Browser )
still  for a quick dirty stuff Bash socketing from the console rocks pretty much ! 🙂


How to debug failing service in systemctl and add a new IP network alias in CentOS Linux

Wednesday, January 15th, 2020

linux-debug-failing-systemctl-systemd-service--add-new-IP-alias-network-cable

If you get some error with some service that is start / stopped via systemctl you might be pondering how to debug further why the service is not up then then you'll be in the situation I was today.
While on one configured server with 8 eth0 configured ethernet network interfaces the network service was reporting errors, when atempted to restart the RedHat way via:
 

service network restart


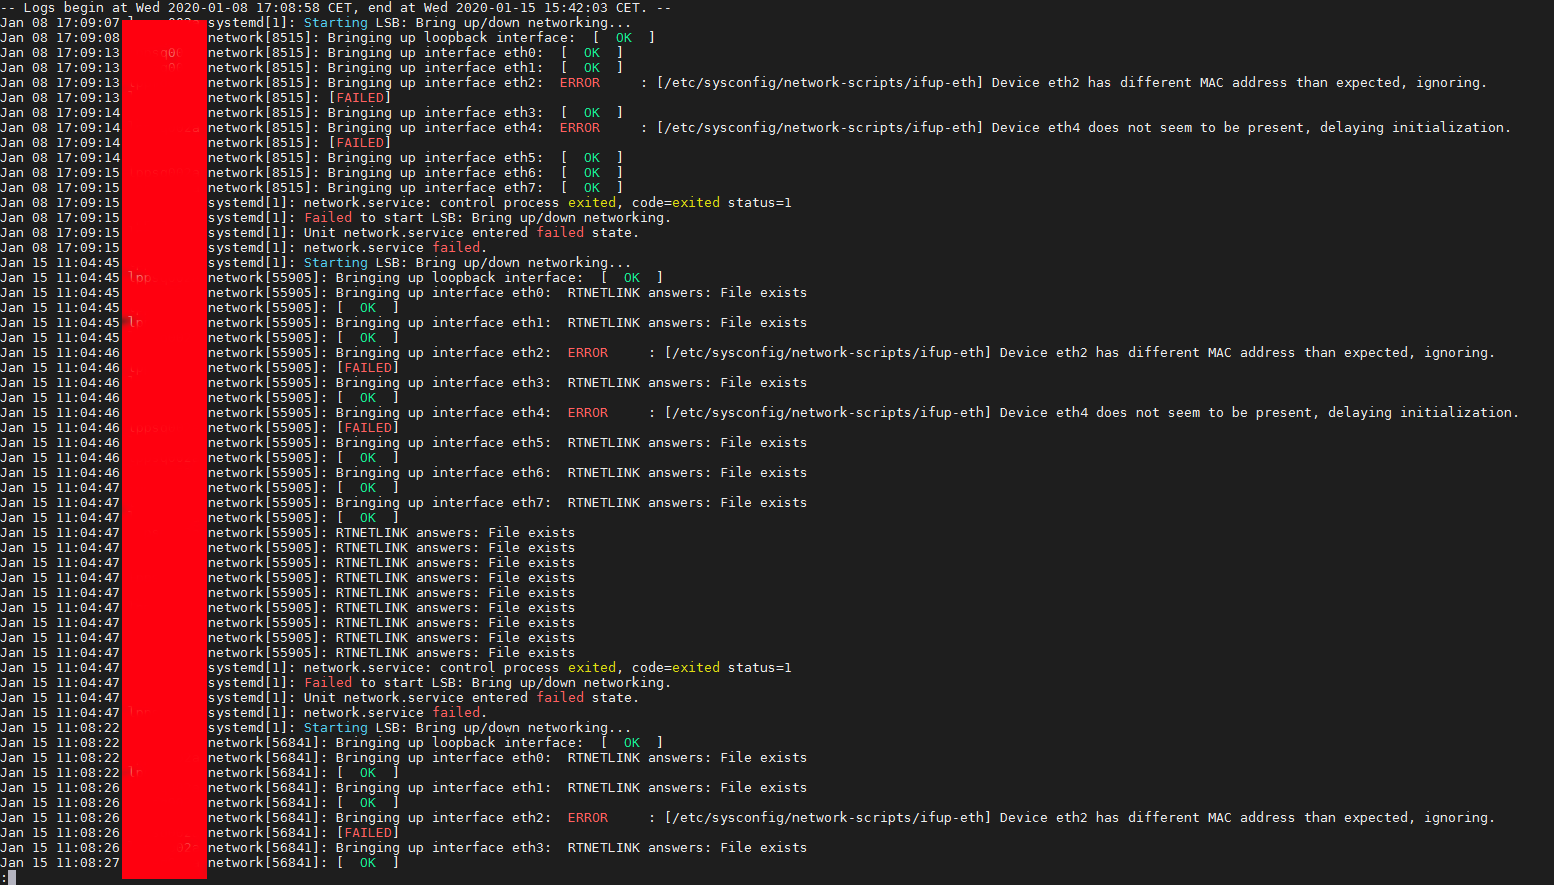
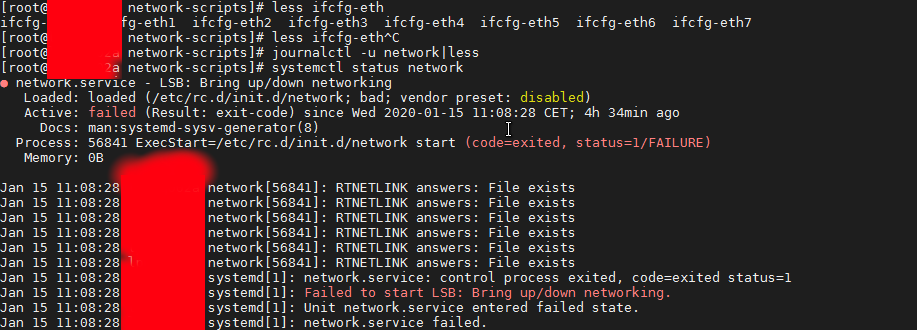
to further debug what the issue was as it was necessery I had to find a way how to debug systemctl so here is how:


How to do a verbose messages status for sysctlct?


linux:~# systemctl status network

linux:~# systemctl status network


Another useful hint is to print out only log messages for the current boot, you can that with:

# journalctl -u service-name.service -b


if you don't want to have the less command like page separation ( paging ) use the –no-pager argument.


# journalctl -u network –no-pager

Jan 08 17:09:14 lppsq002a network[8515]: Bringing up interface eth5:  [  OK  ]

    Jan 08 17:09:15 lppsq002a network[8515]: Bringing up interface eth6:  [  OK  ]
    Jan 08 17:09:15 lppsq002a network[8515]: Bringing up interface eth7:  [  OK  ]
    Jan 08 17:09:15 lppsq002a systemd[1]: network.service: control process exited, code=exited status=1
    Jan 08 17:09:15 lppsq002a systemd[1]: Failed to start LSB: Bring up/down networking.
    Jan 08 17:09:15 lppsq002a systemd[1]: Unit network.service entered failed state.
    Jan 08 17:09:15 lppsq002a systemd[1]: network.service failed.
    Jan 15 11:04:45 lppsq002a systemd[1]: Starting LSB: Bring up/down networking…
    Jan 15 11:04:45 lppsq002a network[55905]: Bringing up loopback interface:  [  OK  ]
    Jan 15 11:04:45 lppsq002a network[55905]: Bringing up interface eth0:  RTNETLINK answers: File exists
    Jan 15 11:04:45 lppsq002a network[55905]: [  OK  ]
    Jan 15 11:04:45 lppsq002a network[55905]: Bringing up interface eth1:  RTNETLINK answers: File exists
    Jan 15 11:04:45 lppsq002a network[55905]: [  OK  ]
    Jan 15 11:04:46 lppsq002a network[55905]: Bringing up interface eth2:  ERROR     : [/etc/sysconfig/network-scripts/ifup-eth] Device eth2 has different MAC address than expected, ignoring.
    Jan 15 11:04:46 lppsq002a network[55905]: [FAILED]
    Jan 15 11:04:46 lppsq002a network[55905]: Bringing up interface eth3:  RTNETLINK answers: File exists
    Jan 15 11:04:46 lppsq002a network[55905]: [  OK  ]
    Jan 15 11:04:46 lppsq002a network[55905]: Bringing up interface eth4:  ERROR     : [/etc/sysconfig/network-scripts/ifup-eth] Device eth4 does not seem to be present, delaying initialization.
    Jan 15 11:04:46 lppsq002a network[55905]: [FAILED]
    Jan 15 11:04:46 lppsq002a network[55905]: Bringing up interface eth5:  RTNETLINK answers: File exists
    Jan 15 11:04:46 lppsq002a network[55905]: [  OK  ]
    Jan 15 11:04:46 lppsq002a network[55905]: Bringing up interface eth6:  RTNETLINK answers: File exists
    Jan 15 11:04:47 lppsq002a network[55905]: [  OK  ]
    Jan 15 11:04:47 lppsq002a network[55905]: Bringing up interface eth7:  RTNETLINK answers: File exists
    Jan 15 11:04:47 lppsq002a network[55905]: [  OK  ]
    Jan 15 11:04:47 lppsq002a network[55905]: RTNETLINK answers: File exists
    Jan 15 11:04:47 lppsq002a network[55905]: RTNETLINK answers: File exists
    Jan 15 11:04:47 lppsq002a network[55905]: RTNETLINK answers: File exists
    Jan 15 11:04:47 lppsq002a network[55905]: RTNETLINK answers: File exists
    Jan 15 11:04:47 lppsq002a network[55905]: RTNETLINK answers: File exists
    Jan 15 11:04:47 lppsq002a network[55905]: RTNETLINK answers: File exists
    Jan 15 11:04:47 lppsq002a network[55905]: RTNETLINK answers: File exists
    Jan 15 11:04:47 lppsq002a network[55905]: RTNETLINK answers: File exists
    Jan 15 11:04:47 lppsq002a network[55905]: RTNETLINK answers: File exists
    Jan 15 11:04:47 lppsq002a systemd[1]: network.service: control process exited, code=exited status=1
    Jan 15 11:04:47 lppsq002a systemd[1]: Failed to start LSB: Bring up/down networking.
    Jan 15 11:04:47 lppsq002a systemd[1]: Unit network.service entered failed state.
    Jan 15 11:04:47 lppsq002a systemd[1]: network.service failed.
    Jan 15 11:08:22 lppsq002a systemd[1]: Starting LSB: Bring up/down networking…
    Jan 15 11:08:22 lppsq002a network[56841]: Bringing up loopback interface:  [  OK  ]
    Jan 15 11:08:22 lppsq002a network[56841]: Bringing up interface eth0:  RTNETLINK answers: File exists
    Jan 15 11:08:22 lppsq002a network[56841]: [  OK  ]
    Jan 15 11:08:26 lppsq002a network[56841]: Bringing up interface eth1:  RTNETLINK answers: File exists
    Jan 15 11:08:26 lppsq002a network[56841]: [  OK  ]
    Jan 15 11:08:26 lppsq002a network[56841]: Bringing up interface eth2:  ERROR     : [/etc/sysconfig/network-scripts/ifup-eth] Device eth2 has different MAC address than expected, ignoring.
    Jan 15 11:08:26 lppsq002a network[56841]: [FAILED]
    Jan 15 11:08:26 lppsq002a network[56841]: Bringing up interface eth3:  RTNETLINK answers: File exists
    Jan 15 11:08:27 lppsq002a network[56841]: [  OK  ]


2020-01-15-15_42_11-root-server


Another useful thing debug arguments is the -xe to do:

# journalctl -xe –no-pager


  • -x (– catalog)
    Augment log lines with explanation texts from the message catalog.
    This will add explanatory help texts to log messages in the output
    where this is available.
  •  -e ( –pager-end )  Immediately jump to the end of the journal inside the implied pager
      tool.

2020-01-15-15_42_32-root-server

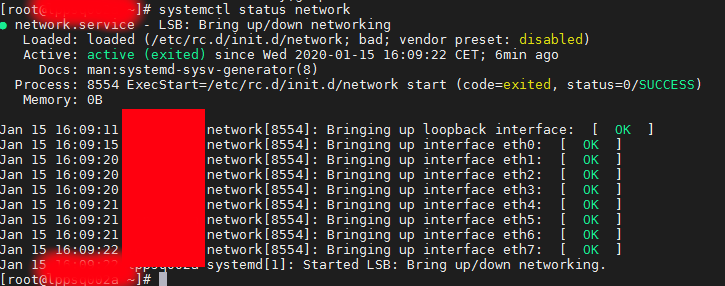
Finally after fixing the /etc/sysconfig/networking-scripts/* IP configuration issues I had all the 8 Ethernet interfaces to work as expected
 

# systemctl status network


2020-01-15-16_15_38-root-server


2. Adding a new IP alias to eth0 interface


Further on I had  to add an IP Alias on the CenOS via its networking configuration, this is done by editing /etc/sysconfig/network-scripts/ifcfg* files.
To create an IP alias for first lan interface eth0, I've had to created a new file named ifcfg-eth0:0
 

linux:~# cd /etc/sysconfig/network-scripts/
linux:~# vim ifcfg-eth0:0


with below content

NAME="eth0:0"
ONBOOT="yes"
BOOTPROTO="none"
IPADDR="10.50.10.5"
NETMASK="255.255.255.0"


Adding this IP address network alias works across all RPM based distributions and should work also on Fedora and Open SuSE as well as Suse Enterprise Linux.
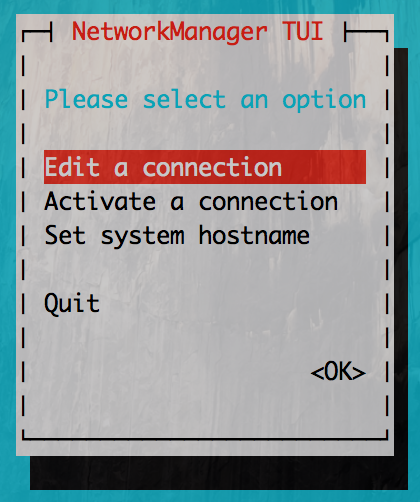
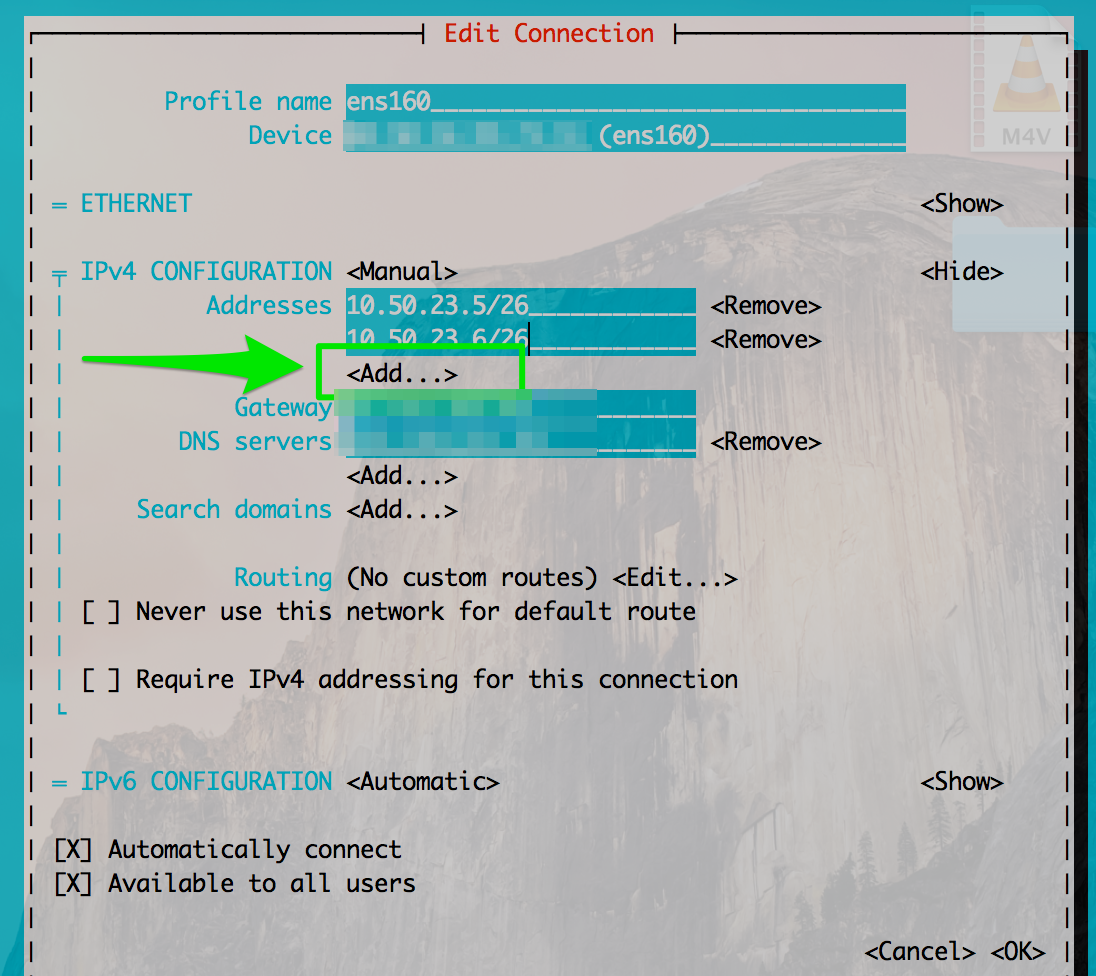
If you however prefer to use a text GUI and do it the CentOS server administration way you can use nmtui (Text User Interface for controlling NetworkManager). tool.
 

linux:~# nmtui


centos7_nmtui-ncurses-network-configuration-sysadmin-tool

nmtui_add_alias_interface-screenshot

How to clear ARP cache on Linux / Windows for a single IP address / Flush All IPs ARP cache

Wednesday, December 11th, 2019

linux-how-to-delete-modify-arp-cache-entries-after-IP-is-migrated-from-one-server-or-VPN-host-to-another-resized

On times of Public Internet IP migration or Local IPs between Linux servers or especially in clustered Linux Application Services running on environments like Pacemaker / Corosync / Heartbeat with services such as Haproxy.
Once an IP gets migrated due to complex network and firewall settings often the Migrated IP from Linux Server 1 (A) to Linux Server 2 (B) keeps time until a request to reload the Internet server IP ARP cache with to point to the new IP location, causing a disruption of accessibility to the Newly configured IP address on the new locations. I will not get much into details here what are the ARP (Address Resolution protocol) and Network ARP records on a Network attached Computer and how they correspond uniquely to each IP address assigned on Ethernet or Aliased network Interfaces (eth0 eth0:1 eth0:2) . But in this article, I'll briefly explain once IP Version 4 address is migrated from one server Data Center location to another DC, how the unique corresponding ARP record kept in OS system memory should be flushed in the ARP corresponding Operating System so called ARP table (of which you should think as a logical block in memory keeping a Map of where IP addresses are located physically on a Network recognized by the corresponding Unique MAC Address.
 

1. List the current ARP cache entries do

Arp is part of net-tools on Debian GNU / Linux and is also available and installed by default on virtually any Linux distribution Fedora / CentOS / RHEL / Ubuntu / Arch Linux and even m$ Windows NT / XP / 2000 / 10 / whatever, the only difference is Linux tool has a bit of more functionality and has a bit more complex use.
Easiest use of arp on GNU / Linux OS-es is.
 

# arp -an 

sample-IP-address-list-with-the-assigned-ARP-cache-mac-addresses
The -a lists all records and -n flag is here to omit IP resolving as some IPs are really slow to resolve and output of command could get lagged.

2. Delete one IP entry from the cache


Assuming only one IP address was migrated, if you want to delete the IP entry from local ARP table on any interface:
 

# arp -d 192.168.0.8


It is useful to delete an ARP cached entry for IP address only on a certain interface, to do so:
 

# /usr/sbin/arp -i eth1 -d 10.0.0.1


3. Create ARP entry MAC address with a static one for tightened security


A useful Hack is to (assign) / bind specific Static MAC addresses to be static in the ARP cache, this is very useful to improve security and fight an ARP poisoning attacks.
Doing so is pretty easy, to do so:

Above will staticly make IP 192.168.0.8 to always appear in the ARP cache table to the MAC 00:50:ba:85:85:ca. So even if we have another system with the same MAC
trying to spoof our location and thus break our real record location for the Hostname in the network holding in reality the MAC 00:50:ba:85:85:ca, poisoning us
trying to make our host to recognize 192.168.0.8 to a different address this will not happen as the static ARP will be kept unchanged in ARP caching table.


 # arp -s 192.168.0.8 00:50:ba:85:85:ca


4. Flush all ARP records only for specific Ethernet Interface


After the IP on interface was migrated run:


# ip link set arp off dev eth0 ; ip link set arp on dev eth0


5. Remove a set of few IPs only migrated ARP cache entries


# for i in 192.168.0.1 10.0.0.1 172.168.0.3; do sudo arp -d $i; done


Once old ARP entries are removed the arp command would return as:


linux:~$ arp
? (192.168.0.8) at <incomplete>  on eth1
? (172.168.0.3) at <incomplete>  on eth2


The 192.168.0.8 / 172.168.0.3 entry now shows as incomplete, which means the ARP entry will be refreshed when it is needed again, this would also depend
on the used network switches / firewalls in the network settings so often could take up to 1 minute or so..


6. Flush all ARP table records on Linux

flush-all-arp-cache-addresses-on-linux-howto-with-ip-command


# ip -s -s neigh flush all


7. Delete ARP Cache on FreeBSD and other BSDs

# arp -d -a 


8.  Flush arp cache on Windows

Run command prompt as Administrator -> (cmd.exe)  and do:

C:\> ipconfig /all
netsh interface ip delete arpcache


9. Monitoring the arp table


On servers with multiple IP addresses, where you expect a number of IP addresses migrated to change it is useful to use watch + arp like so:
 

# watch -n 0.1 'arp -an'

The -n 0.1 will make the arp -an be rerun every 10 miliseconds and by the way is a useful trick to monitor stuff returned by commands that needs a higher refresh frequency.
 

Conclusion


In short in this article, was explained how to list your arp cache table.The arp command is also available both on Linux and Windows) and as integral part of OS networking it is useful to check thoroghfully to its man page (man arp).
Explained was how to create Static ARP table records to prevent ARP poisoning attacks on a server.
I went through how to delete only a single ARP records (in case if) only certain IPs on a host are changed and an ARP cache entry reload is needed, as well as how to flush the complete set of ARP records need to get refreshed, sometimes useful on networks with Buggy Network Switches or when completely changing the set of IP-addresses assigned on a server host.

Rsync copy files with root privileges between servers with root superuser account disabled

Tuesday, December 3rd, 2019


rsync-copy-files-between-two-servers-with-root-privileges-with-root-superuser-account-disabled

Sometimes on servers that follow high security standards in companies following PCI Security (Payment Card Data Security) standards it is necessery to have a very weird configurations on servers,to be able to do trivial things such as syncing files between servers with root privileges in a weird manners.This is the case for example if due to security policies you have disabled root user logins via ssh server and you still need to synchronize files in directories such as lets say /etc , /usr/local/etc/ /var/ with root:root user and group belongings.

Disabling root user logins in sshd is controlled by a variable in /etc/ssh/sshd_config that on most default Linux OS
installations is switched on, e.g. 

grep -i permitrootlogin /etc/ssh/sshd_config
PermitRootLogin yes


Many corporations use Vulnerability Scanners such as Qualys are always having in their list of remote server scan for SSH Port 22 to turn have the PermitRootLogin stopped with:


PermitRootLogin no


In this article, I'll explain a scenario where we have synchronization between 2 or more servers Server A / Server B, whatever number of servers that have already turned off this value, but still need to
synchronize traditionally owned and allowed to write directories only by root superuser, here is 4 easy steps to acheive it.


1. Add rsyncuser to Source Server (Server A) and Destination (Server B)


a. Execute on Src Host:


groupadd rsyncuser
useradd -g 1000 -c 'Rsync user to sync files as root src_host' -d /home/rsyncuser -m rsyncuser


b. Execute on Dst Host:


groupadd rsyncuser
useradd -g 1000 -c 'Rsync user to sync files dst_host' -d /home/rsyncuser -m rsyncuser


2. Generate RSA SSH Key pair to be used for passwordless authentication


a. On Src Host
 

su – rsyncuser

ssh-keygen -t rsa -b 4096


b. Check .ssh/ generated key pairs and make sure the directory content look like.


[rsyncuser@src-host .ssh]$ cd ~/.ssh/;  ls -1

id_rsa
id_rsa.pub
known_hosts


3. Copy id_rsa.pub to Destination host server under authorized_keys


scp ~/.ssh/id_rsa.pub  rsyncuser@dst-host:~/.ssh/authorized_keys


Next fix permissions of authorized_keys file for rsyncuser as anyone who have access to that file (that exists as a user account) on the system
could steal the key and use it to run rsync commands and overwrite remotely files, like overwrite /etc/passwd /etc/shadow files with his custom crafted credentials
and hence hack you 🙂
 

Hence, On Destionation Host Server B fix permissions with:
 

su – rsyncuser; chmod 0600 ~/.ssh/authorized_keys
[rsyncuser@dst-host ~]$


An alternative way for the lazy sysadmins is to use the ssh-copy-id command


$ ssh-copy-id rsyncuser@192.168.0.180
/usr/bin/ssh-copy-id: INFO: Source of key(s) to be installed: "/root/.ssh/id_rsa.pub"
/usr/bin/ssh-copy-id: INFO: attempting to log in with the new key(s), to filter out any that are already installed
/usr/bin/ssh-copy-id: INFO: 1 key(s) remain to be installed — if you are prompted now it is to install the new keys
root@192.168.0.180's password: 


For improved security here to restrict rsyncuser to be able to run only specific command such as very specific script instead of being able to run any command it is good to use little known command= option
once creating the authorized_keys


4. Test ssh passwordless authentication works correctly


For that Run as a normal ssh from rsyncuser

On Src Host


[rsyncuser@src-host ~]$ ssh rsyncuser@dst-host


Perhaps here is time that for those who, think enabling a passwordless authentication is not enough secure and prefer to authorize rsyncuser via a password red from a secured file take a look in my prior article how to login to remote server with password provided from command line as a script argument / Running same commands on many servers 

5. Enable rsync in sudoers to be able to execute as root superuser (copy files as root)


For this step you will need to have sudo package installed on the Linux server.

Then, Execute once logged in as root on Destionation Server (Server B)


[root@dst-host ~]# grep 'rsyncuser ALL' /etc/sudoers|wc -l || echo ‘rsyncuser ALL=NOPASSWD:/usr/bin/rsync’ >> /etc/sudoers


Note that using rsync with a ALL=NOPASSWD in /etc/sudoers could pose a high security risk for the system as anyone authorized to run as rsyncuser is able to overwrite and
respectivle nullify important files on Destionation Host Server B and hence easily mess the system, even shell script bugs could produce a mess, thus perhaps a better solution to the problem
to copy files with root privileges with the root account disabled is to rsync as normal user somewhere on Dst_host and use some kind of additional script running on Dst_host via lets say cron job and
will copy gently files on selective basis.

Perhaps, even a better solution would be if instead of granting ALL=NOPASSWD:/usr/bin/rsync in /etc/sudoers is to do ALL=NOPASSWD:/usr/local/bin/some_copy_script.sh
that will get triggered, once the files are copied with a regular rsyncuser acct.


6. Test rsync passwordless authentication copy with superuser works


Do some simple copy, lets say copy files on Encrypted tunnel configurations located under some directory in /etc/stunnel on Server A to /etc/stunnel on Server B

The general command to test is like so:
 

rsync -aPz -e 'ssh' '–rsync-path=sudo rsync' /var/log rsyncuser@$dst_host:/root/tmp/


This will copy /var/log files to /root/tmp, you will get a success messages for the copy and the files will be at destination folder if succesful.


On Src_Host run:


[rsyncuser@src-host ~]$ dst=FQDN-DST-HOST; user=rsyncuser; src_dir=/etc/stunnel; dst_dir=/root/tmp;  rsync -aP -e 'ssh' '–rsync-path=sudo rsync' $src_dir  $rsyncuser@$dst:$dst_dir;


7. Copying files with root credentials via script


The simlest file to use to copy a bunch of predefined files  is best to be handled by some shell script, the most simple version of it, could look something like this.
 

#!/bin/bash
# On server1 use something like this
# On server2 dst server
# add in /etc/sudoers
# rsyncuser ALL=NOPASSWD:/usr/bin/rsync

user='rsyncuser';

dst_dir="/root/tmp";
dst_host='$dst_host';
src[1]="/etc/hosts.deny";
src[2]="/etc/sysctl.conf";
src[3]="/etc/samhainrc";
src[4]="/etc/pki/tls/";
src[5]="/usr/local/bin/";


for i in $(echo ${src[@]}); do
rsync -aPvz –delete –dry-run -e 'ssh' '–rsync-path=sudo rsync' "$i" $rsyncuser@$dst_host:$dst_dir"$i";
done


In above script as you can see, we define a bunch of files that will be copied in bash array and then run a loop to take each of them and copy to testination dir.
A very sample version of the script rsync_with_superuser-while-root_account_prohibited.sh 
 

Conclusion


Lets do short overview on what we have done here. First Created rsyncuser on SRC Server A and DST Server B, set up the key pair on both copied the keys to make passwordless login possible,
set-up rsync to be able to write as root on Dst_Host / testing all the setup and pinpointing a small script that can be used as a backbone to develop something more complex
to sync backups or keep system configurations identicatial – for example if you have doubts that some user might by mistake change a config etc.
In short it was pointed the security downsides of using rsync NOPASSWD via /etc/sudoers and few ideas given that could be used to work on if you target even higher
PCI standards.


Scanning ports with netcat “nc” command on Linux and UNIX / Checking for firewall filtering between source and destination with nc

Friday, September 6th, 2019

scanning-ports-with-netcat-nc-command-on-Linux-and-UNIX-checking-for-firewall-filtering-between-source-destination-host-with-netcat

Netcat ( nc ) is one of that tools, that is well known in the hacker (script kiddie) communities, but little underestimated in the sysadmin world, due to the fact nmap (network mapper) – the network exploratoin and security auditing tool has become like the standard penetration testing TCP / UDP port tool
 

nc is feature-rich network debugging and investigation tool with tons of built-in capabilities for reading from and writing to network connections using TCP or UDP.

Its Plethora of features includes port listening, port scanning & Transferring files due to which it is often used by Hackers and PenTesters as Backdoor. Netcat was written by a guy we know as the Hobbit <hobbit@avian.org>.

For a start-up and middle sized companies if nmap is missing on server usually it is okay to install it without risking to open a huge security hole, however in Corporate world, due to security policies often nmap is not found on the servers but netcat (nc) is present on the servers so you have to learn, if you haven't so to use netcat for the usual IP range port scans, if you're so used to nmap.

There are different implementations of Netcat, whether historically netcat was UNIX (BSD) program with a latest release of March 1996. The Linux version of NC is GNU Netcat (official source here) and is POSIX compatible. The other netcat in Free Software OS-es is OpenBSD's netcat whose ported version is also used in FreeBSD. Mac OS X also comes with default prebundled netcat on its Mac OS X from OS X version (10.13) onwards, on older OS X-es it is installable via MacPorts package repo, even FreeDOS has a port of it called NTOOL.

The (Swiss Army Knife of Embedded Linux) busybox includes a default leightweight version of netcat and Solaris has the OpenBSD netcat version bundled.

A cryptography enabled version fork exists that supports that supports integrated transport encryption capabilities called Cryptcat.

The Nmap suite also has included rewritten version of GNU Netcat named Ncat, featuring new possibilities such as "Connection Brokering", TCP/UDP Redirection, SOCKS4 client and server support, ability to "Chain" Ncat processes, HTTP CONNECT proxying (and proxy chaining), SSL connect/listen support and IP address/connection filtering. Just like Nmap, Ncat is cross-platform.

In this small article I'll very briefly explain on basic netcat – known as the TCP Army knife tool port scanning for an IP range of UDP / TCP ports.


1. Scanning for TCP opened / filtered ports remote Linux / Windows server


Everyone knows scanning of a port is possible with a simple telnet request towards the host, e.g.:

telnet SMTP.EMAIL-HOST.COM 25


The most basic netcat use that does the same is achiavable with:


$ nc SMTP.EMAIL-HOST.COM 25
220 jeremiah ESMTP Exim 4.92 Thu, 05 Sep 2019 20:39:41 +0300


Beside scanning the remote port, using netcat interactively as pointing in above example, if connecting to HTTP Web services, you can request remote side to return a webpage by sending a false referer, source host and headers, this is also easy doable with curl / wget and lynx but doing it with netcat just like with telnet could be fun, here is for example how to request an INDEX page with spoofed HTTP headers.
 

nc Web-Host.COM 25
GET / HTTP/1.1
Host: spoofedhost.com
Referrer: mypage.com
User-Agent: my-spoofed-browser


2. Performing a standard HTTP request with netcat


To do so just pype the content with a standard bash integrated printf function with the included end of line (the unix one is \n but to be OS independent it is better to use r\n  – the end of line complition character for Windows.


printf "GET /index.html HTTP/1.0\r\nHost: www.pc-freak.net\r\n\r\n" | nc www.pc-freak.net 80


3. Scanning a range of opened / filtered UDP ports


To scan for lets say opened remote system services on the very common important ports opened from UDP port 25 till, 1195 – more specifically for:

  • UDP Bind Port 53
  • Time protocol Port (37)
  • TFTP (69)
  • Kerberos (88)
  • NTP 123
  • Netbios (137,138,139)
  • SNMP (161)
  • LDAP 389
  • Microsoft-DS (Samba 445)
  • Route BGP (52)
  • LDAPS (639)
  • openvpn (1194)


nc -vzu 192.168.0.1 25 1195


UDP tests will show opened, if no some kind of firewall blocking, the -z flag is given to scan only for remote listening daemons without sending any data to them.


4. Port Scanning TCP listening ports with Netcat


As prior said using netcat to scan for remote opened HTTP Web Server on port 80 an FTP on Port 23 or a Socks Proxy or MySQL Database on 3306 / PostgreSQL DB on TCP 5432 is very rare case scenario.

Below is example to scan a Local network situated IP for TCP open ports from port 1 till 7000.


# nc -v -n -z -w 5 192.168.1.2 1-7000

           nc: connect to host.example.com 80 (tcp) failed: Connection refused
           nc: connect to host.example.com 20 (tcp) failed: Connection refused
           Connection to host.example.com port [tcp/ssh] succeeded!
           nc: connect to host.example.com 23 (tcp) failed: Connection refused


Be informed that scanning with netcat is much more slower, than nmap, so specifying smaller range of ports is always a good idea to reduce annoying waiting …


The -w flag is used to set a timeout to remote connection, usually on a local network situated machines the timeout could be low -w 1 but for machines across different Data Centers (let say one in Berlin and one in Seattle), use as a minimum -w 5.

If you expect remote service to be responsive (as it should always be), it is a nice idea to use netcat with a low timeout (-w) value of 1 below is example:
 

netcat -v -z -n -w 1 scanned-hosts 1-1023


5. Port scanning range of IP addresses with netcat


If you have used Nmap you know scanning for a network range is as simple as running something like nmap -sP -P0 192.168.0.* (to scan from IP range 1-255 map -sP -P0 192.168.0.1-150 (to scan from local IPs ending in 1-150) or giving the network mask of the scanned network, e.g. nmap -sF 192.168.0.1/24 – for more examples please check my previous article Checking port security on Linux with nmap (examples).

But what if nmap is not there and want to check a bunch 10 Splunk servers (software for searching, monitoring, and analyzing machine-generated big data, via a Web-style interface.), with netcat to find, whether the default Splunk connection port 9997 is opened or not:


for i in `seq 1 10`; do nc -z -w 5 -vv splunk0$i.server-domain.com 9997; done


6. Checking whether UDP port traffic is allowed to destination server


Assuring you have access on Source traffic (service) Host A  and Host B (remote destination server where a daemon will be set-upped to listen on UDP port and no firewall in the middle Network router or no traffic control and filtering software HUB is preventing the sent UDP proto traffic, lets say an ntpd will be running on its standard 123 port there is done so:

– On host B (the remote machine which will be running ntpd and should be listening on port 123), run netcat to listen for connections


# nc -l -u -p 123
Listening on [0.0.0.0] (family 2, port 123)


Make sure there is no ntpd service actively running on the server, if so stop it with /etc/init.d/ntpd stop
and run above command. The command should run as superuser as UDP port 123 is from the so called low ports from 1-1024 and binding services on such requires root privileges.

– On Host A (UDP traffic send host


nc -uv remote-server-host 123


netcat-linux-udp-connection-succeeded

If the remote port is not reachable due to some kind of network filtering, you will get "connection refused".
An important note to make is on some newer Linux distributions netcat might be silently trying to connect by default using IPV6, bringing false positives of filtered ports due to that. Thus it is generally a good idea, to make sure you're connecting to IPV6


$ nc -uv -4 remote-server-host 123


Another note to make here is netcat's UDP connection takes 2-3 seconds, so make sure you wait at least 4-8 seconds for a very distant located hosts that are accessed over a multitude of routers.
 

7. Checking whether TCP port traffic allowed to DST remote server


To listen for TCP connections on a specified location (external Internet IP or hostname), it is analogous to listening for UDP connections.

Here is for example how to bind and listen for TCP connections on all available Interface IPs (localhost, eth0, eth1, eth2 etc.)
 

nc -lv 0.0.0.0 12345


Then on client host test the connection with


nc -vv 192.168.0.103 12345
Connection to 192.168.0.103 12345 port [tcp/*] succeeded!


8. Proxying traffic with netcat


Another famous hackers use of Netcat is its proxying possibility, to proxy anything towards a third party application with UNIX so any content returned be printed out on the listening nc spawned daemon like process.
For example one application is traffic SMTP (Mail traffic) with netcat, below is example of how to proxy traffic from Host B -> Host C (in that case the yandex current mail server mx.yandex.ru)

linux-srv:~# nc -l 12543 | nc mx.yandex.ru 25


Now go to Host A or any host that has TCP/IP protocol access to port 12543 on proxy-host Host B (linux-srv) and connect to it on 12543 with another netcat or telnet.

to make netcat keep connecting to yandex.ru MX (Mail Exchange) server you can run it in a small never ending bash shell while loop, like so:


linux-srv:~# while :; do nc -l 12543 | nc mx.yandex.ru 25; done


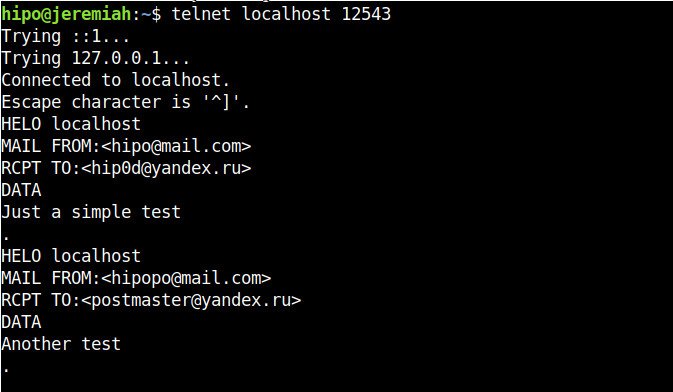
 Below are screenshots of a connection handshake between Host B (linux-srv) proxy host and Host A (the end client connecting) and Host C (mx.yandex.ru).

host-B-running-as-a-proxy-daemon-towards-Host-C-yandex-mail-exchange-server


Host B netcat as a (Proxy)

Host-A-Linux-client-connection-handshake-to-proxy-server-with-netcat
that is possible in combination of UNIX and named pipes (for more on Named pipes check my previous article simple linux logging with named pipes), here is how to run a single netcat version to proxy any traffic in a similar way as the good old tinyproxy.

On Proxy host create the pipe and pass the incoming traffic towards google.com and write back any output received back in the named pipe.
 

# mkfifo backpipe
# nc -l 8080 0<backpipe | nc www.google.com 80 1>backpipe

Other useful netcat proxy set-up is to simulate a network connectivity failures.

For instance, if server:port on TCP 1080 is the normal host application would connect to, you can to set up a forward proxy from port 2080 with

    nc -L server:1080 2080

then set-up and run the application to connect to localhost:2080 (nc proxy port)

    /path/to/application_bin –server=localhost –port=2080

Now application is connected to localhost:2080, which is forwarded to server:1080 through netcat. To simulate a network connectivity failure, just kill the netcat proxy and check the logs of application_bin.

Using netcat as a bind shell (make any local program / process listen and deliver via nc)


netcat can be used to make any local program that can receive input and send output to a server, this use is perhaps little known by the junior sysadmin, but a favourite use of l337 h4x0rs who use it to spawn shells on remote servers or to make connect back shell. The option to do so is -e

-e – option spawns the executable with its input and output redirected via network socket.

One of the most famous use of binding a local OS program to listen and receive / send content is by
making netcat as a bind server for local /bin/bash shell.

Here is how

nc -l -p 4321 -e /bin/sh


If necessery specify the bind hostname after -l. Then from any client connect to 4321 (and if it is opened) you will gain a shell with the user with which above netcat command was run. Note that many modern distribution versions such as Debian / Fedora / SuSE Linux's netcat binary is compiled without the -e option (this works only when compiled with -DGAPING_SECURITY_HOLE), removal in this distros is because option is potentially opening a security hole on the system.

If you're interested further on few of the methods how modern hackers bind new backdoor shell or connect back shell, check out Spawning real tty shells article.


For more complex things you might want to check also socat (SOcket CAT) – multipurpose relay for bidirectional data transfer under Linux.
socat is a great Linux Linux / UNIX TCP port forwarder tool similar holding the same spirit and functionality of netcat plus many, many more.
 

On some of the many other UNIX operating systems that are lacking netcat or nc / netcat commands can't be invoked a similar utilitiesthat should be checked for and used instead are:

ncat, pnetcat, socat, sock, socket, sbd

To use nmap's ncat to spawn a shell for example that allows up to 3 connections and listens for connects only from 192.168.0.0/24 network on port 8081:

ncat –exec "/bin/bash" –max-conns 3 –allow 192.168.0.0/24 -l 8081 –keep-open


9. Copying files over network with netcat


Another good hack often used by hackers to copy files between 2 servers Server1 and Server2 who doesn't have any kind of FTP / SCP / SFTP / SSH / SVN / GIT or any kind of Web copy support service – i.e. servers only used as a Database systems that are behind a paranoid sysadmin firewall is copying files between two servers with netcat.

On Server2 (the Machine on which you want to store the file)
 

nc -lp 2323 > files-archive-to-copy.tar.gz


On server1 (the Machine from where file is copied) run:
 

nc -w 5 server2.example.com 2323 < files-archive-to-copy.tar.gz


Note that the downside of such transfers with netcat is data transferred is unencrypted so any one with even a simple network sniffer or packet analyzier such as iptraf or tcpdump could capture the file, so make sure the file doesn't contain sensitive data such as passwords.

Copying partition images like that is perhaps best way to get disk images from a big server onto a NAS (when you can't plug the NAS into the server).
 

10. Copying piped archived directory files with netcat


On computer A:

export ARIBTRARY_PORT=3232
nc -l $ARBITRARY_PORT | tar vzxf –

On Computer B:

tar vzcf – files_or_directories | nc computer_a $ARBITRARY_PORT


11. Creating a one page webserver with netcat and ncat


As netcat could listen to port and print content of a file, it can be set-up with a bit of bash shell scripting to serve
as a one page webserver, or even combined with some perl scripting and bash to create a multi-serve page webserver if needed.

To make netact serve a page to any connected client run in a screen / tmux session following code:


while true; do nc -l -p 80 -q 1 < somepage.html; done


Another interesting fun example if you have installed ncat (is a small web server that connects current time on server on connect).
 

ncat -lkp 8080 –sh-exec 'echo -ne "HTTP/1.0 200 OK\r\n\r\nThe date is "; date;'


12. Cloning Hard disk partitions with netcat


rsync is a common tool used to clone hard disk partitions over network. However if rsync is not installed on a server and netcat is there you can use it instead, lets say we want to clone /dev/sdb
from Server1 to Server2 assuming (Server1 has a configured working Local or Internet connection).


On Server2 run:
 

nc -l -p 4321 | dd of=/dev/sdb


Following on Server2 to start the Partition / HDD cloning process run


dd if=/dev/sdb | nc 192.168.0.88 4321


Where 192.168.0.88 is the IP address listen configured on Server2 (in case you don't know it, check the listening IP to access with /sbin/ifconfig).

Next you have to wait for some short or long time depending on the partiiton or Hard drive, number of files / directories and allocated disk / partition size.

To clone /dev/sda (a main partiiton) from Server1 to Server2 first requirement is that it is not mounted, thus to have it unmounted on a system assuming you have physical access to the host, you can boot some LiveCD Linux distribution such as Knoppix Live CD on Server1, manually set-up networking with ifconfig or grab an IP via DHCP from the central DHCP server and repeat above example.


Happy netcating 🙂

Fix staled NFS on server with dmesg error log nfs: server nfs-server not responding, still trying

Saturday, March 16th, 2019

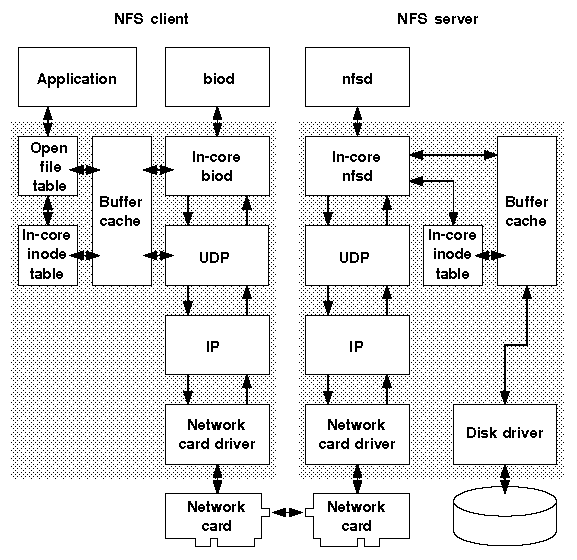
NFS_Filesystem-fix-staled-NFS-System-dmesg-error-nfs-server-not-responding-still-trying

On a server today I've found to have found a number of NFS mounts mounted through /etc/fstab file definitions that were hanging;
 

nfs-server:~# df -hT


 command kept hanging as well as any attempt to access the mounted NFS directory was not possible.
The server with the hanged Network File System is running SLES (SuSE Enterprise Linux 12 SP3) a short investigation in the kernel logs (dmesg) as well as /var/log/messages reveales following errors:


nfs-server:~# dmesg
[3117414.856995] nfs: server nfs-server OK
[3117595.104058] nfs: server nfs-server not responding, still trying
[3117625.032864] nfs: server nfs-server OK
[3117805.280036] nfs: server nfs-server not responding, still trying
[3117835.209110] nfs: server nfs-server OK
[3118015.456045] nfs: server nfs-server not responding, still trying
[3118045.384930] nfs: server nfs-server OK
[3118225.568029] nfs: server nfs-server not responding, still trying
[3118255.560536] nfs: server nfs-server OK
[3118435.808035] nfs: server nfs-server not responding, still trying
[3118465.736463] nfs: server nfs-server OK
[3118645.984057] nfs: server nfs-server not responding, still trying
[3118675.912595] nfs: server nfs-server OK
[3118886.098614] nfs: server nfs-server OK
[3119066.336035] nfs: server nfs-server not responding, still trying
[3119096.274493] nfs: server nfs-server OK
[3119276.512033] nfs: server nfs-server not responding, still trying
[3119306.440455] nfs: server nfs-server OK
[3119486.688029] nfs: server nfs-server not responding, still trying
[3119516.616622] nfs: server nfs-server OK
[3119696.864032] nfs: server nfs-server not responding, still trying
[3119726.792650] nfs: server nfs-server OK
[3119907.040037] nfs: server nfs-server not responding, still trying
[3119936.968691] nfs: server nfs-server OK
[3120117.216053] nfs: server nfs-server not responding, still trying
[3120147.144476] nfs: server nfs-server OK
[3120328.352037] nfs: server nfs-server not responding, still trying
[3120567.496808] nfs: server nfs-server OK
[3121370.592040] nfs: server nfs-server not responding, still trying
[3121400.520779] nfs: server nfs-server OK
[3121400.520866] nfs: server nfs-server OK


It took me a short while to investigate and check the NetApp remote NFS storage filesystem and investigate the Virtual Machine that is running on top of OpenXen Hypervisor system.
The NFS storage permissions of the exported file permissions were checked and they were in a good shape, also a reexport of the NFS mount share was re-exported and on the Linux
mount host the following commands ran to remount the hanged Filesystems:


nfs-server:~# umount -f /mnt/nfs_share
nfs-server:~# umount -l /mnt/nfs_share
nfs-server:~# umount -lf /mnt/nfs_share1
nfs-server:~# umount -lf /mnt/nfs_share2
nfs-server:~# mount -t nfs -o remount /mnt/nfs_share


that fixed one of the hanged mount, but as I didn't wanted to manually remount each of the NFS FS-es, I've remounted them all with:

nfs-server:~# mount -a -t nfs


This solved it but, the fix seemed unpermanent as in a time while the issue started reoccuring and I've spend some time
in further investigation on the weird NFS hanging problem has led me to the following blog post where the same problem was described and it was pointed the root cause of it lays
in parameter for MTU which seems to be quite high MTU 9000 and this over the years has prooven to cause problems with NFS especially due to network router (switches) configurations
which seem to have a filters for MTU and are passing only packets with low MTU levels and using rsize / wzise custom mount NFS values in /etc/fstab could lead to this strange NFS hangs.

Below is a list of Maximum Transmission  Unit (MTU) for Media Transport excerpt taken from wikipedia as of time of writting this article.

https://www.pc-freak.net/images/Maximum-Transmission-Unit-for-Media-Transport-diagram-3.png

In my further research on the issue I've come across this very interesting article which explains a lot on "Large Internet" and Internet Performance

I've used tracepath command which is doing basicly the same as traceroute but could be run without root user and discovers hops (network routers) and shows MTU between path -> destionation.

Below is a sample example

nfs-server:~# tracepath bergon.net
 1?: [LOCALHOST]                      pmtu 1500
 1:  192.168.6.1                                           0.909ms
 1:  192.168.6.1                                           0.966ms
 2:  192.168.222.1                                         0.859ms
 3:  6.192.104.109.bergon.net                              1.138ms reached
     Resume: pmtu 1500 hops 3 back 3


Optiomal pmtu for this connection is to be 1500 .traceroute in some cases might return hops with 'no reply' if there is a router UDP  packet filtering implemented on it.

The high MTU value for the Storage network connection interface on eth1 was evident with a simple:


 nfs-server:~# /sbin/ifconfig |grep -i eth -A 2
eth0      Link encap:Ethernet  HWaddr 00:16:3E:5C:65:74
          inet addr:100.127.108.56  Bcast:100.127.109.255  Mask:255.255.254.0
          UP BROADCAST RUNNING MULTICAST  MTU:1500  Metric:1

eth1      Link encap:Ethernet  HWaddr 00:16:3E:5C:65:76
          inet addr:100.96.80.94  Bcast:100.96.83.255  Mask:255.255.252.0
          UP BROADCAST RUNNING MULTICAST  MTU:9000  Metric:1


The fix was as simple to lower MTU value for eth1 Ethernet interface to 1500 which is the value which most network routers are configured too.

To apply the new MTU to the eth1 interface without restarting the SuSE SLES networking , I first used ifconfig one time with:


 nfs-server:~# /sbin/ifconfig eth1 mtu 1500
 nfs-server:~# ip addr show
 …


To make the setting permanent on next  SuSE boot:

I had to set the MTU=1500 value in


nfs-server:~#/etc/sysconfig/network/ifcfg-eth1
nfs-server:~#  ip address show eth1
3: eth1: <BROADCAST,MULTICAST,UP,LOWER_UP> mtu 1500 qdisc pfifo_fast state UP group default qlen 1000
    link/ether 8c:89:a5:f2:e8:d8 brd ff:ff:ff:ff:ff:ff
    inet 192.168.0.1/24 brd 192.168.0.255 scope global eth1
       valid_lft forever preferred_lft forever


Then to remount the NFS mounted hanged filesystems once again ran:
 

nfs-server:~# mount -a -t nfs


Many network routers keeps the MTU to low as 1500 also because a higher values causes IP packet fragmentation when using NFS over UDP where IP packet fragmentation and packet
reassembly requires significant amount of CPU at both ends of the network connection.
Packet fragmentation also exposes network traffic to greater unreliability, since a complete RPC request must be retransmitted if a UDP packet fragment is dropped for any reason.
Any increase of RPC retransmissions, along with the possibility of increased timeouts, are the single worst impediment to performance for NFS over UDP.
This and many more is very well explained in Optimizing NFS Performance page (which is a must reading) for any sys admin that plans to use NFS frequently.

Even though lowering MTU (Maximum Transmission Union) value does solved my problem at some cases especially in a modern local LANs with Jumbo Frames, allowing and increasing the MTU to 9000 bytes
might be a good idea as this will increase the amount of packet size.and will raise network performance, however as always on distant networks with many router hops keeping MTU value as low as 1492 / 5000 is always a good idea.


Automatic network restart and reboot Linux server script if ping timeout to gateway is not responding as a way to reduce connectivity downtimes

Monday, December 10th, 2018

automatic-server-network-restart-and-reboot-script-if-connection-to-server-gateway-inavailable-tux-penguing-ascii-art-bin-bash

Inability of server to come back online server automaticallyafter electricity / network outage

These days my home server  is experiencing a lot of issues due to Electricity Power Outages, a construction dig operations to fix / change waterpipe tubes near my home are in action and perhaps the power cables got ruptered by the digger machine.
The effect of all this was that my server networking accessability was affected and as I didn't have network I couldn't access it remotely anymore at a certain point the electricity was restored (and the UPS charge could keep the server up), however the server accessibility did not due restore until I asked a relative to restart it or under a more complicated cases where Tech aquanted guy has to help – Alexander (Alex) a close friend from school years check his old site here – alex.www.pc-freak.net helps a lot.to restart the machine physically either run a quick restoration commands on root TTY terminal or generally do check whether default router is reachable.

This kind of Pc-Freak.net downtime issues over the last month become too frequent (the machine was down about 5 times for 2 to 5 hours and this was too much (and weirdly enough it was not accessible from the internet even after electricity network was restored and the only solution to that was a physical server restart (from the Power Button).

To decrease the number of cases in which known relatives or friends has to  physically go to the server and restart it, each time after network or electricity outage I wrote a small script to check accessibility towards Default defined Network Gateway for my server with few ICMP packages sent with good old PING command
and trigger a network restart and system reboot
(in case if the network restart does fail) in a row.

1. Create reboot-if-nwork-is-downsh script under /usr/sbin or other dir

Here is the script itself:


#!/bin/sh
# Script checks with ping 5 ICMP pings 10 times to DEF GW and if so
# triggers networking restart /etc/inid.d/networking restart
# Then does another 5 x 10 PINGS and if ping command returns errors,
# Reboots machine
# This script is useful if you run home router with Linux and you have
# electricity outages and machine doesn't go up if not rebooted in that case

GATEWAY_HOST='192.168.0.1';

run_ping () {
for i in $(seq 1 10); do
    ping -c 5 $GATEWAY_HOST
done

}

reboot_f () {
if [ $? -eq 0 ]; then
        echo "$(date "+%Y-%m-%d %H:%M:%S") Ping to $GATEWAY_HOST OK" >> /var/log/reboot.log
    else
    /etc/init.d/networking restart
        echo "$(date "+%Y-%m-%d %H:%M:%S") Restarted Network Interfaces:" >> /tmp/rebooted.txt
    for i in $(seq 1 10); do ping -c 5 $GATEWAY_HOST; done
    if [ $? -eq 0 ] && [ $(cat /tmp/rebooted.txt) -lt ‘5’ ]; then
         echo "$(date "+%Y-%m-%d %H:%M:%S") Ping to $GATEWAY_HOST FAILED !!! REBOOTING." >> /var/log/reboot.log
        /sbin/reboot

    # increment 5 times until stop
    [[ -f /tmp/rebooted.txt ]] || echo 0 > /tmp/rebooted.txt
    n=$(< /tmp/rebooted.txt)
        echo $(( n + 1 )) > /tmp/rebooted.txt
    fi
    # if 5 times rebooted sleep 30 mins and reset counter
    if [ $(cat /tmprebooted.txt) -eq ‘5’ ]; then
    sleep 1800
        cat /dev/null > /tmp/rebooted.txt
    fi
fi

}
run_ping;
reboot_f;

You can download a copy of reboot-if-nwork-is-down.sh script here.

As you see in script successful runs  as well as its failures are logged on server in /var/log/reboot.log with respective timestamp.
Also a counter to 5 is kept in /tmp/rebooted.txt, incremented on each and every script run (rebooting) if, the 5 times increment is matched

a sleep is executed for 30 minutes and the counter is being restarted.
The counter check to 5 guarantees the server will not get restarted if access to Gateway is not continuing for a long time to prevent the system is not being restarted like crazy all time.
 

2. Create a cron job to run reboot-if-nwork-is-down.sh every 15 minutes or so 

I've set the script to re-run in a scheduled (root user) cron job every 15 minutes with following  job:

To add the script to the existing cron rules without rewriting my old cron jobs and without tempering to use cronta -u root -e (e.g. do the cron job add in a non-interactive mode with a single bash script one liner had to run following command:


{ crontab -l; echo "*/15 * * * * /usr/sbin/reboot-if-nwork-is-down.sh 2>&1 >/dev/null; } | crontab –


I know restarting a server to restore accessibility is a stupid practice but for home-use or small client servers with unguaranteed networks with a cheap Uninterruptable Power Supply (UPS) devices it is useful.

Summary

Time will show how efficient such a  "self-healing script practice is.
Even though I'm pretty sure that even in a Corporate businesses and large Public / Private Hybrid Clouds where access to remote mounted NFS / XFS / ZFS filesystems are failing a modifications of the script could save you a lot of nerves and troubles and unhappy customers / managers screaming at you on the phone 🙂


I'll be interested to hear from others who have a better  ideas to restore ( resurrect ) access to inessible Linux server after an outage.?
 

How to make Reverse SSH Tunnel to servers behind NAT

Thursday, October 11th, 2018

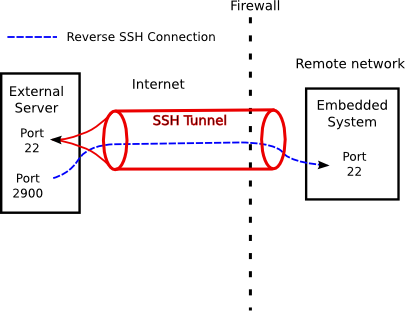
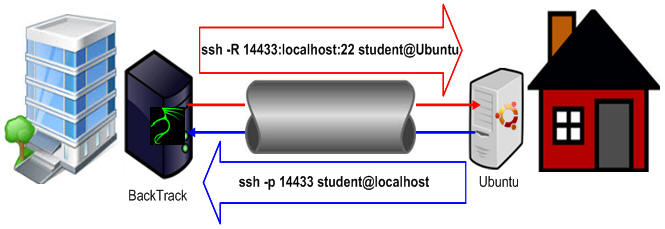
create-reverse-ssh-tunnel-reverse_ssh_diagram-connection

Those who remember the times of IRC chatting long nights and the need to be c00l guy and enter favorite IRC server through a really bizarre hostname, you should certainly remember the usefulness of Reverse SSH Tunnels to appear in IRC /whois like connecting from a remote host (mask yourself) from other IRC guys where are you physically.

The idea of Reverse SSH is to be able to SSH (or other protocols) connect to IPs that are situated behind a NAT server/s.
Creating SSH Reverse Tunnel is an easy task and up to 2 simple SSH commands
,

To better explain how SSH tunnel is achieved, here is a scenario:

A. Linux host behind NAT IP: 192.168.10.70 (Destination host)
B. (Source Host) of Machine with External Public Internet IP 83.228.93.76 through which SSH Tunnel will be established to 192.168.10.70.

1. Create SSH Revere SSH from Destination to Source host (with Public IP)

Connect to the remote machine which has a real IP address and make port of the reverse SSH connection open (remove any firewall), lets say port 23000.

ssh -R 23000:127.0.0.1:22 username@DOMAIN.com -oPort=33

NB! On destination and source servers make sure you have enabled in /etc/ssh/sshd_config
 

AllowAgentForwarding yes
AllowTCPForwarding yes
PermitTunnel yes


2. Connect from Source IP to Destination through the established SSH tunnelling


Connecting to DOMAIN.com through ssh on 23000 will connect you to the back machine with the unreal IP address.
 

ssh local-username@127.0.0.1 -p 23000


ssh -L 19999:localhost:19999 middleman@178.78.78.78

If you want other server with hostname whatever-host.com to access the Reverse SSH Tunneled server you can do it via external IP which in my case is 83.228.93.76

From whatever-host.com just do:

 ssh username@82.228.93.76


reverse_tunnel-linux-diagram-explained
A text diagram of SSH Tunnel looks something like that:

Destination (192.168.10.70) <- |NAT| <- Source (83.228.93.76) <- whatever-host.com


Above examples should work not only on Linux but on NetBSD / OpenBSD / FreeBSD or any other UNIX system with a modern SSH client installed.

Change Linux Wireless Access Point connection from text terminal with iwconfig

Monday, October 8th, 2018

wireless-change-wireless-network-to-connect-to-using-console

If you have configured a couple of Wireless connections at home or work on your Laptop  and each of the remote Wi-FI access points are at different distance (some APs are situated at closer range than others) and your Linux OS keeps connecting sometimes to the wrong AP by default you'll perhaps want to change that behavior, so you keep connected to the Wi-Fi AP that has the best Link Quality (is situatated physically at closest location to your laptop integrated wifi card).
Using a Graphical tool such as Gnome Network Manager / Wicd Network Manager or KDE's Network Manager is great and easy way to do it but sometimes if you do upgrade of your GNU / Linux and the upgrade fails and your Graphical Environment GNOME / KDE / OpenBox / Window Maker or whatever Window Manager you use fails to start it is super handy to use text console (terminal) to connect to the right wiki in order to do a deb / rpm package rollback to revert your GUI environment or Xorg to the older working release.

Connection to WPA or WEP protected APs on GNU / Linux on a low level is done by /sbin/iwlist , /sbin/iwconfig and wpa_supplicant

wpasupplicant and network-manager (if you're running Xorg server).


/sbin/iwlist scan


wlp3s0    Scan completed :
          Cell 01 – Address: 10:FE:ED:43:CB:0E
                    Channel:6
                    Frequency:2.437 GHz (Channel 6)
                    Quality=64/70  Signal level=-46 dBm  
                    Encryption key:on
                    ESSID:"Magdanoz"
                    Bit Rates:1 Mb/s; 2 Mb/s; 5.5 Mb/s; 11 Mb/s; 6 Mb/s
                              9 Mb/s; 12 Mb/s; 18 Mb/s
                    Bit Rates:24 Mb/s; 36 Mb/s; 48 Mb/s; 54 Mb/s
                    Mode:Master
                    Extra:tsf=00000032cff7c214
                    Extra: Last beacon: 144ms ago
                    IE: Unknown: 00084D616764616E6F7A
                    IE: Unknown: 010882848B960C121824
                    IE: Unknown: 030106
                    IE: Unknown: 0706555320010B1B
                    IE: Unknown: 2A0100
                    IE: IEEE 802.11i/WPA2 Version 1
                        Group Cipher : TKIP
                        Pairwise Ciphers (2) : CCMP TKIP
                        Authentication Suites (1) : PSK
                    IE: Unknown: 32043048606C


iwlist command is used to get more detailed wireless info from a wireless interface (in terminal this command shows you the wifi networks available to connect to and various info such as the type of Wifi network the Wifi Name / network quality Frequency (is it it spreading the wifi signal at 2.4 Ghz or 5 Ghz frequency) etc.


# ifconfig interafce_name down


For example on my Thinkpad the wifi interface is wlp3s0 to check what is yours do ifconfig -a e.g.


root@jeremiah:~# /sbin/ifconfig -a
enp0s25: flags=4099<UP,BROADCAST,MULTICAST>  mtu 1500
        ether 00:21:cc:cc:b2:27  txqueuelen 1000  (Ethernet)
        RX packets 0  bytes 0 (0.0 B)
        RX errors 0  dropped 0  overruns 0  frame 0
        TX packets 0  bytes 0 (0.0 B)
        TX errors 0  dropped 0 overruns 0  carrier 0  collisions 0
        device interrupt 20  memory 0xf3900000-f3920000  


lo: flags=73<UP,LOOPBACK,RUNNING>  mtu 65536
        inet 127.0.0.1  netmask 255.0.0.0
        inet6 ::1  prefixlen 128  scopeid 0x10<host>
        loop  txqueuelen 1  (Local Loopback)
        RX packets 350  bytes 28408 (27.7 KiB)
        RX errors 0  dropped 0  overruns 0  frame 0
        TX packets 350  bytes 28408 (27.7 KiB)
        TX errors 0  dropped 0 overruns 0  carrier 0  collisions 0

wlp3s0: flags=4163<UP,BROADCAST,RUNNING,MULTICAST>  mtu 1500
        inet 192.168.0.103  netmask 255.255.255.0  broadcast 192.168.0.255
        inet6 fe80::6267:20ff:fe3c:20ec  prefixlen 64  scopeid 0x20<link>
        ether 60:67:20:3c:20:ec  txqueuelen 1000  (Ethernet)
        RX packets 299735  bytes 362561115 (345.7 MiB)
        RX errors 0  dropped 1  overruns 0  frame 0
        TX packets 278518  bytes 96996135 (92.5 MiB)
        TX errors 0  dropped 0 overruns 0  carrier 0  collisions 0


Next use iwconfig on Debian / Ubuntu Linux it is part of wireless-tools deb package.


root@jeremiah:~# /sbin/iwconfig interface essid "Your-Acess-Point-name"


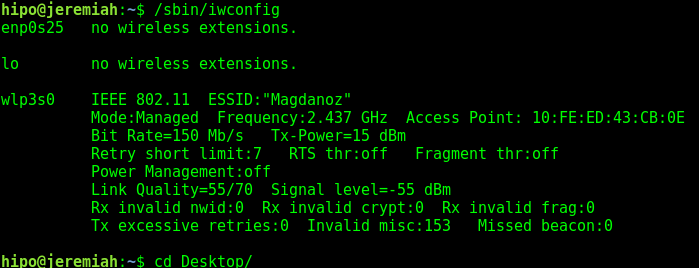
To check whether you're connected to a wireless network you can do:

https://www.pc-freak.net/images/check-wireless-frequency-access-point-mac-and-wireless-name-iwconfig-linux

root@jeremiah:~# iwconfig
enp0s25   no wireless extensions.


lo        no wireless extensions.

wlp3s0    IEEE 802.11  ESSID:"Magdanoz"  
          Mode:Managed  Frequency:2.437 GHz  Access Point: 10:FE:ED:43:CB:0E   
          Bit Rate=150 Mb/s   Tx-Power=15 dBm   
          Retry short limit:7   RTS thr:off   Fragment thr:off
          Encryption key:off
          Power Management:off
          Link Quality=61/70  Signal level=-49 dBm  
          Rx invalid nwid:0  Rx invalid crypt:0  Rx invalid frag:0
          Tx excessive retries:5  Invalid misc:1803   Missed beacon:0


N.B. ! To get a list of all your PC network interfaces you can use cmd:


root@jeremiah:/home/hipo# ls -al /sys/class/net/
total 0
drwxr-xr-x  2 root root 0 Oct  8 22:53 .
drwxr-xr-x 52 root root 0 Oct  8 22:53 ..
lrwxrwxrwx  1 root root 0 Oct  8 22:53 enp0s25 -> ../../devices/pci0000:00/0000:00:19.0/net/enp0s25
lrwxrwxrwx  1 root root 0 Oct  8 22:53 lo -> ../../devices/virtual/net/lo
lrwxrwxrwx  1 root root 0 Oct  8 22:53 wlp3s0 -> ../../devices/pci0000:00/0000:00:1c.1/0000:03:00.0/net/wlp3s0

show-all-network-interfaces-with-netstat-linux

or use netstat like so:

root@jeremiah:/home/hipo# netstat -i | column -t
Kernel   Interface  table
Iface    MTU        RX-OK   RX-ERR  RX-DRP  RX-OVR  TX-OK   TX-ERR  TX-DRP  TX-OVR  Flg
enp0s25  1500       0       0       0       0       0       0       0       0       BMU
lo       65536      590     0       0       0       590     0       0       0       LRU
wlp3s0   1500       428112  0       1       0       423538  0       0       0       BMRU


To get only the Wireless network card interface on Linux (e.g. find out which of the listed above interfaces is your wireless adapter's name), use iw command (that shows devices and their configuration):


root@jeremiah:/home/hipo# iw dev
phy#0
    Interface wlp3s0
        ifindex 3
        wdev 0x1
        addr 60:67:20:3c:20:ec
        type managed
        channel 6 (2437 MHz), width: 40 MHz, center1: 2427 MHz
        txpower 15.00 dBm


linux-wireless-terminal-console-check-wireless-interfaces-command

  • If you need to get only the active Wireless adapter device assigned by Linux kernel


root@jeremiah:~# iw dev | awk '$1=="Interface"{print $2}'


To check the IP / Netmask and Broadcase address assigned by connected Access Point use ifconfig
with your Laptop Wireless Interface Name.

show-extra-information-ip-netmask-broadcast-about-wireless-interface-linux

root@jeremiah:~# /sbin/ifconfig wlp3s0
wlp3s0: flags=4163<UP,BROADCAST,RUNNING,MULTICAST>  mtu 1500
        inet 192.168.0.103  netmask 255.255.255.0  broadcast 192.168.0.255
        inet6 fe80::6267:20ff:fe3c:20ec  prefixlen 64  scopeid 0x20<link>
        ether 60:67:20:3c:20:ec  txqueuelen 1000  (Ethernet)
        RX packets 319534  bytes 365527097 (348.5 MiB)
        RX errors 0  dropped 1  overruns 0  frame 0
        TX packets 285464  bytes 99082701 (94.4 MiB)
        TX errors 0  dropped 0 overruns 0  carrier 0  collisions 0


As you can see in above 3 examples iwconfig could configure various settings regarding the wireless network interface.

It is really annoying because sometimes if you have configured your Linux to connect to multiple access points, the wifi adapter might keep connecting to an access point that is more distanced from you and because of that the Bandwidth might be slower and that could impact your Internet connectivity, to fix that and get rid of any networks that are automatically set to connect to that you don't want to, just delete the correspodning files (the Wifi file name coincides with the Wireless AP network name).
All stored Wi-FI access points that your Linux is configured to connect to are stored inside /etc/NetworkManager/system-connections/

For example to delete an auto connection to wireless router with a name NetGear do:


root@jeremiah:~# rm -f /etc/NetworkManager/system-connections/NetGear


For a complete list of stored Wifi Networks that your PC might connect (and authorize to if configured so) do:


root@jeremiah:~# ls -a /etc/NetworkManager/system-connections/
Magdanoz
NetGear

LinkSys
Cobra
NetIs
WirelessNet


After deleting the required Networks you want your computer to not automatically connect to to make NetworkManager aware of that restart it with:
 

hipo@jeremiah:~# systemctl restart NetworkManager.service


or if you hate systemd like I do just use the good old init script to restart:


hipo@jeremiah:~# /etc/init.d/network-manager restart


To get some more informatoin on the exact network you're connected, you can run:

show-information-about-wireless-connection-on-gnu-linux


hipo@jeremiah:~# systemctl status NetworkManager.service
● NetworkManager.service – Network Manager
   Loaded: loaded (/lib/systemd/system/NetworkManager.service; enabled; vendor preset: enabled)
   Active: active (running) since Mon 2018-10-08 22:35:09 EEST; 15s ago
     Docs: man:NetworkManager(8)
 Main PID: 13721 (NetworkManager)
    Tasks: 5 (limit: 4915)
   CGroup: /system.slice/NetworkManager.service
           ├─13721 /usr/sbin/NetworkManager –no-daemon
           └─13742 /sbin/dhclient -d -q -sf /usr/lib/NetworkManager/nm-dhcp-helper -pf /var/run/dhclient-wlp3s0.pid -lf /var/lib/NetworkManager/dhclie


Oct 08 22:35:15 jeremiah NetworkManager[13721]:   [1539027315.6657] dhcp4 (wlp3s0): state changed unknown -> bound
Oct 08 22:35:15 jeremiah dhclient[13742]: bound to 192.168.0.103 — renewal in 2951 seconds.
Oct 08 22:35:15 jeremiah NetworkManager[13721]:
  [1539027315.6735] device (wlp3s0): state change: ip-config -> ip-check (reason 'none') [70 80
Oct 08 22:35:15 jeremiah NetworkManager[13721]:
  [1539027315.6744] device (wlp3s0): state change: ip-check -> secondaries (reason 'none') [80 9
Oct 08 22:35:15 jeremiah NetworkManager[13721]:
  [1539027315.6747] device (wlp3s0): state change: secondaries -> activated (reason 'none') [90
Oct 08 22:35:15 jeremiah NetworkManager[13721]:
  [1539027315.6749] manager: NetworkManager state is now CONNECTED_LOCAL
Oct 08 22:35:15 jeremiah NetworkManager[13721]:
  [1539027315.6812] manager: NetworkManager state is now CONNECTED_GLOBAL
Oct 08 22:35:15 jeremiah NetworkManager[13721]:
  [1539027315.6813] policy: set 'Magdanoz' (wlp3s0) as default for IPv4 routing and DNS
Oct 08 22:35:15 jeremiah NetworkManager[13721]:
  [1539027315.6816] device (wlp3s0): Activation: successful, device activated.
Oct 08 22:35:15 jeremiah NetworkManager[13721]:
  [1539027315.6823] manager: startup complete


Optimizing Linux TCP/IP Networking to increase Linux Servers Performance

Tuesday, April 8th, 2008

optimize-linux-servers-for-network-performance-to-increase-speed-and-decrease-hardware-costs-_tyan-exhibits-hpc-optimized-server-platforms-featuring-intel-xeon-processor-e7-4800-v3-e5-2600-supercomputing-15_full

Some time ago I thought of ways to optimize my Linux Servers network performance.

Even though there are plenty of nice articles on the topic on how to better optimize Linux server performance by tunning up the kernel sysctl (variables).

Many of the articles I found was not structed in enough understandable way so I decided togoogle around and  found few interesting websites which gives a good overview on how one can speed up a bit and decrease overall server loads by simply tuning few basic kernel sysctl variables.

Below article is a product of my research on the topic on how to increase my GNU / Linux servers performance which are mostly running LAMP (Linux / Apache / MySQL / PHP) together with Qmail mail servers.

The article is focusing on Networking as networking is usual bottleneck for performance.
Below are the variables I found useful for optimizing the Linux kernel Network stack.

Implementing the variables might reduce your server load or if not decrease server load times and CPU utilization, they would at lease increase thoroughput so more users will be able to access your servers with (hopefully) less interruptions.
That of course would save you some Hardware costs and raise up your Servers efficiency.

Here are the variables themselves and some good example:
 

# values.net.ipv4.ip_forward = 0 ( Turn off IP Forwarding )

net.ipv4.conf.default.rp_filter = 1

# ( Control Source route verification )
net.ipv4.conf.default.accept_redirects = 0

# ( Disable ICMP redirects )
net.ipv4.conf.all.accept_redirects = 0 ( same as above )
net.ipv4.conf.default.accept_source_route = 0

# ( Disable IP source routing )
net.ipv4.conf.all.accept_source_route = 0
( - || - )net.ipv4.tcp_fin_timeout = 40

# ( Decrease FIN timeout ) - Useful on busy/high load
serversnet.ipv4.tcp_keepalive_time = 4000 ( keepalive tcp timeout )
net.core.rmem_default = 786426 - Receive memory stack size ( a good idea to increase it if your server receives big files )
net.ipv4.tcp_rmem = "4096 87380 4194304"
net.core.wmem_default = 8388608 ( Reserved Memory per connection )
net.core.wmem_max = 8388608
net.core.optmem_max = 40960
( maximum amount of option memory buffers )

# like a homework investigate by yourself what the variables below stand for :)
net.ipv4.tcp_max_tw_buckets = 360000
net.ipv4.tcp_reordering = 5
net.core.hot_list_length = 256
net.core.netdev_max_backlog = 1024


# Below are newly added experimental
#net.core.rmem_max = 16777216
#net.core.wmem_max = 16777216
##kernel.msgmni = 1024
##kernel.sem = 250 256000 32 1024
##vm.swappiness=0
kernel.sched_migration_cost=5000000


Also a good sysctl.conf file which one might want to substitite or use as a skele for some productive server is ready for download here


Even if you can't reap out great CPU reduction benefits from integrating above values or similar ones, your overall LAMP performance to end customers should increase – at some occasions dramatically, at others little bit but still noticable.

If you're unsure on exact kernel variable values to use check yourself what should be the best values that fits you according to your server Hardware – usually this is done by experimenting and reading the kernel documentation as provided for each one of uplisted variables.

Above sysctl.conf is natively created to run on Debian and on other distributions like CentOS, Fedora Slackware some values might either require slight modifications.

Hope this helps and gives you some idea of how network optimization in Linux is usually done. Happy (hacking) tweakening !