Archive for the ‘Web and CMS’ Category

SEO: Best day and time to write new articles and tweet to get more blog reads – Social Network Timing

Tuesday, June 17th, 2014

what-is-best-time-to-write-articles-to-increase-your-blog-traffic

I'm trying to regularly blog – as this gives me a roadmap what I'm into and how I spent my time. When have free time,  I blog almost daily except on weekends (as in weekends I'm trying to stay away from computers). So if you want to attract more readers to your blog the interesting question arises
 

What time is best to hit publish on your posts?

writing-in-the-mogning-on-the-internet-timing-morning-is-best-for-your-posts
Now there are different angles from where you can extract conclusions on best timing to blog post.One major thing to consider always when posting is that highest percentage of users read blogs in the morning with their morning coffee. Here are some more facts on when web content is more red:

  • 70% of users say they read blogs in the morning
  • More men read blogs at night than woman
  • Mondays are the highest traffic days for avarage blogs
  • 11 a.m. is normally the highest traffic hour for blogs
  • Usually most comments are put on Saturdays
  • Blogs with more than one post a day has higher chance of inbound links and usually get more unique visitors

As my blog is more technical oriented most of my visitors are men and therefore posting my blogs at night doesn't interfere much with my readers.
However, I've noticed that for me personally posting in time interval from 13:00 to 17:00 influence positively the amount of unique visitors the blog gets.

According to research done by Social Fresh – Thursday is the best day to publish an article if you want to get more Social SharesBest-Day-to-Blog-to-get-more-shares-in-social-networks

As a rule of thumb Thursday wins 10% more shares than all other days. In fact, 31% of the top 100 social share days in 2011 fell on Thursday.
My logical explanation on this phenomenon is that people tend to be more and more bored from their work and try to entertain more and more as the week progresses.

To get more attention on what I'm writting I use a bit of social networking but I prefer using only a micro blogging social networking.  I use Twitter to share what I'm into. When I write a new article on my blog I tweet its title with a link to my article, because this drives people attention to what I have to say.

In overall I am skeptical about social siting like Facebook and MySpace because it has negative impact on how people use their time and especially negative on youngsters Other reason why I don't like Friends Networks is because sharing what you have to say on sites like FB, Google+ or "The Russian Facebook" –  Vkontekte VK.com are not respecting privacy of your data.


You write free fresh content for their website for free and you get nothing!


Moreover by daily posting latest buzz you read / watched on Facebook etc. or simply saying what's happening with you, where you're situated now etc., you slowly get addicted to posting – yes for good or bad people tend to be maniacal).

By placing all of your pesronal or impersonal stuff online, you're making these sites better index their sites into Google / Yahoo / Yandex search engines and therefore making them profitable and high ranked websites on the internet and giving out your personal time for Facebook profit? + you loose control over your data (your data is not physically on your side but situated on some remote server, somewhere on the internet).
 

Best avarage time to post on Tweet Facebook, Google+ and Linkedin

best-time-and-day-to-write-new-articles-schedule-content-at-the-right-time-on-social-media-to-get-high-trafficrank

So What is Best Day timing to Post, Pin or Tweet?

Below is an infographic I fond on this blog (visual data is originalcompiled by SurePayRoll) and showing visualized results from some extensive research on the topic.

best-time-to-post-and-tweet-blog-articles-social-media-infographic


Here is most important facts this infographic reveals:


The avarage best time to post tweet and pin your new articles is about 15:00 h
 

  • Best timing to post on Twitter is on Mondays to Thursdays from 13:00 to 15:00 h
  • Best timing to post on facebook is between 13:00 and 16:00 h
  • For Linkedin it is best to place your publish between Tuesdays to Thursdays


Peak times on Facebook, Twitter and Linkedin

  • Peak times for use of Facebook is on Wednesdays about 15:00 h
  • Peak times for use of Twitter is from Monday to Thursdays from 9:00  to 15:00 h
  • Linkedin Peak time is from 17:00 to 18:00 h
  • Including images to your articles increases traffic, tweets with images increase visits, favorites and leads


Worst time (when users will probably not view your content) on FB, Twitter and Linkedin

  • Weekends before 08:00  and after 20:00 h
  • Everyday after 20:00 and Fridays after 15:00 noon
  • Mondays and Fridays from 22:00 to 06:00 morning

Facts about Google+
 

  • Google+ is the fastest growing demographic social network for people aged 45 to 54
  • Best time to share your posts on Google+ is from 09:00 to 10:00 in the morning
  • Including images to your articles increases traffic, tweets with images increase visits, favorites and leads
     

Images generate more traffic and engagement

  • Including images to your articles increases traffic, tweets with images increase visits, favorites and leads


I'm aware as every research above info on best time to tweet and post is just a generalization and according to field of information posted suggested time could be different from optiomal time for individual writer, however as a general direction, info is very useful and it gives you some idea.
Twitter engagement for brands is 17% higher on weekends according to Dan Zarrella’s research. Tweets posted on Friday, Saturday and Sunday had higher CTR (Click Through Rate) than those posted in the rest of the week.

tweet-on-the-weekends-is-better-for-high-click-through-rate

Other best day to tweet other than weekends is mid-week time Wednesday.
Whether your site or blog is using retweet to generate more traffic to website best time to retweet is said to be around 5 pm. CTR is higher

Install certbot on Debian, Ubuntu, CentOS, Fedora Linux 10 / Generate and use Apache / Nginx SSL Letsencrypt certificates

Monday, December 21st, 2020

letsencrypt certbot install on any linux distribution with apache or nginx webserver howto</a><p> Let's Encrypt is a free, automated, and open certificate authority brought to you by the nonprofit <a data-cke-saved-href=
Internet Security Research Group (ISRG). ISRG group gave initiative with the goal to "encrypt the internet", i.e. offer free alternative to the overpriced domani registrer sold certificates with the goal to make more people offer SSL / TSL Free secured connection line on their websites. 
ISRG group supported Letsencrypt non-profit certificate authority actrively by Internet industry standard giants such as Mozilla, Cisco, EFF (Electronic Frontier Foundation),  Facebook, Google Chrome, Amazon AWS, OVH Cloud, Redhat, VMWare, Github and many many of the leading companies in IT.

Letsencrpyt is aimed at automating the process designed to overcome manual creation, validation, signing, installation, and renewal of certificates for secure websites. I.e. you don't have to manually write on console complicated openssl command lines with passing on Certificate CSR /  KEY / PEM files etc and generate Self-Signed Untrusted Authority Certificates (noted in my previous article How to generate Self-Signed SSL Certificates with openssl or use similar process to pay money generate secret key and submit the key to third party authority through a their website webadmin  interface in order to Generate SSL brought by Godaddy or Other Certificate Authority.

But of course as you can guess there are downsides as you submit your private key automatically via letsencrypt set of SSL certificate automation domain scripts to a third party Certificate Authority which is at Letsencrypt.org. A security intrusion in their private key store servers might mean a catastrophy for your data as malicious stealer might be able to decrypt your data with some additional effort and see in plain text what is talking to your Apache / Nginx or Mail Server nevertheless the cert. Hence for a high standards such as PCI environments Letsencrypt as well as for the paranoid security freak admins,  who don't trust the mainstream letsencrypt is definitely not a choice. Anyways for most small and midsized businesses who doesn't hold too much of a top secret data and want a moderate level of security Letsencrypt is a great opportunity to try. But enough talk, lets get down to business.

How to install and use certbot on Debian GNU / Linux 10 Buster?
Certbot is not available from the Debian software repositories by default, but it’s possible to configure the buster-backports repository in your /etc/apt/sources.list file to allow you to install a backport of the Certbot software with APT tool.
 

1. Install certbot on Debian / Ubuntu Linux


root@webserver:/etc/apt# tail -n 1 /etc/apt/sources.list
deb http://ftp.debian.org/debian buster-backports main


If not there append the repositories to file:


  • Install certbot-nginx certbot-apache deb packages

root@webserver:/ # echo 'deb http://ftp.debian.org/debian buster-backports main' >> /etc/apt/sources.list


  • Install certbot-nginx certbot-apache deb packages

root@webserver:/ # apt update
root@webserver:/ # apt install certbot python-certbot-nginx python3-certbot-apache python-certbot-nginx-doc


This will install the /usr/bin/certbot python executable script which is used to register / renew / revoke / delete your domains certificates.
 

2. Install letsencrypt certbot client on CentOS / RHEL / Fedora and other Linux Distributions


For RPM based distributions and other Linux distributions you will have to install snap package (if not already installed) and use snap command :


[root@centos ~ :] # yum install snapd
systemctl enable –now snapd.socket

To enable classic snap support, enter the following to create a symbolic link between

[root@centos ~ :] # ln -s /var/lib/snapd/snap /snap

snap command lets you install, configure, refresh and remove snaps.  Snaps are packages that work across many different Linux distributions, enabling secure delivery and operation of the latest apps and utilities.

[root@centos ~ :] # snap install core; sudo snap refresh core

Logout from console or Xsession to make the snap update its $PATH definitions.

Then use snap universal distro certbot classic package

 [root@centos ~ :] # snap install –classic certbot
[root@centos ~ :] # ln -s /snap/bin/certbot /usr/bin/certbot


If you're having an XOrg server access on the RHEL / CentOS via Xming or other type of Xemulator you might check out also the snap-store as it contains a multitude of packages installable which are not usually available in RPM distros.

 [root@centos ~ :] # snap install snap-store


how-to-install-snap-applications-on-centos-rhel-linux-snap-store

snap-store is a powerful and via it you can install many non easily installable stuff on Linux such as eclipse famous development IDE, notepad++ , Discord, the so favourite for the Quality Assurance guy Protocol tester Postman etc.

  • Installing certbot to any distribution via acme.sh script

Another often preferred solution to Universally deploy  and upgrade an existing LetsEncrypt program to any Linux distribution (e.g. RHEL / CentOS / Fedora etc.) is the acme.sh script. To install acme you have to clone the repository and run the script with –install

P.S. If you don't have git installed yet do

root@webserver:/ # apt-get install –yes git


and then the usual git clone to fetch it at your side

# cd /root
# git clone https://github.com/acmesh-official/acme.sh
Cloning into 'acme.sh'…
remote: Enumerating objects: 71, done.
remote: Counting objects: 100% (71/71), done.
remote: Compressing objects: 100% (53/53), done.
remote: Total 12475 (delta 39), reused 38 (delta 18), pack-reused 12404
Receiving objects: 100% (12475/12475), 4.79 MiB | 6.66 MiB/s, done.
Resolving deltas: 100% (7444/7444), done.

# sh acme.sh –install


To later upgrade acme.sh to latest you can do

# sh acme.sh –upgrade


In order to renew a concrete existing letsencrypt certificiate

# sh acme.sh –renew domainname.com


To renew all certificates using acme.sh script

# ./acme.sh –renew-all


3. Generate Apache or NGINX Free SSL / TLS Certificate with certbot tool

Now lets generate a certificate for a domain running on Apache Webserver with a Website WebRoot directory /home/phpdev/public/www


root@webserver:/ # certbot –apache –webroot -w /home/phpdev/public/www/ -d your-domain-name.com -d your-domain-name.com

root@webserver:/ # certbot certonly –webroot -w /home/phpdev/public/www/ -d your-domain-name.com -d other-domain-name.com


As you see all the domains for which you will need to generate are passed on with -d option.

Once certificates are properly generated you can test it in a browser and once you're sure they work as expected usually you can sleep safe for the next 3 months ( 90 days) which is the default for TSL / SSL Letsencrypt certificates the reason behind of course is security.


4. Enable freshly generated letsencrypt SSL certificate in Nginx VirtualHost config

Go to your nginx VirtualHost configuration (i.e. /etc/nginx/sites-enabled/phpmyadmin.adzone.pro ) and inside chunk of config add after location { … } – 443 TCP Port SSL listener (as in shown in bolded configuration)
 

server {

….
   location ~ \.php$ {
      include /etc/nginx/fastcgi_params;
##      fastcgi_pass 127.0.0.1:9000;
      fastcgi_pass unix:/run/php/php7.3-fpm.sock;
      fastcgi_index index.php;
      fastcgi_param SCRIPT_FILENAME /usr/share/phpmyadmin$fastcgi_script_name;
   }


    listen 443 ssl; # managed by Certbot
    ssl_certificate /etc/letsencrypt/live/phpmyadmin.adzone.pro/fullchain.pem; # managed by Certbot
    ssl_certificate_key /etc/letsencrypt/live/phpmyadmin.adzone.pro/privkey.pem; # managed by Certbot
    include /etc/letsencrypt/options-ssl-nginx.conf; # managed by Certbot
    ssl_dhparam /etc/letsencrypt/ssl-dhparams.pem; # managed by Certbot


5. Enable new generated letsencrypt SSL certificate in Apache VirtualHost


In /etc/apache2/{sites-available,sites-enabled}/your-domain.com-ssl.conf you should have as a minimum a configuration setup like below:


NameVirtualHost *:443 <VirtualHost 123.123.123.12:443>
    ServerAdmin hipo@domain.com
    ServerName www.pc-freak.net
    ServerAlias www.your-domain.com wwww.your-domain.com your-domain.com
 
    HostnameLookups off
    DocumentRoot /var/www
    DirectoryIndex index.html index.htm index.php index.html.var


CheckSpelling on
SSLEngine on

    <Directory />
        Options FollowSymLinks
        AllowOverride All
        ##Order allow,deny
        ##allow from all
        Require all granted
    </Directory>
    <Directory /var/www>
        Options Indexes FollowSymLinks MultiViews
        AllowOverride All
##      Order allow,deny
##      allow from all
Require all granted
    </Directory>

Include /etc/letsencrypt/options-ssl-apache.conf
SSLCertificateFile /etc/letsencrypt/live/your-domain.com/fullchain.pem
SSLCertificateKeyFile /etc/letsencrypt/live/your-domain.com/privkey.pem
</VirtualHost>


6. Simulate a certificate regenerate with –dry-run

Soon before the 90 days period expiry approaches, it is a good idea to test how all installed Nginx webserver certficiates will be renewed and whether any issues are expected this can be done with the –dry-run option.

root@webserver:/ # certbot renew –dry-run


– – – – – – – – – – – – – – – – – – – – – – – – – – – – – – – – – – – – – – – –
** DRY RUN: simulating 'certbot renew' close to cert expiry
**          (The test certificates below have not been saved.)

Congratulations, all renewals succeeded. The following certs have been renewed:
  /etc/letsencrypt/live/adzone.pro/fullchain.pem (success)
  /etc/letsencrypt/live/cdn.natsr.pro/fullchain.pem (success)
  /etc/letsencrypt/live/mail.adzone.pro/fullchain.pem (success)
  /etc/letsencrypt/live/natsr.pro-0001/fullchain.pem (success)
  /etc/letsencrypt/live/natsr.pro/fullchain.pem (success)
  /etc/letsencrypt/live/phpmyadmin.adzone.pro/fullchain.pem (success)
  /etc/letsencrypt/live/www.adzone.pro/fullchain.pem (success)
  /etc/letsencrypt/live/www.natsr.pro/fullchain.pem (success)
** DRY RUN: simulating 'certbot renew' close to cert expiry
**          (The test certificates above have not been saved.)
– – – – – – – – – – – – – – – – – – – – – – – – – – – – – – – – – – – – – – – –


7. Renew a certificate from a multiple installed certificate list

In some time when you need to renew letsencrypt domain certificates you can list them and choose manually which one you want to renew.

root@webserver:/ # certbot –force-renewal
Saving debug log to /var/log/letsencrypt/letsencrypt.log

How would you like to authenticate and install certificates?
– – – – – – – – – – – – – – – – – – – – – – – – – – – – – – – – – – – – – – – –
1: Apache Web Server plugin (apache)
2: Nginx Web Server plugin (nginx)
– – – – – – – – – – – – – – – – – – – – – – – – – – – – – – – – – – – – – – – –
Select the appropriate number [1-2] then [enter] (press 'c' to cancel): 2
Plugins selected: Authenticator nginx, Installer nginx

Which names would you like to activate HTTPS for?
– – – – – – – – – – – – – – – – – – – – – – – – – – – – – – – – – – – – – – – –
1: adzone.pro
2: mail.adzone.pro
3: phpmyadmin.adzone.pro
4: www.adzone.pro
5: natsr.pro
6: cdn.natsr.pro
7: www.natsr.pro
– – – – – – – – – – – – – – – – – – – – – – – – – – – – – – – – – – – – – – – –
Select the appropriate numbers separated by commas and/or spaces, or leave input
blank to select all options shown (Enter 'c' to cancel): 3
Renewing an existing certificate
Deploying Certificate to VirtualHost /etc/nginx/sites-enabled/phpmyadmin.adzone.pro

Please choose whether or not to redirect HTTP traffic to HTTPS, removing HTTP access.
– – – – – – – – – – – – – – – – – – – – – – – – – – – – – – – – – – – – – – – –
1: No redirect – Make no further changes to the webserver configuration.
2: Redirect – Make all requests redirect to secure HTTPS access. Choose this for
new sites, or if you're confident your site works on HTTPS. You can undo this
change by editing your web server's configuration.
– – – – – – – – – – – – – – – – – – – – – – – – – – – – – – – – – – – – – – – –
Select the appropriate number [1-2] then [enter] (press 'c' to cancel): 2
Redirecting all traffic on port 80 to ssl in /etc/nginx/sites-enabled/phpmyadmin.adzone.pro

– – – – – – – – – – – – – – – – – – – – – – – – – – – – – – – – – – – – – – – –
Your existing certificate has been successfully renewed, and the new certificate
has been installed.

The new certificate covers the following domains: https://phpmyadmin.adzone.pro

You should test your configuration at:
https://www.ssllabs.com/ssltest/analyze.html?d=phpmyadmin.adzone.pro
– – – – – – – – – – – – – – – – – – – – – – – – – – – – – – – – – – – – – – – –

IMPORTANT NOTES:
 – Congratulations! Your certificate and chain have been saved at:
   /etc/letsencrypt/live/phpmyadmin.adzone.pro/fullchain.pem

   Your key file has been saved at:
   /etc/letsencrypt/live/phpmyadmin.adzone.pro/privkey.pem
   Your cert will expire on 2021-03-21. To obtain a new or tweaked
   version of this certificate in the future, simply run certbot again
   with the "certonly" option. To non-interactively renew *all* of
   your certificates, run "certbot renew"
 – If you like Certbot, please consider supporting our work by:

   Donating to ISRG / Let's Encrypt:   https://letsencrypt.org/donate
   Donating to EFF:                    https://eff.org/donate-le


8. Renew all present SSL certificates

root@webserver:/ # certbot renew

Processing /etc/letsencrypt/renewal/www.natsr.pro.conf
– – – – – – – – – – – – – – – – – – – – – – – – – – – – – – – – – – – – – – – –
Cert not yet due for renewal


– – – – – – – – – – – – – – – – – – – – – – – – – – – – – – – – – – – – – – – –

The following certs are not due for renewal yet:
  /etc/letsencrypt/live/adzone.pro/fullchain.pem expires on 2021-03-01 (skipped)
  /etc/letsencrypt/live/cdn.natsr.pro/fullchain.pem expires on 2021-02-28 (skipped)
  /etc/letsencrypt/live/mail.adzone.pro/fullchain.pem expires on 2021-02-28 (skipped)
  /etc/letsencrypt/live/natsr.pro-0001/fullchain.pem expires on 2021-03-01 (skipped)
  /etc/letsencrypt/live/natsr.pro/fullchain.pem expires on 2021-02-25 (skipped)
  /etc/letsencrypt/live/phpmyadmin.adzone.pro/fullchain.pem expires on 2021-03-21 (skipped)
  /etc/letsencrypt/live/www.adzone.pro/fullchain.pem expires on 2021-02-28 (skipped)
  /etc/letsencrypt/live/www.natsr.pro/fullchain.pem expires on 2021-03-01 (skipped)
No renewals were attempted.
– – – – – – – – – – – – – – – – – – – – – – – – – – – – – – – – – – – – – – – –


9. Renew all existing server certificates from a cron job


The certbot package will install a script under /etc/cron.d/certbot to be run that will attempt every 12 hours however from my experience
often this script is not going to work, the script looks similar to below:

# Upgrade all existing SSL certbot machine certificates


0 */12 * * * root test -x /usr/bin/certbot -a \! -d /run/systemd/system && perl -e 'sleep int(rand(43200))' && certbot -q renew

Another approach to renew all installed certificates if you want to have a specific options and keep log of what happened is using a tiny shell script like this:


10. Auto renew installed SSL / TSL Certbot certificates with a bash loop over all present certificates

#!/bin/sh
# update SSL certificates
# prints from 1 to 104 (according to each certbot generated certificate and triggers rewew and logs what happened to log file
# an ugly hack for certbot certificate renew
for i in $(seq 1 104); do echo "Updating $i SSL Cert" | tee -a /root/certificate-update.log; yes "$i" | certbot –force-renewal | tee -a /root/certificate-update.log 2>&1; sleep 5; done

Note: The seq 1 104 is the range depends on the count of installed SSL certificates you have installed on the machine, that can be seen and set the proper value according to your case when you run one time certbot –force-renewal.
 

How to Configure Nginx as a Reverse Proxy Load Balancer on Debian, CentOS, RHEL Linux

Monday, December 14th, 2020

set-up-nginx-reverse-proxy-howto-linux-logo

What is reverse Proxy?

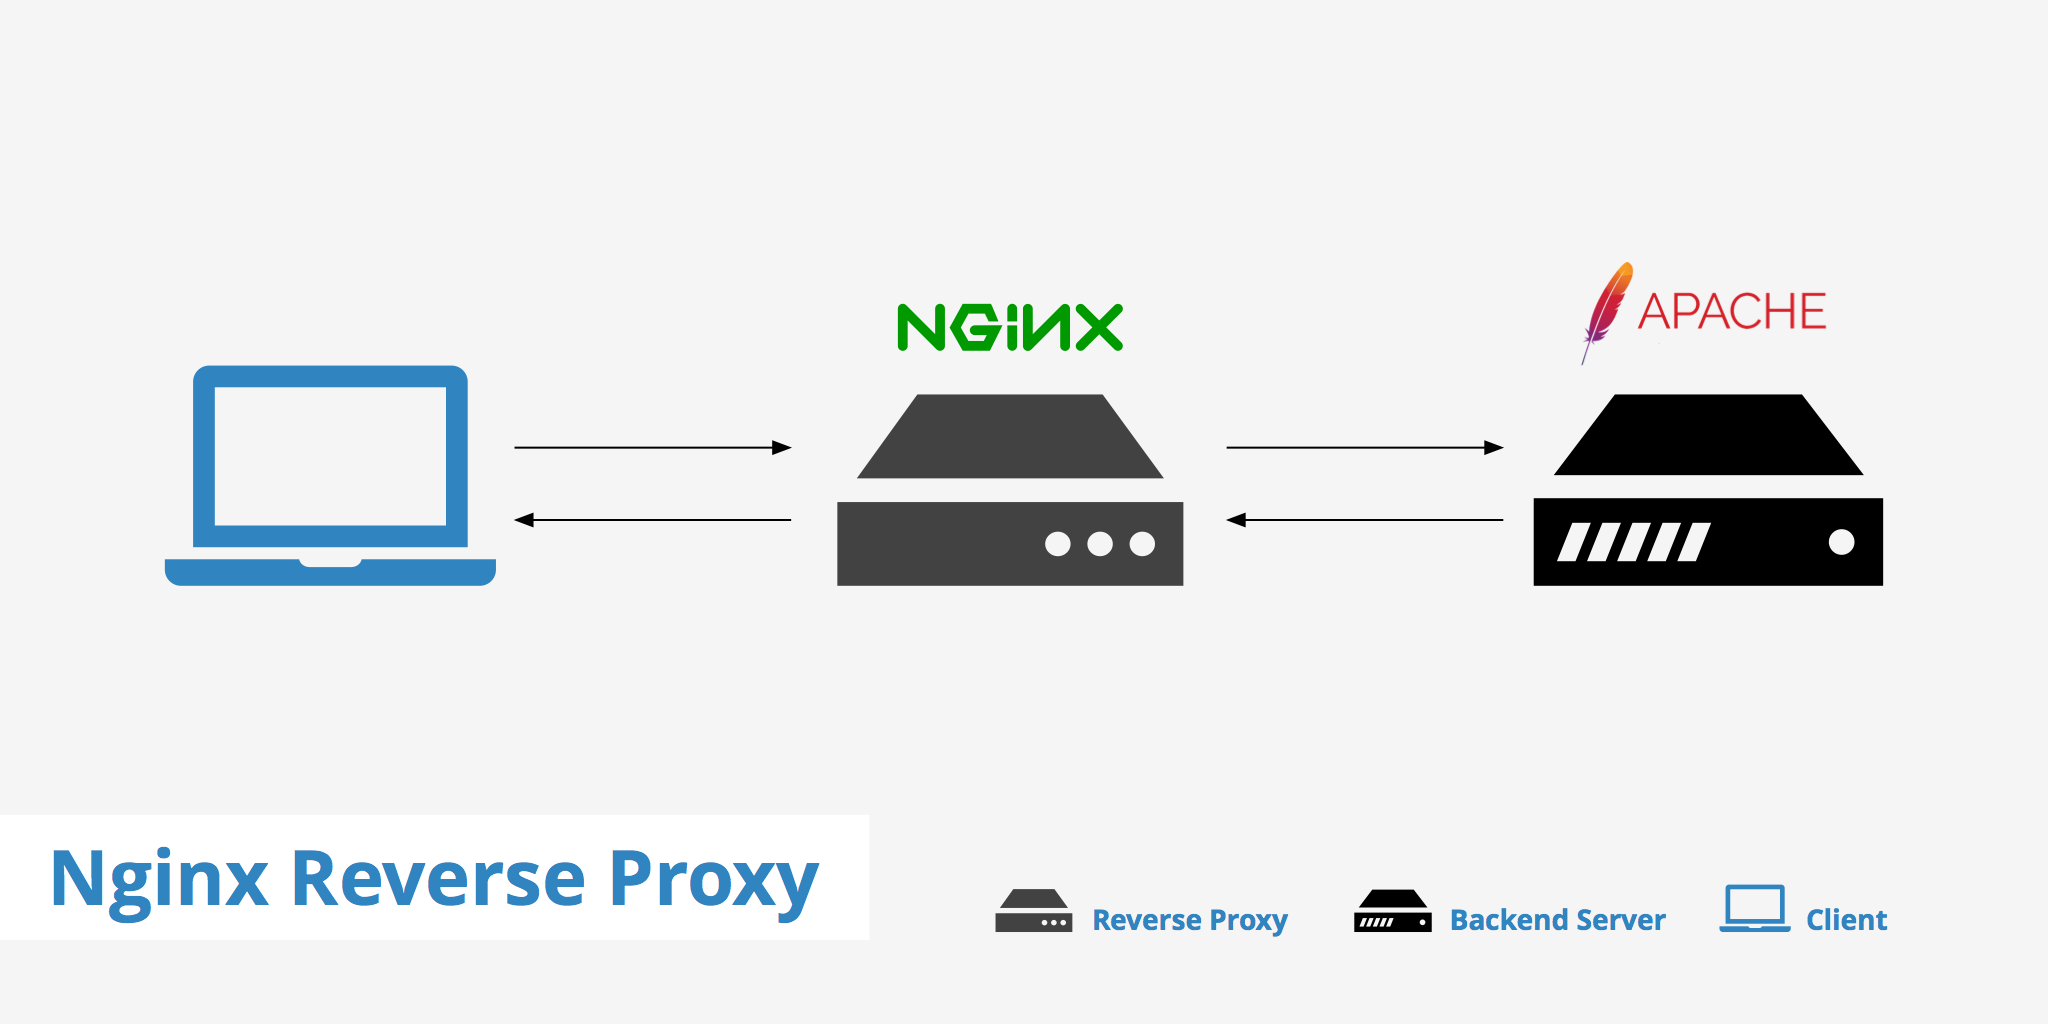
Reverse Proxy (RP) is a Proxy server which routes all incoming traffic to secondary Webserver situated behind the Reverse Proxy site.

Then all incoming replies from secondary webserver (which is not visible) from the internet gets routed back to Reverse Proxy service. The result is it seems like all incoming and outgoing HTTP requests are served from Reverse Proxy host where in reality, reverse proxy host just does traffic redirection. Problem with reverse proxies is it is one more point of failure the good side of it can protect and route only certain traffic to your webserver, preventing the behind reverse proxy located server from crackers malicious HTTP requests.

Treverse proxy, which accepts all traffic and forwards it to a specific resource, like a server or container.  Earlier I've blogged on how to create Apache reverse Proxy to Tomcat.
Having a reverse proxy with apache is a classical scenarios however as NGINX is taking lead slowly and overthrowing apache's use due to its easiness to configure, its high reliability and less consumption of resources.


One of most common use of Reverse Proxy is to use it as a software Load Balancer for traffic towards another webserver or directly to a backend server. Using RP as a to mitigate DDoS attacks from hacked computers Bot nets (coming from a network range) is very common Anti-DDoS protection measure.
With the bloom of VM and Contrainerizations technology such as docker. And the trend to switch services towards micro-services, often reverse proxy is used to seamessly redirect incoming requests traff to multiple separate OS docker running containers etc.


Some of the other security pros of using a Reverse proxy that could be pointed are:

  • Restrict access to locations that may be obvious targets for brute-force attacks, reducing the effectiveness of DDOS attacks by limiting the number of connections and the download rate per IP address. 
  • Cache pre-rendered versions of popular pages to speed up page load times.
  • Interfere with other unwanted traffic when needed.


what-is-reverse-proxy-explained-proxying-tubes


1. Install nginx webserver


Assuming you have a Debian at hand as an OS which will be used for Nginx RP host, lets install nginx.
 

[hipo@proxy ~]$ sudo su – root

[root@proxy ~]#  apt update

[root@proxy ~]# apt install -y nginx


Fedora / CentOS / Redhat Linux could use yum or dnf to install NGINX
 

[root@proxy ~]# dnf install -y nginx
[root@proxy ~]# yum install -y nginx


2. Launch nginx for a first time and test


Start nginx one time to test default configuration is reachable
 

systemctl enable –now nginx


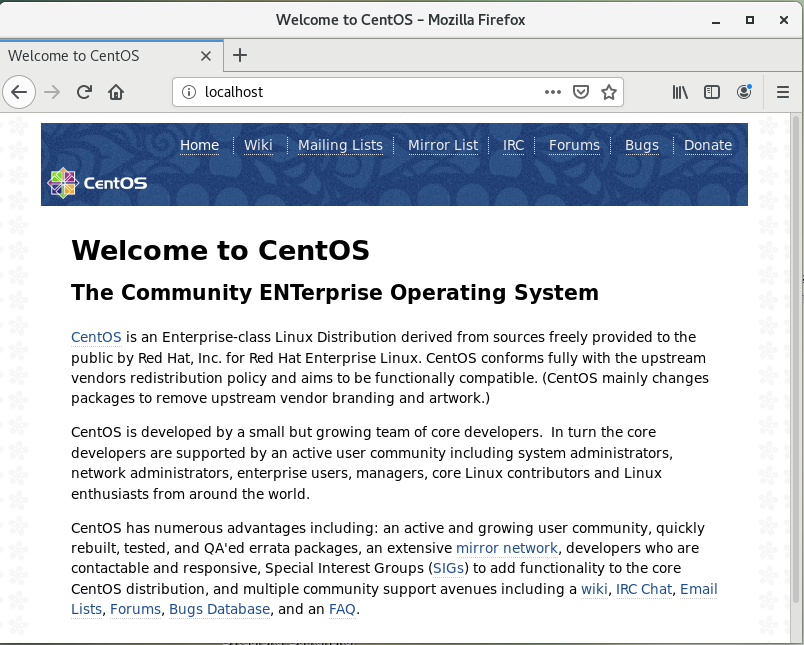
To test nginx works out of the box right after install, open a browser and go to http://localhost if you have X or use text based browser such as lynx or some web console fetcher as curl to verify that the web server is running as expected.

nginx-test-default-page-centos-linux-screenshot
 

3. Create Reverse proxy configuration file

Remove default Nginx package provided configuration

As of 2020 by default nginx does load configuration from file /etc/nginx/sites-enabled/default on DEB based Linuxes and in /etc/nginx/nginx.conf on RPM based ones, therefore to setup our desired configuration and disable default domain config to be loaded we have to unlink on Debian

[root@proxy ~]# unlink /etc/nginx/sites-enabled/default

or move out the original nginx.conf on Fedora / CentOS / RHEL:
 

[root@proxy ~]# mv /etc/nginx/nginx.conf /etc/nginx/nginx.conf-distro


Lets take a scenario where you have a local IP address that's NAT-ted ot DMZ-ed and and you want to run nginx to server as a reverse proxy to accelerate traffic and forward all traffic to another webserver such as LigHTTPD / Apache or towards java serving Application server Jboss / Tomcat etc that listens on the same host on lets say on port 8000 accessible via app server from /application/.

To do so prepare new /etc/nginx/nginx.conf to look like so
 

[root@proxy ~]# mv /etc/nginx/nginx.conf /etc/nginx.conf.bak
[root@proxy ~]# vim /etc/nginx/nginx.conf

user nginx;
worker_processes auto;
worker_rlimit_nofile 10240;
pid /run/nginx.pid;
include /etc/nginx/modules-enabled/*.conf;


events {
#       worker_connections 768;
        worker_connections 4096;
        multi_accept on;
        # multi_accept on;
}

http {

        ##
        # Basic Settings
        ##

        sendfile on;
        tcp_nopush on;
        tcp_nodelay on;
        #keepalive_timeout 65;
        keepalive_requests 1024;
        client_header_timeout 30;
        client_body_timeout 30;
        keepalive_timeout 30;
        types_hash_max_size 2048;
        # server_tokens off;

        # server_names_hash_bucket_size 64;
        # server_name_in_redirect off;

        include /etc/nginx/mime.types;
        default_type application/octet-stream;

        ##
        # SSL Settings
        ##

        ssl_protocols TLSv1 TLSv1.1 TLSv1.2; # Dropping SSLv3, ref: POODLE
        ssl_prefer_server_ciphers on;

        ##
        # Logging Settings
        ##

        access_log /var/log/nginx/domain.com/access.log;
        error_log /var/log/nginx/domain.com/error.log;

        ##
        # Gzip Settings
        ##

        gzip on;

        # gzip_vary on;
        # gzip_proxied any;
        # gzip_comp_level 6;
        # gzip_buffers 16 8k;
        # gzip_http_version 1.1;
        # gzip_types text/plain text/css application/json application/javascript text/xml application/xml application/xml+rss text/javascript;

        ##
        # Virtual Host Configs
        ##

        include /etc/nginx/conf.d/*.conf;
        include /etc/nginx/sites-enabled/*;

 include /etc/nginx/default.d/*.conf;

upstream myapp {
    server 127.0.0.1:8000 weight=3;
    server 127.0.0.1:8001;
    server 127.0.0.1:8002;
    server 127.0.0.1:8003;
# Uncomment and use Load balancing with external FQDNs if needed
#  server srv1.example.com;
#   server srv2.example.com;
#   server srv3.example.co

}

#mail {
#       # See sample authentication script at:
#       # http://wiki.nginx.org/ImapAuthenticateWithApachePhpScript
#
#       # auth_http localhost/auth.php;
#       # pop3_capabilities "TOP" "USER";
#       # imap_capabilities "IMAP4rev1" "UIDPLUS";
#
#       server {
#               listen     localhost:110;
#               protocol   pop3;
#               proxy      on;
#       }
#
#       server {
#               listen     localhost:143;
#               protocol   imap;
#               proxy      on;
#       }
#}


In the example above, there are 3 instances of the same application running on 3 IPs on different ports, just for the sake to illustrate Fully Qualified Domain Names (FQDNs) Load balancing is also supported you can see the 3 commented application instances srv1-srv3.
 When the load balancing method is not specifically configured, it defaults to round-robin. All requests are proxied to the server group myapp1, and nginx applies HTTP load balancing to distribute the requests.Reverse proxy implementation in nginx includes load balancing for HTTP, HTTPS, FastCGI, uwsgi, SCGI, memcached, and gRPC.
To configure load balancing for HTTPS instead of HTTP, just use “https” as the protocol.


To download above nginx.conf configured for High traffic servers and supports Nginx virtualhosts click here.

Now lets prepare for the reverse proxy nginx configuration a separate file under /etc/nginx/default.d/ all files stored there with .conf extension are to be red by nginx.conf as instructed by /etc/nginx/nginx.conf :

We'll need prepare a sample nginx

[root@proxy ~]# vim /etc/nginx/sites-available/reverse-proxy.conf

server {

        listen 80;
        listen [::]:80;


 server_name domain.com www.domain.com;
#index       index.php;
# fallback for index.php usually this one is never used
root        /var/www/domain.com/public    ;
#location / {
#try_files $uri $uri/ /index.php?$query_string;
#}

        location / {
                    proxy_pass http://127.0.0.1:8080;
  }


location /application {
proxy_pass http://domain.com/application/ ;

proxy_http_version                 1.1;
proxy_cache_bypass                 $http_upgrade;

# Proxy headers
proxy_set_header Upgrade           $http_upgrade;
proxy_set_header Connection        "upgrade";
proxy_set_header Host              $host;
proxy_set_header X-Real-IP         $remote_addr;
proxy_set_header X-Forwarded-For   $proxy_add_x_forwarded_for;
proxy_set_header X-Forwarded-Proto $scheme;
proxy_set_header X-Forwarded-Host  $host;
proxy_set_header X-Forwarded-Port  $server_port;

# Proxy timeouts
proxy_connect_timeout              60s;
proxy_send_timeout                 60s;
proxy_read_timeout                 60s;

        access_log /var/log/nginx/reverse-access.log;
        error_log /var/log/nginx/reverse-error.log;

}

##listen 443 ssl;
##    ssl_certificate /etc/letsencrypt/live/domain.com/fullchain.pem;
##    ssl_certificate_key /etc/letsencrypt/live/domain.com/privkey.pem;
##    include /etc/letsencrypt/options-ssl-nginx.conf;
##    ssl_dhparam /etc/letsencrypt/ssl-dhparams.pem;

}

Get above reverse-proxy.conf from here

As you see config makes all incoming traffic towards root ( / ) NGINX directory for domain http://domain.com on port 80 on Nginx Webserver to be passed on http://127.0.0.1:8000/application.

      location / {
                    proxy_pass http://127.0.0.1:8000;
  }


Another set of configuration has configuration domain.com/application to reverse proxy to Webserver on Port 8080 /application.


location /application {
proxy_pass http://domain.com/application/ ;

proxy_http_version                 1.1;
proxy_cache_bypass                 $http_upgrade;

# Proxy headers
proxy_set_header Upgrade           $http_upgrade;
proxy_set_header Connection        "upgrade";
proxy_set_header Host              $host;
proxy_set_header X-Real-IP         $remote_addr;
proxy_set_header X-Forwarded-For   $proxy_add_x_forwarded_for;
proxy_set_header X-Forwarded-Proto $scheme;
proxy_set_header X-Forwarded-Host  $host;
proxy_set_header X-Forwarded-Port  $server_port;

# Proxy timeouts
proxy_connect_timeout              60s;
proxy_send_timeout                 60s;
proxy_read_timeout                 60s;

        access_log /var/log/nginx/reverse-access.log;
        error_log /var/log/nginx/reverse-error.log;

}

– Enable new configuration to be active in NGINX


[root@proxy ~]# ln -s /etc/nginx/sites-available/reverse-proxy.conf /etc/nginx/sites-enabled/reverse-proxy.conf


4. Test reverse proxy nginx config for syntax errors


[root@proxy ~]# nginx -t


nginx: the configuration file /etc/nginx/nginx.conf syntax is ok
nginx: configuration file /etc/nginx/nginx.conf test is successful

Test connectivity to listen external IP address


5. Enable nginx SSL letsencrypt certificates support


[root@proxy ~]# apt-get update
[root@proxy ~]# apt-get install software-properties-common

[root@proxy ~]# apt-get update
[root@proxy ~]# apt-get install python-certbot-nginx


6. Generate NGINX Letsencrypt certificates


[root@proxy ~]# certbot –nginx

Saving debug log to /var/log/letsencrypt/letsencrypt.log
Plugins selected: Authenticator nginx, Installer nginx

Which names would you like to activate HTTPS for?
– – – – – – – – – – – – – – – – – – – – – – – – – – – – – – – – – – – – – – – –
1: your.domain.com
– – – – – – – – – – – – – – – – – – – – – – – – – – – – – – – – – – – – – – – –
Select the appropriate numbers separated by commas and/or spaces, or leave input
blank to select all options shown (Enter 'c' to cancel): 1
Obtaining a new certificate
Performing the following challenges:
http-01 challenge for your.domain.com
Waiting for verification…
Cleaning up challenges
Deploying Certificate to VirtualHost /etc/nginx/sites-enabled/reverse-proxy.conf

Please choose whether or not to redirect HTTP traffic to HTTPS, removing HTTP access.
– – – – – – – – – – – – – – – – – – – – – – – – – – – – – – – – – – – – – – – –
1: No redirect – Make no further changes to the webserver configuration.
2: Redirect – Make all requests redirect to secure HTTPS access. Choose this for
new sites, or if you're confident your site works on HTTPS. You can undo this
change by editing your web server's configuration.
– – – – – – – – – – – – – – – – – – – – – – – – – – – – – – – – – – – – – – – –
Select the appropriate number [1-2] then [enter] (press 'c' to cancel): 2
Redirecting all traffic on port 80 to ssl in /etc/nginx/sites-enabled/reverse-proxy.conf

– – – – – – – – – – – – – – – – – – – – – – – – – – – – – – – – – – – – – – – –
Congratulations! You have successfully enabled https://your.domain.com

You should test your configuration at:
https://www.ssllabs.com/ssltest/analyze.html?d=your.domain.com
– – – – – – – – – – – – – – – – – – – – – – – – – – – – – – – – – – – – – – – –


7. Set NGINX Reverse Proxy to auto-start on Linux server boot

On most modern Linux distros use systemctl for legacy machines depending on the Linux distribution use the addequate runlevel /etc/rc3.d/ symlink link on Debian based distros on Fedoras / CentOS / RHEL and other RPM based ones use chkconfig RedHat command.


[root@proxy ~]# systemctl start nginx
[root@proxy ~]# systemctl enable nginx


8. Fixing weird connection permission denied errors


If you get a weird permission denied errors right after you have configured the ProxyPass on Nginx and you're wondering what is causing it you have to know by default on CentOS 7 and RHEL you'll get this errors due to automatically enabled OS selinux security hardening.

If this is the case after you setup Nginx + HTTPD or whatever application server you will get errors in  /var/log/nginx.log like:

2020/12/14 07:46:01 [crit] 7626#0: *1 connect() to 127.0.0.1:8080 failed (13: Permission denied) while connecting to upstream, client: 127.0.0.1, server: , request: "GET / HTTP/1.1", upstream: "http://127.0.0.1:8080/", host: "localhost"
2020/12/14 07:46:02 [crit] 7626#0: *1 connect() to 127.0.0.1:8080 failed (13: Permission denied) while connecting to upstream, client: 127.0.0.1, server: , request: "GET / HTTP/1.1", upstream: "http://127.0.0.1:8080/", host: "localhost"


The solution to proxy_pass weird permission denied errors is to turn off selinux

[root@proxy ~]# setsebool -P httpd_can_network_connect 1

To permanently allow nginx and httpd

[root@proxy ~]# cat /var/log/audit/audit.log | grep nginx | grep denied | audit2allow -M mynginx
[root@proxy ~]# semodule -i mynginx.pp


[root@proxy ~]# cat /var/log/audit/audit.log | grep httpd | grep denied | audit2allow -M myhttpd
[root@proxy ~]# semodule -i myhttpd.pp


Then to let know nginx and httpd (or whatever else app you run) be aware of new settings restart both

[root@proxy ~]# systemctl restart nginx
[root@proxy ~]# systemctl restart httpd

How to install and use memcached on Debian GNU / Linux to share php sessions between DNS round robined Apache webservers

Monday, November 9th, 2020

apache-load-balancing-keep-persistent-php-sessions-memcached-logo

Recently I had to come up with a solution to make A bunch of websites hosted on a machine to be high available. For the task haproxy is one of logical options to use. However as I didn't wanted to set new IP addresses and play around to build a cluster. I decided the much more simplistic approach to use 2 separate Machines each running Up-to-date same version of Apache Webserver as front end and using a shared data running on Master-to-Master MySQL replication database as a backend. For the load balancing itself I've used a simple 2 multiple DNS 'A' Active records, configured via the Bind DNS name server an Round Robin DNS load balancing for each of the domains, to make them point to the the 2 Internet IP addresses (XXX.XXX.XXX.4 and YYY.YYY.YYY.5) each configured on the 2 Linux servers eth0.

So far so good, this setup worked but immediately, I've run another issue as I found out the WordPress and Joomla based websites's PHP sessions are lost, as the connectivity by the remote client browser reaches one time on XXX…4 and one time on YYY…4 configured listerner on TCP port 80 and TCP p. 443. In other words if request comes up to Front end Apache worker webserver 1 with opened channel data is sent back to Client Browser and the next request is sent due to the other IP resolved by the DNS server to come to Apache worker webserver 2 of course webserver 2 has no idea about this previous session data and it gets confused and returns soemething like a 404 or 500 or any other error … not exciting really huh …

I've thought about work around and as I didn't wanted to involve thirty party stuff as Privoxy / Squid  / Varnish / Polipo etc. just as that would add extra complexity as if I choose to use haproxy from the beginning, after short investigation came to a reason to use memcached as a central PHP sessions storage.
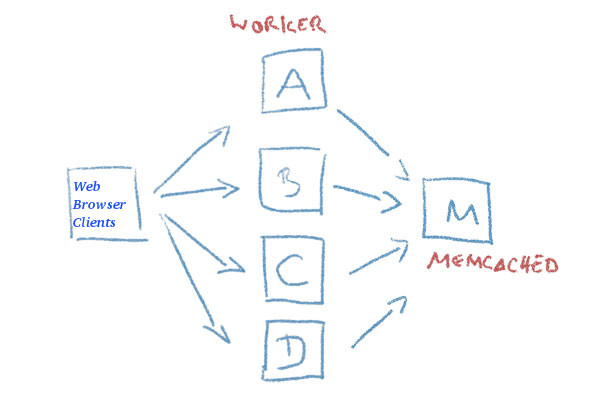
php-memcached-apache-workers-webbrowser-keep-sessions-diagram
 

Why I choose memcached ?


Well it is relatively easy to configure, it doesn't come with mambo-jambo unreadable over-complicated configuration and the time to configure everything is really little as well as the configuration is much straight forward, plus I don't need to occupy more IP addresses and I don't need to do any changes to the already running 2 WebServers on 2 separate Linux hosts configured to be reachable from the Internet.
Of course using memcached is not a rock solid and not the best solution out there, as there is risk that if a memcached dies out for some reason all sessions stored in are lost as they're stored only in volatile memory, as well as there is a drawback that if a communication was done via one of the 2 webservers and one of them goes down sessions that were known by one of Apache's workers disappears.

So let me proceed and explain you the steps to take to configure memcached as a central session storage system.
 

1. Install memcached and php-memcached packages


To enable support for memcached besides installing memcached daemon, you need to have the php-memcached which will provide the memcached.so used by Apache loaded php script interpretter module.

On a Debian / Ubuntu and other deb based GNU / Linux it should be:

webserver1:~# apt-get install memcached php-memcached

TO use php-memcached I assume Apache and its support for PHP is already installed with lets say:
 

webserver1:~# apt-get install php libapache2-mod-php php-mcrypt


On CentOS / RHEL / Fedora Linux it is a little bit more complicated as you'll need to install php-pear and compile the module with pecl


[root@centos ~]# yum install php-pear

[root@centos ~]# yum install php-pecl-memcache


Compile memcache

[root@centos ~]# pecl install memcache


2. Test if memcached is properly loaded in PHP


Once installed lets check if memcached service is running and memcached support is loaded as module into PHP core.


webserver1:~# ps -efa  | egrep memcached
nobody   14443     1  0 Oct23 ?        00:04:34 /usr/bin/memcached -v -m 64 -p 11211 -u nobody -l 127.0.0.1 -l 192.168.0.1

root@webserver1:/# php -m | egrep memcache
memcached


To get a bit more verbose information on memcache version and few of memcached variable settings:

root@webserver1:/# php -i |grep -i memcache
/etc/php/7.4/cli/conf.d/25-memcached.ini
memcached
memcached support => enabled
libmemcached version => 1.0.18
memcached.compression_factor => 1.3 => 1.3
memcached.compression_threshold => 2000 => 2000
memcached.compression_type => fastlz => fastlz
memcached.default_binary_protocol => Off => Off
memcached.default_connect_timeout => 0 => 0
memcached.default_consistent_hash => Off => Off
memcached.serializer => php => php
memcached.sess_binary_protocol => On => On
memcached.sess_connect_timeout => 0 => 0
memcached.sess_consistent_hash => On => On
memcached.sess_consistent_hash_type => ketama => ketama
memcached.sess_lock_expire => 0 => 0
memcached.sess_lock_max_wait => not set => not set
memcached.sess_lock_retries => 5 => 5
memcached.sess_lock_wait => not set => not set
memcached.sess_lock_wait_max => 150 => 150
memcached.sess_lock_wait_min => 150 => 150
memcached.sess_locking => On => On
memcached.sess_number_of_replicas => 0 => 0
memcached.sess_persistent => Off => Off
memcached.sess_prefix => memc.sess.key. => memc.sess.key.
memcached.sess_randomize_replica_read => Off => Off
memcached.sess_remove_failed_servers => Off => Off
memcached.sess_sasl_password => no value => no value
memcached.sess_sasl_username => no value => no value
memcached.sess_server_failure_limit => 0 => 0
memcached.store_retry_count => 2 => 2
Registered save handlers => files user memcached


Make sure /etc/default/memcached (on Debian is enabled) on CentOS / RHELs this should be /etc/sysconfig/memcached

webserver1:~# cat default/memcached 
# Set this to no to disable memcached.
ENABLE_MEMCACHED=yes

As assured on server1 memcached + php is ready to be used, next login to Linux server 2 and repeat the same steps install memcached and the module and check it is showing as loaded.

Next place under some of your webservers hosted websites under check_memcached.php below PHP code
 

<?php
if (class_exists('Memcache')) {
    $server = 'localhost';
    if (!empty($_REQUEST[‘server’])) {
        $server = $_REQUEST[‘server’];
    }
    $memcache = new Memcache;
    $isMemcacheAvailable = @$memcache->connect($server);

    if ($isMemcacheAvailable) {
        $aData = $memcache->get('data');
        echo '<pre>';
        if ($aData) {
            echo '<h2>Data from Cache:</h2>';
            print_r($aData);
        } else {
            $aData = array(
                'me' => 'you',
                'us' => 'them',
            );
            echo '<h2>Fresh Data:</h2>';
            print_r($aData);
            $memcache->set('data', $aData, 0, 300);
        }
        $aData = $memcache->get('data');
        if ($aData) {
            echo '<h3>Memcache seem to be working fine!</h3>';
        } else {
            echo '<h3>Memcache DOES NOT seem to be working!</h3>';
        }
        echo '</pre>';
    }
}

if (!$isMemcacheAvailable) {
    echo 'Memcache not available';
}

?>


Launch in a browser https://your-dns-round-robined-domain.com/check_memcached.php, the browser output should be as on below screenshot:
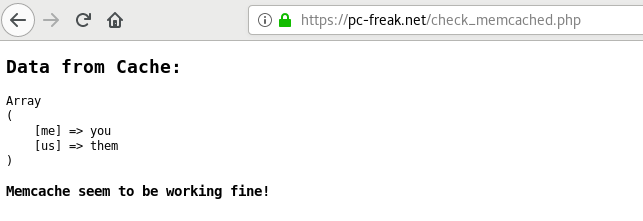
check_memcached-php-script-website-screenshot

3. Configure memcached daemons on both nodes

All we need to set up is the listen IPv4 addresses

On Host Webserver1
You should have in /etc/memcached.conf

-l 127.0.0.1
-l 192.168.0.1

webserver1:~# grep -Ei '\-l' /etc/memcached.conf 
-l 127.0.0.1
-l 192.168.0.1


On Host Webserver2

-l 127.0.0.1
-l 192.168.0.200


webserver2:~# grep -Ei '\-l' /etc/memcached.conf
-l 127.0.0.1
-l 192.168.0.200


4. Configure memcached in php.ini

Edit config /etc/php.ini (on CentOS / RHEL) or on Debians / Ubuntus etc. modify /etc/php/*/apache2/php.ini (where depending on the PHP version you're using your php location could be different lets say /etc/php/5.6/apache2/php.ini):

If you wonder where is the php.ini config in your case you can usually get it from the php cli:

webserver1:~# php -i | grep "php.ini"
Configuration File (php.ini) Path => /etc/php/7.4/cli
Loaded Configuration File => /etc/php/7.4/cli/php.ini


! Note: That on on PHP-FPM installations (where FastCGI Process Manager) is handling PHP requests,path would be rather something like:
 

/etc/php5/fpm/php.ini

in php.ini you need to change as minimum below 2 variables
 

session.save_handler =
session.save_path =


By default session.save_path would be set to lets say session.save_path = "

/var/lib/php7/sessions"


To make php use a 2 central configured memcached servers on webserver1 and webserver2 or even more memcached configured machines set it to look as so:

session.save_path="192.168.0.200:11211, 192.168.0.1:11211"


Also modify set

session.save_handler = memcache


Overall changed php.ini configuration on Linux machine 1 ( webserver1 ) and Linux machine 2 ( webserver2 ) should be:

session.save_handler = memcache
session.save_path="192.168.0.200:11211, 192.168.0.1:11211"


Below is approximately how it should look on both :

webserver1: ~# grep -Ei 'session.save_handler|session.save_path' /etc/php.ini
;; session.save_handler = files
session.save_handler = memcache
;     session.save_path = "N;/path"
;     session.save_path = "N;MODE;/path"
;session.save_path = "/var/lib/php7/sessions"
session.save_path="192.168.0.200:11211, 192.168.0.1:11211"
;       (see session.save_path above), then garbage collection does *not*


webserver2: ~# grep -Ei 'session.save_handler|session.save_path' /etc/php.ini
;; session.save_handler = files
session.save_handler = memcache
;     session.save_path = "N;/path"
;     session.save_path = "N;MODE;/path"
;session.save_path = "/var/lib/php7/sessions"
session.save_path="192.168.0.200:11211, 192.168.0.1:11211"
;       (see session.save_path above), then garbage collection does *not*


As you can see I have configured memcached on webserver1 to listen on internal local LAN IP 192.168.0.200 and on Local LAN eth iface 192.168.0.1 on TCP port 11211 (this is the default memcached connections listen port), for security or obscurity reasons you might choose another empty one. Make sure to also set the proper firewalling to that port, the best is to enable connections only between 192.168.0.200 and 192.168.0.1 on each of machine 1 and machine 2.
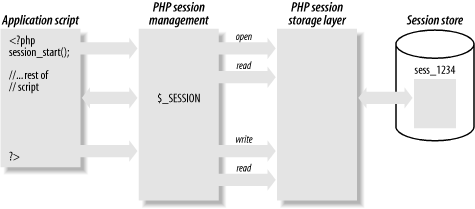
loadbalancing2-php-sessions-scheme-explained
 

5. Enable Memcached for session redundancy


Next step is to configure memcached to allow failover (e.g. use both memcached on 2 linux hosts) and configure session redundancy.
Configure /etc/php/7.3/mods-available/memcache.ini or /etc/php5/mods-available/memcache.ini or respectively to the right location depending on the PHP installed and used webservers version.
 

webserver1 :~#  vim /etc/php/7.3/mods-available/memcache.ini

; configuration for php memcached module
; priority=20
; settings to write sessions to both servers and have fail over
memcache.hash_strategy=consistent
memcache.allow_failover=1
memcache.session_redundancy=3
extension=memcached.so


webserver2 :~# vim /etc/php/7.3/mods-available/memcache.ini

; configuration for php memcached module
; priority=20
; settings to write sessions to both servers and have fail over
memcache.hash_strategy=consistent
memcache.allow_failover=1
memcache.session_redundancy=3
extension=memcached.so


memcache.session_redundancy directive must be equal to the number of memcached servers + 1 for the session information to be replicated to all the servers. This is due to a bug in PHP.
I have only 2 memcached configured that's why I set it to 3.
 

6. Restart Apache Webservers

Restart on both machines webserver1 and webserver2 Apache to make php load memcached.so
 

webserver1:~# systemctl restart httpd

webserver2:~# systemctl restart httpd


7. Restart memcached on machine 1 and 2


webserver1 :~# systemctl restart memcached

webserver2 :~# systemctl restart memcached


8. Test php sessions are working as expected with a php script

Copy to both website locations to accessible URL a file test_sessions.php:
 

<?php  
session_start();

if(isset($_SESSION[‘georgi’]))
{
echo "Sessions is ".$_SESSION[‘georgi’]."!\n";
}
else
{
echo "Session ID: ".session_id()."\n";
echo "Session Name: ".session_name()."\n";
echo "Setting 'georgi' to 'cool'\n";
$_SESSION[‘georgi’]='cool';
}
?>


Now run the test to see PHP sessions are kept persistently:
 

hipo@jeremiah:~/Desktop $ curl -vL -s https://www.pc-freak.net/session.php 2>&1 | grep 'Set-Cookie:'
< Set-Cookie: PHPSESSID=micir464cplbdfpo36n3qi9hd3; expires=Tue, 10-Nov-2020 12:14:32 GMT; Max-Age=86400; path=/

hipo@jeremiah:~/Desktop $ curl -L –cookie "PHPSESSID=micir464cplbdfpo36n3qi9hd3" http://83.228.93.76/session.php http://213.91.190.233/session.php
Session is cool!
Session is cool!


Copy to the locations that is resolving to both DNS servers some sample php script such as sessions_test.php  with below content:

<?php
    header('Content-Type: text/plain');
    session_start();
    if(!isset($_SESSION[‘visit’]))
    {
        echo "This is the first time you're visiting this server\n";
        $_SESSION[‘visit’] = 0;
    }
    else
            echo "Your number of visits: ".$_SESSION[‘visit’] . "\n";

    $_SESSION[‘visit’]++;

    echo "Server IP: ".$_SERVER[‘SERVER_ADDR’] . "\n";
    echo "Client IP: ".$_SERVER[‘REMOTE_ADDR’] . "\n";
    print_r($_COOKIE);
?>

Test in a Web Opera / Firefox / Chrome browser.

You should get an output in the browser similar to:
 

Your number of visits: 15
Server IP: 83.228.93.76
Client IP: 91.92.15.51
Array
(
    [_ga] => GA1.2.651288003.1538922937
    [__utma] => 238407297.651288003.1538922937.1601730730.1601759984.45
    [__utmz] => 238407297.1571087583.28.4.utmcsr=google|utmccn=(organic)|utmcmd=organic|utmctr=(not provided)
    [shellInABox] => 467306938:1110101010
    [fpestid] => EzkIzv_9OWmR9PxhUM8HEKoV3fbOri1iAiHesU7T4Pso4Mbi7Gtt9L1vlChtkli5GVDKtg
    [__gads] => ID=8a1e445d88889784-22302f2c01b9005b:T=1603219663:RT=1603219663:S=ALNI_MZ6L4IIaIBcwaeCk_KNwmL3df3Z2g
    [PHPSESSID] => mgpk1ivhvfc2d0daq08e0p0ec5
)

If you want to test php sessions are working with text browser or from another external script for automation use something as below PHP code:
 

<?php
// save as "session_test.php" inside your webspace  
ini_set('display_errors', 'On');
error_reporting(6143);

session_start();

$sessionSavePath = ini_get('session.save_path');

echo '<br><div style="background:#def;padding:6px">'
   , 'If a session could be started successfully <b>you should'
   , ' not see any Warning(s)</b>, otherwise check the path/folder'
   , ' mentioned in the warning(s) for proper access rights.<hr>';
echo "WebServer IP:" . $_SERVER[‘SERVER_ADDR’] . "\n<br />";
if (empty($sessionSavePath)) {
    echo 'A "<b>session.save_path</b>" is currently',
         ' <b>not</b> set.<br>Normally "<b>';
    if (isset($_ENV[‘TMP’])) {
        echo  $_ENV[‘TMP’], ‘” ($_ENV[“TMP”]) ';
    } else {
        echo '/tmp</b>" or "<b>C:\tmp</b>" (or whatever',
             ' the OS default "TMP" folder is set to)';
    }    
    echo ' is used in this case.';
} else {
    echo 'The current "session.save_path" is "<b>',
         $sessionSavePath, '</b>".';
}

echo '<br>Session file name: "<b>sess_', session_id()
   , '</b>".</div><br>';
?>

You can download the test_php_sessions.php script here.

To test with lynx:

hipo@jeremiah:~/Desktop $ lynx -source 'https://www.pc-freak.net/test_php_sessions.php'
<br><div style="background:#def;padding:6px">If a session could be started successfully <b>you should not see any Warning(s)</b>, otherwise check the path/folder mentioned in the warning(s) for proper access rights.<hr>WebServer IP:83.228.93.76
<br />The current "session.save_path" is "<b>tcp://192.168.0.200:11211, tcp://192.168.0.1:11211</b>".<br>Session file name: "<b>sess_5h18f809b88isf8vileudgrl40</b>".</div><br>

Start Stop Restart Microsoft IIS Webserver from command line and GUI

Thursday, April 17th, 2014

start-stop-restart-microsoft-iis-howto-iis-server-logo
For a decomissioning project just recently I had the task to stop Microsoft IIS  on Windows Server system.
If you have been into security for a while you know well how many vulnerabilities Microsoft (Internet Information Server) Webserver used to be. Nowadays things with IIS are better but anyways it is better not to use it if possible …

Nomatter what the rason if you need to make IIS stop serving web pages here is how to do it via command line:

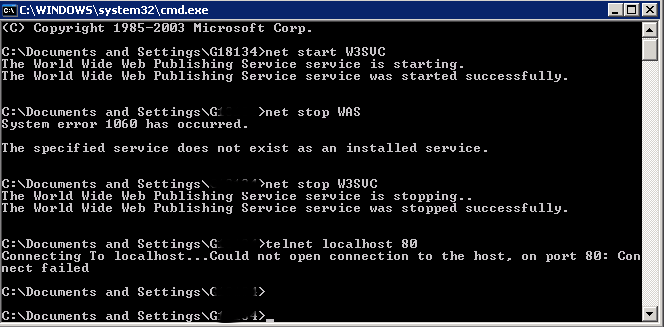
At Windows Command Prompt, type:

net stop WAS

If the command returns error message to stop it type:

net stop W3SVC

stop-microsoft-IIS-webservice
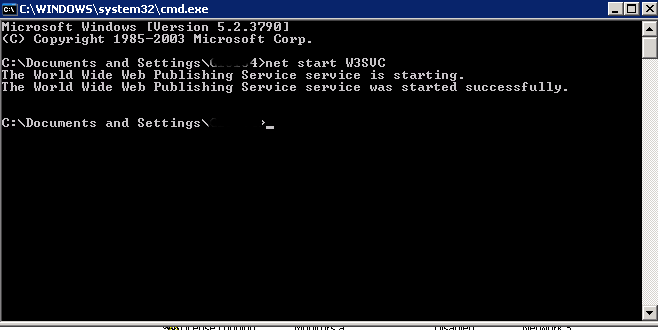
Just in case you have to start it again run:

net start W3SVC

start-restart-IIS-webserver-screenshot

For those who prefer to do it from GUI interface, launch services.msc command from Windows Run:

> services.msc

services-msc-stop-microsoft-iis-webserver

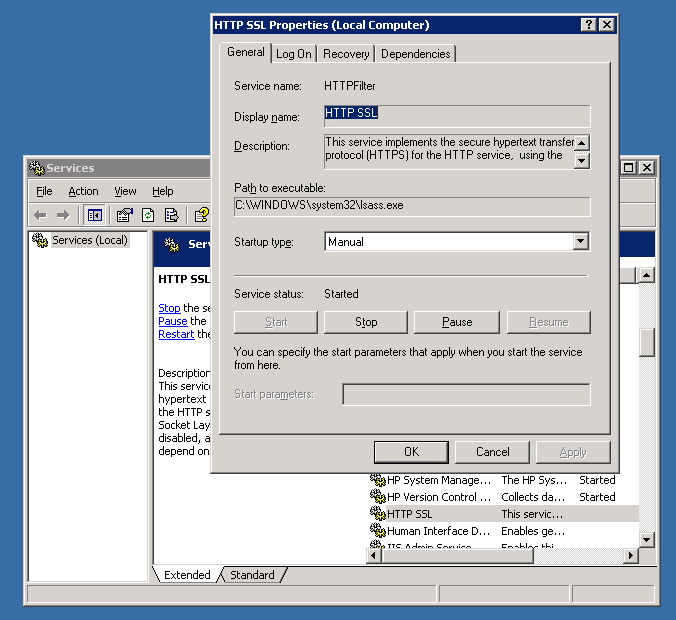
In list of services lookup for
IIS Admin Service and HTTP SSL
a) (Click over it with right mouse button -> Properties)
b) Set Startup type to Manual
c) Click Stop Button

You're done now IIS is stopped to make sure it is stopped you can run from cmd.exe:

telnet localhost 80

when not working you should get 'Could not open connection to the host. on port 80: Connection failed' like shown up in screenshot.

How to check Microsoft IIS webserver version

Monday, July 21st, 2014

If you have to tune some weirdly behaviour Microsoft IIS (Internet Information Services) webserver, the first thing to do is to collect information about the system you're dealing with – get version of installed Windows and check what kind of IIS version is running on the Windows server?

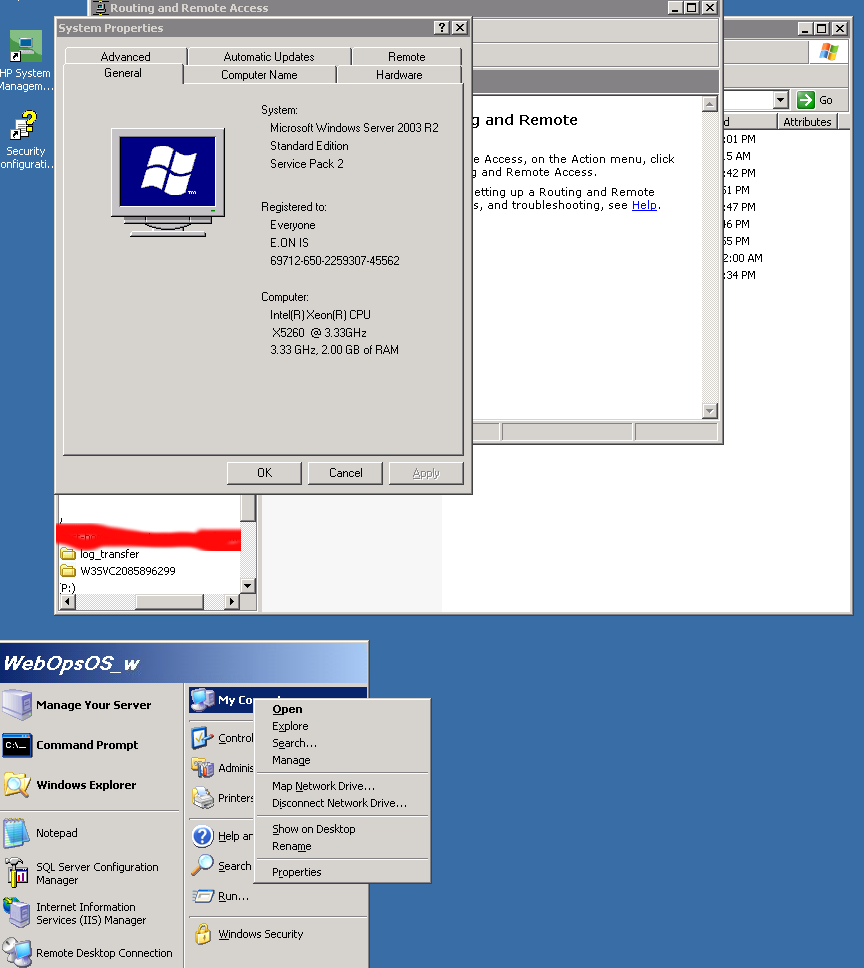
To get the version of installed Windows on the system you just logged in, the quickest way I use is:
 

Start -> My Computer (right mouse button) Properties

check-windows-server-version-screenshot-windows-2003-r2

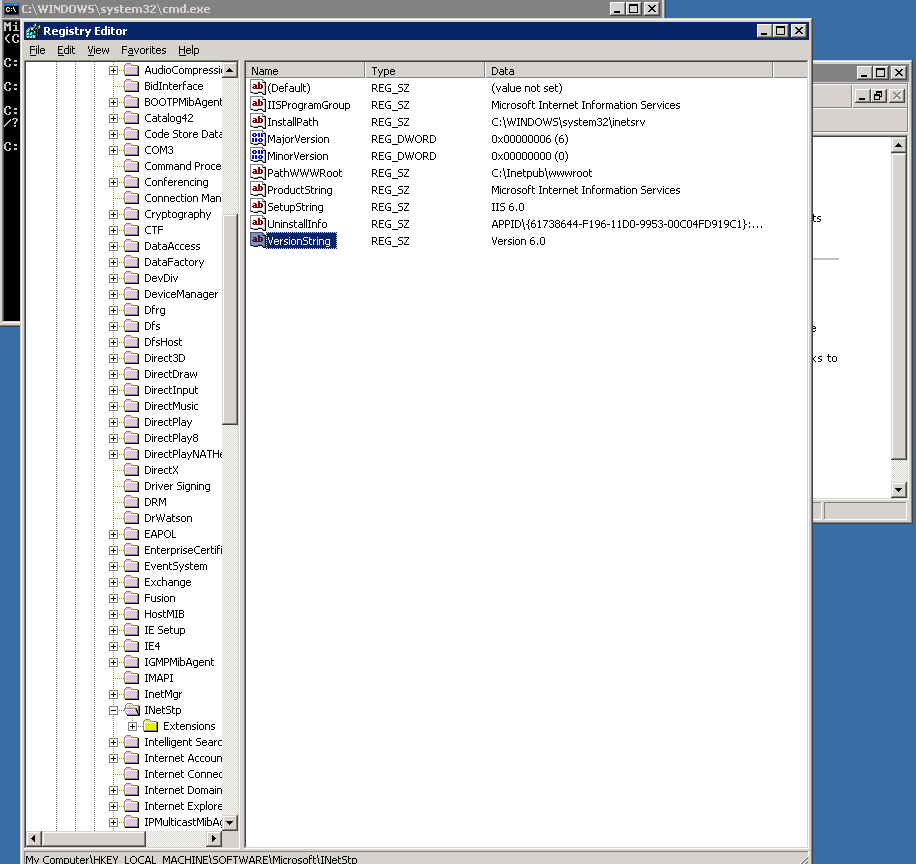
Run regedit from cmd.exe and go and check value of registry value:


HKEY_LOCAL_MACHINE\SOFTWARE\MicrosoftInetStp\VersionString


check-iis-webserver-version-with-windows-registry-screenshot

As you can see in screenshot in this particular case it is IIS version 6.0.

An alternative way to check the IIS version in some cases (if IIS version return is not disabled) is to telnet to webserver:

telnet your-webserver 80


Once connected Send:

HEAD / HTTP/1.0


Also on some Windows versions it is possible to check IIS webserver version from Internet Information Services Management Cosnole:

To check IIS version from IIS Manager:

Start (button) -> Control Panel -> Administrative Tools -> "Internet Information Services" IIS Manager

From IIS Manager go to:

Help -> About Microsoft Management Console


Here is a list with most common IIS version output you will get depending on the version of Windows server:


Windows NT 3.51 1.0
Windows NT 4 2.0-4.0
Windows Server 2000 5.0
Windows XP Professional 5.1
Windows Server 2003 6.0
Windows Vista 7.0
Windows Server 2008 7.0
Windows Server 2008 R2 7.5
Windows 7 7.5
Windows Server 2012 8.0
Windows 8 8.0
Windows Server 2012 R2 8.5
Windows 8.1 8.5

If you have only an upload FTP access to a Folder served by IIS Webserver – i.e. no access to the Win server running IIS, you can also grasp the IIS version with following .ASP code:
 

<%
response.write(Request.ServerVariables("SERVER_SOFTWARE"))
%>


Save the file as anyfile.asp somewhere in IIS docroot and invoke it in browser.

How to convert .CRT SSL Certificate to .PFX format (with openssl Linux command) and Import newly generated .PFX to Windows IIS Webserver

Tuesday, September 27th, 2016

IIS8_Windows_Webserver_logo_convert_CRT_and_import_PFX-certificate

1. Converting to .CRT to.PFX file format with OpenSSL tool on GNU / Linux to import in Windows (for example, IIS)

Assuming you have generated already a certificate using the openssl Linux command and you have issued the .CRT SSL Certificate issuer file
and you need to have the new .CRT SSL Certificate installed on Windows Server (lets say on Windows 2012) with IIS Webserver version 8.5, you will need a way to convert the .CRT file to .PFX, there is plenty of ways to do that including using online Web Site SSL Certificate converter or use a stand alone program on the Windows server or even use a simple perl / python / ruby script to do the conversion but anyways the best approach will be to convert the new .CRT file to IIS supported binary Certificate format .PFX on the same (Linux certificate issuer host where you have first generated the certificate issuer request .KEY (private key file used with third party certificate issuer such as Godaddy or Hostgator to receive the .CRT / PEM file).

Here is how to generate the .PFX file based on the .CRT file for an Internal SSL Certfiicate:


openssl pkcs12 -export -in server.crt -inkey server.key -out server.pfx

On the password prompt to appear use any password because otherwise the future IIS Webserver certificate import will not work.
 

To do a certificate chain SSL export to be accessed from the  internet.


openssl pkcs12 -export -in server.crt -inkey server.key -out server.pfx -certfile internet v2.crt

2. Import the PFX file in Windows


Run: mmc, add snap, Certificates, Computer account, Local Computer; in the
Console:

Certificates (Local Computer) > Personal > Certificates: Select All Tasks > Import File

Enter previously chosen password.
You should get further the Message "Import was successful."

You can import the PFX file by simply copying it to the server where you want it imported and double click it this will  open Windows Importwizzard.

Then select the IIS:


Site, Properties, Directory Security, Server Certificate, Replace the current certficate, select proper Certificate. Done.

Alternatively to complete the IIS Webserver certificate import within one step when a new certificate is to be imported:

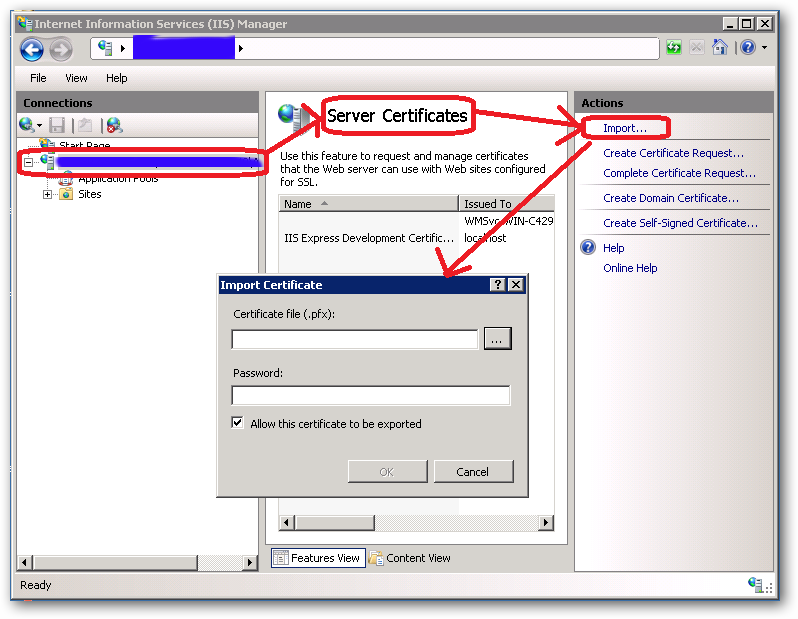
In IIS Manager interface go to :

Site, Properties, Directory Security, Server Certificate, Server Certificate Wizard


Click on

Next

Choose

import a certificate from a .pfx file, select and enter password.

Internet_Information_Server_IIS_Windows-SSL_Certificate-import-PKF-file

3. Import the PFX file into a Java keystore


Another thing you might need if you have the IIS Webserver using a backend Java Virtual Machine on the same or a different Windows server is to import the newly generated .PFX file within the Java VM keystore.

To import with keytool command for Java 1.6 type:


keytool -importkeystore -deststorepass your_pass_here -destkeypass changeit -destkeystore keystore.jks -srckeystore server.pfx -srcstoretype PKCS12 -srcstorepass 1234 -srcalias 1 -destalias xyz


Also the .CRT file could be directly imported into the Java keystore


Import a .crt in a Java keystore


/usr/java/jre/bin/keytool -import -keystore /webdienste/java/jdk/jre/lib/security/cacerts -file certificate.crt -alias Some alias


4. Get a list of Windows locally installed certificates

To manager installed certificates on Windows 7 / 8 / 2012 Server OS is to run command via

Start -> Run


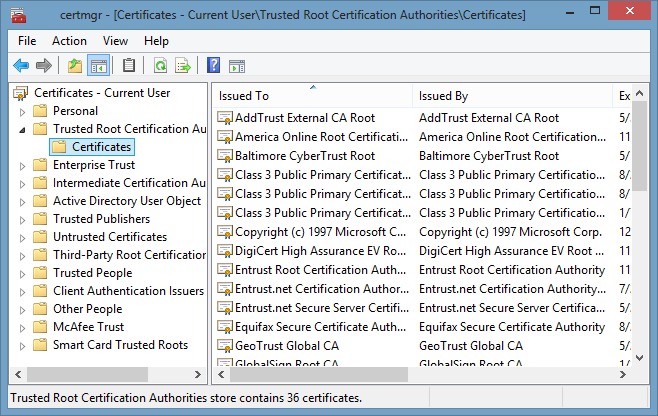
certmgr.msc

certmgr_trca_windows_check-windows-installed-ssl-certificates


One other way to see the installed certificates on your Windows server is checking within

Internet Explorer

Go to Tools (Alt+X) → Internet Options → Content → Certificates.


To get a a complete list of installed Certificate Chain on Windows you can use PowerShell


Get-ChildItem -Recurse Cert:


That's all folks ! 🙂


Use multiple certificates using one IP address (same IP address) on IIS Windows web server

Saturday, October 24th, 2020

If you had to administer some Windows webservers based on IIS and you're coming from the Linux realm, it would be really confusing on how you can use a single IP address to have binded multiple domain certificates.

For those who have done it on linux, they know Apache and other webservers in recent versions support the configuration Directive of a Wildcard instead of IP through the SNI extension capble to capture in the header of the incoming SSL connection the exact domain and match it correctly against the domain with the respective certificate.  Below is what I mean, lets say you have a website called yourdomain.com and you want this domain to be pointing to another location for example to yourdomain1.com

For example in Apache Webserver this is easily done by defining 2 separate virtualhost configuration files similar to below:

/etc/apache2/sites-available/yourdomain.com

<Virtualhost *>

Servername yourdomain.com
ServerAlias www.yourdomain.com
….

        SSLCertificateFile /etc/letsencrypt/live/yourdomain1.com/fullchain.pem
SSLCertificateKeyFile /etc/letsencrypt/live/yourdomain1.com/privkey.pem
</VirtualHost>


/etc/apache2/sites-available/yourdomain1.com

<Virtualhost *>

Servername yourdomain1.com
ServerAlias yourdomain1.com


        SSLCertificateFile /etc/letsencrypt/live/yourdomain1.com/fullchain.pem
SSLCertificateKeyFile /etc/letsencrypt/live/yourdomain1.com/privkey.pem
</VirtualHost>


Unfortunately for those who still run legacy Windows servers  with IIS version 7 / 7.5 your only option is to use separate IP addresses (or ports, but not really acceptable for public facing sites) and to bind each site with it's SSL certificate to that IP address.

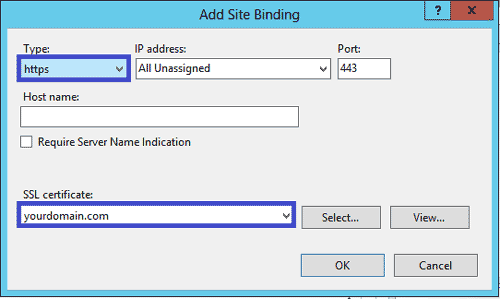
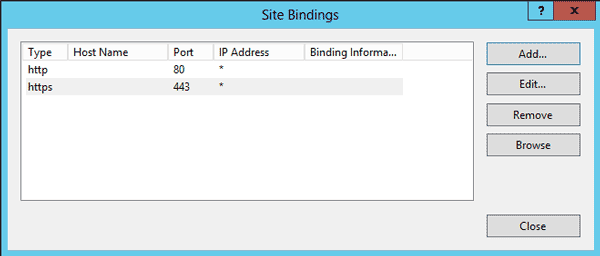
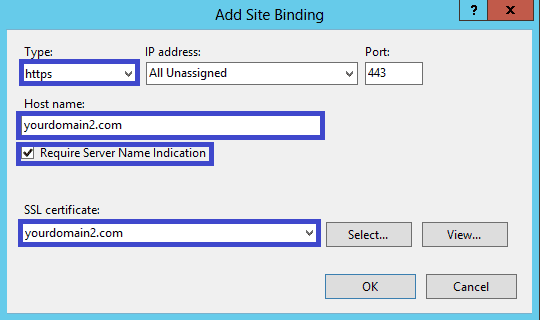
IIS ver. 8+ supports the Server Name Indication extension of TLS which will allow you to bind multiple SSL sites to the same IP address/port based on the host name. It will be transparent and the binding will work the same as with non-HTTPS sites.

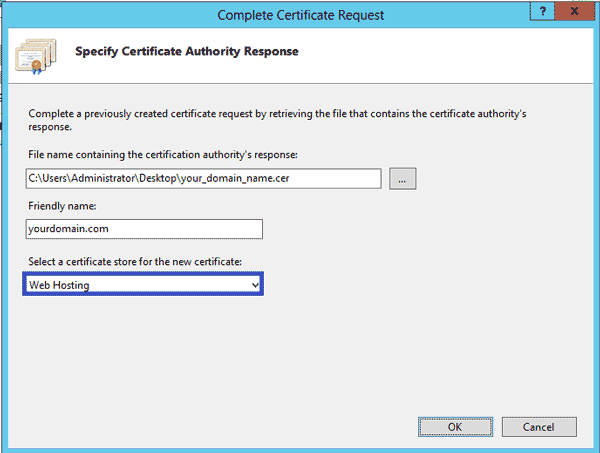
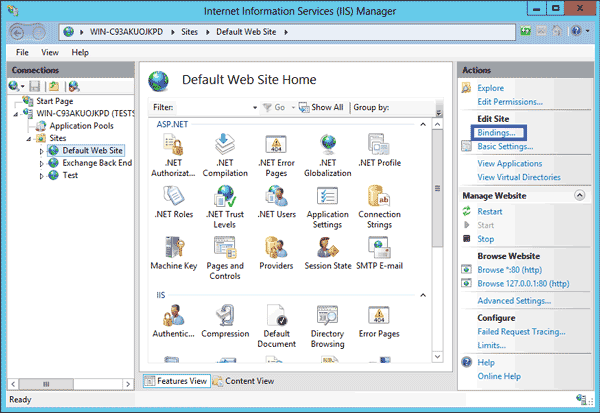
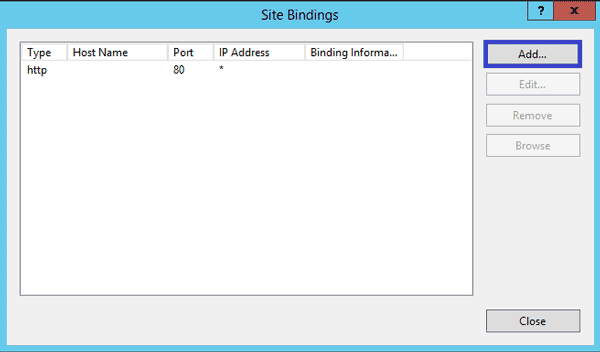
In Microsoft IIS Webserver to configure, it is not possible to simply edit some configurations but you have to do it the clicking way as usually happen in Windows. thus you will need to have generated the Domain Certificate requests and so on and then you can simply do as pointed in below screenshots.

howto-install-iis-8-webserver-ssl-sni-certificate-windows-screenshot
 

iis-config-domain-alias-windows-server-iis-8-webserver

iis-config-domain-alias-windows-server-iis-8-webserver-1

iis-config-domain-alias-windows-server-iis-8-webserver-2

iis-config-domain-alias-windows-server-iis-8-webserver-3

iis-config-domain-alias-windows-server-iis-8-webserver-4
 

Improve wordpress admin password encryption authentication keys security with WordPress Unique Authentication Keys and Salts

Friday, October 9th, 2020

wordpress-improve-security-logo-linux

Having a wordpress blog or website with an admistrator and access via a Secured SSL channel is common nowadays. However there are plenty of SSL encryption leaks already out there and many of which are either slow to be patched or the hosting companies does not care enough to patch on time the libssl Linux libraries / webserver level. Taking that in consideration many websites hosted on some unmaintained one-time run not-frequently updated Linux servers are still vulneable and it might happen that, if you paid for some shared hosting in the past and someone else besides you hosted the website and forget you even your wordpress installation is still living on one of this SSL vulnerable hosts. In situations like that malicious hackers could break up the SSL security up to some level or even if the SSL is secured use MITM (MAN IN THE MIDDLE) attack to simulate your well secured and trusted SSID Name WIFi network to  redirects the network traffic you use (via an SSL transparent Proxy) to connect to WordPress Administrator Dashbiard via https://your-domain.com/wp-admin. Once your traffic is going through the malicious hax0r even if you haven't used the password to authenticate every time, e.g. you have saved the password in browser and WordPress Admin Panel authentication is achieved via a Cookie the cookies generated and used one time by Woddpress site could be easily stealed one time and later from the vicious 1337 h4x0r and reverse the hash with an interceptor Tool and login to your wordpress …

Therefore to improve the wordpress site security it very important to have configured WordPress Unique Authentication Keys and Salts (known also as the WordPress security keys).

They're used by WordPress installation to have a uniquely generated different key and Salt from the default one to the opened WordPress Blog / Site Admin session every time.

So what are the Authentication Unique Keys and Salts and why they are Used?

Like with almost any other web application, when PHP session is opened to WordPress, the code creates a number of Cookies stored locally on your computer.

Two of the cookies created are called:

 wordpress_[hash]
wordpress_logged_in_[hash]

First  cookie is used only in the admin pages (WordPress dashboard), while the second cookie is used throughout WordPress to determine if you are logged in to WordPress or not. Note: [hash] is a random hashed value typically assigned to your session, therefore in reality the cookies name would be named something like wordpress_ffc02f68bc9926448e9222893b6c29a9.

WordPress session stores your authentication details (i.e. WordPress username and password) in both of the above mentioned cookies.

The authentication details are hashed, hence it is almost impossible for anyone to reverse the hash and guess your password through a cookie should it be stolen. By almost impossible it also means that with today’s computers it is practically unfeasible to do so.

WordPress security keys are made up of four authentication keys and four hashing salts (random generated data) that when used together they add an extra layer to your cookies and passwords. 

The authentication details in these cookies are hashed using the random pattern specified in the WordPress security keys. I will not get into too much details but as you might have heard in Cryptography Salts and Keys are important – an indepth explanation on Salts Cryptography (here). A good reading for those who want to know more on how does the authentication based and salts work is on stackexchange.

How to Set up Salt and Key Authentication on WordPress
 

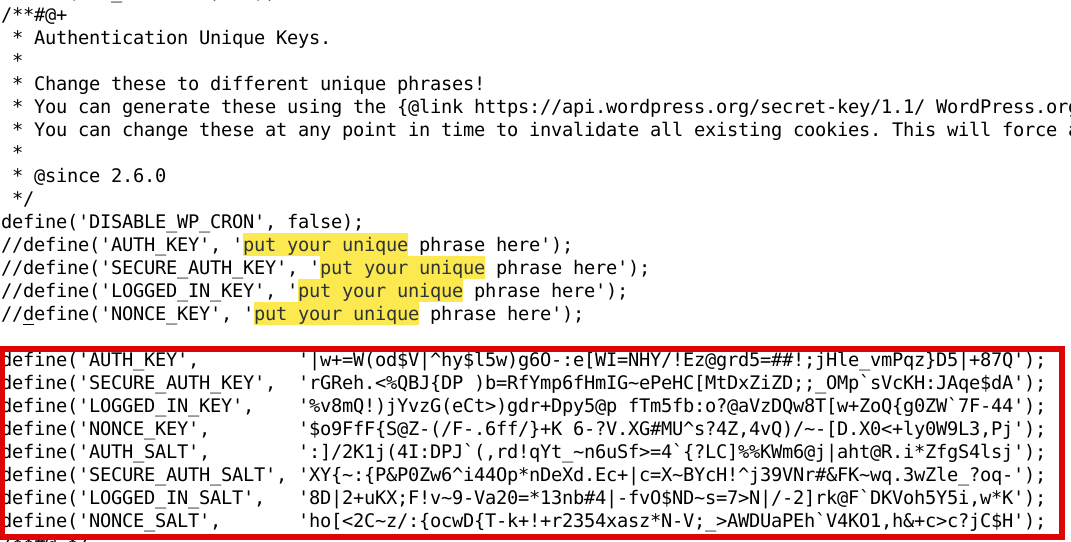
To be used by WP Salts and Key should be configured under wp-config.php usually they look like so:

wordpress-website-blog-salts-keys-wp-config-screenshot-linux

!!! Note !!!  that generating (manually or generated via a random generator program), the definition strings you have to use a random string value of more than 60 characters to prevent predictability 

The default on any newly installed WordPress Website is to have the 4 definitions with _KEY and the four _SALTs to be unconfigured strings looks something like:

default-WordPress-security-keys-and-salts-entries-in-wordPress-wp-config-php-file

Most people never ever take a look at wp-config.php as only the Web GUI Is used for any maintainance, tasks so there is a great chance that if you never heard specifically by some WordPress Security Expert forum or some Security plugin (such as WP Titan Anti Spam & Security) installed to report the WP KEY / SALT you might have never noticed it in the config.

There are 8 WordPress security keys in current WP Installs, but not all of them have been introduced at the same time.
Historically they were introduced in WP versions in below order:

WordPress 2.6: AUTH_KEY, SECURE_AUTH_KEY, LOGGED_IN_KEY
WordPress 2.7: NONCE_KEY
WordPress 3.0: AUTH_SALT, SECURE_AUTH_SALT, LOGGED_IN_SALT, NONCE_SALT

Setting a custom random generated values is an easy task as there is already online Wordpress Security key Random generator.
You can visit above address and you will get an automatic randomly generated values which could be straight copy / pasted to your wp-config.php.

Howeever if you're a paranoic on the guessability of the random generator algorithm, I would advice you use the generator and change some random values yourself on each of the 8 line, the end result in the configuration should be something similar to:


define('AUTH_KEY',         '|w+=W(od$V|^hy$F5w)g6O-:e[WI=NHY/!Ez@grd5=##!;jHle_vFPqz}D5|+87Q');
define('SECURE_AUTH_KEY',  'rGReh.<%QBJ{DP )p=BfYmp6fHmIG~ePeHC[MtDxZiZD;;_OMp`sVcKH:JAqe$dA');
define('LOGGED_IN_KEY',    '%v8mQ!)jYvzG(eCt>)bdr+Rpy5@t fTm5fb:o?@aVzDQw8T[w+aoQ{g0ZW`7F-44');
define('NONCE_KEY',        '$o9FfF{S@Z-(/F-.6fC/}+K 6-?V.XG#MU^s?4Z,4vQ)/~-[D.X0<+ly0W9L3,Pj');
define('AUTH_SALT',        ':]/2K1j(4I:DPJ`(,rK!qYt_~n8uSf>=4`{?LC]%%KWm6@j|aht@R.i*ZfgS4lsj');
define('SECURE_AUTH_SALT', 'XY{~:{P&P0Vw6^i44Op*nDeXd.Ec+|c=S~BYcH!^j39VNr#&FK~wq.3wZle_?oq-');
define('LOGGED_IN_SALT',   '8D|2+uKX;F!v~8-Va20=*d3nb#4|-fv0$ND~s=7>N|/-2]rk@F`DKVoh5Y5i,w*K');
define('NONCE_SALT',       'ho[<2C~z/:{ocwD{T-w+!+r2394xasz*N-V;_>AWDUaPEh`V4KO1,h&+c>c?jC$H');


Wordpress-auth-key-secure-auth-salt-Linux-wordpress-admin-security-hardening

Once above defines are set, do not forget to comment or remove old AUTH_KEY / SECURE_AUTH_KEY / LOGGED_IN_KEY / AUTH_SALT / SECURE_AUTH_SALT / LOGGED_IN_SALT /NONCE_SALT keys.

The values are configured one time and never have to be changed, WordPress installation automatic updates or Installed WP Plugins will not tamper the value with time.
You should never expand or show your private generated keys to anyone otherwise this could be used to hack your website site.
It is also a good security practice to change this keys, especially if you have some suspects someone has somehow stolen your wp-onfig keys. 
 

Closure

Having AUTH KEYs and Properly configured is essential step to improve your WordPress site security. Anytime having any doubt for a browser hijacked session (or if you have logged in) to your /wp-admin via unsecured public Computer with a chance of a stolen site cookies you should reset keys / salts to a new random values. Setting the auth keys is not a panacea and frequent WP site core updates and plugins should be made to secure your install. Always do frequent audits to WP owned websites with a tool such as WPScan is essential to keep your WP Website unhacked.


Linux: Howto Disable logging for all VirtualHosts on Apache and NGINX Webservers one liner

Wednesday, July 1st, 2020

disable-apache-nginx-logging-for-all-virtualhosts
Did you happen to administer Apache Webservers or NGINX webservers whose logs start to grow so rapidly that are flooding the disk too quickly?
Well this happens sometimes and it also happens that sometimes you just want to stop logging especially, to offload disk writting.

There is an easy way to disable logging for requests and errors (access_log and error_log usually residing under /var/log/httpd or /var/log/nginx ) for  all configured Virtual Domains with a short one liner, here is how.

Before you start  Create backup of /etc/apache2/sites-enabled / or /etc/nginx to be able to revert back to original config.

# cp -rpf /etc/apache2/sites-enabled/ ~/

# cp -rpf /etc/nginx/ ~/


1. Disable Logging for All  Virtual Domains configured for Apache Webserver

First lets print what the command will do to make sure we don't mess something

# find /home/hipo/sites-enabled/* -exec echo sed -i 's/#*[Cc]ustom[Ll]og/#CustomLog/g' {} \;


You will get some output like

find /home/hipo//sites-enabled/* -exec echo sed -i 's/#*[Cc]ustom[Ll]og/#CustomLog/g' {} \;

find /etc/apache2/sites-enabled/* -exec sed -i 's/#*[Cc]ustom[Ll]og/#CustomLog/g' {} \;
find /etc/apache2/sites-enabled/* -exec sed -i 's/#*[Ee]rror[Ll]og/#ErrorLog/g' {} \;

2. Disable Logging for All configured Virtual Domains for NGINX Webserver
 

find /etc/nginx/sites-enabled/* -exec sed -i 's/#*access_log/#access_log/g' {} \;
find /etc/nginx/sites-enabled/* -exec sed -i 's/#*error_log/#error_log/g' {} \;

f course above substituations that will comment out with '#' occurances from file configs of only default set access_log and error_log / access.log, error.log 
for machines where there is no certain convention on file naming and there are multiple domains in custom produced named log files this won't work.

This one liner was inspired from a friend's daily Martin Petrov. Martin blogged initially about this nice tip for those reading Cyrillic check out mpetrov.net, so. Thanks Marto ! 🙂