On a server today I've found to have found a number of NFS mounts mounted through /etc/fstab file definitions that were hanging;
nfs-server:~# df -hT
…
command kept hanging as well as any attempt to access the mounted NFS directory was not possible.
The server with the hanged Network File System is running SLES (SuSE Enterprise Linux 12 SP3) a short investigation in the kernel logs (dmesg) as well as /var/log/messages reveales following errors:
nfs-server:~# dmesg
[3117414.856995] nfs: server nfs-server OK
[3117595.104058] nfs: server nfs-server not responding, still trying
[3117625.032864] nfs: server nfs-server OK
[3117805.280036] nfs: server nfs-server not responding, still trying
[3117835.209110] nfs: server nfs-server OK
[3118015.456045] nfs: server nfs-server not responding, still trying
[3118045.384930] nfs: server nfs-server OK
[3118225.568029] nfs: server nfs-server not responding, still trying
[3118255.560536] nfs: server nfs-server OK
[3118435.808035] nfs: server nfs-server not responding, still trying
[3118465.736463] nfs: server nfs-server OK
[3118645.984057] nfs: server nfs-server not responding, still trying
[3118675.912595] nfs: server nfs-server OK
[3118886.098614] nfs: server nfs-server OK
[3119066.336035] nfs: server nfs-server not responding, still trying
[3119096.274493] nfs: server nfs-server OK
[3119276.512033] nfs: server nfs-server not responding, still trying
[3119306.440455] nfs: server nfs-server OK
[3119486.688029] nfs: server nfs-server not responding, still trying
[3119516.616622] nfs: server nfs-server OK
[3119696.864032] nfs: server nfs-server not responding, still trying
[3119726.792650] nfs: server nfs-server OK
[3119907.040037] nfs: server nfs-server not responding, still trying
[3119936.968691] nfs: server nfs-server OK
[3120117.216053] nfs: server nfs-server not responding, still trying
[3120147.144476] nfs: server nfs-server OK
[3120328.352037] nfs: server nfs-server not responding, still trying
[3120567.496808] nfs: server nfs-server OK
[3121370.592040] nfs: server nfs-server not responding, still trying
[3121400.520779] nfs: server nfs-server OK
[3121400.520866] nfs: server nfs-server OK
It took me a short while to investigate and check the NetApp remote NFS storage filesystem and investigate the Virtual Machine that is running on top of OpenXen Hypervisor system.
The NFS storage permissions of the exported file permissions were checked and they were in a good shape, also a reexport of the NFS mount share was re-exported and on the Linux
mount host the following commands ran to remount the hanged Filesystems:
nfs-server:~# umount -f /mnt/nfs_share
nfs-server:~# umount -l /mnt/nfs_share
nfs-server:~# umount -lf /mnt/nfs_share1
nfs-server:~# umount -lf /mnt/nfs_share2
nfs-server:~# mount -t nfs -o remount /mnt/nfs_share
that fixed one of the hanged mount, but as I didn't wanted to manually remount each of the NFS FS-es, I've remounted them all with:
nfs-server:~# mount -a -t nfs
This solved it but, the fix seemed unpermanent as in a time while the issue started reoccuring and I've spend some time
in further investigation on the weird NFS hanging problem has led me to the following blog post where the same problem was described and it was pointed the root cause of it lays
in parameter for MTU which seems to be quite high MTU 9000 and this over the years has prooven to cause problems with NFS especially due to network router (switches) configurations
which seem to have a filters for MTU and are passing only packets with low MTU levels and using rsize / wzise custom mount NFS values in /etc/fstab could lead to this strange NFS hangs.
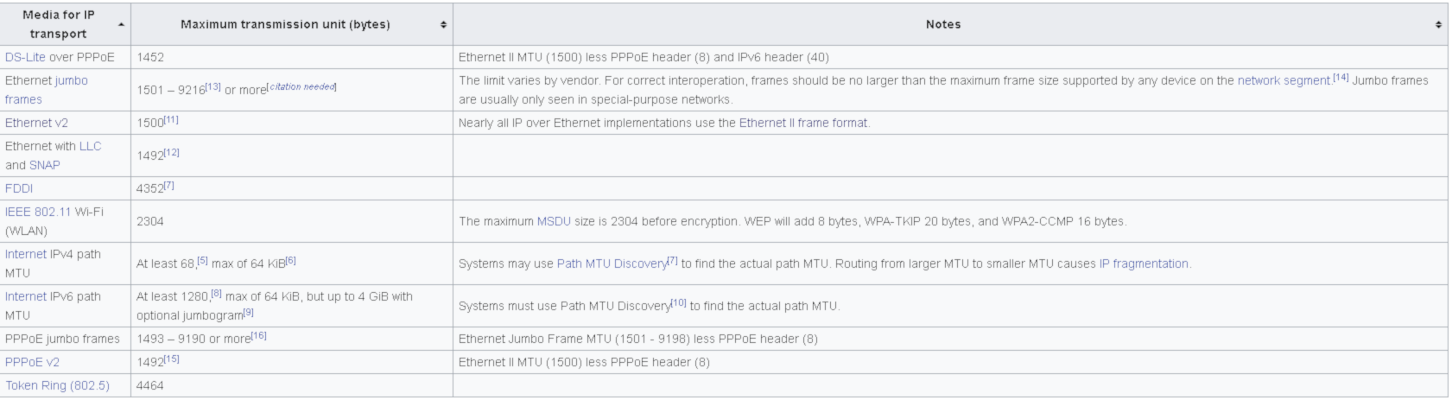
Below is a list of Maximum Transmission Unit (MTU) for Media Transport excerpt taken from wikipedia as of time of writting this article.
In my further research on the issue I've come across this very interesting article which explains a lot on "Large Internet" and Internet Performance
I've used tracepath command which is doing basicly the same as traceroute but could be run without root user and discovers hops (network routers) and shows MTU between path -> destionation.
Below is a sample example
nfs-server:~# tracepath bergon.net
1?: [LOCALHOST] pmtu 1500
1: 192.168.6.1 0.909ms
1: 192.168.6.1 0.966ms
2: 192.168.222.1 0.859ms
3: 6.192.104.109.bergon.net 1.138ms reached
Resume: pmtu 1500 hops 3 back 3
Optiomal pmtu for this connection is to be 1500 .traceroute in some cases might return hops with 'no reply' if there is a router UDP packet filtering implemented on it.
The high MTU value for the Storage network connection interface on eth1 was evident with a simple:
nfs-server:~# /sbin/ifconfig |grep -i eth -A 2
eth0 Link encap:Ethernet HWaddr 00:16:3E:5C:65:74
inet addr:100.127.108.56 Bcast:100.127.109.255 Mask:255.255.254.0
UP BROADCAST RUNNING MULTICAST MTU:1500 Metric:1
—
eth1 Link encap:Ethernet HWaddr 00:16:3E:5C:65:76
inet addr:100.96.80.94 Bcast:100.96.83.255 Mask:255.255.252.0
UP BROADCAST RUNNING MULTICAST MTU:9000 Metric:1
The fix was as simple to lower MTU value for eth1 Ethernet interface to 1500 which is the value which most network routers are configured too.
To apply the new MTU to the eth1 interface without restarting the SuSE SLES networking , I first used ifconfig one time with:
nfs-server:~# /sbin/ifconfig eth1 mtu 1500
nfs-server:~# ip addr show
…
To make the setting permanent on next SuSE boot:
I had to set the MTU=1500 value in
nfs-server:~#/etc/sysconfig/network/ifcfg-eth1
nfs-server:~# ip address show eth1
3: eth1: <BROADCAST,MULTICAST,UP,LOWER_UP> mtu 1500 qdisc pfifo_fast state UP group default qlen 1000
link/ether 8c:89:a5:f2:e8:d8 brd ff:ff:ff:ff:ff:ff
inet 192.168.0.1/24 brd 192.168.0.255 scope global eth1
valid_lft forever preferred_lft forever
Then to remount the NFS mounted hanged filesystems once again ran:
nfs-server:~# mount -a -t nfs
Many network routers keeps the MTU to low as 1500 also because a higher values causes IP packet fragmentation when using NFS over UDP where IP packet fragmentation and packet
reassembly requires significant amount of CPU at both ends of the network connection.
Packet fragmentation also exposes network traffic to greater unreliability, since a complete RPC request must be retransmitted if a UDP packet fragment is dropped for any reason.
Any increase of RPC retransmissions, along with the possibility of increased timeouts, are the single worst impediment to performance for NFS over UDP.
This and many more is very well explained in Optimizing NFS Performance page (which is a must reading) for any sys admin that plans to use NFS frequently.
Even though lowering MTU (Maximum Transmission Union) value does solved my problem at some cases especially in a modern local LANs with Jumbo Frames, allowing and increasing the MTU to 9000 bytes
might be a good idea as this will increase the amount of packet size.and will raise network performance, however as always on distant networks with many router hops keeping MTU value as low as 1492 / 5000 is always a good idea.


How to configure and enable Xen Linux dedicated server’s Virtual machines Internet to work / Enable multipe real IPs and one MAC only in (SolusVM) through NAT routed and iptables
Saturday, June 4th, 2011I’ve been hired as a consultant recently to solve a small task on a newly bought Xen based dedicated server.
The server had installed on itself SolusVM
The server was a good hard-iron machine running with CentOS Linux with enabled Xen virtualization support.
The Data Center (DC) has provided the client with 4 IP public addresses, whether the machine was assigned to possess only one MAC address!
The original idea was the dedicated server is supposed to use 4 of the IP addresses assigned by the DC whether only one of the IPs has an external internet connected ethernet interface with assigned MAC address.
In that case using Xen’s bridging capabilities was pretty much impossible and therefore Xen’s routing mode has to be used, plus an Iptables Network Address Translation or an IP MASQUERADE .
In overall the server would have contained 3 virtual machines inside the Xen installed with 3 copies of:
The scenario I had to deal with is pretty much explained in Xen’s Networking wiki Two Way Routed Network
In this article I will describe as thoroughfully as I can how I configured the server to be able to use the 3 qemu virtual machines (running inside the Xen) with their respective real interner visible public IP addresses.
1. Enable Proxyarp for the eth0 interface
To enable proxyarp for eth0 on boot time and in real time on the server issue the commands:
[root@centos ~]# echo 1 > /proc/sys/net/ipv4/conf/eth0/proxy_arp[root@centos ~]# echo 'net.ipv4.conf.all.proxy_arp = 1' >> /etc/sysctl.conf
2. Enable IP packet forwarding for eth interfaces
This is important pre-requirement in order to make the iptables NAT to work.
[root@centos ~]# echo 'net.ipv4.ip_forward = 1' >> /etc/sysctl.conf
[root@centos ~]# echo 'net.ipv6.conf.all.forwarding=1' >> /etc/sysctl.conf
If you get errors during execution of /etc/init.d/xendomains , like for example:
[root@centos ~]# /etc/init.d/xendomains restart
/etc/xen/scripts/network-route: line 29: /proc/sys/net/ipv4/conf/eth0/proxy_arp: No such file or directory
/etc/xen/scripts/network-route: line 29: /proc/sys/net/ipv6/conf/eth0/proxy_arp: No such file or directory
in order to get rid of the message you will have to edit /etc/xen/scripts/network-route and comment out the lines:
echo 1 >/proc/sys/net/ipv4/conf/${netdev}/proxy_arp
echo 1 > /proc/sys/net/ipv6/conf/eth0/proxy_arp
e.g.
#echo 1 >/proc/sys/net/ipv4/conf/${netdev}/proxy_arp
#echo 1 > /proc/sys/net/ipv6/conf/eth0/proxy_arp
3. Edit /etc/xen/xend-config.sxp, disable ethernet bridging and enable eth0 routing (route mode) and NAT for Xen’s routed mode
Make absolutely sure that in /etc/xen/xend-config.sxp the lines related to bridging are commented.
The lines you need to comment out are:
(network-script network-bridge)(vif-script vif-bridge)
make them look like:
#(network-script network-bridge)#(vif-script vif-bridge)br />
Now as bridging is disabled let’s enable Xen routed network traffic as an bridged networking alternative.
Find the commented (network-script network-route) and (vif-script vif-route) lines and uncomment them:
#(network-script network-route)
#(vif-script     vif-route)
The above commented lines should become:
(network-script network-route)
(vif-script     vif-route)
Next step is to enable NAT for routed traffic in Xen (necessery to make routed mode work).
Below commented two lines in /etc/xen/xend-config.sxp, should be uncommented e.g.:
#(network-script network-nat)
#(vif-script     vif-nat)
Should become:
(network-script network-nat)
(vif-script     vif-nat)
4. Restart Xen control daemon and reload installed Xen’s Virtual Machines installed domains
To do so invoke the commands:
[root@centos ~]# /etc/init.d/xend
[root@centos ~]# /etc/init.d/xendomains restart
This two commands will probably take about 7 to 10 minutes (at least they took this serious amount of time in my case).
If you think this time is too much to speed-up the procedure of restarting Xen and qemu attached virtual machines, restart the whole Linux server, e.g.:
[root@centos ~]# restart
5. Configure iptables NAT rules on the CentOS host
After the server boots up, you will have to initiate the following ifconfig & iptables rules in order to make the Iptables NAT to work out:
echo > > /proc/sys/net/ipv4/conf/tap1.0/proxy_arp/sbin/ifconfig eth0:1 11.22.33.44 netmask 255.255.252.0
/sbin/ifconfig eth0:2 22.33.44.55 netmask 255.255.252.0
/sbin/ifconfig eth0:3 33.44.55.66 netmask 255.255.252.0
/sbin/iptables -t nat -A PREROUTING -d 11.22.33.44 -i eth0 -j DNAT --to-destination 192.168.1.2
/sbin/iptables -t nat -A PREROUTING -d 22.33.44.55 -i eth0 -j DNAT --to-destination 192.168.1.3
/sbin/iptables -t nat -A PREROUTING -d 33.44.55.66 -i eth0 -j DNAT --to-destination 192.168.1.4
/sbin/iptables -t nat -A POSTROUTING -s 192.168.1.2 -o eth0 -j SNAT --to-source 11.22.33.44
/sbin/iptables -t nat -A POSTROUTING -s 192.168.1.3 -o eth0 -j SNAT --to-source 22.33.44.55
/sbin/iptables -t nat -A POSTROUTING -s 192.168.1.4 -o eth0 -j SNAT --to-source 33.44.55.66
In the above ifconfig and iptables rules the IP addresses:
11.22.33.44, 22.33.44.55, 33.44.55.66 are real IP addresses visible from the Internet.
In the above rules eth0:1, eth0:2 and eth0:3 are virtual ips assigned to the main eth0 interface.
This ifconfig and iptables setup assumes that the 3 Windows virtual machines running inside the Xen dedicated server will be configured to use (local) private network IP addresses:
192.168.1.2, 192.168.1.3 and 192.168.1.4
You will have also to substitute the 11.22.33.44, 22.33.44.55 and 33.44.55.66 with your real IP addreses.
To store the iptables rules permanently on the fedora you can use the iptables-save command:
[root@centos ~]# /sbin/iptables-save
However I personally did not use this approach to save my inserserted iptable rules for later boots but I use my small script set_ips.sh to add virtual interfaces and iptables rules via the /etc/rc.local invokation:
If you like the way I have integrated my virtual eths initiation and iptables kernel firewall inclusion, download my script and set it to run in /etc/rc.local, like so:
[root@centos ~]# cd /usr/sbin
[root@centos sbin]# wget https://www.pc-freak.net/bshscr/set_ips.sh
...
[root@centos ~]# chmod +x /usr/sbin/set_ips.sh
[root@centos ~]# mv set_ips.sh /usr/sbin
[root@centos ~]# echo '/usr/sbin/set_ips.sh' >> /etc/rc.local
Note that you will have to modify my set_ips.sh script to substitute the 11.22.33.44, 22.33.44.55 and 33.44.55.66 with your real IP address.
So far so good, one might think that all this should be enough for the Virtual Machines Windows hosts to be able to connect to the Internet and Internet requests to the virtual machines to arrive, but no it’s not!!
6. Debugging Limited Connectivity Windows LAN troubles on the Xen dedicated server
Even though the iptables rules were correct and the vif route and vif nat was enabled inside the Xen node, as well as everything was correctly configured in the Windows 2008 host Virtual machines, the virtual machines’s LAN cards were not able to connect properly to connect to the internet and the Windows LAN interface kept constantly showing Limited Connectivity! , neither a ping was available to the gateway configured for the Windows VM host (which in my case was: 192.168.1.1).
You see the error with Limited connectivity inside the Windows on below’s screenshot:
Here is also a screenshot of my VNC connection to the Virtual machine with the correct IP settings – (TCP/IPv4) Properties Window:
This kind of Limited Connectivity VM Windows error was really strange and hard to diagnose, thus I started investigating what is wrong with this whole situation and why is not able the Virtualized Windows to connect properly to the Internet, through the Iptables NAT inbound and outbound traffic redirection.
To diagnose the problem, I started up with listing the exact network interfaces showing to be on the Xen Dedicated server:
[root@centos ~]# /sbin/ifconfig |grep -i 'Link encap' -A 1

eth0      Link encap:Ethernet  HWaddr 00:19:99:9C:08:3A

inet addr:111.22.33.55  Bcast:111.22.33.255
Mask:255.255.252.0

--

eth0:1    Link encap:Ethernet  HWaddr 00:19:99:9C:08:3A

inet addr:11.22.33.44  Bcast:11.22.33.255
Mask:255.255.252.0

--

eth0:2    Link encap:Ethernet  HWaddr 00:19:99:9C:08:3A

inet addr:22.33.44.55  Bcast:22.33.44.255
Mask:255.255.252.0

--

eth0:3    Link encap:Ethernet  HWaddr 00:19:99:9C:08:3A

inet addr:33.44.55.66  Bcast:33.44.55.255
Mask:255.255.252.0

--

lo        Link encap:Local Loopback

inet addr:127.0.0.1  Mask:255.0.0.0

--

tap1.0    Link encap:Ethernet  HWaddr FA:07:EF:CA:13:31

--

vifvm101.0 Link encap:Ethernet  HWaddr FE:FF:FF:FF:FF:FF

inet addr:111.22.33.55  Bcast:111.22.33.55
Mask:255.255.255.255
I started debugging the issue, using the expelling logic.
In the output concerning my interfaces via ifconfig on eth0, I have my primary server IP address 111.22.33.55 , this one is working for sure as I was currently connected to the server through it.
The other virtual IP addresses assigned on the virtual network interfaces eth0:1, eth0:2 and eth0:3 were also assigned correctly as I was able to ping this ips from my Desktop machine from the Internet.
The lo , interface was also properly configured as I could ping without a problem the loopback ip – 127.0.0.1
The rest of the interfaces displayed by my ifconfig output were: tap1.0, vifvm101.0
After a bit of ressearch, I’ve figured out that they’re virtual interfaces and they belong to the Xen domains which are running qemu virtual machines with the Windows host.
I used tcpdump to debug what kind of traffic does flow through the tap1.0 and vifvm101.0 interfaces, like so
[root@centos ~]# tcpdump -i vifvm101.0
tcpdump: verbose output suppressed, use -v or -vv for full protocol decode
listening on vifvm101.0, link-type EN10MB (Ethernet), capture size 96 bytes
^C
0 packets captured
0 packets received by filter
0 packets dropped by kernel
[root@centos ~]# tcpdump -i tap1.0
cpdump: verbose output suppressed, use -v or -vv for full protocol decode
listening on tap1.0, link-type EN10MB (Ethernet), capture size 96 bytes
^C
08:55:52.490249 IP 229.197.34.95.customer.cdi.no.15685 > 192.168.1.2.12857: UDP, length 42
I’ve figured out as it’s also observable in above’s two tcpdump commands output, that nothing flows through the vifvm101.0 interface, and that there was some traffic passing by tap1.0 interface.
7. Solving the Limited Connectivy Windows Internet network connection problems
As below’s ifconfig output reveals, there is no IP address assigned to tap1.0 interface, using some guidelines and suggestions from guys in irc.freenode.net’s #netfilter irc channel, I’ve decided to give a go to set up an IP address of 192.168.1.1 to tap1.0 .
I choose for a reason as this IP address is configured to be my Gateway’s IP Address inside the Emulated Windows 2008 hosts
To assign the 192.168.1.1 to tap1.0, I issued:
[root@centos ~]# /sbin/ifconfig tap1.0 192.168.1.1 netmask 255.255.255.0
To test if there is difference I logged in to the Virtual Machine host with gtkvncviewer (which by the way is a very nice VNC client for Gnome) and noticed there was an established connection to the internet inside the Virtual Machine 😉I issued a ping to google which was also returned and opened a browser to really test if everything is fine with the Internet.
Thanks God! I could browse and everything was fine 😉
8. Making tap1.0 192.168.1.1 (VM hosts gateway to be set automatically, each time server reboots)
After rebooting the server the tap1.0 assignmend of 192.168.1.1 disappeared thus I had to make the 192.168.1.1, be assigned automatically each time the CentoS server boots.
To give it a try, I decided to place /sbin/ifconfig tap1.0 192.168.1.1 netmask 255.255.255.0 into /etc/rc.local, but this worked not as the tap1.0 interface got initialized a while after all the xendomains gets initialized.
I tried few times to set some kind of sleep time interval with the sleep , right before the /sbin/ifconfig tap1.0 … ip initialization but this did not worked out, so I finally completely abandoned this methodology and make the tap1.0 get initialized with an IP through a cron daemon.
For that purpose I’ve created a script to be invoked, every two minutes via cron which checked if the tap1.0 interface is up and if not issues the ifconfig command to initialize the interface and assign the 192.168.1.1 IP to it.
Here is my set_tap_1_iface.sh shell script
To set it up on your host in /usr/sbin issue:
[root@centos ~]# cd /usr/sbin/
In order to set it on cron to make the tap1.0 initialization automatically every two minutes use the cmd:[root@centos sbin]# wget https://www.pc-freak.net/bshscr/set_tap_1_iface.sh
...
[root@centos ~]# crontab -u root -e
After the cronedit opens up, place the set_tap_1_iface.sh cron invokation rules:
*/2 * * * * /usr/sbin/set_tap_1_iface.sh >/dev/null 2>&1
and save.
That’s all now your Xen dedicated and the installed virtual machines with their public internet IPs will work 😉
If this article helped you to configure your NAT routing in Xen drop me a thanks message, buy me a beer or hire me! Cheers 😉
Tags: addr, amount, arp, arpecho, Bcast, boot time, center dc, control, dedicated server, echo 1, eth, execution, external internet, host, ip masquerade, ips, iptables nat, ipv, ipv4, ipv6, iron machine, mac address, memory, Metric, microsoft windows, modeMake, necessery, Netmask, network address translation, POSTROUTING, proxy arp, public addresses, public ip addresses, qemu, Restart, root, screenshot, sxp, time, uncomment, vif, Virtual, virtual machines, work, xend
Posted in Linux, System Administration | 2 Comments »