Posts Tagged ‘administrator’

Export / Import PuTTY Tunnels SSH Sessions from one to another Windows machine howto

Thursday, January 31st, 2019

Putty-copy-ssh-tunnels-howto-from-one-to-another-windows-machine-3

As I've started on job position – Linux Architect in last November 2018 in Itelligence AG as a contractor (External Service) – a great German company who hires the best IT specialists out there and offers a flexible time schedules for emploees doing various very cool IT advanced operations and Strategic advancement of SAP's Cloud used Technology and Services improvements for SAP SE – SAP S4HANA and HEC (HANA Enterprise Cloud) and been given for work hardware a shiny Lenovo Thinkpad 500 Laptop with Windows 10 OS (SAP pre-installed), I needed to make some SSH Tunnels to machines to (Hop Station / Jump hosts) for that purpose, after some experimenting with MobaXterm Free (Personal Edition 11.0) and the presumable limitations of tunnels of the free client as well as my laziness to add the multiple ssh tunnels to different ssh / rdp / vnc etc. servers, finally I decided to just copy all the tunnels from a colleague who runs Putty and again use the good old Putty – old school Winblows SSH Terminal Client but just for creating the SSH tunnels and for rest use MobaXterm, just like in old times while still employe in Hewlett Packard. For that reason to copy the Tunnels from my dear German Colleague Henry Beck (A good herated collegue who works in field of Storage dealing with NetApps / filer Clusters QNap etc.).

Till that moment I had no idea how copying a saved SSH Tunnels definition is possible, I did a quick research just to find out this is done not with Putty Interface itself but, insetead through dumping Windows Putty Stored Registry records into a File, then transfer to the PC where Tunnels needs to be imported and then again (either double click the registry file) to load it, into registry or use Windows registry editor command line interface reg, here is how:
 

1. Export


Run cmd.exe (note below command) 

requires elevated Run as Administrator prompt:

Only sessions:

regedit /e "%USERPROFILE%\Desktop\putty-sessions.reg" HKEY_CURRENT_USER\Software\SimonTatham\PuTTY\Sessions

All settings:

regedit /e "%USERPROFILE%\Desktop\putty.reg" HKEY_CURRENT_USER\Software\SimonTatham

Powershell:

If you have powershell installed on machine, to dump

Only sessions:


reg export HKCU\Software\SimonTatham\PuTTY\Sessions ([Environment]::GetFolderPath("Desktop") + "\putty-sessions.reg")

All settings:

reg export HKCU\Software\SimonTatham ([Environment]::GetFolderPath("Desktop") + "\putty.reg")


2. Import

Double-click on the 

*.reg

 file and accept the import.


Alternative ways:


cmd.exe

require elevated command prompt:

regedit /i putty-sessions.reg regedit /i putty.reg

PowerShell:

reg import putty-sessions.reg reg import putty.reg


Below are some things to consider:

Note !do not replace 

SimonTatham

 with your username.


Note !: It will create a 

reg

 file on the Desktop of the current user (for a different location modify path)


Note !: It will not export your related (old system stored) SSH keys.

What to expect next?

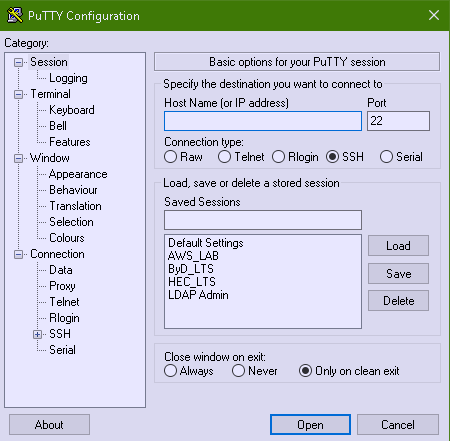
Putty-Tunnels-SSH-Sessions-screenshot-Windows

The result is in Putty you will have the Tunnel sessions loadable when you launch (Portable or installed) Putty version.
Press Load button over the required saved Tunnels list and there you go under


Connection SSH -> Tunnels 


you will see all the copied tunnels.

Enjoy!

How to install KVM Kernel-based Virtual Machine Virtualization on Linux

Sunday, October 14th, 2018

install-KVM-Kernel-based-Virtual-Machine-virtualization-on-Linux

If you want to run multiple virtual machines on GNU / Linux server or your Linux powered Desktop you have the possibility to use a couple of Virtual Machines just to name a few VirtualBox and VMWare are the option the native way to do it is using the Linux kernel via a loadable kernel module called KVM (Kernel-based Virtual Machine).
Though Oracle's Virtualbox generally works and you could add new test beds virtual machines (install multiple Linux / *BSD OS) it is not fully Free Software and not even fully open source licensed, VMWare even though superior as a Virtualization product is proprietary and its application costs a lot of money which not each develpoper or small / mid-sized company could afford.

Once the kvm.ko module is loaded your Linux kernel turns into a full-featured Virtual Machine Hypervisor.
Starting with Linux kernel 2.6.X the KVM Hypervisor is available and easy to install virtually all modern Linux distributions Redhat / CentOS Debian / Ubuntu etc. support it and its up to running few commands to install and start using the Power of Kernel embedded Virtualization.

KVM could be used to run in parallel multiple Operating Systems such as Windows / Linux / FreeBSD and others of BSDs family,  each running under a separate virtual machine with its private dedicated (isolated), disc, graphic card, network card etc.

To start up I assume you have already installed some kind of Linux distribution either locally or on a remote dedicated server.
 

1. Installing KVM on Debian GNU / Linux / Ubuntu / Mint and other deb based distros


Using APT tool install below packages:


root@jeremiah:~# apt install –yes qemu-kvm libvirt-clients libvirt-daemon-system bridge-utils libguestfs-tools genisoimage virtinst libosinfo-bin


2. Installing virt-manager GUI to manage Virtual servers


root@jeremiah:~# apt-cache show virt-manager|grep -i desc -A 1
Description-en: desktop application for managing virtual machines
 It presents a summary view of running domains and their live performance &

Description-md5: 9f7f584744b77cdacc2291f2a8ac220e
Homepage: http://virt-manager.et.redhat.com/


root@jeremiah:~# apt install –yes virt-manager
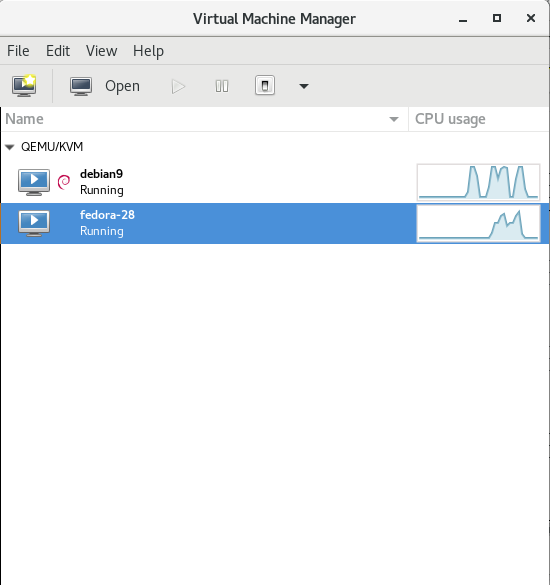


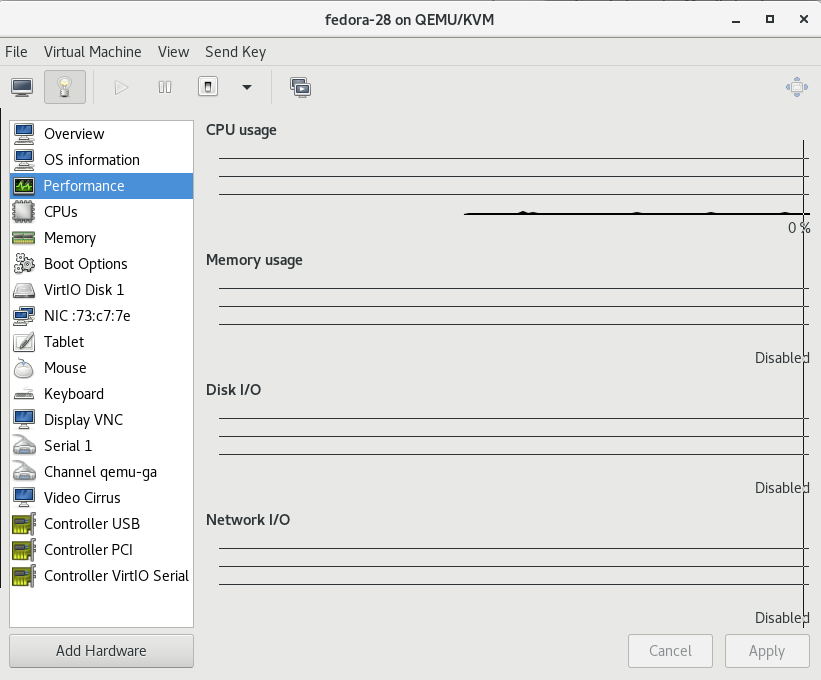
virtual-manager-kvm-gnu-linux-virtual-machines-cpu-hdd-load-statistics-screenshot


virtual-manager-fedora-28-linux-virtual-machine-settings-screenshot


3. Configure bridged networking to allow access to newly configured VMs

Bridging has to be added via /etc/network/interfaces therefore it is a good idea to create a backup of it before modifying:


# cp -rpf /etc/network/interfaces /etc/network/interfaces.bakup-$(echo $(date '+%Y-%m-%d-%H'))


# vim /etc/network/interfaces

auto br0
 iface br0 inet static
         address 10.15.44.26
         netmask 255.255.255.192
         broadcast 10.15.44.63
         dns-nameservers 10.0.80.11 10.0.80.12
         # set static route for LAN
      post-up route add -net 10.0.0.0 netmask 255.0.0.0 gw 10.18.44.1
      post-up route add -net 161.26.0.0 netmask 255.255.0.0 gw 10.18.44.1
         bridge_ports eth0
         bridge_stp off
         bridge_fd 0
         bridge_maxwait 0
 
 # br1 setup with static wan IPv4 with ISP router as a default gateway
 auto br1
 iface br1 inet static
         address 192.168.222.51
         netmask 255.255.255.248
         broadcast 192.168.222.55
         gateway 192.168.222.49
         bridge_ports eth1
         bridge_stp off
         bridge_fd 0
         bridge_maxwait 0


Once file is saved in vim editor restart the networking.


# systemctl restart network.manager


To verify whether the bridge has been succesfully upped.


root@jeremiah:/home/hipo/kvm# brctl show
bridge name    bridge id        STP enabled    interfaces
virbr0        8000.525400cb1cd1    yes        virbr0-nic


4. List all installable Virtual OS images
 

root@jeremiah:/home/hipo/kvm# virt-builder -list
centos-6                 x86_64     CentOS 6.6
centos-7.0               x86_64     CentOS 7.0
centos-7.1               x86_64     CentOS 7.1
centos-7.2               aarch64    CentOS 7.2 (aarch64)
centos-7.2               x86_64     CentOS 7.2
centos-7.3               x86_64     CentOS 7.3
centos-7.4               x86_64     CentOS 7.4
centos-7.5               x86_64     CentOS 7.5
cirros-0.3.1             x86_64     CirrOS 0.3.1
cirros-0.3.5             x86_64     CirrOS 0.3.5
debian-6                 x86_64     Debian 6 (Squeeze)
debian-7                 sparc64    Debian 7 (Wheezy) (sparc64)
debian-7                 x86_64     Debian 7 (wheezy)
debian-8                 x86_64     Debian 8 (jessie)
debian-9                 x86_64     Debian 9 (stretch)
fedora-18                x86_64     Fedora® 18
fedora-19                x86_64     Fedora® 19
fedora-20                x86_64     Fedora® 20
fedora-21                aarch64    Fedora® 21 Server (aarch64)
fedora-21                armv7l     Fedora® 21 Server (armv7l)
fedora-21                ppc64      Fedora® 21 Server (ppc64)
fedora-21                ppc64le    Fedora® 21 Server (ppc64le)
fedora-21                x86_64     Fedora® 21 Server
fedora-22                aarch64    Fedora® 22 Server (aarch64)
fedora-22                armv7l     Fedora® 22 Server (armv7l)
fedora-22                i686       Fedora® 22 Server (i686)
fedora-22                x86_64     Fedora® 22 Server
fedora-23                aarch64    Fedora® 23 Server (aarch64)
fedora-23                armv7l     Fedora® 23 Server (armv7l)
fedora-23                i686       Fedora® 23 Server (i686)
fedora-23                ppc64      Fedora® 23 Server (ppc64)
fedora-23                ppc64le    Fedora® 23 Server (ppc64le)
fedora-23                x86_64     Fedora® 23 Server
fedora-24                aarch64    Fedora® 24 Server (aarch64)
fedora-24                armv7l     Fedora® 24 Server (armv7l)
fedora-24                i686       Fedora® 24 Server (i686)
fedora-24                x86_64     Fedora® 24 Server
fedora-25                aarch64    Fedora® 25 Server (aarch64)
fedora-25                armv7l     Fedora® 25 Server (armv7l)
fedora-25                i686       Fedora® 25 Server (i686)
fedora-25                ppc64      Fedora® 25 Server (ppc64)
fedora-25                ppc64le    Fedora® 25 Server (ppc64le)
fedora-25                x86_64     Fedora® 25 Server
fedora-26                aarch64    Fedora® 26 Server (aarch64)
fedora-26                armv7l     Fedora® 26 Server (armv7l)
fedora-26                i686       Fedora® 26 Server (i686)
fedora-26                ppc64      Fedora® 26 Server (ppc64)
fedora-26                ppc64le    Fedora® 26 Server (ppc64le)
fedora-26                x86_64     Fedora® 26 Server
fedora-27                aarch64    Fedora® 27 Server (aarch64)
fedora-27                armv7l     Fedora® 27 Server (armv7l)
fedora-27                i686       Fedora® 27 Server (i686)
fedora-27                ppc64      Fedora® 27 Server (ppc64)
fedora-27                ppc64le    Fedora® 27 Server (ppc64le)
fedora-27                x86_64     Fedora® 27 Server
fedora-28                i686       Fedora® 28 Server (i686)
fedora-28                x86_64     Fedora® 28 Server
freebsd-11.1             x86_64     FreeBSD 11.1
scientificlinux-6        x86_64     Scientific Linux 6.5
ubuntu-10.04             x86_64     Ubuntu 10.04 (Lucid)
ubuntu-12.04             x86_64     Ubuntu 12.04 (Precise)
ubuntu-14.04             x86_64     Ubuntu 14.04 (Trusty)
ubuntu-16.04             x86_64     Ubuntu 16.04 (Xenial)
ubuntu-18.04             x86_64     Ubuntu 18.04 (bionic)
opensuse-13.1            x86_64     openSUSE 13.1
opensuse-13.2            x86_64     openSUSE 13.2
opensuse-42.1            x86_64     openSUSE Leap 42.1
opensuse-tumbleweed      x86_64     openSUSE Tumbleweed


5. Create Virtual Machine OS-es from scratch with virt-builder

Below we'll create two images one for Fedora 28 and 1 for Debian 9 using the virt-builder (a tool to build virtual images quickly), the images that could be used are shown through below virt-builder –list command.
 

# iso='fedora-28';
# iso1='debian-9';


# sudo virt-builder $iso \
     –size=10G \
     –format qcow2 -o /var/lib/libvirt/images/$iso-vm1.qcow2 \
     –hostname $iso-vm1 \
     –network \
     –timezone Europe/Sofia


[   3.3] Downloading: http://libguestfs.org/download/builder/fedora-28.xz
[   5.2] Planning how to build this image
[   5.2] Uncompressing
[  20.8] Resizing (using virt-resize) to expand the disk to 10.0G
[  50.8] Opening the new disk
[  53.7] Setting a random seed
[  53.7] Setting the hostname: fedora-28-vm1
[  53.7] Setting the timezone: Europe/Sofia
[  53.7] Setting passwords
virt-builder: Setting random password of root to YMTkxaJIkEU24Ytf

[  54.7] Finishing off
                   Output file: /var/lib/libvirt/images/fedora-28-vm1.qcow2
                   Output size: 10.0G
                 Output format: qcow2
            Total usable space: 9.3G
                    Free space: 8.2G (87%)


# sudo virt-builder $iso1 \
     –size=10G \
     –format qcow2 -o /var/lib/libvirt/images/$iso-vm1.qcow2 \
     –hostname $iso1-vm1 \
     –network \
     –timezone Europe/Sofia


[   3.2] Downloading: http://libguestfs.org/download/builder/debian-9.xz
[   4.1] Planning how to build this image
[   4.1] Uncompressing
[  16.9] Resizing (using virt-resize) to expand the disk to 10.0G
[  40.1] Opening the new disk
[  42.9] Setting a random seed
virt-builder: warning: random seed could not be set for this type of guest
[  42.9] Setting the hostname: debian-9-vm1
[  43.6] Setting the timezone: Europe/Sofia
[  43.6] Setting passwords
virt-builder: Setting random password of root to JtzEYGff9KxL5jCR
[  44.3] Finishing off
                   Output file: /var/lib/libvirt/images/debian-9-vm1.qcow2
                   Output size: 10.0G
                 Output format: qcow2
            Total usable space: 9.8G
                    Free space: 9.0G (91%)


vim bridged.xml

<network>
  <name>br0</name>
  <forward mode="bridge"/>
  <bridge name="br0"/>
</network>


# sudo virsh net-define –file bridged.xml
# sudo virsh net-autostart br0
# sudo virsh net-start br0


Above two commands will download pre-packaged KVM isos and store them inside /var/lib/libvirt/images/ you see also the root (administrator) password for both ISOs printed out.


root@jeremiah:/home/hipo/kvm# ls -ld /var/lib/libvirt/images/*
-rw-r–r– 1 root         root         10739318784 Oct 12 23:45 /var/lib/libvirt/images/debian-9-vm1.qcow2
-rw-r–r– 1 root         root         10739318784 Oct 12 23:46 /var/lib/libvirt/images/fedora-28-vm1.qcow2


To access directly the new created VMs as we have specified the –vnc option it is possible to directly vnc to the new host with VNC client (in linux I use vncviewer), on Windows you can use something like TightVNC.
 

6. Use official Linux distributions ISO boot files to install into KVM VM


Those who would like to run inside KVM VM Linux could do it directly using installable ISO files and install the set of Linux with the required packages, just like installing a fresh new Linux on a bare-metal machine.
To do so download your ISO image from the net (either from official distro website or a mirror website, in case if you need to spin an older version) and use virt-install to run the installer inside KVM.


root@jeremiah:~# cd /var/lib/libvirt/boot/;
root@jeremiah:~# wget http://mirrors.netix.net/centos/7.5.1804/isos/x86_64/CentOS-7-x86_64-DVD-1804.iso


# sudo virt-install \
–virt-type=kvm \
–name centos7 \
–ram 2048 \
–vcpus=2 \
–os-variant=centos7.0 \
–virt-type=kvm \
–hvm \
–cdrom=/var/lib/libvirt/boot/CentOS-7-x86_64-DVD-1804.iso \
–network=bridge=br0,model=virtio \
–network=bridge=br1,model=virtio \
–graphics vnc \
–disk path=/var/lib/libvirt/images/centos7.qcow2,size=40,bus=virtio,format=qcow2


7. List newly created VMs with Virsh command


root@jeremiah:/home/hipo/kvm# virsh list –all
 Id    Name                           State
—————————————————-
 3     fedora-28                      running
 –     debian9                        shut off


The –all parameter lists all available VMs ready to spin, if you want to check what are the VMs that are only running use instead:


root@jeremiah:/home/hipo/kvm# virsh list
 Id    Name                           State
—————————————————-
 3     fedora-28                      running


8. Install Virtual Machine OS-es

Below lines will install 2 Virtual machines one Fedora 28 and Debian 9


 os='fedora-28';
virt-install –import –name $os \
    –ram 2048 \
    –vcpu 2 \
    –disk path=/var/lib/libvirt/images/$os-vm1.qcow2,format=qcow2 \
    –os-variant fedora-unknown \
    –network=bridge=br0,model=virtio \
    –noautoconsole \
  –hvm \
  –graphics vnc

os='debian9';
virt-install –import –name $os     \
–ram 2048     \
–vcpu 2     \
–disk path=/var/lib/libvirt/images/$os-vm1.qcow2,format=qcow2     \
–os-variant debian9     –network=bridge=br0,model=virtio     \
–noautoconsole \
–hvm \
–graphics vnc


To deploy more just change the virtual machine type in os variable and modify the –os-variant variable to match the distribution name, to get the correct –os-variant variables that can be passed use osinfo-query below is output of the cmd:


root@jeremiah:/home/hipo/kvm# osinfo-query os
 Short ID             | Name                                               | Version  | ID                                      
———————-+—————————————————-+———-+—————————————–
 altlinux1.0          | Mandrake RE Spring 2001                            | 1.0      | http://altlinux.org/altlinux/1.0        
 altlinux2.0          | ALT Linux 2.0                                      | 2.0      | http://altlinux.org/altlinux/2.0        
 altlinux2.2          | ALT Linux 2.2                                      | 2.2      | http://altlinux.org/altlinux/2.2        
 altlinux2.4          | ALT Linux 2.4                                      | 2.4      | http://altlinux.org/altlinux/2.4        
 altlinux3.0          | ALT Linux 3.0                                      | 3.0      | http://altlinux.org/altlinux/3.0        
 altlinux4.0          | ALT Linux 4.0                                      | 4.0      | http://altlinux.org/altlinux/4.0        
 altlinux4.1          | ALT Linux 4.1                                      | 4.1      | http://altlinux.org/altlinux/4.1        
 altlinux5.0          | ALT Linux 5.0                                      | 5.0      | http://altlinux.org/altlinux/5.0        
 altlinux6.0          | ALT Linux 6.0                                      | 6.0      | http://altlinux.org/altlinux/6.0        
 altlinux7.0          | ALT Linux 7.0                                      | 7.0      | http://altlinux.org/altlinux/7.0        
 centos6.0            | CentOS 6.0                                         | 6.0      | http://centos.org/centos/6.0            
 centos6.1            | CentOS 6.1                                         | 6.1      | http://centos.org/centos/6.1            
 centos6.2            | CentOS 6.2                                         | 6.2      | http://centos.org/centos/6.2            
 centos6.3            | CentOS 6.3                                         | 6.3      | http://centos.org/centos/6.3            
 centos6.4            | CentOS 6.4                                         | 6.4      | http://centos.org/centos/6.4            
 centos6.5            | CentOS 6.5                                         | 6.5      | http://centos.org/centos/6.5            
 centos6.6            | CentOS 6.6                                         | 6.6      | http://centos.org/centos/6.6            
 centos6.7            | CentOS 6.7                                         | 6.7      | http://centos.org/centos/6.7            
 centos6.8            | CentOS 6.8                                         | 6.8      | http://centos.org/centos/6.8            
 centos6.9            | CentOS 6.9                                         | 6.9      | http://centos.org/centos/6.9            
 centos7.0            | CentOS 7.0                                         | 7.0      | http://centos.org/centos/7.0            
 debian1.1            | Debian Buzz                                        | 1.1      | http://debian.org/debian/1.1            
 debian1.2            | Debian Rex                                         | 1.2      | http://debian.org/debian/1.2            
 debian1.3            | Debian Bo                                          | 1.3      | http://debian.org/debian/1.3            
 debian2.0            | Debian Hamm                                        | 2.0      | http://debian.org/debian/2.0            
 debian2.1            | Debian Slink                                       | 2.1      | http://debian.org/debian/2.1            
 debian2.2            | Debian Potato                                      | 2.2      | http://debian.org/debian/2.2            
 debian3              | Debian Woody                                       | 3        | http://debian.org/debian/3              
 debian3.1            | Debian Sarge                                       | 3.1      | http://debian.org/debian/3.1            
 debian4              | Debian Etch                                        | 4        | http://debian.org/debian/4              
 debian5              | Debian Lenny                                       | 5        | http://debian.org/debian/5              
 debian6              | Debian Squeeze                                     | 6        | http://debian.org/debian/6              
 debian7              | Debian Wheezy                                      | 7        | http://debian.org/debian/7              
 debian8              | Debian Jessie                                      | 8        | http://debian.org/debian/8              
 debian9              | Debian Stretch                                     | 9        | http://debian.org/debian/9              
 debiantesting        | Debian Testing                                     | testing  | http://debian.org/debian/testing        
 fedora-unknown       | Fedora                                             | unknown  | http://fedoraproject.org/fedora/unknown
 fedora1              | Fedora Core 1                                      | 1        | http://fedoraproject.org/fedora/1       
 fedora10             | Fedora 10                                          | 10       | http://fedoraproject.org/fedora/10      
 fedora11             | Fedora 11                                          | 11       | http://fedoraproject.org/fedora/11      
 fedora12             | Fedora 12                                          | 12       | http://fedoraproject.org/fedora/12      
 fedora13             | Fedora 13                                          | 13       | http://fedoraproject.org/fedora/13      
 fedora14             | Fedora 14                                          | 14       | http://fedoraproject.org/fedora/14      
 fedora15             | Fedora 15                                          | 15       | http://fedoraproject.org/fedora/15      
 fedora16             | Fedora 16                                          | 16       | http://fedoraproject.org/fedora/16      
 fedora17             | Fedora 17                                          | 17       | http://fedoraproject.org/fedora/17      
 fedora18             | Fedora 18                                          | 18       | http://fedoraproject.org/fedora/18      
 fedora19             | Fedora 19                                          | 19       | http://fedoraproject.org/fedora/19      
 fedora2              | Fedora Core 2                                      | 2        | http://fedoraproject.org/fedora/2       
 fedora20             | Fedora 20                                          | 20       | http://fedoraproject.org/fedora/20      
 fedora21             | Fedora 21                                          | 21       | http://fedoraproject.org/fedora/21      
 fedora22             | Fedora 22                                          | 22       | http://fedoraproject.org/fedora/22      
 fedora23             | Fedora 23                                          | 23       | http://fedoraproject.org/fedora/23      
 fedora24             | Fedora 24                                          | 24       | http://fedoraproject.org/fedora/24      
 fedora25             | Fedora 25                                          | 25       | http://fedoraproject.org/fedora/25      
 fedora26             | Fedora 26                                          | 26       | http://fedoraproject.org/fedora/26      
 fedora3              | Fedora Core 3                                      | 3        | http://fedoraproject.org/fedora/3       
 fedora4              | Fedora Core 4                                      | 4        | http://fedoraproject.org/fedora/4       
 fedora5              | Fedora Core 5                                      | 5        | http://fedoraproject.org/fedora/5       
 fedora6              | Fedora Core 6                                      | 6        | http://fedoraproject.org/fedora/6       
 fedora7              | Fedora 7                                           | 7        | http://fedoraproject.org/fedora/7       
 fedora8              | Fedora 8                                           | 8        | http://fedoraproject.org/fedora/8       
 fedora9              | Fedora 9                                           | 9        | http://fedoraproject.org/fedora/9       
 freebsd1.0           | FreeBSD 1.0                                        | 1.0      | http://freebsd.org/freebsd/1.0          
 freebsd10.0          | FreeBSD 10.0                                       | 10.0     | http://freebsd.org/freebsd/10.0         
 freebsd10.1          | FreeBSD 10.1                                       | 10.1     | http://freebsd.org/freebsd/10.1         
 freebsd10.2          | FreeBSD 10.2                                       | 10.2     | http://freebsd.org/freebsd/10.2         
 freebsd10.3          | FreeBSD 10.3                                       | 10.3     | http://freebsd.org/freebsd/10.3         
 freebsd10.4          | FreeBSD 10.4                                       | 10.4     | http://freebsd.org/freebsd/10.4         
 freebsd11.0          | FreeBSD 11.0                                       | 11.0     | http://freebsd.org/freebsd/11.0         
 freebsd11.1          | FreeBSD 11.1                                       | 11.1     | http://freebsd.org/freebsd/11.1         
 freebsd2.0           | FreeBSD 2.0                                        | 2.0      | http://freebsd.org/freebsd/2.0          
 freebsd2.0.5         | FreeBSD 2.0.5                                      | 2.0.5    | http://freebsd.org/freebsd/2.0.5        
 freebsd2.2.8         | FreeBSD 2.2.8                                      | 2.2.8    | http://freebsd.org/freebsd/2.2.8        
 freebsd2.2.9         | FreeBSD 2.2.9                                      | 2.2.9    | http://freebsd.org/freebsd/2.2.9        
 freebsd3.0           | FreeBSD 3.0                                        | 3.0      | http://freebsd.org/freebsd/3.0          
 freebsd3.2           | FreeBSD 3.2                                        | 3.2      | http://freebsd.org/freebsd/3.2          
 freebsd4.0           | FreeBSD 4.0                                        | 4.0      | http://freebsd.org/freebsd/4.0          
 freebsd4.1           | FreeBSD 4.1                                        | 4.1      | http://freebsd.org/freebsd/4.1          
 freebsd4.10          | FreeBSD 4.10                                       | 4.10     | http://freebsd.org/freebsd/4.10         
 freebsd4.11          | FreeBSD 4.11                                       | 4.11     | http://freebsd.org/freebsd/4.11         
 freebsd4.2           | FreeBSD 4.2                                        | 4.2      | http://freebsd.org/freebsd/4.2          
 freebsd4.3           | FreeBSD 4.3                                        | 4.3      | http://freebsd.org/freebsd/4.3          
 freebsd4.4           | FreeBSD 4.4                                        | 4.4      | http://freebsd.org/freebsd/4.4          
 freebsd4.5           | FreeBSD 4.5                                        | 4.5      | http://freebsd.org/freebsd/4.5          
 freebsd4.6           | FreeBSD 4.6                                        | 4.6      | http://freebsd.org/freebsd/4.6          
 freebsd4.7           | FreeBSD 4.7                                        | 4.7      | http://freebsd.org/freebsd/4.7          
 freebsd4.8           | FreeBSD 4.8                                        | 4.8      | http://freebsd.org/freebsd/4.8          
 freebsd4.9           | FreeBSD 4.9                                        | 4.9      | http://freebsd.org/freebsd/4.9          
 freebsd5.0           | FreeBSD 5.0                                        | 5.0      | http://freebsd.org/freebsd/5.0          
 freebsd5.1           | FreeBSD 5.1                                        | 5.1      | http://freebsd.org/freebsd/5.1          
 freebsd5.2           | FreeBSD 5.2                                        | 5.2      | http://freebsd.org/freebsd/5.2          
 freebsd5.2.1         | FreeBSD 5.2.1                                      | 5.2.1    | http://freebsd.org/freebsd/5.2.1        
 freebsd5.3           | FreeBSD 5.3                                        | 5.3      | http://freebsd.org/freebsd/5.3          
 freebsd5.4           | FreeBSD 5.4                                        | 5.4      | http://freebsd.org/freebsd/5.4          
 freebsd5.5           | FreeBSD 5.5                                        | 5.5      | http://freebsd.org/freebsd/5.5          
 freebsd6.0           | FreeBSD 6.0                                        | 6.0      | http://freebsd.org/freebsd/6.0          
 freebsd6.1           | FreeBSD 6.1                                        | 6.1      | http://freebsd.org/freebsd/6.1          
 freebsd6.2           | FreeBSD 6.2                                        | 6.2      | http://freebsd.org/freebsd/6.2          
 freebsd6.3           | FreeBSD 6.3                                        | 6.3      | http://freebsd.org/freebsd/6.3          
 freebsd6.4           | FreeBSD 6.4                                        | 6.4      | http://freebsd.org/freebsd/6.4          
 freebsd7.0           | FreeBSD 7.0                                        | 7.0      | http://freebsd.org/freebsd/7.0          
 freebsd7.1           | FreeBSD 7.1                                        | 7.1      | http://freebsd.org/freebsd/7.1          
 freebsd7.2           | FreeBSD 7.2                                        | 7.2      | http://freebsd.org/freebsd/7.2          
 freebsd7.3           | FreeBSD 7.3                                        | 7.3      | http://freebsd.org/freebsd/7.3          
 freebsd7.4           | FreeBSD 7.4                                        | 7.4      | http://freebsd.org/freebsd/7.4          
 freebsd8.0           | FreeBSD 8.0                                        | 8.0      | http://freebsd.org/freebsd/8.0          
 freebsd8.1           | FreeBSD 8.1                                        | 8.1      | http://freebsd.org/freebsd/8.1          
 freebsd8.2           | FreeBSD 8.2                                        | 8.2      | http://freebsd.org/freebsd/8.2          
 freebsd8.3           | FreeBSD 8.3                                        | 8.3      | http://freebsd.org/freebsd/8.3          
 freebsd8.4           | FreeBSD 8.4                                        | 8.4      | http://freebsd.org/freebsd/8.4          
 freebsd9.0           | FreeBSD 9.0                                        | 9.0      | http://freebsd.org/freebsd/9.0          
 freebsd9.1           | FreeBSD 9.1                                        | 9.1      | http://freebsd.org/freebsd/9.1          
 freebsd9.2           | FreeBSD 9.2                                        | 9.2      | http://freebsd.org/freebsd/9.2          
 freebsd9.3           | FreeBSD 9.3                                        | 9.3      | http://freebsd.org/freebsd/9.3          
 freedos1.2           | FreeDOS 1.2                                        | 1.2      | http://freedos.org/freedos/1.2          
 gnome-continuous-3.10 | GNOME 3.10                                         | 3.10     | http://gnome.org/gnome-continuous/3.10  
 gnome-continuous-3.12 | GNOME 3.12                                         | 3.12     | http://gnome.org/gnome-continuous/3.12  
 gnome-continuous-3.14 | GNOME 3.14                                         | 3.14     | http://gnome.org/gnome-continuous/3.14  
 gnome3.6             | GNOME 3.6                                          | 3.6      | http://gnome.org/gnome/3.6              
 gnome3.8             | GNOME 3.8                                          | 3.8      | http://gnome.org/gnome/3.8              
 macosx10.0           | MacOS X Cheetah                                    | 10.0     | http://apple.com/macosx/10.0            
 macosx10.1           | MacOS X Puma                                       | 10.1     | http://apple.com/macosx/10.1            
 macosx10.2           | MacOS X Jaguar                                     | 10.2     | http://apple.com/macosx/10.2            
 macosx10.3           | MacOS X Panther                                    | 10.3     | http://apple.com/macosx/10.3            
 macosx10.4           | MacOS X Tiger                                      | 10.4     | http://apple.com/macosx/10.4            
 macosx10.5           | MacOS X Leopard                                    | 10.5     | http://apple.com/macosx/10.5            
 macosx10.6           | MacOS X Snow Leopard                               | 10.6     | http://apple.com/macosx/10.6            
 macosx10.7           | MacOS X Lion                                       | 10.7     | http://apple.com/macosx/10.7            
 mageia1              | Mageia 1                                           | 1        | http://mageia.org/mageia/1              
 mageia2              | Mageia 2                                           | 2        | http://mageia.org/mageia/2              
 mageia3              | Mageia 3                                           | 3        | http://mageia.org/mageia/3              
 mageia4              | Mageia 4                                           | 4        | http://mageia.org/mageia/4              
 mageia5              | Mageia 5                                           | 5        | http://mageia.org/mageia/5              
 mageia6              | Mageia 6                                           | 6        | http://mageia.org/mageia/6              
 mandrake10.0         | Mandrake Linux 10.0                                | 10.0     | http://mandriva.com/mandrake/10.0       
 mandrake10.1         | Mandrake Linux 10.1                                | 10.1     | http://mandriva.com/mandrake/10.1       
 mandrake10.2         | Mandrake Linux 10.2                                | 10.2     | http://mandriva.com/mandrake/10.2       
 mandrake5.1          | Mandrake Linux 5.1                                 | 5.1      | http://mandriva.com/mandrake/5.1        
 mandrake5.2          | Mandrake Linux 5.2                                 | 5.2      | http://mandriva.com/mandrake/5.2        
 mandrake5.3          | Mandrake Linux 5.3                                 | 5.3      | http://mandriva.com/mandrake/5.3        
 mandrake6.0          | Mandrake Linux 6.0                                 | 6.0      | http://mandriva.com/mandrake/6.0        
 mandrake6.1          | Mandrake Linux 6.1                                 | 6.1      | http://mandriva.com/mandrake/6.1        
 mandrake7.0          | Mandrake Linux 7.0                                 | 7.0      | http://mandriva.com/mandrake/7.0        
 mandrake7.1          | Mandrake Linux 7.1                                 | 7.1      | http://mandriva.com/mandrake/7.1        
 mandrake7.2          | Mandrake Linux 7.2                                 | 7.2      | http://mandriva.com/mandrake/7.2        
 mandrake8.0          | Mandrake Linux 8.0                                 | 8.0      | http://mandriva.com/mandrake/8.0        
 mandrake8.1          | Mandrake Linux 8.1                                 | 8.1      | http://mandriva.com/mandrake/8.1        
 mandrake8.2          | Mandrake Linux 8.2                                 | 8.2      | http://mandriva.com/mandrake/8.2        
 mandrake9.0          | Mandrake Linux 9.0                                 | 9.0      | http://mandriva.com/mandrake/9.0        
 mandrake9.1          | Mandrake Linux 9.1                                 | 9.1      | http://mandriva.com/mandrake/9.1        
 mandrake9.2          | Mandrake Linux 9.2                                 | 9.2      | http://mandriva.com/mandrake/9.2        
 mandriva2006.0       | Mandriva Linux 2006.0                              | 2006.0   | http://mandriva.com/mandriva/2006.0     
 mandriva2007         | Mandriva Linux 2007                                | 2007     | http://mandriva.com/mandriva/2007       
 mandriva2007.1       | Mandriva Linux 2007 Spring                         | 2007.1   | http://mandriva.com/mandriva/2007.1     
 mandriva2008.0       | Mandriva Linux 2008                                | 2008.0   | http://mandriva.com/mandriva/2008.0     
 mandriva2008.1       | Mandriva Linux 2008 Spring                         | 2008.1   | http://mandriva.com/mandriva/2008.1     
 mandriva2009.0       | Mandriva Linux 2009                                | 2009.0   | http://mandriva.com/mandriva/2009.0     
 mandriva2009.1       | Mandriva Linux 2009 Spring                         | 2009.1   | http://mandriva.com/mandriva/2009.1     
 mandriva2010.0       | Mandriva Linux 2010                                | 2010.0   | http://mandriva.com/mandriva/2010.0     
 mandriva2010.1       | Mandriva Linux 2010 Spring                         | 2010.1   | http://mandriva.com/mandriva/2010.1     
 mandriva2010.2       | Mandriva Linux 2010.2                              | 2010.2   | http://mandriva.com/mandriva/2010.2     
 mandriva2011         | Mandriva Linux 2011                                | 2011     | http://mandriva.com/mandriva/2011       
 mbs1.0               | Mandriva Business Server 1.0                       | 1.0      | http://mandriva.com/mbs/1.0             
 mes5                 | Mandriva Enterprise Server 5.0                     | 5.0      | http://mandriva.com/mes/5.0             
 mes5.1               | Mandriva Enterprise Server 5.1                     | 5.1      | http://mandriva.com/mes/5.1             
 msdos6.22            | Microsoft MS-DOS 6.22                              | 6.22     | http://microsoft.com/msdos/6.22         
 netbsd0.8            | NetBSD 0.8                                         | 0.8      | http://netbsd.org/netbsd/0.8            
 netbsd0.9            | NetBSD 0.9                                         | 0.9      | http://netbsd.org/netbsd/0.9            
 netbsd1.0            | NetBSD 1.0                                         | 1.0      | http://netbsd.org/netbsd/1.0            
 netbsd1.1            | NetBSD 1.1                                         | 1.1      | http://netbsd.org/netbsd/1.1            
 netbsd1.2            | NetBSD 1.2                                         | 1.2      | http://netbsd.org/netbsd/1.2            
 netbsd1.3            | NetBSD 1.3                                         | 1.3      | http://netbsd.org/netbsd/1.3            
 netbsd1.4            | NetBSD 1.4                                         | 1.4      | http://netbsd.org/netbsd/1.4            
 netbsd1.5            | NetBSD 1.5                                         | 1.5      | http://netbsd.org/netbsd/1.5            
 netbsd1.6            | NetBSD 1.6                                         | 1.6      | http://netbsd.org/netbsd/1.6            
 netbsd2.0            | NetBSD 2.0                                         | 2.0      | http://netbsd.org/netbsd/2.0            
 netbsd3.0            | NetBSD 3.0                                         | 3.0      | http://netbsd.org/netbsd/3.0            
 netbsd4.0            | NetBSD 4.0                                         | 4.0      | http://netbsd.org/netbsd/4.0            
 netbsd5.0            | NetBSD 5.0                                         | 5.0      | http://netbsd.org/netbsd/5.0            
 netbsd5.1            | NetBSD 5.1                                         | 5.1      | http://netbsd.org/netbsd/5.1            
 netbsd6.0            | NetBSD 6.0                                         | 6.0      | http://netbsd.org/netbsd/6.0            
 netbsd6.1            | NetBSD 6.1                                         | 6.1      | http://netbsd.org/netbsd/6.1            
 netbsd7.0            | NetBSD 7.0                                         | 7.0      | http://netbsd.org/netbsd/7.0            
 netbsd7.1            | NetBSD 7.1                                         | 7.1      | http://netbsd.org/netbsd/7.1            
 netbsd7.1.1          | NetBSD 7.1.1                                       | 7.1.1    | http://netbsd.org/netbsd/7.1.1          
 netware4             | Novell Netware 4                                   | 4        | http://novell.com/netware/4             
 netware5             | Novell Netware 5                                   | 5        | http://novell.com/netware/5             
 netware6             | Novell Netware 6                                   | 6        | http://novell.com/netware/6             
 openbsd4.2           | OpenBSD 4.2                                        | 4.2      | http://openbsd.org/openbsd/4.2          
 openbsd4.3           | OpenBSD 4.3                                        | 4.3      | http://openbsd.org/openbsd/4.3          
 openbsd4.4           | OpenBSD 4.4                                        | 4.4      | http://openbsd.org/openbsd/4.4          
 openbsd4.5           | OpenBSD 4.5                                        | 4.5      | http://openbsd.org/openbsd/4.5          
 openbsd4.8           | OpenBSD 4.8                                        | 4.8      | http://openbsd.org/openbsd/4.8          
 openbsd4.9           | OpenBSD 4.9                                        | 4.9      | http://openbsd.org/openbsd/4.9          
 openbsd5.0           | OpenBSD 5.0                                        | 5.0      | http://openbsd.org/openbsd/5.0          
 openbsd5.1           | OpenBSD 5.1                                        | 5.1      | http://openbsd.org/openbsd/5.1          
 openbsd5.2           | OpenBSD 5.2                                        | 5.2      | http://openbsd.org/openbsd/5.2          
 openbsd5.3           | OpenBSD 5.3                                        | 5.3      | http://openbsd.org/openbsd/5.3          
 openbsd5.4           | OpenBSD 5.4                                        | 5.4      | http://openbsd.org/openbsd/5.4          
 openbsd5.5           | OpenBSD 5.5                                        | 5.5      | http://openbsd.org/openbsd/5.5          
 openbsd5.6           | OpenBSD 5.6                                        | 5.6      | http://openbsd.org/openbsd/5.6          
 openbsd5.7           | OpenBSD 5.7                                        | 5.7      | http://openbsd.org/openbsd/5.7          
 openbsd5.8           | OpenBSD 5.8                                        | 5.8      | http://openbsd.org/openbsd/5.8          
 openbsd5.9           | OpenBSD 5.9                                        | 5.9      | http://openbsd.org/openbsd/5.9          
 openbsd6.0           | OpenBSD 6.0                                        | 6.0      | http://openbsd.org/openbsd/6.0          
 openbsd6.1           | OpenBSD 6.1                                        | 6.1      | http://openbsd.org/openbsd/6.1          
 openbsd6.2           | OpenBSD 6.2                                        | 6.2      | http://openbsd.org/openbsd/6.2          
 opensolaris2009.06   | OpenSolaris 2009.06                                | 2009.06  | http://sun.com/opensolaris/2009.06      
 opensuse-factory     | openSUSE                                           | factory  | http://opensuse.org/opensuse/factory    
 opensuse-unknown     | openSUSE                                           | unknown  | http://opensuse.org/opensuse/unknown    
 opensuse10.2         | openSUSE 10.2                                      | 10.2     | http://opensuse.org/opensuse/10.2       
 opensuse10.3         | openSUSE 10.3                                      | 10.3     | http://opensuse.org/opensuse/10.3       
 opensuse11.0         | openSUSE 11.0                                      | 11.0     | http://opensuse.org/opensuse/11.0       
 opensuse11.1         | openSUSE 11.1                                      | 11.1     | http://opensuse.org/opensuse/11.1       
 opensuse11.2         | openSUSE 11.2                                      | 11.2     | http://opensuse.org/opensuse/11.2       
 opensuse11.3         | openSUSE 11.3                                      | 11.3     | http://opensuse.org/opensuse/11.3       
 opensuse11.4         | openSUSE 11.4                                      | 11.4     | http://opensuse.org/opensuse/11.4       
 opensuse12.1         | openSUSE 12.1                                      | 12.1     | http://opensuse.org/opensuse/12.1       
 opensuse12.2         | openSUSE 12.2                                      | 12.2     | http://opensuse.org/opensuse/12.2       
 opensuse12.3         | openSUSE 12.3                                      | 12.3     | http://opensuse.org/opensuse/12.3       
 opensuse13.1         | openSUSE 13.1                                      | 13.1     | http://opensuse.org/opensuse/13.1       
 opensuse13.2         | openSUSE 13.2                                      | 13.2     | http://opensuse.org/opensuse/13.2       
 opensuse42.1         | openSUSE Leap 42.1                                 | 42.1     | http://opensuse.org/opensuse/42.1       
 opensuse42.2         | openSUSE Leap 42.2                                 | 42.2     | http://opensuse.org/opensuse/42.2       
 opensuse42.3         | openSUSE Leap 42.3                                 | 42.3     | http://opensuse.org/opensuse/42.3       
 opensusetumbleweed   | openSUSE Tumbleweed                                | tumbleweed | http://opensuse.org/opensuse/tumbleweed
 rhel-atomic-7.0      | Red Hat Enterprise Linux Atomic Host 7.0           | 7.0      | http://redhat.com/rhel-atomic/7.0       
 rhel-atomic-7.1      | Red Hat Enterprise Linux Atomic Host 7.1           | 7.1      | http://redhat.com/rhel-atomic/7.1       
 rhel-atomic-7.2      | Red Hat Enterprise Linux Atomic Host 7.2           | 7.2      | http://redhat.com/rhel-atomic/7.2       
 rhel2.1              | Red Hat Enterprise Linux 2.1                       | 2.1      | http://redhat.com/rhel/2.1              
 rhel2.1.1            | Red Hat Enterprise Linux 2.1 Update 1  
/etc/bind/masters/elinvent.com            | 2.1.1    | http://redhat.com/rhel/2.1.1            
 rhel2.1.2            | Red Hat Enterprise Linux 2.1 Update 2              | 2.1.2    | http://redhat.com/rhel/2.1.2            
 rhel2.1.3            | Red Hat Enterprise Linux 2.1 Update 3              | 2.1.3    | http://redhat.com/rhel/2.1.3            
 rhel2.1.4            | Red Hat Enterprise Linux 2.1 Update 4              | 2.1.4    | http://redhat.com/rhel/2.1.4            
 rhel2.1.5            | Red Hat Enterprise Linux 2.1 Update 5              | 2.1.5    | http://redhat.com/rhel/2.1.5            
 rhel2.1.6            | Red Hat Enterprise Linux 2.1 Update 6              | 2.1.6    | http://redhat.com/rhel/2.1.6            
 rhel2.1.7            | Red Hat Enterprise Linux 2.1 Update 7              | 2.1.7    | http://redhat.com/rhel/2.1.7            
 rhel3                | Red Hat Enterprise Linux 3                         | 3        | http://redhat.com/rhel/3                
 rhel3.1              | Red Hat Enterprise Linux 3 Update 1                | 3.1      | http://redhat.com/rhel/3.1              
 rhel3.2              | Red Hat Enterprise Linux 3 Update 2                | 3.2      | http://redhat.com/rhel/3.2              
 rhel3.3              | Red Hat Enterprise Linux 3 Update 3                | 3.3      | http://redhat.com/rhel/3.3              
 rhel3.4              | Red Hat Enterprise Linux 3 Update 4                | 3.4      | http://redhat.com/rhel/3.4              
 rhel3.5              | Red Hat Enterprise Linux 3 Update 5                | 3.5      | http://redhat.com/rhel/3.5              
 rhel3.6              | Red Hat Enterprise Linux 3 Update 6                | 3.6      | http://redhat.com/rhel/3.6              
 rhel3.7              | Red Hat Enterprise Linux 3 Update 7                | 3.7      | http://redhat.com/rhel/3.7              
 rhel3.8              | Red Hat Enterprise Linux 3 Update 8                | 3.8      | http://redhat.com/rhel/3.8              
 rhel3.9              | Red Hat Enterprise Linux 3 Update 9                | 3.9      | http://redhat.com/rhel/3.9              
 rhel4.0              | Red Hat Enterprise Linux 4.0                       | 4.0      | http://redhat.com/rhel/4.0              
 rhel4.1              | Red Hat Enterprise Linux 4.1                       | 4.1      | http://redhat.com/rhel/4.1              
 rhel4.2              | Red Hat Enterprise Linux 4.2                       | 4.2      | http://redhat.com/rhel/4.2              
 rhel4.3              | Red Hat Enterprise Linux 4.3                       | 4.3      | http://redhat.com/rhel/4.3              
 rhel4.4              | Red Hat Enterprise Linux 4.4                       | 4.4      | http://redhat.com/rhel/4.4              
 rhel4.5              | Red Hat Enterprise Linux 4.5                       | 4.5      | http://redhat.com/rhel/4.5              
 rhel4.6              | Red Hat Enterprise Linux 4.6                       | 4.6      | http://redhat.com/rhel/4.6              
 rhel4.7              | Red Hat Enterprise Linux 4.7                       | 4.7      | http://redhat.com/rhel/4.7              
 rhel4.8              | Red Hat Enterprise Linux 4.8                       | 4.8      | http://redhat.com/rhel/4.8              
 rhel4.9              | Red Hat Enterprise Linux 4.9                       | 4.9      | http://redhat.com/rhel/4.9              
 rhel5.0              | Red Hat Enterprise Linux 5.0                       | 5.0      | http://redhat.com/rhel/5.0              
 rhel5.1              | Red Hat Enterprise Linux 5.1                       | 5.1      | http://redhat.com/rhel/5.1              
 rhel5.10             | Red Hat Enterprise Linux 5.10                      | 5.10     | http://redhat.com/rhel/5.10             
 rhel5.11             | Red Hat Enterprise Linux 5.11                      | 5.11     | http://redhat.com/rhel/5.11             
 rhel5.2              | Red Hat Enterprise Linux 5.2                       | 5.2      | http://redhat.com/rhel/5.2              
 rhel5.3              | Red Hat Enterprise Linux 5.3                       | 5.3      | http://redhat.com/rhel/5.3              
 rhel5.4              | Red Hat Enterprise Linux 5.4                       | 5.4      | http://redhat.com/rhel/5.4              
 rhel5.5              | Red Hat Enterprise Linux 5.5                       | 5.5      | http://redhat.com/rhel/5.5              
 rhel5.6              | Red Hat Enterprise Linux 5.6                       | 5.6      | http://redhat.com/rhel/5.6              
 rhel5.7              | Red Hat Enterprise Linux 5.7                       | 5.7      | http://redhat.com/rhel/5.7              
 rhel5.8              | Red Hat Enterprise Linux 5.8                       | 5.8      | http://redhat.com/rhel/5.8              
 rhel5.9              | Red Hat Enterprise Linux 5.9                       | 5.9      | http://redhat.com/rhel/5.9              
 rhel6.0              | Red Hat Enterprise Linux 6.0                       | 6.0      | http://redhat.com/rhel/6.0              
 rhel6.1              | Red Hat Enterprise Linux 6.1                       | 6.1      | http://redhat.com/rhel/6.1              
 rhel6.2              | Red Hat Enterprise Linux 6.2                       | 6.2      | http://redhat.com/rhel/6.2              
 rhel6.3              | Red Hat Enterprise Linux 6.3                       | 6.3      | http://redhat.com/rhel/6.3              
 rhel6.4              | Red Hat Enterprise Linux 6.4                       | 6.4      | http://redhat.com/rhel/6.4              
 rhel6.5              | Red Hat Enterprise Linux 6.5                       | 6.5      | http://redhat.com/rhel/6.5              
 rhel6.6              | Red Hat Enterprise Linux 6.6                       | 6.6      | http://redhat.com/rhel/6.6              
 rhel6.7              | Red Hat Enterprise Linux 6.7                       | 6.7      | http://redhat.com/rhel/6.7              
 rhel6.8              | Red Hat Enterprise Linux 6.8                       | 6.8      | http://redhat.com/rhel/6.8              
 rhel6.9              | Red Hat Enterprise Linux 6.9                       | 6.9      | http://redhat.com/rhel/6.9              
 rhel7.0              | Red Hat Enterprise Linux 7.0                       | 7.0      | http://redhat.com/rhel/7.0              
 rhel7.1              | Red Hat Enterprise Linux 7.1                       | 7.1      | http://redhat.com/rhel/7.1              
 rhel7.2              | Red Hat Enterprise Linux 7.2                       | 7.2      | http://redhat.com/rhel/7.2              
 rhel7.3              | Red Hat Enterprise Linux 7.3                       | 7.3      | http://redhat.com/rhel/7.3              
 rhel7.4              | Red Hat Enterprise Linux 7.4                       | 7.4      | http://redhat.com/rhel/7.4              
 rhl1.0               | Red Hat Linux 1.0                                  | 1.0      | http://redhat.com/rhl/1.0               
 rhl1.1               | Red Hat Linux 1.1                                  | 1.1      | http://redhat.com/rhl/1.1               
 rhl2.0               | Red Hat Linux 2.0                                  | 2.0      | http://redhat.com/rhl/2.0               
 rhl2.1               | Red Hat Linux 2.1                                  | 2.1      | http://redhat.com/rhl/2.1               
 rhl3.0.3             | Red Hat Linux 3.0.3                                | 3.0.3    | http://redhat.com/rhl/3.0.3             
 rhl4.0               | Red Hat Linux 4.0                                  | 4.0      | http://redhat.com/rhl/4.0               
 rhl4.1               | Red Hat Linux 4.1                                  | 4.1      | http://redhat.com/rhl/4.1               
 rhl4.2               | Red Hat Linux 4.2                                  | 4.2      | http://redhat.com/rhl/4.2               
 rhl5.0               | Red Hat Linux 5.0                                  | 5.0      | http://redhat.com/rhl/5.0               
 rhl5.1               | Red Hat Linux 5.1                                  | 5.1      | http://redhat.com/rhl/5.1               
 rhl5.2               | Red Hat Linux 5.2                                  | 5.2      | http://redhat.com/rhl/5.2               
 rhl6.0               | Red Hat Linux 6.0                                  | 6.0      | http://redhat.com/rhl/6.0               
 rhl6.1               | Red Hat Linux 6.1                                  | 6.1      | http://redhat.com/rhl/6.1               
 rhl6.2               | Red Hat Linux 6.2                                  | 6.2      | http://redhat.com/rhl/6.2               
 rhl7                 | Red Hat Linux 7                                    | 7        | http://redhat.com/rhl/7                 
 rhl7.1               | Red Hat Linux 7.1                                  | 7.1      | http://redhat.com/rhl/7.1               
 rhl7.2               | Red Hat Linux 7.2                                  | 7.2      | http://redhat.com/rhl/7.2               
 rhl7.3               | Red Hat Linux 7.3                                  | 7.3      | http://redhat.com/rhl/7.3               
 rhl8.0               | Red Hat Linux 8.0                                  | 8.0      | http://redhat.com/rhl/8.0               
 rhl9                 | Red Hat Linux 9                                    | 9        | http://redhat.com/rhl/9                 
 sled10               | SUSE Linux Enterprise Desktop 10                   | 10       | http://suse.com/sled/10                 
 sled10sp1            | SUSE Linux Enterprise Desktop 10 SP1               | 10.1     | http://suse.com/sled/10.1               
 sled10sp2            | SUSE Linux Enterprise Desktop 10 SP2               | 10.2     | http://suse.com/sled/10.2               
 sled10sp3            | SUSE Linux Enterprise Desktop 10 SP3               | 10.3     | http://suse.com/sled/10.3               
 sled10sp4            | SUSE Linux Enterprise Desktop 10 SP4               | 10.4     | http://suse.com/sled/10.4               
 sled11               | SUSE Linux Enterprise Desktop 11                   | 11       | http://suse.com/sled/11                 
 sled11sp1            | SUSE Linux Enterprise Desktop 11 SP1               | 11.1     | http://suse.com/sled/11.1               
 sled11sp2            | SUSE Linux Enterprise Desktop 11 SP2               | 11.2     | http://suse.com/sled/11.2               
 sled11sp3            | SUSE Linux Enterprise Desktop 11 SP3               | 11.3     | http://suse.com/sled/11.3               
 sled11sp4            | SUSE Linux Enterprise Desktop 11 SP4               | 11.4     | http://suse.com/sled/11.4               
 sled12               | SUSE Linux Enterprise Desktop 12                   | 12       | http://suse.com/sled/12                 
 sled12sp1            | SUSE Linux Enterprise Desktop 12 SP1               | 12.1     | http://suse.com/sled/12.1               
 sled12sp2            | SUSE Linux Enterprise Desktop 12 SP2               | 12.2     | http://suse.com/sled/12.2               
 sled9                | SUSE Linux Enterprise Desktop 9                    | 9        | http://suse.com/sled/9                  
 sles10               | SUSE Linux Enterprise Server 10            
/etc/bind/masters/elinvent.com        | 10       | http://suse.com/sles/10                 
 sles10sp1            | SUSE Linux Enterprise Server 10 SP1                | 10.1     | http://suse.com/sles/10.1               
 sles10sp2            | SUSE Linux Enterprise Server 10 SP2                | 10.2     | http://suse.com/sles/10.2               
 sles10sp3            | SUSE Linux Enterprise Server 10 SP3                | 10.3     | http://suse.com/sles/10.3               
 sles10sp4            | SUSE Linux Enterprise Server 10 SP4                | 10.4     | http://suse.com/sles/10.4               
 sles11               | SUSE Linux Enterprise Server 11                    | 11       | http://suse.com/sles/11                 
 sles11sp1            | SUSE Linux Enterprise Server 11 SP1                | 11.1     | http://suse.com/sles/11.1               
 sles11sp2            | SUSE Linux Enterprise Server 11 SP2                | 11.2     | http://suse.com/sles/11.2               
 sles11sp3            | SUSE Linux Enterprise Server 11 SP3                | 11.3     | http://suse.com/sles/11.3               
 sles11sp4            | SUSE Linux Enterprise Server 11 SP4                | 11.4     | http://suse.com/sles/11.4               
 sles12               | SUSE Linux Enterprise Server 12                    | 12       | http://suse.com/sles/12                 
 sles12sp1            | SUSE Linux Enterprise Server 12 SP1                | 12.1     | http://suse.com/sles/12.1               
 sles12sp2            | SUSE Linux Enterprise Server 12 SP2                | 12.2     | http://suse.com/sles/12.2               
 sles9                | SUSE Linux Enterprise Server 9                     | 9        | http://suse.com/sles/9                  
 solaris10            | Solaris 10                                         | 10       | http://sun.com/solaris/10               
 solaris11            | Oracle Solaris 11                                  | 11       | http://oracle.com/solaris/11            
 solaris9             | Solaris 9                                          | 9        | http://sun.com/solaris/9                
 ubuntu10.04          | Ubuntu 10.04 LTS                                   | 10.04    | http://ubuntu.com/ubuntu/10.04          
 ubuntu10.10          | Ubuntu 10.10                                       | 10.10    | http://ubuntu.com/ubuntu/10.10          
 ubuntu11.04          | Ubuntu 11.04                                       | 11.04    | http://ubuntu.com/ubuntu/11.04          
 ubuntu11.10          | Ubuntu 11.10                                       | 11.10    | http://ubuntu.com/ubuntu/11.10          
 ubuntu12.04          | Ubuntu 12.04 LTS                                   | 12.04    | http://ubuntu.com/ubuntu/12.04          
 ubuntu12.10          | Ubuntu 12.10                                       | 12.10    | http://ubuntu.com/ubuntu/12.10          
 ubuntu13.04          | Ubuntu 13.04                                       | 13.04    | http://ubuntu.com/ubuntu/13.04          
 ubuntu13.10          | Ubuntu 13.10                                       | 13.10    | http://ubuntu.com/ubuntu/13.10          
 ubuntu14.04          | Ubuntu 14.04 LTS                                   | 14.04    | http://ubuntu.com/ubuntu/14.04          
 ubuntu14.10          | Ubuntu 14.10                                       | 14.10    | http://ubuntu.com/ubuntu/14.10          
 ubuntu15.04          | Ubuntu 15.04                                       | 15.04    | http://ubuntu.com/ubuntu/15.04          
 ubuntu15.10          | Ubuntu 15.10                                       | 15.10    | http://ubuntu.com/ubuntu/15.10          
 ubuntu16.04          | Ubuntu 16.04                                       | 16.04    | http://ubuntu.com/ubuntu/16.04          
 ubuntu16.10          | Ubuntu 16.10                                       | 16.10    | http://ubuntu.com/ubuntu/16.10          
 ubuntu17.04          | Ubuntu 17.04                                       | 17.04    | http://ubuntu.com/ubuntu/17.04          
 ubuntu17.10          | Ubuntu 17.10                                       | 17.10    | http://ubuntu.com/ubuntu/17.10          
 ubuntu4.10           | Ubuntu 4.10                                        | 4.10     | http://ubuntu.com/ubuntu/4.10           
 ubuntu5.04           | Ubuntu 5.04                                        | 5.04     | http://ubuntu.com/ubuntu/5.04           
 ubuntu5.10           | Ubuntu 5.10                                        | 5.10     | http://ubuntu.com/ubuntu/5.10           
 ubuntu6.06           | Ubuntu 6.06 LTS                                    | 6.06     | http://ubuntu.com/ubuntu/6.06           
 ubuntu6.10           | Ubuntu 6.10                                        | 6.10     | http://ubuntu.com/ubuntu/6.10           
 ubuntu7.04           | Ubuntu 7.04                                        | 7.04     | http://ubuntu.com/ubuntu/7.04           
 ubuntu7.10           | Ubuntu 7.10                                        | 7.10     | http://ubuntu.com/ubuntu/7.10           
 ubuntu8.04           | Ubuntu 8.04 LTS                                    | 8.04     | http://ubuntu.com/ubuntu/8.04           
 ubuntu8.10           | Ubuntu 8.10                                        | 8.10     | http://ubuntu.com/ubuntu/8.10           
 ubuntu9.04           | Ubuntu 9.04                                        | 9.04     | http://ubuntu.com/ubuntu/9.04           
 ubuntu9.10           | Ubuntu 9.10                                        | 9.10     | http://ubuntu.com/ubuntu/9.10           
 win1.0               | Microsoft Windows 1.0                              | 1.0      | http://microsoft.com/win/1.0            
 win10                | Microsoft Windows 10                               | 10.0     | http://microsoft.com/win/10             
 win2.0               | Microsoft Windows 2.0                              | 2.0      | http://microsoft.com/win/2.0            
 win2.1               | Microsoft Windows 2.1                              | 2.1      | http://microsoft.com/win/2.1            
 win2k                | Microsoft Windows 2000                             | 5.0      | http://microsoft.com/win/2k             
 win2k12              | Microsoft Windows Server 2012                      | 6.3      | http://microsoft.com/win/2k12           
 win2k12r2            | Microsoft Windows Server 2012 R2                   | 6.3      | http://microsoft.com/win/2k12r2         
 win2k3               | Microsoft Windows Server 2003                      | 5.2      | http://microsoft.com/win/2k3            
 win2k3r2             | Microsoft Windows Server 2003 R2                   | 5.2      | http://microsoft.com/win/2k3r2          
 win2k8               | Microsoft Windows Server 2008                      | 6.0      | http://microsoft.com/win/2k8            
 win2k8r2             | Microsoft Windows Server 2008 R2                   | 6.1      | http://microsoft.com/win/2k8r2          
 win3.1               | Microsoft Windows 3.1                              | 3.1      | http://microsoft.com/win/3.1            
 win7                 | Microsoft Windows 7                                | 6.1      | http://microsoft.com/win/7              
 win8                 | Microsoft Windows 8                                | 6.2      | http://microsoft.com/win/8              
 win8.1               | Microsoft Windows 8.1                              | 6.3      | http://microsoft.com/win/8.1            
 win95                | Microsoft Windows 95                               | 4.0      | http://microsoft.com/win/95             
 win98                | Microsoft Windows 98                               | 4.1      | http://microsoft.com/win/98             
 winme                | Microsoft Windows Millennium Edition               | 4.9      | http://microsoft.com/win/me             
 winnt3.1             | Microsoft Windows NT Server 3.1                    | 3.1      | http://microsoft.com/winnt/3.1          
 winnt3.5             | Microsoft Windows NT Server 3.5                    | 3.5      | http://microsoft.com/winnt/3.5          
 winnt3.51            | Microsoft Windows NT Server 3.51                   | 3.51     | http://microsoft.com/winnt/3.51         
 winnt4.0             | Microsoft Windows NT Server 4.0                    | 4.0      | http://microsoft.com/winnt/4.0          
 winvista             | Microsoft Windows Vista                            | 6.0      | http://microsoft.com/win/vista          
 winxp                | Microsoft Windows XP                               | 5.1      | http://microsoft.com/win/xp  


9. Start / Stop listed KVM Virtual Machine


root@jeremiah:~# virsh list –all
 Id    Name                           State
—————————————————-
 3     fedora-28                      running
 –     debian9                        shut off


To start debian9 linux virtual machine that is currently off


root@jeremiah:~# virsh start fedora-28
Domain fedora-28 started


root@jeremiah:/home/hipo# virsh start debian9
error: Failed to start domain debian9
error: Requested operation is not valid: network 'default' is not active

root@jeremiah:/home/hipo# virsh net-list –all
Name                 State      Autostart     Persistent
———————————————————-
br0                  active     yes           yes
default              inactive   no            yes


root@jeremiah:/home/hipo# virsh net-start default
Network default started

root@jeremiah:/home/hipo# virsh start debian9
Domain debian9 started


10. Attach to running VM with virsh or virt-manager


root@jeremiah:~# virsh list
 Id    Name                           State
—————————————————-
 1     fedora-28                      running
 3     debian9                        running

root@jeremiah:~# virsh connect debian9


Note that to make the login prompt appear you have to press enter once after the ^] connection string appears
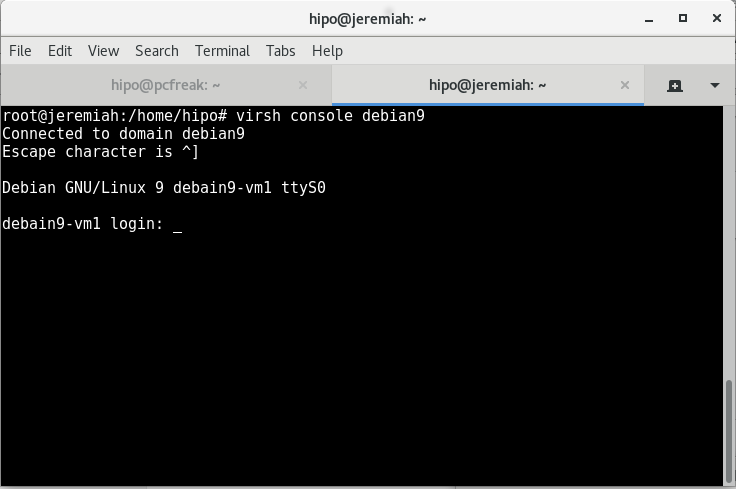

kvm-connect-to-virtual-machine-with-virsh-command-screenshot-howto

An alternative way is to use virt-manager GUI KVM desktop management interface and click over the Virtual Machine Guest name, in same fashion like in VirtualBox.
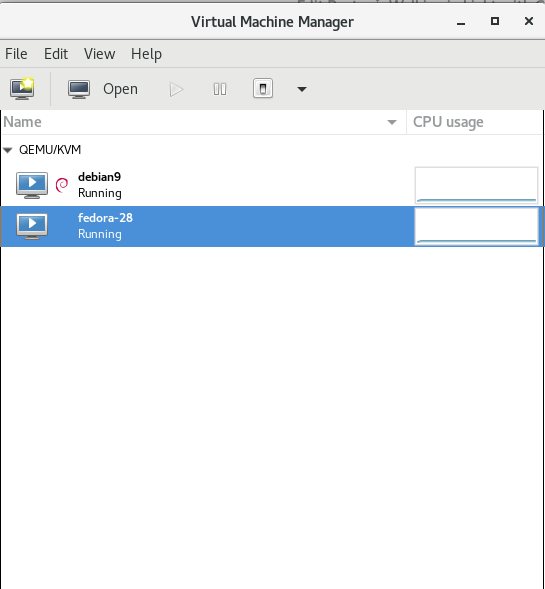
virtual-manager-virt-manager-screenshot-with-Virtual-Machines-inside-on-Debian-Linux

virt-manager-gui-interface-connect-to-fedora-28-virtual-machine

If you have KVM running on your Linux desktop PC / notebook you can also connect via VNC with virsh command.


root@jericho:~# virsh vncdisplay centos7


Another handy thing is to expose the Virtualized Guest OS with VNC in order to be able to connect and manage installation or further Linux configuration via VNC using an SSH Tunnel with port forwarding:


$ ssh hipo@www.pc-freak.net -L 5901:127.0.0.1:5901


11.  Start / Shutdown / Suspend / Reboot (safe reboot) a VM guest machine domain


root@jericho:~# virsh shutdown debian9
root@jericho:~# virsh start fedora-28
root@jericho:~# virsh suspend debian9
root@jericho:~# virsh reboot fedora-28


12. Remove / Delete KVM Virtual Machines domain


root@jeremiah:~# virsh undefine fedora-28
root@jeremiah:~# virsh destroy fedora-28


Closing words


Using KVM to experiment with different OS distributions is really fun just like you can easily run a number of the major most popular Linux Distributions and a set of different versions. It takes few minutes to have a fully functional Linux to play with and it saves a lot of hassles when dealing with GNU / Linux and FreeBSD, doing so in Virtualbox for me prooved to be much more complicated (not to mention that often Virtualbox had an ugly bugs so even Importing an Appliance as a Guest VM with an official distro OS-es failed with weird errors.
One other very practical use of Kerkel-based Virtualization is if you want to run your servers using own Micro-Services architecture (e.g. run multiple Linux OS-es each running a separate Apache / Nginx / MySQL / PostGreSQL / Backup / Storage) etc. all of it running on a single dedicated server or a self-hosted bare-metal
There are plenty of Web Interfaces for Management KVM (proprietary and free software) that could even futher simplify the use and deploy / destory of KVM VMs.
All that makes possible running your own Linux or Web hosting provider a relatively easy task and seriously could cut business expenses and operational (maintenance) costs.

If you plan to run youw own hosting company, I can help you establish your infrastructure and advise you on the right technologies to use.


How to check Linux OS install date / How long ago was Linux installed

Sunday, October 22nd, 2017

If you're sysadmin who inherited a few hundreds of Linux machines from a previous admin and you're in process of investigating how things were configured by the previous administrator one of the crucial things to find out might be

How Long ago was Linux installed?

Here is how to check the Linux OS install date.

The universal way nomatter the Linux distribution is to use fullowing command:


root@pcfreak:~# tune2fs -l /dev/sda1 | grep 'Filesystem created:'
Filesystem created:       Thu Sep  6 21:44:22 2012


Above command assumes the Linux's root partition / is installed on /dev/sda1 however if your case is different, e.g. the primary root partition is installed on /dev/sda2 or /dev/sdb1 / dev/sdb2 etc. just place the right first partition into the command.

If primary install root partition is /dev/sdb1 for example:
 

root@pcfreak:~# tune2fs -l /dev/sdb1 | grep 'Filesystem created:'


To find out what is the root partition of the Linux server installed use fdisk command:


root@pcfreak:~# fdisk -l


Disk /dev/sda: 465,8 GiB, 500107862016 bytes, 976773168 sectors
Units: sectors of 1 * 512 = 512 bytes
Sector size (logical/physical): 512 bytes / 512 bytes
I/O size (minimum/optimal): 512 bytes / 512 bytes
Disklabel type: dos
Disk identifier: 0x00051eda

Device     Boot     Start       End   Sectors   Size Id Type
/dev/sda1  *         2048 965193727 965191680 460,2G 83 Linux
/dev/sda2       965195774 976771071  11575298   5,5G  5 Extended
/dev/sda5       965195776 976771071  11575296   5,5G 82 Linux swap / Solaris

Disk /dev/sdb: 111,8 GiB, 120034123776 bytes, 234441648 sectors
Units: sectors of 1 * 512 = 512 bytes
Sector size (logical/physical): 512 bytes / 512 bytes
I/O size (minimum/optimal): 512 bytes / 512 bytes
Disklabel type: dos
Disk identifier: 0x00000000


Other ways to check the Linux OS install date on Debian / Ubuntu / Mint etc. deb. based GNU / Linux


Deban based Linux distributions do create an initial /var/log/installer directory containing various install information such as hardware-summary, partition, initial installed deb packages, exact version of Linux distribution, and the way it was installed either it was installed from an ISO image, or it was network install etc.


root@pcfreak:~# ls -al /var/log/installer/
total 1228
drwxr-xr-x  3 root root   4096 sep  6  2012 ./
drwxr-xr-x 72 root root  12288 окт 22 06:26 ../
drwxr-xr-x  2 root root   4096 sep  6  2012 cdebconf/
-rw-r–r–  1 root root  17691 sep  6  2012 hardware-summary
-rw-r–r–  1 root root    163 sep  6  2012 lsb-release
-rw——-  1 root root 779983 sep  6  2012 partman
-rw-r–r–  1 root root  51640 sep  6  2012 status
-rw——-  1 root root 363674 sep  6  2012 syslog


If those directory is missing was wiped out by the previous administrator, to clear up traces of his previous work before he left job another possible way to find out exact install date is to check timestamp of /lost+found directory;
 

root@pcfreak:~# ls -ld /lost+found/
drwx—— 2 root root 16384 sep  6  2012 /lost+found//


Check OS Linux install date on (Fedora, CentOS, Scientific Linux, Oracle and other Redhat RPM based Distros)


[root@centos: ~]# rpm -qi basesystem
Name        : basesystem
Version     : 10.0
Release     : 7.el7
Architecture: noarch
Install Date: Mon 02 May 2016 19:20:58 BST
Group       : System Environment/Base
Size        : 0
License     : Public Domain
Signature   : RSA/SHA256, Tue 01 Apr 2014 14:23:16 BST, Key ID     199e2f91fd431d51
Source RPM  : basesystem-10.0-7.el7.src.rpm
Build Date  : Fri 27 Dec 2013 17:22:15 GMT
Build Host  : ppc-015.build.eng.bos.redhat.com
Relocations : (not relocatable)
Packager    : Red Hat, Inc. <http://bugzilla.redhat.com/bugzilla>
Vendor      : Red Hat, Inc.
Summary     : The skeleton package which defines a simple Red Hat Enterprise Linux system
Description :
Basesystem defines the components of a basic Red Hat Enterprise Linux
system (for example, the package installation order to use during
bootstrapping). Basesystem should be in every installation of a system,
and it should never be removed.


Windows 7 fix menu messed up cyrillic – How to fix cyrillic text in Windows

Friday, July 22nd, 2016

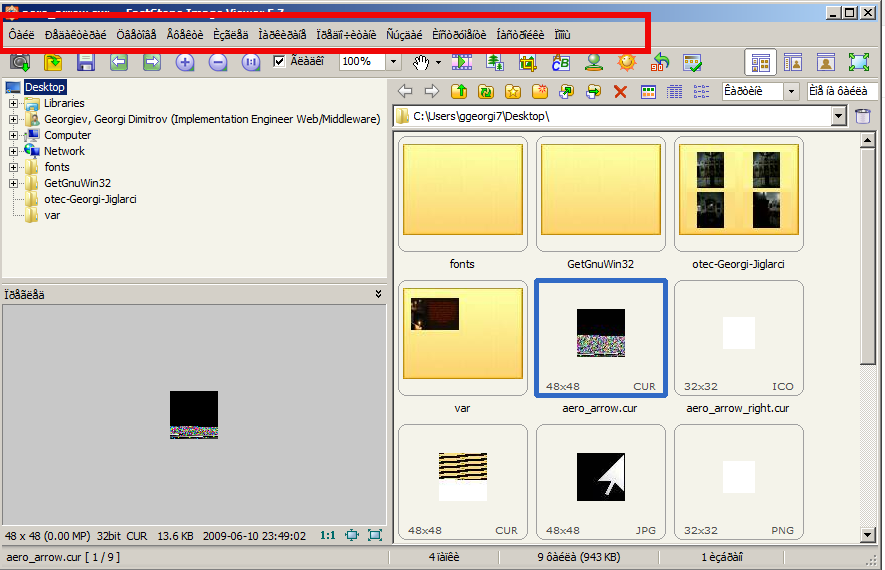
faststone-viewer-messed-up-menu-cyrillic-windows-7-screenshot

How to fix Cyrillic text on Windows 7

I've reinstalled my HP provided company work notebook with Windows 7 Enterprise x86 and had troubles with seeing Cyrillic written text, letters and fonts.
The result after installing some programs and selecting as a default language Bulgarian during installation setup prompt let me to see in some programs and in some of my old written text file names and Cyrillic WIN CP1251 content to be showing a cryptic letters like in above screenshot.

If you're being curious what is causing the broken encoding cyrillic text, it is the fact that in past a lot of cyrillic default encoding was written in KOI-8R and WIN-CP1251 encoding which is not unicode e.g. not compatible with the newer standard encoding for cyrillic UTF-8. Of course the authors of some old programs and documents are not really responsbie for the messed up cyrillic as noone expected that every Cyrillic text will be in UTF-8 in newer times.

Thanksfully there is a way to fix the unreadable / broken encoding cyrillic text by:

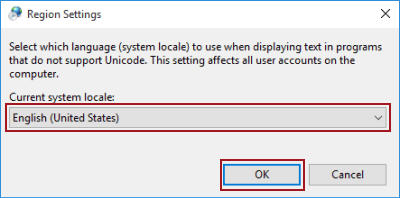
Going too menus:

Start menu -> Control Panel -> Change display language -> Clock, Language and Religion

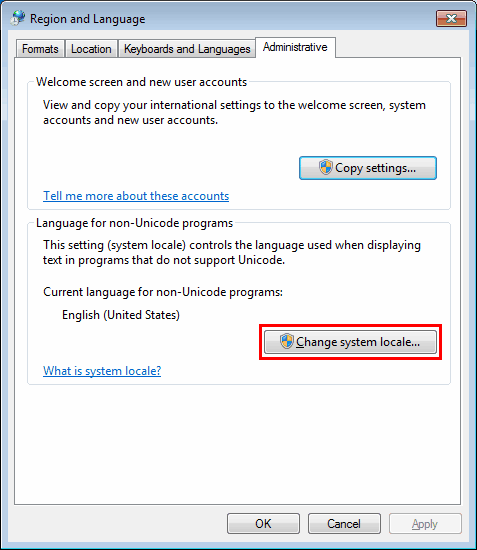
Once there click the Administratibe tab

and choose

Change system locale.

windows-7_administrative_tab_change-system-locale

Here if you're not logged in with administrator user you will be prompted for administrative privileges.

select-system-locale-choose-bulgarian-and-hit-ok-windows-7

Being there choose your language (country) to be:

Bulgarian (Bulgaria) – if you're like me a Bulgarian or Russian (if you're Russian / Belarusian / Ukrainian) or someone from the countries of ex-USSR.
Click OK

And reboot (restart) your computer in order to make the new settings active.
 

This should be it from now on all cyrillic letters in all programs / documents and file names on your PC should visualize fine just as it was intended more or less by the cyrillic assumed creator Saint Climent Ohridski who was a  who reformed Cyrillic from Glagolic alphabet.

How to change / reset lost or forgot TightVNC administrator password

Tuesday, May 24th, 2011

how-to-change-reset-lost-TightVNC-administrator-password

I have installed TightVNC to a Windows host just a few weeks ago in order to be able to manage remotely a Windows host and forgot to write down the administrator password 🙂 (stoopid!)

I had to explain to a friend remotely how to change the TightVNC admin password and it was a complete nightmare!

Shortly here is the exact menus one who wants to reset the password of a TigthVNC server after forgotten:

Start -> All Programs -> TightVNC
-> TightVNC Server (Service Mode) ->
TightVNC Service - Offline Configuration.

In the configuration dialog to popup there are the Server and Administration tabs through which a new password can be set.

After the password is change either a restart of the TightVNC server is necessery or a restart of the Windows PC.

How to improve Linux kernel security with GrSecurity / Maximum Linux kernel security with GrSecurity

Tuesday, May 3rd, 2011

In short I’ll explain here what is Grsecurity http://www.grsecurity.net/ for all those who have not used it yet and what kind of capabilities concerning enhanced kernel security it has.

Grsecurity is a combination of patches for the Linux kernel accenting at the improving kernel security.

The typical application of GrSecurity is in the field of Linux systems which are administered through SSH/Shell, e.g. (remote hosts), though you can also configure grsecurity on a normal Linux desktop system if you want a super secured Linux desktop ;).

GrSecurity is used heavily to protect server system which require a multiple users to have access to the shell.

On systems where multiple user access is required it’s a well known fact that (malicious users, crackers or dumb script kiddies) get administrator (root) privileges with a some just poped in 0 day root kernel exploit.
If you’re an administrator of a system (let’s say a web hosting) server with multiple users having access to the shell it’s also common that exploits aiming at hanging in certain daemon service is executed by some of the users.
In other occasions you have users which are trying to DoS the server with some 0 day Denial of Service exploit.
In all this cases GrSecurity having a kernel with grsecurity is priceless.

Installing grsecurity patched kernel is an easy task for Debian and Ubuntu and is explained in one of my previous articles.
This article aims to explain in short some configuration options for a GrSecurity tightened kernel, when one have to compile a new kernel from source.

I would skip the details on how to compile the kernel and simply show you some picture screens with GrSecurity configuration options which are working well and needs to be set-up before a make command is issued to compile the new kernel.

After preparing the kernel source for compilation and issuing:

linux:/usr/src/kernel-source$ make menuconfig

You will have to select options like the ones you see in the pictures below:

[nggallery id=”8″]

After completing and saving your kernel config file, continue as usual with an ordinary kernel compilation, e.g.:

linux:/usr/src/kernel-source$ make
linux:/usr/src/kernel-source$ make modules
linux:/usr/src/kernel-source$ su root
linux:/usr/src/kernel-source# make modules_install
linux:/usr/src/kernel-source# make install
linux:/usr/src/kernel-source# mkinitrd -o initrd.img-2.6.xx 2.6.xx

Also make sure the grub is properly configured to load the newly compiled and installed kernel.

After a system reboot, if all is fine you should be able to boot up the grsecurity tightened newly compiled kernel, but be careful and make sure you have a backup solution before you reboot, don’t blame me if your new grsecurity patched kernel fails to boot! You’re on your own boy 😉
This article is written thanks to based originally on his article in Bulgarian. If you’re a Bulgarian you might also checkout static’s blog

Howto install GeoTrust RapidSSL certificate on Debian Lenny / Squeeze / Wheezy Linux

Thursday, March 25th, 2010

I faced the task of generating official Validated SSL Certificates by in mydaily duties as a System Administrator at cadiaholding.com . Though generating self-signedSSL certificate is comparatively easy task. It was a pain in the ass setting Apache version 2.2.9-10+lenny6to correctly serve pages through https:// protocol over openssl version 0.9.8g-15+lenny6.I’ll try to go through the whole process of Generating the certificate in order to help some other Debianusers out there to face less setbacks in such a simple task as installing a Trusted SSL Certificate issued(bought) by RapidSSL. Even though this article will mostly deal with SSL certificate issued by RapidSSL,it should be not a problem to apply this methodogy with Verisign or some of the other Geotrust issuedSecure Socket Layer certificates.

In generating the Validated certficate I used enom which is a domain name,ssl certificates, email and hosting company whole-saler.
Fron emon’s website after logging in and using the web interface, there are two major things required to fill inin order to issue your Trusted SSL certificate.

1. Fill in in a form a CSR file, this is usually generated on the Linux server using the openssl.
To issue the CSR file required by Enom use the following commands:

a. First we generate an DES3 RSA encrypted key which we will use next to generate the opeensl CSR file required by ENOM.
debian:~# /usr/bin/openssl genrsa -des3 -out www.domain.com.key 2048
Enter pass phrase for www.domain.com.key:

You’ll be required to fill in a pass-phrase that will be later be required to fill in before Apache servers starts or restarts,so make sure you fill something you either remember or you keep the password stored in a file.
You have to change also the www.domain.com.key in accordance with your domain name.
Now as we already have a proper generated DES3 RSA key afterwards it’s necessery to generate the CSR file with the openssl command line frontend.
So here is how:

debian:~# /usr/bin/openssl req -new -key /home/hipo/www.domain.com.key -out /home/hipo/www.domain.com.csr

Again in the above example change all the paths and file names as you wish.
It’s necessery that the end user fill in a number of questions related to the Certificate Signing Request.
Herein I’ll list what kind of prompts will emerge after executing the above command:

Enter pass phrase for /home/hipo/www.domain.com.key:
You are about to be asked to enter information that will be incorporated
into your certificate request.
What you are about to enter is what is called a Distinguished Name or a DN.
There are quite a few fields but you can leave some blank
For some fields there will be a default value,
If you enter '.', the field will be left blank.
-----
Country Name (2 letter code) [AU]:
State or Province Name (full name) [Some-State]:
Locality Name (eg, city) []:
Organization Name (eg, company) [Internet Widgits Pty Ltd]:
Organizational Unit Name (eg, section) []:
Common Name (eg, YOUR name) []:
Email Address []:
Please enter the following 'extra' attributes
to be sent with your certificate request
A challenge password []:
An optional company name []:

Note that you’ll hav eto fill in the pass phrase previously entered during the generation of the www.domain.com.key file.
In case if you’d like to read more thoroughly on the subject of howto create a Certificate Signing Request or (CSR) as we called it on multiple times, you can read About Certificate Signing Request (CSR) Generation Instructions – Apache SSL more in depth here

2. Hopefully following the above instructions you’ll now have a file named www.domain.csrJust open the www.domain.scr and copy paste it’s content to the ENOM website CSR * webform.

3. Further on select your Webserver type on Enom’s website:In our case we have to select Apache + ApacheSSL

4. What follows next is filling in your company contact information This is also required for proper certificate generation, you have to think twice before you fill in this data, take a note this can’t be changed later on without issuing a brand SSL new certificate.

Apart from the 3 major above requirements to fill in Enom there are some few more radio buttons to use to make some selections according to your personal preferences, however I won’t take time to dig in that and I’ll leave this to you.
After all the above is fulfilled you’ll have to submit your certificate details and choose an email address to which you will receive in a minute a RapidSSL Certificate Request Confirmation

Following a link from the email, will show you some basic information about the certificate about to be generated. That’s your final chance to cancel the issued Trusted Certificated.
If you’re absolutely sure the information about to enter the certificate is correct then you’ll have to follow a link and approve the certificate.

You’ll be informed that you’ll receive your certificate either through Certifier website (e.g. Enom’s website) or via another email.
I thought it’s more probable I receive it via email but anyways I was wrong. More thank 4 hours has passed since the certificate was issued and is available via Enom’s interface but I haven’t received nothing on my mail.
Therefore my friendly advice is to check about your brand new shiny Trusted Certificate on Emom’s website. I had mine ready in about 10 minutes after the CSR was issued.

Assuming that you’ve succesfully obtained the SSL Trusted certificate from RapidSSL what follows is setting up the certificate.
Initially I tried using documentation from RapidSSL website called Installing your SSL Certificate / Web Server Certificate / Secure Server Certificate from RapidSSL.com
I tried to configure one of my Virtualhost as shown in their example inserting in my /etc/apache/sites-available/www.domain.com file, few directives within the VirtualHost something like the shown below

SSLEngine on
# domain.com.crt cointains the Trusted SSL certificate generated and obtained by you from RapidSSL
SSLCertificateFile /etc/apache2/ssl/www.domain.com.crt
# www.domain.com.key contains the file used to generate the CSR file as described earlier in this post
SSLCertificateKeyFile /etc/apache2/ssl/www.domain.com.key

It is also possible insetad of using the SSLCertificateFile and SSLCertificateKeyFile directvies directives in Apache config to use:


Another alternative is to use

SSLCertificateFile /etc/ssl/certs/your-domain-name.crt
SSLCertificateKeyFile /etc/ssl/certs/your-domain-name.key
SSLCACertificateFile /etc/ssl/certs/gd_bundle.crt

The key file is the one generated earlier on the server and handed to the SSL regisrar, the files:

your-domain-name.crt and gd_bundle.crt files are provided by RapidSSL or from whatever SSL registrater the SSL was purchased.

After trying the above configuration and restarting apache with:

/etc/init.d/apache2 restart

Apache failed to start, it might be helpful to somebody out there the error I had in my apache error.log:
The error.log red the following:

[warn] RSA server certificate is a CA certificate (BasicConstraints: CA == TRUE !?)

After some 30 minutes or an hour of Googling on the error I came to the conclusion that the error is caused, becauseApache is supposed to work with .PEM files instead of the classical .CRT and .KEY files asnormally approached in most of the other Unix operating systems.

It took me a bit more of reading on the internet to find out that actually the .pem files so widely adopted in Debian simply contain both the www.domain.com.key file and the www.domain.com.crt key simply pasted one after another, this I also observed from the default Apache self-signed certificate that I believe comes with debian /etc/apache2/ssl/apache.pem .
So I copied both the content of my www.domain.com.key and www.domain.com.crt and store it in one file:
/etc/apache2/ssl/www.domain.com.pem

Also the following configuration:
SSLEngine on
SSLCertificateFile /etc/apache2/ssl/www.domain.com.pem

had to go in your
/etc/apache2/sites-enabled/www.domain.com

Last thing that’s left is to restart your Apache;

/etc/init.d/apache2 restart

Apache will prompt you for your certificate password entered by you during the www.domain.com.key generation. Type your password and with a bit of luck and hopefully with God’s help you’ll be having a Trusted Certificate on your webserver.

Last step is to check if the certificate is okay accessing your domain https://www.domain.com.

Well this is the end of the article, hope you enjoy.If you do please leave your comments, any corrections are also welcomed 🙂

Monitoring multi core / (multiple CPUs) servers with top, tload and on Linux

Thursday, March 17th, 2011

The default GNU / Linux top command does allow to see statistics on servers and systems with multiple CPUs.
This is quite beneficial especially on Linux systems which are not equipped with htop which does show statistics to the multiple-core system load.

To examine the multiple CPUs statistics with the default top command available on every Linux system and part of the procps/proc file system utilities

1. Start top:

linux:~# top

When the top system load statistics screen starts up refreshing,

2. press simply 1
You will notice all your system cpus to show up in the top head:

8 cpu top screen statistics on Linux

As I have started talking about top, a very useful way to use top to track processes which are causing a system high loads is:

linux:~# top -b -i

This command will run top in batch mode interactively and will show you statistics about the most crucial processes which does cause a server load, look over the output and you will get an idea about what is causing you server troubles.
Moreover if you’re a Linux console freak as me you will also probably want to take a look at tload

tload command is a part of the procps – /proc file system utilities and as you can read in the tload manual tload – graphic representation of system load average

Here is a picture to give you an idea on the console output of tload :

tload console/terminal system load statistics on Linux screenshot

Another tool that you might find very usefel is slabtop it’s again a part of the procps linux package.
slabtop – displays a listing of the top caches sorted by one of the listed sort criteria., in most of the cases the slabtop kernel cache monitoring tool won’t be necessary for the regular administrator, however on some servers it might help up to the administrator to resolve performance issues which are caused by the kernel as a bottleneck.
slabtop is also used as a tool by kernel developers to write and debug the Linux kernel.

MySQL SSL Configure Howto – How to Make MySQL communication secured

Wednesday, January 15th, 2014

mysql-over-ssl-how-to-configure-logo how to configure ssl on mysql server

Recently I've been asked How to make communication to MySQL database encrypted. The question was raised by a fellow developer who works on developing a Desktop standalone application in Delphi Programming Language with DevArt an (SQL Connection Component capable to connect Delphi applications to multiple databases like MySQL, Oracle, PostgreSQL, Interbase, Firebird etc.

Communicating in Secured form to MySQL database is not common task to do, as MySQL usually communicates to applications hosted on same server or applications to communicate to MySQL are in secured DMZ or administrated via phpMyAdmin web interface.

MySQL supports encrypted connections to itself using Secure Socket Layer (SSL) encryption. Setting up MySQL db to be communicated encrypted is a must for standalone Desktop applications which has to extract / insert data via remote SQL.
Configuring SQL to support communicated queries encrpytion is supported by default and easily configured on most standard Linux version distributions (Debian, RHEL, Fedora) with no need to recompile it.
1. Generate SSL Certificates

$ mkdir /etc/mysql-ssl && cd mysql-ssl

# Create CA certificate
$ openssl genrsa 2048 > ca-key.pem
$ openssl req -new -x509 -nodes -days 3600 \
         -key ca-key.pem -out ca-cert.pem

Create server certificate, remove passphrase, and sign it
server-cert.pem is public key, server-key.pem is private key
$ openssl req -newkey rsa:2048 -days 3600 \
         -nodes -keyout server-key.pem -out server-req.pem

$ openssl rsa -in server-key.pem -out server-key.pem
$ openssl x509 -req -in server-req.pem -days 3600 \
         -CA ca-cert.pem -CAkey ca-key.pem -set_serial 01 -out server-cert.pem

Create client certificate, remove passphrase, and sign it
client-cert.pem is public key and client-key.pem is private key
$ openssl req -newkey rsa:2048 -days 3600 \
         -nodes -keyout client-key.pem -out client-req.pem

$ openssl rsa -in client-key.pem -out client-key.pem
$ openssl x509 -req -in client-req.pem -days 3600 \
         -CA ca-cert.pem -CAkey ca-key.pem -set_serial 01 -out client-cert.pem

After generating the certificates, verify them:

$ openssl verify -CAfile ca-cert.pem server-cert.pem client-cert.pem
 

2. Add SSL support variables to my.cnf

Once SSL key pair files are generated in order to active SSL encryption support in MySQL server, add to (/etc/my.cnf,  /etc/mysql/my.cnf, /usr/local/etc/my.cnf … ) or wherever config is depending on distro

# SSL
ssl-ca=/etc/mysql-ssl/ca-cert.pem
ssl-cert=/etc/mysql-ssl/server-cert.pem
ssl-key=/etc/mysql-ssl/server-key.pem

3. Restart MySQL server

/etc/init.d/mysqld restart
...

4. Create SQL user to require SSL login

Create new user with access to database;

GRANT ALL ON Sql_User_DB.* TO Sql_User@localhost;
FLUSH PRIVILEGES;

To create administrator privileges user:

GRANT ALL PRIVILEGES ON *.* TO ‘ssluser’@'%’ IDENTIFIED BY ‘pass’ REQUIRE SSL;
FLUSH PRIVILEGES;

5. Test SSL Connection with MySQL CLI client or with few lines of PHP

To use mysql cli for testing whether SSL connection works:

$ mysql -u ssluser -p'pass' –ssl-ca /etc/mysql-ssl/client-cert.pem –ssl-cert /etc/mysql-ssl/client-key.pem

Once connected to MySQL to verify SSL connection works fine:

mysql> SHOW STATUS LIKE 'Ssl_Cipher';
 +---------------+--------------------+
| Variable_name | Value              |
 +---------------+--------------------+
| Ssl_cipher    | DHE-RSA-AES256-SHA |
+---------------+--------------------+

If you get this output this means MySQL SSL Connection is working as should.

Alternative way is to use test-mysqli-ssl.php script to test availability to mysql over SSL.

$conn=mysqli_init();
mysqli_ssl_set($conn, '/etc/mysql-ssl/client-key.pem', '/etc/mysql-ssl/client-cert.pem', NULL, NULL, NULL);
if (!mysqli_real_connect($conn, '127.0.0.1', 'ssluser', 'pass')) { die(); }
$res = mysqli_query($conn, 'SHOW STATUS like "Ssl_cipher"');
print_r(mysqli_fetch_row($res));
mysqli_close($conn);

Note: Change username password according to your user / pass before using the script

That's all now you have mysql communicating queries data over SSL


The daily drink of Russian System Administrator – The sysadmin milk :)

Monday, August 27th, 2012

Zolton - The system administrator beer, sysadmin common drink, what is the milk food of the system administartor

For my dear readers who don’t speak Slavonic. The sticker on the bottle says in Russian. Adminskoe – A fictive Russian word for The “Administrtor’s drink”.