Posts Tagged ‘amd64’

Monitoring network traffic tools to debug network issues in console interactively on Linux

Thursday, December 14th, 2023

transport-layer-fourth-layer-data-transport-diagram


In my last article Debugging and routing network issues on Linux (common approaches), I've given some step by step methology on how to debug a network routing or unreachability issues between network hosts. As the article was mostly targetting a command line tools that can help debugging the network without much interactivity. I've decided to blog of a few other tools that might help the system administrator to debug network issues by using few a bit more interactive tools. Throughout the years of managing multitude of Linux based laptops and servers, as well as being involved in security testing and penetration in the past, these tools has always played an important role and are worthy to be well known and used by any self respecting sys admin or network security expert that has to deal with Linux and *Unix operating systems.
 

1. Debugging what is going on on a network level interactively with iptraf-ng

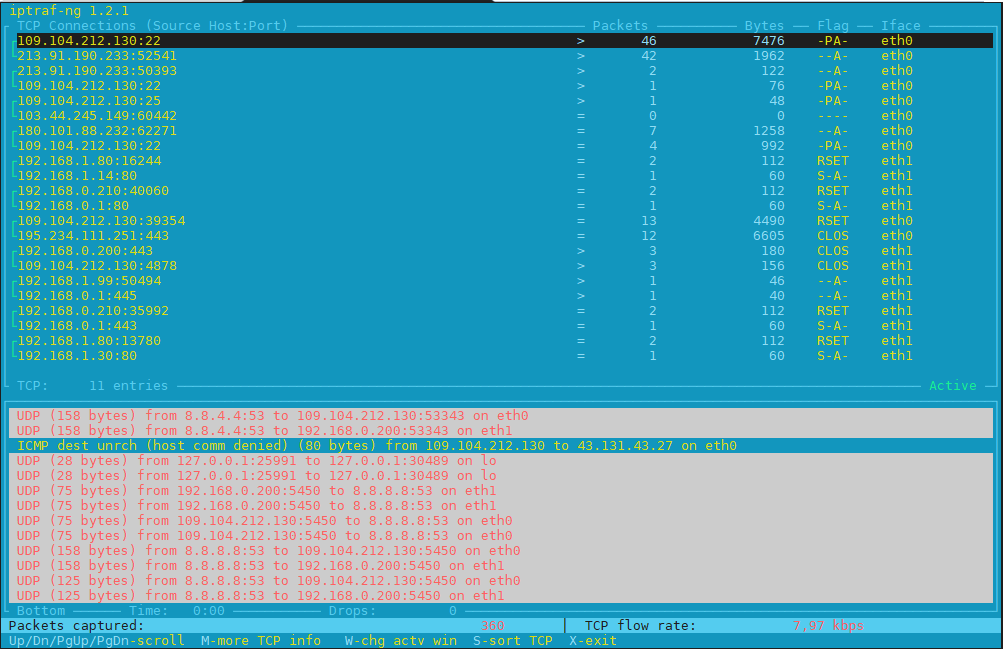
Historically iptraf and today's iptraf is also a great tool one can use to further aid the arsenal debug a network issue or Protocol problem, failure of packets or network interaction issues SYN -> ACK etc. proto interactions and check for Flag states and packets flow.

To use iptraf-ng which is a ncurses based tool just install it and launch it and select the interface you would like to debug trafic on.

To install On Debians distros

# apt install iptraf-ng –yes

# iptraf-ng
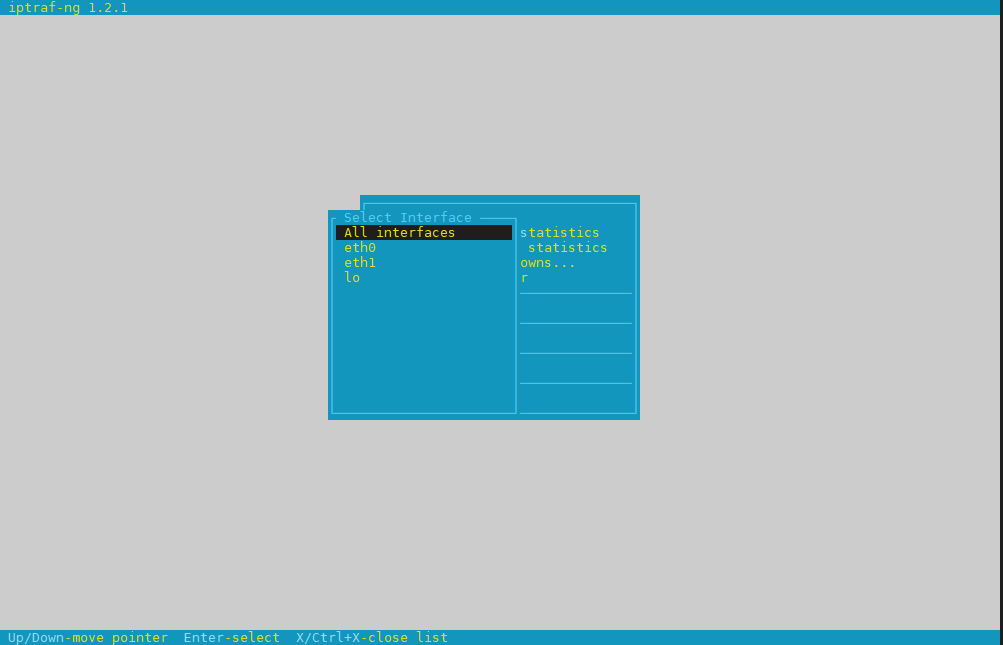

iptraf-ng-linux-select-interface-screen
 

iptraf-ng-listen-all-interfaces-check-tcp-flags-and-packets


Session-Layer-in-OSI-Model-diagram
 

2. Use hackers old tool sniffit to monitor current ongoing traffic and read plain text messages

Those older who remember the rise of Linux to the masses, should remember sniffit was a great tool to snoop for traffic on the network.

root@pcfreak:~# apt-cache show sniffit|grep -i description -A 10 -B10
Package: sniffit
Version: 0.5-1
Installed-Size: 139
Maintainer: Joao Eriberto Mota Filho <eriberto@debian.org>
Architecture: amd64
Depends: libc6 (>= 2.14), libncurses6 (>= 6), libpcap0.8 (>= 0.9.8), libtinfo6 (>= 6)
Description-en: packet sniffer and monitoring tool
 Sniffit is a packet sniffer for TCP/UDP/ICMP packets over IPv4. It is able
 to give you a very detailed technical info on these packets, as SEQ, ACK,
 TTL, Window, etc. The packet contents also can be viewed, in different
 formats (hex or plain text, etc.).
 .
 Sniffit is based in libpcap and is useful when learning about computer
 networks and their security.
Description-md5: 973beeeaadf4c31bef683350f1346ee9
Homepage: https://github.com/resurrecting-open-source-projects/sniffit
Tag: interface::text-mode, mail::notification, role::program, scope::utility,
 uitoolkit::ncurses, use::monitor, use::scanning, works-with::mail,
 works-with::network-traffic
Section: net
Priority: optional
Filename: pool/main/s/sniffit/sniffit_0.5-1_amd64.deb
Size: 61796
MD5sum: ea4cc0bc73f9e94d5a3c1ceeaa485ee1
SHA256: 7ec76b62ab508ec55c2ef0ecea952b7d1c55120b37b28fb8bc7c86645a43c485


Sniffit is not installed by default on deb distros, so to give it a try install it

# apt install sniffit –yes
# sniffit
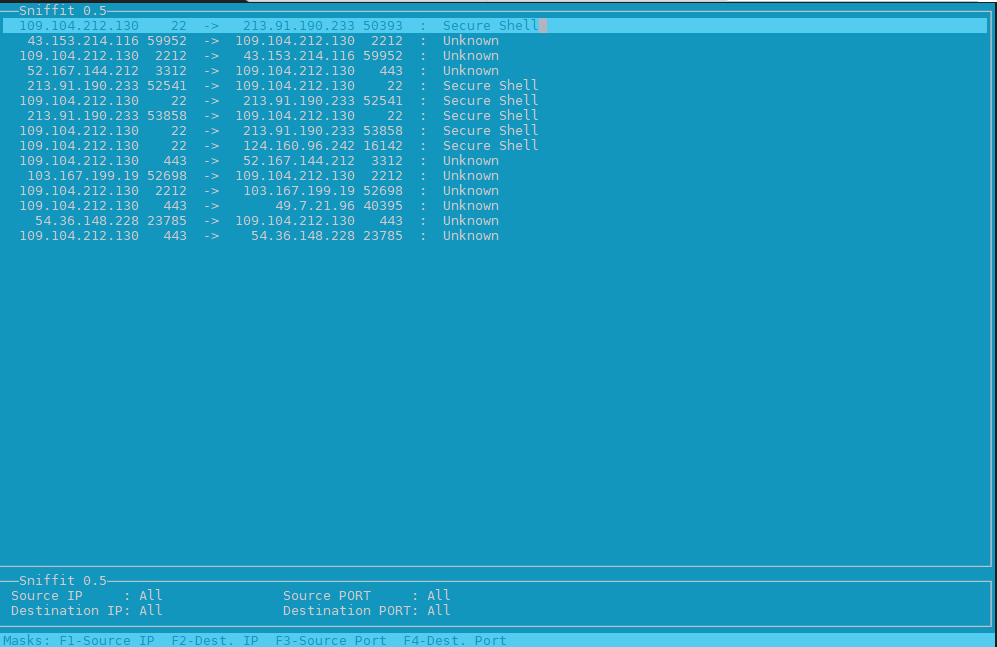

sniffit-linux-check-tcp-traffic-screenshot
 

3. Use bmon to monitor bandwidth and any potential traffic losses and check qdisc pfifo
Linux network stack queues


root@pcfreak:~# apt-cache show bmon |grep -i description
Description-en: portable bandwidth monitor and rate estimator
Description-md5: 3288eb0a673978e478042369c7927d3f
root@pcfreak:~# apt-cache show bmon |grep -i description -A 10 -B10
Package: bmon
Version: 1:4.0-7
Installed-Size: 146
Maintainer: Patrick Matthäi <pmatthaei@debian.org>
Architecture: amd64
Depends: libc6 (>= 2.17), libconfuse2 (>= 3.2.1~), libncursesw6 (>= 6), libnl-3-200 (>= 3.2.7), libnl-route-3-200 (>= 3.2.7), libtinfo6 (>= 6)
Description-en: portable bandwidth monitor and rate estimator
 bmon is a commandline bandwidth monitor which supports various output
 methods including an interactive curses interface, lightweight HTML output but
 also simple ASCII output.
 .
 Statistics may be distributed over a network using multicast or unicast and
 collected at some point to generate a summary of statistics for a set of
 nodes.
Description-md5: 3288eb0a673978e478042369c7927d3f
Homepage: http://www.infradead.org/~tgr/bmon/
Tag: implemented-in::c, interface::text-mode, network::scanner,
 role::program, scope::utility, uitoolkit::ncurses, use::monitor,
 works-with::network-traffic
Section: net
Priority: optional
Filename: pool/main/b/bmon/bmon_4.0-7_amd64.deb
Size: 47348
MD5sum: c210f8317eafa22d9e3a8fb8316e0901
SHA256: 21730fc62241aee827f523dd33c458f4a5a7d4a8cf0a6e9266a3e00122d80645


root@pcfreak:~# apt install bmon –yes

root@pcfreak:~# bmon
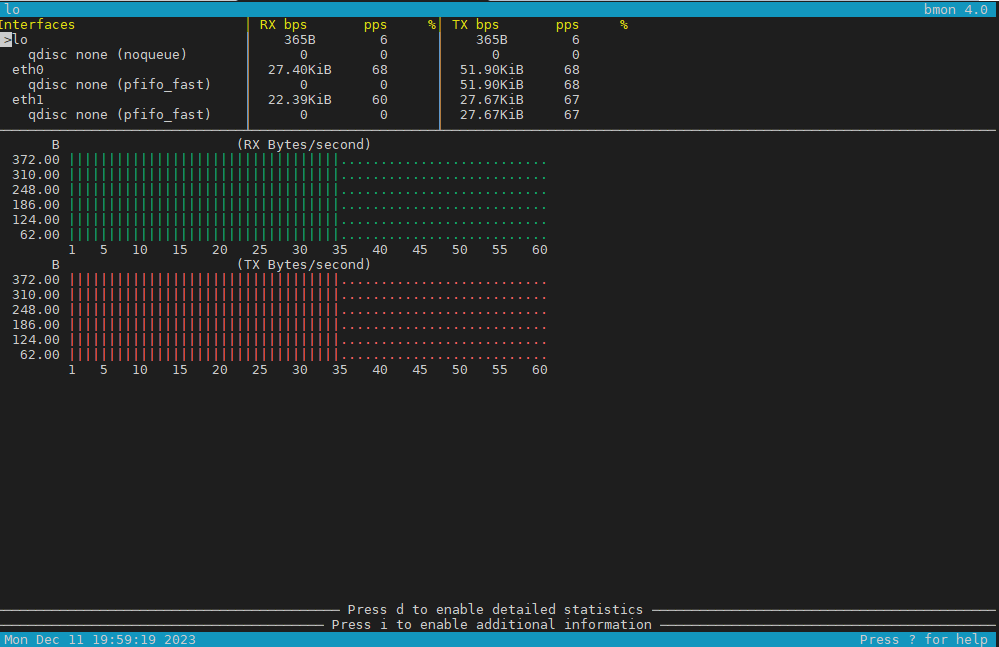
bmon_monitor_qdisc-network-stack-bandwidth-on-linux

4. Use nethogs net diagnosis text interactive tool

NetHogs is a small 'net top' tool. 
Instead of breaking the traffic down per protocol or per subnet, like most tools do, it groups bandwidth by process.
 

root@pcfreak:~# apt-cache show nethogs|grep -i description -A10 -B10
Package: nethogs
Source: nethogs (0.8.5-2)
Version: 0.8.5-2+b1
Installed-Size: 79
Maintainer: Paulo Roberto Alves de Oliveira (aka kretcheu) <kretcheu@gmail.com>
Architecture: amd64
Depends: libc6 (>= 2.15), libgcc1 (>= 1:3.0), libncurses6 (>= 6), libpcap0.8 (>= 0.9.8), libstdc++6 (>= 5.2), libtinfo6 (>= 6)
Description-en: Net top tool grouping bandwidth per process
 NetHogs is a small 'net top' tool. Instead of breaking the traffic down per
 protocol or per subnet, like most tools do, it groups bandwidth by process.
 NetHogs does not rely on a special kernel module to be loaded.
Description-md5: 04c153c901ad7ca75e53e2ae32565ccd
Homepage: https://github.com/raboof/nethogs
Tag: admin::monitoring, implemented-in::c++, role::program,
 uitoolkit::ncurses, use::monitor, works-with::network-traffic
Section: net
Priority: optional
Filename: pool/main/n/nethogs/nethogs_0.8.5-2+b1_amd64.deb
Size: 30936
MD5sum: 500047d154a1fcde5f6eacaee45148e7
SHA256: 8bc69509f6a8c689bf53925ff35a5df78cf8ad76fff176add4f1530e66eba9dc

root@pcfreak:~# apt install nethogs –yes

# nethogs
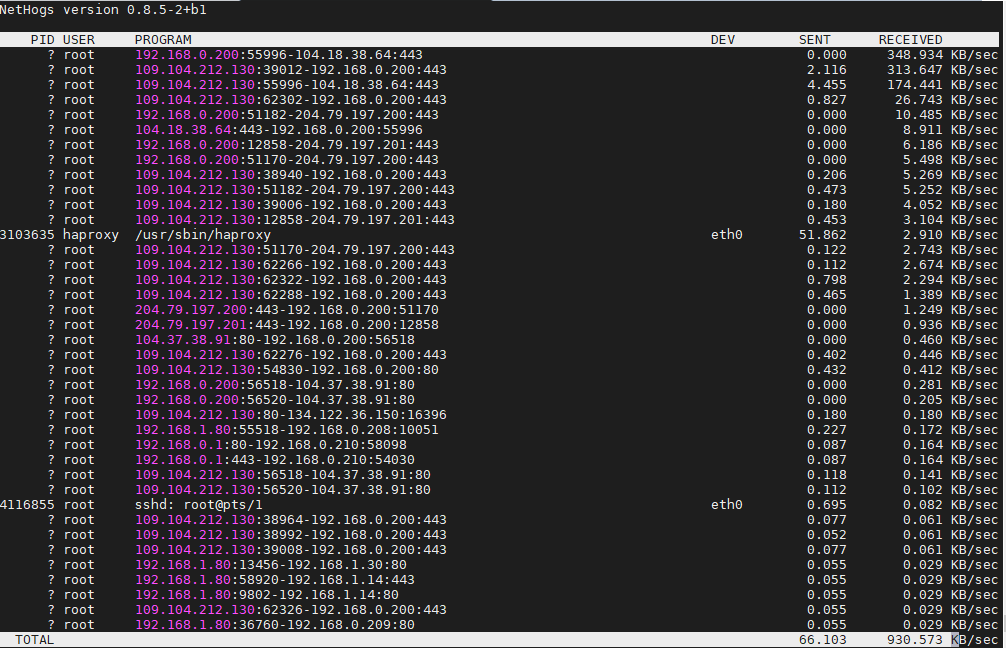

nethogs-tool-screenshot-show-user-network--traffic-by-process-name-ID

5;.Use iftop –  to display network interface usage


root@pcfreak:~# apt-cache show iftop |grep -i description -A10 -B10
Package: iftop
Version: 1.0~pre4-7
Installed-Size: 97
Maintainer: Markus Koschany <apo@debian.org>
Architecture: amd64
Depends: libc6 (>= 2.29), libncurses6 (>= 6), libpcap0.8 (>= 0.9.8), libtinfo6 (>= 6)
Description-en: displays bandwidth usage information on an network interface
 iftop does for network usage what top(1) does for CPU usage. It listens to
 network traffic on a named interface and displays a table of current bandwidth
 usage by pairs of hosts. Handy for answering the question "Why is my Internet
 link so slow?".
Description-md5: f7e93593aba6acc7b5a331b49f97466f
Homepage: http://www.ex-parrot.com/~pdw/iftop/
Tag: admin::monitoring, implemented-in::c, interface::text-mode,
 role::program, scope::utility, uitoolkit::ncurses, use::monitor,
 works-with::network-traffic
Section: net
Priority: optional
Filename: pool/main/i/iftop/iftop_1.0~pre4-7_amd64.deb
Size: 42044
MD5sum: c9bb9c591b70753880e455f8dc416e0a
SHA256: 0366a4e54f3c65b2bbed6739ae70216b0017e2b7421b416d7c1888e1f1cb98b7


root@pcfreak:~# apt install –yes iftop
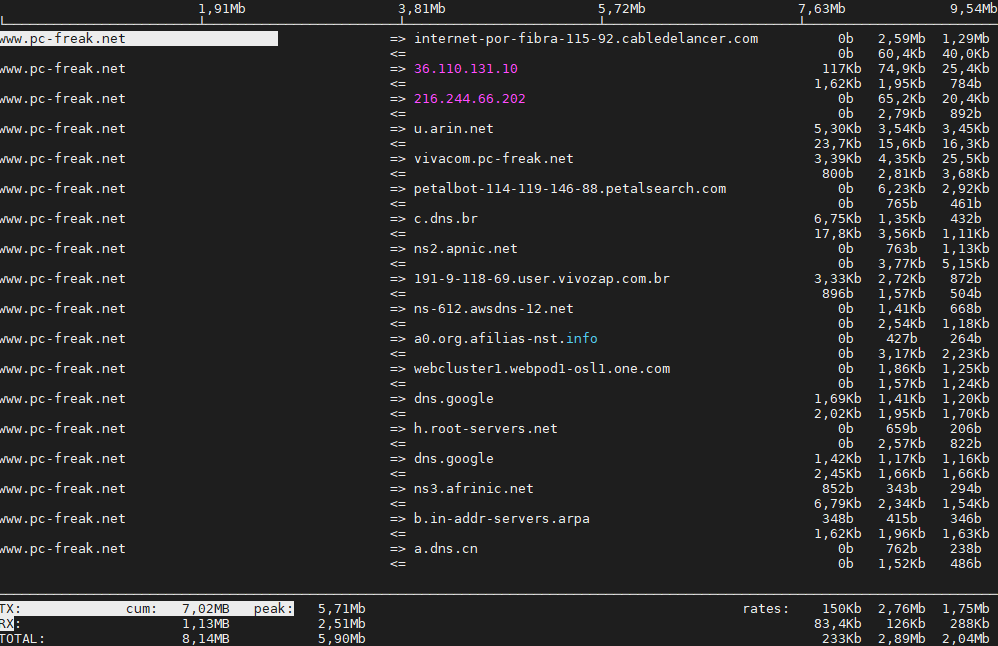
iftop-interactive-network-traffic-output-linux-screenshot


6. Ettercap (tool) to active and passive dissect network protocols for in depth network and host analysis

root@pcfreak:/var/www/images# apt-cache show ettercap-common|grep -i description -A10 -B10
Package: ettercap-common
Source: ettercap
Version: 1:0.8.3.1-3
Installed-Size: 2518
Maintainer: Debian Security Tools <team+pkg-security@tracker.debian.org>
Architecture: amd64
Depends: ethtool, geoip-database, libbsd0 (>= 0.0), libc6 (>= 2.14), libcurl4 (>= 7.16.2), libgeoip1 (>= 1.6.12), libluajit-5.1-2 (>= 2.0.4+dfsg), libnet1 (>= 1.1.6), libpcap0.8 (>= 0.9.8), libpcre3, libssl1.1 (>= 1.1.1), zlib1g (>= 1:1.1.4)
Recommends: ettercap-graphical | ettercap-text-only
Description-en: Multipurpose sniffer/interceptor/logger for switched LAN
 Ettercap supports active and passive dissection of many protocols
 (even encrypted ones) and includes many feature for network and host
 analysis.
 .
 Data injection in an established connection and filtering (substitute
 or drop a packet) on the fly is also possible, keeping the connection
 synchronized.
 .
 Many sniffing modes are implemented, for a powerful and complete
 sniffing suite. It is possible to sniff in four modes: IP Based, MAC Based,
 ARP Based (full-duplex) and PublicARP Based (half-duplex).
 .
 Ettercap also has the ability to detect a switched LAN, and to use OS
 fingerprints (active or passive) to find the geometry of the LAN.
 .
 This package contains the Common support files, configuration files,
 plugins, and documentation.  You must also install either
 ettercap-graphical or ettercap-text-only for the actual GUI-enabled
 or text-only ettercap executable, respectively.
Description-md5: f1d894b138f387661d0f40a8940fb185
Homepage: https://ettercap.github.io/ettercap/
Tag: interface::text-mode, network::scanner, role::app-data, role::program,
 uitoolkit::ncurses, use::scanning
Section: net
Priority: optional
Filename: pool/main/e/ettercap/ettercap-common_0.8.3.1-3_amd64.deb
Size: 734972
MD5sum: 403d87841f8cdd278abf20bce83cb95e
SHA256: 500aee2f07e0fae82489321097aee8a97f9f1970f6e4f8978140550db87e4ba9


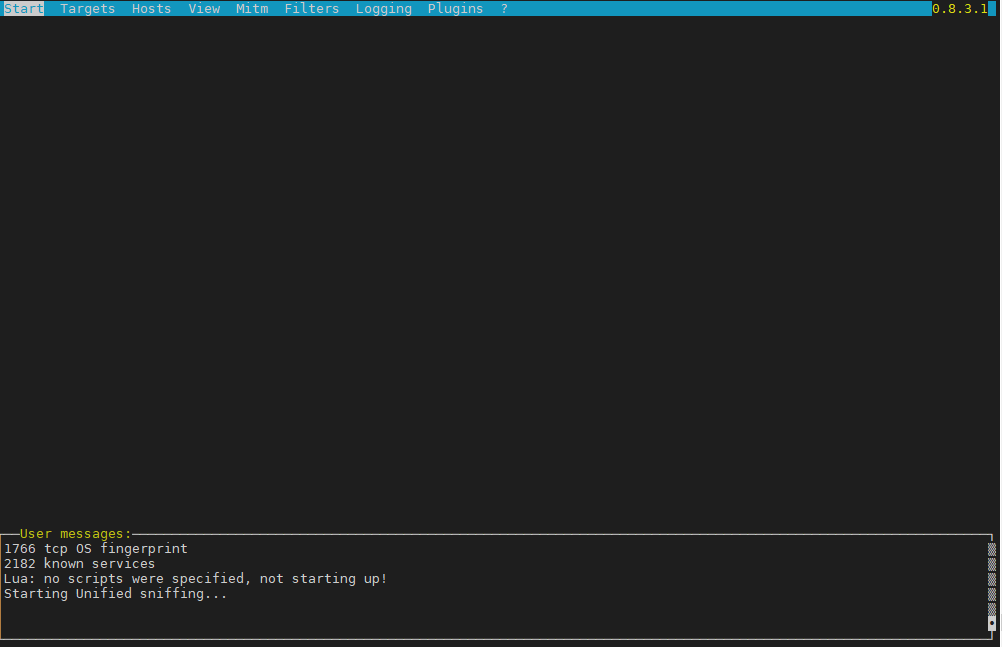
root@pcfreak:/ # apt install ettercap-text-only –yes

root@pcfreak:/ # ettercap -C


ettercap-text-interface-unified-sniffing-screenshot-linux

7. iperf and netperf to measure connecitivity speed on Network LAN and between Linux server hosts

iperf and netperf are two very handy tools to measure the speed of a network and various aspects of the bandwidth. It is mostly useful when designing network infrastructure or building networks from scratch.
 

If you never used netperf in the past here is a description from man netperf

NAME
       netperf – a network performance benchmark

SYNOPSIS
       netperf [global options] — [test specific options]

DESCRIPTION
       Netperf  is  a benchmark that can be used to measure various aspects of
       networking performance.  Currently, its focus is on bulk data  transfer
       and  request/response  performance  using  either  TCP  or UDP, and the
       Berkeley Sockets interface. In addition, tests for DLPI, and  Unix  Do‐
       main Sockets, tests for IPv6 may be conditionally compiled-in.


root@freak:~# netperf
MIGRATED TCP STREAM TEST from 0.0.0.0 (0.0.0.0) port 0 AF_INET to localhost () port 0 AF_INET : demo
Recv   Send    Send
Socket Socket  Message  Elapsed
Size   Size    Size     Time     Throughput
bytes  bytes   bytes    secs.    10^6bits/sec

 87380  65536  65536    10.00    17669.96


Testing UDP network throughput using NetPerf

Change the test name from TCP_STREAM to UDP_STREAM. Let’s use 1024 (1MB) as the message size to be sent by the client.
If you receive the following error send_data: data send error: Network is unreachable (errno 101) netperf: send_omni:

send_data failed: Network is unreachable, add option -R 1 to remove the iptable rule that prohibits NetPerf UDP flow.

$ netperf -H 172.31.56.48 -t UDP_STREAM -l 300 — -R 1 -m 1024
MIGRATED UDP STREAM TEST from 0.0.0.0 (0.0.0.0) port 0 AF_INET to 172.31.56.48 () port 0 AF_INET
Socket Message Elapsed Messages
Size Size Time Okay Errors Throughput
bytes bytes secs # # 10^6bits/sec

212992 1024 300.00 9193386 0 251.04
212992 300.00 9131380 249.35

UDP Throughput in a WAN

$ netperf -H HOST -t UDP_STREAM -l 300 — -R 1 -m 1024
MIGRATED UDP STREAM TEST from (null) (0.0.0.0) port 0 AF_INET to (null) () port 0 AF_INET : histogram : spin interval
Socket Message Elapsed Messages
Size Size Time Okay Errors Throughput
bytes bytes secs # # 10^6bits/sec

9216 1024 300.01 35627791 0 972.83
212992 300.01 253099 6.91


Testing TCP throughput using iPerf


Here is a short description of iperf

NAME
       iperf – perform network throughput tests

SYNOPSIS
       iperf -s [options]

       iperf -c server [options]

       iperf -u -s [options]

       iperf -u -c server [options]

DESCRIPTION
       iperf  2  is  a tool for performing network throughput and latency mea‐
       surements. It can test using either TCP or UDP protocols.  It  supports
       both  unidirectional  and  bidirectional traffic. Multiple simultaneous
       traffic streams are also supported. Metrics are displayed to help  iso‐
       late the causes which impact performance. Setting the enhanced (-e) op‐
       tion provides all available metrics.

       The user must establish both a both a server (to discard traffic) and a
       client (to generate traffic) for a test to occur. The client and server
       typically are on different hosts or computers but need not be.


Run iPerf3 as server on the server:

$ iperf3 –server –interval 30
———————————————————–
Server listening on 5201
———————————————————–


Test TCP Throughput in Local LAN


$ iperf3 –client 172.31.56.48 –time 300 –interval 30
Connecting to host 172.31.56.48, port 5201
[ 4] local 172.31.100.5 port 44728 connected to 172.31.56.48 port 5201
[ ID] Interval Transfer Bandwidth Retr Cwnd
[ 4] 0.00-30.00 sec 1.70 GBytes 488 Mbits/sec 138 533 KBytes
[ 4] 30.00-60.00 sec 260 MBytes 72.6 Mbits/sec 19 489 KBytes
[ 4] 60.00-90.00 sec 227 MBytes 63.5 Mbits/sec 15 542 KBytes
[ 4] 90.00-120.00 sec 227 MBytes 63.3 Mbits/sec 13 559 KBytes
[ 4] 120.00-150.00 sec 228 MBytes 63.7 Mbits/sec 16 463 KBytes
[ 4] 150.00-180.00 sec 227 MBytes 63.4 Mbits/sec 13 524 KBytes
[ 4] 180.00-210.00 sec 227 MBytes 63.5 Mbits/sec 14 559 KBytes
[ 4] 210.00-240.00 sec 227 MBytes 63.5 Mbits/sec 14 437 KBytes
[ 4] 240.00-270.00 sec 228 MBytes 63.7 Mbits/sec 14 516 KBytes
[ 4] 270.00-300.00 sec 227 MBytes 63.5 Mbits/sec 14 524 KBytes
– – – – – – – – – – – – – – – – – – – – – – – – –
[ ID] Interval Transfer Bandwidth Retr
[ 4] 0.00-300.00 sec 3.73 GBytes 107 Mbits/sec 270 sender
[ 4] 0.00-300.00 sec 3.73 GBytes 107 Mbits/sec receiver

Test TCP Throughput in a WAN Network

$ iperf3 –client HOST –time 300 –interval 30
Connecting to host HOST, port 5201
[ 5] local 192.168.1.73 port 56756 connected to HOST port 5201
[ ID] Interval Transfer Bitrate
[ 5] 0.00-30.00 sec 21.2 MBytes 5.93 Mbits/sec
[ 5] 30.00-60.00 sec 27.0 MBytes 7.55 Mbits/sec
[ 5] 60.00-90.00 sec 28.6 MBytes 7.99 Mbits/sec
[ 5] 90.00-120.00 sec 28.7 MBytes 8.02 Mbits/sec
[ 5] 120.00-150.00 sec 28.5 MBytes 7.97 Mbits/sec
[ 5] 150.00-180.00 sec 28.6 MBytes 7.99 Mbits/sec
[ 5] 180.00-210.00 sec 28.4 MBytes 7.94 Mbits/sec
[ 5] 210.00-240.00 sec 28.5 MBytes 7.97 Mbits/sec
[ 5] 240.00-270.00 sec 28.6 MBytes 8.00 Mbits/sec
[ 5] 270.00-300.00 sec 27.9 MBytes 7.81 Mbits/sec
– – – – – – – – – – – – – – – – – – – – – – – – –
[ ID] Interval Transfer Bitrate
[ 5] 0.00-300.00 sec 276 MBytes 7.72 Mbits/sec sender
[ 5] 0.00-300.00 sec 276 MBytes 7.71 Mbits/sec receiver


$ iperf3 –client 172.31.56.48 –interval 30 -u -b 100MB
Accepted connection from 172.31.100.5, port 39444
[ 5] local 172.31.56.48 port 5201 connected to 172.31.100.5 port 36436
[ ID] Interval Transfer Bandwidth Jitter Lost/Total Datagrams
[ 5] 0.00-30.00 sec 354 MBytes 98.9 Mbits/sec 0.052 ms 330/41774 (0.79%)
[ 5] 30.00-60.00 sec 355 MBytes 99.2 Mbits/sec 0.047 ms 355/41903 (0.85%)
[ 5] 60.00-90.00 sec 354 MBytes 98.9 Mbits/sec 0.048 ms 446/41905 (1.1%)
[ 5] 90.00-120.00 sec 355 MBytes 99.4 Mbits/sec 0.045 ms 261/41902 (0.62%)
[ 5] 120.00-150.00 sec 354 MBytes 99.1 Mbits/sec 0.048 ms 401/41908 (0.96%)
[ 5] 150.00-180.00 sec 353 MBytes 98.7 Mbits/sec 0.047 ms 530/41902 (1.3%)
[ 5] 180.00-210.00 sec 353 MBytes 98.8 Mbits/sec 0.059 ms 496/41904 (1.2%)
[ 5] 210.00-240.00 sec 354 MBytes 99.0 Mbits/sec 0.052 ms 407/41904 (0.97%)
[ 5] 240.00-270.00 sec 351 MBytes 98.3 Mbits/sec 0.059 ms 725/41903 (1.7%)
[ 5] 270.00-300.00 sec 354 MBytes 99.1 Mbits/sec 0.043 ms 393/41908 (0.94%)
– – – – – – – – – – – – – – – – – – – – – – – – –
[ ID] Interval Transfer Bandwidth Jitter Lost/Total Datagrams
[ 5] 0.00-300.04 sec 3.45 GBytes 98.94 Mbits/sec 0.043 ms 4344/418913 (1%)

UDP Throughput in a WAN

$ iperf3 –client HOST –time 300 -u -b 7.7MB
Accepted connection from 45.29.190.145, port 60634
[ 5] local 172.31.56.48 port 5201 connected to 45.29.190.145 port 52586
[ ID] Interval Transfer Bandwidth Jitter Lost/Total Datagrams
[ 5] 0.00-30.00 sec 27.4 MBytes 7.67 Mbits/sec 0.438 ms 64/19902 (0.32%)
[ 5] 30.00-60.00 sec 27.5 MBytes 7.69 Mbits/sec 0.446 ms 35/19940 (0.18%)
[ 5] 60.00-90.00 sec 27.5 MBytes 7.68 Mbits/sec 0.384 ms 39/19925 (0.2%)
[ 5] 90.00-120.00 sec 27.5 MBytes 7.68 Mbits/sec 0.528 ms 70/19950 (0.35%)
[ 5] 120.00-150.00 sec 27.4 MBytes 7.67 Mbits/sec 0.460 ms 51/19924 (0.26%)
[ 5] 150.00-180.00 sec 27.5 MBytes 7.69 Mbits/sec 0.485 ms 37/19948 (0.19%)
[ 5] 180.00-210.00 sec 27.5 MBytes 7.68 Mbits/sec 0.572 ms 49/19941 (0.25%)
[ 5] 210.00-240.00 sec 26.8 MBytes 7.50 Mbits/sec 0.800 ms 443/19856 (2.2%)
[ 5] 240.00-270.00 sec 27.4 MBytes 7.66 Mbits/sec 0.570 ms 172/20009 (0.86%)
[ 5] 270.00-300.00 sec 25.3 MBytes 7.07 Mbits/sec 0.423 ms 1562/19867 (7.9%)
– – – – – – – – – – – – – – – – – – – – – – – – –
[ ID] Interval Transfer Bandwidth Jitter Lost/Total Datagrams
[ 5] 0.00-300.00 sec 272 MBytes 7.60 Mbits/sec 0.423 ms 2522/199284 (1.3%)
[SUM] 0.0-300.2 sec 31 datagrams received out-of-order


Sum it up what learned


Debugging network issues and snooping on a Local LAN (DMZ) network on a server or home LAN is useful  to debug for various network issues and more importantly track and know abou tsecurity threads such as plain text passowd communication via insecure protocols a failure of proper communication between Linux network nodes at times, or simply to get a better idea on what kind of network is your new purchased dedicated server living in .It can help you also strenghten your security and close up any possible security holes, or even help you start thinking like a security intruder (cracker / hacker) would do. In this article we went through few of my favourite tools I use for many years quite often. These tools are just part of the tons of useful *Unix free tools available to do a network debug. Tools mentioned up are worthy to install on every server you have to administratrate or even your home desktop PCs, these are iptraf, sniffit, iftop, bmon, nethogs, nmon, ettercap, iperf and netperf.
 If you have some other useful tools used on Linux sys admin tasks please share, I'll be glad to know it and put them in my arsenal of used tools.

Enjoy ! 🙂

Apache disable requests to not log to access.log Logfile through SetEnvIf and dontlog httpd variables

Monday, October 11th, 2021

apache-disable-certain-strings-from-logging-to-access-log-logo

Logging to Apache access.log is mostly useful as this is a great way to keep log on who visited your website and generate periodic statistics with tools such as Webalizer or Astats to keep track on your visitors and generate various statistics as well as see the number of new visitors as well most visited web pages (the pages which mostly are attracting your web visitors), once the log analysis tool generates its statistics, it can help you understand better which Web spiders visit your website the most (as spiders has a predefined) IP addresses, which can give you insight on various web spider site indexation statistics on Google, Yahoo, Bing etc. . Sometimes however either due to bugs in web spiders algorithms or inconsistencies in your website structure, some of the web pages gets double visited records inside the logs, this could happen for example if your website uses to include iframes.

Having web pages accessed once but logged to be accessed twice hence is erroneous and unwanted, and though that usually have to be fixed by the website programmers, if such approach is not easily doable in the moment and the website is running on critical production system, the double logging of request can be omitted thanks to a small Apache log hack with SetEnvIf Apache config directive. Even if there is no double logging inside Apache log happening it could be that some cron job or automated monitoring scripts or tool such as monit is making periodic requests to Apache and this is garbling your Log Statistics results.

In this short article hence I'll explain how to do remove certain strings to not get logged inside /var/log/httpd/access.log.

1. Check SetEnvIf is Loaded on the Webserver
 

On CentOS / RHEL Linux:

# /sbin/apachectl -M |grep -i setenvif
AH00558: httpd: Could not reliably determine the server's fully qualified domain name, using localhost.localdomain. Set the 'ServerName' directive globally to suppress this message
 setenvif_module (shared)


On Debian / Ubuntu Linux:

/usr/sbin/apache2ctl -M |grep -i setenvif
AH00548: NameVirtualHost has no effect and will be removed in the next release /etc/apache2/sites-enabled/000-default.conf:1
 setenvif_module (shared)


2. Using SetEnvIf to omit certain string to get logged inside apache access.log


SetEnvIf could be used either in some certain domain VirtualHost configuration (if website is configured so), or it can be set as a global Apache rule from the /etc/httpd/conf/httpd.conf 

To use SetEnvIf  you have to place it inside a <Directory …></Directory> configuration block, if it has to be enabled only for a Certain Apache configured directory, otherwise you have to place it in the global apache config section.

To be able to use SetEnvIf, only in a certain directories and subdirectories via .htaccess, you will have defined in <Directory>

AllowOverride FileInfo


The general syntax to omit a certain Apache repeating string from keep logging with SetEnvIf is as follows:
 

SetEnvIf Request_URI "^/WebSiteStructureDirectory/ACCESS_LOG_STRING_TO_REMOVE$" dontlog


General syntax for SetEnvIf is as follows:

SetEnvIf attribute regex env-variable

SetEnvIf attribute regex [!]env-variable[=value] [[!]env-variable[=value]] …

Below is the overall possible attributes to pass as described in mod_setenvif official documentation.
 

  • Host
  • User-Agent
  • Referer
  • Accept-Language
  • Remote_Host: the hostname (if available) of the client making the request.
  • Remote_Addr: the IP address of the client making the request.
  • Server_Addr: the IP address of the server on which the request was received (only with versions later than 2.0.43).
  • Request_Method: the name of the method being used (GET, POST, etc.).
  • Request_Protocol: the name and version of the protocol with which the request was made (e.g., "HTTP/0.9", "HTTP/1.1", etc.).
  • Request_URI: the resource requested on the HTTP request line – generally the portion of the URL following the scheme and host portion without the query string.

Next locate inside the configuration the line:

CustomLog /var/log/apache2/access.log combined


To enable filtering of included strings, you'll have to append env=!dontlog to the end of line.


CustomLog /var/log/apache2/access.log combined env=!dontlog


You might be using something as cronolog for log rotation to prevent your WebServer logs to become too big in size and hard to manage, you can append env=!dontlog to it in same way.

If you haven't used cronolog is it is perhaps best to show you the package description.

server:~# apt-cache show cronolog|grep -i description -A10 -B5
Version: 1.6.2+rpk-2
Installed-Size: 63
Maintainer: Debian QA Group <packages@qa.debian.org>
Architecture: amd64
Depends: perl:any, libc6 (>= 2.4)
Description-en: Logfile rotator for web servers
 A simple program that reads log messages from its input and writes
 them to a set of output files, the names of which are constructed
 using template and the current date and time.  The template uses the
 same format specifiers as the Unix date command (which are the same
 as the standard C strftime library function).
 .
 It intended to be used in conjunction with a Web server, such as
 Apache, to split the access log into daily or monthly logs:
 .
   TransferLog "|/usr/bin/cronolog /var/log/apache/%Y/access.%Y.%m.%d.log"
 .
 A cronosplit script is also included, to convert existing
 traditionally-rotated logs into this rotation format.

Description-md5: 4d5734e5e38bc768dcbffccd2547922f
Homepage: http://www.cronolog.org/
Tag: admin::logging, devel::lang:perl, devel::library, implemented-in::c,
 implemented-in::perl, interface::commandline, role::devel-lib,
 role::program, scope::utility, suite::apache, use::organizing,
 works-with::logfile
Section: web
Priority: optional
Filename: pool/main/c/cronolog/cronolog_1.6.2+rpk-2_amd64.deb
Size: 27912
MD5sum: 215a86766cc8d4434cd52432fd4f8fe7

If you're using cronolog to daily rotate the access.log and you need to filter out the strings out of the logs, you might use something like in httpd.conf:


CustomLog "|/usr/bin/cronolog –symlink=/var/log/httpd/access.log /var/log/httpd/access.log_%Y_%m_%d" combined env=!dontlog


3. Disable Apache logging access.log from certain USERAGENT browser
 

You can do much more with SetEnvIf for example you might want to omit logging requests from a UserAgent (browser) to end up in /dev/null (nowhere), e.g. prevent any Website requests originating from Internet Explorer (MSIE) to not be logged.

SetEnvIf User_Agent "(MSIE)" dontlog

CustomLog /var/log/apache2/access.log combined env=!dontlog


4. Disable Apache logging from requests coming from certain FQDN (Fully Qualified Domain Name) localhost 127.0.0.1 or concrete IP / IPv6 address

SetEnvIf Remote_Host "dns.server.com$" dontlog

CustomLog /var/log/apache2/access.log combined env=!dontlog


Of course for this to work, your website should have a functioning DNS servers and Apache should be configured to be able to resolve remote IPs to back resolve to their respective DNS defined Hostnames.

SetEnvIf recognized also perl PCRE Regular Expressions, if you want to filter out of Apache access log requests incoming from multiple subdomains starting with a certain domain hostname.


SetEnvIf Remote_Host "^example" dontlog

– To not log anything coming from localhost.localdomain address ( 127.0.0.1 ) as well as from some concrete IP address :

SetEnvIf Remote_Addr "127\.0\.0\.1" dontlog

SetEnvIf Remote_Addr "192\.168\.1\.180" dontlog

– To disable IPv6 requests that be coming at the log even though you don't happen to use IPv6 at all

SetEnvIf Request_Addr "::1" dontlog

CustomLog /var/log/apache2/access.log combined env=!dontlog


– Note here it is obligatory to escape the dots '.'


5. Disable robots.txt Web Crawlers requests from being logged in access.log

SetEnvIf Request_URI "^/robots\.txt$" dontlog

CustomLog /var/log/apache2/access.log combined env=!dontlog

Using SetEnvIfNoCase to read incoming useragent / Host / file requests case insensitve

The SetEnvIfNoCase is to be used if you want to threat incoming originators strings as case insensitive, this is useful to omit extraordinary regular expression SetEnvIf rules for lower upper case symbols.

SetEnvIFNoCase User-Agent "Slurp/cat" dontlog
SetEnvIFNoCase User-Agent "Ask Jeeves/Teoma" dontlog
SetEnvIFNoCase User-Agent "Googlebot" dontlog
SetEnvIFNoCase User-Agent "bingbot" dontlog
SetEnvIFNoCase Remote_Host "fastsearch.net$" dontlog

Omit from access.log logging some standard web files .css , .js .ico, .gif , .png and Referrals from own domain

Sometimes your own site scripts do refer to stuff on your own domain that just generates junks in the access.log to keep it off.

SetEnvIfNoCase Request_URI "\.(gif)|(jpg)|(png)|(css)|(js)|(ico)|(eot)$" dontlog


SetEnvIfNoCase Referer "www\.myowndomain\.com" dontlog

CustomLog /var/log/apache2/access.log combined env=!dontlog


6. Disable Apache requests in access.log and error.log completely


Sometimes at rare cases the produced Apache logs and error log is really big and you already have the requests logged in another F5 Load Balancer or Haproxy in front of Apache WebServer or alternatively the logging is not interesting at all as the Web Application served written in ( Perl / Python / Ruby ) does handle the logging itself. 
I've earlier described how this is done in a good amount of details in previous article Disable Apache access.log and error.log logging on Debian Linux and FreeBSD

To disable it you will have to comment out CustomLog or set it to together with ErrorLog to /dev/null in apache2.conf / httpd.conf (depending on the distro)
 

CustomLog /dev/null
ErrorLog /dev/null


7. Restart Apache WebServer to load settings
 

An important to mention is in case you have Webserver with multiple complex configurations and there is a specific log patterns to omit from logs it might be a very good idea to:

a. Create /etc/httpd/conf/dontlog.conf / etc/apache2/dontlog.conf
add inside all your custom dontlog configurations
b. Include dontlog.conf from /etc/httpd/conf/httpd.conf / /etc/apache2/apache2.conf

Finally to make the changes take affect, of course you will need to restart Apache webserver depending on the distro and if it is with systemd or System V:

For systemd RPM based distro:

systemctl restart httpd

or for Deb based Debian etc.

systemctl apache2 restart

On old System V scripts systems:

On RedHat / CentOS etc. restart Apache with:
 

/etc/init.d/httpd restart


On Deb based SystemV:
 

/etc/init.d/apache2 restart


What we learned ?
 

We have learned about SetEnvIf how it can be used to prevent certain requests strings getting logged into access.log through dontlog, how to completely stop certain browser based on a useragent from logging to the access.log as well as how to omit from logging certain requests incoming from certain IP addresses / IPv6 or FQDNs and how to stop robots.txt from being logged to httpd log.


Finally we have learned how to completely disable Apache logging if logging is handled by other external application.
 

How to redirect TCP port traffic from Internet Public IP host to remote local LAN server, Redirect traffic for Apache Webserver, MySQL, or other TCP service to remote host

Thursday, September 23rd, 2021


Linux-redirect-forward-tcp-ip-port-traffic-from-internet-to-remote-internet-LAN-IP-server-rinetd-iptables-redir


1. Use the good old times rinetd – internet “redirection server” service


Perhaps, many people who are younger wouldn't remember rinetd's use was pretty common on old Linuxes in the age where iptables was not on the scene and its predecessor ipchains was so common.
In the raise of mass internet rinetd started loosing its popularity because the service was exposed to the outer world and due to security holes and many exploits circulating the script kiddie communities
many servers get hacked "pwned" in the jargon of the script kiddies.

rinetd is still available even in modern Linuxes and over the last years I did not heard any severe security concerns regarding it, but the old paranoia perhaps and the set to oblivion makes it still unpopular soluttion for port redirect today in year 2021.
However for a local secured DMZ lans I can tell you that its use is mostly useful and I chooes to use it myself, everynow and then due to its simplicity to configure and use.
rinetd is pretty standard among unixes and is also available in old Sun OS / Solaris and BSD-es and pretty much everything on the Unix scene.

Below is excerpt from 'man rinetd':


DESCRIPTION
     rinetd redirects TCP connections from one IP address and port to another. rinetd is a single-process server which handles any number of connections to the address/port pairs
     specified in the file /etc/rinetd.conf.  Since rinetd runs as a single process using nonblocking I/O, it is able to redirect a large number of connections without a severe im‐
     pact on the machine. This makes it practical to run TCP services on machines inside an IP masquerading firewall. rinetd does not redirect FTP, because FTP requires more than
     one socket.
     rinetd is typically launched at boot time, using the following syntax:      /usr/sbin/rinetd      The configuration file is found in the file /etc/rinetd.conf, unless another file is specified using the -c command line option.

To use rinetd on any LInux distro you have to install and enable it with apt or yum as usual. For example on my Debian GNU / Linux home machine to use it I had to install .deb package, enable and start it it via systemd :


server:~# apt install –yes rinetd

server:~#  systemctl enable rinetd


server:~#  systemctl start rinetd


server:~#  systemctl status rinetd
● rinetd.service
   Loaded: loaded (/etc/init.d/rinetd; generated)
   Active: active (running) since Tue 2021-09-21 10:48:20 EEST; 2 days ago
     Docs: man:systemd-sysv-generator(8)
    Tasks: 1 (limit: 4915)
   Memory: 892.0K
   CGroup: /system.slice/rinetd.service
           └─1364 /usr/sbin/rinetd


rinetd is doing the traffic redirect via a separate process daemon, in order for it to function once you have service up check daemon is up as well.

root@server:/home/hipo# ps -ef|grep -i rinet
root       359     1  0 16:10 ?        00:00:00 /usr/sbin/rinetd
root       824 26430  0 16:10 pts/0    00:00:00 grep -i rinet

+ Configuring a new port redirect with rinetd


Is pretty straight forward everything is handled via one single configuration – /etc/rinetd.conf

The format (syntax) of a forwarding rule is as follows:

     [bindaddress] [bindport] [connectaddress] [connectport]


Besides that rinetd , could be used as a primitive firewall substitute to iptables, general syntax of allow deny an IP address is done with (allow, deny) keywords:
 

allow 192.168.2.*
deny 192.168.2.1?


To enable logging to external file ,you'll have to include in the configuration:

# logging information
logfile /var/log/rinetd.log

Here is an example rinetd.conf configuration, redirecting tcp mysql 3306, nginx on port 80 and a second web service frontend for ILO to server reachable via port 8888 and a redirect from External IP to local IP SMTP server.


#
# this is the configuration file for rinetd, the internet redirection server
#
# you may specify global allow and deny rules here
# only ip addresses are matched, hostnames cannot be specified here
# the wildcards you may use are * and ?
#
# allow 192.168.2.*
# deny 192.168.2.1?


#
# forwarding rules come here
#
# you may specify allow and deny rules after a specific forwarding rule
# to apply to only that forwarding rule
#
# bindadress    bindport  connectaddress  connectport


# logging information
logfile /var/log/rinetd.log
83.228.93.76        80            192.168.0.20       80
192.168.0.2        3306            192.168.0.19        3306
83.228.93.76        443            192.168.0.20       443
# enable for access to ILO
83.228.93.76        8888            192.168.1.25 443

127.0.0.1    25    192.168.0.19    25


83.228.93.76 is my external ( Public )  IP internet address where 192.168.0.20, 192.168.0.19, 192.168.0.20 (are the DMZ-ed Lan internal IPs) with various services.

To identify the services for which rinetd is properly configured to redirect / forward traffic you can see it with netstat or the newer ss command
 

root@server:/home/hipo# netstat -tap|grep -i rinet
tcp        0      0 www.pc-freak.net:8888   0.0.0.0:*               LISTEN      13511/rinetd      
tcp        0      0 www.pc-freak.n:http-alt 0.0.0.0:*               LISTEN      21176/rinetd        
tcp        0      0 www.pc-freak.net:443   0.0.0.0:*               LISTEN      21176/rinetd      


+ Using rinetd to redirect External interface IP to loopback's port (127.0.0.1)


If you have the need to redirect an External connectable living service be it apache mysql / privoxy / squid or whatever rinetd is perhaps the tool of choice (especially since there is no way to do it with iptables.

If you want to redirect all traffic which is accessed via Linux's loopback interface (localhost) to be reaching a remote host 11.5.8.1 on TCP port 1083 and 1888, use below config

# bindadress    bindport  connectaddress  connectport
11.5.8.1        1083            127.0.0.1       1083
11.5.8.1        1888            127.0.0.1       1888


For a quick and dirty solution to redirect traffic rinetd is very useful, however you'll have to keep in mind that if you want to redirect traffic for tens of thousands of connections constantly originating from the internet you might end up with some disconnects as well as notice a increased use of rinetd CPU use with the incrased number of forwarded connections.


2. Redirect TCP / IP port using DNAT iptables firewall rules


Lets say you have some proxy, webservice or whatever service running on port 5900 to be redirected with iptables.
The easeiest legacy way is to simply add the redirection rules to /etc/rc.local​. In newer Linuxes rc.local so if you decide to use,
you'll have to enable rc.local , I've written earlier a short article on how to enable rc.local on newer Debian, Fedora, CentOS


# redirect 5900 TCP service 
sysctl -w net.ipv4.conf.all.route_localnet=1
iptables -t nat -I PREROUTING -p tcp –dport 5900 -j REDIRECT –to-ports 5900
iptables -t nat -I OUTPUT -p tcp -o lo –dport 5900 -j REDIRECT –to-ports 5900
iptables -t nat -A OUTPUT -o lo -d 127.0.0.1 -p tcp –dport 5900 -j DNAT  –to-destination 192.168.1.8:5900
iptables -t nat -I OUTPUT –source 0/0 –destination 0/0 -p tcp –dport 5900 -j REDIRECT –to-ports 5900


Here is another two example which redirects port 2208 (which has configured a bind listener for SSH on Internal host 192.168.0.209:2208) from External Internet IP address (XXX.YYY.ZZZ.XYZ) 
 

# Port redirect for SSH to VM on openxen internal Local lan server 192.168.0.209 
-A PREROUTING  -p tcp –dport 2208 -j DNAT –to-destination 192.168.0.209:2208
-A POSTROUTING -p tcp –dst 192.168.0.209 –dport 2208 -j SNAT –to-source 83.228.93.76


3. Redirect TCP traffic connections with redir tool


If you look for an easy straight forward way to redirect TCP traffic, installing and using redir (ready compiled program) might be a good idea.


root@server:~# apt-cache show redir|grep -i desc -A5 -B5
Version: 3.2-1
Installed-Size: 60
Maintainer: Lucas Kanashiro <kanashiro@debian.org>
Architecture: amd64
Depends: libc6 (>= 2.15)
Description-en: Redirect TCP connections
 It can run under inetd or stand alone (in which case it handles multiple
 connections).  It is 8 bit clean, not limited to line mode, is small and
 light. Supports transparency, FTP redirects, http proxying, NAT and bandwidth
 limiting.
 .
 redir is all you need to redirect traffic across firewalls that authenticate
 based on an IP address etc. No need for the firewall toolkit. The
 functionality of inetd/tcpd and "redir" will allow you to do everything you
 need without screwy telnet/ftp etc gateways. (I assume you are running IP
 Masquerading of course.)

Description-md5: 2089a3403d126a5a0bcf29b22b68406d
Homepage: https://github.com/troglobit/redir
Tag: interface::daemon, network::server, network::service, role::program,
 use::proxying
Section: net
Priority: optional


server:~# apt-get install –yes redir

Here is a short description taken from its man page 'man redir'


DESCRIPTION
     redir redirects TCP connections coming in on a local port, [SRC]:PORT, to a specified address/port combination, [DST]:PORT.  Both the SRC and DST arguments can be left out,
     redir will then use 0.0.0.0.

     redir can be run either from inetd or as a standalone daemon.  In –inetd mode the listening SRC:PORT combo is handled by another process, usually inetd, and a connected
     socket is handed over to redir via stdin.  Hence only [DST]:PORT is required in –inetd mode.  In standalone mode redir can run either in the foreground, -n, or in the back‐
     ground, detached like a proper UNIX daemon.  This is the default.  When running in the foreground log messages are also printed to stderr, unless the -s flag is given.

     Depending on how redir was compiled, not all options may be available.


+ Use redir to redirect TCP traffic one time


Lets say you have a MySQL running on remote machine on some internal or external IP address, lets say 192.168.0.200 and you want to redirect all traffic from remote host to the machine (192.168.0.50), where you run your Apache Webserver, which you want to configure to use
as MySQL localhost TCP port 3306.

Assuming there are no irewall restrictions between Host A (192.168.0.50) and Host B (192.168.0.200) is already permitting connectivity on TCP/IP port 3306 between the two machines.

To open redirection from localhost on 192.168.0.50 -> 192.168.0.200:


server:~# redir –laddr=127.0.0.1 –lport=3306 –caddr=192.168.0.200 –cport=3306


If you need other third party hosts to be additionally reaching 192.168.0.200 via 192.168.0.50 TCP 3306.

root@server:~# redir –laddr=192.168.0.50 –lport=3306 –caddr=192.168.0.200 –cport=3306


Of course once you close, the /dev/tty or /dev/vty console the connection redirect will be cancelled.


+ Making TCP port forwarding from Host A to Host B permanent


One solution to make the redir setup rules permanent is to use –rinetd option or simply background the process, nevertheless I prefer to use instead GNU Screen.
If you don't know screen is a vVrtual Console Emulation manager with VT100/ANSI terminal emulation to so, if you don't have screen present on the host install it with whatever Linux OS package manager is present and run:


root@server:~#screen -dm bash -c 'redir –laddr=127.0.0.1 –lport=3306 –caddr=192.168.0.200 –cport=3306'


That would run it into screen session and detach so you can later connect, if you want you can make redir to also log connections via syslog with ( -s) option.

I found also useful to be able to track real time what's going on currently with the opened redirect socket by changing redir log level.

Accepted log level is:


  -l, –loglevel=LEVEL
             Set log level: none, err, notice, info, debug.  Default is notice.


root@server:/ # screen -dm bash -c 'redir –laddr=127.0.0.1 –lport=3308 –caddr=192.168.0.200 –cport=3306 -l debug'


To test connectivity works as expected use telnet:
 

root@server:/ # telnet localhost 3308
Trying 127.0.0.1…
Connected to localhost.
Escape character is '^]'.
g
5.5.5-10.3.29-MariaDB-0+deb10u1-log�+c2nWG>B���o+#ly=bT^]79mysql_native_password

6#HY000Proxy header is not accepted from 192.168.0.19 Connection closed by foreign host.

once you attach to screen session with


root@server:/home #  screen -r


You will get connectivity attempt from localhost logged : .
 

redir[10640]: listening on 127.0.0.1:3306
redir[10640]: target is 192.168.0.200:3306
redir[10640]: Waiting for client to connect on server socket …
redir[10640]: target is 192.168.0.200:3306
redir[10640]: Waiting for client to connect on server socket …
redir[10793]: peer IP is 127.0.0.1
redir[10793]: peer socket is 25592
redir[10793]: target IP address is 192.168.0.200
redir[10793]: target port is 3306
redir[10793]: Connecting 127.0.0.1:25592 to 127.0.0.1:3306
redir[10793]: Entering copyloop() – timeout is 0
redir[10793]: Disconnect after 1 sec, 165 bytes in, 4 bytes out

The downsides of using redir is redirection is handled by the separate process which is all time hanging in the process list, as well as the connection redirection speed of incoming connections might be about at least 30% slower to if you simply use a software (firewall ) redirect such as iptables. If you use something like kernel IP set ( ipsets ). If you hear of ipset for a first time and you wander whta it is below is short package description.


root@server:/root# apt-cache show ipset|grep -i description -A13 -B5
Maintainer: Debian Netfilter Packaging Team <pkg-netfilter-team@lists.alioth.debian.org>
Architecture: amd64
Provides: ipset-6.38
Depends: iptables, libc6 (>= 2.4), libipset11 (>= 6.38-1~)
Breaks: xtables-addons-common (<< 1.41~)
Description-en: administration tool for kernel IP sets
 IP sets are a framework inside the Linux 2.4.x and 2.6.x kernel which can be
 administered by the ipset(8) utility. Depending on the type, currently an
 IP set may store IP addresses, (TCP/UDP) port numbers or IP addresses with
 MAC addresses in a  way which ensures lightning speed when matching an
 entry against a set.
 .
 If you want to
 .
  * store multiple IP addresses or port numbers and match against the
    entire collection using a single iptables rule.
  * dynamically update iptables rules against IP addresses or ports without
    performance penalty.
  * express complex IP address and ports based rulesets with a single
    iptables rule and benefit from the speed of IP sets.

 .
 then IP sets may be the proper tool for you.
Description-md5: d87e199641d9d6fbb0e52a65cf412bde
Homepage: http://ipset.netfilter.org/
Tag: implemented-in::c, role::program
Section: net
Priority: optional
Filename: pool/main/i/ipset/ipset_6.38-1.2_amd64.deb
Size: 50684
MD5sum: 095760c5db23552a9ae180bd58bc8efb
SHA256: 2e2d1c3d494fe32755324bf040ffcb614cf180327736c22168b4ddf51d462522

Linux show largest sized packages / Which Deb, RPM Linux installed package use most disk space and How to Free Space for critical system updates

Sunday, January 12th, 2020

linux-show-largest-sized-packages-which-deb-rpm-linux-package-use-most-disk-space-to-free-space-for-critical-system-updates

A very common problem that happens on both Linux installed servers and Desktop Linux is a starting to fill / (root partition). This problem could happen due to several reasons just to point few of them out of my experience low disk space (ending free space) could be due to:

– Improper initial partitioning / bad space planning / or OS install made in a hurry (due to time constrains)
– Linux installed on old laptop machine with low Hard Disk Drive capacity (e.g. 80 Giga / 160 GB)
– Custom user partitioning on install time aiming for a small root partition originally and changing space requirements in time
– Due to increasing space taken by Linux updates / user stored files etc / distribution OS Level upgrades dist-upgrades.
– Improperly assigned install time partitions cause of lack of knowledge to understand how partitioning is managed.
– Due to install being made in a hurry

– Linux OS installed on a Cloud based VPN (e.g. running) in a Cloud Instance that is hosted in Amazon EC2, Linode, Digital Ocean, Hostgator etc.

So here is a real time situation that happened me many times, you're launching an apt-get upgrade / apt-get dist-upgrade or yum upgrade the packages are about to start downloading or downloaded and suddenly you get a message of not enough disk space to apply OS package updates …
That's nasty stuff mostly irritating and here there are few approaches to take.

a. perhaps easiest you can ofcourse extend the partition (with a free spaced other Primary or Extended partition) with something like:

parted (the disk partitioning manipulator for Linux), gparted (in case if Desktop with GUI / XOrg server running)

b. if not enough space on the Hard Disk Drive or SSD (Solid State Drive) and you have a budget to buy and free laptop / PC slot to place another physical HDD to clone it to a larger sized HDD and use some kind of partition clone tool, such as:

or any of the other multiple clone tools available in Linux.

But what if you don't have the option for some reason to extend the paritiotn, how can you apply the Critical Security Errata Updates issued to patch security vulnerabilities reported by well known CVEs?
Well you can start with the obvious easy you can start removing unnecessery stuff from the system (if home is also stored on the / – root partiiton) to delete something from there, even delete the /usr/local/man pages if you don't plan to read it free some logs by archiving purging logs from /var/log/* …

But if this is not possible, a better approach is simply try to remove / purge any .deb / .rpm whatever distro package manager packages that are not necessery used and just hanging around, that is often the case especially on Linux installed on Notebooks for a personal home use, where with years you have installed a growing number of packages which you don't actively use but installed just to take a look, while hunting for Cool Linux games and you wanted to give a try to Battle of Wesnoth  / FreeCIV / AlienArena / SuperTux Kart / TuxRacer etc.  or some GUI heavy programs like Krita / Inskape / Audacity etc.

To select which package might be not needed and just takes space hence you need to to list all installed packages on the system ordered by their size this is different in Debian based Linuces e.g. – Debian GNU / Linux / Ubuntu / Mint etc. and RPM based ones Fedora / CentOS / OpenSuSE


1. List all RPM installed packages by Size on CentOS / SuSE
 

Finding how much space each of the installed rpm packages take on the HDD and displaying them in a sorted order is done with:

rpm -qa –queryformat '%10{size} – %-25{name} \t %{version}\n' | sort -n

From the command above,  the '%10{size}' option aligns the size of the package to the right with a padding of 10 characters. The '%-25{name} aligns the name of the package to the left, padded to 25 characters. The '%{version} indicates the version and 'sort -n' flag sorts the packages according to size from the smallest to the largest in bytes.


2. List all installed RPM packages sorted by size on Fedora

Fedora has introduced the dnf package manager instead of yum, to get how much size individual rpm package occupies on system:

dnf info samba
Available Packages
Name        : samba
Arch        : x86_64
Epoch       : 2
Version     : 4.1.20
Release     : 1.fc21
Size        : 558 k
Repo        : updates
Summary     : Server and Client software to interoperate with Windows machines
URL         : http://www.samba.org/
License     : GPLv3+ and LGPLv3+
Description : Samba is the standard Windows interoperability suite of programs
            : for Linux and Unix.


To get a list of all packages on system with their size

dnf info * | grep -i "Installed size" |sort -n


3. List all installed DEB packages on Debian / Ubuntu / Mint etc. with dpkg / aptitude / apt-get and wajig


The most simple way to get a list of largest packages is through dpkg


# dpkg-query -Wf '${Installed-Size}\t${Package}\n' | sort -n
        brscan4
6       default-jre
6       libpython-all-dev
6       libtinfo-dev
6       python-all
6       python-all-dev
6       task-cinnamon-desktop
6       task-cyrillic
6       task-desktop
6       task-english
6       task-gnome-desktop
6       task-laptop
6       task-lxde-desktop
6       task-mate-desktop
6       task-print-server
6       task-ssh-server
6       task-xfce-desktop
8       mysql-client
8       printer-driver-all


207766    libwine
215625    google-chrome-stable
221908    libwine
249401    frogatto-data
260717    linux-image-4.19.0-5-amd64
262512    linux-image-4.19.0-6-amd64
264899    mame
270589    fonts-noto-extra
278903    skypeforlinux
480126    metasploit-framework


above cmd displays packages in size order, largest package last, but the output will include also size of packages, that used to exist,
have been removed but was not purged. Thus if you find  a package that is shown as very large by size but further dpkg -l |grep -i package-name shows package as purged e.g. package state is not 'ii' but 'rc', the quickest work around is to purge all removed packages, that are still not purged and have some configuration remains and other chunks of data that just take space for nothing with:

# dpkg –list |grep "^rc" | cut -d " " -f 3 | xargs sudo dpkg –purge


Be cautious when you execute above command, because if for some reason you uninstalled a package with the idea to keep old configuration files only and in case if you decide to use it some time in future to reuse already custom made configs but do run above purge commands all such package saved kept configs will disappear.
For people who don't want to mess up with, uninstalled but present packages use this to filter out ready to be purged state packages.

# dpkg-query -Wf '${db:Status-Status} ${Installed-Size}\t${Package}\n' | sed -ne 's/^installed //p'|sort -n


aptitude – (high level ncurses interface like to package management) can also be easily used to list largest size packages eating up your hard drive in both interactive or cli mode, like so:


# aptitude search –sort '~installsize' –display-format '%p %I' '~i' | head
metasploit-framework 492 MB
skypeforlinux 286 MB
fonts-noto-extra 277 MB
mame 271 MB
linux-image-4.19.0-6-amd64 269 MB
linux-image-4.19.0-5-amd64 267 MB
frogatto-data 255 MB
libwine 227 MB
google-chrome-stable 221 MB
libwine:i386 213 MB


  • –sort is package sort order, and ~installsize specifies a package sort policy.
  • installsize means 'sort on (estimated) installed size', and the preceding ~ means sort descending (since default for all sort policies is ascending).
  • –display-format changes the <you guessed :->. The format string '%p %I' tells aptitude to output package name, then installed size.
  • '~i' tells aptitude to search only installed packages.

How much a certain .deb package removal will free up on the disk can be seen with apt-get as well to do so for the famous 3D acceleration Graphic Card (enabled) or not  test game extremetuxracer

apt-get –assume-no –purge remove "texlive*" | grep "be freed" | 
   awk '{print $4, $5}'

Perhaps,  the easiest to remember and more human readable output biggest packages occupied space on disk is to install and use a little proggie called wajig to do so


# apt install –yes wajig


Here is how to pick up 10 biggest size packages.

root@jeremiah:/home/hipo# wajig large|tail -n 10
fonts-noto-cjk-extra               204,486      installed
google-chrome-stable               215,625      installed
libwine                            221,908      installed
frogatto-data                      249,401      installed
linux-image-4.19.0-5-amd64         260,717      installed
linux-image-4.19.0-6-amd64         262,512      installed
mame                               264,899      installed
fonts-noto-extra                   270,589      installed
skypeforlinux                      278,903      installed
metasploit-framework               480,126      installed


As above example lists a short package name and no description for those who want get more in depth knowledge on what exactly is the package bundle used for use:

# aptitude search –sort '~installsize' –display-format '%30p %I %r %60d' '~i' |head


%30p %I %r %60d display more information in your format string, or change field widths, enhanced format string

Meaning of parameters is:

  • %30p : package name in field width=30 char
  • %I : estimated install size
  • %r : 'reverse depends count': approximate number of other installed packages which depend upon this package
  • %60d : package's short description in field width=60 char

wajig is capable is a python written and idea is to easify Debian console package management (so you don't have to all time remember when and with which arguments to use apt-get / apt-cache etc.), below is list of commands it accepts.


root@jeremiah:/home/hipo## wajig commands
addcdrom           Add a Debian CD/DVD to APT's list of available sources
addrepo            Add a Launchpad PPA (Personal Package Archive) repository
aptlog             Display APT log file
autoalts           Mark the Alternative to be auto-set (using set priorities)
autoclean          Remove no-longer-downloadable .deb files from the download cache
autodownload       Do an update followed by a download of all updated packages
autoremove         Remove unused dependency packages
build              Get source packages, unpack them, and build binary packages from them.
builddeps          Install build-dependencies for given packages
changelog          Display Debian changelog of a package
clean              Remove all deb files from the download cache
contents           List the contents of a package file (.deb)
dailyupgrade       Perform an update then a dist-upgrade
dependents         Display packages which have some form of dependency on the given package
describe           Display one-line descriptions for the given packages
describenew        Display one-line descriptions of newly-available packages
distupgrade        Comprehensive system upgrade
download           Download one or more packages without installing them
editsources        Edit list of Debian repository locations for packages
extract            Extract the files from a package file to a directory
fixconfigure       Fix an interrupted install
fixinstall         Fix an install interrupted by broken dependencies
fixmissing         Fix and install even though there are missing dependencies
force              Install packages and ignore file overwrites and depends
hold               Place packages on hold (so they will not be upgraded)
info               List the information contained in a package file
init               Initialise or reset wajig archive files
install            Package installer
installsuggested   Install a package and its Suggests dependencies
integrity          Check the integrity of installed packages (through checksums)
large              List size of all large (>10MB) installed packages
lastupdate         Identify when an update was last performed
listall            List one line descriptions for all packages
listalternatives   List the objects that can have alternatives configured
listcache          List the contents of the download cache
listcommands       Display all wajig commands
listdaemons        List the daemons that wajig can start, stop, restart, or reload
listfiles          List the files that are supplied by the named package
listhold           List packages that are on hold (i.e. those that won't be upgraded)
listinstalled      List installed packages
listlog            Display wajig log file
listnames          List all known packages; optionally filter the list with a pattern
listpackages       List the status, version, and description of installed packages
listscripts        List the control scripts of the package of deb file
listsection        List packages that belong to a specific section
listsections       List all available sections
liststatus         Same as list but only prints first two columns, not truncated
localupgrade       Upgrade using only packages that are already downloaded
madison            Runs the madison command of apt-cache
move               Move packages in the download cache to a local Debian mirror
new                Display newly-available packages
newdetail          Display detailed descriptions of newly-available packages
news               Display the NEWS file of a given package
nonfree            List packages that don't meet the Debian Free Software Guidelines
orphans            List libraries not required by any installed package 
policy             From preferences file show priorities/policy (available)
purge              Remove one or more packages and their configuration files
purgeorphans       Purge orphaned libraries (not required by installed packages)
purgeremoved       Purge all packages marked as deinstall
rbuilddeps         Display the packages which build-depend on the given package
readme             Display the README file(s) of a given package
recdownload        Download a package and all its dependencies
recommended        Display packages installed as Recommends and have no dependents
reconfigure        Reconfigure package
reinstall          Reinstall the given packages
reload             Reload system daemons (see LIST-DAEMONS for available daemons)
remove             Remove packages (see also PURGE command)
removeorphans      Remove orphaned libraries
repackage          Generate a .deb file from an installed package
reportbug          Report a bug in a package using Debian BTS (Bug Tracking System)
restart            Restart system daemons (see LIST-DAEMONS for available daemons)
rpm2deb            Convert an .rpm file to a Debian .deb file
rpminstall         Install an .rpm package file
search             Search for package names containing the given pattern
searchapt          Find nearby Debian package repositories
show               Provide a detailed description of package
sizes              Display installed sizes of given packages
snapshot           Generates a list of package=version for all installed packages
source             Retrieve and unpack sources for the named packages
start              Start system daemons (see LIST-DAEMONS for available daemons)
status             Show the version and available versions of packages
statusmatch        Show the version and available versions of matching packages
stop               Stop system daemons (see LISTDAEMONS for available daemons)
tasksel            Run the task selector to install groups of packages
todo               Display the TODO file of a given package
toupgrade          List versions of upgradable packages
tutorial           Display wajig tutorial
unhold             Remove listed packages from hold so they are again upgradeable
unofficial         Search for an unofficial Debian package at apt-get.org
update             Update the list of new and updated packages
updatealternatives Update default alternative for things like x-window-manager
updatepciids       Updates the local list of PCI ids from the internet master list
updateusbids       Updates the local list of USB ids from the internet master list
upgrade            Conservative system upgrade
upgradesecurity    Do a security upgrade
verify             Check package's md5sum
versions           List version and distribution of given packages
whichpackage       Search for files matching a given pattern within packages


4. List installed packages order by size in Arch Linux

ArchLinux is using the funny named package manager – pacman (a nice prank for the good old arcade game).
What is distinctive of pacman uses libalpm (Arch Linux Package Management (ALPM) library) as a back-end to perform all the actions.


# pacman -Qi | awk '/^Name/{name=$3} /^Installed Size/{print $4$5, name}' | sort -hr | head -25
296.64MiB linux-firmware
144.20MiB python
105.43MiB gcc-libs
72.90MiB python2
66.91MiB linux
57.47MiB perl
45.49MiB glibc
35.33MiB icu
34.68MiB git
30.96MiB binutils
29.95MiB grub
18.96MiB systemd
13.94MiB glib2
13.79MiB coreutils
13.41MiB python2-boto
10.65MiB util-linux
9.50MiB gnupg
8.09MiB groff
8.05MiB gettext
7.99MiB texinfo
7.93MiB sqlite
7.15MiB bash
6.50MiB lvm2
6.43MiB openssl
6.33MiB db


There is another mean to list packages by size using a ArchLinux tool called pacgraph


# pacgraph -c | head -25

Autodetected Arch.
Loading package info
Total size: 1221MB
367MB linux
144MB pacgraph
98MB cloud-init
37MB grub
35MB icu
34MB git
31698kB binutils
19337kB pacman
11029kB man-db
8186kB texinfo
8073kB lvm2
7632kB nano
7131kB openssh
5735kB man-pages
3815kB xfsprogs
3110kB sudo
3022kB wget
2676kB tar
2626kB netctl
1924kB parted
1300kB procps-ng
1248kB diffutils


4. Debian Goodies


Most debian users perhaps never hear of debian-goodies package, but I thought it is worthy to mention it as sooner or later as a sysadmin or .deb based Desktop user it might help you somewhere.
 

Debian-goodies is sall toolbox-style utilities for Debian systems
 These programs are designed to integrate with standard shell tools,
 extending them to operate on the Debian packaging system.

 .
  dglob  – Generate a list of package names which match a pattern
           [dctrl-tools, apt*, apt-file*, perl*]
  dgrep  – Search all files in specified packages for a regex
           [dctrl-tools, apt-file (both via dglob)]
 .
 These are also included, because they are useful and don't justify
 their own packages:
 .
  check-enhancements
 
           – find packages which enhance installed packages [apt,
                dctrl-tools]
  checkrestart
 
           – Help to find and restart processes which are using old versions
               of upgraded files (such as libraries) [python3, procps, lsof*]
  debget     – Fetch a .deb for a package in APT's database [apt]
  debman     – Easily view man pages from a binary .deb without extracting
               [man, apt* (via debget)]
  debmany    – Select manpages of installed or uninstalled packages [man |
               sensible-utils, whiptail | dialog | zenity, apt*, konqueror*,
               libgnome2-bin*, xdg-utils*]
  dhomepage  – Open homepage of a package in a web browser [dctrl-tools,
               sensible-utils*, www-browser* | x-www-browser*]
  dman       – Fetch manpages from online manpages.debian.org service [curl,
               man, lsb-release*]
  dpigs      – Show which installed packages occupy the most space
               [dctrl-tools]
  find-dbgsym-packages
             – Get list of dbgsym packages from core dump or PID [dctrl-tools,
               elfutils, libfile-which-perl, libipc-system-simple-perl]
  popbugs    – Display a customized release-critical bug list based on
               packages you use (using popularity-contest data) [python3,
               popularity-contest]
  which-pkg-broke
             – find which package might have broken another [python3, apt]
  which-pkg-broke-build
             – find which package might have broken the build of another
               [python3 (via which-pkg-broke), apt]

Even simpler by that is to use dpigs shell script part of the debian-goodies package which will automatically print out the largest packages.

dpigs command output is exactly the same as 'dpkg-query -Wf '${Installed-Size}\t${Package}\n' | sort -nr | head', but is useful cause you don't have to remember that complex syntax.


5. Checking where your space is gone in a Spacesniffer like GUI manner with Baobab


In my prior article Must have software on a new installed Windows 2 of the  of the precious tools to set are Spacesniffer and WinDirStat.
Windows users will be highly delighted to know that SpaceSniffer equivallent is already present on Linux – say hello baobab.
Baobab
is simple but useful Graphic disk usage overview program for those who don't want to mess to much with the console / terminal to find out which might be the possible directory candidate for removal. It is very simplistic but it does well what it is aimed for, to install it on a Debian or .deb based OS.

# apt install –yes baobab


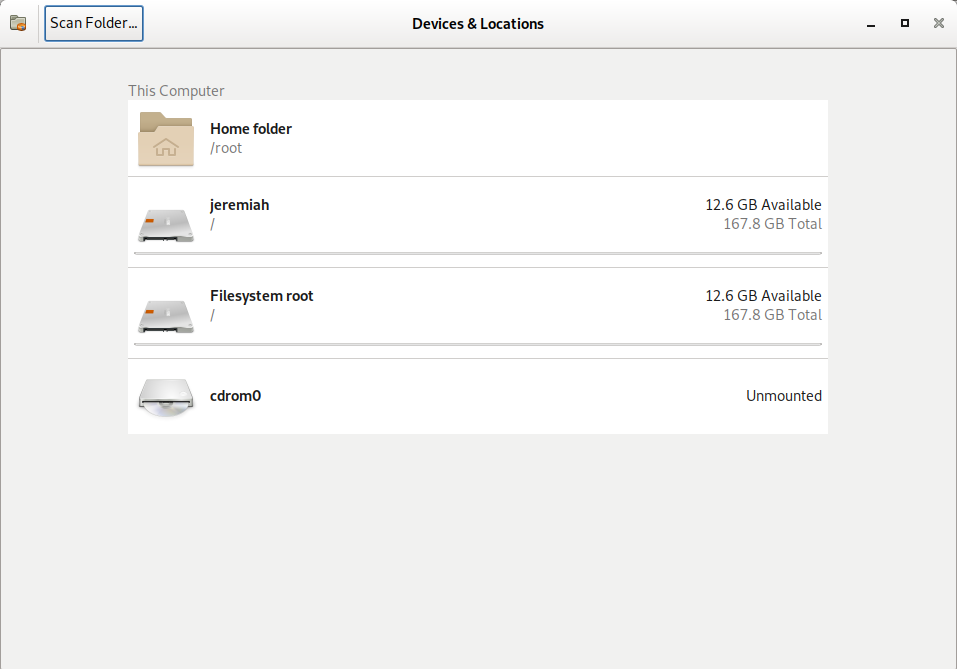
baobab-entry-screen-debian-gnu-linux-screenshot

baobab Linux Hard Disk Usage Analyzer for GNOME. – It can easily scan either the whole filesystem or a specific user-requested branch (Iocal or remote)


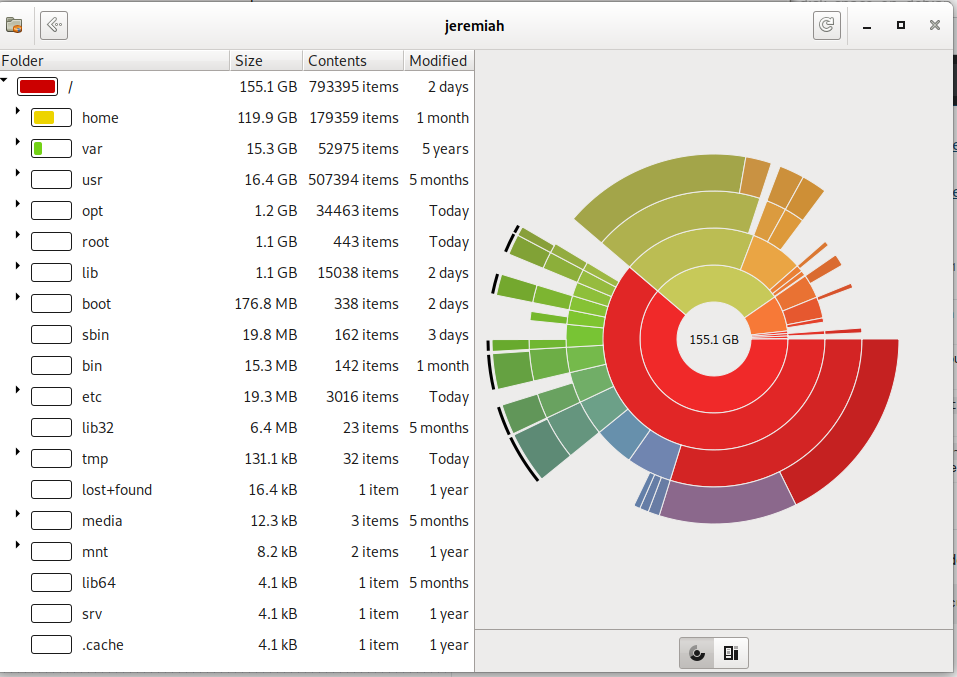
baobab-entry-screen-debian-gnu-linux-directories-taking-most-space-pie-screenshot

Baobab / (root) directory statistics Rings Chart pie


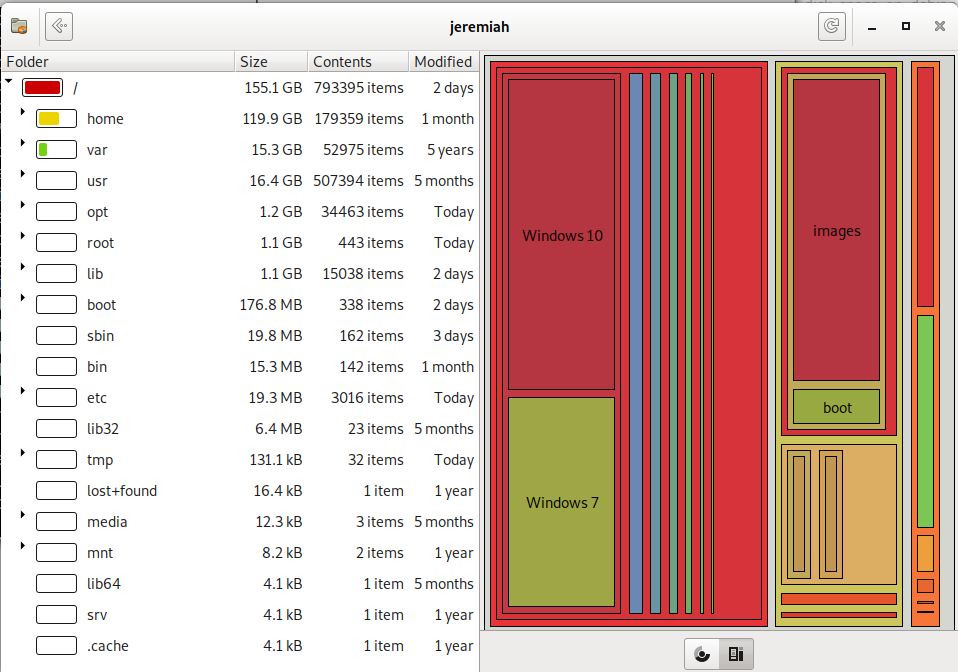
baobab-entry-screen-debian-gnu-linux-disk-space-by-size-visualized-screenshot

baobab – Treemap Chart for directory usage sorted by size on disk 

!!! Note that before removing any files found as taking up too much space with baobab – make sure this files are not essential parts of a .deb package first, otherwise you might break up your system !!!

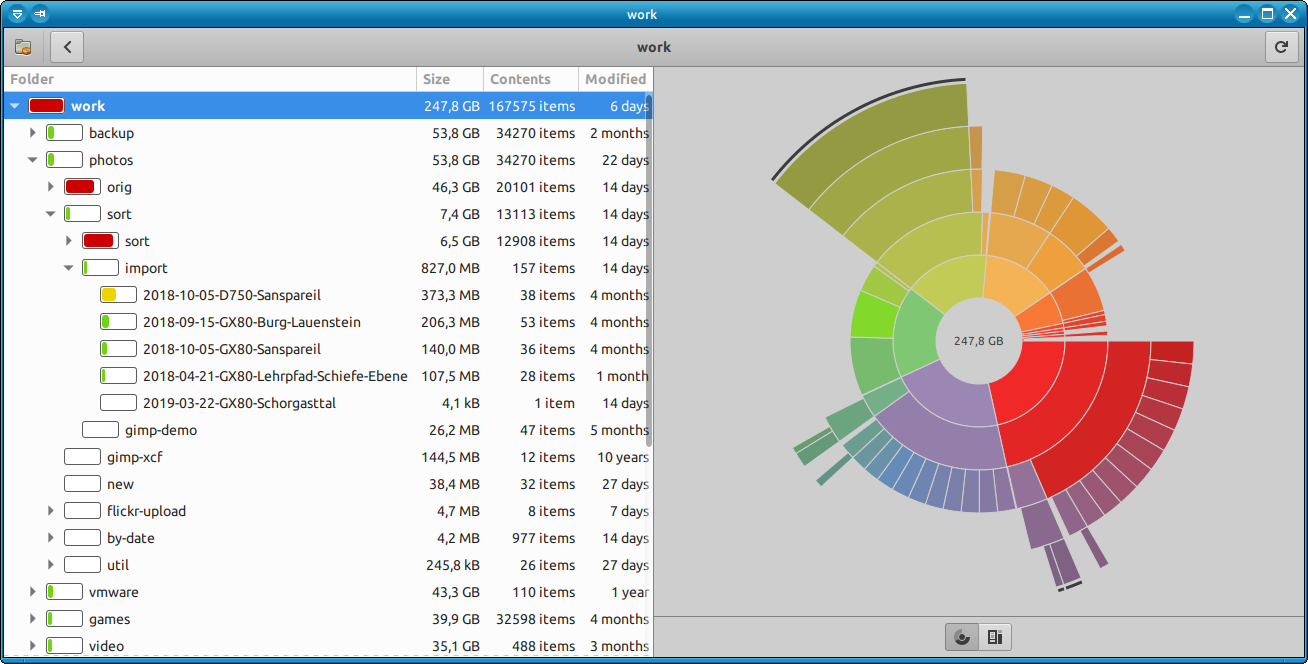
KDE (Plasma) QT library users could use Qdirstat instead of baobab 

qdirstat-on-gnu-linur checking what is the disk space bottleneck qdirstat KDE


6. Use ncdu or duper perl script tool to generate directory disk usage in ASCII chart bar

ncdu and duper are basicly the same except one is using ncurses and is interactive in a very simplistic interface with midnight commander.
 

# apt install –yes ncdu
# ncdu /root


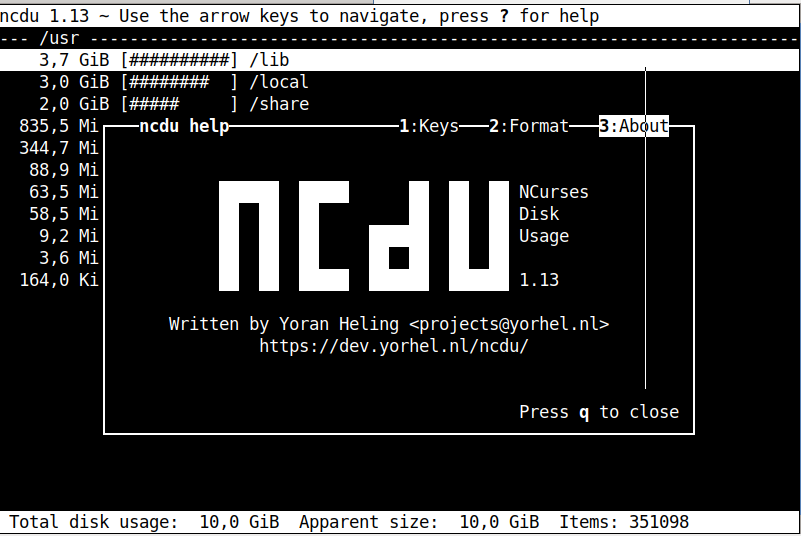
ncdu-gnu-linux-debian-screenshot


# apt-get install –yes durep
# durep -td 1 /usr

[ /usr    14.4G (0 files, 11 dirs) ]
   6.6G [#############                 ]  45.54% lib/
   5.5G [###########                   ]  38.23% share/
   1.1G [##                            ]   7.94% bin/
 552.0M [#                             ]   3.74% local/
 269.2M [                              ]   1.83% games/
 210.4M [                              ]   1.43% src/
  88.9M [                              ]   0.60% libexec/
  51.3M [                              ]   0.35% sbin/
  41.2M [                              ]   0.28% include/
   8.3M [                              ]   0.06% lib32/
 193.8K [                              ]   0.00% lib64/


Conclusion


In this article, I've shortly explained the few approach you can take to handle low disk space preventing you to update a regular security updates on Linux.
The easiest one is to clone your drive to a bigger (larger) sized SATA HDD or SDD Drive or using a free space left on a hard drive to exnted the current filling up the root partition. 

Further, I looked through the common reasons for endind with a disk being low spaced and a quick work around to free disk space through listing and purging larges sized package, this is made differently in different Linux distributions, because different Linux has different package managers. As I'm primary using Debian, I explained thoroughfully on how this is achieved with apt-get / dpkg-query / dpkg / aptitude and the little known debian-goodies .deb package manager helper pack. For GUI Desktop users there is baobab / qdirstat. ASCII lovers could enjoy durep and ncdu.

That's all folks hope you enjoyed and learned something new. If you know of other cool tools or things this article is missing please share.

Howto Pass SSH traffic through a Secured Corporate Proxy server with corkscrew, using sshd as a standalone proxy service with no proxy installed on remote Linux server or VPS

Tuesday, November 19th, 2019

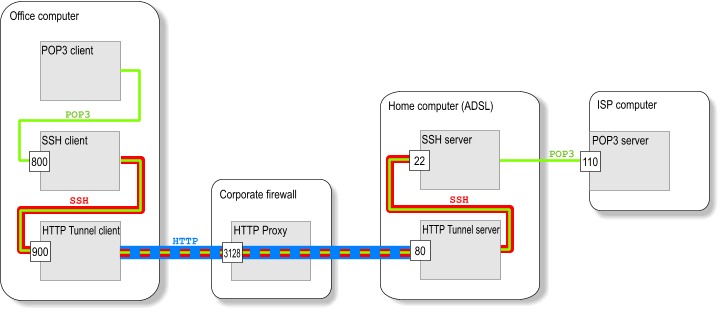
howto pass ssh traffic through proxy to remote server use remote machine as a proxy for connecting to the Internet

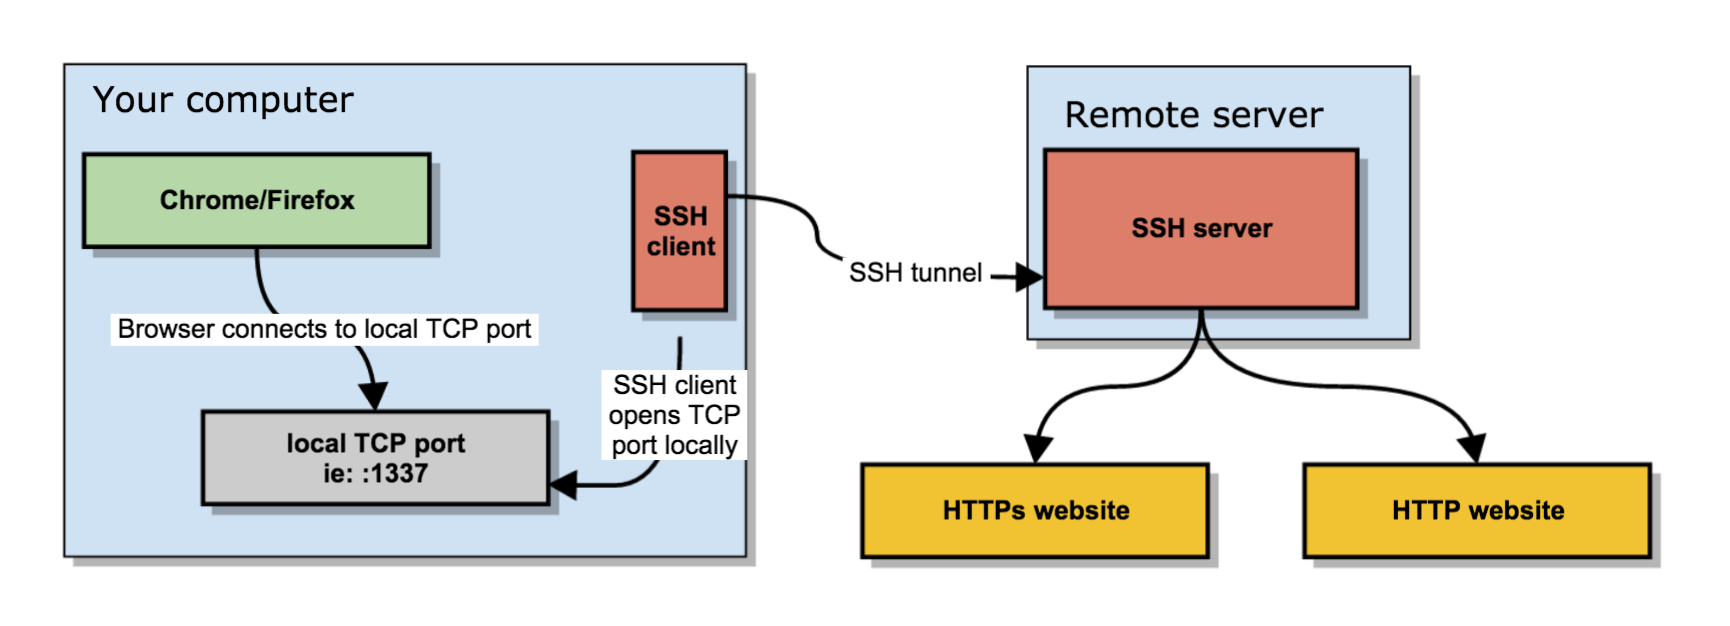
Working in the big bad corporate world (being employed in  any of the Fortune 500) companies, especially in an IT delivery company is a nasty thing in terms of User Personal Data Privacy because usually when employeed in any of a corporation, the company ships you with a personal Computer with some kind of pre-installed OS (most often this is Windows) and the computer is not a standalone one but joined in Active Directory (AD) belonging to Windows Domain and centrally administered by whoever.

As part of the default deplyed configuration in this pre-installed OS and software is that part or all your network traffic and files is being monitored in some kind of manner as your pre-installed Windows or Linux notebook given by the Corporation is having a set of standard software running in the background, and even though you have Windows Administrator there are many things you have zero control or even if you have changed it once the Domain Policy is triggered your custom made changes / Installed Programs that happen to be against the company policy are being automatically deleted, any registry changes made are being rewinded etc. Sometimes even by trying to manually clean up your PC from the corporate crapware,  you might breaks access to the corporate DMZ firewalled network. A common way to secure their employee PC data large companies have a Network seperation, your PC when not connected to the Corporate VPN is having a certain IP configuration and once connected to the Demilitarized Zone VPN those configuration changes and the PC have access to internal company infrastructure servers / router / switches / firewalls / SANs etc. Access to corporate Infrastructure is handled via crypted VPN clinet such as Cisco AnyConnect Secure Mobility Client which is perhaps one of the most used ones out there.

Part of the common software installed to Monitor your PC for threats / viruses / trojans among which is MCafee / EMET (Enhandced Mitigation Experience Toolkit) the PC is often prebundled with some kind of anti-malware (crapware) :). But the tip of the iceberg on user surveillance where most of surveillance happens is the default installed proxy on the PC which usually does keep track of all your remote accessed HTTP Website URLs accessed in plain text – traffic flowing on Port 80 and crypted one on standard (SSL) Port 443. This Web Traffic is handled by the Central Corporate proxy that is being deployed via some kind of Domain policy, every time the Computer joins the Windows domain. 

This of course is a terrible thing for your Browsing security and together with the good security practice to run your browser in Incognito mode, which makes all your browsing activity such as access URLs History or Saved Cookies data to be cleared up on a Browser close it is important to make sure you run your own personal traffic via a separate browser which you will use only for your own concern browsing such as Accessing your Bank Money Accounts to check your Monthly Sallary / Purchase things online via Amazon.com / Ebay.com, whether all of the rest traffic company related is trafficed via the default set corporate central proxy.
This is relatively easy sometimes in companies, where security is not of a top concern but in corporations with tightened security accessing remote proxy, or accessing even common daily news and Public Email websites or social media sites  Gmail.com / Twitter / Youtube will be filtered so the only way to reach them will be via some kind of Proxy and often this proxy is the only way out to the Free world from the corporate jail.

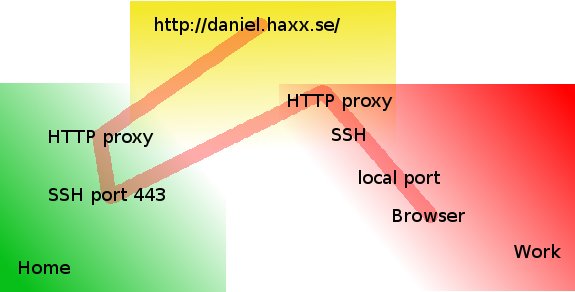
Here is where the good old SSH comes as a saving grace as it turns out SSH traffic could be trafficed over a proxy. In below article I will give you a short insight on how Proxy through SSH could be achieved to Secure your dailty web traffic and use SSH to reach your own server on the Internet as well as how you can copy securely data via SSH through corporate Proxy. 
 

1. How to view your corporate used (default) proxy / Check Proxy.pac file definitions


To get an idea what is the used proxy on your Corporate PC (as most corporate employee given notebooks are running some kind of M$ Windows)  you can go to:

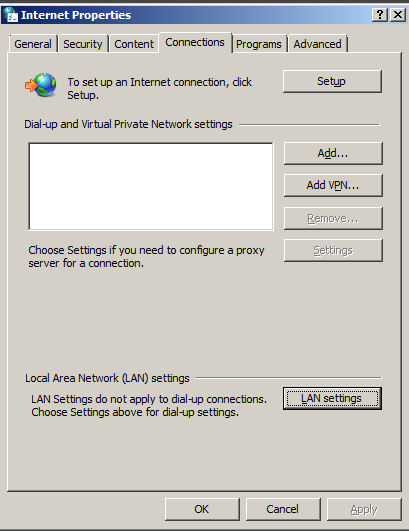
Windows Control Panel -> Internet Options -> Connections -> Lan Settings


internet-properties-microsoft-windows-screenshot

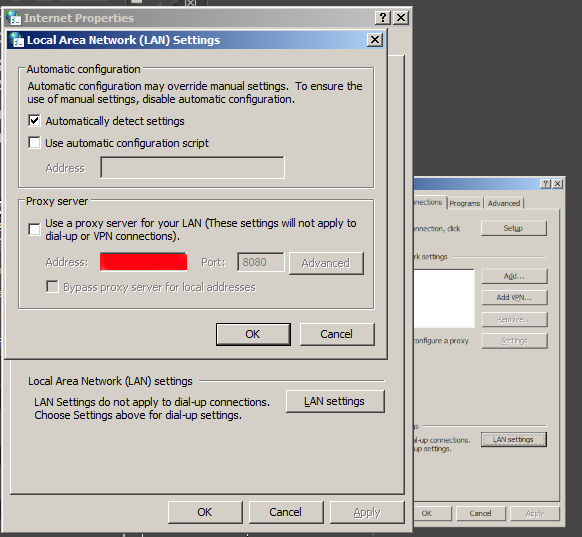
Under the field Proxy server (check out the Proxy configured Address and Port number )

local-area-network-lan-settings-screenshot-windows-1
 

Having that as browsers venerate the so-called Proxy.pac file, to be rawly aware on some general Company Proxy configured definitions you can access in a browser the proxy itself fething the proxy.pac file for example.


http://your-corporate-firewall-rpoxy-url:8080/proxy.pac


This is helpful as some companies Proxies have some proxy rules that reveal some things about its Internet architecture and even some have some badly configured proxy.pac files which could be used to fool the proxy under some circumstances 🙂
 

2. Few of the reasons corporations proxy all their employee's work PC web traffic


The corporate proxying of traffic has a number of goals, some of which are good hearted and others are for mostly spying on the users.


1. Protect Corporate Employees from malicious Viruses / Trojans Horses / Malware / Badware / Whatever ware – EXCELLENT
2. Prevent users from acessing a set of sources that due to the corporate policy are considered harmful (e.g. certain addresses 
of information or disinformation of competitors, any Internet source that might preach against the corporation, hacking ralated websites etc.) – NOT GOOD (for the employee / user) and GOOD for the company
3.Spy on the users activity and be able to have evidence against the employee in case he decided to do anything harmful to the company evidences from proxy could even later be used in court if some kind of corpoate infringment occurs due to misbehave of the employee. – PERFECT FOR COMPANY and Complete breach of User privacy and IMHO totally against European Union privacy legislation such as GDRP
4. In companies that are into the field of Aritificial Intelligence / Users behavior could even be used to advance Self-learning bots and mechanisms – NASTY ! YAECKES


3. Run SSH Socks proxy to remote SSHd server running on common SSL 443 port


Luckily sysadmins who were ordered the big bosses to sniff on your Web behaviour and preferences could be outsmarted with some hacks.

To protect your Browsing behaviours and Secure your privacy perhaps the best option is to use the Old but gold practice o Securing your Networkf traffic using SSH Over Proxy and SSH Dynamic tunnel as a Proxy as explained in my previous article here.

how-to-use-sshd-server-as-a-proxy-without-a-real-proxy-ssh-socks5_proxy_linux
 

In short the quest way to have your free of charge SOCKS  Remote proxy to your Home based Linux installed OS server / VPN with a Public Internet address is to use ssh as so:


ssh -D 3128 UserName@IP-of-Remote-SSHD-Host -p 443


This will start the SOCKS Proxy tunnel from Corporate Work PC to your Own Home brew server.

For some convenience it is useful to set up an .alias (for cygwin) / linux users in .bashrc file:


alias proxy='ssh -D 3128 UserName@IP-of-Remote-SSHD-Host -p 443';


To start using the Proxy from browser, I use a plugin called FoxyProxy in Chrome and Firefox browsers
set-up to connect to localhost – 127.0.0.1:3128 for All Protocols as a SOCKs v5 Proxy.

The sshd Socks proxy can be used for multiple others for example, using it you can also pass on traffic from Mail client such as Thunderbird to your Email server if you're behind a firewall prohibiting access to the common POP3 port 110 or IMAP port TCP 143. 

4. How to access SSH through Proxy using jumphost SSH hop


If you're like me and you have on your Home Linux machine only one Internet address and you have already setupped an SSL enabled service (lets say Webmail) to listen to that Public Internet IP and you don't have the possibility to run another instance of /usr/bin/sshd on port 443 via configuration or manually one time by issuing:


/usr/sbin/sshd -p 443


Then you can use another ssh another Linux server as a jump host to your own home Linux sshd server. This can be done even by purchasing a cheap VPS server for lets say 3 dollars month etc. or even better if you have a friend with another Linux home server, you can ask him to run you sshd on TCP port 443 and add you an ssh account.
Once you have the second Linux machine as JumpHost to reach out to your own machine use:


ssh -J Your-User@Your-jump-host.com:443 hipo@your-home-server.com -v


To easify this a bit long line it is handy to use some kind of alias like:


alias sshhome='ssh -J Your-User@Your-jump-host.com:443 hipo@your-home-server.com -v'


The advantage here is just by issuing this sshd tunnel and keeping it open in a terminal or setting it up as Plink Putty tunnel you have all your Web Traffic Secured
between your Work Corporate PC and your Home Brew Server, keeping the curious eyes of your Company Security Officers from your own Web traffic, hence
separating the corporate privacy from your own personal privacy. Using the just established own SSH Proxy Tunnel to home for your non-work stuff browsing habits
from the corporate systems which are accessed by switching with a button click in FoxyProxy to default proxy settings.
 

5. How to get around paranoid corporate setup where only remote access to Corporate proxy on TCP Port 80 and TCP 443 is available in Browser only


Using straight ssh and to create Proxy will work in most of the cases but it requires SSH access to your remote SSH running server / VPS on TCP Port 22, however under some Fort-Nox like financial involved institutions and companies for the sake of tightened security, it is common that all Outbound TCP Ports are prohibited except TCP Port 80 and SSL 443 as prior said, so what can you do then to get around this badful firewall and access the Internet via your own server Proxy? 
The hack to run SSH server either on tcp port 80 or tcp port 443 on remote Host and use 443 / 80 to acess SSHD should work, but then even for the most paranoid corporations the ones who are PCI Compliant – PCI stands for (Payment Card Industry), e.g. works with Debit and Credit Card data etc, accessing even 80 or 443  ports with something like telnet client or netcat will be impossible. 
Once connected to the corporate VPN,  this 2 two ports firewall exceptions will be only accessible via the Corporate Proxy server defined in a Web Browser (Firefox / IE / Chrome etc.) as prior explained in article.

The remedy here is to use a 3rd party tools such as httptunnel or corkscrew that  are able to TUNNEL SSH TRAFFIC VIA CORPORATE PROXY SERVER and access your own resource out of the DMZ.

Both httptunnel and corkscrew are installable both on most Linux distros or for Windows users via CygWin for those who use MobaXterm.

Just to give you better idea on what corkscrew and (hts) httptunnel does, here is Debian packages descriptions.

# apt-cache show​ corkscrew
" corkscrew is a simple tool to tunnel TCP connections through an HTTP
 proxy supporting the CONNECT method. It reads stdin and writes to
 stdout during the connection, just like netcat.
 .
 It can be used for instance to connect to an SSH server running on
 a remote 443 port through a strict HTTPS proxy.
"


# apt-cache show httptunnel|grep -i description -A 7
Description-en: Tunnels a data stream in HTTP requests
 Creates a bidirectional virtual data stream tunnelled in
 HTTP requests. The requests can be sent via a HTTP proxy
 if so desired.
 .
 This can be useful for users behind restrictive firewalls. If WWW
 access is allowed through a HTTP proxy, it's possible to use
 httptunnel and, say, telnet or PPP to connect to a computer

Description-md5: ed96b7d53407ae311a6c5ef2eb229c3f
Homepage: http://www.nocrew.org/software/httptunnel.html
Tag: implemented-in::c, interface::commandline, interface::daemon,
 network::client, network::server, network::vpn, protocol::http,
 role::program, suite::gnu, use::routing
Section: net
Priority: optional
Filename: pool/main/h/httptunnel/httptunnel_3.3+dfsg-4_amd64.deb

Windows cygwin users can install the tools with:
 

apt-cyg install –yes corkscrew httptunnel


Linux users respectively with:

apt-get install –yes corkscrew httptunnel

or 

yum install -y corkscrew httptunnel


You will then need to have the following configuration in your user home directory $HOME/.ssh/config file
 

Host host-addrs-of-remote-home-ssh-server.com
ProxyCommand /usr/bin/corkscrew your-corporate-firewall-rpoxy-url 8080 %h %p


howto-transfer-ssh-traffic-over-proxy

Picture Copyright by Daniel Haxx

The best picture on how ssh traffic is proxied is the one found on Daniel Haxx's website which is a great quick tutorial which originally helped to get the idea of how corkscrew works in proxying traffic I warmly recommend you take a quick look at his SSH Through or over Proxy article.

Host-addrs-of-remote-home-ssh-server.com could be also and IP if you don't have your own domain name in case if using via some cheap VPN Linux server with SSH, or alternatively
if you don't want to spend money on buying domain for SSH server (assuming you don't have such yet) you can use Dyn DNS or NoIP.

Another thing is to setup the proper http_proxy / https_proxy / ftp_proxy variable exports in $HOME/.bashrc in my setup I have the following:
 

export ftp_proxy="http://your-corporate-firewall-rpoxy-url:8080"
export https_proxy="https://your-corporate-firewall-rpoxy-url:8080"
export http_proxy="http://your-corporate-firewall-rpoxy-url:8080"
export HTTP_PROXY="http://your-corporate-firewall-rpoxy-url:8080"
export HTTPS_PROXY="http://your-corporate-firewall-rpoxy-url:8080"


6. How to Transfer Files / Data via SSH Protocol through  Proxy with SCP and SFTP


Next logical question is how to Transfer your own personal encrypted files (that contains no corporate sensitive information) between your Work laptop and home brew Linux ssh server or cheap VPN.

It took me quite a lot of try-outs until finally I got it how Secure Copy (scp) command can be used toto transfer files between my Work Computer and my Home brew server using JumpHost, here is how:
 

scp -o 'ProxyJump Username@Jumpt-Host-or-IP.com:443' ~/file-or-files-to-copy* Username@home-ssh-server.com:/path/where/to/copy/files


I love using sftp (Secure FTP) command Linux client to copy files and rarely use scp so I have a lot of try-outs to connect interacitvely via the Corporate Proxy server over a Jump-Host:443 to my Destination home machine, 


I've tried using netcat as it was pointed in many articles online, like so to traffic my sftp traffic via my localhost binded SSH Socks proxy on :3128 together with netcat as shown in article prior example, using following line:
 

sftp -oProxyCommand='/bin/nc -X connect -x 127.0.0.1:3128 %h %p' Username@home-ssh-server.com 22


Also tried proxy connect like this:


sftp -o ProxyCommand="proxy-connect -h localhost -p 3128 %h %p" Username@home-ssh-server.com


Moreover, tried to use the ssh  command (-s) argument capability to invoke SSH protocol subsystem feature which is used to facilitiate use of SSH secure transport for other application
 

ssh -v -J hipo@Jump-Host:443 -s sftp root@home-ssh-server.com -v

open failed: administratively prohibited: open failed


Finally decided to give a try to the same options arguments as in scp and thanks God it worked and I can even access via the Corporate Proxy through the Jump Host SSH interactively via Secure FTP 🙂

!! THE FINAL WORKING SFTP THROUGH PROXY VIA SSH JUMPHOST !!
 

sftp -o 'ProxyJump Username@Jumpt-Host-or-IP.com:443' Username@home-ssh-server.com


To save time from typing this long line every time, I've setup the following alias to ~/.bashrc
 

alias sftphome='sftp -o 'ProxyJump Username@Jumpt-Host-or-IP.com:443' Username@home-ssh-server.com'


Conclusion

Of course using own Proxy via your Home brew SSH Machine as well as transferring your data securely from your Work PC (notebook) to Home does not completely make you Surveillance free, as the Corporate Windows installed OS image is perhaps prebundled with its own integrated Keylogger as well as the Windows Domain administrators have certainly access to connect to your PC and run various commands, so this kind of Security is just an attempt to make company has less control and know less on your browsing habits and the best solution where possible to secure your privacy and separate your Personal Space form Work space by using a second computer (if having the ability to work from home) with a KVM Switch device and switch over your Work PC and Home PC via it or in some cases (where companies) allows it, setup something like VNC server (TightVNC / RealVNC) on work PC and leave it all time running in office and connect remotely with vncviewer from your own controlled secured computer.

In article I've explained shortly common scenario found in corporate Work computers proxy setup, designed to Surveil all your move, mentioned few common softwares running by default to protect from Viruses and aimed to Protect user from malicious hacking tools, explained how to view your work notebook configured Proxy, shortly mentioned on Proxy.pac and hinted how to view proxy.pac config as well as gave few of the reasons why all web traffic is being routed over central proxy.

That's all folks, Enjoy the Freedom to be less surveilled !

Creating data backups on Debian and Ubuntu servers with Bacula professional backup tool

Wednesday, April 17th, 2013

Bacula professional GNU Linux Freebsd Netbsd backup software logo with bat

1. Install Bacula Backup System

root@pcfreak:~# apt-cache show bacula |grep -i description -A 5

Description: network backup, recovery and verification – meta-package
 Bacula is a set of programs to manage backup, recovery and verification
 of computer data across a network of computers of different kinds.
 .
 It is efficient and relatively easy to use, while offering many advanced
 storage management features that make it easy to find and recover lost or
 damaged files. Due to its modular design, Bacula is scalable from small
 single computer systems to networks of hundreds of machines.
 .

root@pcfreak:~# apt-get install bacula


Reading package lists… Done
Building dependency tree      
Reading state information… Done
The following extra packages will be installed:
  bacula-client bacula-common bacula-common-sqlite3 bacula-console bacula-director-common bacula-director-sqlite3 bacula-fd bacula-sd
  bacula-sd-sqlite3 bacula-server bacula-traymonitor libsqlite0 mt-st mtx sqlite sqlite3
Suggested packages:
  bacula-doc dds2tar scsitools sg3-utils kde gnome-desktop-environment sqlite-doc sqlite3-doc
The following NEW packages will be installed:
  bacula bacula-client bacula-common bacula-common-sqlite3 bacula-console bacula-director-common bacula-director-sqlite3 bacula-fd bacula-sd
  bacula-sd-sqlite3 bacula-server bacula-traymonitor libsqlite0 mt-st mtx sqlite sqlite3
0 upgraded, 17 newly installed, 0 to remove and 0 not upgraded.
2 not fully installed or removed.
Need to get 2,859 kB of archives.
After this operation, 6,992 kB of additional disk space will be used.
Do you want to continue [Y/n]? Y
Get:1 http://security.debian.org/ squeeze/updates/main bacula-common amd64 5.0.2-2.2+squeeze1 [637 kB]
Get:2 http://security.debian.org/ squeeze/updates/main bacula-common-sqlite3 amd64 5.0.2-2.2+squeeze1 [102 kB]
Get:3 http://security.debian.org/ squeeze/updates/main bacula-console amd64 5.0.2-2.2+squeeze1 [67.6 kB]
Get:4 http://security.debian.org/ squeeze/updates/main bacula-director-common amd64 5.0.2-2.2+squeeze1 [56.6 kB]
Get:5 http://security.debian.org/ squeeze/updates/main bacula-director-sqlite3 amd64 5.0.2-2.2+squeeze1 [308 kB]
Get:6 http://security.debian.org/ squeeze/updates/main bacula-sd amd64 5.0.2-2.2+squeeze1 [459 kB]
Get:7 http://security.debian.org/ squeeze/updates/main bacula-sd-sqlite3 amd64 5.0.2-2.2+squeeze1 [435 kB]
Get:8 http://security.debian.org/ squeeze/updates/main bacula-server all 5.0.2-2.2+squeeze1 [48.5 kB]
Get:9 http://security.debian.org/ squeeze/updates/main bacula-fd amd64 5.0.2-2.2+squeeze1 [124 kB]
Get:10 http://security.debian.org/ squeeze/updates/main bacula-client all 5.0.2-2.2+squeeze1 [48.5 kB]
Get:11 http://security.debian.org/ squeeze/updates/main bacula all 5.0.2-2.2+squeeze1 [1,030 B]
Get:12 http://security.debian.org/ squeeze/updates/main bacula-traymonitor amd64 5.0.2-2.2+squeeze1 [70.0 kB]
Get:13 http://ftp.uk.debian.org/debian/ squeeze/main sqlite3 amd64 3.7.3-1 [100 kB]
Get:14 http://ftp.uk.debian.org/debian/ squeeze/main libsqlite0 amd64 2.8.17-6 [188 kB]
Get:15 http://ftp.uk.debian.org/debian/ squeeze/main sqlite amd64 2.8.17-6 [22.0 kB]
Get:16 http://ftp.uk.debian.org/debian/ squeeze/main mtx amd64 1.3.12-3 [154 kB]
Get:17 http://ftp.uk.debian.org/debian/ squeeze/main mt-st amd64 1.1-4 [35.6 kB]                                                            
Fetched 2,859 kB in 6s (471 kB/s)                                                                                                           
Selecting previously deselected package bacula-common.
(Reading database … 86693 files and directories currently installed.)
Unpacking bacula-common (from …/bacula-common_5.0.2-2.2+squeeze1_amd64.deb) …
Adding user 'bacula'… Ok.
Selecting previously deselected package bacula-common-sqlite3.
Unpacking bacula-common-sqlite3 (from …/bacula-common-sqlite3_5.0.2-2.2+squeeze1_amd64.deb) …
Selecting previously deselected package bacula-console.
Unpacking bacula-console (from …/bacula-console_5.0.2-2.2+squeeze1_amd64.deb) …
Processing triggers for man-db …
Setting up bacula-common (5.0.2-2.2+squeeze1) …
Selecting previously deselected package bacula-director-common.
(Reading database … 86860 files and directories currently installed.)
Unpacking bacula-director-common (from …/bacula-director-common_5.0.2-2.2+squeeze1_amd64.deb) …
Selecting previously deselected package sqlite3.
Unpacking sqlite3 (from …/sqlite3_3.7.3-1_amd64.deb) …
Selecting previously deselected package libsqlite0.
Unpacking libsqlite0 (from …/libsqlite0_2.8.17-6_amd64.deb) …
Selecting previously deselected package sqlite.
Unpacking sqlite (from …/sqlite_2.8.17-6_amd64.deb) …
Selecting previously deselected package bacula-director-sqlite3.
Unpacking bacula-director-sqlite3 (from …/bacula-director-sqlite3_5.0.2-2.2+squeeze1_amd64.deb) …
Selecting previously deselected package mtx.
Unpacking mtx (from …/mtx_1.3.12-3_amd64.deb) …
Selecting previously deselected package bacula-sd.
Unpacking bacula-sd (from …/bacula-sd_5.0.2-2.2+squeeze1_amd64.deb) …
Selecting previously deselected package bacula-sd-sqlite3.
Unpacking bacula-sd-sqlite3 (from …/bacula-sd-sqlite3_5.0.2-2.2+squeeze1_amd64.deb) …
Selecting previously deselected package bacula-server.
Unpacking bacula-server (from …/bacula-server_5.0.2-2.2+squeeze1_all.deb) …
Selecting previously deselected package bacula-fd.
Unpacking bacula-fd (from …/bacula-fd_5.0.2-2.2+squeeze1_amd64.deb) …
Selecting previously deselected package bacula-client.
Unpacking bacula-client (from …/bacula-client_5.0.2-2.2+squeeze1_all.deb) …
Selecting previously deselected package bacula.
Unpacking bacula (from …/bacula_5.0.2-2.2+squeeze1_all.deb) …
Selecting previously deselected package bacula-traymonitor.
Unpacking bacula-traymonitor (from …/bacula-traymonitor_5.0.2-2.2+squeeze1_amd64.deb) …
Selecting previously deselected package mt-st.
Unpacking mt-st (from …/archives/mt-st_1.1-4_amd64.deb) …
Processing triggers for man-db …
Setting up acct (6.5.4-2.1) …
Setting up bacula-director-common (5.0.2-2.2+squeeze1) …
Setting up bacula-director-sqlite3 (5.0.2-2.2+squeeze1) …
config: Running dbc_go bacula-director-sqlite3 configure
Stopping Bacula Director…:.
 *** Checking type of existing DB at /var/lib/bacula/bacula.db: None
 *** Will create new database at this location.
dbconfig-common: writing config to /etc/dbconfig-common/bacula-director-sqlite3.conf

Creating config file /etc/dbconfig-common/bacula-director-sqlite3.conf with new version
creating database bacula.db: success.
verifying database bacula.db exists: success.
populating database via sql…  done.
Processing configuration…Ok.
Starting Bacula Director…:.
Setting up bacula-sd (5.0.2-2.2+squeeze1) …
Starting Bacula Storage daemon…:.
Setting up acct (6.5.4-2.1) …
insserv: warning: script 'K02courier-imap' missing LSB tags and overrides
insserv: script iptables: service skeleton already provided!
insserv: warning: script 'courier-imap' missing LSB tags and overrides
Turning on process accounting, file set to '/var/log/account/pacct'.
Done..
Setting up bacula-sd-sqlite3 (5.0.2-2.2+squeeze1) …
Setting up bacula-server (5.0.2-2.2+squeeze1) …
Setting up bacula-fd (5.0.2-2.2+squeeze1) …
Starting Bacula File daemon…:.
Setting up bacula-client (5.0.2-2.2+squeeze1) …
Setting up bacula (5.0.2-2.2+squeeze1) …
Setting up proftpd-basic (1.3.3a-6squeeze6) …
Starting ftp server: proftpd.
Setting up mt-st (1.1-4) …
update-alternatives: using /bin/mt-st to provide /bin/mt (mt) in auto mode.


Once installed you will have 3 processes running in background used by Bacula backup system (bacula-dir, bacula-sd and bacula-fd)
root@pcfreak:~# ps ax |grep -i bacula|grep -v grep
6044 ? Ssl 0:00 /usr/sbin/bacula-dir -c /etc/bacula/bacula-dir.conf -u bacula -g bacula
6089 ? Ssl 0:00 /usr/sbin/bacula-sd -c /etc/bacula/bacula-sd.conf -u bacula -g tape
6167 ? Ssl 0:00 /usr/sbin/bacula-fd -c /etc/bacula/bacula-fd.conf

Here is what each of them does:

a) Bacula-dir or Bacula-Director is main Bacula Backup system component. Bacula-dir controls the whole backup system and the various other 2 daemons Bacula-FD and  Bacula-SD.

b) Bacula-fd – (Bacula File Daemon) acts as the interface between  Bacula network backup system and the filesystems to be backed up:  it  is  responsible for   reading/writing/verifying the files to be  backup'd/verified/restored. Network transfer can optionally be compressed.

c) Bacula-sd – (Bacula Storage Daemon) acts as interface between Bacula network backup system and Tape Drive or filesystem where backups will be stored

Each of 3 processes bacula-dir, bacula-fd and bacula-sd has their own init script in /etc/rc.d/, e.g.:

# /etc/init.d/bacula-directory
# /etc/init.d/bacula-fd
# /etc/init.d/bacula-sd

2. Configuring Bacula Backup System

Configuring Bacula is done via configuration files located in /etc/bacula

root@pcfreak:~# cd /etc/bacula
root@pcfreak:/etc/bacula# ls -1
bacula-dir.conf
bacula-fd.conf
bacula-fd.conf.dist
bacula-sd.conf
bacula-sd.conf.dist
bconsole.conf
common_default_passwords
scripts/
tray-monitor.conf

3. Defining what needs to be backed up

Here is a short description of most important configuration blocks in Bacula's main config bacula-dir.conf
 

1.Director resource defines the Director’s parameters. Name, Password, WorkingDirectory, and PidDirectory must be set. QueryFile specifies where the Director can find the SQL queries.

2.Job defines a backup or restore to perform. You will need at least one job per client. To simplify configuration of similar clients, create a common JobDefs resource and refer to it from within a Job. For example, if you have one set of defaults for desktops and another set for servers, you can create a Desktop and Server (these names are arbitrary and set with the Name attribute) JobDefs and refer to those two collections of settings from a Job.

3. Schedule resource is referred to within a Job to allow it to occur automatically.

4. FileSet resource defines which files are to be backed up. You can both Include and Exclude files.

5.Each Client resource details the clients that this Director can back up.

6.Storage resource specifies the storage daemon available to the Director.

7.Pool identifies a set of storage volumes (tapes/files) that Bacula can write data to. Each Pool can be configured to use different sets of tapes for different jobs.

8.Catalog resource defines Bacula catalog (database) to be used.

9. Messages resource captures where to send messages and which messages to send.
 

a) Defining directories to be backed up

Defining what needs to be backed up is done through bacula-dir.conf ( /etc/bacula/bacula-dir.conf ). In the file there is a FileSet section, where dirs to backed up have to be included, below config defines to backup /usr/sbin, /etc/, /root, /usr and /var directories
 

# List of files to be backed up
FileSet {
  Name = "Full Set"
  Include {
    Options {
      signature = MD5
    }
#   
#  Put your list of files here, preceded by 'File =', one per line
#    or include an external list with:
#
#    File = <file-name
#
#  Note: / backs up everything on the root partition.
#    if you have other partitions such as /usr or /home
#    you will probably want to add them too.
#
#  By default this is defined to point to the Bacula binary
#    directory to give a reasonable FileSet to backup to
#    disk storage during initial testing.
#
    File = /usr/sbin
    File = /root
    File = /etc
    File = /usr
    File = /var

  }

b) Defining where to store back ups

All configuration of where Bacula will store created backups is done through /etc/bacula/bacula-sd.conf

There are few configurations that needs to be tuned according to custom user purposes, below I paste them from config:
 

Storage {                             # definition of myself
  Name = pcfreak-sd
  SDPort = 9103                  # Director's port     
  WorkingDirectory = "/var/lib/bacula"
  Pid Directory = "/var/run/bacula"
  Maximum Concurrent Jobs = 20
  SDAddress = 127.0.0.1
}

Device {
  Name = FileStorage
  Media Type = File
  Archive Device = /nonexistant/path/to/file/archive/dir
  LabelMedia = yes;                   # lets Bacula label unlabeled media
  Random Access = Yes;
  AutomaticMount = yes;               # when device opened, read it
  RemovableMedia = no;
  AlwaysOpen = no;
}

Messages {
  Name = Standard
  director = pcfreak-dir = all

}


Storage sets working directory where temporary backups are created on backup creation time – default is /var/lib/bacula

Device – defines exact directory where backups will be stored after created – usually this is a directory with  mounted hard disk specially for backups. Bacula default is /nonexistant/path/to/file/archive/dir

Messages – configures where and what kind of messages are send on bacula operations

c) Configuring Bacula to create backups via network

Configuring where Bacula will act just on server localhost, or will bind and be visible to store backups via network IP is done from Bacula-FD (Bacula File Daemon).

By default it listens to localhost127.0.0.1. Bacula-FD configurations are done from /etc/bacula/bacula-fd.conf. Most important section configuring where bacula listens is named FileDaemon.
 

#
# "Global" File daemon configuration specifications
#
FileDaemon {                          # this is me
  Name = pcfreak-fd
  FDport = 9102                  # where we listen for the director
  WorkingDirectory = /var/lib/bacula
  Pid Directory = /var/run/bacula
  Maximum Concurrent Jobs = 20
  FDAddress = 127.0.0.1
}


By commenting FDAddress, Bacula will automatically listen to external IP configured on lan interface eth0

4. Managing Bacula Command Line Interfa – bconsole

Managing bacula interactively is done through bconsole (Bacula's Management Console) command.

root@pcfreak:~# bconsole

Connecting to Director localhost:9101
1000 OK: pcfreak-dir Version: 5.0.2 (28 April 2010)
Enter a period to cancel a command.
*
*help
  Command       Description
  =======       ===========
  add           Add media to a pool
  autodisplay   Autodisplay console messages
  automount     Automount after label
  cancel        Cancel a job
  create        Create DB Pool from resource
  delete        Delete volume, pool or job
  disable       Disable a job
  enable        Enable a job
  estimate      Performs FileSet estimate, listing gives full listing
  exit          Terminate Bconsole session
  gui           Non-interactive gui mode
  help          Print help on specific command
  label         Label a tape
  list          List objects from catalog
  llist         Full or long list like list command
  messages      Display pending messages
  memory        Print current memory usage
  mount         Mount storage
  prune         Prune expired records from catalog
  purge         Purge records from catalog
  python        Python control commands
  quit          Terminate Bconsole session
  query         Query catalog
  restore       Restore files
  relabel       Relabel a tape
  release       Release storage
  reload        Reload conf file
  run           Run a job
  status        Report status
  setdebug      Sets debug level
  setip         Sets new client address — if authorized
  show          Show resource records
  sqlquery      Use SQL to query catalog
  time          Print current time
  trace         Turn on/off trace to file
  unmount       Unmount storage
  umount        Umount – for old-time Unix guys, see unmount
  update        Update volume, pool or stats
  use           Use catalog xxx
  var           Does variable expansion
  version       Print Director version
  wait          Wait until no jobs are running

When at a prompt, entering a period cancels the command.

You have messages.
*
 

On run bconsole launches another service bacula-console.

root@pcfreak:~# ps ax |grep -i bacula-console|grep -v grep 13959 pts/5 Sl+ 0:00 /usr/sbin/bacula-console -c /etc/bacula/bconsole.conf

There are 4 tcp/ip ports via which communication between Bacula processes is done;

a) Communication from bconsole to Bacula is throigh Port Number 9101
b) Communication from bacula-dir to bacula-sd is done using Port Number 9103
c) bacula-dir to bacula-fd talks via Port Number 9102
d) Messages between Bacula-fd to bacula-sd is via port num 9103

Both of 4 ports are only listening on (127.0.0.1) / localhost and thus there is no security risk from external malicious users to enter Bacula remotely.

a) some essential commands while in bconsole shell

*show pools
Pool: name=Default PoolType=Backup
      use_cat=1 use_once=0 cat_files=1
      max_vols=0 auto_prune=1 VolRetention=1 year
      VolUse=0 secs recycle=1 LabelFormat=*None*
      CleaningPrefix=*None* LabelType=0
      RecyleOldest=0 PurgeOldest=0 ActionOnPurge=0
      MaxVolJobs=0 MaxVolFiles=0 MaxVolBytes=0
      MigTime=0 secs MigHiBytes=0 MigLoBytes=0
      JobRetention=0 secs FileRetention=0 secs
Pool: name=File PoolType=Backup
      use_cat=1 use_once=0 cat_files=1
      max_vols=100 auto_prune=1 VolRetention=1 year
      VolUse=0 secs recycle=1 LabelFormat=*None*
      CleaningPrefix=*None* LabelType=0
      RecyleOldest=0 PurgeOldest=0 ActionOnPurge=0
      MaxVolJobs=0 MaxVolFiles=0 MaxVolBytes=53687091200
      MigTime=0 secs MigHiBytes=0 MigLoBytes=0
      JobRetention=0 secs FileRetention=0 secs
Pool: name=Scratch PoolType=Backup
      use_cat=1 use_once=0 cat_files=1
      max_vols=0 auto_prune=1 VolRetention=1 year
      VolUse=0 secs recycle=1 LabelFormat=*None*
      CleaningPrefix=*None* LabelType=0
      RecyleOldest=0 PurgeOldest=0 ActionOnPurge=0
      MaxVolJobs=0 MaxVolFiles=0 MaxVolBytes=0
      MigTime=0 secs MigHiBytes=0 MigLoBytes=0
      JobRetention=0 secs FileRetention=0 secs
You have messages.

*status
Status available for:
     1: Director
     2: Storage
     3: Client
     4: All
Select daemon type for status (1-4):

*label
Automatically selected Catalog: MyCatalog
Using Catalog "MyCatalog"
Automatically selected Storage: File
Enter new Volume name:

*messages

b) Restoring Backups with bconsole

Restoring from backups is done with restore command

*restore
Automatically selected Catalog: MyCatalog
Using Catalog "MyCatalog"

First you select one or more JobIds that contain files
to be restored. You will be presented several methods
of specifying the JobIds. Then you will be allowed to
select which files from those JobIds are to be restored.

To select the JobIds, you have the following choices:
     1: List last 20 Jobs run
     2: List Jobs where a given File is saved
     3: Enter list of comma separated JobIds to select
     4: Enter SQL list command
     5: Select the most recent backup for a client
     6: Select backup for a client before a specified time
     7: Enter a list of files to restore
     8: Enter a list of files to restore before a specified time
     9: Find the JobIds of the most recent backup for a client
    10: Find the JobIds for a backup for a client before a specified time
    11: Enter a list of directories to restore for found JobIds
    12: Select full restore to a specified Job date
    13: Cancel
Select item:  (1-13):


Bacula can create backups on Tapes as well as tapes are still heavily used for backing data in some Banks, airports and other organizations where data is crucial.

Bacula is not among the easiest systems to create backups but for Backup administrators who work with Linux and FreeBSD it is great. Its scalability allows to make a very robust and complex backupping scheme which are hardly achievalable with other less professional backup tools like rsnapshot or rsync.
 

How to set repository to install binary packages on amd64 FreeBSD 9.1

Friday, January 11th, 2013

Though, it is always good idea to build from source for better performance of Apache + MySQL + PHP, its not worthy the time on installing minor things like; trafshow, tcpdump or deco (MC – midnight commander like native freebsd BSD program).

If you're on a 64 bit version of FreeBSD ( amd64) 9.1 and you try to install a binary package with;

freebsd# pkg_add -vr vim

Ending up with an error;

Error: Unable to get ftp://ftp.freebsd.org/pub/FreeBSD/ports/amd64/packages-9.1-release/Latest/vim.tbz: File unavailable (e.g., file not found, no access)
pkg_add: unable to fetch 'ftp://ftp.freebsd.org/pub/FreeBSD/ports/amd64/packages-9.1-release/Latest/vim.tbz' by URL
pkg_add: 1 package addition(s) failed

The error is caused by lack of special packages-9.1-release directory existing on FreeBSD.org servers. I've realized this after doing a quick manual check opening ftp://ftp.freebsd.org/pub/FreeBSD/ports/amd64. The existing URL containing working fbsd 9.1 binaries is:

ftp://ftp.freebsd.org/pub/FreeBSD/ports/amd64/packages-9-current/Latest/
h

You will have to set a repository for FreeBSD 9.1 amd64 packages manually with cmd:
freebsd# echo $SHELL
/bin/csh
freebsd# setenv PACKAGESITE ftp://ftp.freebsd.org/pub/FreeBSD/ports/amd64/packages-9-current/Latest/

If you're on bash shell use export instead:

freebsd# export PACKAGESITE="ftp://ftp.freebsd.org/pub/FreeBSD/ports/amd64/packages-9-current/Latest/"

To make ftp://ftp.freebsd.org/pub/FreeBSD/ports/amd64/packages-9-current/Latest/ as a permanent binary repository:

echo 'setenv PACKAGESITE ftp://ftp.freebsd.org/pub/FreeBSD/ports/amd64/packages-9-current/Latest/' >> /root/.cshrc

or

echo 'export PACKAGESITE="ftp://ftp.freebsd.org/pub/FreeBSD/ports/amd64/packages-9-current/Latest/"' >> /root/.bashrc

Now, pkg_add as much as you like 😉

Pc-Freak 2 days Downtime / Debian Linux Squeeze 32 bit i386 to amd64 hell / Expression of my great Thanks to Alex and my Sister

Tuesday, October 16th, 2012

Debian upgrade Squeeze Linux from 32 to 64 problems, don't try do it except you have physical access !!!

Recently for some UNKNOWN to ME reasons New Pc-Freak computer hardware crashed 2 times over last 2 weeks time, this was completely unexpected especially after the huge hardware upgrade of the system. Currently the system is equipped with 8GB of memory a a nice Dual Core Intel CPU running on CPU speed of 6 GHZ, however for completely unknown to me reasons it continued experience outages and mysteriously hang ups ….

So far I didn’t have the time to put some few documentary pictures of PC hardware on which this blog and the the rest of sites and shell access is running so I will use this post to do this as well:

Below I include a picture for sake of History preservation 🙂 of Old Pc-Freak hardware running on IBM ThinkCentre (1GB Memory, 3Ghz Intel CPU and 80 GB HDD):

IBM Desktop ThinkCentre old pc-freak hardware server PC

The old FreeBSD powered Pc-Freak IBM ThinkCentre

Here are 2 photos of new hardware host running on Lenovo ThinCentre Edge:

New Pc-Freak host hardware lenovo ThinkEdge Photo
New Pc-Freak host hardware Lenovo ThinkEdge Camera Photo
My guess was those unsual “freezes” were caused due to momentum overloads of WebServer or MySQL db.
Actually the Linux Squeeze installed was “stupidly” installed with a 32 bit Debian Linux (by me). I did that stupidity, just few weeks ago, when I moved every data content (SQL, Apache config, Qmail accounts, Shell accounts etc. etc.) from old Pc-Freak computer to the new purchased one.

After finding out I have improperly installed (being in a hurry) – 32 Bit system, I’ve Upgrade only the system 32 bit kernel hich doesn’t support well more than 4GB to an amd64 one supporting up to 64GB of memory – if interested I’ve prior blogged on this here.
Thanks to my dear friend Alexander (who in this case should have a title similar to Alexander the Great – for he did great and not let me down being there in such a difficult moment for me spending from his personal time helping me bringing up Pc-Freak.Net. To find a bit more about Alex you might check his personal home page hosted on www.pc-freak.net too here 🙂
I don’t exaggerate, really Alex did a lot for me and this is maybe the 10th time I disturb him over the last 2 years, so I owe him a lot ! Alex – I really owe you a lot bro – thanks for your great efforts; thanks for going home 3 times for just to days, thanks for recording Rescue CDs, staying at home until 2 A.M. and really thanks for all!!

Just to mention again, to let me via Secure Shell, Alex burned and booted for me Debian Linux Rescue Live CD downloaded from linke here.

This time I messed my tiny little home hosted server, very very badly!!! Those of you who might read my blog or have SSH accounts on Pc-Freak.NET, already should have figured out Pc-Freak.net was down for about 2 days time (48 HOURS!!!!).

The exact “official” downtime period was:

Saturday OCTOBER 13!!!( from around 16:00 o’clock – I’m not fatalist but this 13th was really a harsh date) until Monday 15-th of Oct (14:00h) ….

I’m completely in charge and responsible for the 2 days down time, and honestly I had one of my worst life days, so far. The whole SHIT story occurred after I attempted to do a 32 bit (i386) to AMD64 (64 bit) system packages deb binary upgrade; host is installed to run Debian Squeeze 6.0.5 ….; Note to make here is Officially according to documentation package binary upgrades from 32 bit to 64 arch Debian Linux are not possible!. Official debian.org documentation recommended for 32 bit to 64 packs update (back up all system existent data) and do a clean CD install / re-install, over the old installed 32 bit version. However ignoring the official documentation, being unwise and stubborn, I decided to try to anyways upgrading using those Dutch person guide … !!!

I’ve literally followed above Dutch guy, steps and instead of succeeding 64 bit update, after few of the steps outlined in his article the node completely (libc – library to which all libraries are linked) broke up. Then trying to fix those amd64 libc, I tried re-installing coreutils package part of base-files – basis libs and bins deb;
I’ve followed few tutorials (found on the next instructing on the 32bit to 64 bit upgrade), combined chunks from them, reloaded libc in a live system !!! (DON’T TRY THAT EVER!); then by mistake during update deleted coreutils package!!!, leaving myself without even essential command tools like /bin/ls , /bin/cp etc. etc. ….. And finally very much (in my fashion) to make the mess complete I decided to restart the system in those state without /bin/ls and all essential /bins ….
Instead of making things better I made the system completely un-bootable 🙁

Well to conclude it, here I am once again I stupid enough not to follow the System Administrator Golden Rule of Thumb:

IF SOMETHING WORKS DON’T TOUCH IT !!!!!!!!! EVER !!!!, cause of my stubbornness I screw it up all so badly.
I should really take some moral from this event, as similar stories has happened to me long time ago on few Fedora Linux hosts on productive Web servers, and I went through all this upgrades nightmare but apparently learned nothing from it. My personal moral out of the story is I NEVER LEARN FROM MY MISTAKES!!! PFFF …

I haven’t had days like this in which I was totally down, for a very long time, really I fell in severe desperation and even depressed, after un-abling to access in any way Pc-Freak.NET, I even thought it will be un-fixable forever and I will loose all data on the host and this deeply saddened me.
Here is good time to Give thanks to Svetlana (Sveta) (A lovely kind, very beautiful Belarusian lady 🙂 who supported me and Sali and his wife Mimi (Meleha) who encouraged and lived up my hardly bearable tempper when angry or/and sad :)). Lastly I have to thank a lot to Happy (Indian Lady whose whose my dear indian brother Jose met me with in Skype earlier. Happy encouraged me in many times of trouble in Skype, giving me wise advices not to take all so serious and be more confied, also most importantly Happy helped me with her prayers …. Probably many others to which I complained about situation helped with their prayers too – Thanks to to God and to all and let God return them blessing according to their good prayers for me !

Some people who know me well might know Pc-Freak.Net Linux host has very sentimental value for me and even though it doesn’t host too much websites (only 38 sites not so important ones ), still it is very bad to know your “work input” which you worked on in your spare time over the last 3 years (including my BLOG – blogging almost every day for last 3 yrs, the public shell SSH access for my Friends, custom Qmail Mail server / POP3 and IMAP services / SQL data etc. might not be lost forever. Or in more positive better scenario could be down for huge period of time like few months until I go home and fix it physically on phys terminal …

All this downtime mess occurred due to my own inability to estimate properly update risks (obviously showing how bad I’m in risk management …). Whole “down time story”” proofed me only, I have a lot to learn in life and worry less about things ….
It also show me how much of an “idol”, one can make some kind of object of daily works as www.pc-freak.net become to me. Good thing is I at least realize my blog has with time, become like an idol to me as I’m mostly busy with it and in a way too much worrying for it makes me fill up in the gap “worshipping an idol” and each Christian knows pretty well, God tells us: “Do not have other Gods besides me”.

I suppose this whole mess was allowed to happen by God’s Great Mercy to show me how weak my faith is, and how often I put my personal interest on top of real important things. Whole situation teached me, once again I easy fall in spirit and despair; hope it is a lesson given to me I will learn from and next time I will be more solid in critical situation …

Here are some of my thoughts on the downtime, as I felt obliged to express them too;

Whole problem severeness (in my mind), would not be so bad if I only had some kind of physical access to System terminal. However as I’m currently in Arnhem Holland 6500 kilometers away from the Server (hosted in Dobrich, Bulgaria), don’t have access to IPKVM or any kind of web management to act on the physical keyboard input, my only option was to ask Alex go home and tell him act as a pro tech support which though I repeat myself I will say again, he did great.
What made this whole downtime mess even worser in my distorted vision on situation is, fact; I don’t know people who are Linux GURUs who can deal with the situation and fix the host without me being physically there, so this even exaggerated me worrying it even more …

I’m relatively poor person and I couldn’t easily afford to buy a flight ticket back to Bulgaria which in best case as I checked today in WizzAir.com’s website would costs me about 90EUR (at best – just one way flight ticket ) to Sofia and then more 17 euro for bus ticket from Sofia to Dobrich; Meaning whole repair costs would be no less than 250 EUR with prince included train ticket expenses to Eindhoven.);

Therefore obviously traveling back to fix it on physical console was not an option.
Some other options I considered (as adviced by Sveta), was hiring some (pro sysadm to fix the host) – here I should say it is almost impossible to find person in Dobrich who has the Linux knowledge to fix the system; moreover Linux system administrators are so expensive these days. Most pro sysadmins will not bother to fix the host if not being paid hour – fee of at least 40 / 50 EUR. Obviously therefore hiring a professional UNIX system adminsitrator to solve my system issues would have cost approximately equal to travel expenses of myself, if going physically to the computer; spend the same 5 hours fixing it and loose at least 2 or 3 more days in traveling back to Holland …..
Also it is good to mention on the system, I’ve done a lot of custom things, which an external hired person will be hardly possible to deal with, without my further interference and even if I had hired someone to fix it I would have spend at least 50 euro on Phone Bills to explain specifics ….

As I was in the shit, I should thanks in this post also (on first place) to MY DEAR SISTER Stanimira !!! My sis was smart enough to call my dear friend Alexander (Alex), who as always didn’t fail me – for a 3rd time BIG THANKS ALEX !, spending time and having desire to help me at this critical times. I instructed him as a first step to try loading on the unbootable linux, the usual boot-able Debian Squeeze Install LiveCD….
So far so good, but unfortunately with this bootable CD, the problem is Debian Setup (Install) CD does not come equipped with SSHD (SSH Server) by default and hence I can’t just get in via Internet;
I’ve searched through the net if there is a way to make the default Debian Install CD1 (.iso) recovery CD to have openssh-server enabled, but couldn’t find anyone explainig how ?? If there is some way and someone reading this post knows it please drop a comment ….

As some might know Debian Setup CD is running as its basis environment busybox; system tools there provided whether choosing boot the Recovery Console are good mostly for installing or re-installing Debian, but doesn’t include any way to allow one to do remote system recovery over SSH connection.

Further on, have instructed Alex, brought up the Network Interfacse on the system with ifconfig using cmds:


# /sbin/ifconfig MY_IP netmask 255.255.255.240
# /sbin/route add default gw MY_GATEWAY_IP;

BTW, I have previously blogged on how to bring network interfaces with ifconfig here
Though the LAN Interfaces were up after that and I could ping ($ ping www.pc-freak.net) this was of not much use, as I couldn’t log in. Neither somehow can access system in a chroot.
I did thoroughfully explained Alex, how to fix the un-chroot-table badly broken (mounted) system. ….
In order to have accessed the system via SSH, after a bit of research I’ve asked Alex to download and boot from the CD Drive Debian Linux based AMD64 Rescue CD available here ….

Using this much better rescue CD than default Debian Install CD1, thanks God, Alex was able to bring up a working sshd server.

To let me access the rescue CD, Alex changed root pass to a trivial one with usual:


# passwd root
....

Then finally I logged in on host via ssh. Since chroot over the mounted /vev/sda1 in /tmp/aaa was impossible due to a missing working /bin/bash – Here just try imagine how messed up this system was!!!, I asked Alex to copy over the basic system files from the Rescue CD with cp copy command within /tmp/aaa/. The commands I asked him to execute to override some of the old messed up Linux files were:


# cp -rpf /lib/* /tmp/aaa/lib
# cp -rpf /usr/lib/* /tmp/aaa/usr/lib
# cp -rpf /lib32/* /tmp/aaa/lib32
# cp -rpf /bin/* /tmp/aaa/bin
# cp -rpf /usr/lib64/* /tmp/aaa/usr/lib64
# cp -rpf /sbin/* /tmp/aaa/sbin
# cp -rpf /usr/sbin/* /tmp/aaa/usr/sbin

After this at least chroot /tmp/aaa worked!! Thanks God!

I also said Alex to try bootstrap to install a base debian system files inside the broken /tmp/aaa, but this didn’t make things better (so I’m not sure if debootstrap helped or made things worse)??. Exact bootstrap command tried on the host was:


# debootstrap --arch amd64 squeeze /tmp/aaa http://ftp.us.debian.org/debian

This command as explained in Debian Wiki Debootstrap section is supposed to download and override basis Linux system with working base bins and libs.

After I logged in over ssh, I’ve entered chroot-ing and following instructions of 2 of my previous articles:

1. How to do proper chroot and recover broken Ubuntu using mount and chrooting

2. How to mount /proc and /dev and in chroot on Linux – for fail system recovery

Next on, after logging in via ssh I chrooted to mounted system;


# mount /dev/sda1 /mnt/aaa
# chroot /mnt/aaa

Inside chrooted environment, I tried running ssh server, listen on separate port 2208 with command:


# /usr/sbin/sshd -p 2208

sshd did not start up but spitted mer error: PRNG is not seeded, after reading a bit online I’ve found others experiencing PRNG is not seeded err in thread here

The PRNG is not seeded error is caused due to a missing /dev/urandom inside the chroot-ed environment:


# ls -al /dev/urandom
ls: cannot access /dev/urandom: No such file or directory

To solve it, one has to create /dev/urandom with mknod command:


# mknod /dev/urandom c 1 9

….

Something else worthy to mention is very helpful post found on noah.org explaining few basic things on apt, aptitude and dpkg which helped me over the whole severe failed dependency apt-get issues experienced inside chroot.

Inside the chroot, I tried using few usual apt-get cmds to solve the multiple appearing broken packages inter-dependency. I tried:


# apt-get update
....
# apt-get --yes upgrade
# apt-get -f install

Even before that apt, package was broken, so I instructed Alex, to download me one from a web link. By mistake I gave him, a Debian Etch apt version instead of Debian Squeze. So using once again dpkg -i apt* after downloading the latest stable apt deb binaries from debian.org, I had to re-install apt-get…

Besides that Alex, had copied a bunch of libraries, straight copied from my notebook running amd64 Debian Squeeze and has to place all this transferred binaries in /mnt/aaa/{lib,usr/lib} in order to solve missing libraries for proper apt-get operation.

As it seemed slightly impossible fix the broken dependencies with apt-get, I first tried fixing failed inter-dependencies using the other automated dependency solver tool (written in perl language) aptitude. I tried with it solving the situation issuing:


# aptitute update
# aptitude safe-upgrade
# aptitude safe-upgrade --full-resolver

No of the above aptitude command options helped anyhow, so
I’ve decided to try the old but gold approach of combining common logic with a bit of shell scripting 🙂
Here is my customly invented approach 🙂 :

1. Inside the chroot, make a dump of all installed deb packages names in a file
2. Outside the chroot straight ssh-ing again to the Rescucd shell, use RescueCD apt-get to only download all amd64 binaries corresponding to dumped packages names
3. Move all downloaded only apt-get binaries from /var/cache/apt/archives to /mnt/aaa/var/cache/apt/archives
4. Inside chroot, run cd to /var/cache/apt/archives/ and use for bash loop to install each package with dpkg -i

Inside Chroot-ed environment chroot /tmp/aaa, dpkg – to dump list of all installed i386 previous packages on broken system:


# dpkg -l|awk '{ print $2 }' >> /mnt/aaa/root/all_deb_packages_list.txt

Thereon, I delete first 5 lines in beginning of file (2 empty lines) and 3 lines with content:


Status=Not/Inst/Conf-files/Unpacked/halF-conf/Half-inst/trig-aWait/Trig-pend
Err?=(none)/Reinst-required
Name

should be deleted.

Onwards outside of chroot-ed env, I downloaded all deb packages corresponding to previous ones in all_deb_packges.txt:


# mkdir /tmp/apt
# cd /tmp/apt
# for i in $(cat /mnt/aaa/root/all_deb_packages.txt; do \
apt-get --download-only install -yy $i \
....
.....
done

In a while after 30 / 40 minutes all amd64 .deb packages were downloaded in rescuecd /var/cache/apt/archives/.
/var/cache/apt/archives/ in LiveCDs is stored in system memory, thanksfully I have 8 Gigabytes of memory on the host so memory was more than enough to store all packs 😉
Once above loop, completed. I copied all debs to /mnt/aaa/var/cache/apt, i.e.:


# cp -vrpf /var/cache/apt/archives/*.deb /mnt/aaa/var/cache/apt/archives/

Then back in the (chroot-ed broken system), in another ssh session chroot /mnt/aaa, I run another shell loop aim-ing to install each copied deb package (below command should run after chroot-ing):


# cd /var/cache/apt/archives
# for i in *.deb; do \
dpkg -i $i
done

I had on the system installed Qmail server which was previously linked against old 32 bit installed libs, so in my case was also necessery rebuild qmail install as well as ucsp-tcp and ucsp-ssl, after rebooting and booting the finally working amd64 libs system (after reboot and proper boot!):

a) to Re-compile qmail base binaries, had to issue:


# qmailctl stop
# cd /usr/src/qmail
# make clean
# make man
# make setup check

b) to re-compile ucspi-tcp and ucspi-ssl:


# rm -rf /packages/ucspi-ssl-0.70.2/
#mkdir /packages
# chmod 1755 /packages
# cd /tmp
# tar -zxvf /downloads/ucspi-ssl-0.70.2.tar.gz
....
# mv /tmp/host/superscript.com/net/ucspi-ssl-0.70.2/ /packages
# cd /packages/ucspi-ssl-0.70.2/
# rm -rf /tmp/host/
# sed -i 's/local\///' src/conf-tcpbin
# sed -i 's/usr\/local/etc/' src/conf-cadir
# sed -i 's/usr\/local\/ssl\/pem/etc\/ssl/' src/conf-dhfile
# openssl dhparam -check -text -5 1024 -out /etc/ssl/dh1024.pem

Then had to stop temporary daemontools service, through commenting line in /etc/inittab:


# SV:123456:respawn:/usr/bin/svscanboot


# init q

After that remove commented line:


SV:123456:respawn:/usr/bin/svscanboot

and consequentually install ucsp-{tcp,ssl}:


# cd /packages/ucspi-ssl-0.70.2/
# package/compile
# package/rts
# package/install

c) Rebuild Courier-Imap and CourierImapSSL

As I have custom compiled Courier-IMAP and Courier-IMAPSSL it was necessery to rebuild Courier-imaps following steps earlier explained in this article

I have on the system running DjbDNS as local caching server so I had to also re-install djbdns, re-compiling it from source

Finally after restart the system booted OKAY!! Thanks God!!!!!! 🙂
Further on to check the boot-ed system runs 64 bit architecture dpkg should be used
To check if the system architecture is 64 now 64 bit, there is a command dpkg-architecture, as I learned from superuser.com forums thread here


root@pcfreak:~# dpkg-architecture -qDEB_HOST_ARCH
amd64

One more thing, which helped me a lot during the whole system recovery was main Debian deb HTTP repositories ftp.us.debian.org/debian/pool/ , I’ve downloaded apt (amd64 Squeeze) version and few other packages from there.
Hope this article helps someone who end up in 32 to 64 bit debian arch upgrade. Enjoy 🙂

How to solve qmail /usr/local/bin/tcpserver: libc.so.6: failed to map segment from shared object: Cannot allocate memory

Saturday, April 30th, 2011

If you’re building (compiling) a new qmail server on some Linux host and after properly installing the qmail binaries and daemontools, suddenly you notice in readproctitle service errors: or somewhere in in qmail logs for instance in/var/log/qmail/current the error:

/usr/local/bin/tcpserver: error while loading shared libraries:
libc.so.6: failed to map segment from shared object: Cannot allocate memory

then you have hit a bug caused by insufficient memory assigned for tcpserver in your /var/qmail/supervise/qmail-smtpd/run daemontools qmail-smtpd initialize script:

This kind of issue is quite common especially on hardware architectures that are 64 bit and on Linux installations that are amd65 (x86_64) e.g. run 64 bit version of Linux.

It relates to the 64 bit architecture different memory distribution and thus as I said to solve requires increase in memory softlimit specified in the run script an example good qmail-smtpd run script configuration which fixed the libc.so.6: failed to map segment from shared object: Cannot allocate memory I use currently is as follows:

#!/bin/shQMAILDUID=`id -u vpopmail`NOFILESGID=`id -g vpopmail`MAXSMTPD=`cat /var/qmail/control/concurrencyincoming`# softlimit changed from 8000000exec /usr/local/bin/softlimit -m 32000000 /usr/local/bin/tcpserver -v -H -R -l 0 -x /home/vpopmail/etc/tcp.smtp.cdb -c "$MAXSMTPD"
-u "$QMAILDUID" -g "$NOFILESGID" 0 smtp
/var/qmail/bin/qmail-smtpd
/home/vpopmail/bin/vchkpw /bin/true 2>&1

The default value which was for softlimit was:

exec /usr/local/bin/softlimit -m 8000000

A good softlimit raise up values which in most cases were solving the issue for me are:

exec /usr/local/bin/softlimit -m 3000000

or exec /usr/local/bin/softlimit -m 4000000

The above example run configuration fixed the issue on a amd64 debian 5.0 lenny install, the server hardware was:

CPU: Intel(R) Core(TM)2 Duo CPU @ 2.93GHz
System Memory: 4GB
HDD Disk space: 240GB

The softlimit configuration which I had to setup on another server with system parameters:

Intel(R) Core(TM) i7 CPU (8 CPUS) @ 2.80GHz
System Memory: 8GB
HDD Disk Space: 1.4Terabytes

is as follows:

#!/bin/sh
QMAILDUID=`id -u vpopmail`
NOFILESGID=`id -g vpopmail`
MAXSMTPD=`cat /var/qmail/control/concurrencyincoming`
exec /usr/bin/softlimit -m 64000000
/usr/local/bin/tcpserver -v -H -R -l 0
-x /home/vpopmail/etc/tcp.smtp.cdb -c "$MAXSMTPD"
-u "$QMAILDUID" -g "$NOFILESGID" 0 smtp
/var/qmail/bin/qmail-smtpd
/home/vpopmail/bin/vchkpw /bin/true 2>&1

If none of the two configurations pointed out in the post works, for you just try to manually set up the exec /usr/bin/softlimit -m to some high value.

To assure that the newly set value is not producing the same error you will have to, reload completely the daemontools proc monitor system.
To do so open /etc/inittab comment out the line:

SV:123456:respawn:/command/svscanboot
to
#SV:123456:respawn:/command/svscanboot

Save again /etc/inittab and issue te cmd:

linux:~# init q

Now again open /etc/inittab and uncomment the commented line:

#SV:123456:respawn:/command/svscanboot to
SV:123456:respawn:/command/svscanboot

Lastly reload the inittab script once again with command:

linux:~# init q

To check if the error has disappeared check the readproctitle process, like so:

linux:~# ps ax|grep -i readproctitle

The command output should produce something like:

3070 ? S 0:00 readproctitle service errors: .......................................

Hope that helps.