Posts Tagged ‘based’

Create Haproxy Loadbalancer Access Control Lists and forward incoming frontend traffics based on simple logic

Friday, February 16th, 2024

Create-haproxy-loadbalancer-access-control-list-and-forward-frontend-traffic-based-on-simple-logic-acls-logo

Haproxy Load Balancers could do pretty much to load balance traffic between application servers. The most straight forward way to use is to balance traffic for incoming Frontends towards a Backend configuration with predefined Application machines and ports to send the traffic, where one can be the leading one and others be set as backup or we can alternatively send the traffic towards a number of machines incoming to a Frontend port bind IP listener and number of backend machine.

Besides this the more interesting capabilities of Haproxy comes with using Access Control Lists (ACLs) to forward Incoming Frontend (FT) traffic towards specific backends and ports based on logic, power ACLs gives to Haproxy to do a sophisticated load balancing are enormous. 
In this post I'll give you a very simple example on how you can save some time, if you have already a present Frontend listening to a Range of TCP Ports and it happens you want to redirect some of the traffic towards a spefic predefined Backend.

This is not the best way to it as Access Control Lists will put some extra efforts on the server CPU, but as today machines are quite powerful, it doesn't really matter. By using a simple ACLs as given in below example, one can save much of a time of writting multiple frontends for a complete sequential port range, if lets say only two of the ports in the port range and distinguish and redirect traffic incoming to Haproxy frontend listener in the port range of 61000-61230 towards a certain Ports that are supposed to go to a Common Backends to a separate ones, lets say ports 61115 and 61215.

Here is a short description on the overall screnarios. We have an haproxy with 3 VIP (Virtual Private IPs) with a Single Frontend with 3 binded IPs and 3 Backends, there is a configured ACL rule to redirect traffic for certain ports, the overall Load Balancing config is like so:

Frontend (ft):

ft_PROD:
listen IPs:

192.168.0.77
192.168.0.83
192.168.0.78

On TCP port range: 61000-61299

Backends (bk): 

bk_PROD_ROUNDROBIN
bk_APP1
bk_APP2


Config Access Control Liststo seperate incoming haproxy traffic for CUSTOM_APP1 and CUSTOM_APP2


By default send all incoming FT traffic to: bk_PROD_ROUNDROBIN

With exception for frontend configured ports on:
APP1 port 61115 
APP2 port 61215

If custom APP1 send to bk:
RULE1
If custom APP2 send to bk:
RULE2

Config on frontends traffic send operation: 

bk_PROD_ROUNDROBIN (roundrobin) traffic send to App machines all in parallel
traffic routing mode (roundrobin)
Appl1
Appl2
Appl3
Appl4

bk_APP1 and bk_APP2

traffic routing mode: (balance source)
Appl1 default serving host

If configured check port 61888, 61887 is down, traffic will be resend to configured pre-configured backup hosts: 

Appl2
Appl3
Appl4


/etc/haproxy/haproxy.cfg that does what is described with ACL LB capabilities looks like so:

#———————————————————————
# Global settings
#———————————————————————
global
    log         127.0.0.1 local2

    chroot      /var/lib/haproxy
    pidfile     /var/run/haproxy.pid
    maxconn     4000
    user        haproxy
    group       haproxy
    daemon

    # turn on stats unix socket
    stats socket /var/lib/haproxy/stats

#———————————————————————
# common defaults that all the 'listen' and 'backend' sections will
# use if not designated in their block
#———————————————————————
defaults
    mode                    tcp
    log                     global
    option                  tcplog
    #option                  dontlognull
    #option http-server-close
    #option forwardfor       except 127.0.0.0/8
    option                  redispatch
    retries                 7
    #timeout http-request    10s
    timeout queue           10m
    timeout connect         30s
    timeout client          20m
    timeout server          10m
    #timeout http-keep-alive 10s
    timeout check           30s
    maxconn                 3000


#———————————————————————
# Synchronize server entries in sticky tables
#———————————————————————

peers hapeers
    peer haproxy1-fqdn.com 192.168.0.58:8388
    peer haproxy2-fqdn.com 192.168.0.79:8388


#———————————————————————
# HAProxy Monitoring Config
#———————————————————————
listen stats 192.168.0.77:8080                #Haproxy Monitoring run on port 8080
    mode http
    option httplog
    option http-server-close
    stats enable
    stats show-legends
    stats refresh 5s
    stats uri /stats                            #URL for HAProxy monitoring
    stats realm Haproxy\ Statistics
    stats auth hauser:secretpass4321         #User and Password for login to the monitoring dashboard
    stats admin if TRUE
    #default_backend bk_Prod1         #This is optionally for monitoring backend
#———————————————————————
# HAProxy Monitoring Config
#———————————————————————
#listen stats 192.168.0.83:8080                #Haproxy Monitoring run on port 8080
#    mode http
#    option httplog
#    option http-server-close
#    stats enable
#    stats show-legends
#    stats refresh 5s
#    stats uri /stats                            #URL for HAProxy monitoring
#    stats realm Haproxy\ Statistics
#    stats auth hauser:secretpass321          #User and Password for login to the monitoring dashboard
#    stats admin if TRUE
#    #default_backend bk_Prod1           #This is optionally for monitoring backend

#———————————————————————
# HAProxy Monitoring Config
#———————————————————————
# listen stats 192.168.0.78:8080                #Haproxy Monitoring run on port 8080
#    mode http
#    option httplog
#    option http-server-close
#    stats enable
#    stats show-legends
#    stats refresh 5s
#    stats uri /stats                            #URL for HAProxy monitoring
#    stats realm Haproxy\ Statistics
#    stats auth hauser:secretpass123          #User and Password for login to the monitoring dashboard
#    stats admin if TRUE
#    #default_backend bk_DKV_PROD_WLPFO          #This is optionally for monitoring backend


#———————————————————————
# frontend which proxys to the backends
#———————————————————————
frontend ft_PROD
    mode tcp
    bind 192.168.0.77:61000-61299
        bind 192.168.0.83:51000-51300
        bind 192.168.0.78:51000-62300
    option tcplog
        # (4) Peer Sync: a sticky session is a session maintained by persistence
        stick-table type ip size 1m peers hapeers expire 60m
# Commented for change CHG0292890
#   stick on src
    log-format %ci:%cp\ [%t]\ %ft\ %b/%s\ %Tw/%Tc/%Tt\ %B\ %ts\ %ac/%fc/%bc/%sc/%rc\ %sq/%bq
        acl RULE1 dst_port 61115
        acl RULE2 dst_port 61215
        use_backend APP1 if app1
        use_backend APP2 if app2
    default_backend bk_PROD_ROUNDROBIN


#———————————————————————
# round robin balancing between the various backends
#———————————————————————
backend bk_PROD_ROUNDROBIN
    mode tcp
    # (0) Load Balancing Method.
    balance roundrobin
    # (4) Peer Sync: a sticky session is a session maintained by persistence
    stick-table type ip size 1m peers hapeers expire 60m
    # (5) Server List
    # (5.1) Backend
    server appl1 10.33.0.50 check port 31232
    server appl2 10.33.0.51 check port 31232 
    server appl2 10.45.0.78 check port 31232 
    server appl3 10.45.0.79 check port 31232 

#———————————————————————
# source balancing for the GUI
#———————————————————————
backend bk_APP2
    mode tcp
    # (0) Load Balancing Method.
    balance source
    # (4) Peer Sync: a sticky session is a session maintained by persistence
    stick-table type ip size 1m peers hapeers expire 60m
        stick on src
    # (5) Server List
    # (5.1) Backend
    server appl1 10.33.0.50 check port 55232
    server appl2 10.32.0.51 check port 55232 backup
    server appl3 10.45.0.78 check port 55232 backup
    server appl4 10.45.0.79 check port 55232 backup

#———————————————————————
# source balancing for the OLW
#———————————————————————
backend bk_APP1
    mode tcp
    # (0) Load Balancing Method.
    balance source
    # (4) Peer Sync: a sticky session is a session maintained by persistence
    stick-table type ip size 1m peers hapeers expire 60m
        stick on src
    # (5) Server List
    # (5.1) Backend
    server appl1 10.33.0.50 check port 53119
    server appl2 10.32.0.51 check port 53119 backup
    server appl3 10.45.0.78 check port 53119 backup
    server appl4 10.45.0.79 check port 53119 backup


You can also check and download the haproxy.cfg here.
Enjjoy !

Saint Emilianos (Emilian) of Dorostorum (Silistra) ancient saint venerated in Bulgarian Orthodox Church

Saturday, August 5th, 2023

saint_Emilian-Dorostolski-Dorostorum-780x470-orthodox-icon

Saint Emilian / Emilianos Dorostolski is a martyr revered with a feast day by the Bulgarian Orthodox Church.

According to his biography, he was born in Durostorum (now Silistra Bulgaria), where he spent his life as a servant (or slave) to the mayor.
He lived in the time of Emperor Julian (the apostate).

Emperor Julian sent a new governor to Dorostol charged with the task of eradicating Christianity from the city.

Frightened by his fame as a very cruel ruler, the local inhabitants hide from him that there are Christians among them and declare that they all worship the pagan gods.
Satisfied, he gives a feast to the citizens, but for the zealous Christian Aemilianus (Emilianos), the boasting of the pagan governor is unbearable, and during the feast he smashes the statues of the pagan gods in the sanctuary with a hammer.

An innocent person is accused of the crime, but knowing this, Emilian appears before the governor and confesses his guilt.

The city was fined for harboring Christians, and Aemilianus himself, after torture, was burned at the stake by the Danube[1] (river) on July 18, 362; this date is today the day of his veneration by the church[2].

It is assumed that the life of Saint Emilian was written immediately after the saint's death – the end of the 4th and the beginning of the 5th century. Its earliest variants are generally two.

The first is based on the so-called Codex Vaticanus 866 (published by Boschius in 1868), and the second is based on the so-called Codex Parisiensis of the 9th century (published by François Halkin). Although the Codex Parisiensis largely repeats the Codex Vaticanus, there is a difference between the two lives in both the date of Aemilian's martyrdom and the location of his obituary. According to the first, Emilian was burned at the stake on September 3 in Gedina (localized near the present-day village of Golesh), and according to the second, it happened on July 18 in Gezedina, right next to Durostorum (fortress).

Information about Saint Emilian can also be found in blessed Jerome, and saint Ambrose (Ambrosius) of Milan, Theophanes the Confessor and Nicephorus Callistus.
In the Church-Slavic hagiography, the life enters mainly from its later copies in the Paschal Chronicle (Chronicon Paschalae), the Synaxarium (Church book with the service text dedicated to the sant) of the Constantinople Patriarchate (Synaxarium Constantinopolitanum) and the Monthly Message of Emperor Basil II (Menologium Basilii (Basilius) II).

A major difference between the early lives and their later editions is Aemilian's social status.

According to the late Church Slavonic redactions, he was a slave / servant of the mayor of Durostorum (today city of Silistra Bulgaria), while according to the earlier ones he himself was of noble birth – his father Sevastian was the governor of the city – and was a soldier (presumably from the XI Claudius Legion)[3].


Sources

 1. Georgi Atanasov, 345 early Christian saints-martyrs from the Bulgarian lands I – IV centuries / Publisher: Unicart ISBN: 9789542953012 / page 11
  2. Lives of the Saints. Synodal publishing house. Sofia, 1991. pp. 337-338.
  3. St. Emilian Dorostolski: My name is Christian

Other Research sources

  • Constantinesco, R. Les martyrs de Durostorum. – Revue des Etudes Sud-Est Europeennes, 5, 1967, No. 1 – 2, 14 – 19.
  • G. Atanasov. St. Emilian Dorostolsky († 362) – the last early Christian martyr in Mysia. – In: Civitas divino-humana in honor of Professor Georgi Bakalov. S. 2004, 203 – 218.
  • Ivanova, R., G. Atanasov, P. Donevski. History of Silistra. T. 1. The ancient Durostorum. Silistra-S., 2006.
  • Atanasov, G. The Christian Durostorum-Druster. Varna, 2007.

Megaraid SAS software installation on CentOS Linux

Saturday, October 20th, 2012

With a standard el5 on a new Dell server, it may be necessary to install the Dell Raid driver, otherwise the OMSA always reports an error and hardware monitoring is therefore obsolete:

Previously, the megaraid_sys package was now called mptlinux

For this we need the following packages in advance:

# yum install gcc kernel-devel
Now the driver stuff:

# yum install dkms mptlinux
That should have built the new module, better test it:

# modinfo mptsas

# dkms status
After a kernel update it may be necessary to build the driver for the new version:

# dkms build -m mptlinux -v 4.00.38.02

# dkms install -m mptlinux -v 4.00.38.02

How to filter dhcp traffic between two networks running separate DHCP servers to prevent IP assignment issues and MAC duplicate addresses

Tuesday, February 8th, 2022

how-to-filter-dhcp-traffic-2-networks-running-2-separate-dhcpd-servers-to-prevent-ip-assignment-conflicts-linux
Tracking the Problem of MAC duplicates on Linux routers
 

If you have two networks that see each other and they're not separated in VLANs but see each other sharing a common netmask lets say 255.255.254.0 or 255.255.252.0, it might happend that there are 2 dhcp servers for example (isc-dhcp-server running on 192.168.1.1 and dhcpd running on 192.168.0.1 can broadcast their services to both LANs 192.168.1.0.1/24 (netmask 255.255.255.0) and Local Net LAN 192.168.1.1/24. The result out of this is that some devices might pick up their IP address via DHCP from the wrong dhcp server.

Normally if you have a fully controlled little or middle class home or office network (10 – 15 electronic devices nodes) connecting to the LAN in a mixed moth some are connected via one of the Networks via connected Wifi to 192.168.1.0/22 others are LANned and using static IP adddresses and traffic is routed among two ISPs and each network can see the other network, there is always a possibility of things to go wrong. This is what happened to me so this is how this post was born.

The best practice from my experience so far is to define each and every computer / phone / laptop host joining the network and hence later easily monitor what is going on the network with something like iptraf-ng / nethogs  / iperf – described in prior  how to check internet spepeed from console and in check server internet connectivity speed with speedtest-cliiftop / nload or for more complex stuff wireshark or even a simple tcpdump. No matter the tools network monitoring is only part on solving network issues. A very must have thing in a controlled network infrastructure is defining every machine part of it to easily monitor later with the monitoring tools. Defining each and every host on the Hybrid computer networks makes administering the network much easier task and  tracking irregularities on time is much more likely. 

Since I have such a hybrid network here hosting a couple of XEN virtual machines with Linux, Windows 7 and Windows 10, together with Mac OS X laptops as well as MacBook Air notebooks, I have followed this route and tried to define each and every host based on its MAC address to pick it up from the correct DHCP1 server  192.168.1.1 (that is distributing IPs for Internet Provider 1 (ISP 1), that is mostly few computers attached UTP LAN cables via LiteWave LS105G Gigabit Switch as well from DHCP2 – used only to assigns IPs to servers and a a single Wi-Fi Access point configured to route incoming clients via 192.168.0.1 Linux NAT gateway server.

To filter out the unwanted IPs from the DHCPD not to propagate I've so far used a little trick to  Deny DHCP MAC Address for unwanted clients and not send IP offer for them.

To give you more understanding,  I have to clear it up I don't want to have automatic IP assignments from DHCP2 / LAN2 to DHCP1 / LAN1 because (i don't want machines on DHCP1 to end up with IP like 192.168.0.50 or DHCP2 (to have 192.168.1.80), as such a wrong IP delegation could potentially lead to MAC duplicates IP conflicts. MAC Duplicate IP wrong assignments for those older or who have been part of administrating large ISP network infrastructures  makes the network communication unstable for no apparent reason and nodes partially unreachable at times or full time …

However it seems in the 21-st century which is the century of strangeness / computer madness in the 2022, technology advanced so much that it has massively started to break up some good old well known sysadmin standards well documented in the RFCs I know of my youth, such as that every electronic equipment manufactured Vendor should have a Vendor Assigned Hardware MAC Address binded to it that will never change (after all that was the idea of MAC addresses wasn't it !). 
Many mobile devices nowadays however, in the developers attempts to make more sophisticated software and Increase Anonimity on the Net and Security, use a technique called  MAC Address randomization (mostly used by hackers / script kiddies of the early days of computers) for their Wi-Fi Net Adapter OS / driver controlled interfaces for the sake of increased security (the so called Private WiFi Addresses). If a sysadmin 10-15 years ago has seen that he might probably resign his profession and turn to farming or agriculture plant growing, but in the age of digitalization and "cloud computing", this break up of common developed network standards starts to become the 'new normal' standard.

I did not suspected there might be a MAC address oddities, since I spare very little time on administering the the network. This was so till recently when I accidently checked the arp table with:

Hypervisor:~# arp -an
192.168.1.99     5c:89:b5:f2:e8:d8      (Unknown)
192.168.1.99    00:15:3e:d3:8f:76       (Unknown)

..


and consequently did a network MAC Address ARP Scan with arp-scan (if you never used this little nifty hacker tool I warmly recommend it !!!)
If you don't have it installed it is available in debian based linuces from default repos to install

Hypervisor:~# apt-get install –yes arp-scan


It is also available on CentOS / Fedora / Redhat and other RPM distros via:

Hypervisor:~# yum install -y arp-scan


Hypervisor:~# arp-scan –interface=eth1 192.168.1.0/24

192.168.1.19    00:16:3e:0f:48:05       Xensource, Inc.
192.168.1.22    00:16:3e:04:11:1c       Xensource, Inc.
192.168.1.31    00:15:3e:bb:45:45       Xensource, Inc.
192.168.1.38    00:15:3e:59:96:8e       Xensource, Inc.
192.168.1.34    00:15:3e:d3:8f:77       Xensource, Inc.
192.168.1.60    8c:89:b5:f2:e8:d8       Micro-Star INT'L CO., LTD
192.168.1.99     5c:89:b5:f2:e8:d8      (Unknown)
192.168.1.99    00:15:3e:d3:8f:76       (Unknown)

192.168.x.91     02:a0:xx:xx:d6:64        (Unknown)
192.168.x.91     02:a0:xx:xx:d6:64        (Unknown)  (DUP: 2)

N.B. !. I found it helpful to check all available interfaces on my Linux NAT router host.

As you see the scan revealed, a whole bunch of MAC address mess duplicated MAC hanging around, destroying my network topology every now and then 
So far so good, the MAC duplicates and strangely hanging around MAC addresses issue, was solved relatively easily with enabling below set of systctl kernel variables.
 

1. Fixing Linux ARP common well known Problems through disabling arp_announce / arp_ignore / send_redirects kernel variables disablement


Linux answers ARP requests on wrong and unassociated interfaces per default. This leads to the following two problems:

ARP requests for the loopback alias address are answered on the HW interfaces (even if NOARP on lo0:1 is set). Since loopback aliases are required for DSR (Direct Server Return) setups this problem is very common (but easy to fix fortunately).

If the machine is connected twice to the same switch (e.g. with eth0 and eth1) eth2 may answer ARP requests for the address on eth1 and vice versa in a race condition manner (confusing almost everything).

This can be prevented by specific arp kernel settings. Take a look here for additional information about the nature of the problem (and other solutions): ARP flux.

To fix that generally (and reboot safe) we  include the following lines into


Hypervisor:~# cp -rpf /etc/sysctl.conf /etc/sysctl.conf_bak_07-feb-2022
Hypervisor:~# cat >> /etc/sysctl.conf

# LVS tuning
net.ipv4.conf.lo.arp_ignore=1
net.ipv4.conf.lo.arp_announce=2
net.ipv4.conf.all.arp_ignore=1
net.ipv4.conf.all.arp_announce=2

net.ipv4.conf.all.send_redirects=0
net.ipv4.conf.eth0.send_redirects=0
net.ipv4.conf.eth1.send_redirects=0
net.ipv4.conf.default.send_redirects=0

Press CTRL + D simultaneusly to Write out up-pasted vars.


To read more on Load Balancer using direct routing and on LVS and the arp problem here


2. Digging further the IP conflict / dulicate MAC Problems

Even after this arp tunings (because I do have my Hypervisor 2 LAN interfaces connected to 1 switch) did not resolved the issues and still my Wireless Connected devices via network 192.168.1.1/24 (ISP2) were randomly assigned the wrong range IPs 192.168.0.XXX/24 as well as the wrong gateway 192.168.0.1 (ISP1).
After thinking thoroughfully for hours and checking the network status with various tools and thanks to the fact that my wife has a MacBook Air that was always complaining that the IP it tried to assign from the DHCP was already taken, i"ve realized, something is wrong with DHCP assignment.
Since she owns a IPhone 10 with iOS and this two devices are from the same vendor e.g. Apple Inc. And Apple's products have been having strange DHCP assignment issues from my experience for quite some time, I've thought initially problems are caused by software on Apple's devices.
I turned to be partially right after expecting the logs of DHCP server on the Linux host (ISP1) finding that the phone of my wife takes IP in 192.168.0.XXX, insetad of IP from 192.168.1.1 (which has is a combined Nokia Router with 2.4Ghz and 5Ghz Wi-Fi and LAN router provided by ISP2 in that case Vivacom). That was really puzzling since for me it was completely logical thta the iDevices must check for DHCP address directly on the Network of the router to whom, they're connecting. Guess my suprise when I realized that instead of that the iDevices does listen to the network on a wide network range scan for any DHCPs reachable baesd on the advertised (i assume via broadcast) address traffic and try to connect and take the IP to the IP of the DHCP which responds faster !!!! Of course the Vivacom Chineese produced Nokia router responded DHCP requests and advertised much slower, than my Linux NAT gateway on ISP1 and because of that the Iphone and iOS and even freshest versions of Android devices do take the IP from the DHCP that responds faster, even if that router is not on a C class network (that's invasive isn't it??). What was even more puzzling was the automatic MAC Randomization of Wifi devices trying to connect to my ISP1 configured DHCPD and this of course trespassed any static MAC addresses filtering, I already had established there.

Anyways there was also a good think out of tthat intermixed exercise 🙂 While playing around with the Gigabit network router of vivacom I found a cozy feature SCHEDULEDING TURNING OFF and ON the WIFI ACCESS POINT  – a very useful feature to adopt, to stop wasting extra energy and lower a bit of radiation is to set a swtich off WIFI AP from 12:30 – 06:30 which are the common sleeping hours or something like that.
 

3. What is MAC Randomization and where and how it is configured across different main operating systems as of year 2022?

Depending on the operating system of your device, MAC randomization will be available either by default on most modern mobile OSes or with possibility to have it switched on:

  • Android Q: Enabled by default 
  • Android P: Available as a developer option, disabled by default
  • iOS 14: Available as a user option, disabled by default
  • Windows 10: Available as an option in two ways – random for all networks or random for a specific network

Lately I don't have much time to play around with mobile devices, and I do not my own a luxury mobile phone so, the fact this ne Androids have this MAC randomization was unknown to me just until I ended a small mess, based on my poor configured networks due to my tight time constrains nowadays.

Finding out about the new security feature of MAC Randomization, on all Android based phones (my mother's Nokia smartphone and my dad's phone, disabled the feature ASAP:


4. Disable MAC Wi-Fi Ethernet device Randomization on Android

MAC Randomization creates a random MAC address when joining a Wi-Fi network for the first time or after “forgetting” and rejoining a Wi-Fi network. It Generates a new random MAC address after 24 hours of last connection.

Disabling MAC Randomization on your devices. It is done on a per SSID basis so you can turn off the randomization, but allow it to function for hotspots outside of your home.

  1. Open the Settings app
  2. Select Network and Internet
  3. Select WiFi
  4. Connect to your home wireless network
  5. Tap the gear icon next to the current WiFi connection
  6. Select Advanced
  7. Select Privacy
  8. Select "Use device MAC"
     

5. Disabling MAC Randomization on MAC iOS, iPhone, iPad, iPod

To Disable MAC Randomization on iOS Devices:

Open the Settings on your iPhone, iPad, or iPod, then tap Wi-Fi or WLAN


  1. Tap the information button next to your network
  2. Turn off Private Address
  3. Re-join the network


Of course next I've collected their phone Wi-Fi adapters and made sure the included dhcp MAC deny rules in /etc/dhcp/dhcpd.conf are at place.

The effect of the MAC Randomization for my Network was terrible constant and strange issues with my routings and networks, which I always thought are caused by the openxen hypervisor Virtualization VM bugs etc.

That continued for some months now, and the weird thing was the issues always started when I tried to update my Operating system to the latest packetset, do a reboot to load up the new piece of software / libraries etc. and plus it happened very occasionally and their was no obvious reason for it.


6. How to completely filter dhcp traffic between two network router hosts
IP 192.168.0.1 / 192.168.1.1 to stop 2 or more configured DHCP servers
on separate networks see each other

To prevent IP mess at DHCP2 server side (which btw is ISC DHCP server, taking care for IP assignment only for the Servers on the network running on Debian 11 Linux), further on I had to filter out any DHCP UDP traffic with iptables completely.
To prevent incorrect route assignments assuming that you have 2 networks and 2 routers that are configurred to do Network Address Translation (NAT)-ing Router 1: 192.168.0.1, Router 2: 192.168.1.1.

You have to filter out UDP Protocol data on Port 67 and 68 from the respective source and destination addresses.

In firewall rules configuration files on your Linux you need to have some rules as:

# filter outgoing dhcp traffic from 192.168.1.1 to 192.168.0.1
-A INPUT -p udp -m udp –dport 67:68 -s 192.168.1.1 -d 192.168.0.1 -j DROP
-A OUTPUT -p udp -m udp –dport 67:68 -s 192.168.1.1 -d 192.168.0.1 -j DROP
-A FORWARD -p udp -m udp –dport 67:68 -s 192.168.1.1 -d 192.168.0.1 -j DROP

-A INPUT -p udp -m udp –dport 67:68 -s 192.168.0.1 -d 192.168.1.1 -j DROP
-A OUTPUT -p udp -m udp –dport 67:68 -s 192.168.0.1 -d 192.168.1.1 -j DROP
-A FORWARD -p udp -m udp –dport 67:68 -s 192.168.0.1 -d 192.168.1.1 -j DROP

-A INPUT -p udp -m udp –sport 67:68 -s 192.168.1.1 -d 192.168.0.1 -j DROP
-A OUTPUT -p udp -m udp –sport 67:68 -s 192.168.1.1 -d 192.168.0.1 -j DROP
-A FORWARD -p udp -m udp –sport 67:68 -s 192.168.1.1 -d 192.168.0.1 -j DROP


You can download also filter_dhcp_traffic.sh with above rules from here


Applying this rules, any traffic of DHCP between 2 routers is prohibited and devices from Net: 192.168.1.1-255 will no longer wrongly get assinged IP addresses from Network range: 192.168.0.1-255 as it happened to me.


7. Filter out DHCP traffic based on MAC completely on Linux with arptables

If even after disabling MAC randomization on all devices on the network, and you know physically all the connecting devices on the Network, if you still see some weird MAC addresses, originating from a wrongly configured ISP traffic router host or whatever, then it is time to just filter them out with arptables.

## drop traffic prevent mac duplicates due to vivacom and bergon placed in same network – 255.255.255.252
dchp1-server:~# arptables -A INPUT –source-mac 70:e2:83:12:44:11 -j DROP


To list arptables configured on Linux host

dchp1-server:~# arptables –list -n


If you want to be paranoid sysadmin you can implement a MAC address protection with arptables by only allowing a single set of MAC Addr / IPs and dropping the rest.

dchp1-server:~# arptables -A INPUT –source-mac 70:e2:84:13:45:11 -j ACCEPT
dchp1-server:~# arptables -A INPUT  –source-mac 70:e2:84:13:45:12 -j ACCEPT


dchp1-server:~# arptables -L –line-numbers
Chain INPUT (policy ACCEPT)
1 -j DROP –src-mac 70:e2:84:13:45:11
2 -j DROP –src-mac 70:e2:84:13:45:12

Once MACs you like are accepted you can set the INPUT chain policy to DROP as so:

dchp1-server:~# arptables -P INPUT DROP


If you later need to temporary, clean up the rules inside arptables on any filtered hosts flush all rules inside INPUT chain, like that
 

dchp1-server:~#  arptables -t INPUT -F

ASCII Art studio – A powerful ASCII art editor for Windows / Playscii a cool looking text editor for Linux

Monday, June 28th, 2021

This post is just informative for Text Geeks who are in love with ASCII Art, it is a bit of rant as I will say nothing new, but I thought it might be of interest to some console maniac out there 🙂

ascii art studio aas program windows xp professional drawing program screenshot

While checking stuff on Internet I've stumbled on interesting ASCII arts freak software – >ASCII Art Studio. ASCII Art Studio is unfortunately needs licensing is not Free Software. But anyways, for anyone willing to draw pro ASCII art pictures it is a must see. Check it out;

Isn't it like a Plain Text pro Photoshop ? 🙂 Its a pity we don't have a Linux / BSD Release of this wonderful piece of software. I've tried with WINE (Windows Emulator) on Linux to make the Ascii Art Studio work but that was a fail. It seems only way to make it work is have Windows as a worst case install a Virtual Machine with VirtualBox / Vmware and run it inside if you don't have a Windows PC at hand.

Of course there are stuff on Linux to ascii art edit you can use if you want to have a native software to edit ASCIIs such as Playscii. Unfortunately Playscii is not an easy one to install and the software doesn't have a prepared rpm or deb binary you can easily roll on the OS and you have to manually build all required python modules and have a working version of python3 to be able to make it work.

I did not have much time to test to install it and since I faced issues with plascii install I just abandoned it. If some geek has some more time anyways I guess it is worse to give it a try below is 2 screenshots from PLAYSCII official download page. 

playscii_shot1-official.

As you see authors of the open source playscii whose source is available via github choose to have an amazing looking ascii art text menus, though for daily ASCII art editing it is perhaps much more complicated to use than the simlistic ASCII Art Studio

playscii_shot2-official

There is other stuff for Linux to do ASCII Art files text edit like:
JaVE (this one I don't personally like because it is Java Based),  Ascii Art Maker or Pablow Draw Linux (unfortunately this 2 ones are proprietary).

Adding custom user based host IP aliases load custom prepared /etc/hosts from non root user on Linux – Script to allow define IPs that doesn’t have DNS records to user preferred hostname

Wednesday, April 14th, 2021

adding-custom-user-based-host-aliases-etc-hosts-logo-linux

Say you have access to a remote Linux / UNIX / BSD server, i.e. a jump host and you have to remotely access via ssh a bunch of other servers
who have existing IP addresses but the DNS resolver recognized hostnames from /etc/resolv.conf are long and hard to remember by the jump host in /etc/resolv.conf and you do not have a way to include a new alias to /etc/hosts because you don't have superuser admin previleges on the hop station.
To make your life easier you would hence want to add a simplistic host alias to be able to easily do telnet, ssh, curl to some aliased name like s1, s2, s3 … etc.


The question comes then, how can you define the IPs to be resolvable by easily rememberable by using a custom User specific /etc/hosts like definition file? 

Expanding /etc/hosts predefined host resolvable records is pretty simple as most as most UNIX / Linux has the HOSTALIASES environment variable
Hostaliases uses the common technique for translating host names into IP addresses using either getaddrinfo(3) or the obsolete gethostbyname(3). As mentioned in hostname(7), you can set the HOSTALIASES environment variable to point to an alias file, and you've got per-user aliases

create ~/.hosts file

linux:~# vim ~/.hosts

with some content like:
 

g google.com
localhostg 127.0.0.1
s1 server-with-long-host1.fqdn-whatever.com 
s2 server5-with-long-host1.fqdn-whatever.com
s3 server18-with-long-host5.fqdn-whatever.com

linux:~# export HOSTALIASES=$PWD/.hosts

The caveat of hostaliases you should know is this will only works for resolvable IP hostnames.
So if you want to be able to access unresolvable hostnames.
You can use a normal alias for the hostname you want in ~/.bashrc with records like:

alias server-hostname="ssh username@10.10.10.18 -v -o stricthostkeychecking=no -o passwordauthentication=yes -o UserKnownHostsFile=/dev/null"
alias server-hostname1="ssh username@10.10.10.19 -v -o stricthostkeychecking=no -o passwordauthentication=yes -o UserKnownHostsFile=/dev/null"
alias server-hostname2="ssh username@10.10.10.20 -v -o stricthostkeychecking=no -o passwordauthentication=yes -o UserKnownHostsFile=/dev/null"

then to access server-hostname1 simply type it in terminal.

The more elegant solution is to use a bash script like below:

# include below code to your ~/.bashrc
function resolve {
        hostfile=~/.hosts
        if [[ -f “$hostfile” ]]; then
                for arg in $(seq 1 $#); do
                        if [[ “${!arg:0:1}” != “-” ]]; then
                                ip=$(sed -n -e "/^\s*\(\#.*\|\)$/d" -e "/\<${!arg}\>/{s;^\s*\(\S*\)\s*.*$;\1;p;q}" "$hostfile")
                                if [[ -n “$ip” ]]; then
                                        command "${FUNCNAME[1]}" "${@:1:$(($arg-1))}" "$ip" "${@:$(($arg+1)):$#}"
                                        return
                                fi
                        fi
                done
        fi
        command "${FUNCNAME[1]}" "$@"
}

function ping {
        resolve "$@"
}

function traceroute {
        resolve "$@"
}

function ssh {
        resolve "$@"
}

function telnet {
        resolve "$@"
}

function curl {
        resolve "$@"
}

function wget {
        resolve "$@"
}


Now after reloading bash login session $HOME/.bashrc with:

linux:~# source ~/.bashrc

ssh / curl / wget / telnet / traceroute and ping will be possible to the defined ~/.hosts IP addresses just like if it have been defined global wide on System in /etc/hosts.

Enjoy
 

6 of April Short Living and Death of Saint Methodius a brother of Constantin Cyril – Christian Enlighteners of the Bulgarian and Slavonic Lands

Wednesday, April 7th, 2021

Saints_Cyril_and_Methodius_Bulgarian_Enlighteners_Icon_by_Avram_Dichov,_1892

Saint Methodius was the bigger child of the two brothers enlighteners of Bulgarian Lands and the Slavonic nations Saint Cyril (known as The Philosopher) and Saint Methodius born in Thessaloniki
a region of the Byzantine empire. Thessaloniki and its regions according to manuscripts has been mostly inhabited by Slavs at IX century.

In his young age he has chosen to be a Byzantine army man. For 10 years he has been assigned to govern a region of Slavonic lands part of Byzantine Eastern Empire. 
Even though he had been a successful in his worldly career and has been taking a respectful service for the Byzantine Emperor he felt the calling of God, gave up his high position in
aristocracy and entered one of the many monasteries of the empire in mount of Olympus Asia Minor region. Soon after to the same monastery came his younger brother Constantine
Since that moment the two brothers never departed until death of Cyril who died in Rome. And even in his death has been highly venerated by the Pope and considered saint even in
time of his burial at the famous Basillica Church San Clemente where they reside for veneration by Slavs even to this day.

San_clemente_fresco_Saint_Cyril-And-Methodius-in-Rome.

The receiving of Saint Cyril and Methodius in Rome with the Relics of Saint Clement 4th Pope of Rome

The two God chosen man also achieved a glorious deed which was not achieved by anyone before. The creation of the Glagolic Alphabet which become the foundation of the Cyrillic alphabet
currently used of about 300 000 000 people worldwide including by us Bulgarians. The new language was developed to be able to share the high truths of Christ the Gospel and his Church services and books  and 
most impotantly the eternal salvation prepared by God The Holy Trinity The Father the Son and the Holy Spirit for all those who love him and servce him.

The_Grave-of-Saint-Cyril-in-San-Clemente

The Holy relics of Saint Cyril in San Clemente Crypt

As knowing the truth about Heaven and Hell and the Heavenly
kingdom they were highly conserned for the high see of Slavs in the Empire who still have been in darkness of idolatry and paganism. Inspired by God they soon creating an Alphabet in which  translated the whole Holy Bible (The Gospel of Christ the Epistle books and Old Testament book  and Church service books translating the Eastern Orthodox Holy Liturgy of Saint John The Crysostom and Saint John The Basil.
in language understandable for the Slavs. The glagolic alphabet has been soon translated to the Cyrillic Alphabet by the 7 pupils of Saint Cyril and Methodius and has been spread in Bulgarian lands first then in Serbia, Kiev
and rest of Slavonic nations.

Saint_Methodius-Archibishop-of-Moravia-and_Pannonia

In Great Moravia a region today situated in Chech Republic the two saint brothers teached and baptized the local Slavs , teaching them the Eternal heavenly truths of the Gospel.
The German clergy envied the two apostle equal mans mission great success and tried to rebaptize and teach the already baptized according to a Roman Rite and spread their own influence pushed by a lust for power.
Hence Methodius (also called by Western histographs Method) has been chased away from Moravia by the German clergy to the nearby Pannonia, where king Kocel  who appreciated St. Methodius great deeds for his people and
not understanding why the German-clergy is chasing such a saintly man has moved him to Rome to Pope Adrian II-nd with an enquiry to ordain him a Bishop. The Pope ordained him almost immediately and accepted St. Methodius
and St Cyrilus with all his clergy in honour, because the 2 saints were bringing a highly esteemed gift the Holy Relics who were attained by them earlier in their Baptizmal Mission to The Hazars (an assignment given to them by the Eastern Byzantine Emperor
and successfully achieved).
During their travel in Herzon the two saints has found the Holy Relics of Saint Clement Ist the 4th Pope of Rome who has been exiled and passed away to Christ as a martyr in Herzon (Today's Crimea) in the distant 2nd century.
After his consecration in Rome saint  Metho has been raised from a simple Gospel preacher to the high clergy rank of Archibishop for Pannonia and Moravia, a region who has been under the rule of the Bishop of Rome.

The fight against the clean life of the saint continued with full power even after his raise to the throne of archibishopship. The envious pseudo spiritual missioners sent by the Pope hungering not for Christ but for earthly power slandered
frequently against Method. to the local prince. because Methodius was publicly rebuke their unclean life being filled with the power of Christ spirit who detests all uncleanness in man. At other times suggested to the pope that Methodius is
against the Western Church and eagers to cut Moravia and Pannonia from the diocese of Rome and give it to the Byzantines. In parallel the German "clergy" was frequetnly sending letters slandering against Methodius accusing him in inobedience to the Eastern Christian Emperor
and the The Great Church of Byzantium the homechurch of st. Cyril and Method. and to whom they were obedient still …
Methodius being already in advanced age had to go everywhere by person and rebuke and testify about himself that all this is a far away from truth. His enemies succeeded eventually and for 2 years and a half he has been thrown in prison without the knowledge of the pope.
Finding out about this ungodly deed of his inobedient power-lust german clergy Pope John VIII issued a special order bulla for the immediate liberation of his archibishop.

Saints-Cyril-Methodius-Zahari-Zograph-1848.

Icon of Saint Cyril and Methodius painting from 1848 y.

Even in this hardships saint Methodius never stopped to preach the Gospel to the Slavs and spread the Good news of Jesus Christ The Son of God enbodiment, life, Crucifix for the sins of all mankind anf Glorious Resurrection through which all those who believe are saved if they persist in the good deeds of Christ and stick to the trutfullness  of the Church of Christ which at the time of St. Cyrilus was before the Great Schism in year 1054, when the Roman Catholics has fallen away from the One Church who kept and preserved the head of the Church Jesus Christ teaching the Holy Eastern Orthodox Church.
Being even in prison Saint Methodius continued to translate The Holy books from Greek to the new language invented and adjusted for the Slavs talk. 
He left us as a heritage the Translation Copy of All Books of Holy Bible except the book of Maccabees which is today only present in the Orthodox Bible and considered one of the non-canonical but God inspired books, as well as the Nomocanon (the book with rules and Church laws of the Church and the clergy).
Nomocanon comes from .(Greek: Νομοκανών, Nomokanōn; from the Greek nomos – law and kanon – a rule). It is  a collection of ecclesiastical law, consisting of the elements from both the Civil law and the Canon law.
Nomocanons even today forms part of the canon law of the Eastern Catholic Churches (through the Eastern Catholic canon law) and of the Eastern Orthodox Churches.

Sveti_Sveti-Saints_Kyril-i-Metodij

Saint Methodius the Slav-Bulgarian enlighter passed silently to Christ full of God''s Grace in saintship on 6th of April year 885 A.D. His burial was in Velegrad Chech Republic, and according to the Church tradition about his living  he "lays in the Great Moravian Church in the left side of the wall behind the alter dedicated to the Mother of God the Holy Theotokos Virgin Maria". A church service dedicated to him is still presented in the Bulgarian Church's manuscripts and a copies of it in preservation museums in Russia.

The deeds of Saint Methodius and Saint Cyrilus has a mark on the whole world's events. Even to this day as in Bulgaria, we have a translation of the Bible based on the Cyrillic language named after saint Cyrilus the brother of Methodius based on his started work to translate Glagolic alphabet to Cyrillic, continued by his pupils and fully completed by Saint Clement (Kliment) of Ohrid, who was warmly accepted by Saint Apostle equal King Boris I of Bulgaria. Thanks to him the deeds of Saint Methodius and their pupils and we have the cyrillic alphabet and Bulgarian Orthodox Church and spirituality even today. The deeds of Saint Cyrilus and the Cyrillic are recognizable worldwide in the face of the strange for the Western and the Asians Cyrillic language used by Russians.

Two Saints Cyril and Methodius has were officially proclaimed as a protectors of Europe recently by Pope John Paul II, for a reason as the ex-Pope has seen and experienced the powerness of prayers of the two saints while he was a cardinal in Bulgaria before his raise to the Roman Popeship throne about little know nowadays.

The Memory and veneration of Saint Methodius and Cyrilus logically are mostly observed in Bulgaria logically as Bulgaria was the first Empire country historically to accept the spiritual fruits the new language.  Many Schools and institutions, streets are named after the two saints.
The official Church veneration of St. St. Cyril and Methodius is on 11 in Church and  May in secular tradition. The Bulgarian Orthodox church has established a number of feasts connected to the two saints as they''re the prime patron saints thanks to whose prayers the Bulgarian Church has been established survived through centuries and conitnues its triumphal march towards the kingdom of heaven.

Let by the two saints Methodius and Cyril Bulgaria and Europe have Peace, Faith and Love and Enlightenment about the true teaching of Christ the Holy Orthodoxy!
 

Create simple proxy http server with netcat ( nc ) based tiny shell script

Tuesday, January 26th, 2021

use-Netcat_proxy-picture

The need of proxy server is inevitable nowadays especially if you have servers located in a paranoid security environments. Where virtually all is being passed through some kind of a proxy server. In my work we have recently started a  CentOS Linux release 7.9.2009 on HP Proliant DL360e Gen8 (host named rhel-testing).

HP DL360e are quite old nowadays but since we have spare servers and we can refurnish them to use as a local testing internal server Hypervisor it is okay for us. The machine is attached to a Rack that is connected to a Secured Deimilitarized Zone LAN (DMZ Network) which is so much filtered that even simple access to the local company homebrew RPM repository is not accessible from the machine.
Thus to set and remove software from the machine we needed a way to make yum repositories be available, and it seems the only way was to use a proxy server (situated on another accessible server which we use as a jump host to access the testing machine).

Since opening additional firewall request was a time consuming non-sense and the machine is just for testing purposes, we had to come with a solution where we can somehow access a Local repository RPM storage server http://rpm-package-server-repo.com/ for which we have a separate /etc/yum.repos.d/custom-rpms.repo definition file created.

This is why we needed a simplistic way to run a proxy but as we did not have the easy way to install privoxy / squid / haproxy or apache webserver configured as a proxy (to install one of those of relatively giant piece of software need to copy many rpm packages and manually satisfy dependencies), we looked for a simplistic way to run a proxy server on jump-host machine host A.

A note to make here is jump-host that was about to serve as a proxy  had already HTTP access towards the RPM repositories http://rpm-package-server-repo.com and could normally fetch packages with curl or wget via it …

For to create a simple proxy server out of nothing, I've googled a bit thinking that it should be possible either with BASH's TCP/IP capabilities or some other small C written tool compiled as a static binary, just to find out that netcat swiss army knife as a proxy server bash script is capable of doing the trick.

Jump host machine which was about to be used as a proxy server for http traffic did not have enabled access to tcp/port 8888 (port's firewall policies were prohibiting access to it).Since 8888 was the port targetted to run the proxy to allow TCP/IP port 8888 accessibility from the testing RHEL machine towards jump host, we had to issue first on jump host:

[root@jump-host: ~ ]# firewall-cmd –permanent –zone=public –add-port=8888/tcp

To run the script once placed under /root/tcp-proxy.sh on jump-host we had to run a never ending loop in a GNU screen session to make sure it runs forever:

Original tcp-proxy.sh script used taken from above article is:
 

#!/bin/sh -e


if [ $# != 3 ]
then
    echo "usage: $0 <src-port> <dst-host> <dst-port>"
    exit 0
fi

TMP=`mktemp -d`
BACK=$TMP/pipe.back
SENT=$TMP/pipe.sent
RCVD=$TMP/pipe.rcvd
trap 'rm -rf "$TMP"' EXIT
mkfifo -m 0600 "$BACK" "$SENT" "$RCVD"
sed 's/^/ => /' <"$SENT" &
sed 's/^/<=  /' <"$RCVD" &
nc -l -p "$1" <"$BACK" | tee "$SENT" | nc "$2" "$3" | tee "$RCVD" >"$BACK"


Above tcp-proxy.sh script you can download here.

I've tested the script one time and it worked, the script syntax is:

 [root@jump-host: ~ ]#  sh tcp-proxy.sh
usage: tcp-proxy.sh <src-port> <dst-host> <dst-port>


To make it work for one time connection I've run it as so:


 [root@jump-host: ~ ]# sh tcp-proxy.sh 8888 rpm-package-server-repo.com 80


To make the script work all the time I had to use one small one liner infinite bash loop which goes like this:

[root@jump-host: ~ ]#  while [ 1 ]; do sh tcp-proxy.sh 8888 rpm-package-server-repo.com 80; done​

On rhel-testing we had to configure for yum and all applications to use a proxy temporary via
 

[root@rhel-tresting: ~ ]# export http_proxy=jump-host_machine_accessibleIP:8888


And then use the normal yum check-update && yum update to apply to rhel-testing machine latest RPM package security updates.

The nice stuff about the tcp-proxy.sh with netcat in a inifite loop is you will see the binary copy of traffic flowing on the script which will make you feel like in those notorious Hackers movies ! 🙂

The stupid stuff is that sometimes some connections and RPM database updates or RPMs could be cancelled due to some kind of network issues.

To make the connection issues that are occuring to the improvised proxy server go away we finally used a slightly modified version from the original netcat script, which read like this.
 

#!/bin/sh -e


if [ $# != 3 ]
then
    echo "usage: $0 <src-port> <dst-host> <dst-port>"
        exit 0
        fi

        TMP=`mktemp -d`
        BACK=$TMP/pipe.back
        SENT=$TMP/pipe.sent
        RCVD=$TMP/pipe.rcvd
        trap 'rm -rf "$TMP"' EXIT
        mkfifo -m 0600 "$BACK" "$SENT" "$RCVD"
        sed 's/^/ => /' <"$SENT" &
        sed 's/^/<=  /' <"$RCVD" &
        nc –proxy-type http -l -p "$1" <"$BACK" | tee "$SENT" | nc "$2" "$3" | tee "$RCVD" >"$BACK"


Modified version tcp-proxy1.sh with –proxy-type http argument passed to netcat script u can download here.

With –proxy-type http yum check-update works normal just like with any normal fully functional http_proxy configured.

Next step wasto make the configuration permanent you can either add to /root/.bashrc or /etc/bashrc (if you need the setting to be system wide for every user that logged in to Linux system).

[root@rhel-tresting: ~ ]#  echo "http_proxy=http://jump-host_machine_accessibleIP:8888/" > /etc/environment


If you need to set the new built netcat TCP proxy only for yum package update tool include proxy only in /etc/yum.conf:

[root@rhel-tresting: ~ ]# vi /etc/yum.conf
proxy=http_proxy=http://jump-host_machine_accessibleIP:8888/


That's all now you have a proxy out of nothing with just a simple netcat enjoy.

Postfix copy every email to a central mailbox (send a copy of every mail sent via mail server to a given email)

Wednesday, October 28th, 2020

Postfix-logo-always-bcc-email-option-send-all-emails-to-a-single-address-with-postfix.svg

Say you need to do a mail server migration, where you have a local configured Postfix on a number of Linux hosts named:

Linux-host1
Linux-host2
Linux-host3

etc.


all configured to send email via old Email send host (MailServerHostOld.com) in each linux box's postfix configuration's /etc/postfix/main.cf.
Now due to some infrastructure change in the topology of network or anything else, you need to relay Mails sent via another asumably properly configured Linux host relay (MailServerNewHost.com).

Usually such a migrations has always a risk that some of the old sent emails originating from local running scripts on Linux-host1, Linux-Host2 … or some application or anything else set to send via them might not properly deliver emails to some external Internet based Mailboxes via the new relayhost MailServerNewHost.com.

E.g. in /etc/postfix/main.cf Linux-Host* machines, you have below config after the migration:

relayhost = [MailServerNewHost.com]

Lets say that you want to make sure, that you don't end up with lost emails as you can't be sure whether the new email server will deliver correctly to the old repicient emails. What to do then?

To make sure will not end up in undelivered state and get lost forever after a week or so (depending on the mail queue configuration retention period made on Linux sent MTAs and mailrelay MailServerNewHost.com, it is a very good approach to temprorary set all email communication that will be sent via MailServerNewHost.com a BCC emaills (A Blind Carbon Copy) of each sent mail via relay that is set on your local configured Postfix-es on Linux-Host*.

In postfix to achieve that it is very easy all you have to do is set on your MailServerNewHost.com a postfix config variable always_bcc smartly included by postfix Mail Transfer Agent developers for cases exactly like this.

To forward all passed emails via the mail server just place in the end of /etc/postfix/mail.conf after login via ssh on MailServerNewHost.com

always_bcc=All-Emails@your-diresired-redirect-email-address.com


Now all left is to reload the postfix to force the new configuration to get loaded on systemd based hosts as it is usually today do:

# systemctl reload postfix


Finally to make sure all works as expected and mail is sent do from do a testing via local MTAs. 
 

Linux-Host:~# echo -e "Testing body" | mail -s "testing subject" -r "testing@test.com" georgi.stoyanov@remote-user-email-whatever-address.com

Linux-Host:~# echo -e "Testing body" | mail -s "testing subject" -r "testing@test.com" georgi.stoyanov@sample-destination-address.com


As you can see I'm using the -r to simulate a sender address, this is a feature of mailx and is not available on older Linux Os hosts that are bundled with mail only command.
Now go to and open the All-Emails@your-diresired-redirect-email-address.com in Outlook (if it is M$ Office 365 MX Shared mailbox), Thunderbird or whatever email fetching software that supports POP3 or IMAP (in case if you configured the common all email mailbox to be on some other Postfix / Sendmail / Qmail MTA). and check whether you started receiving a lot of emails 🙂

That's all folks enjoy ! 🙂

How to enable HaProxy logging to a separate log /var/log/haproxy.log / prevent HAProxy duplicate messages to appear in /var/log/messages

Wednesday, February 19th, 2020

haproxy-logging-basics-how-to-log-to-separate-file-prevent-duplicate-messages-haproxy-haproxy-weblogo-squares
haproxy  logging can be managed in different form the most straight forward way is to directly use /dev/log either you can configure it to use some log management service as syslog or rsyslogd for that.

If you don't use rsyslog yet to install it: 

# apt install -y rsyslog

Then to activate logging via rsyslogd we can should add either to /etc/rsyslogd.conf or create a separte file and include it via /etc/rsyslogd.conf with following content:
 

Enable haproxy logging from rsyslogd


Log haproxy messages to separate log file you can use some of the usual syslog local0 to local7 locally used descriptors inside the conf (be aware that if you try to use some wrong value like local8, local9 as a logging facility you will get with empty haproxy.log, even though the permissions of /var/log/haproxy.log are readable and owned by haproxy user.

When logging to a local Syslog service, writing to a UNIX socket can be faster than targeting the TCP loopback address. Generally, on Linux systems, a UNIX socket listening for Syslog messages is available at /dev/log because this is where the syslog() function of the GNU C library is sending messages by default. To address UNIX socket in haproxy.cfg use:

log /dev/log local2 


If you want to log into separate log each of multiple running haproxy instances with different haproxy*.cfg add to /etc/rsyslog.conf lines like:

local2.* -/var/log/haproxylog2.log
local3.* -/var/log/haproxylog3.log


One important note to make here is since rsyslogd is used for haproxy logging you need to have enabled in rsyslogd imudp and have a UDP port listener on the machine.

E.g. somewhere in rsyslog.conf or via rsyslog include file from /etc/rsyslog.d/*.conf needs to have defined following lines:

$ModLoad imudp
$UDPServerRun 514


I prefer to use external /etc/rsyslog.d/20-haproxy.conf include file that is loaded and enabled rsyslogd via /etc/rsyslog.conf:

# vim /etc/rsyslog.d/20-haproxy.conf

$ModLoad imudp
$UDPServerRun 514​
local2.* -/var/log/haproxy2.log


It is also possible to produce different haproxy log output based on the severiy to differentiate between important and less important messages, to do so you'll need to rsyslog.conf something like:
 

# Creating separate log files based on the severity
local0.* /var/log/haproxy-traffic.log
local0.notice /var/log/haproxy-admin.log


Prevent Haproxy duplicate messages to appear in /var/log/messages

If you use local2 and some default rsyslog configuration then you will end up with the messages coming from haproxy towards local2 facility producing doubled simultaneous records to both your pre-defined /var/log/haproxy.log and /var/log/messages on Proxy servers that receive few thousands of simultanous connections per second.
This is a problem since doubling the log will produce too much data and on systems with smaller /var/ partition you will quickly run out of space + this haproxy requests logging to /var/log/messages makes the file quite unreadable for normal system events which are so important to track clearly what is happening on the server daily.

To prevent the haproxy duplicate messages you need to define somewhere in rsyslogd usually /etc/rsyslog.conf local2.none near line of facilities configured to log to file:

*.info;mail.none;authpriv.none;cron.none;local2.none     /var/log/messages

This configuration should work but is more rarely used as most people prefer to have haproxy log being written not directly to /dev/log which is used by other services such as syslogd / rsyslogd.

To use /dev/log to output logs from haproxy configuration in global section use config like:
 

global
        log /dev/log local2 debug
        chroot /var/lib/haproxy
        stats socket /run/haproxy/admin.sock mode 660 level admin
        stats timeout 30s
        user haproxy
        group haproxy
        daemon

The log global directive basically says, use the log line that was set in the global section for whole config till end of file. Putting a log global directive into the defaults section is equivalent to putting it into all of the subsequent proxy sections.

Using global logging rules is the most common HAProxy setup, but you can put them directly into a frontend section instead. It can be useful to have a different logging configuration as a one-off. For example, you might want to point to a different target Syslog server, use a different logging facility, or capture different severity levels depending on the use case of the backend application. 

Insetad of using /dev/log interface that is on many distributions heavily used by systemd to store / manage and distribute logs,  many haproxy server sysadmins nowdays prefer to use rsyslogd as a default logging facility that will manage haproxy logs.
Admins prefer to use some kind of mediator service to manage log writting such as rsyslogd or syslog, the reason behind might vary but perhaps most important reason is  by using rsyslogd it is possible to write logs simultaneously locally on disk and also forward logs  to a remote Logging server  running rsyslogd service.

Logging is defined in /etc/haproxy/haproxy.cfg or the respective configuration through global section but could be also configured to do a separate logging based on each of the defined Frontend Backends or default section. 
A sample exceprt from this section looks something like:

#———————————————————————
# Global settings
#———————————————————————
global
    log         127.0.0.1 local2

    chroot      /var/lib/haproxy
    pidfile     /var/run/haproxy.pid
    maxconn     4000
    user        haproxy
    group       haproxy
    daemon

    # turn on stats unix socket
    stats socket /var/lib/haproxy/stats

#———————————————————————
defaults
    mode                    tcp
    log                     global
    option                  tcplog
    #option                  dontlognull
    #option http-server-close
    #option forwardfor       except 127.0.0.0/8
    option                  redispatch
    retries                 7
    #timeout http-request    10s
    timeout queue           10m
    timeout connect         30s
    timeout client          20m
    timeout server          10m
    #timeout http-keep-alive 10s
    timeout check           30s
    maxconn                 3000


# HAProxy Monitoring Config
#———————————————————————
listen stats 192.168.0.5:8080                #Haproxy Monitoring run on port 8080
    mode http
    option httplog
    option http-server-close
    stats enable
    stats show-legends
    stats refresh 5s
    stats uri /stats                            #URL for HAProxy monitoring
    stats realm Haproxy\ Statistics
    stats auth hproxyauser:Password___          #User and Password for login to the monitoring dashboard


#———————————————————————
# frontend which proxys to the backends
#———————————————————————
frontend ft_DKV_PROD_WLPFO
    mode tcp
    bind 192.168.233.5:30000-31050
    option tcplog
    log-format %ci:%cp\ [%t]\ %ft\ %b/%s\ %Tw/%Tc/%Tt\ %B\ %ts\ %ac/%fc/%bc/%sc/%rc\ %sq/%bq
    default_backend Default_Bakend_Name


#———————————————————————
# round robin balancing between the various backends
#———————————————————————
backend bk_DKV_PROD_WLPFO
    mode tcp
    # (0) Load Balancing Method.
    balance source
    # (4) Peer Sync: a sticky session is a session maintained by persistence
    stick-table type ip size 1m peers hapeers expire 60m
    stick on src
    # (5) Server List
    # (5.1) Backend
    server Backend_Server1 10.10.10.1 check port 18088
    server Backend_Server2 10.10.10.2 check port 18088 backup


The log directive in above config instructs HAProxy to send logs to the Syslog server listening at 127.0.0.1:514. Messages are sent with facility local2, which is one of the standard, user-defined Syslog facilities. It’s also the facility that our rsyslog configuration is expecting. You can add more than one log statement to send output to multiple Syslog servers.

Once rsyslog and haproxy logging is configured as a minumum you need to restart rsyslog (assuming that haproxy config is already properly loaded):

# systemctl restart rsyslogd.service

To make sure rsyslog reloaded successfully:

systemctl status rsyslogd.service


Restarting HAproxy

If the rsyslogd logging to 127.0.0.1 port 514 was recently added a HAProxy restart should also be run, you can do it with:
 

# /usr/sbin/haproxy -f /etc/haproxy/haproxy.cfg -D -p /var/run/haproxy.pid -sf $(cat /var/run/haproxy.pid)


Or to restart use systemctl script (if haproxy is not used in a cluster with corosync / heartbeat).

# systemctl restart haproxy.service

You can control how much information is logged by adding a Syslog level by

    log         127.0.0.1 local2 info


The accepted values are the standard syslog security level severity:

Value Severity Keyword Deprecated keywords Description Condition
0 Emergency emerg panic System is unusable A panic condition.
1 Alert alert   Action must be taken immediately A condition that should be corrected immediately, such as a corrupted system database.
2 Critical crit   Critical conditions Hard device errors.
3 Error err error Error conditions  
4 Warning warning warn Warning conditions  
5 Notice notice   Normal but significant conditions Conditions that are not error conditions, but that may require special handling.
6 Informational info   Informational messages  
7 Debug debug   Debug-level messages Messages that contain information normally of use only when debugging a program.


Logging only errors / timeouts / retries and errors is done with option:

Note that if the rsyslog is configured to listen on different port for some weird reason you should not forget to set the proper listen port, e.g.:
 

  log         127.0.0.1:514 local2 info

option dontlog-normal

in defaults or frontend section.

You most likely want to enable this only during certain times, such as when performing benchmarking tests.

(or log-format-sd for structured-data syslog) directive in your defaults or frontend
 

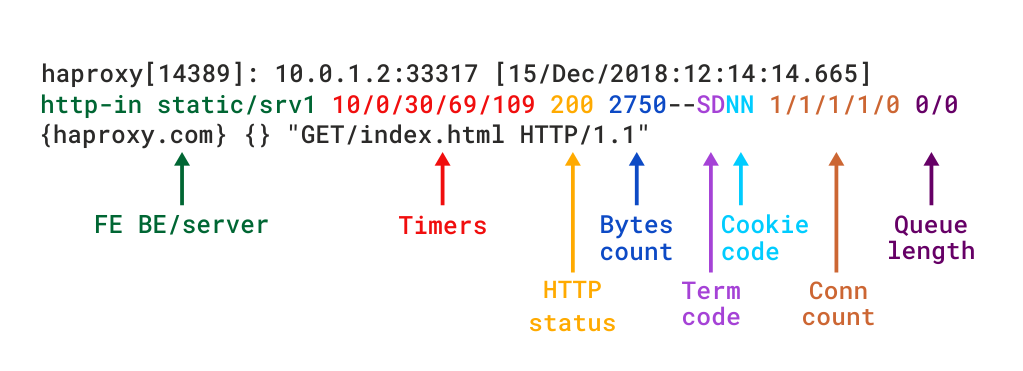
Haproxy Logging shortly explained


The type of logging you’ll see is determined by the proxy mode that you set within HAProxy. HAProxy can operate either as a Layer 4 (TCP) proxy or as Layer 7 (HTTP) proxy. TCP mode is the default. In this mode, a full-duplex connection is established between clients and servers, and no layer 7 examination will be performed. When in TCP mode, which is set by adding mode tcp, you should also add option tcplog. With this option, the log format defaults to a structure that provides useful information like Layer 4 connection details, timers, byte count and so on.

Below is example of configured logging with some explanations:

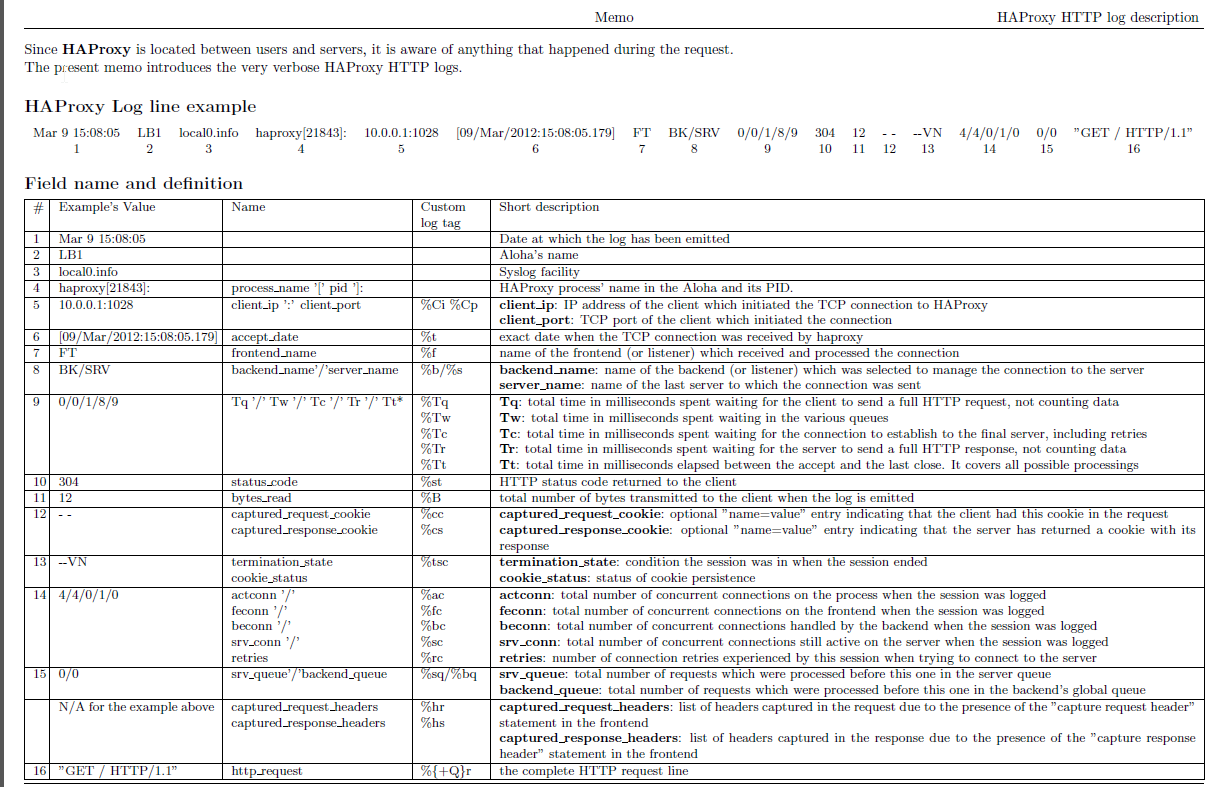
Log-format "%ci:%cp [%t] %ft %b/%s %Tw/%Tc/%Tt %B %ts %ac/%fc/%bc/%sc/%rc %sq/%bq"

haproxy-logged-fields-explained
Example of Log-Format configuration as shown above outputted of haproxy config:

Log-format "%ci:%cp [%tr] %ft %b/%s %TR/%Tw/%Tc/%Tr/%Ta %ST %B %CC %CS %tsc %ac/%fc/%bc/%sc/%rc %sq/%bq %hr %hs %{+Q}r"

haproxy_http_log_format-explained1

To understand meaning of this abbreviations you'll have to closely read  haproxy-log-format.txt. More in depth info is to be found in HTTP Log format documentation


haproxy_logging-explained

Logging HTTP request headers

HTTP request header can be logged via:
 

 http-request capture

frontend website
    bind :80
    http-request capture req.hdr(Host) len 10
    http-request capture req.hdr(User-Agent) len 100
    default_backend webservers


The log will show headers between curly braces and separated by pipe symbols. Here you can see the Host and User-Agent headers for a request:

192.168.150.1:57190 [20/Dec/2018:22:20:00.899] website~ webservers/server1 0/0/1/0/1 200 462 – – —- 1/1/0/0/0 0/0 {mywebsite.com|Mozilla/5.0 (X11; Linux x86_64) AppleWebKit/537.36 (KHTML, like Gecko) Ubuntu Chromium/71.0.3578.80 } "GET / HTTP/1.1"


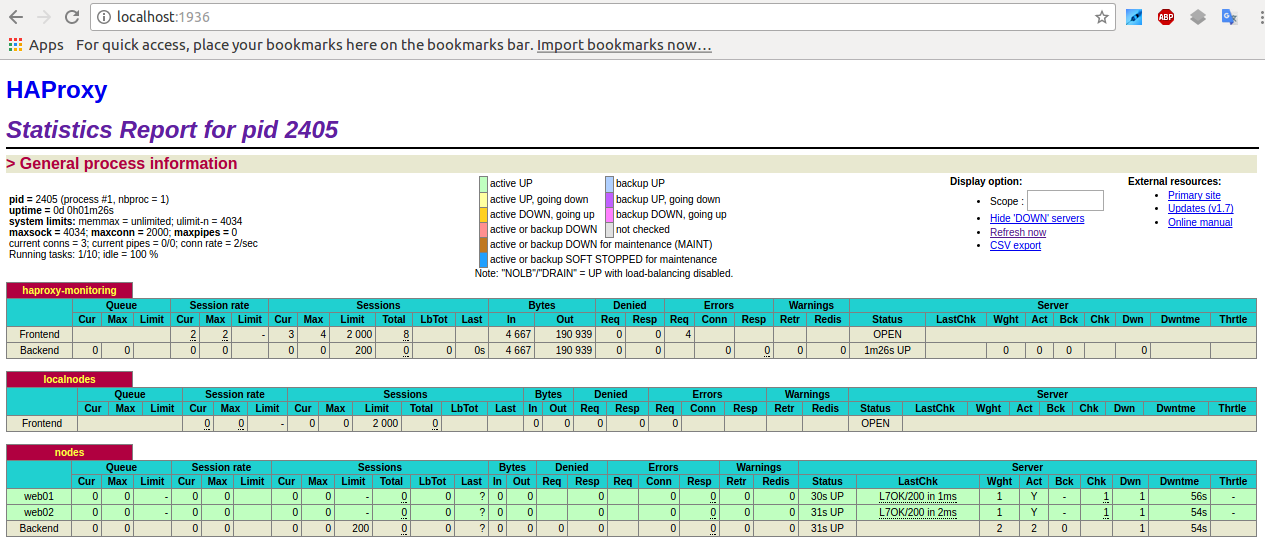
Haproxy Stats Monitoring Web interface


Haproxy is having a simplistic stats interface which if enabled produces some general useful information like in above screenshot, through which
you can get a very basic in browser statistics and track potential issues with the proxied traffic for all configured backends / frontends incoming outgoing
network packets configured nodes
 experienced downtimes etc.

haproxy-statistics-report-picture

The basic configuration to make the stats interface accessible would be like pointed in above config for example to enable network listener on address
 

https://192.168.0.5:8080/stats


with hproxyuser / password config would be:

# HAProxy Monitoring Config
#———————————————————————
listen stats 192.168.0.5:8080                #Haproxy Monitoring run on port 8080
    mode http
    option httplog
    option http-server-close
    stats enable
    stats show-legends
    stats refresh 5s
    stats uri /stats                            #URL for HAProxy monitoring
    stats realm Haproxy\ Statistics
    stats auth hproxyauser:Password___          #User and Password for login to the monitoring dashboard


Sessions states and disconnect errors on new application setup

Both TCP and HTTP logs include a termination state code that tells you the way in which the TCP or HTTP session ended. It’s a two-character code. The first character reports the first event that caused the session to terminate, while the second reports the TCP or HTTP session state when it was closed.

Here are some essential termination codes to track in for in the log:
 

Here are some termination code examples most commonly to see on TCP connection establishment errors:

Two-character code    Meaning
—    Normal termination on both sides.
cD    The client did not send nor acknowledge any data and eventually timeout client expired.
SC    The server explicitly refused the TCP connection.
PC    The proxy refused to establish a connection to the server because the process’ socket limit was reached while attempting to connect.


To get all non-properly exited codes the easiest way is to just grep for anything that is different from a termination code –, like that:

tail -f /var/log/haproxy.log | grep -v ' — '


This should output in real time every TCP connection that is exiting improperly.

There’s a wide variety of reasons a connection may have been closed. Detailed information about all possible termination codes can be found in the HAProxy documentation.
To get better understanding a very useful reading to haproxy Debug errors with  is in haproxy-logging.txt in that small file are collected all the cryptic error messages codes you might find in your logs when you're first time configuring the Haproxy frontend / backend and the backend application behind.

Another useful analyze tool which can be used to analyze Layer 7 HTTP traffic is halog for more on it just google around.