Posts Tagged ‘bash shell’

Report haproxy node switch script useful for Zabbix or other monitoring

Tuesday, June 9th, 2020

zabbix-monitoring-logo
For those who administer corosync clustered haproxy and needs to build monitoring in case if the main configured Haproxy node in the cluster is changed, I've developed a small script to be integrated with zabbix-agent installed to report to a central zabbix server via a zabbix proxy.
The script  is very simple it assumed DC1 variable is the default used haproxy node and DC2 and DC3 are 2 backup nodes. The script is made to use crm_mon which is not installed by default on each server by default so if you'll be using it you'll have to install it first, but anyways the script can easily be adapted to use pcs cmd instead.

Below is the bash shell script:

UserParameter=active.dc,f=0; for i in $(sudo /usr/sbin/crm_mon -n -1|grep -i 'Node ' |awk '{ print $2 }'); do ((f++)); DC[$f]="$i"; done; \
DC=$(sudo /usr/sbin/crm_mon -n -1 | grep 'Current DC' | awk '{ print $1 " " $2 " " $3}' | awk '{ print $3 }'); \
if [ “$DC” == “${DC[1]}” ]; then echo “1 Default DC Switched to ${DC[1]}”; elif [ “$DC” == “${DC[2]}” ]; then \
echo "2 Default DC Switched to ${DC[2]}”; elif [ “$DC” == “${DC[3]}” ]; then echo “3 Default DC: ${DC[3]}"; fi


To configure it with zabbix monitoring it can be configured via UserParameterScript.

The way I configured  it in Zabbix is as so:


1. Create the userpameter_active_node.conf

Below script is 3 nodes Haproxy cluster

# cat > /etc/zabbix/zabbix_agentd.d/userparameter_active_node.conf

UserParameter=active.dc,f=0; for i in $(sudo /usr/sbin/crm_mon -n -1|grep -i 'Node ' |awk '{ print $2 }'); do ((f++)); DC[$f]="$i"; done; \
DC=$(sudo /usr/sbin/crm_mon -n -1 | grep 'Current DC' | awk '{ print $1 " " $2 " " $3}' | awk '{ print $3 }'); \
if [ “$DC” == “${DC[1]}” ]; then echo “1 Default DC Switched to ${DC[1]}”; elif [ “$DC” == “${DC[2]}” ]; then \
echo "2 Default DC Switched to ${DC[2]}”; elif [ “$DC” == “${DC[3]}” ]; then echo “3 Default DC: ${DC[3]}"; fi

Once pasted to save the file press CTRL + D


The version of the script with 2 nodes slightly improved is like so:
 

UserParameter=active.dc,f=0; for i in $(sudo /usr/sbin/crm_mon -n -1|grep -i 'Node ' |awk '{ print $2 }' | sed -e 's#:##g'); do DC_ARRAY[$f]=”$i”; ((f++)); done; GET_CURR_DC=$(sudo /usr/sbin/crm_mon -n -1 | grep ‘Current DC’ | awk ‘{ print $1 ” ” $2 ” ” $3}’ | awk ‘{ print $3 }’); if [ “$GET_CURR_DC” == “${DC_ARRAY[0]}” ]; then echo “1 Default DC ${DC_ARRAY[0]}”; fi; if [ “$GET_CURR_DC” == “${DC_ARRAY[1]}” ]; then echo “2 Default Current DC Switched to ${DC_ARRAY[1]} Please check “; fi; if [ -z “$GET_CURR_DC” ] || [ -z “$DC_ARRAY[1]” ]; then printf "Error something might be wrong with HAProxy Cluster on  $HOSTNAME "; fi;


The haproxy_active_DC_zabbix.sh script with a bit of more comments as explanations is available here 
2. Configure access for /usr/sbin/crm_mon for zabbix user in sudoers


# vim /etc/sudoers

zabbix          ALL=NOPASSWD: /usr/sbin/crm_mon


3. Configure in Zabbix for active.dc key Trigger and Item

active-node-switch1

Howto Configure Linux shell Prompt / Setup custom Terminal show Prompt using default shell variables PS1, PS2, PS3, PS4

Tuesday, August 27th, 2019

how-to-configure-lunux-bsd-shell-prompt-ps1-howto-make-your-terminal-console-shell-nice-and-shiny-1

System Console, Command Operation Console  or Terminal is a Physical device for text (command) input from keyboard, getting the command output and monitoring the status of a shell or programs I/O operations generated traditionally with attached screen. With the development of Computers, physical consoles has become emulated and the input output is translated on the monitor usually via a data transfer  protocol historically mostly over TCP/IP connection to remote IP with telnet or rsh, but due to security limitations Consoles are now accessed over data (encrypted) network protocols with SHA2 / MD5 cryptography algorithm enabled such as over SSH (Secure Shell) network protocol..
The ancestors of physical consoles which in the past were just a Terminal (Monitoring / Monitor device attached to a MainFrame system computer).

Mainframe-physical-terminal-monitor-Old-Computer

What is Physical Console
A classical TTY (TeleTYpewriter) device looked like so and served the purpose of being just a communication and display deivce, whether in reality the actual computing and storage tape devices were in a separate room and communicating to Terminal.

mainframe-super-computer-computing-tape-machine
TTYs are still present in  modern UNIX like GNU / Linux distrubions OSes and the BSD berkley 4.4 code based FreeBSD / NetBSD / OpenBSD if you have installed the OS on a physical computer in FreeBSD and Solaris / SunOS there is also tty command. TTY utility in *nix writes the name of the terminal attached to standard input to standard output, in Linux there is a GNU remake of same program part called GNU tty of coreutils package (try man tty) for more.

The physical console is recognizable in Linux as it is indicated with other tree letters pts – (pseudo terminal device) standing for a terminal device which is emulated by an other program (example: xterm, screen, or ssh are such programs). A pts is the slave part of a pts is pseudo there is no separate binary program for it but it is dynamically allocated in memory.
PTS is also called Line consle in Cisco Switches / Router devices, VTY is the physical Serial Console connected on your Cisco device and the network connection emulation to network device is creates with a virtual console session VTL (Virtual Terminal Line). In freebsd the actual /dev/pts* /dev/tty* temporary devices on the OS are slightly different and have naming such as /dev/ttys001.
But the existence of tty and pts emulator is not enough for communicating interrupts to Kernel and UserLand binaries of the Linux / BSD OS, thus to send the commands on top of it is running a System Shell as CSH / TSH / TCSH or BASH which is usually the first program set to run after user logs in over ptty or pseudo tty virtual terminal.
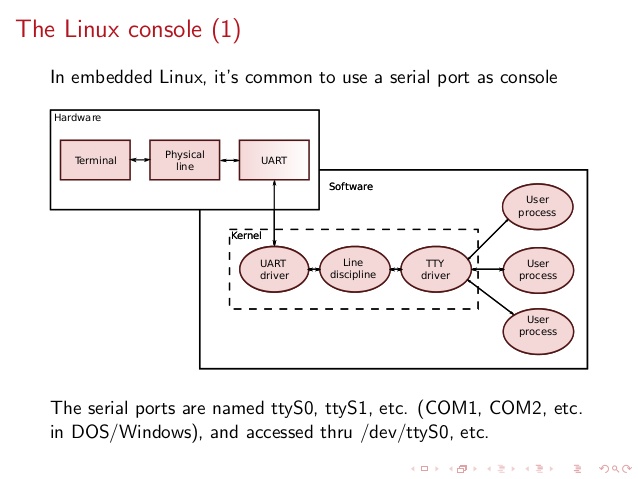
linux-tty-terminal-explained-brief-intro-to-linux-device-drivers-20-638


Setting the Bash Prompt in Terminal / Console on GNU / Linux

Bash has system environments to control multiple of variables, which are usually visible with env command, one important variable to change in the past was for example USER / USERNAME which was red by IRC Chat clients  such as BitchX / irssi and could be displayed publicly so if not changed to a separate value, one could have known your Linux login username by simple /whois query to the Nickname in question (if no inetd / xinetd service was running on the Linux box and usually inetd was not running).

Below is my custom set USER / USERNAME to separate

hipo@pcfreak:~$ env|grep USER
USERNAME=Attitude
USER=Attitude

There is plenty of variables to  tune email such as MAIL store directory, terminal used TERM, EDITOR etc. but there are some
variables that are not visible with env query as they're not globally available for all users but just for the single user, to show this ones you need to use declare command instead, to get a full list of All Single and System Wide defined variables and functions type declare in the bash shell, for readability, below is last 10 returned results:


hipo@pcfreak:~$ declare | tail -10
{
    local quoted=${1//\'/\'\\\'\'};
    printf "'%s'" "$quoted"
}
quote_readline ()
{
    local quoted;
    _quote_readline_by_ref "$1" ret;
    printf %s "$ret"
}


PS1 is present there virtually on any modern Linux distribution and is installed through user home's directory $HOME/.bashrc , ~/.profile or .bash_profile or System Wide globally for all existing users in /etc/passwd (password database file) from /etc/bash.bashrc
In Debian / Ubuntu / Mint GNU / Linux this system variable is set in user home's .bashrc but in Fedora / RHEL Linux distro,
PS1 is configured from /home/username/.bash_profile to find out where PS1 is located for ur user:

cd ~
grep -Rli PS1 .bash*

Here is one more example:

hipo@pcfreak:~$ declare|grep -i PS1|head -1
PS1='\[\e]0;\u@\h: \w\a\]${debian_chroot:+($debian_chroot)}\u@\h:\w\$ '
 

hipo@pcfreak:~$ grep PS1 /etc/bash.bashrc
[ -z “$PS1” ] && return
# but only if not SUDOing and have SUDO_PS1 set; then assume smart user.
if ! [ -n “${SUDO_USER}” -a -n “${SUDO_PS1}” ]; then
  PS1='${debian_chroot:+($debian_chroot)}\u@\h:\w\$ '


Getting current logged in user shell configured PS1 variable can be done with echo:

hipo@pcfreak:~$ echo $PS1
\[\e]0;\u@\h: \w\a\]${debian_chroot:+($debian_chroot)}\u@\h:\w\$

So lets observe a little bit the meaning of this obscure line of (code) instructions code which are understood by BASH when being red from PS1 var to do so, I'll give a list of meaning of main understood commands, each of which is defined with \.

The ${debian_chroot} shell variable is defined from /etc/bash.bashrc

Easiest way to change PS1 is to export the string you like with the arguments like so:


root@linux:/home/hipo# export PS1='My-Custom_Server-Name# '
My-Custom_Server-Name# echo $PS1
My-Custom_Server-Name#


  •     \a : an ASCII bell character (07)
  •     \d : the date in “Weekday Month Date” format (e.g., “Tue May 26”)
  •     \D{format} : the format is passed to strftime(3) and the result is inserted into the prompt string; an empty format results in a locale-specific time representation. The braces are required
  •     \e : an ASCII escape character (033)
  •     \h : the hostname up to the first ‘.’
  •     \H : the hostname
  •     \j : the number of jobs currently managed by the shell
  •     \l : the basename of the shell's terminal device name
  •     \n : newline
  •     \r : carriage return
  •     \s : the name of the shell, the basename of $0 (the portion following the final slash)
  •     \t : the current time in 24-hour HH:MM:SS format
  •     \T : the current time in 12-hour HH:MM:SS format
  •     \@ : the current time in 12-hour am/pm format
  •     \A : the current time in 24-hour HH:MM format
  •     \u : the username of the current user
  •     \v : the version of bash (e.g., 2.00)
  •     \V : the release of bash, version + patch level (e.g., 2.00.0)
  •     \w : the current working directory, with $HOME abbreviated with a tilde
  •     \W : the basename of the current working directory, with $HOME abbreviated with a tilde
  •     \! : the history number of this command
  •     \# : the command number of this command
  •     \$ : if the effective UID is 0, a #, otherwise a $
  •     \nnn : the character corresponding to the octal number nnn
  •     \\ : a backslash
  •     \[ : begin a sequence of non-printing characters, which could be used to embed a terminal control sequence into the prompt
  •     \] : end a sequence of non-printing characters

The default's PS1 set prompt on Debian Linux is:
 

echo $PS1
\[\e]0;\u@\h: \w\a\]${debian_chroot:+($debian_chroot)}\u@\h:\w\$


As you can see \u (print username) \h (print hostname)  and \W (basename of current working dir) or \w (print $HOME/current working dir)
are the most essential, the rest are bell character, escape character etc.

A very good way to make your life easier and learn the abbreviations / generate exactly the PS1 PROMPT you want to have is with Easy Bash PS1 Generator Web Utility
with which you can just click over buttons that are capable to produce all of the PS1 codes.
 

1. How to show current hour:minute:seconds / print full date in Prompt Shell (PS)


Here is an example with setting the Bash Shell prompt  to include also the current time in format hour:minute:seconds (very useful if you're executing commands on a critical servers and you run commands in some kind of virtual terminal like screen or tmux.
 

root@pcfreak:~# PS1="\n\t \u@\h:\w# "
14:03:51 root@pcfreak:/home#
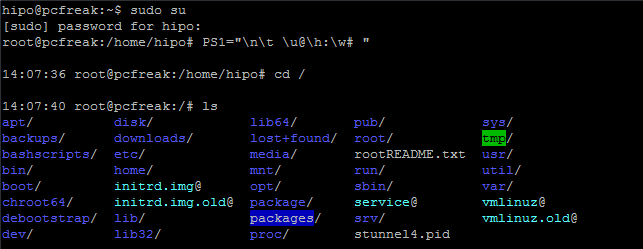

PS1-how-to-setup-date-time-hour-minutes-and-seconds-in-bash-shell-prompt


export PS1='\u@\H \D{%Y-%m-%d %H:%M;%S%z}] \W ] \$ '


export-PS1-Linux-set-full-date-time-clock-prompt-screenshot-console


Make superuser appear in RED color (adding PS1 prompt custom color for a User)
 

root@pcfreak:~$  PS1="\\[$(tput setaf 1)\\]\\u@\\h:\\w #\\[$(tput sgr0)\\]"


how-to-change-colors-in-bash-prompt-shell-on-linux-shell-environment

In above example the Shell Prompt Color changed is changed for administrator (root) to shebang symbol # in red, green, yellow and blue for the sake to show you how it is done, however this example can be adapted for any user on the system. Setting different coloring for users is very handy if you have to administer Mail Server service like Qmail or other Application that consists of multiple small ones of multiple daemons such as qmail + vpopmail + clamd + mysql etc. Under such circumstances, coloring each of the users in different color like in the example for debugging is very useful.

Coloring the PS1 system prompt on Linux to different color has been a standard practice in Linux Server environments running Redhat Enterprise Linux (RHEL) and SuSE Enterprise Linux and some Desktop distributions such as Mint Linux.

To make The Root prompt Red colored only for system super user (root) on any Linux distribution
, add the following to /etc/bashrc, e.g.

vim /etc/bashrc


# If id command returns zero, you've root access.
if [ $(id -u) -eq 0 ];
then # you are root, set red colour prompt
  PS1="\\[$(tput setaf 1)\\]\\u@\\h:\\w #\\[$(tput sgr0)\\]"
else # normal
  PS1="[\\u@\\h:\\w] $"
fi


2. How to make the prompt of a System user appear Green


Add to ~/.bashrc  following line


PS1="\\[$(tput setaf 2)\\]\\u@\\h:\\w #\\[$(tput sgr0)\\]"


3. Print New line, username@hostname, base PTY, shell level, history (number), newline and full working directory $PWD


export PS1='\n[\u@\h \l:$SHLVL:\!]\n$PWD\$ '


4. Showing the numbert of jobs the shell is currently managing.


This is useful if you run and switch with fg / bg (foreground / background) commands
to switch between jobs and forget some old job.


export PS1='\u@\H \D{%Y-%m-%d %H:%M;%S%z}] \W \$]'


Multi Lines Prompt / Make very colorful Shell prompt full of stats info

PS1="\n\[\033[35m\]\$(/bin/date)\n\[\033[32m\]\w\n\[\033[1;31m\]\u@\h: \[\033[1;34m\]\$(/usr/bin/tty | /bin/sed -e ‘s:/dev/::’): \[\033[1;36m\]\$(/bin/ls -1 | /usr/bin/wc -l | /bin/sed ‘s: ::g’) files \[\033[1;33m\]\$(/bin/ls -lah | /bin/grep -m 1 total | /bin/sed ‘s/total //’)b\[\033[0m\] -> \[\033[0m\]"


prompt-show-how-many-files-and-virtual-pts-ps1-linux
 

5. Set color change on command failure


If you have a broken command or the command ended with non zero output with some kind of bad nasty message and you want to make, that more appearing making it red heighlighted, here is how:


PROMPT_COMMAND='PS1="\[\033[0;33m\][\!]\`if [[ \$? = “0” ]]; then echo “\\[\\033[32m\\]”; else echo “\\[\\033[31m\\]”; fi\`[\u.\h: \`if [[ `pwd|wc -c|tr -d ” “` > 18 ]]; then echo “\\W”; else echo “\\w”; fi\`]\$\[\033[0m\] “; echo -ne “\033]0;`hostname -s`:`pwd`\007"'


6. Other beautiful PS1 Color Prompts with statistics


PS1="\n\[\e[32;1m\](\[\e[37;1m\]\u\[\e[32;1m\])-(\[\e[37;1m\]jobs:\j\[\e[32;1m\])-(\[\e[37;1m\]\w\[\e[32;1m\])\n(\[\[\e[37;1m\]! \!\[\e[32;1m\])-> \[\e[0m\]"


another-very-beuatiful-bash-colorful-prompt


7. Add Muliple Colors to Same Shell prompt


function prompt { local BLUE="\[\033[0;34m\]” local DARK_BLUE=”\[\033[1;34m\]” local RED=”\[\033[0;31m\]” local DARK_RED=”\[\033[1;31m\]” local NO_COLOR=”\[\033[0m\]” case $TERM in xterm*|rxvt*) TITLEBAR=’\[\033]0;\u@\h:\w\007\]’ ;; *) TITLEBAR=”” ;; esac PS1=”\u@\h [\t]> ” PS1=”${TITLEBAR}\ $BLUE\u@\h $RED[\t]>$NO_COLOR " PS2='continue-> ' PS4='$0.$LINENO+ ' }
colorful-prompt-blue-and-red-linux-console-PS1
 

8. Setting / Change Shell background Color


changing-background-color-of-bash-shell-prompt-linux


export PS1="\[$(tput bold)$(tput setb 4)$(tput setaf 7)\]\u@\h:\w $ \[$(tput sgr0)\]"


tput Color Capabilities:

  • tput setab [1-7] – Set a background color using ANSI escape
  • tput setb [1-7] – Set a background color
  • tput setaf [1-7] – Set a foreground color using ANSI escape
  • tput setf [1-7] – Set a foreground color

tput Text Mode Capabilities:

  • tput bold – Set bold mode
  • tput dim – turn on half-bright mode
  • tput smul – begin underline mode
  • tput rmul – exit underline mode
  • tput rev – Turn on reverse mode
  • tput smso – Enter standout mode (bold on rxvt)
  • tput rmso – Exit standout mode
  • tput sgr0 – Turn off all attributes

Color Code for tput:

  • 0 – Black
  • 1 – Red
  • 2 – Green
  • 3 – Yellow
  • 4 – Blue
  • 5 – Magenta
  • 6 – Cyan
  • 7 – White


9. Howto Use bash shell function inside PS1 variable

If you administrate Apache or other HTTPD servers or any other server whose processes are forked and do raise drastically at times to keep an eye while actively working on the server.


function httpdcount { ps aux | grep apache2 | grep -v grep | wc -l } export PS1="\u@\h [`httpdcount`]> "

10. PS2, PS3, PS4 little known variables
 

I'll not get much into detail to PS2, PS3, PS4 but will mention them as perhaps many people are not even aware they exist.
They're rarely used in the daily system administrator's work but useful for Shell scripting purposes of Dev Ops and Shell Scripting Guru Programmers.

  • PS2 – Continuation interactive prompt

A very long unix command can be broken down to multiple line by giving \ at the end of the line. The default interactive prompt for a multi-line command is “> “.  Let us change this default behavior to display “continue->” by using PS2 environment variable as shown below.

hipo@db-host :~$ myisamchk –silent –force –fast –update-state \
> –key_buffer_size=512M –sort_buffer_size=512M \
> –read_buffer_size=4M –write_buffer_size=4M \
> /var/lib/mysql/bugs/*.MYI
[Note: This uses the default “>” for continuation prompt]

  • PS3 – Prompt used by “select” inside shell script (usefulif you write scripts with user prompts)


  • PS4 – Used by “set -x” to prefix tracing output
    The PS4 shell variable defines the prompt that gets displayed.

You can find  example with script demonstrating PS2, PS3, PS4 use via small shell scripts in thegeekstuff's article Take control of PS1, PS2, PS3, PS4 read it here


Summary


In this article, I've shortly reviewed on what is a TTY, how it evolved into Pseudo TTY and how it relates to current shells which are the interface communicating with the modern UNIX like Operating systems's userland and kernel.
Also it was reviewed shortly how the current definitions of shell variables could be viewed with declare cmd. Also I went through on how to display the PS1 variable and  on how to modify PS1 and make the prompt different statistics and monitoring parameters straight into the command shell. I've shown some common PS1 strings that report on current date hour, minute, seconds, modify the coloring of the bash prompt shell, show processes count, and some PS1 examples were given that combines beuatiful shell coloring as well as how the Prompt background color can be changed.
Finally was shown how a combination of commands can be executed by exporting to PS1 to update process counf of Apache on every shell prompt iteration.
Other shell goodies are mostly welcome



How to search text strings only in hidden files dot (.) files within a directory on Linux and FreeBSD

Saturday, April 28th, 2012

how-to-search-hidden-files-linux-freebsd-logo_grep
If there is necessity to look for a string in all hidden files with all sub-level subdirectories (be aware this will be time consuming and CPU stressing) use:
 

hipo@noah:~$ grep -rli 'PATH' .*

./.gftp/gftprc
./.gftp/cache/cache.OOqZVP
….

Sometimes its necessery to only grep for variables within the first-level directories (lets say you would like to grep a 'PATH' variable set, string within the $HOME directory, the command is:

hipo@noah:~$ grep PATH .[!.]*

.profile:PATH=/bin:/usr/bin/:${PATH}
.profile:export PATH
.profile:# set PATH so it includes user's private bin if it exists
.profile: PATH="$HOME/bin:$PATH"
.profile.language-env-bak:# set PATH so it includes user's private bin if it exists
.profile.language-env-bak: PATH="$HOME/bin:$PATH"
.viminfo:?/PATH.xcyrillic: XNLSPATH=/usr/X11R6/lib/X11/nls
.xcyrillic: export XNLSPATH

The regular expression .[!.]*, means exclude any file or directory name starting with '..', e.g. match only .* files

Note that to use the grep PATH .[!.]* on FreeBSD you will have to use this regular expression in bash shell, the default BSD csh or tsch shells will not recognize the regular expression, e.g.:

grep PATH '.[!.]*'
grep: .[!.]*: No such file or directory

Hence on BSD, if you need to look up for a string within the home directory, hidden files: .profile .bashrc .bash_profile .cshrc run it under bash shell:

freebsd# /usr/local/bin/bash
[root@freebsd:/home/hipo]# grep PATH .[!.]*

.bash_profile:# set PATH so it includes user's private bin if it exists
.bash_profile:# PATH=~/bin:"${PATH}"
.bash_profile:# do the same with …

Another easier to remember, alternative grep cmd is:

hipo@noah:~$ grep PATH .*
.profile:PATH=/bin:/usr/bin/:${PATH}
.profile:export PATH
.profile:# set PATH so it includes user's private bin if it exists
.profile: PATH="$HOME/bin:$PATH"
….

Note that grep 'string' .* is a bit different in meaning, as it will not prevent grep to match filenames with names ..filename1, ..filename2 etc.
Though grep 'string' .* will work note that it will sometimes output some unwanted matches if filenames with double dot in the beginning of file name are there …
That's all folks 🙂

Command to get CPU server load in % percentage using bash and /proc/stat on Linux

Wednesday, March 11th, 2015

Command-to-get-CPU-server-load-in-percentage-using-bash-shell-script-and-linux-proc-stat

Getting load avarage is easy with uptime command, however since nowadays Linux servers are running on multiple CPU machines and Dual cores, returned load avarage shows only information concerning a single processor. Of course seeing overall CPU server load is possible with TOP / TLoad command  / HTOP and a bunch of other monitoring commands, but how you can get a CPU percentage server load using just  /proc/stat and bash scripting? Here is hwo:
 

:;sleep=1;CPU=(`cat /proc/stat | head -n 1`);PREV_TOTAL=0;for VALUE in "${CPU[@]}”; do let “PREV_TOTAL=$PREV_TOTAL+$VALUE”;done;PREV_IDLE=${CPU[4]};sleep $sleep; CPU=(`cat /proc/stat | head -n 1`);unset CPU[0];IDLE=${CPU[4]};TOTAL=0; for VALUE in “${CPU[@]}"; do let "TOTAL=$TOTAL+$VALUE"; done;echo $(echo "scale=2; ((($sleep*1000)*(($TOTAL-$PREV_TOTAL)-($IDLE-$PREV_IDLE))/($TOTAL-$PREV_TOTAL))/10)" | bc -l );

52.45

As you can see command output shows CPU is loaded on 52.45%, so this server will soon have to be replaced with better hardware, because it gets CPU loaded over 50%

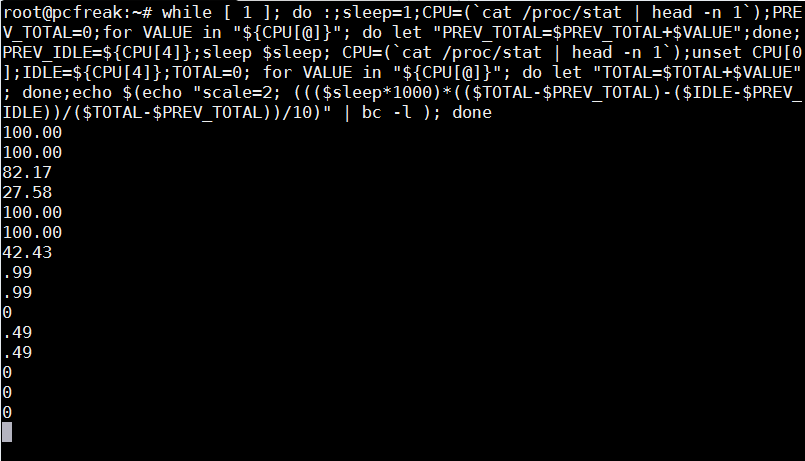
It is useful to use above bash shell command one liner together with little for loop to refresh output every few seconds and see how the CPU is loaded in percentage over time.


for i in $(seq 0 10); do :;sleep=1;CPU=(`cat /proc/stat | head -n 1`);PREV_TOTAL=0;for VALUE in "${CPU[@]}”; do let “PREV_TOTAL=$PREV_TOTAL+$VALUE”;done;PREV_IDLE=${CPU[4]};sleep $sleep; CPU=(`cat /proc/stat | head -n 1`);unset CPU[0];IDLE=${CPU[4]};TOTAL=0; for VALUE in “${CPU[@]}"; do let "TOTAL=$TOTAL+$VALUE"; done;echo $(echo "scale=2; ((($sleep*1000)*(($TOTAL-$PREV_TOTAL)-($IDLE-$PREV_IDLE))/($TOTAL-$PREV_TOTAL))/10)" | bc -l ); done

47.50

13.86
27.36
82.67
77.18

To monitor "forever" output from all server processor overall load use:
 

while [ 1 ]; do :;sleep=1;CPU=(`cat /proc/stat | head -n 1`);PREV_TOTAL=0;for VALUE in “${CPU[@]}”; do let “PREV_TOTAL=$PREV_TOTAL+$VALUE”;done;PREV_IDLE=${CPU[4]};sleep $sleep; CPU=(`cat /proc/stat | head -n 1`);unset CPU[0];IDLE=${CPU[4]};TOTAL=0; for VALUE in “${CPU[@]}"; do let "TOTAL=$TOTAL+$VALUE"; done;echo $(echo "scale=2; ((($sleep*1000)*(($TOTAL-$PREV_TOTAL)-($IDLE-$PREV_IDLE))/($TOTAL-$PREV_TOTAL))/10)" | bc -l ); done


Auto restart Apache on High server load (bash shell script) – Fixing Apache server temporal overload issues

Saturday, March 24th, 2012

auto-restart-apache-on-high-load-bash-shell-script-fixing-apache-temporal-overload-issues

I've written a tiny script to check and restart, Apache if the server encounters, extremely high load avarage like for instance more than (>25). Below is an example of a server reaching a very high load avarage:;

server~:# uptime
13:46:59 up 2 days, 18:54, 1 user, load average: 58.09, 59.08, 60.05
load average: 0.09, 0.08, 0.08

Sometimes high load avarage is not a problem, as the server might have a very powerful hardware. A high load numbers is not always an indicator for a serious problems. Some 16 CPU dual core (2.18 Ghz) machine with 16GB of ram could probably work normally with a high load avarage like in the example. Anyhow as most servers are not so powerful having such a high load avarage, makes the machine hardly do its job routine.

In my specific, case one of our Debian Linux servers is periodically reaching to a very high load level numbers. When this happens the Apache webserver is often incapable to serve its incoming requests and starts lagging for clients. The only work-around is to stop the Apache server for a couple of seconds (10 or 20 seconds) and then start it again once the load avarage has dropped to less than "3".

If this temporary fix is not applied on time, the server load gets increased exponentially until all the server services (ssh, ftp … whatever) stop responding normally to requests and the server completely hangs …

Often this server overloads, are occuring at night time so I'm not logged in on the server and one such unexpected overload makes the server unreachable for hours.
To get around the sudden high periodic load avarage server increase, I've written a tiny bash script to monitor, the server load avarage and initiate an Apache server stop and start with a few seconds delay in between.

#!/bin/sh
# script to check server for extremely high load and restart Apache if the condition is matched
check=`cat /proc/loadavg | sed 's/\./ /' | awk '{print $1}'`
# define max load avarage when script is triggered
max_load='25'
# log file
high_load_log='/var/log/apache_high_load_restart.log';
# location of inidex.php to overwrite with temporary message
index_php_loc='/home/site/www/index.php';
# location to Apache init script
apache_init='/etc/init.d/apache2';
#
site_maintenance_msg="Site Maintenance in progress - We will be back online in a minute";
if [ $check -gt "$max_load" ]; then>
#25 is load average on 5 minutes
cp -rpf $index_php_loc $index_php_loc.bak_ap
echo "$site_maintenance_msg" > $index_php_loc
sleep 15;
if [ $check -gt "$max_load" ]; then
$apache_init stop
sleep 5;
$apache_init restart
echo "$(date) : Apache Restart due to excessive load | $check |" >> $high_load_log;
cp -rpf $index_php_loc.bak_ap $index_php_loc
fi
fi

The idea of the script is partially based on a forum thread – Auto Restart Apache on High Loadhttp://www.webhostingtalk.com/showthread.php?t=971304Here is a link to my restart_apache_on_high_load.sh script

The script is written in a way that it makes two "if" condition check ups, to assure 100% there is a constant high load avarage and not just a temporal 5 seconds load avarage jump. Once the first if is matched, the script first tries to reduce the server load by overwritting a the index.php, index.html script of the website with a one stating the server is ongoing a maintenance operations.
Temporary stopping the index page, often reduces the load in 10 seconds of time, so the second if case is not necessery at all. Sometimes, however this first "if" condition cannot decrease enough the load and the server load continues to stay too high, then the script second if comes to play and makes apache to be completely stopped via Apache init script do 2 secs delay and launch the apache server again.

The script also logs about, the load avarage encountered, while the server was overloaded and Apache webserver was restarted, so later I can check what time the server overload occured.
To make the script periodically run, I've scheduled the script to launch every 5 minutes as a cron job with the following cron:

# restart Apache if load is higher than 25
*/5 * * * * /usr/sbin/restart_apache_on_high_load.sh >/dev/null 2>&1

I have also another system which is running FreeBSD 7_2, which is having the same overload server problems as with the Linux host.
Copying the auto restart apache on high load script on FreeBSD didn't work out of the box. So I rewrote a little chunk of the script to make it running on the FreeBSD host. Hence, if you would like to auto restart Apache or any other service on FreeBSD server get /usr/sbin/restart_apache_on_high_load_freebsd.sh my script and set it on cron on your BSD.

This script is just a temporary work around, however as its obvious that the frequency of the high overload will be rising with time and we will need to buy new server hardware to solve permanently the issues, anyways, until this happens the script does a great job 🙂

I'm aware there is also alternative way to auto restart Apache webserver on high server loads through using monit utility for monitoring services on a Unix system. However as I didn't wanted to bother to run extra services in the background I decided to rather use the up presented script.

Interesting info to know is Apache module mod_overload exists – which can be used for checking load average. Using this module once load avarage is over a certain number apache can stop in its preforked processes current serving request, I've never tested it myself so I don't know how usable it is. As of time of writting it is in early stage version 0.2.2
If someone, have tried it and is happy with it on a busy hosting servers, please share with me if it is stable enough?

Fixing Shellshock new critical remote bash shell exploitable vulnerability on Debian / Ubuntu / CentOS / RHEL / Fedora / OpenSuSE and Slackware

Friday, October 10th, 2014

Bash-ShellShock-remote-exploitable-Vulnerability-affecting-Linux-Mac-OSX-and-BSD-fixing-shellshock-bash-vulnerability-debian-redhat-fedora-centos-ubuntu-slackware-and-opensuse
If you still haven’t heard about the ShellShock Bash (Bourne Again) shell remote exploit vulnerability and you admin some Linux server, you will definitely have to read seriously about it. ShellShock Bash Vulnerabily has become public on Sept 24 and is described in details here.

The vulnerability allows remote malicious attacker to execute arbitrary code under certain conditions, by passing strings of code following environment variable assignments. Affected are most of bash versions starting with bash 1.14 to bash 4.3.
Even if you have patched there are some reports, there are other bash shell flaws in the way bash handles shell variables, so probably in the coming month there will be even more patches to follow.

Affected bash flaw OS-es are Linux, Mac OS and BSDs;

• Some DHCP clients

• OpenSSL servers that use ForceCommand capability in (Webserver config)

• Apache Webservers that use CGi Scripts through mod_cgi and mod_cgid as well as cgis written in bash or launching bash subshells

• Network exposed services that use bash somehow

Even though there is patch there are futher reports claiming patch ineffective from both Google developers and RedHat devs, they say there are other flaws in how batch handles variables which lead to same remote code execution.

There are a couple of online testing tools already to test whether your website or certain script from a website is vulnerable to bash remote code executions, one of the few online remote bash vulnerability scanner is here and here. Also a good usable resource to test whether your webserver is vulnerable to ShellShock remote attack is found on ShellShocker.Net.

As there are plenty of non-standard custom written scripts probably online and there is not too much publicity about the problem and most admins are lazy the vulnerability will stay unpatched for a really long time and we’re about to see more and more exploit tools circulating in the script kiddies irc botnets.

Fixing bash Shellcode remote vulnerability on Debian 5.0 Lenny.

Follow the article suggesting how to fix the remote exploitable bash following few steps on older unsupported Debian 4.0 / 3.0 (Potato) etc. – here.

Fixing the bash shellcode vulnerability on Debian 6.0 Squeeze. For those who never heard since April 2014, there is a A Debian LTS (Long Term Support) repository. To fix in Debian 6.0 use the LTS package repository, like described in following article.

If you have issues patching your Debian Wheezy 6.0 Linux bash, it might be because you already have a newer installed version of bash and apt-get is refusing to overwrite it with an older version which is provided by Debian LTS repos. The quickest and surest way to fix it is to do literally the following:


vim /etc/apt/sources.list

Paste inside to use the following LTS repositories:

deb http://http.debian.net/debian/ squeeze main contrib non-free
deb-src http://http.debian.net/debian/ squeeze main contrib non-free
deb http://security.debian.org/ squeeze/updates main contrib non-free
deb-src http://security.debian.org/ squeeze/updates main contrib non-free
deb http://http.debian.net/debian squeeze-lts main contrib non-free
deb-src http://http.debian.net/debian squeeze-lts main contrib non-free

Further on to check the available installable deb package versions with apt-get, issue:


apt-cache showpkg bash
...
...
Provides:
4.1-3+deb6u2 -
4.1-3 -
Reverse Provides:

As you see there are two installable versions of bash one from default Debian 6.0 repos 4.1-3 and the second one 4.1-3+deb6u2, another way to check the possible alternative installable versions when more than one version of a package is available is with:


apt-cache policy bash
...
*** 4.1-3+deb6u2 0
500 http://http.debian.net/debian/ squeeze-lts/main amd64 Packages
100 /var/lib/dpkg/status
4.1-3 0
500 http://http.debian.net/debian/ squeeze/main amd64 Packages

Then to install the LTS bash version on Debian 6.0 run:


apt-get install bash=4.1-3+deb6u2

Patching Ubuntu Linux supported version against shellcode bash vulnerability:
A security notice addressing Bash vulnerability in Ubuntus is in Ubuntu Security Notice (USN) here
USNs are a way Ubuntu discloses packages affected by a security issues, thus Ubuntu users should try to keep frequently an eye on Ubuntu Security Notices

apt-get update
apt-get install bash

Patching Bash Shellcode vulnerability on EOL (End of Life) versions of Ubuntu:

mkdir -p /usr/local/src/dist && cd /usr/local/src/dist
wget http://ftpmirror.gnu.org/bash/bash-4.3.tar.gz.sig
wget http://ftpmirror.gnu.org/bash/bash-4.3.tar.gz
wget http://tiswww.case.edu/php/chet/gpgkey.asc
gpg --import gpgkey.asc
gpg --verify bash-4.3.tar.gz.sig
cd ..
tar xzvf dist/bash-4.3.tar.gz
cd bash-4.3
mkdir patches && cd patches
wget -r --no-parent --accept "bash43-*" -nH -nd
ftp.heanet.ie/mirrors/gnu/bash/bash-4.3-patches/ # Use a local mirror
echo *sig | xargs -n 1 gpg --verify --quiet # see note 2

cd ..
echo patches/bash43-0?? | xargs -n 1 patch -p0 -i # see note 3 below

./configure --prefix=/usr --bindir=/bin
--docdir=/usr/share/doc/bash-4.3
--without-bash-malloc
--with-installed-readline

make
make test && make install

To solve bash vuln in recent Slackware Linux:

slackpkg update
slackpkg upgrade bash

For old Slacks, either download a patched version of bash or download the source for current installed package and apply the respective patch for the shellcode vulnerability.
There is also a GitHub project “ShellShock” Proof of Concept code demonstrating – https://github.com/mubix/shellshocker-pocs
There are also non-confirmed speculations for bash vulnerability bug to impact also:

Speculations:(Non-confirmed possibly vulnerable common server services):

• XMPP(ejabberd)

• Mailman

• MySQL

• NFS

• Bind9

• Procmail

• Exim

• Juniper Google Search

• Cisco Gear

• CUPS

• Postfix

• Qmail

Fixing ShellShock bash vulnerability on supported versions of CentOS, Redhat, Fedora

In supported versions of CentOS where EOL has not reached:

yum –y install bash

In Redhat, Fedoras recent releases to patch:

yum update bash

To upgrade the bash vulnerability in OpenSUSE:

zipper patch –cve=CVE-2014-7187

Shellcode is worser vulnerability than recent SSL severe vulnerability Hearbleed. According to Redhat and other sources this new bash vulnerability is already actively exploited in the wild and probably even worms are crawling the net stealing passwords, data and building IRC botnets for remote control and UDP flooding.

Remove \r (Carriage Return) from string with standard bash shell / sed / tr / vim or awk – Replace \r hidden messy characters from files

Tuesday, February 10th, 2015

remove_r_carriage_return_from_string_with-standard-bash_shell_sed_tr_or_awk_replace_annoying_hidden_messy_characters_from_files

I've been recently writting this Apache webserver / Tomcat / JBoss / Java decomissioning bash script. Part of the script includes extraction from httpd.conf of DocumentRoot variable configured for Apache host.
I was using following one liner to grep and store DocumentRoot set directory into new variable:

documentroot=$(grep -i documentroot /usr/local/apache/conf/httpd.conf | awk '{ print $2 }' |sed -e 's#"##g');

Above line greps for documentroot prints 2nd column of the matchi (which is the Apache server set docroot and then removes any " chars).

However I faced the issue that parsed string contained in $documentroot variable there was mysteriously containing r – return carriage – this is usually Carriage Return (CR) sent by Mac OS and Apple computers. For those who don't know the End of Line of files in UNIX / Linux OS-es is LF – often abreviated as n – often translated as return new line), while Windows PCs use for EOF CR + LF – known as the infamous  rn. I was running the script from the server which is running SuSE SLES 11 Linux, meaning the CR + LF end of file is standardly used, however it seem someone has editted the httpd.conf earlier with a text editor from Mac OS X (Terminal). Thus I needed a way to remove the r from CR character out of the variable, because otherwise I couldn't use it to properly exec tar to archive the documentroot set directory, cause the documentroot directory was showing unexistent.

Opening the httpd.conf in standard editor didn't show the r at the end of
"directory", e.g. I could see in the file when opened with vim

DocumentRoot "/usr/local/apache/htdocs/site/www"

However obviously the r character was there to visualize it I had to use cat command -v option (–show-nonprinting):

cat -v /usr/local/apache/conf/httpd.conf

DocumentRoot "/usr/local/apache/htdocs/site/wwwr"


1. Remove the r CR with bash

To solve that with bash, I had to use another quick bash parsing that scans through $directory and removes r, here is how:

documentroot=${documentroot%$'r'}

It is also possible to use same example to remove "broken" Windows rn Carriage Returns after file is migrated from Windows to Liunx /  FreeBSD host:

documentroot=${documentroot%$'rn'}


2. Remove r Carriage Return character with sed

Other way to do remove (del) Windows / Mac OS Carriage Returns in case if Migrating to UNIX is with sed (stream editor).

sed -i s/r// filename >> filename_out.txt


3. Remove r CR character with tr

There is a third way also to do it with (tr) – translate or delete characters old shool *nix command:

tr -d 'r' < file_with_carriagereturns > file_without_carriage_returns


4. Remove r CRs with awk (pattern scanning and processing language)

 awk 'sub("$", "r")' inputf_with_crs.txt > outputf_without_crs.txt


5. Delete r CR with VIM editor

:%s/r//g


6. Converting  file DOS / UNIX OSes with dos2unix and unix2dos command line tools

For sysadmins who don't want to bother with writting code to convert CR when moving files between Windows and UNIX hosts there are dos2unix and unix2dos installable commands.

All done Cheers ! 🙂

Windows Explorer (Open directory in command prompt preserving dir PATH) – Add Dos Prompt Here feature via tiny registry tweak

Friday, January 10th, 2014

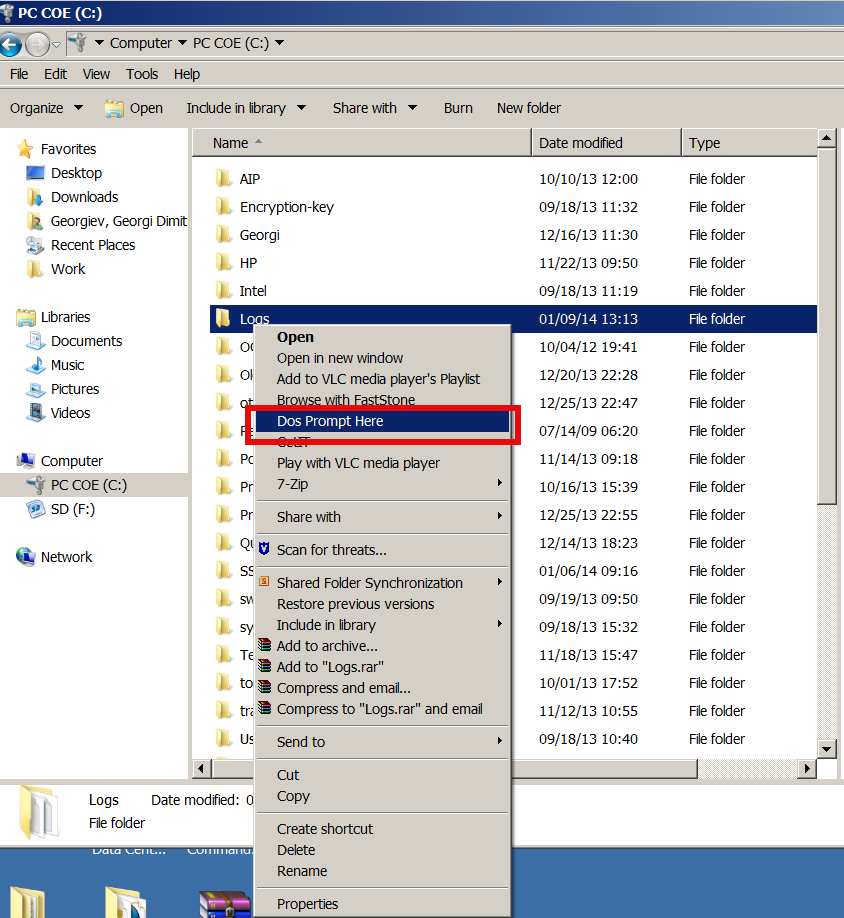
Windows explorer dos prompt here open directory in windows command line

If you have to use Windows on system administration level, you had to use command prompt daily, thus its useful to be able to be able to open Command Line starting from desired directory with no need to copy directory Path by hand and CD to it manually.

By default Command Prompt, cmd.exe always opens itself setting a path to user home directory, reading what is defined by win system variable %USERPROFILE% or %HOMEPATH% – MS Windows equivalent of UNIX's $HOME shell variable.

To add open in  DOS Prompt Here Command Prompt option to Windows Explorer menus its necessary to apply few rules to Windows registry DB
Use above Download link and launch it and from there on clicking with right Mouse button to any directory will enable you to open directory in CMD.EXE.

Here is content of little registry tweak adding the new menu Dos Prompt Here button
Windows Registry Editor Version 5.00

[HKEY_CLASSES_ROOT\Directory\shell\DosHere]
@="Dos &Prompt Here"

[HKEY_CLASSES_ROOT\Directory\shell\DosHere\Command]
@="cmd.exe /k cd %1"

[HKEY_CLASSES_ROOT\Drive\shell\DosHere]
@="Dos &Prompt Here"

[HKEY_CLASSES_ROOT\Drive\shell\DosHere\Command]
@="cmd.exe /k cd %1"

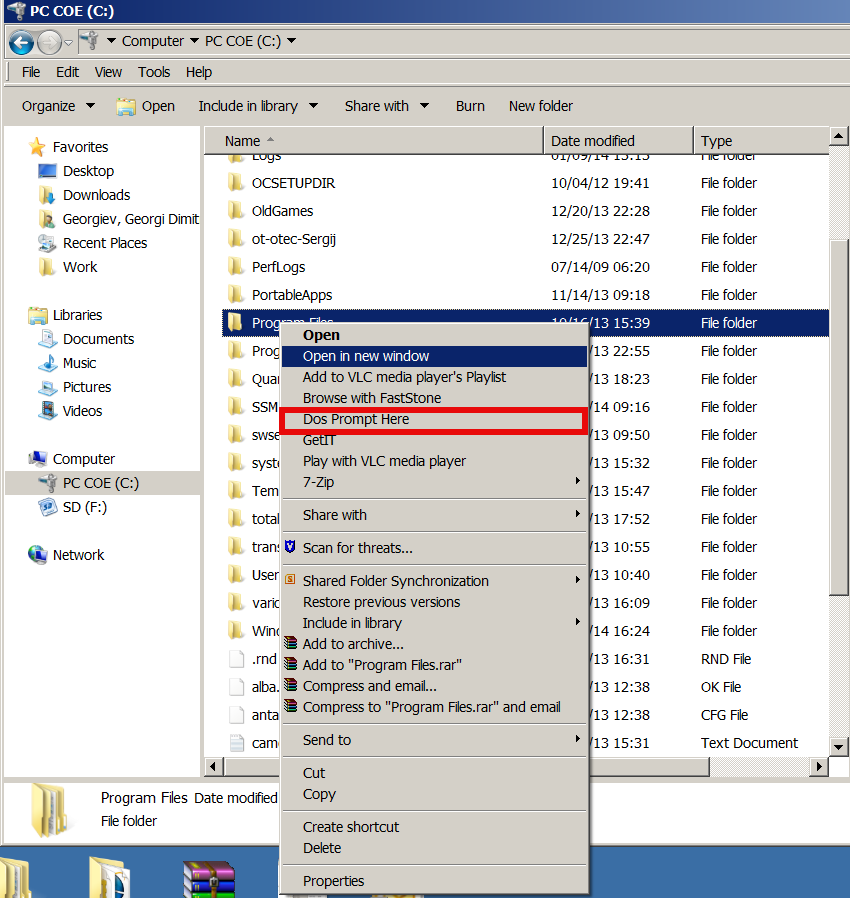
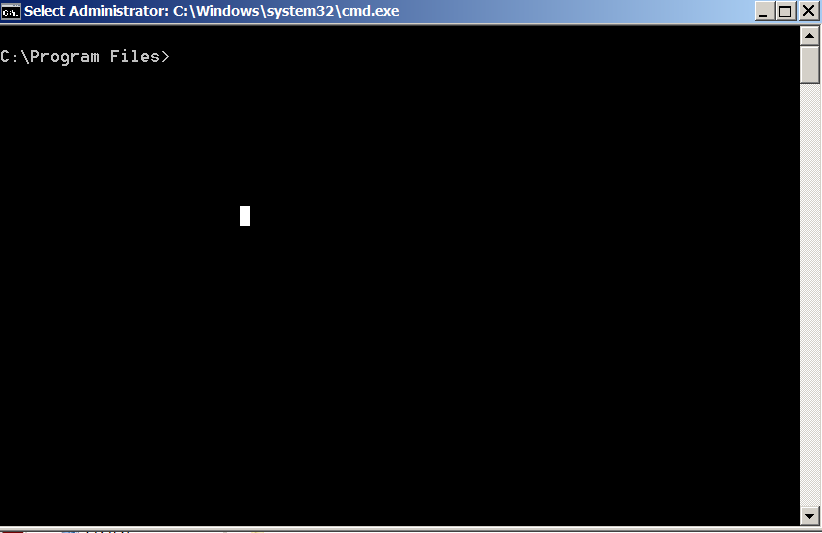
Windows explorer open program files or any specific directory in windows command line

windows opening directory in command line program files screenshot win 7

This little registry code is originally for Windows 2000, anyways it is compatible with all NT technology based Windowses, Add DOS Prompt Here tweak works fine on Windows XP, Windows 7 and Windows 8 (Home, Pro and Business editions).

By Mentioning $HOME its interesting to say Windows equivalent of Linux's as it might be useful to know:

linux:~# echo $HOME
/home/hipo

is

C:\\> echo %USERPROFILE%
C:\\Users\\georgi

To list all Windows Command Prompt environment variable equivalent to Linux's bash shell env / setenv is SET command), here is example output from my Winblows;

C:\Users\georgi> SET
ALLUSERSPROFILE=C:\\ProgramData
APPDATA=C:\\Users\georgi\AppData\Roaming
CLASSPATH=.;C:\\Program Files (x86)\\Java\\jre6\\lib\\ext\\QTJava.zip
CommonProgramFiles=C:\\Program Files\Common Files
CommonProgramFiles(x86)=C:\\Program Files (x86)\\Common Files
CommonProgramW6432=C:\\Program Files\\Common Files
COMPUTERNAME=GEORGI
ComSpec=C:\\Windows\\system32\\cmd.exe
DEFLOGDIR=C:\\ProgramData\\McAfee\\DesktopProtection
FP_NO_HOST_CHECK=NO
HOMEDRIVE=C:
HOMEPATH=\\Users\\georgi
LOCALAPPDATA=C:\\Users\\georgi\\AppData\\Local
NUMBER_OF_PROCESSORS=4
OS=Windows_NT
Path=C:\\Program Files\\RA2HP\\;C:\\Windows\\system32;C:\\Windows;C:\\Windows\\S
Wbem;C:\\Windows\\System32\\WindowsPowerShell\v1.0\;C:\\Program Files\\WIDCOM
oth Software\\;C:\\Program Files\\WIDCOMM\\Bluetooth Software\\syswow64;C:\\Pr
les (x86)\\Hewlett-Packard\\HP ProtectTools Security Manager\\Bin\\;C:\\Progr
\\ActivIdentity\\ActivClient\\;C:\\Program Files (x86)\\ActivIdentity\\ActivCl
\\Program Files (x86)\\QuickTime\\QTSystem\\
PATHEXT=.COM;.EXE;.BAT;.CMD;.VBS;.VBE;.JS;.JSE;.WSF;.WSH;.MSC
PROCESSOR_ARCHITECTURE=AMD64
PROCESSOR_IDENTIFIER=Intel64 Family 6 Model 58 Stepping 9, GenuineIntel
PROCESSOR_LEVEL=6
PROCESSOR_REVISION=3a09
ProgramData=C:\\ProgramData
ProgramFiles=C:\\Program Files
ProgramFiles(x86)=C:\\Program Files (x86)
ProgramW6432=C:\\Program Files
PROMPT=$P$G
PSModulePath=C:\\Windows\\system32\\WindowsPowerShell\\v1.0\Modules\\
PTSMInstallPath_X86=C:\\Program Files (x86)\\Hewlett-Packard\\HP ProtectToo
ity Manager\\
PUBLIC=C:\\Users\\Public
QTJAVA=C:\\Program Files (x86)\\Java\\jre6\\lib\\ext\\QTJava.zip
SESSIONNAME=Console
SystemDrive=C:
SystemRoot=C:\\Windows
TEMP=C:\\Users\\georgi\\AppData\\Local\\Temp
TMP=C:\\Users\\georgi\\AppData\\Local\\Temp
USERDNSDOMAIN=EMEA.CPQCORP.NET
USERDOMAIN=EMEA
USERNAME=georgi
USERPROFILE=C:\\Users\\georgi
VSEDEFLOGDIR=C:\\ProgramData\\McAfee\\DesktopProtection
windir=C:\\Windows
windows_tracing_flags=3
windows_tracing_logfile=C:\\BVTBin\\Tests\\installpackage\\csilogfile.log

Hope this little trick hopes someone out there.
I will be glad to hear of other cool useful windows registry tweaks?


Linux bash: Add line numbering to text file with NL – number lines command

Friday, March 22nd, 2013

Lets say you have a plainjt text TXT file with sentences and you would like to put quickly line numbering in a Linux bash shell. First thing that might pop up to your mind is to use a loop cat text file and print it line by one together with output of incremental values counted from 0 to the number of lines the file contains. This would work but is useless work. As coreutils package already contains a tool called nl ( /usr/bin/nl ). Here is paste from header of nl manual page;


NAME
       nl – number lines of files

SYNOPSIS
       nl [OPTION]… [FILE]…
 

Thus to put line numbering to lets say this fortune's bible quotes plain text file;

$ nl bible > bible_quotes_numbered.txt

Here is a small chunk of bible_quotes_numbered.txt;


$ cat bible_quotes_numbered.txt

 1  In the beginning God created the heaven and the earth.
     2                  — Genesis 1:1
     3  %
     4  And the earth was without form, and void; and darkness was upon
     5  the face of the deep. And the Spirit of God moved upon the face of
     6  the waters.
     7                  — Genesis 1:2
     8  %
     9  And God said, Let there be light: and there was light.
    10                  — Genesis 1:3
    11  %
    12  And God saw the light, that it was good: and God divided the light
    13  from the darkness.
    14                  — Genesis 1:4
    15  %
    16  And God called the light Day, and the darkness he called Night.
    17  And the evening and the morning were the first day.
    18                  — Genesis 1:5
    19  %
    20  And God said, Let there be a firmament in the midst of the waters,
    21  and let it divide the waters from the waters.
    22                  — Genesis 1:6
    23  %
    24  And God made the firmament, and divided the waters which were under
    25  the firmament from the waters which were above the firmament: and
    26  it was so.
    27                  — Genesis 1:7
    28  %
    29  And God called the firmament Heaven. And the evening and the morning
    30  were the second day.
    31                  — Genesis 1:8
    32  %
    33  And God said, Let the waters under the heaven be gathered together
    34  unto one place, and let the dry land appear: and it was so.
    35                  — Genesis 1:9
    36  %
    37  And God called the dry land Earth; and the gathering together of
    38  the waters called he Seas: and God saw that it was good.
    39                  — Genesis 1:10
    40  %
    41  And God said, Let the earth bring forth grass, the herb yielding
    42  seed, and the fruit tree yielding fruit after his kind, whose seed
    43  is in itself, upon the earth: and it was so.
    44                  — Genesis 1:11


It is worthy mentioning the same opeartion can be achieved with good old /bin/cat with cat -n, e.g.;

$ cat -n bible >bible_quotes_numbered.txt


On *BSDs nl command is not available, thus cat -n is very good to know of since it works for numbering ASCII plain text files on Free/Net/OpenBSDs