Posts Tagged ‘cfg’

Simple bash shell Script to easy and quickly automate deploy RHEL Linux Virtual Machines on KVM Virtualization

Friday, November 3rd, 2023

how-to-install-a-kvm-guest-os-from-the-commandline-easily-with-script-virt-install-logo

Earlier I've blogged in about howto build KVM Virtual Machine RHEL 8.3 Linux install on Redhat 8.3 Linux Hypervisor with custom tailored kickstart.cfg as one of the Projects i was involved in my work duty as system administrator, we had the task to build
a KVM virtual machines and build a High Availability Linux  PCS Corosync / Pacemaker / haproxy cluster on it to save some money for the company from purchasing VMWare licenses.

The setup of the KVM Virtual machine on a first glimpse is relatively simple and I thought, this can be done just for 2 / 3 days but it turned out to take up 2 weeks or so to properly prepare the kickstarter file and learn a bit about basic virt-install KVM options and experiment with them until
we can produce a noral working Virtual machines. 

The original developed simple script that I used to bring up a new KVM virtual machines in a bit easier way virt-install-kvm.sh looked like so:
 

#!/bin/sh
# Script to build a new VM based on a kickstart.cfg file template
# with virt-install
# Author Georgi Georgiev hip0
# hipo@Pc-freak.net

KS_FILE='kickstart.cfg';
VM_NAME='RHEL8_3-VirtualMachine';
VM_DESCR='CentOS 8.3 Virtual Machine';
RAM='8192';
CPUS='8';
# size is in Gigabytes
VM_IMG_SIZE='70';
ISO_LOCATION='/vmprivate/rhel-server-8.3-x86_64-dvd.iso';
VM_IMG_FILE_LOC='/vmprivate/RHEL8_3-VirtualMachine.img';

virt-install -n "$VMNAME" –description "$VM_DESCR" –os-type=Linux –os-variant=rhel8.3 –ram=8192 –vcpus=8 –location="$ISO_LOCATION" –disk path=$VM_IMG_FILE,bus=virtio,size=$IMG_VM_SIZE –graphics none –initrd-inject=/root/$KS_FILE –extra-args "console=ttyS0 ks=file:/$KS_FILE"


The script basicly did what it was aimed for but modifying the kickstarter ks.cfg every time with multiple additional parameters, like network configurations as well some additional modifications to ks.cfg for VM parameters was annoying.

Recently as we had to repeat the same task again in order to migrate old customer containing a Linux OpenVZ Virtual machines to a newer  OS installed RHEL versionb with KVM virtual machines, i've took some hours and scripted a small script that would easiy our task to build new KVM Virtual Machines
from scratch relatively easy, if we have to repeat the Linux OS build operation again and again.

Before proceeding to use the script of course one has to use LVM and setup the partitions on the Host which will be the Hypervisor where the KVM VMs will be installed as well you need to download an ISO image of Redhat Enterprise Linux / CentOS / Fedora or whatever kind of RPM based Linux
you would like to setup as well as do the basic configurations regarding the emulated Hardware node "Power" of the new Virtual Machine (CPU / Memory / Disk Partition) as well as choose a proper meaningful VM name (preferrably following some good meaningful crafted naming convention, that will talk a bit about what is inside the KVM VM container).

The script that automates a bit the KVM VM installation which you find below you can also download from here virt-install.sh


#!/bin/bash
virt_install_path=$(which virt-install);
vm_host='vmname01';
boot_iso='/vmprivate/rhel-8.7-x86_64-dvd.iso';
os_version='rhel8.7';
vm_cpus_count='4';
vm_ram='6144';
vm_img_location='/vmprivate/NAME-of-VM.img';
vm_machine_description='Name Production system';
ks_file_location_template='/root/ks.cfg.templ';
ks_file_location='/root/ks.cfg';
ks_vm_read_loc=$(echo $ks_file_location |sed -e 's#root/##g');
vm_main_ip='192.168.23.52';
vm_netmask='255.255.255.192';
vm_gateway='192.168.23.33';
vm_nameserver='172.30.50.2';
#–ip=192.168.233.52 –netmask=255.255.255.192 –gateway=192.168.233.33 –nameserver=172.20.88.2

echo "Checking if defined $vm_host image $vm_img_location is not already present";
if [ ! -f $vm_img_location ]; then
echo
else
echo 'Exiting $vm_img_location is present';
echo "To destroy exiting VM image $vm_img_location run manually cmds:";
echo 'virsh list; virsh destroy $vm_host; virsh undefine $vm_host –remove-all-storage';
exit 1;
fi

alias cp='cp -f';
/usr/bin/cp -rpf $ks_file_location_template $ks_file_location;

echo "Setting  VM Main IP: $vm_main_ip";
echo "Setting  VM netmask: $vm_netmask";
echo "Setting  VM Gateway: $vm_gateway";
echo "Setting  VM Nameserver $vm_nameserver";
/usr/bin/perl -pi -e "s/ip=a1.a2.a3.a4/ip=$vm_main_ip/" $ks_file_location
/usr/bin/perl -pi -e "s/netmask=b1.b2.b3.b4/netmask=$vm_netmask/" $ks_file_location
/usr/bin/perl -pi -e "s/gateway=c1.c2.c3.c4/nameserver=$vm_nameserver/" $ks_file_location
/usr/bin/perl -pi -e "s/nameserver=d1.d2.d3.d4/gateway=$vm_gateway/" $ks_file_location
/usr/bin/perl -pi -e "s/vm-hostname/$vm_host/" $ks_file_location

echo "Running VM install:";
echo $virt_install_path -n $vm_host –description "$vm_machine_description" –os-type=Linux –os-variant=$os_version –ram=$vm_ram –vcpus=$vm_cpus_count –location=$boot_iso –disk path=$vm_img_location,bus=virtio,size=90 –graphics none –initrd-inject=$ks_file_location –extra-args "console=ttyS0 ks=file:$ks_vm_read_loc"

$virt_install_path -n $vm_host –description "$vm_machine_description" –os-type=Linux –os-variant=$os_version –ram=$vm_ram –vcpus=$vm_cpus_count –location=$boot_iso –disk path=$vm_img_location,bus=virtio,size=90 –graphics none –initrd-inject=$ks_file_location –extra-args "console=ttyS0 ks=file:$ks_vm_read_loc"


Modify the script to insert the required parameters of the new VM in the script header session, you will have to provide below options.


vm_host='vmname01';
boot_iso='/vmprivate/rhel-8.7-x86_64-dvd.iso';
os_version='rhel8.7';
vm_cpus_count='4';
vm_ram='6144';
vm_img_location='/vmprivate/NAME-of-VM.img';
vm_machine_description='Name Production system';
ks_file_location_template='/root/ks.cfg.templ';
ks_file_location='/root/ks.cfg';
ks_vm_read_loc=$(echo $ks_file_location |sed -e 's#root/##g');
vm_main_ip='192.168.23.52';
vm_netmask='255.255.255.192';
vm_gateway='192.168.23.33';
vm_nameserver='172.30.50.2';

The automatic Build virtual machine script is tested and works with Redhat Enterprise Linux and of course is pretty primitive as there is so much available online that would do similar, but still I like it because it works for me 🙂

You will need also the ks.cfg.templ file which has the basic kickstarter configuration that will bring up the Virtual machines according to predefined configurations.
Here is the ks.cfg.templ and ks.cfg files as well, you will have to place them under /root/ or some other directory.
Of course this script is just a basic one, it can be easily updated to accept its variable options as arguments if you need to bring up a multitude of virtual machines relatively quickly with few minor modifications. 

Hope the script is helpful to some sysadmin out there. If so don't forget to donate me for a beer in my Patreon account found in the widgets section 🙂

How to configure multiple haproxies and frontends to log in separate log files via rsyslog

Monday, September 5th, 2022

log-multiple-haproxy-servers-to-separate-files-log-haproxy-froentend-to-separate-file-haproxy-rsyslog-Logging-diagram
In my last article How to create multiple haproxy instance separate processes for different configuration listeners,  I've shortly explained how to create a multiple instances of haproxies by cloning the systemd default haproxy.service and the haproxy.cfg to haproxyX.cfg.
But what if you need also to configure a separate logging for both haproxy.service and haproxy-customname.service instances how this can be achieved?

The simplest way is to use some system local handler staring from local0 to local6, As local 1,2,3 are usually used by system services a good local handler to start off would be at least 4.
Lets say we already have the 2 running haproxies, e.g.:

[root@haproxy2:/usr/lib/systemd/system ]# ps -ef|grep -i hapro|grep -v grep
root      128464       1  0 Aug11 ?        00:01:19 /usr/sbin/haproxy -Ws -f /etc/haproxy/haproxy.cfg -p /run/haproxy.pid -S /run/haproxy-master.sock
haproxy   128466  128464  0 Aug11 ?        00:49:29 /usr/sbin/haproxy -Ws -f /etc/haproxy/haproxy.cfg -p /run/haproxy.pid -S /run/haproxy-master.sock

root      346637       1  0 13:15 ?        00:00:00 /usr/sbin/haproxy-customname-wrapper -Ws -f /etc/haproxy/haproxy_customname_prod.cfg -p /run/haproxy_customname_prod.pid -S /run/haproxy-customname-master.sock
haproxy   346639  346637  0 13:15 ?        00:00:00 /usr/sbin/haproxy-customname-wrapper -Ws -f /etc/haproxy/haproxy_customname_prod.cfg -p /run/haproxy_customname_prod.pid -S /run/haproxy-customname-master.sock


1. Configure local messaging handlers to work via /dev/log inside both haproxy instance config files
 

To congigure the separte logging we need to have in /etc/haproxy/haproxy.cfg and in /etc/haproxy/haproxy_customname_prod.cfg the respective handlers.

To log in separate files you should already configured in /etc/haproxy/haproxy.cfg something like:


global
        stats socket /var/run/haproxy/haproxy.sock mode 0600 level admin #Creates Unix-Like socket to fetch stats
        log /dev/log    local0
        log /dev/log    local1 notice

#       nbproc 1
#       nbthread 2
#       cpu-map auto:1/1-2 0-1
        nbproc          1
        nbthread 2
        cpu-map         1 0
        cpu-map         2 1
        chroot /var/lib/haproxy
        user haproxy
        group haproxy
        daemon
        maxconn 99999

defaults
        log     global
        mode    tcp


        timeout connect 5000
        timeout connect 30s
        timeout server 10s

    timeout queue 5s
    timeout tunnel 2m
    timeout client-fin 1s
    timeout server-fin 1s

    option forwardfor
        maxconn 3000
    retries                 15

frontend http-in
        mode tcp

        option tcplog
        log global


        option logasap
        option forwardfor
        bind 0.0.0.0:80

default_backend webservers_http
backend webservers_http
    fullconn 20000
        balance source
stick match src
    stick-table type ip size 200k expire 30m

        server server-1 192.168.1.50:80 check send-proxy weight 255 backup
        server server-2 192.168.1.54:80 check send-proxy weight 254
        server server-3 192.168.0.219:80 check send-proxy weight 252 backup
        server server-4 192.168.0.210:80 check send-proxy weight 253 backup
        server server-5 192.168.0.5:80 maxconn 3000 check send-proxy weight 251 backup

For the second /etc/haproxy/haproxy_customname_prod.cfg the logging configuration should be similar to:
 

global
        stats socket /var/run/haproxy/haproxycustname.sock mode 0600 level admin #Creates Unix-Like socket to fetch stats
        log /dev/log    local5
        log /dev/log    local5 notice

#       nbproc 1
#       nbthread 2
#       cpu-map auto:1/1-2 0-1
        nbproc          1
        nbthread 2
        cpu-map         1 0
        cpu-map         2 1
        chroot /var/lib/haproxy
        user haproxy
        group haproxy
        daemon
        maxconn 99999

defaults
        log     global
        mode    tcp


2. Configure separate haproxy Frontend logging via local5 inside haproxy.cfg
 

As a minimum you need a configuration for frontend like:


frontend http-in
        mode tcp

        option tcplog
        log /dev/log    local5 debug
…..
….

..
.

Of course the mode tcp in my case is conditional you might be using mode http etc. 


3. Optionally but (preferrably) make local5 / local6 handlers to work via rsyslogs UDP imudp protocol


In this example /dev/log is straightly read by haproxy instead of sending the messages first to rsyslog, this is a good thing in case if you have doubts that rsyslog might stop working and respectively you might end up with no logging, however if you prefer to use instead rsyslog which most of people usually do you will have instead for /etc/haproxy/haproxy.cfg to use config:

global
    log          127.0.0.1 local6 debug

defaults
        log     global
        mode    tcp

And for /etc/haproxy_customname_prod.cfg config like:

global
    log          127.0.0.1 local5 debug

defaults
        log     global
        mode    tcp

If you're about to send the haproxy logs directly via rsyslog, it should have enabled in /etc/rsyslog.conf the imudp module if you're not going to use directly /dev/log

# provides UDP syslog reception
module(load="imudp")
input(type="imudp" port="514")


4. Prepare first and second log file and custom frontend output file and set right permissions
 

Assumably you already have /var/log/haproxy.log and this will be the initial haproxy log if you don't want to change it, normally it is installed on haproxy package install time on Linux and should have some permissions like following:

root@haproxy2:/etc/rsyslog.d# ls -al /var/log/haproxy.log
-rw-r–r– 1 haproxy haproxy 6681522  1 сеп 16:05 /var/log/haproxy.log


To create the second config with exact permissions like haproxy.log run:

root@haproxy2:/etc/rsyslog.d# touch /var/log/haproxy_customname.log
root@haproxy2:/etc/rsyslog.d# chown haproxy:haproxy /var/log/haproxy_customname.log

Create the haproxy_custom_frontend.log file that will only log output of exact frontend or match string from the logs
 

root@haproxy2:/etc/rsyslog.d# touch  /var/log/haproxy_custom_frontend.log
root@haproxy2:/etc/rsyslog.d# chown haproxy:haproxy  /var/log/haproxy_custom_frontend.log


5. Create the rsyslog config for haproxy.service to log via local6 to /var/log/haproxy.log
 

root@haproxy2:/etc/rsyslog.d# cat 49-haproxy.conf
# Create an additional socket in haproxy's chroot in order to allow logging via
# /dev/log to chroot'ed HAProxy processes
$AddUnixListenSocket /var/lib/haproxy/dev/log

# Send HAProxy messages to a dedicated logfile
:programname, startswith, "haproxy" {
  /var/log/haproxy.log
  stop
}


Above configs will make anything returned with string haproxy (e.g. proccess /usr/sbin/haproxy) to /dev/log to be written inside /var/log/haproxy.log and trigger a stop (by the way the the stop command works exactly as the tilda '~' discard one, except in some newer versions of haproxy the ~ is no now obsolete and you need to use stop instead (bear in mind that ~ even though obsolete proved to be working for me whether stop not ! but come on this is no strange this is linux mess), for example if you run latest debian Linux 11 as of September 2022 haproxy with package 2.2.9-2+deb11u3.
 

6. Create configuration for rsyslog to log from single Frontend outputting local2 to /var/log/haproxy_customname.log
 

root@haproxy2:/etc/rsyslog.d# cat 48-haproxy.conf
# Create an additional socket in haproxy's chroot in order to allow logging via
# /dev/log to chroot'ed HAProxy processes
$AddUnixListenSocket /var/lib/haproxy/dev/log

# Send HAProxy messages to a dedicated logfile
#:programname, startswith, "haproxy" {
#  /var/log/haproxy.log
#  stop
#}
# GGE/DPA 2022/08/02: HAProxy logs to local2, save the messages
local5.*                                                /var/log/haproxy_customname.log


You might also explicitly define the binary that will providing the logs inside the 48-haproxy.conf as we have a separate /usr/sbin/haproxy-customname-wrapper in that way you can log the output from the haproxy instance only based
on its binary command and you can omit writting to local5 to log via it something else 🙂

root@haproxy2:/etc/rsyslog.d# cat 48-haproxy.conf
# Create an additional socket in haproxy's chroot in order to allow logging via
# /dev/log to chroot'ed HAProxy processes
$AddUnixListenSocket /var/lib/haproxy/dev/log

# Send HAProxy messages to a dedicated logfile
#:programname, startswith, "haproxy" {
#  /var/log/haproxy.log
#  stop
#}
# GGE/DPA 2022/08/02: HAProxy logs to local2, save the messages

:programname, startswith, "haproxy-customname-wrapper " {
 
/var/log/haproxy_customname.log
  stop
}


7. Create the log file to log the custom frontend of your preference e.g. /var/log/haproxy_custom_frontend.log under local5 /prepare rsyslog config for
 

root@haproxy2:/etc/rsyslog.d# cat 47-haproxy-custom-frontend.conf
$ModLoad imudp
$UDPServerAddress 127.0.0.1
$UDPServerRun 514
#2022/02/02: HAProxy logs to local6, save the messages
local4.*                                                /var/log/haproxy_custom_frontend.log
:msg, contains, "https-in" ~

The 'https-in' is my frontend inside /etc/haproxy/haproxy.cfg it returns the name of it every time in /var/log/haproxy.log therefore I will log the frontend to local5 and to prevent double logging inside /var/log/haproxy.log of connections incoming towards the same frontend inside /var/log/haproxy.log, I have the tilda symbol '~' which instructs rsyslog to discard any message coming to rsyslog with "https-in" string in, immediately after the same frontend as configured inside /etc/haproxy/haproxy.cfg will output the frontend operations inside local5.


!!! Note that for rsyslog it is very important to have the right order of configurations, the configuration order is being considered based on the file numbering. !!!
 

Hence notice that my filter file number 47_* preceeds the other 2 configured rsyslog configs.
 

root@haproxy2:/etc/rsyslog.d# ls -1
47-haproxy-custom-frontend.conf
48-haproxy.conf
49-haproxy.conf

This will make 47-haproxy-custom-frontend.conf to be read and processed first 48-haproxy.conf processed second and 49-haproxy.conf processed third.


8. Reload rsyslog and haproxy and test


root@haproxy2: ~# systemctl restart rsyslog
root@haproxy2: ~# systemctl restart haproxy
root@haproxy2: ~# systemctl status rsyslog

● rsyslog.service – System Logging Service
     Loaded: loaded (/lib/systemd/system/rsyslog.service; enabled; vendor preset: enabled)
     Active: active (running) since Thu 2022-09-01 17:34:51 EEST; 1s ago
TriggeredBy: ● syslog.socket
       Docs: man:rsyslogd(8)
             man:rsyslog.conf(5)
             https://www.rsyslog.com/doc/
   Main PID: 372726 (rsyslogd)
      Tasks: 6 (limit: 4654)
     Memory: 980.0K
        CPU: 8ms
     CGroup: /system.slice/rsyslog.service
             └─372726 /usr/sbin/rsyslogd -n -iNONE

сеп 01 17:34:51 haproxy2 systemd[1]: Stopped System Logging Service.
сеп 01 17:34:51 haproxy2 rsyslogd[372726]: warning: ~ action is deprecated, consider using the 'stop' statement instead [v8.210>
сеп 01 17:34:51 haproxy2 systemd[1]: Starting System Logging Service…
сеп 01 17:34:51 haproxy2 rsyslogd[372726]: [198B blob data]
сеп 01 17:34:51 haproxy2 systemd[1]: Started System Logging Service.
сеп 01 17:34:51 haproxy2 rsyslogd[372726]: [198B blob data]
сеп 01 17:34:51 haproxy2 rsyslogd[372726]: imuxsock: Acquired UNIX socket '/run/systemd/journal/syslog' (fd 3) from systemd.  [>
сеп 01 17:34:51 haproxy2 rsyslogd[372726]: [origin software="rsyslogd" swVersion="8.2102.0" x-pid="372726" x-info="https://www.

Do some testing with some tool like curl / wget / lynx / elinks etc. on each of the configured haproxy listeners and frontends and check whether everything ends up in the correct log files.
That's all folks enjoy ! 🙂
 

How to create multiple haproxy instance separate processes for different configuration listeners with systemd on single Linux server

Tuesday, August 30th, 2022

HAProxy-Multiple-instanes-with-systemd-on-same-host-howto-Load-Balance-Your-Servers

In this aticle will be explained, howto configure multiple haproxy instances with separate haproxy binary wrappers and configs to run on the same Linux server host
by creating and using systemd additional .services.

Usually haproxy as installed and  ran standard on Linux swapns 2 listener processes which are configured to serve any proxy configuration setup inside /etc/haproxy/haproxy.cfg.

Here is example:

[root@haproxy2:~ ]# ps -ef|grep -i haproxy
root      128464       1  0 Aug11 ?        00:01:19 /usr/sbin/haproxy -Ws -f /etc/haproxy/haproxy.cfg -p /run/haproxy.pid -S /run/haproxy-master.sock
haproxy   128466  128464  0 Aug11 ?        00:49:24 /usr/sbin/haproxy -Ws -f /etc/haproxy/haproxy.cfg -p /run/haproxy.pid -S /run/haproxy-master.sock

However what if you need to have a multiple services to be proxied and you need to have multiple configuration files separated under various
/etc/haproxy/ stored files (.e.g /etc/haproxy/haproxy-customer1.cfg /etc/haproxy-customer2.cfg /etc/haproxy-custmXYZ.fg) etc. , what then how this can be done ?

Besides the many down sides of involving systemd into Linux, there is some good sides of it, as on any modern Linux there is a separate service to manage haproxy as of year 2022 on most modern Linuxes Debian / CentOS / Redhat the location where usually systemd service scripts are located is under directory /usr/lib/systemd/system/ the systemd managed service files are with extension .service

[root@haproxy2:/usr/lib/systemd/system ]# ls -al haproxy.service
-rw-r–r– 1 root root 1509 Sep  5  2021 haproxy.service

[root@haproxy2:/usr/lib/systemd/system ]# ls -al cron.service
-rw-r–r– 1 root root 316 Feb 23  2021 cron.service

[root@haproxy2:/usr/lib/systemd/system ]# ls -al networking.service
-rw-r–r– 1 root root 643 Sep 21  2020 networking.service

[root@haproxy2:/usr/lib/systemd/system ]# ls -al systemd-journald.service
-rw-r–r– 1 root root 1812 Jul 13  2021 systemd-journald.service


1. Create new haproxy-custom.service and /etc/haproxy.cfg file copies
 

Adding new services that will be managed by systemd is pretty simple hence, you just need to have the original service file in that case this is haproxy.service and modify it a bit, original haproxy.service file on Red Hat Enterprise Linux release 8.5 (Ootpa) would look like this

Make exact copy of haproxy.service to haproxy-your-custom.service

[root@haproxy2:/usr/lib/systemd/system ]#  cp -vprf haproxy.service haproxy-customname.service
'haproxy.service' -> 'haproxy-customname.service'

[root@haproxy2:/usr/lib/systemd/system]# cp -vrpf /etc/haproxy/haproxy.cfg /etc/haproxy/haproxy_customname_prod.cfg
'/etc/haproxy/haproxy.cfg' -> '/etc/haproxy/haproxy_customname_prod.cfg'


2. Modify the new haproxy-customname.service and haproxy-custoname.cfg

a) Create hardlink copy of /usr/sbin/haproxy binary

It is a good idea to separte the haproxy executable binary for the additional systemd haproxy instance. This can be done either by copying /usr/sbin/haproxy to something like /usr/sbin/haproxy-customname-wrapper or by creating a hard link. As i'm cautious to keep the haproxy-customname-wrapper binary up2date and updated together once the haproxy rpm package / deb package is updated either with yum or apt depending on the Linux distro, hard link  use is always better.
Just for reference hardlink does keep an own copy of the binary data and occupies additional Filesystem inodes, but at the same time the first inode of the binary does point to the original binary, meaning that a package update will make the hardlink be updated up to the latest version of the file and no extra management of the hard linked haproxy-customname-wrapper is necessery.

[root@haproxy2:/usr/sbin ]# ln haproxy haproxy-custname-wrapper

[root@haproxy2:/usr/sbin ]#  ls -al haproxy-custname-wrapper
-rwxr-xr-x 2 root root 2541848 Sep  5  2021 haproxy-custname-wrapper*
root@haproxy2:/usr/sbin# ls -al haproxy
-rwxr-xr-x 2 root root 2541848 Sep  5  2021 haproxy*


b) Modify haproxy-custoname.service systemd instance

The original service file will have content like

[Unit]
Description=HAProxy Load Balancer
After=network-online.target
Wants=network-online.target

[Service]
Environment="CONFIG=/etc/haproxy/haproxy.cfg" "PIDFILE=/run/haproxy.pid"
EnvironmentFile=/etc/sysconfig/haproxy
ExecStartPre=/usr/sbin/haproxy -f $CONFIG -c -q $OPTIONS
ExecStart=/usr/sbin/haproxy -Ws -f $CONFIG -p $PIDFILE $OPTIONS
ExecReload=/usr/sbin/haproxy -f $CONFIG -c -q $OPTIONS

ExecReload=/bin/kill -USR2 $MAINPID
SuccessExitStatus=143
KillMode=mixed
Type=notify

[Install]
WantedBy=multi-user.target


The modified one for the customname.service should have content similar to:
 

[Unit]
Description=HAProxy Load Balancer
After=network-online.target
Wants=network-online.target

[Service]
Environment="CONFIG=/etc/haproxy/haproxy_customname_prod.cfg" "PIDFILE=/run/haproxy_customname_prod.pid"
EnvironmentFile=/etc/sysconfig/haproxy
ExecStartPre=/usr/sbin/haproxy_customname -f $CONFIG -c -q $OPTIONS
ExecStart=/usr/sbin/haproxy_customname -Ws -f $CONFIG -p $PIDFILE $OPTIONS
ExecReload=/usr/sbin/haproxy_customname -f $CONFIG -c -q $OPTIONS

ExecReload=/bin/kill -USR2 $MAINPID
SuccessExitStatus=143
KillMode=mixed
Type=notify

[Install]
WantedBy=multi-user.target

c) modify haproxy_customname_prod.cfg

Do the required config and save the file, below is minimal config sample:

[root@haproxy2:/etc/haproxy ]#  vim /etc/haproxy/haproxy_customname_prod.cfg
 

#———————————————————————
# Global settings
#———————————————————————
global
    log          127.0.0.1 local6 debug
    chroot       /var/lib/haproxy
    pidfile      /run/haproxy.pid
    stats socket /var/lib/haproxy/haproxy.sock mode 0600 level admin
    maxconn      4000
    user         haproxy
    group        haproxy
    daemon
    #debug
    #quiet

#———————————————————————
# common defaults that all the 'listen' and 'backend' sections will
# use if not designated in their block
#———————————————————————
defaults
    mode        tcp
    log         global
#    option      dontlognull
#    option      httpclose
#    option      httplog
#    option      forwardfor
    option      redispatch
    option      log-health-checks
    timeout connect 10000 # default 10 second time out if a backend is not found
    timeout client 300000
    timeout server 300000
    maxconn     60000
    retries     3


#———————————————————————
# round robin balancing between the various backends
#———————————————————————

frontend Frotnend_customname1
        bind 10.10.10.1:15000
        mode tcp
        option tcplog
        #log global
        log-format [%t]\ %ci:%cp\ %bi:%bp\ %b/%s:%sp\ %Tw/%Tc/%Tt\ %B\ %ts\ %ac/%fc/%bc/%sc/%rc\ %sq/%bq

       default_backend Frontend_customname1

backend Frontend_customname1
        balance roundrobin
        timeout client 350000
        timeout server 350000
        timeout connect 35000
        server backend-server1 10.10.10.50:15000 weight 1 check port 15000
        server backend-server2 10.10.10.51:15000 weight 2  check port 15000


3. Reload systemd to make haproxy-customname.service known to systemctl, restart the freshly created service
and check its status


a) Execute daemon-reload to refresh known .service files in systemd

[root@haproxy2:/etc/haproxy ]# systemctl daemon-reload
[root@haproxy2:/etc/haproxy ]#


b) Restart haproxy-customname

[root@haproxy2:/usr/lib/systemd/system ]# systemctl restart haproxy-customname
[root@haproxy2:/usr/lib/systemd/system ]#

c) Check status is active running and process is properly forked

[root@haproxy2:/usr/lib/systemd/system ]# systemctl status haproxy-customname
● haproxy-customname.service – HAProxy Load Balancer
     Loaded: loaded (/lib/systemd/system/haproxy-customname.service; disabled; vendor preset: enabled)
     Active: active (running) since Tue 2022-08-30 13:15:35 EEST; 16s ago
       Docs: man:haproxy(1)
             file:/usr/share/doc/haproxy/configuration.txt.gz
    Process: 346635 ExecStartPre=/usr/sbin/haproxy-customname-wrapper -f $CONFIG -c -q $EXTRAOPTS (code=exited, status=0/SUCCES>
   Main PID: 346637 (haproxy-customn)
      Tasks: 3 (limit: 4654)
     Memory: 14.5M
        CPU: 68ms
     CGroup: /system.slice/haproxy-customname.service
             ├─346637 /usr/sbin/haproxy-customname-wrapper -Ws -f /etc/haproxy/haproxy_customname_prod.cfg -p /run/haproxy_cust>
             └─346639 /usr/sbin/haproxy-customname-wrapper -Ws -f /etc/haproxy/haproxy_customname_prod.cfg -p /run/haproxy_cust>

Aug 30 13:15:35 haproxy2 haproxy-customname-wrapper[346637]:    | timeouts are set to a non-zero value: 'client', 'connect', 's>
Aug 30 13:15:35 haproxy2 haproxy-customname-wrapper[346637]: [NOTICE] 241/131535 (346637) : New worker #1 (346639) forked
Aug 30 13:15:35 haproxy2 haproxy-customname-wrapper[346637]: Proxy webservers_http started.
Aug 30 13:15:35 haproxy2 haproxy-customname-wrapper[346637]: Proxy https-in started.
Aug 30 13:15:35 haproxy2 haproxy-customname-wrapper[346637]: Proxy webservers-https started.
Aug 30 13:15:35 haproxy2 haproxy-customname-wrapper[346637]: Proxy stats started.

The new haproxy-customname.service processes will be visible in process list together with the normal haproxy.service spawned processes:

[root@haproxy2:/usr/lib/systemd/system ]# ps -ef|grep -i hapro|grep -v grep
root      128464       1  0 Aug11 ?        00:01:19 /usr/sbin/haproxy -Ws -f /etc/haproxy/haproxy.cfg -p /run/haproxy.pid -S /run/haproxy-master.sock
haproxy   128466  128464  0 Aug11 ?        00:49:29 /usr/sbin/haproxy -Ws -f /etc/haproxy/haproxy.cfg -p /run/haproxy.pid -S /run/haproxy-master.sock

root      346637       1  0 13:15 ?        00:00:00 /usr/sbin/haproxy-customname-wrapper -Ws -f /etc/haproxy/haproxy_customname_prod.cfg -p /run/haproxy_customname_prod.pid -S /run/haproxy-customname-master.sock
haproxy   346639  346637  0 13:15 ?        00:00:00 /usr/sbin/haproxy-customname-wrapper -Ws -f /etc/haproxy/haproxy_customname_prod.cfg -p /run/haproxy_customname_prod.pid -S /run/haproxy-customname-master.sock


Following the same steps you can create as many separate haproxy instances as you like, but you have to be cautious not to intermix the listener ports for frontends. There is always risk when you copy from the original /etc/haproxy/haproxy.cfg to /etc/haproxy/haproxy-whatever.cfg to forget to change the listen port addresses in new config. 
Also note, that you might have problems, if you exceeed the usual maximum number of ports  65535 by using a high port ranges in the listeneres and due to that your additional systemd instances might refuse to start.

If you need to create a multiple bunch of systemd separte instances and haproxy configurations you can write easily a small script in bash that does this steps automatically.
Hope this article helped someone. If so drop me a thanks email or do your appreatiation for my blog by supporting my patreon.

Cheers ! 🙂

Fix weird double logging in haproxy.log file due to haproxy.cfg misconfiguration

Tuesday, March 8th, 2022

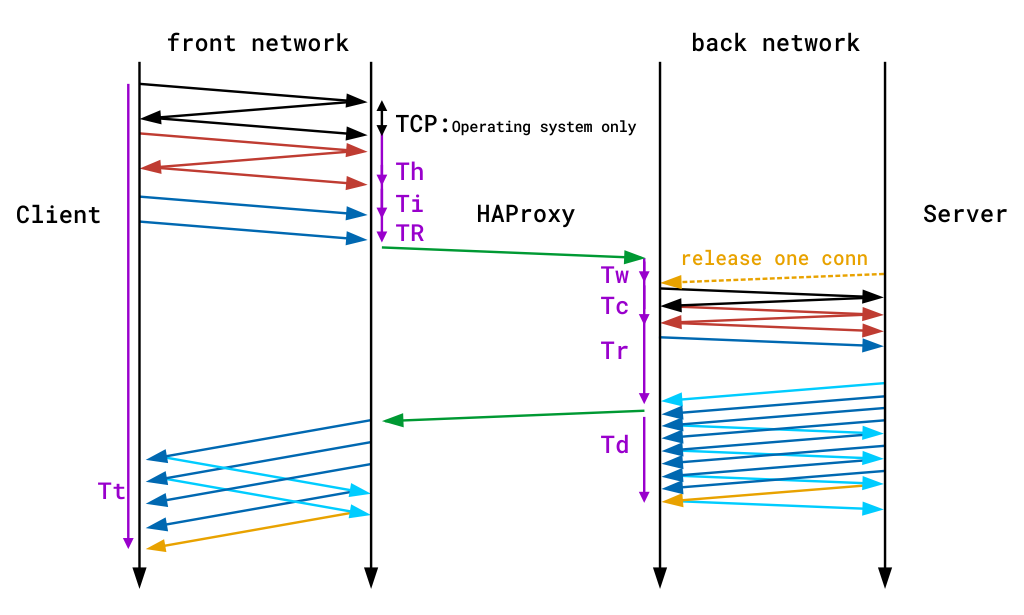
haproxy-logging-front-network-back-network-diagram

While we were building a new machine that will serve as a Haproxy server proxy frontend to tunnel some traffic to a number of backends, 
came across weird oddity. The call requests sent to the haproxy and redirected to backend servers, were being written in the log twice.

Since we have two backend Application servers hat are serving the request, my first guess was this is caused by the fact haproxy
tries to connect to both nodes on each sent request, or that the double logging is caused by the rsyslogd doing something strange on each
received query. The rsyslog configuration configured to send via local6 facility to rsyslog is like that:

$ModLoad imudp
$UDPServerAddress 127.0.0.1
$UDPServerRun 514
#2022/02/02: HAProxy logs to local6, save the messages
local6.*                                                /var/log/haproxy.log


The haproxy basic global and defaults and frontend section config is like that:
 

global
    log          127.0.0.1 local6 debug
    chroot       /var/lib/haproxy
    pidfile      /run/haproxy.pid
    stats socket /var/lib/haproxy/haproxy.sock mode 0600 level admin
    maxconn      4000
    user         haproxy
    group        haproxy
    daemon


defaults
    mode        tcp
    log         global
#    option      dontlognull
#    option      httpclose
#    option      httplog
#    option      forwardfor
    option      redispatch
    option      log-health-checks
    timeout connect 10000 # default 10 second time out if a backend is not found
    timeout client 300000
    timeout server 300000
    maxconn     60000
    retries     3
 

listen FRONTEND1
        bind 10.71.80.5:63750
        mode tcp
        option tcplog
        log global
        log-format [%t]\ %ci:%cp\ %bi:%bp\ %b/%s:%sp\ %Tw/%Tc/%Tt\ %B\ %ts\ %ac/%fc/%bc/%sc/%rc\ %sq/%bq
        balance roundrobin
        timeout client 350000
        timeout server 350000
        timeout connect 35000
        server backend-host1 10.80.50.1:13750 weight 1 check port 15000
        server backend-host2 10.80.50.2:13750 weight 2 check port 15000

After quick research online on why this odd double logging of request ends in /var/log/haproxy.log it turns out this is caused by the 

log global  defined double under the defaults section as well as in the frontend itself, hence to resolve simply had to comment out the log global in Frontend, so it looks like so:

listen FRONTEND1
        bind 10.71.80.5:63750
        mode tcp
        option tcplog
  #      log global
        log-format [%t]\ %ci:%cp\ %bi:%bp\ %b/%s:%sp\ %Tw/%Tc/%Tt\ %B\ %ts\ %ac/%fc/%bc/%sc/%rc\ %sq/%bq
        balance roundrobin
        timeout client 350000
        timeout server 350000
        timeout connect 35000
        server backend-host1 10.80.50.1:13750 weight 1 check port 15000
        server backend-host2 10.80.50.2:13750 weight 2 check port 15000


Next just reloaded haproxy and one request started leaving only one trail inside haproxy.log as expected 🙂
 

KVM Virtual Machine RHEL 8.3 Linux install on Redhat 8.3 Linux Hypervisor with custom tailored kickstart.cfg

Friday, January 22nd, 2021

kvm_virtualization-logo-redhat-8.3-install-howto-with-kickstart

If you don't have tried it yet Redhat and CentOS and other RPM based Linux operationg systems that use anaconda installer is generating a kickstart file after being installed under /root/{anaconda-ks.cfg,initial-setup- ks.cfg,original-ks.cfg} immediately after the OS installation completes. Using this Kickstart file template you can automate installation of Redhat installation with exactly the same configuration as many times as you like by directly loading your /root/original-ks.cfg file in RHEL installer.

Here is the official description of Kickstart files from Redhat:

"The Red Hat Enterprise Linux installation process automatically writes a Kickstart file that contains the settings for the installed system. This file is always saved as /root/anaconda-ks.cfg. You may use this file to repeat the installation with identical settings, or modify copies to specify settings for other systems."


Kickstart files contain answers to all questions normally asked by the text / graphical installation program, such as what time zone you want the system to use, how the drives should be partitioned, or which packages should be installed. Providing a prepared Kickstart file when the installation begins therefore allows you to perform the installation automatically, without need for any intervention from the user. This is especially useful when deploying Redhat based distro (RHEL / CentOS / Fedora …) on a large number of systems at once and in general pretty useful if you're into the field of so called "DevOps" system administration and you need to provision a certain set of OS to a multitude of physical servers or create or recreate easily virtual machines with a certain set of configuration.
 

1. Create /vmprivate storage directory where Virtual machines will reside

First step on the Hypervisor host which will hold the future created virtual machines is to create location where it will be created:

[root@redhat ~]#  lvcreate –size 140G –name vmprivate vg00
[root@redhat ~]#  mkfs.ext4 -j -b 4096 /dev/mapper/vg00-vmprivate
[root@redhat ~]# mount /dev/mapper/vg00-vmprivate /vmprivate

To view what is the situation with Logical Volumes and  VG group names:

[root@redhat ~]# vgdisplay -v|grep -i vmprivate -A7 -B7
  Segments               1
  Allocation             inherit
  Read ahead sectors     auto
  – currently set to     8192
  Block device           253:0


  — Logical volume —
  LV Path                /dev/vg00/vmprivate
  LV Name                vmprivate
  VG Name                vg00
  LV UUID                VVUgsf-FXq2-TsMJ-QPLw-7lGb-Dq5m-3J9XJJ
  LV Write Access        read/write
  LV Creation host, time main.hostname.com, 2021-01-20 17:26:11 +0100
  LV Status              available
  # open                 1
  LV Size                150.00 GiB


Note that you'll need to have the size physically available on a SAS / SSD Hard Drive physically connected to Hypervisor Host.

To make the changes Virtual Machines storage location directory permanently mounted add to /etc/fstab

/dev/mapper/vg00-vmprivate  /vmprivate              ext4    defaults,nodev,nosuid 1 2

[root@redhat ~]# echo '/dev/mapper/vg00-vmprivate  /vmprivate              ext4    defaults,nodev,nosuid 1 2' >> /etc/fstab


2. Second we need to install the following set of RPM packages on the Hypervisor Hardware host

[root@redhat ~]# yum install qemu-kvm qemu-img libvirt virt-install libvirt-client virt-manager libguestfs-tools virt-install virt-top -y

3. Enable libvirtd on the host

[root@redhat ~]#  lsmod | grep -i kvm
[root@redhat ~]#  systemctl enable libvirtd

4. Configure network bridging br0 interface on Hypervisor


In /etc/sysconfig/network-scripts/ifcfg-eth0 you need to include:

NM_CONTROLED=NO

Next use nmcli redhat configurator to create the bridge (you can use ip command instead) but since the tool is the redhat way to do it lets do it their way ..

[root@redhat ~]# nmcli connection delete eno3
[root@redhat ~]# nmcli connection add type bridge autoconnect yes con-name br0 ifname br0
[root@redhat ~]# nmcli connection modify br0 ipv4.addresses 10.80.51.16/26 ipv4.method manual
[root@redhat ~]# nmcli connection modify br0 ipv4.gateway 10.80.51.1
[root@redhat ~]# nmcli connection modify br0 ipv4.dns 172.20.88.2
[root@redhat ~]# nmcli connection add type bridge-slave autoconnect yes con-name eno3 ifname eno3 master br0
[root@redhat ~]# nmcli connection up br0

5. Prepare a working kickstart.cfg file for VM


Below is a sample kickstart file I've used to build a working fully functional Virtual Machine with Red Hat Enterprise Linux 8.3 (Ootpa) .

#version=RHEL8
#install
# Run the Setup Agent on first boot
firstboot --enable
ignoredisk --only-use=vda
# Use network installation
#url --url=http://hostname.com/rhel/8/BaseOS
##url --url=http://171.23.8.65/rhel/8/os/BaseOS
# Use text mode install
text
#graphical
# System language
#lang en_US.UTF-8
keyboard --vckeymap=us --xlayouts='us'
# Keyboard layouts
##keyboard us
lang en_US.UTF-8
# Root password
rootpw $6$gTiUCif4$YdKxeewgwYCLS4uRc/XOeKSitvDJNHFycxWVHi.RYGkgKctTMCAiY2TErua5Yh7flw2lUijooOClQQhlbstZ81 --iscrypted
# network-stuff
# place ip=your_VM_IP, netmask, gateway, nameserver hostname 
network --bootproto=static --ip=10.80.21.19 --netmask=255.255.255.192 --gateway=10.80.21.1 --nameserver=172.30.85.2 --device=eth0 --noipv6 --hostname=FQDN.VMhost.com --onboot=yes
# if you need just localhost initially configured uncomment and comment above
##network В --device=lo --hostname=localhost.localdomain
# System authorization information
authconfig --enableshadow --passalgo=sha512 --enablefingerprint
# skipx
skipx
# Firewall configuration
firewall --disabled
# System timezone
timezone Europe/Berlin
# Clear the Master Boot Record
##zerombr
# Repositories
## Add RPM repositories from KS file if necessery
#repo --name=appstream --baseurl=http://hostname.com/rhel/8/AppStream
#repo --name=baseos --baseurl=http://hostname.com/rhel/8/BaseOS
#repo --name=inst.stage2 --baseurl=http://hostname.com ff=/dev/vg0/vmprivate
##repo --name=rhsm-baseos В  В --baseurl=http://172.54.8.65/rhel/8/rhsm/x86_64/BaseOS/
##repo --name=rhsm-appstream --baseurl=http://172.54.8.65/rhel/8/rhsm/x86_64/AppStream/
##repo --name=os-baseos В  В  В --baseurl=http://172.54.9.65/rhel/8/os/BaseOS/
##repo --name=os-appstream В  --baseurl=http://172.54.8.65/rhel/8/os/AppStream/
#repo --name=inst.stage2 --baseurl=http://172.54.8.65/rhel/8/BaseOS
# Disk partitioning information set proper disk sizing
##bootloader --location=mbr --boot-drive=vda
bootloader --append=" crashkernel=auto tsc=reliable divider=10 plymouth.enable=0 console=ttyS0 " --location=mbr --boot-drive=vda
# partition plan
zerombr
clearpart --all --drives=vda --initlabel
part /boot --size=1024 --fstype=ext4 --asprimary
part swap --size=1024
part pv.01 --size=30000 --grow --ondisk=vda
##part pv.0 --size=80000 --fstype=lvmpv
#part pv.0 --size=61440 --fstype=lvmpv
volgroup s pv.01
logvol / --vgname=s --size=15360 --name=root --fstype=ext4
logvol /var/cache/ --vgname=s --size=5120 --name=cache --fstype=ext4 --fsoptions="defaults,nodev,nosuid"
logvol /var/log --vgname=s --size=7680 --name=log --fstype=ext4 --fsoptions="defaults,nodev,noexec,nosuid"
logvol /tmp --vgname=s --size=5120 --name=tmp --fstype=ext4 --fsoptions="defaults,nodev,nosuid"
logvol /home --vgname=s --size=5120 --name=home --fstype=ext4 --fsoptions="defaults,nodev,nosuid"
logvol /opt --vgname=s --size=2048 --name=opt --fstype=ext4 --fsoptions="defaults,nodev,nosuid"
logvol /var/log/audit --vgname=s --size=3072 --name=audit --fstype=ext4 --fsoptions="defaults,nodev,nosuid"
logvol /var/spool --vgname=s --size=2048 --name=spool --fstype=ext4 --fsoptions="defaults,nodev,nosuid"
logvol /var --vgname=s --size=7680 --name=var --fstype=ext4 --fsoptions="defaults,nodev,nosuid"
# SELinux configuration
selinux --disabled
# Installation logging level
logging --level=debug
# reboot automatically
reboot
###
%packages
@standard
python3
pam_ssh_agent_auth
-nmap-ncat
#-plymouth
#-bpftool
-cockpit
#-cryptsetup
-usbutils
#-kmod-kvdo
#-ledmon
#-libstoragemgmt
#-lvm2
#-mdadm
-rsync
#-smartmontools
-sos
-subscription-manager-cockpit
# Tune Linux vm.dirty_background_bytes (IMAGE-439)
# The following tuning causes dirty data to begin to be background flushed at
# 100 Mbytes, so that it writes earlier and more often to avoid a large build
# up and improving overall throughput.
echo "vm.dirty_background_bytes=100000000" >> /etc/sysctl.conf
# Disable kdump
systemctl disable kdump.service
%end

Important note to make here is the MD5 set root password string in (rootpw) line this string can be generated with openssl or mkpasswd commands :

Method 1: use openssl cmd to generate (md5, sha256, sha512) encrypted pass string

[root@redhat ~]# openssl passwd -6 -salt xyz test
$6$xyz$rjarwc/BNZWcH6B31aAXWo1942.i7rCX5AT/oxALL5gCznYVGKh6nycQVZiHDVbnbu0BsQyPfBgqYveKcCgOE0

Note: passing -1 will generate an MD5 password, -5 a SHA256 encryption and -6 SHA512 encrypted string (logically recommended for better security)

Method 2: (md5, sha256, sha512)

[root@redhat ~]# mkpasswd –method=SHA-512 –stdin

The option –method accepts md5, sha-256 and sha-512
Theoretically there is also a kickstart file generator web interface on Redhat's site here however I never used it myself but instead use above kickstart.cfg
 

6. Install the new VM with virt-install cmd


Roll the new preconfigured VM based on above ks template file use some kind of one liner command line  like below:
 

[root@redhat ~]# virt-install -n RHEL8_3-VirtualMachine –description "CentOS 8.3 Virtual Machine" –os-type=Linux –os-variant=rhel8.3 –ram=8192 –vcpus=8 –location=/vmprivate/rhel-server-8.3-x86_64-dvd.iso –disk path=/vmprivate/RHEL8_3-VirtualMachine.img,bus=virtio,size=70 –graphics none –initrd-inject=/root/kickstart.cfg –extra-args "console=ttyS0 ks=file:/kickstart.cfg"

7. Use a tiny shell script to automate VM creation


For some clarity and better automation in case you plan to repeat VM creation you can prepare a tiny bash shell script:
 

#!/bin/sh
KS_FILE='kickstart.cfg';
VM_NAME='RHEL8_3-VirtualMachine';
VM_DESCR='CentOS 8.3 Virtual Machine';
RAM='8192';
CPUS='8';
# size is in Gigabytes
VM_IMG_SIZE='140';
ISO_LOCATION='/vmprivate/rhel-server-8.3-x86_64-dvd.iso';
VM_IMG_FILE_LOC='/vmprivate/RHEL8_3-VirtualMachine.img';

virt-install -n "$VMNAME" –description "$VM_DESCR" –os-type=Linux –os-variant=rhel8.3 –ram=8192 –vcpus=8 –location="$ISO_LOCATION" –disk path=$VM_IMG_FILE,bus=virtio,size=$IMG_VM_SIZE –graphics none –initrd-inject=/root/$KS_FILE –extra-args "console=ttyS0 ks=file:/$KS_FILE"


A copy of virt-install.sh script can be downloaded here

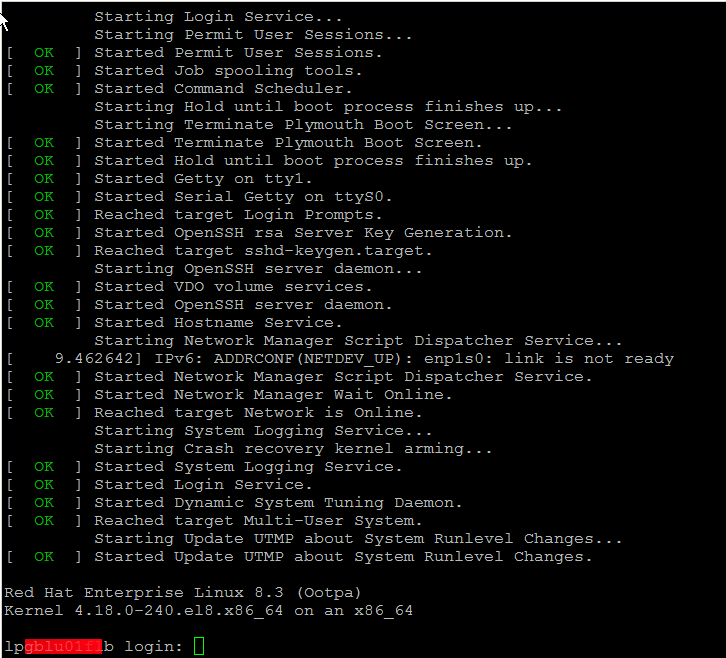
Wait for the installation to finish it should be visualized and if all installation is smooth you should get a login prompt use the password generated with openssl tool and test to login, then disconnect from the machine by pressing CTRL + ] and try to login via TTY with

[root@redhat ~]# virst list –all
 Id   Name        State
—————————
 2    
RHEL8_3-VirtualMachine   running

[root@redhat ~]#  virsh console RHEL8_3-VirtualMachine


redhat8-login-prompt

One last thing I recommend you check the official documentation on Kickstart2 from CentOS official website

In case if you later need to destroy the VM and the respective created Image file you can do it with:
 

[root@redhat ~]#  virsh destroy RHEL8_3-VirtualMachine
[root@redhat ~]#  virsh undefine RHEL8_3-VirtualMachine

Don't forget to celebreate the success and give this nice article a credit by sharing this nice tutorial with a friend or by placing a link to it from your blog 🙂


Enjoy !

How to test RAM Memory for errors in Linux / UNIX OS servers. Find broken memory RAM banks

Friday, December 3rd, 2021

test-ram-memory-for-errors-linux-unix-find-broken-memory-logo


1. Testing the memory with motherboard integrated tools
 

Memory testing has been integral part of Computers for the last 50 years. In the dawn of computers those older perhaps remember memory testing was part of the computer initialization boot. And this memory testing was delaying the boot with some seconds and the user could see the memory numbers being counted up to the amount of memory. With the increased memory modern computers started to have and the annoyance to wait for a memory check program to check the computer hardware memory on modern computers this check has been mitigated or completely removed on some hardware.
Thus under some circumstances sysadmins or advanced computer users might need to check the memory, especially if there is some suspicion for memory damages or if for example a home PC starts crashing with Blue screens of Death on Windows without reason or simply the PC or some old arcane Linux / UNIX servers gets restarted every now and then for now apparent reason. When such circumstances occur it is an idea to start debugging the hardware issue with a simple memory check.

There are multiple ways to test installed memory banks on a server laptop or local home PC both integrated and using external programs.
On servers that is usually easily done from ILO or IPMI or IDRAC access (usually web) interface of the vendor, on laptops and home usage from BIOS or UEFI (Unified Extensible Firmware Interface) acces interface on system boot that is possible as well.
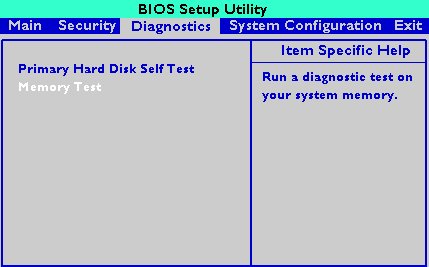
memtest-hp
HP BIOS Setup

An old but gold TIP, more younger people might not know is the


Prolonged SHIFT key press which once held with the user instructs the machine to initiate a memory test before the computer starts reading what is written in the boot loader.

So before anything else from below article it might be a good idea to just try HOLD SHIFT for 15-20 seconds after a complete Shut and ON from the POWER button.

If this test does not triggered or it is triggered and you end up with some corrupted memory but you're not sure which exact Memory bank is really crashing and want to know more on what memory Bank and segments are breaking up you might want to do a more thorough testing. In below article I'll try to explain shortly how this can be done.


2. Test the memory using a boot USB Flash Drive / DVD / CD 
 

Say hello to memtest86+. It is a Linux GRUB boot loader bootable utility that tests physical memory by writing various patterns to it and reading them back. Since memtest86+ runs directly off the hardware it does not require any operating system support for execution. Perhaps it is important to mention that memtest86 (is PassMark memtest86)and memtest86+ (An Advanced Memory diagnostic tool) are different tools, the first is freeware and second one is FOSS software.

To use it all you'll need is some version of Linux. If you don't already have some burned in somewhere at your closet, you might want to burn one.
For Linux / Mac users this is as downloading a Linux distribution ISO file and burning it with

# dd if=/path/to/iso of=/dev/sdbX bs=80M status=progress


Windows users can burn a Live USB with whatever Linux distro or download and burn the latest versionof memtest86+ from https://www.memtest.org/  on Windows Desktop with some proggie like lets say UnetBootIn.
 

2.1. Run memtest86+ on Ubuntu

Many Linux distributions such as Ubuntu 20.0 comes together with memtest86+, which can be easily invoked from GRUB / GRUB2 Kernel boot loader.
Ubuntu has a separate menu pointer for a Memtest.
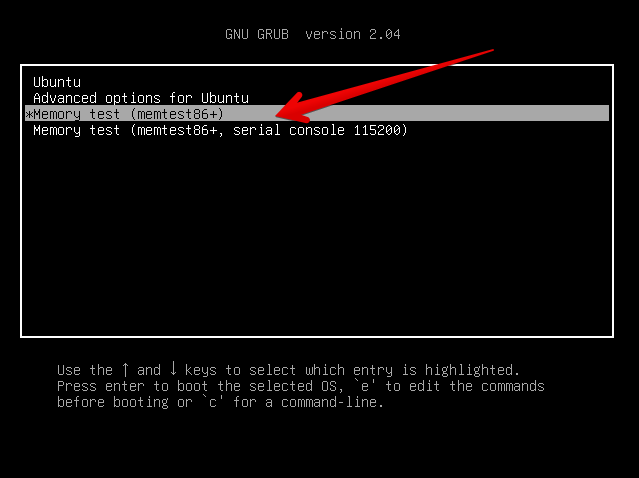
ubuntu-grub-2-04-boot-loader-memtest86-menu-screenshot

Other distributions RPM based distributions such as CentOS, Fedora Linux, Redhat things differ.

2.2. memtest86+ on Fedora


Fedora used to have the memtest86+ menu at the GRUB boot selection prompt, but for some reason removed it and in newest Fedora releases as of time such as Fedora 35 memtest86+ is preinstalled and available but not visible, to start on  already and to start a memtest memory test tool:

  •   Boot a Fedora installation or Rescue CD / USB. At the prompt, type "memtest86".

boot: memtest86

2.3 memtest86+ on RHEL Linux

The memtest86+tool is available as an RPM package from Red Hat Network (RHN) as well as a boot option from the Red Hat Enterprise Linux rescue disk.
And nowadays Red Hat Enterprise Linux ships by default with the tool.

Prior redhat (now legacy) releases such as on RHEL 5.0 it has to be installed and configure it with below 3 commands.

[root@rhel ~]# yum install memtest86+
[root@rhel ~]# memtest-setup
[root@rhel ~]# grub2-mkconfig -o /boot/grub2/grub.cfg


    Again as with CentOS to boot memtest86+ from the rescue disk, you will need to boot your system from CD 1 of the Red Hat Enterprise Linux installation media, and type the following at the boot prompt (before the Linux kernel is started):

boot: memtest86
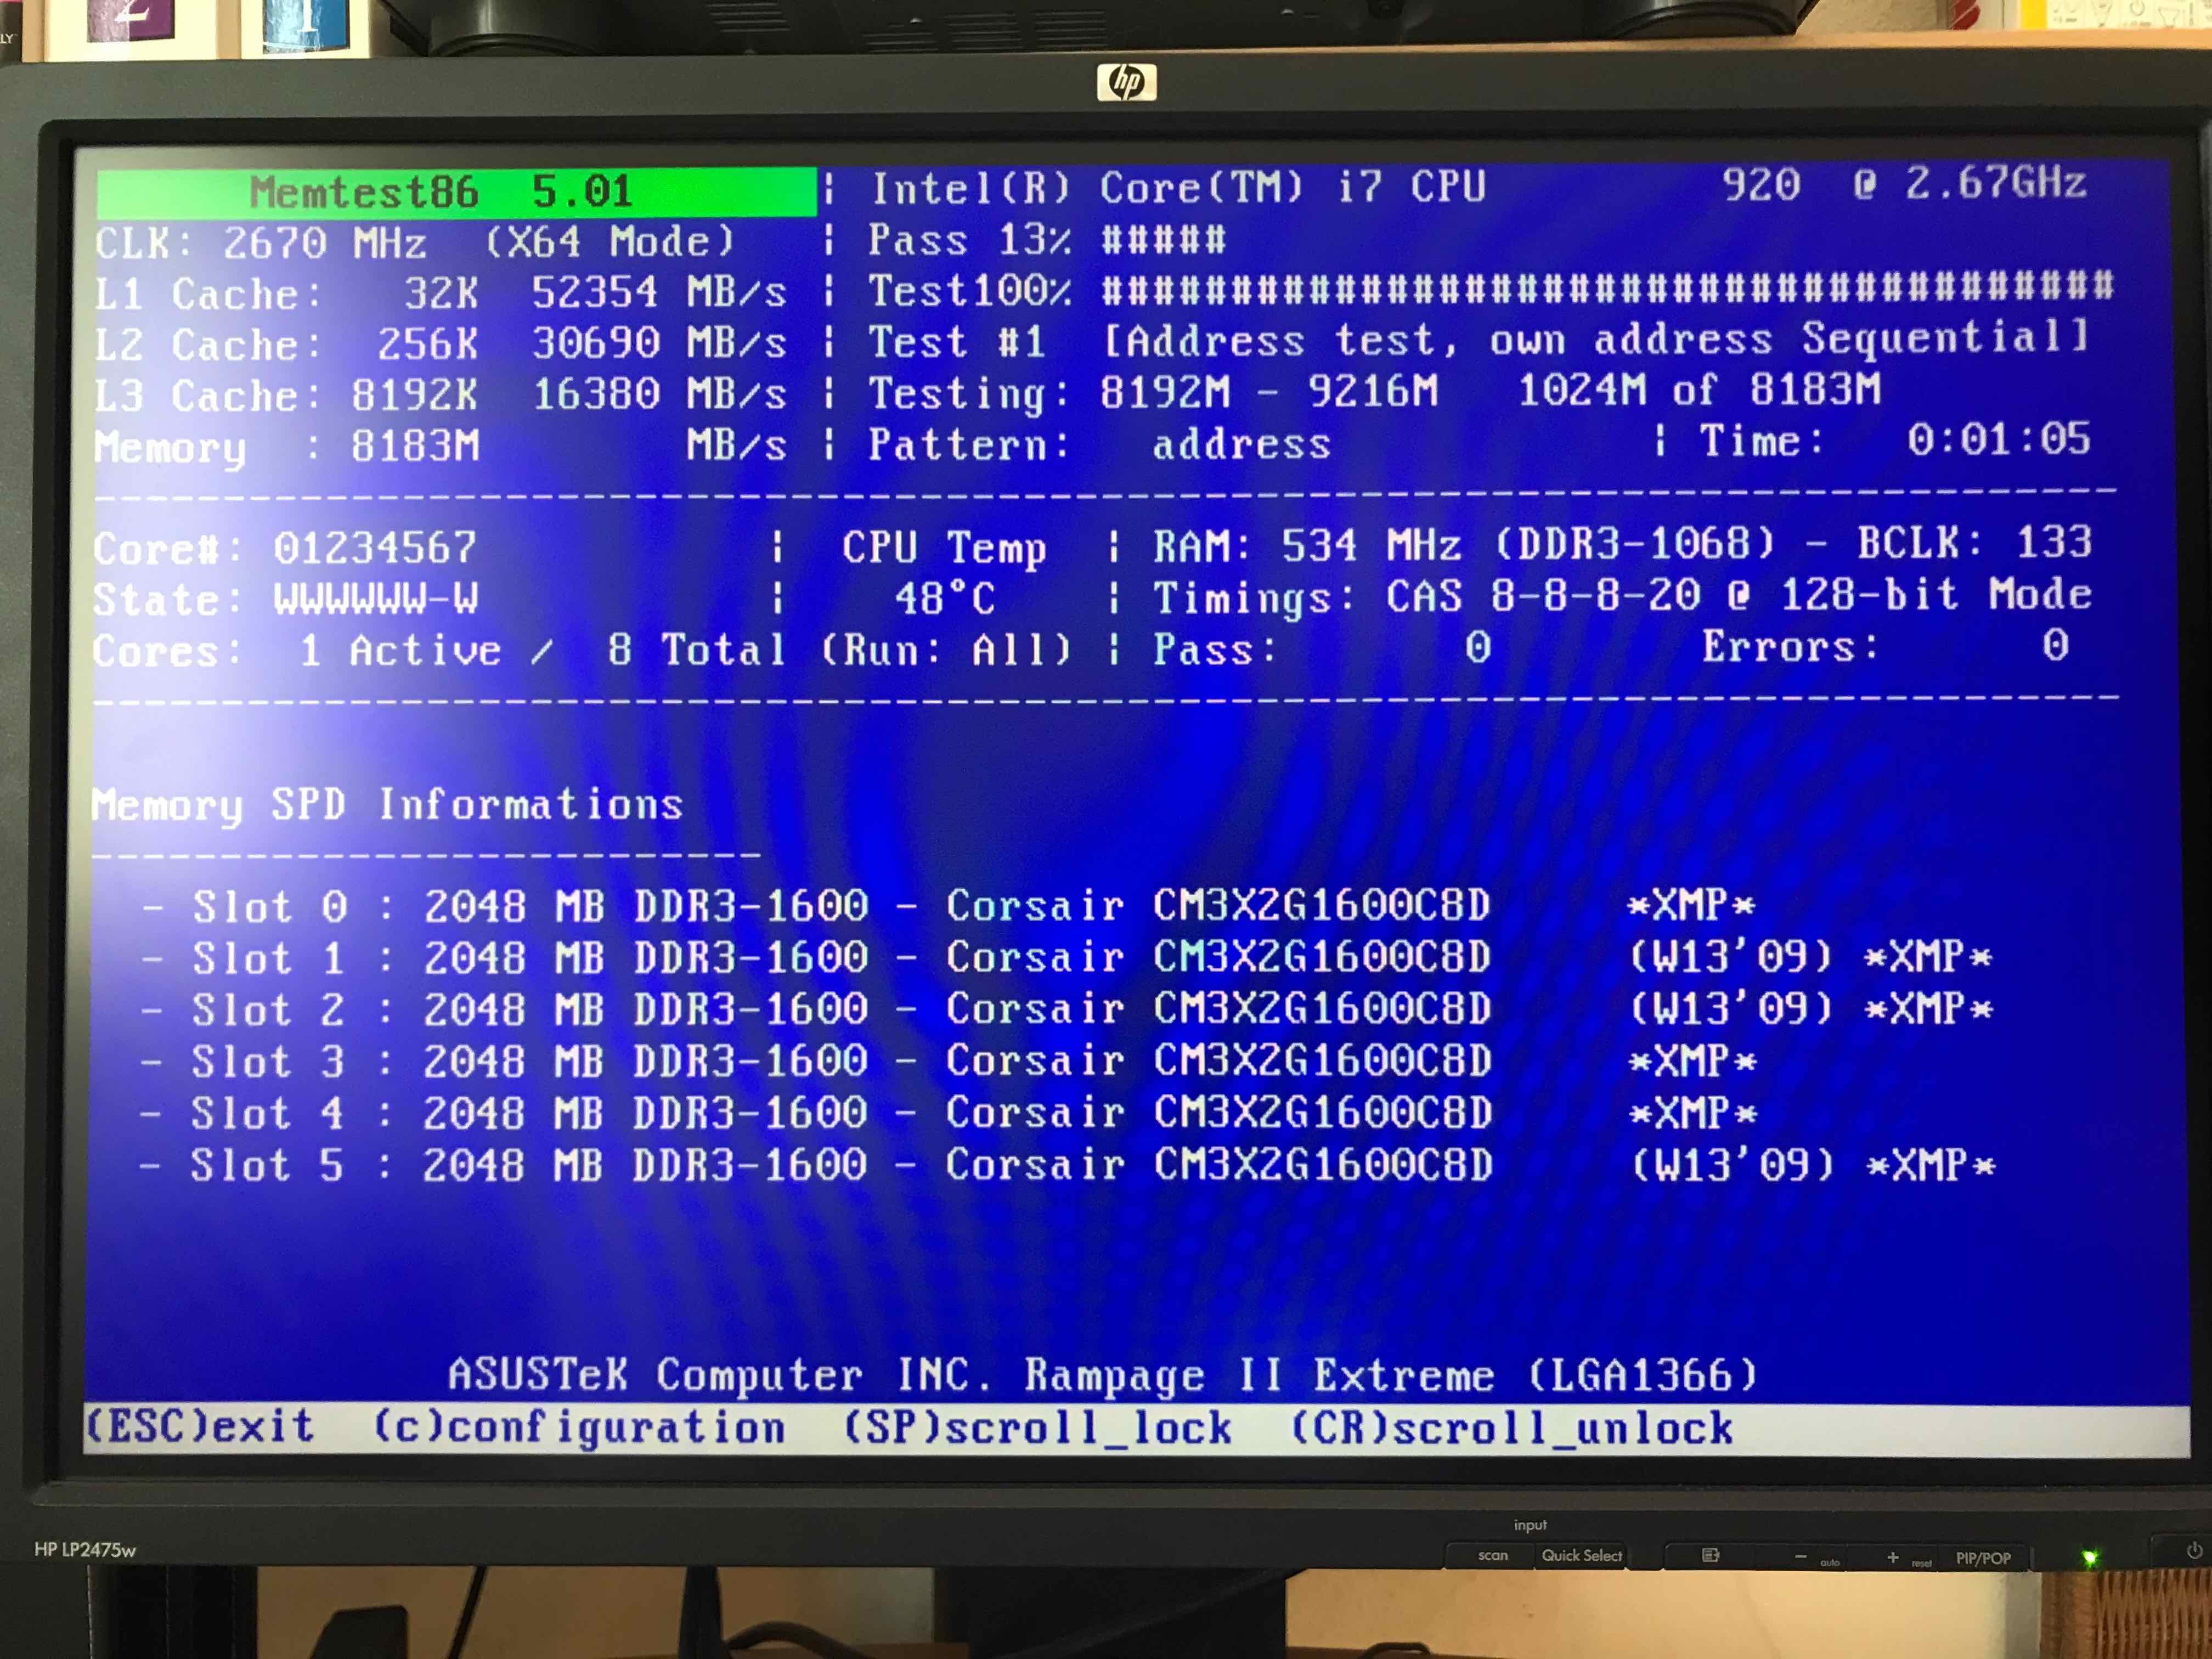
memtestx86-8gigabytes-of-memory-boot-screenshot
memtest86+ testing 5 memory slots

As you see all on above screenshot the Memory banks are listed as Slots. There are a number of Tests to be completed until
it can be said for sure memory does not have any faulty cells. 
The

Pass: 0
Errors: 0 

Indicates no errors, so in the end if memtest86 does not find anything this values should stay at zero.
memtest86+ is also usable to detecting issues with temperature of CPU. Just recently I've tested a PC thinking that some memory has defects but it turned out the issue on the Computer was at the CPU's temperature which was topping up at 80 – 82 Celsius.

If you're unfortunate and happen to get some corrupted memory segments you will get some red fields with the memory addresses found to have corrupted on Read / Write test operations:
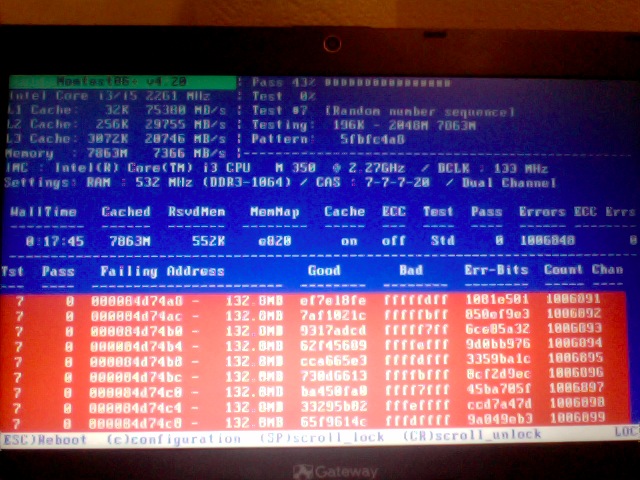
memtest86-returning-memory-address-errors-screenshot


2.4. Install and use memtest and memtest86+ on Debian / Mint Linux

You can install either memtest86+ or just for the fun put both of them and play around with both of them as they have a .deb package provided out of debian non-free /etc/apt/sources.list repositories.


root@jeremiah:/home/hipo# apt-cache show memtest86 memtest86+
Package: memtest86
Version: 4.3.7-3
Installed-Size: 302
Maintainer: Yann Dirson <dirson@debian.org>
Architecture: amd64
Depends: debconf (>= 0.5) | debconf-2.0
Recommends: memtest86+
Suggests: hwtools, memtester, kernel-patch-badram, grub2 (>= 1.96+20090523-1) | grub (>= 0.95+cvs20040624), mtools
Description-en: thorough real-mode memory tester
 Memtest86 scans your RAM for errors.
 .
 This tester runs independently of any OS – it is run at computer
 boot-up, so that it can test *all* of your memory.  You may want to
 look at `memtester', which allows testing your memory within Linux,
 but this one won't be able to test your whole RAM.
 .
 It can output a list of bad RAM regions usable by the BadRAM kernel
 patch, so that you can still use you old RAM with one or two bad bits.
 .
 This is the last DFSG-compliant version of this software, upstream
 has opted for a proprietary development model starting with 5.0.  You
 may want to consider using memtest86+, which has been forked from an
 earlier version of memtest86, and provides a different set of
 features.  It is available in the memtest86+ package.
 .
 A convenience script is also provided to make a grub-legacy-based
 floppy or image.

Description-md5: 0ad381a54d59a7d7f012972f613d7759
Homepage: http://www.memtest86.com/
Section: misc
Priority: optional
Filename: pool/main/m/memtest86/memtest86_4.3.7-3_amd64.deb
Size: 45470
MD5sum: 8dd2a4c52910498d711fbf6b5753bca9
SHA256: 09178eca21f8fd562806ccaa759d0261a2d3bb23190aaebc8cd99071d431aeb6

Package: memtest86+
Version: 5.01-3
Installed-Size: 2391
Maintainer: Yann Dirson <dirson@debian.org>
Architecture: amd64
Depends: debconf (>= 0.5) | debconf-2.0
Suggests: hwtools, memtester, kernel-patch-badram, memtest86, grub-pc | grub-legacy, mtools
Description-en: thorough real-mode memory tester
 Memtest86+ scans your RAM for errors.
 .
 This tester runs independently of any OS – it is run at computer
 boot-up, so that it can test *all* of your memory.  You may want to
 look at `memtester', which allows to test your memory within Linux,
 but this one won't be able to test your whole RAM.
 .
 It can output a list of bad RAM regions usable by the BadRAM kernel
 patch, so that you can still use your old RAM with one or two bad bits.
 .
 Memtest86+ is based on memtest86 3.0, and adds support for recent
 hardware, as well as a number of general-purpose improvements,
 including many patches to memtest86 available from various sources.
 .
 Both memtest86 and memtest86+ are being worked on in parallel.
Description-md5: aa685f84801773ef97fdaba8eb26436a
Homepage: http://www.memtest.org/

Tag: admin::benchmarking, admin::boot, hardware::storage:floppy,
 interface::text-mode, role::program, scope::utility, use::checking
Section: misc
Priority: optional
Filename: pool/main/m/memtest86+/memtest86+_5.01-3_amd64.deb
Size: 75142
MD5sum: 4f06523532ddfca0222ba6c55a80c433
SHA256: ad42816e0b17e882713cc6f699b988e73e580e38876cebe975891f5904828005


root@jeremiah:/home/hipo# apt-get install –yes memtest86+

root@jeremiah:/home/hipo# apt-get install –yes memtest86

Reading package lists… Done
Building dependency tree       
Reading state information… Done
Suggested packages:
  hwtools kernel-patch-badram grub2 | grub
The following NEW packages will be installed:
  memtest86
0 upgraded, 1 newly installed, 0 to remove and 21 not upgraded.
Need to get 45.5 kB of archives.
After this operation, 309 kB of additional disk space will be used.
Get:1 http://ftp.de.debian.org/debian buster/main amd64 memtest86 amd64 4.3.7-3 [45.5 kB]
Fetched 45.5 kB in 0s (181 kB/s)     
Preconfiguring packages …
Selecting previously unselected package memtest86.
(Reading database … 519985 files and directories currently installed.)
Preparing to unpack …/memtest86_4.3.7-3_amd64.deb …
Unpacking memtest86 (4.3.7-3) …
Setting up memtest86 (4.3.7-3) …
Generating grub configuration file …
Found background image: saint-John-of-Rila-grub.jpg
Found linux image: /boot/vmlinuz-4.19.0-18-amd64
Found initrd image: /boot/initrd.img-4.19.0-18-amd64
Found linux image: /boot/vmlinuz-4.19.0-17-amd64
Found initrd image: /boot/initrd.img-4.19.0-17-amd64
Found linux image: /boot/vmlinuz-4.19.0-8-amd64
Found initrd image: /boot/initrd.img-4.19.0-8-amd64
Found linux image: /boot/vmlinuz-4.19.0-6-amd64
Found initrd image: /boot/initrd.img-4.19.0-6-amd64
Found linux image: /boot/vmlinuz-4.19.0-5-amd64
Found initrd image: /boot/initrd.img-4.19.0-5-amd64
Found linux image: /boot/vmlinuz-4.9.0-8-amd64
Found initrd image: /boot/initrd.img-4.9.0-8-amd64
Found memtest86 image: /boot/memtest86.bin
Found memtest86+ image: /boot/memtest86+.bin
Found memtest86+ multiboot image: /boot/memtest86+_multiboot.bin
File descriptor 3 (pipe:[66049]) leaked on lvs invocation. Parent PID 22581: /bin/sh
done
Processing triggers for man-db (2.8.5-2) …


After this both memory testers memtest86+ and memtest86 will appear next to the option of booting a different version kernels and the Advanced recovery kernels, that you usually get in the GRUB boot prompt.

2.5. Use memtest embedded tool on any Linux by adding a kernel variable
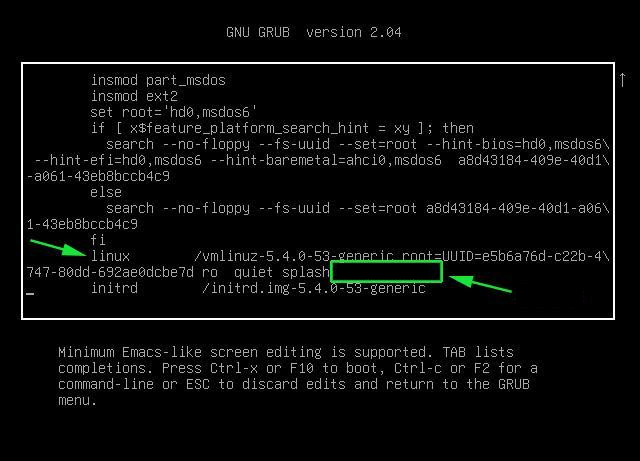
Edit-Grub-Parameters-add-memtest-4-to-kernel-boot

2.4.1. Reboot your computer

# reboot

2.4.2. At the GRUB boot screen (with UEFI, press Esc).

2.4.3 For 4 passes add temporarily the memtest=4 kernel parameter.
 

memtest=        [KNL,X86,ARM,PPC,RISCV] Enable memtest
                Format: <integer>
                default : 0 <disable>
                Specifies the number of memtest passes to be
                performed. Each pass selects another test
                pattern from a given set of patterns. Memtest
                fills the memory with this pattern, validates
                memory contents and reserves bad memory
                regions that are detected.


3. Install and use memtester Linux tool
 

At some condition, memory is the one of the suspcious part, or you just want have a quick test. memtester  is an effective userspace tester for stress-testing the memory subsystem.  It is very effective at finding intermittent and non-deterministic faults.

The advantage of memtester "live system check tool is", you can check your system for errors while it's still running. No need for a restart, just run that application, the downside is that some segments of memory cannot be thoroughfully tested as you already have much preloaded data in it to have the Operating Sytstem running, thus always when possible try to stick to rule to test the memory using memtest86+  from OS Boot Loader, after a clean Machine restart in order to clean up whole memory heap.

Anyhow for a general memory test on a Critical Legacy Server  (if you lets say don't have access to Remote Console Board, or don't trust the ILO / IPMI Hardware reported integrity statistics), running memtester from already booted is still a good idea.


3.1. Install memtester on any Linux distribution from source

wget http://pyropus.ca/software/memtester/old-versions/memtester-4.2.2.tar.gz
# tar zxvf memtester-4.2.2.tar.gz
# cd memtester-4.2.2
# make && make install

3.2 Install on RPM based distros


On Fedora memtester is available from repositories however on many other RPM based distros it is not so you have to install it from source.

[root@fedora ]# yum install -y memtester


3.3. Install memtester on Deb based Linux distributions from source
 

To install it on Debian / Ubuntu / Mint etc. , open a terminal and type:
 

root@linux:/ #  apt install –yes memtester

The general run syntax is:

memtester [-p PHYSADDR] [ITERATIONS]


You can hence use it like so:

hipo@linux:/ $ sudo memtester 1024 5

This should allocate 1024MB of memory, and repeat the test 5 times. The more repeats you run the better, but as a memtester run places a great overall load on the system you either don't increment the runs too much or at least run it with  lowered process importance e.g. by nicing the PID:

hipo@linux:/ $ nice -n 15 sudo memtester 1024 5


  • If you have more RAM like 4GB or 8GB, it is upto you how much memory you want to allocate for testing.
  • As your operating system, current running process might take some amount of RAM, Please check available Free RAM and assign that too memtester.
  • If you are using a 32 Bit System, you cant test more than 4 GB even though you have more RAM( 32 bit systems doesnt support more than 3.5 GB RAM as you all know).
  • If your system is very busy and you still assigned higher than available amount of RAM, then the test might get your system into a deadlock, leads to system to halt, be aware of this.
  • Run the memtester as root user, so that memtester process can malloc the memory, once its gets hold on that memory it will try to apply lock. if specified memory is not available, it will try to reduce required RAM automatically and try to lock it with mlock.
  • if you run it as a regular user, it cant auto reduce the required amount of RAM, so it cant lock it, so it tries to get hold on that specified memory and starts exhausting all system resources.


If you have 8 Gigas of RAM plugged into the PC motherboard you have to multiple 1024*8 this is easily done with bc (An arbitrary precision calculator language) tool:

root@linux:/ # bc -l
bc 1.07.1
Copyright 1991-1994, 1997, 1998, 2000, 2004, 2006, 2008, 2012-2017 Free Software Foundation, Inc.
This is free software with ABSOLUTELY NO WARRANTY.
For details type `warranty'. 
8*1024
8192


 for example you should run:

root@linux:/ # memtester 8192 5

memtester version 4.3.0 (64-bit)
Copyright (C) 2001-2012 Charles Cazabon.
Licensed under the GNU General Public License version 2 (only).

pagesize is 4096
pagesizemask is 0xfffffffffffff000
want 8192MB (2083520512 bytes)
got  8192MB (2083520512 bytes), trying mlock …Loop 1/1:
  Stuck Address       : ok        
  Random Value        : ok
  Compare XOR         : ok
  Compare SUB         : ok
  Compare MUL         : ok
  Compare DIV         : ok
  Compare OR          : ok
  Compare AND         : ok
  Sequential Increment: ok
  Solid Bits          : ok        
  Block Sequential    : ok        
  Checkerboard        : ok        
  Bit Spread          : ok        
  Bit Flip            : ok        
  Walking Ones        : ok        
  Walking Zeroes      : ok        
  8-bit Writes        : ok
  16-bit Writes       : ok

Done.


4. Shell Script to test server memory for corruptions
 

If for some reason the machine you want to run a memory test doesn't have connection to the external network such as the internet and therefore you cannot configure a package repository server and install memtester, the other approach is to use a simple memory test script such as memtestlinux.sh
 

#!/bin/bash
# Downloaded from https://www.srv24x7.com/memtest-linux/
echo "ByteOnSite Memory Test"
cpus=`cat /proc/cpuinfo | grep processor | wc -l`
if [ $cpus -lt 6 ]; then
threads=2
else
threads=$(($cpus / 2))
fi
echo "Detected $cpus CPUs, using $threads threads.."
memory=`free | grep 'Mem:' | awk {'print $2'}`
memoryper=$(($memory / $threads))
echo "Detected ${memory}K of RAM ($memoryper per thread).."
freespace=`df -B1024 . | tail -n1 | awk {'print $4'}`
if [ $freespace -le $memory ]; then
echo You do not have enough free space on the current partition. Minimum: $memory bytes
exit 1
fi
echo "Clearing RAM Cache.."
sync; echo 3 > /proc/sys/vm/drop_cachesfile
echo > dump.memtest.img
echo "Writing to dump file (dump.memtest.img).."
for i in `seq 1 $threads`;
do
# 1044 is used in place of 1024 to ensure full RAM usage (2% over allocation)
dd if=/dev/urandom bs=$memoryper count=1044 >> dump.memtest.img 2>/dev/null &
pids[$i]=$!
echo $i
done
for pid in "${pids[@]}"
do
wait $pid
done

echo "Reading and analyzing dump file…"
echo "Pass 1.."
md51=`md5sum dump.memtest.img | awk {'print $1'}`
echo "Pass 2.."
md52=`md5sum dump.memtest.img | awk {'print $1'}`
echo "Pass 3.."
md53=`md5sum dump.memtest.img | awk {'print $1'}`
if [ “$md51” != “$md52” ]; then
fail=1
elif [ “$md51” != “$md53” ]; then
fail=1
elif [ “$md52” != “$md53” ]; then
fail=1
else
fail=0
fi
if [ $fail -eq 0 ]; then
echo "Memory test PASSED."
else
echo "Memory test FAILED. Bad memory detected."
fi
rm -f dump.memtest.img
exit $fail

Nota Bene !: Again consider the restults might not always be 100% trustable if possible restart the server and test with memtest86+

Consider also its important to make sure prior to script run,  you''ll have enough disk space to produce the dump.memtest.img file – file is created as a test bed for the memory tests and if not scaled properly you might end up with a full ( / ) root directory!


4.1 Other memory test script with dd and md5sum checksum

I found this solution on the well known sysadmin site nixCraft cyberciti.biz, I think it makes sense and quicker.

First find out memory site using free command.
 

# free
             total       used       free     shared    buffers     cached
Mem:      32867436   32574160     293276          0      16652   31194340
-/+ buffers/cache:    1363168   31504268
Swap:            0          0          0


It shows that this server has 32GB memory,
 

# dd if=/dev/urandom bs=32867436 count=1050 of=/home/memtest


free reports by k and use 1050 is to make sure file memtest is bigger than physical memory.  To get better performance, use proper bs size, for example 2048 or 4096, depends on your local disk i/o,  the rule is to make bs * count > 32 GB.
run

# md5sum /home/memtest; md5sum /home/memtest; md5sum /home/memtest


If you see md5sum mismatch in different run, you have faulty memory guaranteed.
The theory is simple, the file /home/memtest will cache data in memory by filling up all available memory during read operation. Using md5sum command you are reading same data from memory.


5. Other ways to test memory / do a machine stress test

Other good tools you might want to check for memory testing is mprime – ftp://mersenne.org/gimps/ 
(https://www.mersenne.org/ftp_root/gimps/)

  •  (mprime can also be used to stress test your CPU)

Alternatively, use the package stress-ng to run all kind of stress tests (including memory test) on your machine.
Perhaps there are other interesting tools for a diagnosis of memory if you know other ones I miss, let me know in the comment section.
How to automate open xen Hypervisor Virtual Machines backups shell script

Tuesday, June 22nd, 2021

openxen-backup-logo As a sysadmin that have my own Open Xen Debian Hypervisor running on a Lenovo ThinkServer few months ago due to a human error I managed to mess up one of my virtual machines and rebuild the Operating System from scratch and restore files service and MySQl data from backup that really pissed me of and this brought the need for having a decent Virtual Machine OpenXen backup solution I can implement on the Debian ( Buster) 10.10 running the free community Open Xen version 4.11.4+107-gef32c7afa2-1. The Hypervisor is a relative small one holding just 7 VM s:
HypervisorHost:~#  xl list
Name                                        ID   Mem VCPUs      State   Time(s)
Domain-0                                     0 11102    24     r—–  214176.4
pcfrxenweb                                  11 12288     4     -b—-  247425.5
pcfrxen                                     12 16384    10     -b—-  1371621.4
windows7                                    20  4096     2     -b—-   97887.2
haproxy2                                    21  4096     2     -b—-   11806.9
jitsi-meet                                  22  2048     2     -b—-   12843.9
zabbix                                      23  2048     2     -b—-   20275.1
centos7                                     24  2040     2     -b—-   10898.2

HypervisorHost:~# xl list|grep -v 'Name ' |grep  -v 'Domain-0'  |wc -l
7


The backup strategy of the script is very simple to shutdown the running VM machine, make a copy with rsync to a backup location the image of each of the Virtual Machines in a bash shell loop for each virtual machine shown in output of xl command and backup to a preset local directory in my case this is /backups/ the backup of each virtual machine is produced within a separate backup directory with a respective timestamp. Backup VM .img files are produced in my case to mounted 2x external attached hard drives each of which is a 4 Terabyte Seagate Plus Backup (Storage). The original version of the script was made to be a slightly different by Zhiqiang Ma whose script I used for a template to come up with my xen VM backup solution. To prevent the Hypervisor's load the script is made to do it with a nice of (nice -n 10) this might be not required or you might want to modify it to better suit your needs. Below is the script itself you can fetch a copy of it /usr/sbin/xen_vm_backups.sh :

#!/bin/bash

# Author: Zhiqiang Ma (http://www.ericzma.com/)
# Modified to work with xl and OpenXen by Georgi Georgiev – https://pc-freak.net
# Original creation dateDec. 27, 2010
# Script takes all defined vms under xen_name_list and prepares backup of each
# after shutting down the machine prepares archive and copies archive in externally attached mounted /backup/disk1 HDD
# Latest update: 08.06.2021 G. Georgiev – hipo@pc-freak.net

mark_file=/backups/disk1/tmp/xen-bak-marker
log_file=/var/log/xen/backups/bak-$(date +%Y_%m_%d).log
err_log_file=/var/log/xen/backups/bak_err-$(date +%H_%M_%Y_%m_%d).log
xen_dir=/xen/domains
xen_vmconfig_dir=/etc/xen/
local_bak_dir=/backups/disk1/tmp
#bak_dir=xenbak@backup_host1:/lhome/xenbak
bak_dir=/backups/disk1/xen-backups/xen_images/$(date +%Y_%m_%d)/xen/domains
#xen_name_list="haproxy2 pcfrxenweb jitsi-meet zabbix windows7 centos7 pcfrxenweb pcfrxen"
xen_name_list="windows7 haproxy2 jitsi-meet zabbix centos7"

if [ ! -d /var/log/xen/backups ]; then
echo mkdir -p /var/log/xen/backups
 mkdir -p /var/log/xen/backups
fi

if [ ! -d $bak_dir ]; then
echo mkdir -p $bak_dir
 mkdir -p $bak_dir

fi


# check whether bak runned last week
if [ -e $mark_file ] ; then
        echo  rm -f $mark_file
 rm -f $mark_file
else
        echo  touch $mark_file
 touch $mark_file
  # exit 0
fi

# set std and stderr to log file
        echo mv $log_file $log_file.old
       mv $log_file $log_file.old
        echo mv $err_log_file $err_log_file.old
       mv $err_log_file $err_log_file.old
        echo "exec 2> $err_log_file"
       exec 2> $err_log_file
        echo "exec > $log_file"
       exec > $log_file


# check whether the VM is running
# We only backup running VMs

echo "*** Check alive VMs"

xen_name_list_tmp=""

for i in $xen_name_list
do
        echo "/usr/sbin/xl list > /tmp/tmp-xen-list"
        /usr/sbin/xl list > /tmp/tmp-xen-list
  grepinlist=`grep $i" " /tmp/tmp-xen-list`;
  if [[ “$grepinlist” == “” ]]
  then
    echo $i is not alive.
  else
    echo $i is alive.
    xen_name_list_tmp=$xen_name_list_tmp" "$i
  fi
done

xen_name_list=$xen_name_list_tmp

echo "Alive VM list:"

for i in $xen_name_list
do
   echo $i
done

echo "End alive VM list."

###############################
date
echo "*** Backup starts"

###############################
date
echo "*** Copy VMs to local disk"

for i in $xen_name_list
do
  date
  echo "Shutdown $i"
        echo  /usr/sbin/xl shutdown $i
        /usr/sbin/xl shutdown $i
        if [ $? != ‘0’ ]; then
                echo 'Not Xen Disk image destroying …';
                /usr/sbin/xl destroy $i
        fi
  sleep 30

  echo "Copy $i"
  echo "Copy to local_bak_dir: $local_bak_dir"
      echo /usr/bin/rsync -avhW –no-compress –progress $xen_dir/$i/{disk.img,swap.img} $local_bak_dir/$i/
     time /usr/bin/rsync -avhW –no-compress –progress $xen_dir/$i/{disk.img,swap.img} $local_bak_dir/$i/
      echo /usr/bin/rsync -avhW –no-compress –progress $xen_vmconfig_dir/$i.cfg $local_bak_dir/$i.cfg
     time /usr/bin/rsync -avhW –no-compress –progress $xen_vmconfig_dir/$i.cfg $local_bak_dir/$i.cfg
  date
  echo "Create $i"
  # with vmmem=1024"
  # /usr/sbin/xm create $xen_dir/vm.run vmid=$i vmmem=1024
          echo /usr/sbin/xl create $xen_vmconfig_dir/$i.cfg
          /usr/sbin/xl create $xen_vmconfig_dir/$i.cfg
## Uncomment if you need to copy with scp somewhere
###       echo scp $log_file $bak_dir/xen-bak-111.log
###      echo  /usr/bin/rsync -avhW –no-compress –progress $log_file $local_bak_dir/xen-bak-111.log
done

####################
date
echo "*** Compress local bak vmdisks"

for i in $xen_name_list
do
  date
  echo "Compress $i"
      echo tar -z -cfv $bak_dir/$i-$(date +%Y_%m_%d).tar.gz $local_bak_dir/$i-$(date +%Y_%m_%d) $local_bak_dir/$i.cfg
     time nice -n 10 tar -z -cvf $bak_dir/$i-$(date +%Y_%m_%d).tar.gz $local_bak_dir/$i/ $local_bak_dir/$i.cfg
    echo rm -vf $local_bak_dir/$i/ $local_bak_dir/$i.cfg
    rm -vrf $local_bak_dir/$i/{disk.img,swap.img}  $local_bak_dir/$i.cfg
done

####################
date
echo "*** Copy local bak vmdisks to remote machines"

copy_remote () {
for i in $xen_name_list
do
  date
  echo "Copy to remote: vm$i"
        echo  scp $local_bak_dir/vmdisk0-$i.tar.gz $bak_dir/vmdisk0-$i.tar.gz
done

#####################
date
echo "Backup finishes"
        echo scp $log_file $bak_dir/bak-111.log

}

date
echo "Backup finished"


Things to configure before start using using the script to prepare backups for you is the xen_name_list variable

#  directory skele where to store already prepared backups
bak_dir=/backups/disk1/xen-backups/xen_images/$(date +%Y_%m_%d)/xen/domains

# The configurations of the running Xen Virtual Machines
xen_vmconfig_dir=/etc/xen/
# a local directory that will be used for backup creation ( I prefer this directory to be on the backup storage location )
local_bak_dir=/backups/disk1/tmp
#bak_dir=xenbak@backup_host1:/lhome/xenbak
# the structure on the backup location where daily .img backups with be produced with rsync and tar archived with bzip2
bak_dir=/backups/disk1/xen-backups/xen_images/$(date +%Y_%m_%d)/xen/domains

# list here all the Virtual Machines you want the script to create backups of
xen_name_list="windows7 haproxy2 jitsi-meet zabbix centos7"

If you need the script to copy the backup of Virtual Machine images to external Backup server via Local Lan or to a remote Internet located encrypted connection with a passwordless ssh authentication (once you have prepared the Machines to automatically login without pass over ssh with specific user), you can uncomment the script commented section to adapt it to copy to remote host.

Once you have placed at place /usr/sbin/xen_vm_backups.sh use a cronjob to prepare backups on a regular basis, for example I use the following cron to produce a working copy of the Virtual Machine backups everyday.
 

# crontab -u root -l 

# create windows7 haproxy2 jitsi-meet centos7 zabbix VMs backup once a month
00 06 1,2,3,4,5,6,7,8,9,10,11,12 * * /usr/sbin/xen_vm_backups.sh 2>&1 >/dev/null


I do clean up virtual machines Images that are older than 95 days with another cron job

# crontab -u root -l

# Delete xen image files older than 95 days to clear up space from backup HDD
45 06 17 * * find /backups/disk1/xen-backups/xen_images* -type f -mtime +95 -exec rm {} \; 2>&1 >/dev/null

#### Delete xen config backups older than 1 year+3 days (368 days)
45 06 17 * * find /backups/disk1/xen-backups/xen_config* -type f -mtime +368 -exec rm {} \; 2>&1 >/dev/null

How to permanently enable Cookies in Lynx text browser – Disable accept cookies prompt in lynx console browser

Wednesday, April 18th, 2012

lynx-text-browser-logo
The default behaviour of lynx console text browser on Linuces, BSD and other free OSes is to always ask, for the accept cookies prompt once an internet web page is opened that requires browser cookies to be enabled.

I should admin, having this "secure by default" (always ask for new cookies) behaviour in lynx was a good practice from a security point of view.

Another reason, why this cookies prompt is enabled by default is back in the days, when lynx was actively developed by programmers the websites with cookies support was not that many and even cookies was mostly required for user/pass authentication (all those who still remember this days the websites that requires authentication was a way less than today) …
With this said the current continuing security cautious behaviour in the browser, left from its old days is understandable.

Screenshot Google Accept cookies Lynx dialog FreeBSD

However I personally sometimes, need to use lynx more frequently and this behaviour of always opening a new website in text mode in console to prompts me for a cookie suddenly becomes a big waste of time if you use lynx to browser more than few sites. Hence I decided to change the default way lynx handles cookies and make them enabled by default instead.
Actually even in the past, when I was mainly using internet in console on every new server or home Linux install, I was again making the cookies to be permanently accepted.
Everyone who used lynx a few times already knows its "annoying" to all time accept cookie prompts … This provoked me to write this short article to explain how enabling of constant cookie accepting in lynx is done

To enable the persistent cookies in lynx, one needs to edit lynx.cfg on different GNU / Linux and BSD* distributions lynx.cfg is located in different directory.

Most of the lynx.cfg usual locations are /etc/lynx/lynx.cfg or /etc/lynx.cfg as of time of writting this post in Debian Squeeze GNU / Linux the lynx.cfg is located in /etc/lynx-cur/lynx.cfg, whether for FreeBSD / NetBSD / OpenBSD users the file is located in /usr/local/etc/lynx.cfg

What I did to allow all cookies is open lynx.cfg in vim edit and change the following lines:

a)

#FORCE_SSL_COOKIES_SECURE:FALSE

with

FORCE_SSL_COOKIES_SECURE:TRUE

b)

#SET_COOKIES:TRUE

uncomment it to:

SET_COOKIES:TRUE

c) next, change

ACCEPT_ALL_COOKIES:FALSE

ACCEPT_ALL_COOKIES:TRUE

Onwards opening any website with lynx auto-accepts the cookies.

lynx Always allowing from domain cookies Linux screenshot

Google in Bulgarian Lynx browser screenshot

For people who care about there security (who still browse in console (surely not many anymore)), permanently allowing the cookies is not a good idea. But for those who are ready to drop off little security for convenience its ok.
 

Updating Flash Player on Debian GNU / Linux / Keeping Flash player up-to-date with update-flashplugin-nonfree

Saturday, November 10th, 2012


Update flash player on Debian GNU / Linux update-flashplugin-nonfree macromedia flash logo

Assuming you have previously installed and running Adobe Flash Player – package flashplugin-nonfree i.e.:

debian:~# dpkg -l |grep -i flashplugin-nonfree
ii flashplugin-nonfree 1:2.8.3 Adobe Flash Player - browser plugin

and you want to Update flash player to the latest provided version for Linux, there is an update script part of flashplugin-nonfree, package /usr/sbin/update-flashplugin-nonfree. The script updates flash player to latest Linux version avaiable fetching the version from macromedia's website in a .tar.gz and untarring it substituting the old flash library.

To update your Debian FlashPlayer, launch as superuser:

debian:~# update-flashplugin-nonfree --install
--2012-11-10 00:51:48-- http://fpdownload.macromedia.com/get/flashplayer/pdc/11.2.202.251/install_flash_player_11_linux_x86_64.tar.gz Resolving fpdownload.macromedia.com... 92.123.98.70 Connecting to fpdownload.macromedia.com|92.123.98.70|:80... connected. HTTP request sent, awaiting response... 200 OK Length: 7228964 (6.9M) [application/x-gzip] Saving to: “./install_flash_player_11_linux_x86_64.tar.gz”

0K .......... .......... .......... ..........
.......... 0% 69.5K 1m41s 50K .......... .......... .......... ..........
.......... 1% 91.1K 88s 100K .......... .......... .......... ..........
.......... 2% 70.8K 91s ........
..........

After a while (usually up to a minute), update will be completed. Restart your browser of use IceWeasel, Epiphany, Opera, Chrome etc. and test it with About Flash Player Page and / or youtube. You should be with latest Flash Linux version now.

It might be a good idea to automate future flash player updates via a cron job, I think launching the update script every two weeks is a good timing;

To do so add to root user cron like so:

10,27 * * * * /usr/sbin/update-flashplugin-nonfree –install -q 2>&1 >/dev/null

If you still haven't configured your pulseaudio to play multiple sound streams do that too.

I've seen also on Debian's Wiki FlashPlayer page, mentioning that on some systems after update to Flash Player 11 there might be laggy performance issues, due to disabled hardware acceleration in Flash Player > v. 10. If that's the case with you you might also need to put a mss.cfg like this one to /etc/adobe/mss.cfg

# wget -q https://www.pc-freak.net/files/adobe-flash-player-config-for-hardware-acceleration-mms.cfg
# mv adobe-flash-player-config-for-hardware-acceleration-mms.cfg /etc/adobe/mms.cfg

Finally if you experience, some flash video lagging issues, you could try experimenting with OverrideGPUValidation=true flash setting which in some cases improves Linux flash video performance

Firefox users might be also interested to check out www.mozilla.org/en-US/plugincheck – the URL provides information on essential Firefox video plugins and whether plugins installed are up2date or prone to remote web exploitation vulnerability.