Posts Tagged ‘cms’

Tools to scan a Linux / Unix Web server for Malware and Rootkits / Lynis and ISPProtect – clean Joomla / WordPress and other CMS for malware and malicious scripts and trojan codes

Monday, March 14th, 2016

Linux-BSD-Unix-Rootkit-Malware-XSS-Injection-spammer-scripts-clean-howto-manual

If you have been hacked or have been suspicious that someone has broken up in some of the shared web hosting servers you happent o manage you already probably have tried the server with rkhuter, chroot and unhide tools which gives a general guidance where a server has been compromised

However with the evolution of hacking tools out there and the boom of Web security XSS / CSS / Database injections and PHP scripts vulnerability catching an intruder especially spammers has been becoming more and more hard to achieve.

Just lately a mail server of mine's load avarage increased about 10 times, and the CPU's and HDD I/O load jump over the sky.
I started evaluating the situation to find out what exactly went wrong with the machine, starting with a hardware analysis tools and a physical check up whether all was fine with the hardware Disks / Ram etc. just to find out the machine's hardware was working perfect.
I've also thoroughfully investigated on Logs of Apache, MySQL, TinyProxy and Tor server and bind DNS and DJBDns  which were happily living there for quite some time but didn't found anything strange.

Not on a last place I investigated TOP processes (with top command) and iostat  and realized the CPU high burst lays in exessive Input / Output of Hard Drive. Checking the Qmail Mail server logs and the queue with qmail-qstat was a real surprise for me as on the queue there were about 9800 emails hanging unsent, most of which were obviously a spam, so I realized someone was heavily spamming through the server and started more thoroughfully investigating ending up to a WordPress Blog temp folder (writtable by all system users) which was existing under a Joomla directory infrastructure, so I guess someone got hacked through the Joomla and uploaded the malicious php spammer script to the WordPress blog. I've instantly stopped and first chmod 000 to stop being execuded and after examing deleted view73.php, javascript92.php and index8239.php which were full of PHP values with binary encoded values and one was full of encoded strings which after being decoding were actually the recepient's spammed emails.
BTW, the view*.php javascript*.php and index*.php files were owned by www-data (the user with which Apache was owned), so obviously someone got hacked through some vulnerable joomla or wordpress script (as joomla there was quite obscure version 1.5 – where currently Joomla is at version branch 3.5), hence my guess is the spamming script was uploaded through Joomla XSS vulnerability).

As I was unsure wheteher the scripts were not also mirrored under other subdirectories of Joomla or WP Blog I had to scan further to check whether there are no other scripts infected with malware or trojan spammer codes, webshells, rootkits etc.
And after some investigation, I've actually caught the 3 scripts being mirrored under other webside folders with other numbering on filename view34.php javascript72.php, index8123.php  etc..

I've used 2 tools to scan and catch malware the trojan scripts and make sure no common rootkit is installed on the server.

1. Lynis (to check for rootkits)
2. ISPProtect (Proprietary but superb Website malware scanner with a free trial)

1. Lynis – Universal security auditing tool and rootkit scanner

Lynis is actually the well known rkhunter, I've used earlier to check servers BSD and Linux servers for rootkits.
To have up-to-date version of Lynis, I've installed it from source:
 

cd /tmp
wget https://cisofy.com/files/lynis-2.1.1.tar.gz
tar xvfz lynis-2.1.1.tar.gz
mv lynis /usr/local/
ln -s /usr/local/lynis/lynis /usr/local/bin/lynis


Then to scan the server for rootkits, first I had to update its malware definition database with:
 

lynis update info


Then to actually scan the system:
 

lynis audit system


Plenty of things will be scanned but you will be asked on a multiple times whether you would like to conduct different kind fo system services and log files, loadable kernel module rootkits and  common places to check for installed rootkits or server placed backdoors. That's pretty annoying as you will have to press Enter on a multiple times.
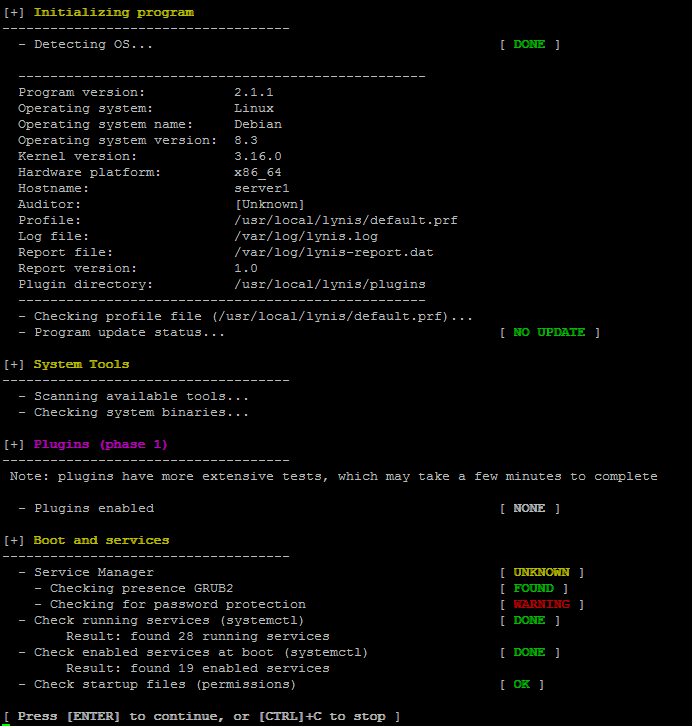
lynis-asking-to-scan-for-rootkits-backdoors-and-malware-your-linux-freebsd-netbsd-unix-server

Once scan is over you will get a System Scan Summary like in below screenshot:
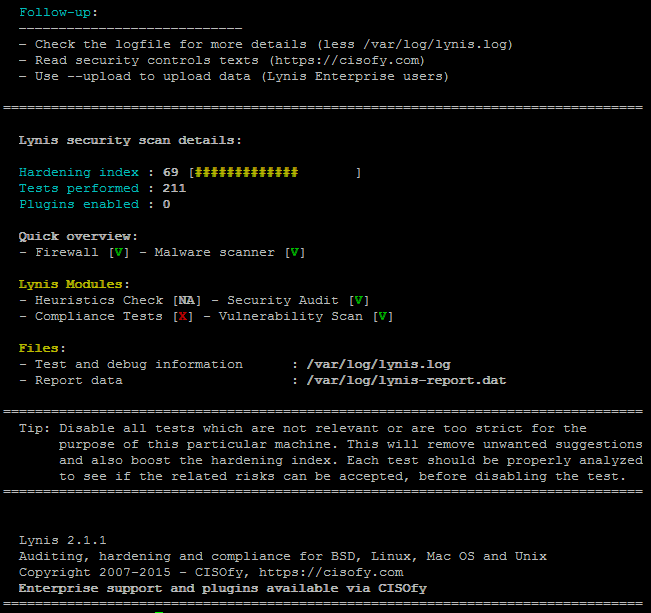
lynis-scanned-server-for-rootkit-summer-results-linux-check-for-backdoors-tool

Lynis suggests also a very good things that might be tampered to make the system more secure, so using some of its output when I have time I'll work out on hardening all servers.

To prevent further incidents and keep an eye on servers I've deployed Lynis scan via cron job once a month on all servers, I've placed under a root cronjob on every first dae of month in following command:


server:~# crontab -u root -e
0 3 1 * * /usr/local/bin/lynis –quick 2>&1 | mail -s "lynis output of my server" admin-mail@my-domain.com)


2. ISPProtect – Website malware scanner

ISPProtect is a malware scanner for web servers, I've used it to scan all installed  CMS systems like WordPress, Joomla, Drupal etc.
ISPProtect is great for PHP / Pyhon / Perl and other CMS based frameworks.
ISPProtect contains 3 scanning engines: a signature based malware scanner, a heuristic malware scanner, and a scanner to show the installation directories of outdated CMS systems.
Unfortunately it is not free software, but I personally used the FREE TRIAL option  which can be used without registration to test it or clean an infected system.
I first webserver first locally for the infected site and then globally for all the other shared hosting websites.

As I wanted to check also rest of hosted websites, I've run ISPProtect over the all bunch of installed websites.
Pre-requirement of ISPProtect is to have a working PHP Cli and Clamav Anti-Virus installed on the server thus on RHEL (RPM) based servers make sure you have it installed if not:
 

server:~# yum -y install php

server:~# yum -y install clamav


Debian based Linux servers web hosting  admins that doesn't have php-cli installed should run:
 

server:~# apt-get install php5-cli

server:~# apt-get install clamav


Installing ISPProtect from source is with:

mkdir -p /usr/local/ispprotect
chown -R root:root /usr/local/ispprotect
chmod -R 750 /usr/local/ispprotect
cd /usr/local/ispprotect
wget http://www.ispprotect.com/download/ispp_scan.tar.gz
tar xzf ispp_scan.tar.gz
rm -f ispp_scan.tar.gz
ln -s /usr/local/ispprotect/ispp_scan /usr/local/bin/ispp_scan


To initiate scan with ISPProtect just invoke it:
 

server:~# /usr/local/bin/ispp_scan
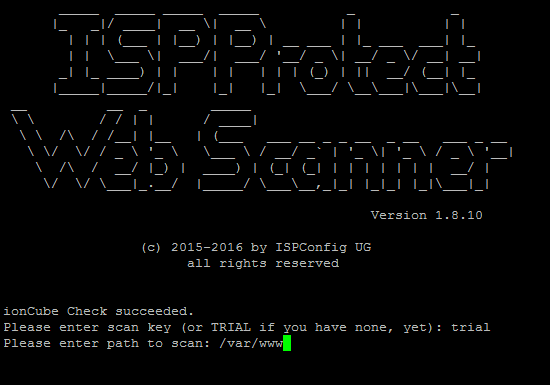
 

ispprotect-scan-websites-for-malware-and-infected-with-backdoors-or-spamming-software-source-code-files

I've used it as a trial

Please enter scan key:  trial
Please enter path to scan: /var/www

You will be shown the scan progress, be patient because on a multiple shared hosting servers with few hundred of websites.
The tool will take really, really long so you might need to leave it for 1 hr or even more depending on how many source files / CSS / Javascript etc. needs to be scanned.

Once scan is completed scan and infections found logs will be stored under /usr/local/ispprotect, under separate files for different Website Engines and CMSes:

After the scan is completed, you will find the results also in the following files:
 

Malware => /usr/local/ispprotect/found_malware_20161401174626.txt
Wordpress => /usr/local/ispprotect/software_wordpress_20161401174626.txt
Joomla => /usr/local/ispprotect/software_joomla_20161401174626.txt
Drupal => /usr/local/ispprotect/software_drupal_20161401174626.txt
Mediawiki => /usr/local/ispprotect/software_mediawiki_20161401174626.txt
Contao => /usr/local/ispprotect/software_contao_20161401174626.txt
Magentocommerce => /usr/local/ispprotect/software_magentocommerce_20161401174626.txt
Woltlab Burning Board => /usr/local/ispprotect/software_woltlab_burning_board_20161401174626.txt
Cms Made Simple => /usr/local/ispprotect/software_cms_made_simple_20161401174626.txt
Phpmyadmin => /usr/local/ispprotect/software_phpmyadmin_20161401174626.txt
Typo3 => /usr/local/ispprotect/software_typo3_20161401174626.txt
Roundcube => /usr/local/ispprotect/software_roundcube_20161401174626.txt


ISPProtect is really good in results is definitely the best malicious scripts / trojan / trojan / webshell / backdoor / spammer (hacking) scripts tool available so if your company could afford it you better buy a license and settle a periodic cron job scan of all your servers, like lets say:


server:~# crontab -u root -e
0 3  1 * *   /usr/local/ispprotect/ispp_scan –update && /usr/local/ispprotect/ispp_scan –path=/var/www –email-results=admin-email@your-domain.com –non-interactive –scan-key=AAA-BBB-CCC-DDD


Unfortunately ispprotect is quite expensive so I guess most small and middle sized shared hosting companies will be unable to afford it.
But even for a one time run this tools worths the try and will save you an hours if not days of system investigations.
I'll be glad to hear from readers if aware of any available free software alternatives to ISPProtect. The only one I am aware is Linux Malware Detect (LMD).
I've used LMD in the past but as of time of writting this article it doesn't seems working any more so I guess the tool is currently unsupported / obsolete.

 

How to check Apache Webserver and MySQL server uptime – Check uptime of a running daemon with PS (process) command

Tuesday, March 10th, 2015

check_Apache_Webserver_and_MySQL_server_uptime_-_Check-uptime-of-running-daemon-service-with-PS-process-command

Something very useful that most Apache LAMP (Linux Apache MySQL PHP) admins should know is how to check Apache Webserver uptime and MySQL server running (uptime).
Checking Apache / MySQL uptime is primary useful for scripting purposes – creating auto Apache / MySQL service restart scripts, or just as a quick console way to check what is the status and uptime of Webserver / SQL.

My experience as a sysadmin shows that lack of Periodic Apache and MySQL restart every week or every month often creates sys-admin a lot of a headaches cause (Apache / NGINX / SQL  server) starts eating too much memory or under some circumstances leads to service or system crashes. Periodic system main services restart is especially helpful in case if Website's backend programming code is writetn in a bad and buggy uneffient way by unprofessional (novice) programmers.
While I was still working as Senior SysAdmin in Design.BG, I've encountered many such Crappy Web applications developed by dozen of different programmers (because company's programmers changed too frequently and many of the hired Web Developers ,were still learning to program, I guess same is true also for other Start-UP Web / IT Company where crappy programming code is developed you will certainly need to keep an eye on Apache / MYSQL uptime.  If that's the case below 2 quick one liners with PS command will help you keep an eye on Apache / MYSQL uptime


ps -eo "%U %c %t"| grep apache2 | grep -v grep|grep root
root     apache2            02:30:05

Note that above example is Debian specific on RPM based distributions you will have to grep for httpd instead of apache2
 

ps -eo "%U %c %t"| grep http| grep -v grep|grep root

root     apache2            10:30:05

To check MySQL uptine:
 

ps -eo "%U %c %t"| grep mysqld
root     mysqld_safe        20:42:53
mysql    mysqld             20:42:53


Though example is for mysql and Apache you can easily use ps cmd in same way to check any other Linux service uptime such as Java / Qmail / PostgreSQL / Postfix etc.
 

ps -eo "%U %c %t"|grep qmail
qmails   qmail-send      19-01:10:48
qmaill   multilog        19-01:10:48
root     qmail-lspawn    19-01:10:48
qmailr   qmail-rspawn    19-01:10:48
qmailq   qmail-clean     19-01:10:48
qmails   qmail-todo      19-01:10:48
qmailq   qmail-clean     19-01:10:48
qmaill   multilog        40-18:02:53


 ps -eo "%U %c %t"|grep -i nginx|grep -v root|uniq
nobody   nginx           55-01:22:44


ps -eo "%U %c %t"|grep -i java|grep -v root |uniq
hipo   java            27-22:02:07


12 must have Joomla extension plugins / Essential modules for new Joomla CMS install

Thursday, June 16th, 2011

Joomla bundle of must have extensions picture

These days very often I have to install, plain new Joomla based websites. I’ve realized that since there is no structured guide to follow describing the most essential plugins that every new fresh new joomla installation is required to have.
Thus I took the time and wrote this post, as it will be useful to myself in my future new joomla based websites establishment, I also believe these guide will be useful to other Joomla enthusiasts or administrators in their daily work.

Below I will describe in short the installation, configuration and oddities I’ve faced during installment of the above described bundle of plugins on a plan Joomla 1.5 install.These article will walk through 12 joomla essential plugins that I believe every fresh Joomla installation should be equipped with.
Hope this guide will be helpful to you. Now let’s start it up:

1. JoomlaXplorer – A sophisticated web file explorer for Joomla

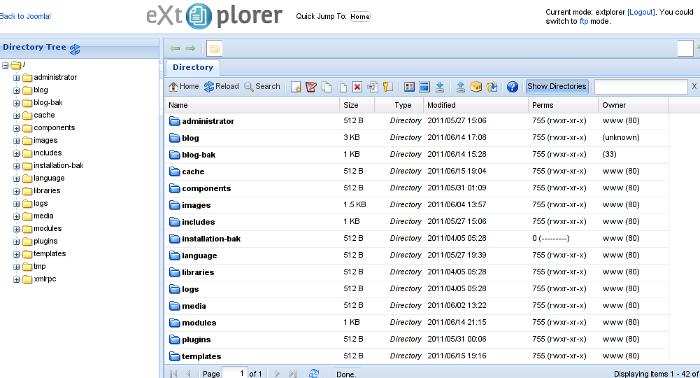
One of the basic modules, beneficial with a new joomla CMS install is Joomla Xptplorer . This module enables the joomla admin to browse files in a web file explorer, on the server where the joomla CMS is installed. Below you see how handy the joomla web explorer provided by the plugin is:

Joomla file explorer extplorer module

Installing and using the plugin is a piece of cake. To install the plugin:

a. download Joomla file Xplorer from here or from the official plugin website.

b. Install the plugin through the admin joomla menu:

Extensions -> Install/Uninstall

c. Start using the newly installed plugin by following to menus:

Components -> eXtplorer

2. JCrawler Generate easily sitemap.xml to aim the overall Joomla website SEO optimization

JCrawler logo plugin joomla

I have previously written a very through tutorial on how to install configure and generate website sitemap with Jcrawler module, You can read my article titled: How to build website sitemap.xml in Joomla here

3. sh404SEF – Make your Joomla links and content more user friendly

sh404sef Joomla Search Engine Optimization plugin

sh404SEF is a great Joomla plugin, which will seriously improve SEO and could contribute well for a website to be better indexed with major search engines.

I have previously written an article describing thoroughfully the install and use procedures for the module.
You can read the article Making your Joomla URLS Google friendly with sh404sef plugin / Simple Joomla link SEO here

4. Akeeba Backup Joomla solution

Akeeba backup Joomla Module

Installing a joomla backup solution is very essential if you does take care about your data, it often happens that server hard disk got crashes or a RAID massives got corrupted or some kind of other unexpected disaster hits the server. In these terrible times, having a website backup will save you nerves and data recovery funds, not to mention that in many cases data recovery is impossible.

Joomla has a very easy to use software for creating full website backup called Akeeba Backup

To start using the software one must:

a. Download Akeeba Backup and install it via:

Extensions -> Install/Uninstall

After the Akeeba Backup installation is over, to create your first backup, one needs to navigate to:

Components -> Akeeba Backup -> Backup Now

Each Akeeba backup (a version of the website’s files data and sql info) will be created in an archive file with the extension .jpa
The backup files are created under joomla’s website (main) root directory in directory location administrator/components/com_akeeba/backup

The Akeeba plugin also has capabilities to recover a (.jpa) backup restore point easily.
To recover a backup with the Akeeba plugin one needs to do it once again, via the plugin joomla web interface.
5. Google Analytics (place easy tracking code) in Joomla

Google Analytics Tracking Module for Joomla

a. Download the Google Analytics Tracking Module
The module is available from Joomla Extensions on joomla.org

At the current time of writting you need to download the analytics_tracking15,zip file

b. Install the Google Analytics Tracking Module;
Login as joomla admin and navigate to;

Extensions -> Install

Place the analytics_tracking15.zip url to the Install URL: field.
Again as of time of writting you need to place https://www.pc-freak.net/files/analytics_tracking15.zip;

c. Open the Module Manager

Extensions -> Module Manager

d. Click over Google Analytics Tracking Module
On the right pane you will notice in the Module Parameters the Analytics_uacct_code field. In the uacct_code field you need to paste your UA obtained from your created google-analytics account.
This code is usually something like UA-2101595-10
Now place your code their and press the save green button located near the right top of the screen. You should see the text in blue Item Saved which would indicate your UA code is stored already in the Google Analytics Tracking Module, now press the Cancel button located again on the right top.
As a last step before the Google analytics is set-up on the Joomla you need to enable the plugin to do you need to press over the tick left sided from the text reading Google Analytics Tracking Module in the Module Manager
e. Click over the Enabled button in Module Manager;
Google Analytics Tracking Module -> Enabled

6. Itprism (Facebook, Twitter etc.) Social Network share buttons Joomla plugin

ITPShare Large Social Buttons Joomla

a. to add the itpsocialbuttons to joomla Download the Itpsocialbuttons latest module files from http://itprism.com/free-joomla-extensions/social-buttons-plugin or use my mirrored module files below:

Download mod_itpsocialbuttons .zip file
Download plg_itpsocialbuttons .zip

After having the two files necessery to be installed to make the ITPSocialButtons appear on website, installation is done like with any other installation:

Extensions -> Install/Uninstall -> Upload Package File (Choose File)

Next its necessery to configure the plugin to do so, follow to menus:

Extensions -> Module Manager -> Share

You will notice the Share dialog in the list of Module Name column in Module Manager

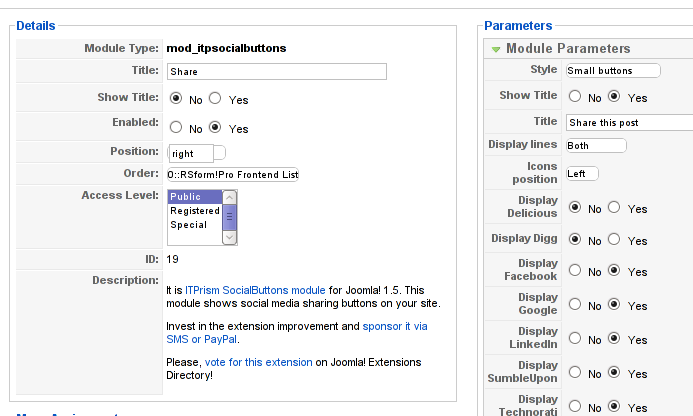
Here is a screenshot on how the settings options for ITpsocialbuttons will look like:

Mod ITpSocialButtons settings screen

The options which I personally changed was:

Show Title – I set this one to No as I wanted to omit the plugin title text to appear on my website.
Further on I’ve set the Enabled option to Yes to enable the plugin and choose the buttons Style option to be of a Small buttons type.
I’ve also found that the most suitable position for the Social Share buttons were to be of a right – Position .

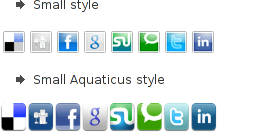
Here is how the social network itprism share buttons looks like:

ITprism Joomla Social Share Plugin various button types

The plugin supports sharing of joomla pages to the following list of social networks:
 

  • Delicios.com
  • Digg.com
  • Facebook
  • Google Bookmarks
  • StumbleUpon
  • Technorati
  • Twitter
  • LinkedIn

The module configuration, also allows the user to configure the type of social network buttons, one wants to display on the website.

7. Joomla JCE Content Editor

This content editor is really awesome compared to the default editor TinyMCE. If you want to have an options rich content editor for Joomla, then this is the one for you 🙂
download JCE Content Editor here

After installing the JCE Joomla content editor in order to enable it as a default editor you need to go to the following location:

Site -> Global Configuration -> Default WYSIWYG Editor

There place on Editor TinyMCE and change it with Editor – JCE

Now go to edit some article, and you will see the difference in the editor 🙂

8. Add gallery Joomla capabilities with sigplus (Image Gallery Plus) and Very Simple Image Gallery

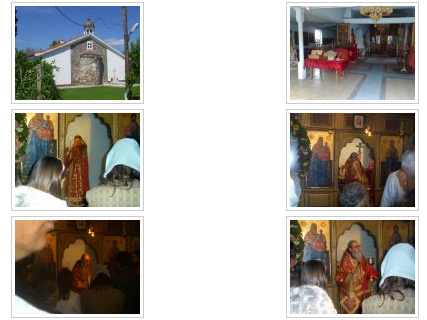
Image Gallery Plus sigplus Joomla Screenshot

Image Gallery Plus plugin (sigplus) gallery review screenshot

sigplus Image Gallery Plus is a straightforward way to add image or photo galleries to a Joomla article with a simple syntax. It takes a matter of minutes to set up a gallery but those who are looking for a powerful gallery solution will not be disappointed either: sigplus is suitable for both beginner and advanced users.

Download Sigplus Joomla Image Gallery plugin here
Using sigllus is quite easy all one has to do is use Joomla Media Manager from links:

Site -> Media Manager

Create new folder in the stories folder, let’s say New Pictures and further on use Media Manager to upload all desired pictures to be later displayed.

Being done with uploading the images you want to display, go to Article Manager :

Content -> Article Manager

From there choose your article where new uploaded pictures you want to display and type in the article:

{gallery}New Pictures{/gallery}.

Note that New Pictures is the directory just recently created as stated below, it’s important that there is no spacing between {gallery}and New Pictures, if one tries {gallery} New Pictures {/gallery} instead of {gallery}New Pictures{/gallery} an error will occur instead of the pictures being displayed in a scrolled gallery.

Sigplus Image Gallery has also a number of configuration options, which might make it look a bit more decent.
I have to say in my view the default way sigplus displays pictures is awful!

Another alternative if you don’t like Sigplus ‘s way of creating new galleries is to use Very Simple Image Gallery

Very Simple Image Gallery joomla screenshot

Here is a screenshot on a sample gallery created with Very Simple Image Gallery Joomla Plugin

You can download Very simple image gallery here

After installing the plugin. It’s use is analogous to the Sigplus . To use it likewise sigplus create new directory through Media Manager and in stories and upload your files in let’s say New Pictures1 . Later on in your article place, the code

{vsig}New Pictures1{/vsig}

Gallery will be generated automatically by the plugin. I think Simple Image Gallery is a bit more advanced and gives a better outlook to Galleries, though it’s configuration settings are much less than with SigPlus image gallery.

To add pictures comments e.g. img link alt=” and title=” tib you need to place a code within the Article manager similar to:

{vsig_c}0|Picture_1.JPG|Some sample text|Some other text{/vsig_c}
{vsig_c}0|Picture_2.JPG|Some example text|Some text{/vsig_c}
etc. ..

Note that the 0 in above example specifies the gallery number if you for instance are using a couple of galleries with Simple Image Gallery , the first one you used would be call 0 . The text specified as comments to the picture will also appear after you preview the gallery right below the picture when clicked on as a picture description in a really nice way.
9. Install Google maps plugin for Joomla

Google Maps plugin for Joomla screenshot

It’s a wise idea that every website has a location map on it’s website, for that reason Google maps is just great.
To install Google maps capability to joomla one can use a plugin called Google Maps .

You can straighly download Joomla’s Googlemap plugin from here

Afterwards use Extension Manager to install the plugin e.g. follow:

Extensions -&gr; Install/Uninstall (Choose File)

and click on Upload File & Install button.

To further enable and configure the Joomla Googlemap plugin you will have to go to the location:

Extensions -> Plugin Manager

Therein you will have to find and enable the Google Maps plugin which is to be found in the column named Plugin Manager
On my Joomla installation the plugin was located in the second page with modules, so if you don’t find the module on the listing with modules on the first page, make sure you scroll to the bottom of the page and click on Next button.

Therein in the list you will most likely notice Google Maps use the Enable button to enable it.

Next step is to configure the plugin, to do so press on the plugin name Google Maps
All configuration necessery here is to place Googlemaps API Key in the respective field (you will see it among config options).

Issuing a new Google Maps api key takes just few seconds, if you already have a gmail account just go to http://code.google.com/apis/maps/signup.html and take few seconds to issue the key.

You will get the key right on your gmail account after being issued (to repeat myself issuing takes few seconds so no worrier here).

One moreOnce having the key place it in the Googlemaps API Key field and configuring Address (which is one of the list of many options the plugin provides) you will be done with configuration.

To display a google map the location you just configured go to the Article Manager , select the article where you want the google maps location picture of your address to appear and type in the Article:

{mosmap|text='Exact street address location'|zoom='15'|zoomType='Large'|zoomNew='0'}

After you save the article a very nice Google map showing you the location’s streets will appear.
You can further conifgure a number of things related to the google map to appear, one thing you might want to play with is the zoom option which as you see in below’s code is equal to 15, e.g. zoom=’15’
Set it to another one if you want to regulate your googlemaps zoom level. For more thoroughful options take a look at the extensive plugin documentation.

10. Joomla Xmap (generating static HTML sitemap) Download Xmap from here , install it the usual plugin way.

Right after installation on the plugin succesful install screen you will notice the link component menu .
Clicking on the component menu you will be leaded to a page showing you few links Sitemap’s URL :
 

  • XML Sitemap:
  • HTML Sitemap:
  • News Sitemap:
  • Images Sitemap:

11. Add Joomla donate Paypal capabilities with Joomla PAYPAL DONATION MODULE

Paypal Donation Module Joomla Screenshot

Just recently I’ve written a a post on how to add a paypal donation capabilities to joomla, you can read my previous post here

12. Install Joomla RSForms Module (Advanced Joomla Forms Support)

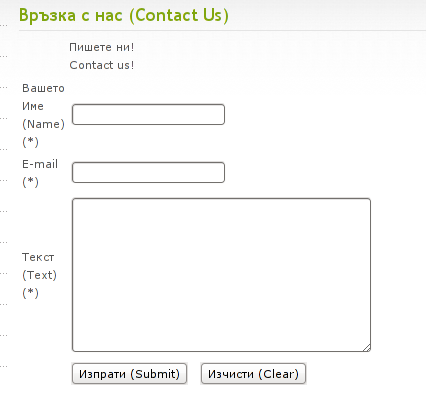
Simple Joomla RsForm contact form

If you’re planning to add a complicated form support for Joomla, there are plenty of plugins, however one that was suggested by a friend of mine which is deep in Joomla world and moreover works good on my joomla installations is RSForms

Joomla – RSForms! is free to download and has great and easy interface to create new joomla forms.

At the time of writting I use these three RSForms components on new Joomla installations:

RSform Pro 1.1.0 com
Mod RsForm for Joomla 1.5
Mod Rsform list for Joomla

For latest release of RSForms! use the link http://www.rsjoomla.com/joomla-components/rsform.html

Installation is like any other module and is done through Extensions -> Install/Uninstall menu.

After installation, setting up a new form is available from the Joomla Menus:

Components -> RSform!Pro -> Manage Forms

I would not enter in details on how to edit the default RSForms or create a new RSForm. Just take some time and learn it by trying 😉

After the rsform is ready, to enable the new form, navigate to Joomla menus:

Menus -> Main Menu

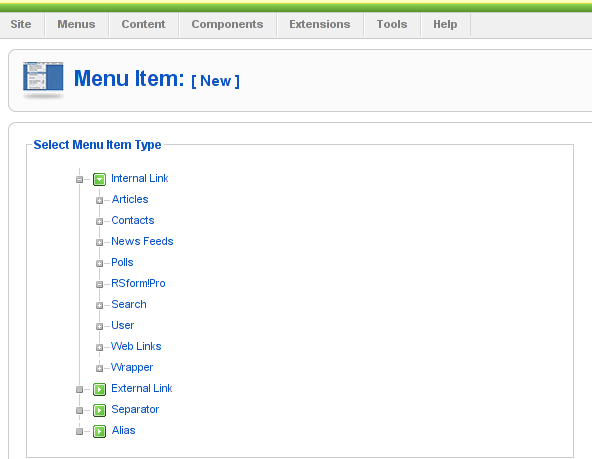
Press the New button located in the buttons bar nearby the page header in the list of options in Select Menu item Type you will notice the RSForm!Pro as an option, press on it to establish the new form in the menus.

A follow up window will appear where one can set a Title: and Alias: for the new form as well as few other options.
After finalizing the settings press on Apply button to save the settings and the new form should appear in Joomla.

Probably there are many more handy plugins, which I’m missing here thus I’ll be glad if readers suggest some more helpful essential (must have plugins) for Joomla.
Feedback on this tutorial is very welcome!
Looking forward to hear for your opinions if my article was helpful to you 😉

How to easy add Joomla 1.5 donate Paypal capabilities with Joomla PAYPAL DONATION MODULE

Wednesday, June 15th, 2011

PayPal donation Module Joomla Screenshot

Many joomla CMS installations are for Non-profit organizations or Non Government organizations. These are organizations which are not officially making profit and therefore this instituations are interested into donations to support their activities.

In this occasions adding Joomla paypal capabilities is very essential. There are plenty of modules which enables Joomla to support paypal monetary payments, however many of them are either paid or requires registration and thus it’s quite time consuming to set up a decent PayPal supporting module for Joomla.
After a bit of investigation thanks God, I’ve come across a module that is free of charge, easily downloadable (wihtout registration) and is also relatively easy to configure, these module is called PAYPAL DONATION MODULE
I’ve mirored the module to my server, just in case if the module disappears in the future.

Here are a very brief explanation on how the module can be downloaded installed and configured:

First Download (mod_ojdonation_pp) Paypal Donation Module here

Install it as joomla module via:

Extensions -> Install/Uninstall
menu

Afterwards, go to:

Extensions -> Module Manager

In the list of modules you will notice the Donate module which will be disabled. Use the Enable button to enable it.

Next by clicking on the Donate Module Name, one can configure the module, where the most essential configuration values that needs to be filled in are:

1. Title: – The title of the donation form:
2. Donation Title: – Title of donation picture to show in the webpage
3. Donation Amount: – Default donation amount user will donate with paypal by clicking on Donate button
4. Currency – Default currency the donators will use to donate to configured paypal account
5. Paypal ID: – The email address of paypal account your donators will donate to (This was a bit hard to understand since Paypal ID is not a number ID but the email address configured as an username in PayPal).
6. Donation Description: – Description text to appear before the Donate button
7. Donation Footer: – Text to appear after the Donate button

There are two ways one could add the donation module to show the donation form, on the joomla website:
a. One is to enable the donation button on every joomla webpage (I don’t like this kind of behaviour).

To use this kind of donate button display approach, you will have to select from the Donation module, conf options:
– Show on FrontPage: and Show Title:

Also make sure the Enabled: option is set to Yes

b. Second approach is to set the PayPal Donation form only to appear on a single menu, to do so:

While in Paypal Donation Module configuration in Menu Assignment section, select:

Select Menu Item(s) from the List
instead of the default All value set for Menus.

The last setting to be choosen is the paypal donation form page location (where exactly on the selected pages the form will appear).

The form location is set from the Position: dropdown menu, the option which I found to be the best one for me was the bottom option. However just play with the Position setting and choose the one that will be best for you.

Then scroll on in the Menu Selection: and choose only the menus where you want a paypal donation form to appear.

Finally to save all the recent made settings, click on Apply and refreshing in a new page should show you paypal’s money donation form in joomla

If all is configured fine with Joomla’s – Paypal Donation Module you should get on your webpage:

PayPal donation Module in Joomla Screenshot
 

How to tune MySQL Server to increase MySQL performance using mysqltuner.pl and Tuning-primer.sh

Tuesday, August 9th, 2011

MySQL Easy performance tuning with mysqltuner.pl and Tuning-primer.sh scripts

Improving MySQL performance is crucial for improving a website responce times, reduce server load and improve overall work efficiency of a mysql database server.

I’ve seen however many Linux System administrators who does belittle or completely miss the significance of tuning a newly installed MySQL server installation.
The reason behind that is probably caused by fact that many people think MySQL config variables, would not significantly improve performance and does not pay back for optimization efforts. Moreover there are a bunch of system admins who has to take care for numerous services so they don’t have time to get good knowledge to optimize MySQL servers.
Thus many admins and webmasters nowdays, think optimizations depend mostly on the side of the website programmers.
It’s also sometimes falsely believed that optimizing a MySQL server could reduce the overall server stability.

With the boom of Internet website building and internet marketing, many webmasters emerged and almost anybody with almost no knowledge on GNU/Linux or minimal or no knowledge on PHP can start his Online store, open a blog or create a website powered by some CMS like joomla.
Thus nowdays many servers even doesn’t have a hired system administrators but are managed by people whose knowledge on *Nix is almost next to zero, this is another reason why dozens of MySQL installations online are a default ones and are not taking a good advantage of the server hardware.

The incrase of website visitors leads people servers expectations for hardware also to grow, thus many companies simply buy a new hardware instead of taking the few time to investigate on how current server hardware can be utilized better.
In that manner of thought I though it will be a good idea to write this small article on Tuning mysql servers with two scripts Tuning-primer.sh and mysqltuner.pl.
The scripts are ultra easy to use and does not require only a minimal knowledge on MySQL, Linux or (*BSD *nix if sql is running on BSD).
Tuning-primer.sh and mysqltuner.pl are therefore suitable for a quick MySQL server optimizations to even people who are no computer experts.

I use this two scripts for MySQL server optimizations on almost every new configured GNU/Linux with a MySQL backend.
Use of the script comes to simply download with wget, lynx, curl or some other web client and execute it on the server host which is already running the MySQL server.

Here is an example of how simple it is to run the scripts to Optimize MySQL:

debian:~# perl mysqltuner.pl
>> MySQLTuner 1.2.0 - Major Hayden >major@mhtx.net<
>> Bug reports, feature requests, and downloads at http://mysqltuner.com/
>> Run with '--help' for additional options and output filtering

——– General Statistics ————————————————–
[–] Skipped version check for MySQLTuner script
[OK] Currently running supported MySQL version 5.1.49-3
[OK] Operating on 64-bit architecture

——– Storage Engine Statistics ——————————————-
[–] Status: +Archive -BDB -Federated +InnoDB -ISAM -NDBCluster
[–] Data in MyISAM tables: 6G (Tables: 952)
[!!] InnoDB is enabled but isn’t being used
[!!] Total fragmented tables: 12

——– Security Recommendations ——————————————-
[OK] All database users have passwords assigned

——– Performance Metrics ————————————————-
[–] Up for: 1d 2h 3m 35s (68M q [732.193 qps], 610K conn, TX: 49B, RX: 11B)
[–] Reads / Writes: 76% / 24%
[–] Total buffers: 512.0M global + 2.8M per thread (2000 max threads)
[OK] Maximum possible memory usage: 6.0G (25% of installed RAM)
[OK] Slow queries: 0% (3K/68M)
[OK] Highest usage of available connections: 7% (159/2000)
[OK] Key buffer size / total MyISAM indexes: 230.0M/1.7G
[OK] Key buffer hit rate: 97.8% (11B cached / 257M reads)
[OK] Query cache efficiency: 76.6% (46M cached / 61M selects)
[!!] Query cache prunes per day: 1822075
[OK] Sorts requiring temporary tables: 0% (1K temp sorts / 2M sorts)
[!!] Joins performed without indexes: 63635
[OK] Temporary tables created on disk: 1% (26K on disk / 2M total)
[OK] Thread cache hit rate: 99% (159 created / 610K connections)
[!!] Table cache hit rate: 4% (1K open / 43K opened)
[OK] Open file limit used: 17% (2K/16K)
[OK] Table locks acquired immediately: 99% (36M immediate / 36M locks)

——– Recommendations —————————————————–
General recommendations:
Add skip-innodb to MySQL configuration to disable InnoDB
Run OPTIMIZE TABLE to defragment tables for better performance
Enable the slow query log to troubleshoot bad queries
Increasing the query_cache size over 128M may reduce performance
Adjust your join queries to always utilize indexes
Increase table_cache gradually to avoid file descriptor limits
Variables to adjust:
query_cache_size (> 256M) [see warning above] join_buffer_size (> 256.0K, or always use indexes with joins) table_cache (> 7200)

You see there are plenty of things, the script reports, for the unexperienced most of the information can be happily skipped without need to know the cryptic output, the section of importance here is Recommendations for some clarity, I’ve made this section to show up bold.

The most imporant things from the Recommendations script output is actually the lines who give suggestions for incrase of certain variables for MySQL.In this example case this are the last three variables:
query_cache_size,
join_buffer_size and
table_cache

All of these variables are tuned from /etc/mysql/my.cnf (on Debian) and derivatives distros and from /etc/my.cnf on RHEL, CentOS, Fedora and the other RPM based Linux distributions.

On some custom server installs my.cnf is also located in /usr/local/mysql/etc/ or some other a bit more unstandard location 😉

Anyways now having the Recommendation from the script, it’s necessery to edit my.cnf and try to double the values for the suggested variables.

First, I check if all the suggested variables are existent in my config with grep , if they’re not then I’ll simply add the variable with doubled size of the suggested values.
P.S: One note here is sometimes some values which are configured, are the default value for the MySQL server and does not have a record in my.cnf

debian:~# grep -E 'query_cache_size|join_buffer_size|table_cache' /etc/mysql/my.cnf table_cache = 7200
query_cache_size = 256M
join_buffer_size = 262144

All of my variables are in the config so, now edit my.cnf and set values to:
table_cache = 14400
query_cache_size = 512M
join_buffer_size = 524288

I always, however preserve the old variable’s value, because sometimes raising the value might create problem and the MySql server might be unable to restart properly.
Thus before going with adding the new values make sure the old ones are commented with # , e.g.:
#table_cache = 7200
#query_cache_size = 256M
#join_buffer_size = 262144

I would recommend vim as editor of choice while editing my.cnf as vim completely rox 😉 If you’re not acquainted to vim use nano or mcedit or your editor of choice 😉 :

debian:~# vim /etc/mysql/my.cnf
...

Assuming that the changes are made, it’s time to restart MySQL to make sure the new values are read by the SQL server.

debian:~# /etc/init.d/mysql restart
* Stopping MySQL database server mysqld [ OK ]
* Starting MySQL database server mysqld [ OK ]
Checking for tables which need an upgrade, are corrupt or were not closed cleanly.

If mysql server fails, however to restart, make sure immediately you reverse back the changed variables to the commented values and restart once again via mysql init script to make server load.

Afterwards start adding the values one by one until find out which one is causing the mysqld to fail.

Now the second script (Tuning-primer.sh) is also really nice for MySQL performance optimizations are necessery. However it’s less portable (as it’s written in bash scripting language).
Consider running this script among different GNU/Linux distributious (especially the newer ones) might produce errors.
Tuning-primer.sh requires some minor code changes to be able to run on FreeBSD, NetBSD and OpenBSD *nices.

The way Tuning-primer.sh works is precisely like mysqltuner.pl , one runs it it gives some info about current running MySQL server and based on certain factors gives suggestions on how increasing or decresing certain my.cnf variables could reduce sql query bottlenecks, solve table locking issues as well as generally improve INSERT, UPDATE query times.

Here is an example output from tuning-primer.sh run on another server:

server:~# wget https://www.pc-freak.net/files/Tuning-primer.sh
...
server:~# sh Tuning-primer.sh
-- MYSQL PERFORMANCE TUNING PRIMER --
- By: Matthew Montgomery -

MySQL Version 5.0.51a-24+lenny5 x86_64

Uptime = 8 days 10 hrs 19 min 8 sec
Avg. qps = 179
Total Questions = 130851322
Threads Connected = 1

Server has been running for over 48hrs.
It should be safe to follow these recommendations

To find out more information on how each of these
runtime variables effects performance visit:
http://dev.mysql.com/doc/refman/5.0/en/server-system-variables.html

SLOW QUERIES
Current long_query_time = 1 sec.
You have 16498 out of 130851322 that take longer than 1 sec. to complete
The slow query log is NOT enabled.
Your long_query_time seems to be fine

MAX CONNECTIONS
Current max_connections = 2000
Current threads_connected = 1
Historic max_used_connections = 85
The number of used connections is 4% of the configured maximum.
Your max_connections variable seems to be fine.

WORKER THREADS
Current thread_cache_size = 128
Current threads_cached = 84
Current threads_per_sec = 0
Historic threads_per_sec = 0
Your thread_cache_size is fine

MEMORY USAGE
Tuning-primer.sh: line 994: let: expression expected
Max Memory Ever Allocated : 741 M
Configured Max Memory Limit : 5049 M
Total System Memory : 23640 M

KEY BUFFER
Current MyISAM index space = 1646 M
Current key_buffer_size = 476 M
Key cache miss rate is 1 / 56
Key buffer fill ratio = 90.00 %
You could increase key_buffer_size
It is safe to raise this up to 1/4 of total system memory;
assuming this is a dedicated database server.

QUERY CACHE
Query cache is enabled
Current query_cache_size = 64 M
Current query_cache_used = 38 M
Current Query cache fill ratio = 59.90 %

SORT OPERATIONS
Current sort_buffer_size = 2 M
Current record/read_rnd_buffer_size = 256.00 K
Sort buffer seems to be fine

JOINS
Current join_buffer_size = 128.00 K
You have had 111560 queries where a join could not use an index properly
You have had 91 joins without keys that check for key usage after each row
You should enable “log-queries-not-using-indexes”
Then look for non indexed joins in the slow query log.
If you are unable to optimize your queries you may want to increase your
join_buffer_size to accommodate larger joins in one pass.

TABLE CACHE
Current table_cache value = 3600 tables
You have a total of 798 tables
You have 1904 open tables.
The table_cache value seems to be fine

TEMP TABLES
Current tmp_table_size = 128 M
1% of tmp tables created were disk based
Created disk tmp tables ratio seems fine

TABLE SCANS
Current read_buffer_size = 128.00 K
Current table scan ratio = 797 : 1
read_buffer_size seems to be fine

TABLE LOCKING
Current Lock Wait ratio = 1 : 1782
You may benefit from selective use of InnoDB.

As seen from script output, there are certain variables which might be increased a bit for better SQL performance, one such variable as suggested is key_buffer_size(You could increase key_buffer_size)

Now the steps to make the tunings to my.cnf are precisely the same as with mysqltuner.pl, e.g.:
1. Preserve old config variables which will be changed by commenting them
2. Double value of current variables in my.cnf suggested by script
3. Restart Mysql server via /etc/init.d/mysql restart cmd.
4. If mysql runs fine monitor mysql performance with mtop or mytop for at least 15 mins / half an hour.

if all is fine run once again the tuning scripts to see if there are no further improvement suggestions, if there are more follow the 4 steps described procedure once again.

It’s also a good idea that these scripts are periodically re-run on the server like once per few months as changes in SQL queries amounts and types will require changes in MySQL operational variables.
The authors of these nice scripts has done great job and have saved us a tons of nerves time, downtimes and money spend on meaningless hardware. So big thanks for the awesome scripts guys 😉
Finally after hopefully succesful deployment of changes, enjoy the incresed SQL server performance 😉

How to Add sub-menus to Joomla main navigation buttons (Making dropdown menus) in Joomla

Tuesday, December 7th, 2010

I’m using a template youbizz just recently for a website. The website is already configured to use Joomla as a CMS.
This is a website related to the university so joomla was the perfect choice for a quick and easy to configure Content Management System

The youbizz template really makes difference and make the website layout look & feel quite a business looking.

However I needed a way to make my general configured menu buttons on the website to have a dropdown sub-menus in it

I even didn’t know if Joomla is supporting this, but by a chance I’ve made a submenu to the website Home buttom menu and thus I learned it how I can make submenus.

It actually appears creating the submenus to a menu in Joomla is a piece of cake, all you have to do in joomla administrator is go to to:

Menus -> Main Menu

From there you can configure as website buttons and link them to the ones already prepared in Article Manager

Just in case if you don’t know to add a buttons to a new joomla installation it’s necessary from admin to first go to:

Content -> Article Manager

Next press the New button (a green button with an image of a plus sign)

Thereon put a Title , Alias and in the input box put on everything you want this button pressed to show up in ur website.

Completing that simply press the Apply button and it should be done.
Next step to make the article appear in Menus -> Main Menu is to go this section and respectively from there use the green button with the plus sign to add up a new element to the main menu.

Right after you will have the Menu Item: [ New ] to appear it looks like in the pic below:

Joomla menu add new element screenshot

From the list of items to select you need to select the Article menu element. A submenu will appear in your browser to the Articles reading:

Article Layout
Article Submission Layout
etc.

From this menu you will have to select the Article Layout

The next screen to appear will look like the pic below:

Joomla main menu add new button through article, article layout

Here in article layout few things needs to be adjusted, again you will need to place the Title and the Alias, further after from the Parameters (Basic) located on the right you will have to select an article to link the new menu you’re just creating in Joomla’s new menu.
This is achieved via pressing the Select button located nearby the Select Article
Here it’s important to note the existence of Parent Item scrolldown field. This field will have all the created menu buttons in Main Menu . In case if this is the first one to create in main menu then it could be also empty.

The Parent Item field is really an important field and through it the menu’s submenus are created in Joomla.

For instance let’s say you want the current creating article to be listing as a sub-benu button to another already existing category, instead of listing as a separate button to the Joomla’s main menu navigation.

Well it’s pretty easy just choose from the Parent Item the name of an already existing menu button in Joomla main menu to be the parent of the sub-menu button you want to have.
That’s it now you will have the sub-menu button to appear as a drop down button (if of course your template supports dropdown menus).
There are few more options to choose in between which I found to be quite self explanatory, so I want explain them

But I hope I was able to explain at least the basics how menu subbuttons can be created in Joomla 1.5I find it a bit harder to explain in a bit plain way, but anyways if some of my dear readers is not understanding how to achieve the sub-menus I’m more than willing to help out further via the comments.

How to fix “The function split() is deprecated in PHP 5.3” on FreeBSD

Saturday, May 28th, 2011

If you’re installing some PHP based CMS/blog like (Joomla or WordPress) or some kind of template and suddenly you stumble on a error:

Deprecated: Function split() is deprecated in /usr/local/www/websitedomain/templates/youbizz/html/modules.php on line 78

In order to fix that the file which spits the error message, in my case modules.php needs to be modified and the split php function has to be substituted with explode on every occuring place.

I experienced this error on FreeBSD 7_2 with php version 5.3.5 installed from ports.
This simple fix works fine.

How to set custom page titles in Joomla 1.5 manually for better SEO

Thursday, June 2nd, 2011

he Joomla CMS default behaviour is that Page titles of the Joomla Articles created are always set to the page Title assigned to each of the articles.

This is not very good behaviour in terms of SEO, as the page title of each link on the main page is different and there is no continuous repeating pattern in all of the joomla pages.
Everyone that has even basic idea of SEO knows that page titles are very important weight factor to make indexing inside Search Engines succesful.

There is a well know SEO rule which is the more reoccuring pattern one has in his page titles, more is stressed on the keywords contained in the title.
As I said for some weird reason Joomla has no common page Title for all my the created Article pages linked via the Main Menu*

Thus in order to improve this bad default Joomla SEO behaviour one has to change the default auto assigned titles for created pages, manually.

Two things are necessery to change each of the joomla already existing TITLES.

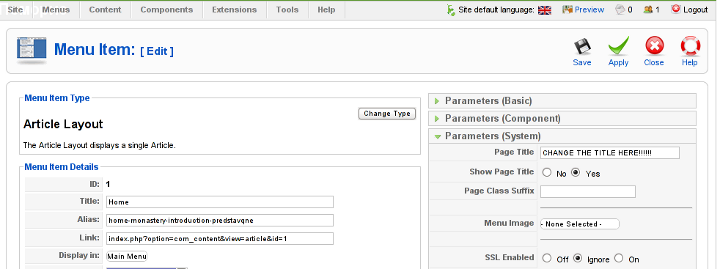
1. Go to each of the pages (.e.g. Home etc.) and change the Parameters System Page Title settings

After logging in with administrator in Joomla, navigate to Menus -> Main Menu*

Further on choose a menu item from all your existing items, let’s say Home and click on it.

On the left side below the Save, Apply, Close and Help buttons you will notice the menus:

Parameters (Basic), Parameters (Component), Parameters (System)

When clicked on Parameters (System) a submenu will appear:
Joomla Main Menu Parameters System Page Title better SEO

Above is a screenshot of the up-described Parameters (System) [Page Title] location

You need to change where it reads on the screenshot CHANGE THE TITLE HERE !!!!!! 😉

After entering your own desired page title go and save the article via the Apply or Save button (also visible in the screenshot).

Now as the custom Page Title is set, next step is to enable the custom Page Title for the respective Article in Article Manager

2. Enable custom Page Title for created pages in Joomla

Go to the Article Manager by following the menus:

Content -> Article Manager

Select the Article of which you want to change the Page Title to some custom text and click over it.

As the article opens for edit in an html editor, navigate to Parameters (Advanced) tab and therein change the Show Title from default setting value:
Use Global
to
Yes

Once again use the Save or Apply button to confirm the new settings and open your website in a new tab, try to browse and check the title of the articles parameters just edited. It should show up in the Title (page heading) the custom input Title.

Now repeat the same procedure for all pages (Articles), existing in Joomla to attune the Page Titles to some Google friendly strings and enjoy the better Search engine indexing which should likely follow.

How to add multi-lingual (multi language) support in Joomla 1.5

Friday, June 3rd, 2011

Joomfish MultiLanguage Support enable plugin

If you are facing the task to build a multi-language enabled Joomla website like me then I think my experience on building a multi-language website with Joomla CMS might be beneficial to you.

In order to build a multi-language website in Joomla you will have to use Joom!Fish multilanguage Joomla support plugin.

The plugin is a bit buggy, but in overall it will allow you to build a multi language website and consequently add the page different languate translations.

To install the plugin on your 1.5 Joomla based install;

1. Download the JoomFish plugin

Install it the usual joomla way joomla plugins are installed, via;

Extensions -> Install/Uninstall

2. Enable the Joom!Fish plugin

To do so navigate to;

Extensions -> Module Manager

Enable the module by ticking under the Enabled column on the line where you read Language Selection

3. Install Language packs for all languages which should be supported by JoomFish

Now as the JoomFish Language selection module is enabled, one needs to install the necessery Joomla Language Packs for all the languages which the Joomla based website is planned to support.

In my case I neede a three lingual website, which will support only the Languages:
 

  • Bulgarian
  • Russian
  • and

  • English

Thus I went on Joomla! Extensions Directory – extensions.joomla.org and downloaded the the three language packs I needed (English, Russian and Bulgarian).

Again the Installation of the language packs is trivial and is done through the Joomla’s:

Extensions -> Install/Uninstall

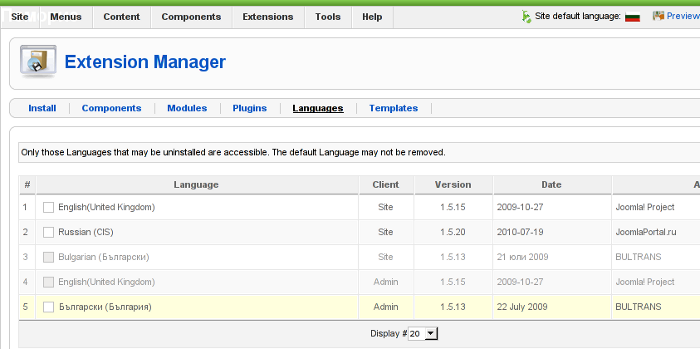
After installation to find out all the languages your Joomla installation will support you can navigate inside Joomla admin to:

Extensions -> Install/Uninstall -> Languages

Screenshot of my installed list of Joomla Language packs Screenshot of my installed list of Joomla Language Packs (Multi-Language setup)
Another way to check the list of enabled installed languages supported in your Joomla is via the menu:

Site -> Control Panel -> Language Manager

Something important here is to a default language is set in the Language Manager

4. Create translations from default installed language to the rest of the installed ones

Go to the JoomFish component through the menus:

Components -> Joom!Fish -> Control Panel

If all your language packs are correctly installed and enabled so far you should notice them listed while clicking on Content Languages

If all the Joomla Languages which your website is supposed to support are not there, this means something is generally wrong with installed lanaguage packs and you need to go back few steps and check what might be wrong, hopefully that’s not the case 😉

To immediately start translating your Joomla website to another from one language to another one, use the control menus:

Components -> Joom!Fish -> Translation

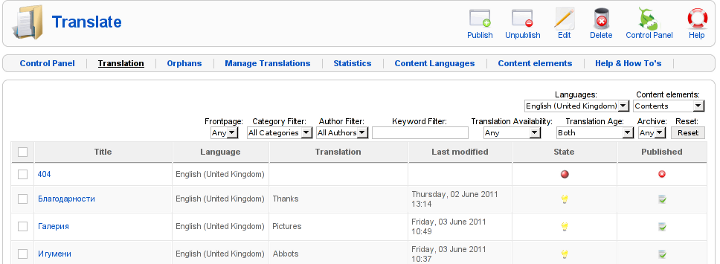
Here is screenshot on how this menu would look like:

Joomla JoomFish Plugin Translate Menu Screenshot

Notice in the above screenshot the Languages: and Content Elements dropdown menus, this ones are actually the two menus used for all language translations.

One needs to select under Languages: menu the Language to which will be translated to, while in Content Elements: has to be choseen the exact site elements which are about to be translated.

The Content Elements: necessery to be translated in most of the cases would be just Menus and Contents

Translating that will have your website user frontend be completely translated info the foreign language choosen in the Languages: dialog.

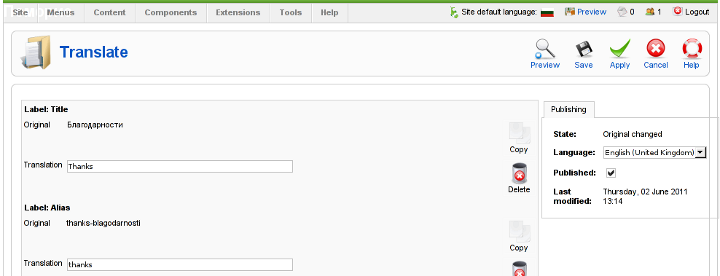
After finalizing the translations of all Articles available in Menus and Contents make sure the translation is Published, by selecting the Published tick, below I show you an example language translation edit of an article, on the left side you see the Published tick which need to be enabled, for translation to appear officially in Joomla.

Joomla Joomfish published tick enabled screenshot

After completing all the translations of elements offered by the translation window, save the translation by pressing the Apply buttonFurther on you can check the website in a new tab, if everything is okay with translations, on the down left corner of the website footer you should notice the flags of enabled languages to appear.
Clicking on each of the languages should show you the website in the language choosen (if you have previously done the translation to the respective menus).

5. Solving a minor bug in JoomlaFish which prevents translated language text to display on webpages

During translation of my website from Bulgarian to English, I have noticed a bug of JoomFish, even though I did the translation of all my Menus and website Content elements and saved the translations, refreshing the website in a new tab and choosing the desired translation was constantly displaying the error message:

“There are no translations available”

I was not able to find a good explanation on the Internet on why exactly and how this bug occurs, but by some experiments I come up with a workaround.

If you get the “There are no translations available” after properly configuring Joom!Fish Multilang support, in order to solve the error you will have to select temporary a different default website language from the one currently specified by your website.

(E.g.) go to jooma admin panel location:

Site -> Control Panel -> Language Manager

and trigger the default language configured to some of the other available ones. After reverting back in a couple of seconds this setting to your desired default language the annoying: “There are no translations available” message will disappear and your translated content will appear on the website.

6. Changing the location of language flags (language links) in Joomla’s JoomFish

I have seen plenty of people online looking for a solution on how they can change the default image flags location, which by default is placed a place which is not that intuitive and visible by the user.

Maybe I did not searched enough but from my quick research it appears there is no information available on how the placement of language flags switching menu can be changed.

Even though I couldn’t find a solution to change the langage flags in JoomFish , after a bunch of experiments I find a way to do it! 🙂

The placement of Language selector buttons can be easily adjusted through following the Joomla Admin menu:

Extensions -> Module Mamager -> Language Selection

After opening the Language Selection , you will notice the Position: dropdown menu setting. The setting has a bunch of optionsand allows you to choose the best preferred placement of the language selector flag buttons, just take few minutes to experiment which settingfits you best and choose the one most suitable to you and you’re done! 😉

Honestly I never imagined that building a multi-lingual website with Joomla will be such a piece of cake.

The only drawback with JoomFish, is the way language translation is implemented as it is not enough user friendly, anyways having the option to build multi language website for free using open source CMS solution is great. Ain’t it? 🙂

How to add multi language support to wordpress with qTranslate

Monday, October 3rd, 2011

QTRanslate WordPress Language Translate Screenshot 1

Lately, I have to deal with some wordpress based installs in big part of my working time. One of the wordpress sites needed to have added a multi language support.

My first research in Google pointed me to WPML Multilingual CMS The WordPress Multilingual Plugin
WPML Multilingual CMS looks nice and easy to use but unfortunately its paid, the company couldn’t afford to pay for the plugin so I looked forward online for a free alternative and stumbled upon QTranslate

QTranslate is free and very easy to install. Its installed the wordpress classic way and the installation went smoothly, e.g.:

1. Download and unzip QTranslate

# cd /var/www/blog/wp-content/plugins
/var/www/blog/wp-content/plugins# wget http://downloads.wordpress.org/plugin/qtranslate.2.5.24.zip
...
/var/www/blog/wp-content/plugins# unzip qtranslate.2.5.24.zip
...

Just for fun and in case the plugin disappears in future, a mirror of Qtranslate 2.5.24 is found here

2. Enable QTranslate from wordpress admin

Plugins -> Inactive -> qTranslate (Activate)

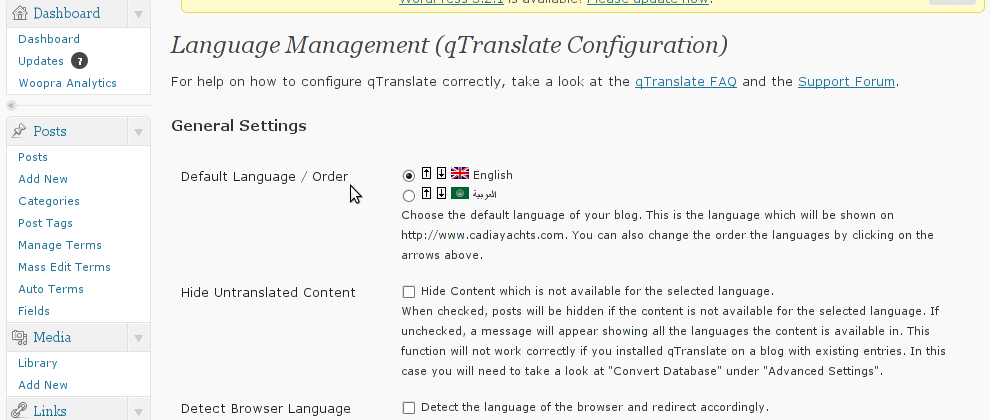
After activating the plugin, there is a Settings button from which qTranslate‘s various plugin parameteres can be tuned.

qTranslate WordPress translate screenshot 2

In my case my site had to support both English and Arabic, so from the settings I added support for Arabic translation to the wordpress install.

Adding Arabic is done in the following way:

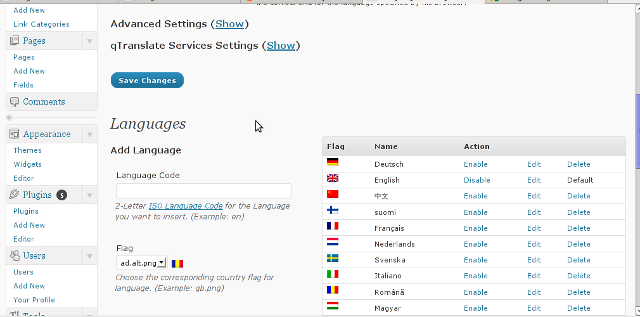
a. From the Language Management (qTranslate Configuration) from the Languages menu and the Languages (Add Languages) I had to choose a language code (in my case a language code of ar – for Arabic). Next I had to choose the Arabic flag from the follow up flag list.

In next text box Name , again I had to fill Arabic, for Locale en_US.UTF-8
The following Date Format and Time Format text boxes are optional so I left them blank.
To complete the process of adding the Arabic as a new language wordpress should support I pressed the Add Language button and the Arabic got added as a second language.

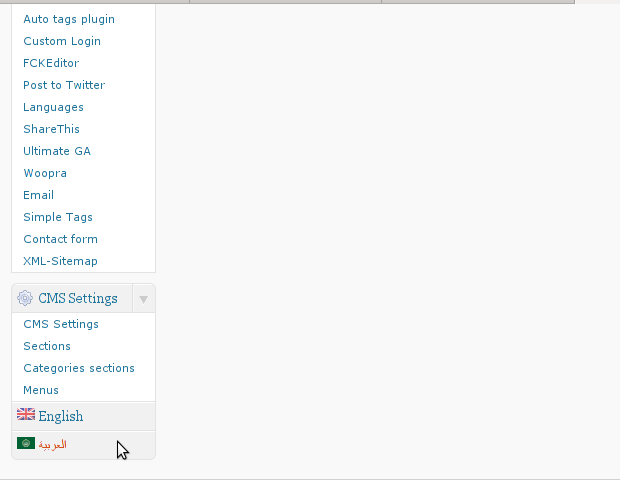
Afterwards the Arabic was added as second language, on the bottom of the left wordpress menu pane a button allowing a switch between English, Arabic appeared (see below screenshot):

MultiLingual WordPress with qTranslate

Finally to make Arabic appear as a second language of choice on the website I added it as a Widget in the Widgets menu from the AWidgets menu:

Appearance -> Widgets

In widgets I added qTranslate Language Chooser to the Sidebar without putting any kind of Title for qtranslate widget .
I found it most helpful to choose the Text and Image as an option on how to display the Language switching in the wp.