Posts Tagged ‘code’

Shutdown tomcat server node in case of memory depletion – Avoiding Tomcat Out of memory

Friday, June 6th, 2014

fix-avoid-tomcat-out-of-memory-logo

Out Of Memory Errors, or OOMEs, are one of the most common problems faced by Apache Tomcat users. Tomcat cluster behind Apache unreachable (causing customer downtimes). OOME errors occur on production servers that are experiencing an unusually high spike of traffic.

Out of memory errors are usually a problem of application and not of Tomcat server. OMEs have become such a persistent topic of discussion in the Apache Tomcat community cause its so difficult to trace to their root cause. Usually 'incorrect' web app code causing Tomcat to run out of memory is usually technically correct.

Most common reasons for Out of Memory errors in application code are:
 

  •     the heap size being too small
  •     running out of file descriptors
  •     more open threads than the host OS allows
  •     code with high amounts of recursion
  •     code that loads a very large file into memory
  •     code that retaining references to objects or classloaders
  •     a large number of web apps and a small PermGen


The following java option -XX:OnOutOfMemoryError= could be added to any of tomcat java application servers in setenv.sh in  JAVA_OPTS= variable in case of regular Out of Memory errors occur making an application unstable.

-XX:OnOutOfMemoryError=<path_to_tomcat_shutdown_script.sh>

Where < path_to tomcat_shutdown_script.sh > is shutdown script(which performs kill <tomcat_pid> if normal shutdown fails) for the tomcat instance.

With this setup if any tomcat instance run out of memory it will be shutdown (shutdown script invoked) – as result the Apache proxy infront of Tomcats should not pass any further requests to this instance and application will visualize / work properly for end customers.

Usually a tomcat_shutdown_script.sh to invoke in case of OOM would initiate a Tomcat server restart something like:

for i in `ps -ef |grep tomcat |grep /my_path_to_my_instance | awk '{print $2}'`
do
kill -9 "$i"
#path and script to start tomcat
done

To prevent blank pages returned to customer because of shutdown_script.sh starting stopping Tomcat you can set in Reverse Apache Proxy something like:
 

<Proxy balancer://mycluster>
   BalancerMember ajp://10.16.166.48:11010/ route=delivery1 timeout=30 retry=1
   BalancerMember ajp://10.16.166.70:11010/ route=delivery2 timeout=30 retry=1
</Proxy>

Where in above example I assume, there are only two tomcat nodes, for more just add respective ones.

Note that if the deployed application along all servers is having some code making it crash all tomcat nodes can get shutdown all time and you can get in a client havoc 🙂

Run 2 and more Skypes simultaneously on Mac OS X – Run multiple Skype acccounts on same Mac

Saturday, June 21st, 2014

run-2-and-more-skypes-simultaneously-on-mac-os-x-multiple-skype-account-login-on-mac
For people running Mac OS X, the question of 
how is it possible to use 2 skype accounts in parallel on Mac probably makes good sense?

I don't own a Mac notebook and thefore I'm a Mac newbie, however, I'm into situation where I and my wife Svetlana went (for 3 days) to my hometown Dobrich and we have with us only her Mac OS X powered Mac Book air.


One user is already logged in Skype, (my wife) is expecting some relatives and friends to contact us and  same time I had to login to check few servers via ssh and discuss some server downtime issues from yesterday in Skype .
Thus we
need 2 skype instances to run separately on her Macbook air powered PC with Mac OS X Leopard
 

Earlier I've blogged how to make 2 and more Skype accounts work simultaneously on one Windows PC because I had to set it up for a company, in this short article I will explain how is possible to run many skype clients on Mac OS X.


1. Open Mac Terminal from Finder

finder-terminal-screenshot-mac-os-x-leopard-run-many-skypes-mac-os

2. In Terminal run the first Skype Instance

Type in Terminal:

open /Applications/Skype.app/Contents/MacOS/Skype

3. Run Second Skype instance

In older Skype Mac OS versions, I read the

/secondary

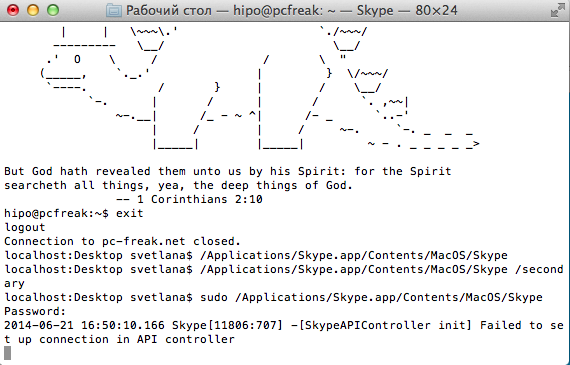
Skype command option was there and could be used to run a second parallel skype instance on Mac, however in newer releases this option was removed and if you try to invoke it warning window pops up saying an instance is already running.

mac-os-x-you-have-another-copy-of-skype-running-screenshot

To get around the issue and run the second Skype, quickest way is to run another Skype client under privileged user through sudo command (this is unsecure – but anyways as Mac OS is proprietary and we don't have access to code and probably there are tons of spy and report software integrated into the OS, it doesn't really matter.)

mac-os-x-skype-run-screenshot-pic

To get around the issue and run the second Skype, quickest way is to run another Skype client under privileged user through sudo command (this is unsecure – but anyways as Mac OS is proprietary and we don't have access to code and probably there are tons of spy and report software integrated into the OS, it doesn't really matter.)

4. Script it into 2nd_skype.sh for later use

To run and use two parallel skypes regularly it might be useful to make shell script out of it and place it somewhere, 2nd_skype.sh script should be something like:


#!/bin/bash
open /Applications/Skype.app/Contents/MacOS/Skype
sudo /Applications/Skype.app/Contents/MacOS/Skype

Then make the script executable with:

chmod a+x 2nd_skype.sh

5. Run more than 2 Skypes (Run multiple Skypes on same Mac PC hack)

There is another "hack" method with deleting the Skype.pid (Process ID). Skype recognize where it is running by checking its Skype.pid on start up.

Deleting the pid after each next Skype client launch,  allow the user to run as many Skypes as you want on Mac OS X but it is not clear for how long it time it will work.

rm -f ~/Library/Application Support/Skype/Skype.pid

Then launch again Skype in background from Mac Terminal

open -nW '/Application/Skype.app' &

In case if you wonder why the open command is used, since above line could be run also directly and Skype will pop-up, by using open command you instruct the program to detach itself from Terminal from which it run, so later if Terminal is closed Skype app. will not terminate.

Another approach is to create, a many users lets say 5 users and use the Skype sudo run method each client with a separate user.

sudo user1 /Applications/Skype.app/Contents/MacOS/Skype
sudo user2 /Applications/Skype.app/Contents/MacOS/Skype
sudo user3 /Applications/Skype.app/Contents/MacOS/Skype
sudo user4 /Applications/Skype.app/Contents/MacOS/Skype

sudo user5 /Applications/Skype.app/Contents/MacOS/Skype

I enclose the script with the custom icon (Skype) ready to be launched and Voila, on script launch Skype multiple login prompts pops up.

For the lazy ones who don't want to tamper with writting scripts or doing hacks to run Skype multiple times on Mac there is even a Multi Skype Launcher app for Mac.


VIM and VI UNIX text editor syntax highlighting and howto add remove code auto indent

Tuesday, February 4th, 2014

vim-vi-linux-text-editor-logo-vim-highlighting how to turn vim syntax highlighting on linux

For my daily system administration job I have to login to many SuSE Linux servers and do various configugration edits.
The systems are configured in different ways and the only text editors available across all servers I can use are VI and VIM (VI Improved).

As I usually had to edit configuration files and scripts and I'm on SSH color terminal its rather annoying that on some of the servers opening a file with VIM is not displayed with SYNTAX HIGHLIGHTING. Not having syntax highlighting is ugly and makes editting ugly and unreadable.
Thus it is useful to enable VI syntax highlighting straight into the file being editted. I suspect many novice sysadmins might not know how to turn syntax highlighting in vi so here is how.
 

Turn Syntax Highlighting in VIM


1. Open file with vim lets say Apache configuration

# vim /etc/apache2/apache2.conf

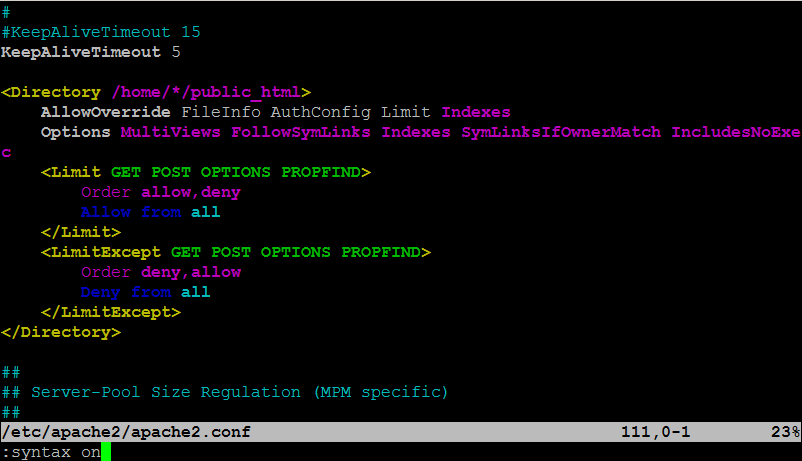
2. Press (Esc) Escape and ":" from kbd and then type in syntax on

:syntax on

vim-syntax-highlighting-howto-syntax-on-picture-screenshot-apache-config

To Turn On / Off VI Syntax Highlighting permanent add ":syntax on"
into ~/.vimrc

~/.vimrc file is red automatically on VIM start, so right after :syntax on is appended in it on relaunch vim will start showing colorfully.

Enjoy ! 🙂


How to count how many files are in a directory with find on Linux

Tuesday, February 21st, 2012

how to count how many directories are on your linux server

Did you ever needed to count, how many files in a directory are there?
Having the concrete number of files in a directory is not a seldom task but still very useful especially for scripts or simply for the sake of learning

The quickest and maybe the easiest way to count all files in a directory in Linux is with a combination of find and wc commands:

Here is how;

linux:~# cd ascii
linux:~/ascii# find . -type f -iname '*' -print |wc -l
407

This will find and list all matched files in any directory and subdirectories, print them out and count them with wc command.
The -type f argument instructs find to look only for files.

Other helpful variance of finding and listing all files in a directory and subdirectories is to list and count all the files with a certain file extension under a directory. For example, lets list all text files (.txt) contained in a directory and all level sub-directories:

linux:~/ascii# find . -type f -iname '*.txt' -print |wc -l
401

If you need to check the number of files in a directory for multiple directories on a server and you're aiming at doing it efficienly, issung above find .. | wc code will definitely be not a good choice. If used it will generate heavy load for the system and along with that will complete the execution in ages if issued on a large number of files containing dirs.

Thanksfully if efficiency is targetted, there is a command written in C called tree which is more efficient than find.
To count the number of files in dir but using tree :

linux:~# cd ascii
linux:/ascii# tree | tail -n 1
32 directories, 407 files

By default tree prints info for both the number of found files and directories.
To print out only the files matched, awk comes handy, e.g.:

linux:/ascii# tree |tail -n 1| awk '{ print $3 }'407

To list only the number of files in a directory without its existing sub-directories ls + wc use is also possible:

linux:~/ascii# ls -l | grep ^- | wc -l68

This result the above command would produce is +1 more than the real number of files, as it counts the directory ".." as one file (in UNIX / LINUX everything is file).

A short one liner script that can calculate all files correctly by substracting 1 is and hence present correct result on number of files is like so:

linux:~/ascii# var=$(ls -l | grep ^- | wc -l); var=$(($var - 1)); echo $var

ls can be used to calculate the number of 1-st level sub-directories under certain directory for instance:

linux:~/ascii# ls -l |grep ^d|wc -l
25

You see the ascii directory has 25 subdirectories in its 1st level.

To check symlinks under a directory with ls the command would be:

linux:~/ascii# ls -l | grep ^l | wc -l
0

Note above 3 ls | grep … examples, will not work properly if the directory contains files with SUID or some special properties set.
Hence to get the same 3 results for active files, directories and symbolic links, a one liner similar to the one below can be used instead:

linux:~/ascii# for t in files links directories; do echo `find . -type ${t:0:1} | wc -l` $t; done 2> /dev/null
407 files
0 links
33 directories

This will show statistics about all files, links and directories for all directory sub-levels.
Just in case if there is need to only count files, links and directories without directory recursion enabled, use:

linux:~/ascii# for t in files links directories; do echo `find . -maxdepth 1 -type ${t:0:1} | wc -l` $t; done 2> /dev/null
68 files
0 links
26 directories

Anyways the above bash loop will be slow, for directories containing thousands of files. For better performance the equivallent of above bash loop rewritten in perl would be:

linux:~/ascii# ls -l |perl -e 'while(<>){$h{substr($_,0,1)}+=1;} END {foreach(keys %h) {print "$_ $h{$_}\n";}}'
- 68
d 25
t 1
linux:~/ascii#
In any case the most preferrable and efficient way to count files en directories is by using tree command.
In my view using always tree command instead of code "hacks" is smart idea.

In Slackware tree command is part of the base install, on Debian and CentOS Linux, tree cmd is not part of the base system and requires install via apt / yum e.g.:

debian:~# apt-get --yes install tree
...

[root@centos:~ ]# yum --yes install tree

Happy counting 😉

How to disable ACPI on productive Linux servers to decrease kernel panics and increase CPU fan lifespan

Tuesday, May 15th, 2012

Linux TUX ACPI logo / Tux Hates ACPI logohttps://www.pc-freak.net/images/linux_tux_acpi_logo-tux-hates-acpi.png

Why would anyone disable ACPI support on a server machine??
Well  ACPI support kernel loaded code is just another piece of code constantly being present in the memory,  that makes the probability for a fatal memory mess up leading to  a fatal bug resulting in system crash (kernel panic) more likely.

Many computers ship with buggy or out of specifications ACPI firmware which can cause a severe oddities on a brand new bought piece of comp equipment.

One such oddity related to ACPI motherboard support problems is if you notice your machine randomly powering off or failing to boot with a brand new Linux installed on it.

Another reason to switch off ACPI code will would to be prevent the CPU FAN rotation from being kernel controlled.

If the kernel controls the CPU fan on  high CPU heat up it will instruct the fan to rotate quickly and on low system loads it will bring back the fan to loose speed.
 This frequent switch of FAN from high speed to low speed  increases the probability for a short fan damage due to frequent changes of fan speed. Such a fan damage leads often to  system outage due to fan failure to rotate properly.

Therefore in my view it is better ACPI support is switched off completely on  servers. On some servers ACPI is useful as it can be used to track CPU temperature with embedded motherboard sensors with lm_sensors or any piece of hardwre vendor specific software provided. On many machines, however lm_sensors will not properly recognize the integrated CPU temperature sensors and hence ACPI is mostly useless.

There are 3 ways to disable fully or partially ACPI support.

- One is to disable it straight for BIOS (best way IMHO)
- Disable via GRUB or LILO passing a kernel parameter
- Partial ACPI off-ing - /disabling the software that controls the CPU fan/

1. Disable ACPI in BIOS level

Press DEL, F1, F2, F10 or whatever the enter bios key combination is go through all the different menus (depending on the vios BENDOR) and make sure every occurance of ACPI is set to off / disable whatever it is called.

Below is a screenshot of menus with ACPI stuff on a motherboard equipped with Phoenix AwardBIOS:
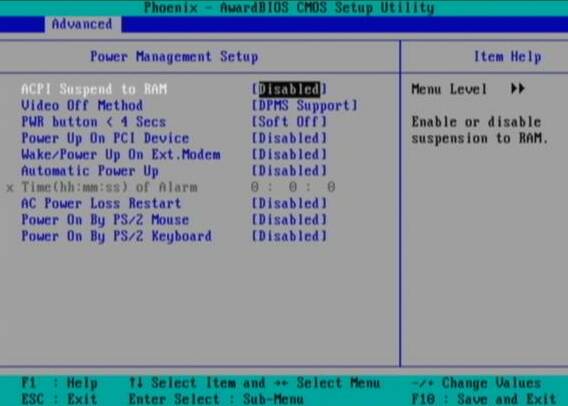
BIOS ACPI Disable power Off Phoenix BIOS

This is the in my opinon best and safest way to disable ACPI power saving, Unfortunately some newer PCs lack the functionality to disable ACPI; (probably due to the crazy "green" policy the whole world is nowdays mad of).

If that's the case with you, thanksfully there is a "software way" to disable ACPI via passing kernel options via GRUB and LILO boot loaders.

2. Disabling ACPI support on kernel boot level through GRUB boot loader config

There is a tiny difference in command to pass in order to disable  ACPI depending on the Linux installed  GRUB ver. 1.x or GRUB 2.x.

a) In GRUB 0.99 (GRUB version 1)

Edit file /etc/grub/menu.lst or /etc/grub/grub.conf (location differs across Linux distribution). Therein append:

acpi=off

to the end of kernel command line.

Here is an example of a kernel command line with ACPI not disabled (example taken from CentOS server grub.conf):

[root@centos ~]# grep -i title -A 4 /etc/grub/grub.conf
title Red Hat Enterprise Linux Server (2.6.18-36.el5)
root (hd0,0)
kernel /vmlinuz-2.6.18-36.el5 ro root=/dev/VolGroup00/LogVol00 console=ttyS0,115200n8
initrd /initrd-2.6.18-36.el5.img

The edited version of the file with acpi=off included should look like so:

title Red Hat Enterprise Linux Server (2.6.18-36.el5)
root (hd0,0)
kernel /vmlinuz-2.6.18-36.el5 ro root=/dev/VolGroup00/LogVol00 console=ttyS0,115200n8 acpi=off
initrd /initrd-2.6.18-36.el5.img

The kernel option root=/dev/VolGroup00/LogVol00 means the the server is configured to use LVM (Logical Volume Manager).

b) Disabling ACPI on GRUB version 1.99 +

This version is by default installed on newer Ubuntu and Debian Linux-es.

In grub 1.99 on latest Debian Squeeze, the file to edit is located in /boot/grub/grub.cfg. The file is more messy than with its predecessor menu.lst (grub 0.99).
Thanks God there is no need to directly edit the file (though this is possible), but on newer Linuces (as of time of writting the post), there is another simplied grub config file /etc/grub/config

Hence to add the acpi=off to 1.99 open /etc/grub/config find the line reading:

GRUB_CMDLINE_LINUX_DEFAULT="quiet"

and append the "acpi=off" option, e.g. the line has to change to:

GRUB_CMDLINE_LINUX_DEFAULT="quiet acpi=off"

On some servers it might be better to also disable APIC along with ACPI:

Just in case you don't know what is the difference between ACPI and APIC, here is a short explanation:

ACPI = Advanced Configuration and Power Interface

APIC = Advanced Programmable Interrupt Controllers

ACPI is the system that controls your dynamic speed fans, the power button behavior, sleep states, etc.

APIC is the replacement for the old PIC chip that used to come imbedded on motherboards that allowed you to setup interrupts for your soundcard, ide controllers, etc.

Hence on some machines experiencing still problems with even ACPI switched off, it is helpful  to disable the APIC support too, by using:

acpi=off noapic noacpi

Anyways, while doing the changes, be very very cautious or you might end up with un-boot-able server. Don't blame me if this happens :); be sure you have a backup option if server doesn't boot.

To assure faultless kernel boot, GRUB has ability to be configured to automatically load up a second kernel if 1st one fails to boot, if you need that read the grub documentation on that.

To load up the kernel with the new setting, give it a restart:

[root@centos ~]# shutdown -r now
....

3. Disable ACPI support on kernel boot time on Slackware or other Linuxes still booting kernel with LILO

Still, some Linux distros like Slackware, decided to keep the old way and use LILO (LInux LOader) as a default boot loader.

Disabling ACPI support in LILO is done through /etc/lilo.conf

By default in /etc/lilo.conf, there is a line:

append= acpi=on

it should be changed to:

append= acpi=off

Next to load up the new acpi disabled setting, lilo has to be reloaded:

slackware:~# /sbin/lilo -c /etc/lilo.conf
....

Finally a reboot is required:

slackware:~# reboot
....

(If you don't have a physical access or someone near the server you better not 🙂 )

4. Disable ACPI fan control support on a running Linux server without restart

This is the most secure work-around, to disabling the ACPI control over the machine CPU fan, however it has a downside that still the ACPI code will be loaded in the kernel and could cause kernel issues possibly in the long run – lets say the machine has uptime of more than 2 years…

The acpi support on a user level  is controlled by acpid or haldaemon (depending on the Linux distro), hence to disable the fan control on servers this services has to be switched off:

a) disabling ACPI on Debian and deb based Linux-es

As of time of writting on Debian Linux servers acpid (Advanced Configuration and Power Interface event daemon) is there to control how power management will be handled. To disable it stop it as a service (if running):

debian:~# /etc/init.d/acpid stop

To permanently remove acpid from boot up on system boot disable it with update-rc.d:

debian:~# update-rc.d acpid disable 2 3 4 5
update-rc.d: using dependency based boot sequencing
insserv: Script iptables is broken: incomplete LSB comment.
insserv: missing `Required-Start:' entry: please add even if empty.
insserv: warning: current start runlevel(s) (empty) of script `acpid' overwrites defaults (2 3 4 5).
insserv: warning: current stop runlevel(s) (2 3 4 5) of script `acpid' overwrites defaults (empty).
insserv: missing `Required-Start:' entry: please add even if empty.

b) disabling ACPI on RHEL, Fedora and other Redhat-s (also known as RedHacks 🙂 )

I'm not sure if this is safe,as many newer rpm based server system services,  might not work properly with haldaemon disabled.

Anyways you can give it a try if when it is stopped there are issues just bring it up again.

[root@rhel ~]# /etc/init.d/haldaemon stop

If all is fine with the haldaemon switched off (hope so), you can completely disable it to load on start up with:

[root@centos ~]# /sbin/chkconfig --level 2 3 4 5 haldaemon off

Disabling ACPI could increase a bit your server bills, but same time decrease losses from downtimes, so I guess it worths its costs 🙂


How to convert OGG Vorbis .ogg to MP3 on GNU / Linux and FreeBSD

Friday, July 27th, 2012

I’ve used K3B just recently to RIP an Audio CD with music to MP3. K3b has done a great job ripping the tracks, the only problem was By default k3b RIPs songs in OGG Vorbis (.ogg) and not mp3. I personally prefer OGG Vorbis as it is a free freedom respecting audio format, however the problem was the .ogg-s cannot be read on many of the audio players and it could be a problem reading the RIPped oggs on Windows. I’ve done the RIP not for myself but for a Belarusian gfriend of mine and she is completely computer illiterate and if I pass her the songs in .OGG, there is no chance she succed in listening the oggs. I’ve seen later k3b has an option to choose to convert directly to MP3 Using linux mp3 lame library this however is time consuming and I have to wait another 10 minutes or so for the songs to be ripped to shorten the time I decided to directly convert the existing .ogg files to .mp3 on my (Debian Linux). There are probably many ways to convert .ogg to mp3 on linux and likely many GUI frontends (like SoundConverter) to use in graphic env.

SoundConverter Debian GNU Linux graphic GUI environment program for convertion of ogg to mp3 and mp3 to ogg, convert multiple sound formats on GNU / Linux.

I however am a console freak so I preferred doing it from terminal. I’ve done quick research on the net and figured out the good old ffmpeg is capable of converting .oggs to .mp3s. To convert all mp3s just ripped in the separate directory I had to run ffmpeg in a tiny bash loop.

A short bash shell script 1 liner combined with ffmpeg does it, e.g.;

for f in *.ogg; do ffmpeg -i "$f" "`basename "$f" .ogg`.mp3"; done.....

The loop example is in bash so in order to make the code work on FreeBSD it is necessery it is run in a bash shell and not in BSDs so common csh or tcsh.

Well, that’s all oggs are in mp3; Hip-hip Hooray 😉

How to count lines of PHP source code in a directory (recursively)

Saturday, July 14th, 2012

Count PHP and other programming languages lines of source code (source code files count) recursively

Being able to count the number of PHP source code lines for a website is a major statistical information for timely auditting of projects and evaluating real Project Managment costs. It is inevitable process for any software project evaluation to count the number of source lines programmers has written.
In many small and middle sized software and website development companies, it is the system administrator task to provide information or script quickly something to give info on the exact total number of source lines for projects.

Even for personal use out of curiousity it is useful to know how many lines of PHP source code a wordpress or Joomla website (with the plugins) contains.
Anyone willing to count the number of PHP source code lines under one directory level, could do it with:::

serbver:~# cd /var/www/wordpress-website
server:/var/www/wordpress-website:# wc -l *.php
17 index.php
101 wp-activate.php
1612 wp-app.php
12 wp-atom.php
19 wp-blog-header.php
105 wp-comments-post.php
12 wp-commentsrss2.php
90 wp-config-sample.php
85 wp-config.php
104 wp-cron.php
12 wp-feed.php
58 wp-links-opml.php
59 wp-load.php
694 wp-login.php
236 wp-mail.php
17 wp-pass.php
12 wp-rdf.php
15 wp-register.php
12 wp-rss.php
12 wp-rss2.php
326 wp-settings.php
451 wp-signup.php
110 wp-trackback.php
109 xmlrpc.php
4280 total

This will count and show statistics, for each and every PHP source file within wordpress-website (non-recursively), to get only information about the total number of PHP source code lines within the directory, one could grep it, e.g.:::

server:/var/www/wordpress-website:# wc -l *.php |grep -i '\stotal$'
4280 total

The command grep -i '\stotal$' has \s in beginning and $ at the end of total keyword in order to omit erroneously matching PHP source code file names which contain total in file name; for example total.php …. total_blabla.php …. blabla_total_bla.php etc. etc.

The \s grep regular expression meaning is "put empty space", "$" is placed at the end of tital to indicate to regexp grep only for words ending in string total.

So far, so good … Now it is most common that instead of counting the PHP source code lines for a first directory level to count complete number of PHP, C, Python whatever source code lines recursively – i. e. (a source code of website or projects kept in multiple sub-directories). To count recursively lines of programming code for any existing filesystem directory use find in conjunction with xargs:::

server:/var/www/wp-website1# find . -name '*.php' | xargs wc -l
1079 ./wp-admin/includes/file.php
2105 ./wp-admin/includes/media.php
103 ./wp-admin/includes/list-table.php
1054 ./wp-admin/includes/class-wp-posts-list-table.php
105 ./wp-admin/index.php
109 ./wp-admin/network/user-new.php
100 ./wp-admin/link-manager.php
410 ./wp-admin/widgets.php
108 ./wp-content/plugins/akismet/widget.php
104 ./wp-content/plugins/google-analytics-for-wordpress/wp-gdata/wp-gdata.php
104 ./wp-content/plugins/cyr2lat-slugs/cyr2lat-slugs.php
,,,,
652239 total

As you see the cmd counts and displays the number of source code lines encountered in each and every file, for big directory structures the screen gets floated and passing | less is nice, e.g.:

find . -name '*.php' | xargs wc -l | less

Displaying lines of code for each file within the directories is sometimes unnecessery, whether just a total number of programming source code line is required, hence for scripting purposes it is useful to only get the source lines total num:::

server:/var/www/wp-website1# find . -name '*.php' | xargs wc -l | grep -i '\stotal$'

Another shorter and less CPU intensive one-liner to calculate the lines of codes is:::

server:/var/www/wp-website1# ( find ./ -name '*.php' -print0 | xargs -0 cat ) | wc -l

Here is one other shell script which displays all file names within a directory with the respective calculated lines of code

For more professional and bigger projects using pure Linux bash and command line scripting might not be the best approach. For counting huge number of programming source code and displaying various statistics concerning it, there are two other tools – SLOCCount
as well as clock (count lines of code)

Both tools, are written in Perl, so for IT managers concerned for speed of calculating projects source (if too frequent source audit is necessery) this tools might be a bit sluggish. However for most projects they should be of a great add on value, actually SLOCCount was already used for calculating the development costs of GNU / Linux and other projects of high importance for Free Software community and therefore it is proven it works well with ENORMOUS software source line code calculations written in programming languages of heterogenous origin.

sloccount and cloc packages are available in default Debian and Ubuntu Linux repositories, so if you're a Debilian user like me you're in luck:::

server:~# apt-cache search cloc$
cloc - statistics utility to count lines of code
server:~# apt-cache search sloccount$
sloccount - programs for counting physical source lines of code (SLOC)

Well that's all folks, Cheers en happy counting 😉

How to list Files in a directory and generate web URLS with PHP

Tuesday, April 10th, 2012

I needed a short PHP script that reads all, my .html files in a directory and then generates html a hrefs links pointing to each of the html files stored in the directory.

Here is the short code I come up:

$directory_to_open=”my-dir/”;
$max_files=100;
$i=0;
if ($handle = opendir(“$directory_to_open”)) {
while (false !== ($file = readdir($handle)) && $i <= $max_files)
{
$i=$i+1;
if ($file != “.” && $file != “..”)
{
$thelist .= ‘| ‘.str_replace(“.html”,””,$file).’ |’;
echo “$thelist”; }
}
closedir($handle);
}

In my case the directories with html were planned to contain, less than 100 files a directory, so in order to show links to only the first 100 files in the directory, I used the $max_files=100 and a check if value is reached in the while loop. For anyone who want to build html you see in above while if $max_files is reached then the while loop exits.

Because by default the files returned contained the naming format file_name.html, whether I wanted to show only the file name without the .html extensions used str_replace(); to get rid of file extensions string.

Fix Null error in WordPress comment reply with wordpress-threaded-comments plugin enabled

Friday, April 6th, 2012

I'm running WordPress for already 3 years or so now. Since some very long time. The first wordpress install, I can hardly remember but it something like wordpress 2.5 or wordpress 2.4

Since quite a long time my wordpress blog is powered by a number of plugins, which I regularly update, whenever new plugins pops up …
I haven't noticed most of the time problems during major WordPress platform updates or the update of the installed extensions. However, today while I tried to reply back to one of my blog comments, I've been shocked that, I couldn't.
Pointing at the the Comment Reply box and typing inside was impossible and a null message was stayed filled in the form:

To catch what was causing this weird misbehaving with the reply comments functionality, I grepped through my /var/www/blog/wp-content/plugins/* for the movecfm(null,0,1,null):

# cd /var/www/blog/wp-content/plugins
# grep -rli 'movecfm(null,0,1,null)' */*.php
wordpress-thread-comment/wp-thread-comment.php

I've taken the string movecfm(null,0,1,null) from the browser page source in in my Firefox by pressing – Ctrl+U).

Once I knew of the problem, I first tried commenting the occurances of the null fields in wp-thread-comment.php, but as there, were other troubles in commenting this and I was lazy to read the whole code, checked online if some other fellows experienced the same shitty null void javascript error and already someone pointed at a solution. In the few minutes search I was unable to find anyone who reported for this bug, but what I found is some user threads on wordpress.org mentioning since WordPress 2.7+ the wordpress-threaded-comments is obsolete and the functionality provided by the plugin is already provided by default in newer WPinstalls.

Hence in order to enable the threaded comments WordPress (embedded) reply functionality from within the wp-admin panel used:

Settings -> Discussions -> Enable Threaded (nested) comments (Tick)

Enable Nested Comments WordPress default wp comments enable reply functionality screenshot

You see there is also an option to define how many nested comments subcomments, can be placed per comment, the default was 5, but I thought 5 is a bit low so increased it to 10 comments reply possible per comment.

Finally, to prevent the default threaded comments to interfere with the WordPress Threaded Comments plugin, disabled the plugin through menus:

Plugins -> Active -> WordPress Thread Comments (Deactivate)

This solved the weird javascript null "bug" caused by wordpress-threaded-comments once and for all.
Hopefully onwards, my blog readers will not have issues with threaded Reply Comments.

How to run your Own / Personal Domain Web WHOIS service in a minute with SpeedyWHOIS

Thursday, April 5th, 2012

Running your own personal WHOIS service speedy whois in browser screenshot

I've been planning to run my own domain WHOIS service, for quite sime time and I always postpone or forgot to do it.
If you wonder, why would I need a (personal) web whois service, well it is way easier to use and remember for future use reference if you run it on your own URL, than wasting time in search for a whois service in google and then using some other's service to get just a simple DOMAIN WHOIS info.

So back to my post topic, I postpopned and postponed to run my own web whois, just until  yesterday, whether I have remembered about my idea to have my own whois up and running and proceeded wtih it.

To achieve my goal I checked if there is free software or (open source) software that easily does this.
I know I can write one for me from scratch, but since it would have cost me some at least a week of programming and testing and I didn't wanted to go this way.

To check if someone had already made an easy to install web whois service, I looked through in the "ultimate source for free software" sourceforge.net

Looking for the "whois web service" keywords, displayed few projects on top. But unfortunately many of the projects sources was not available anymore from http://sf.net and the project developers pages..
Thanksfully in a while, I found a project called SpeedyWhois, which PHP source was available for download.

With all prior said about project missing sources, Just in case if SpeedyWhois source  disappears in the future (like it probably) happened with, some of the other WHOIS web service projects, I've made SpeedyWhois  mirror for download here

 
Contrary to my idea that installing the web whois service might be a "pain in the ass", (like is the case  with so many free software php scripts and apps) – the installation went quite smoothly.
 
To install it I took the following 4 steps:
 
1. Download the source (zip archive) with wget 
 
# cd /var/www/whois-service;
/var/www/whois-service# wget -q https://www.pc-freak.net/files/speedywhois-0.1.4.zip
 
2. Unarchive it with unzip command 
 
 
/var/www/whois-service# unzip speedywhois-0.1.4.zip
3. Set the proper DNS records

My NS are using Godaddy, so I set my desired subdomain record from their domain name manager.
 

4. Edit Apache httpd.conf to create VirtualHost
 
This step is not mandatory, but I thought it is nice if I put the whois service under a subdomain, so add a VirtualHost to my httpd.conf
 
The Virtualhost Apache directives, I used are:
 
<VirtualHost *:80>
        ServerAdmin hipo_aT_www.pc-freak.net
        DocumentRoot /var/www/whois-service
        ServerName whois.www.pc-freak.net
        &lt;Directory /var/www/whois-service
        AllowOverride All
        Order Allow,Deny
        Allow from All
        </Directory>
</VirtualHost>
 
Onwards to take effect of new Webserver configs, I did Apache restart
 
# /usr/local/etc/rc.d/apache2 restart
 
Further on You can test whois a domain using my new installed SpeedyWHOISWeb WHOIS service  on http://whois.www.pc-freak.net
Whenever I have some free time, maybe I will work on the code, to try to add support for logging of previous whois requests and posting links pointing to the previous whois done via the web WHOIS service on the main whois page.
 
One thing that I disliked about how SpeedyWHOIS is written is, if there is no WHOIS information returned for a domain request (e.g.) a:
 
# whois domainname.com
 
returns an empty information, the script doesn't warn with a message there is no WHOIS data available for this domain or something.
 
 
This is not so important as this kind of behaviour of 'error' handling can easily be changed with minimum changes in the php code.
If you wonder, why do I need the web whois service, the answer is it is way easier to use.
I don't have more time to research a bit further on the alternative open source web whois services, so I would be glad to hear from anyone who tested other web whois service that is free comes under a FOSS license.
In the mean time, I'm sure people with a small internet websites like mine who are looking to run their OWN (personal) whois service SpeedyWHOIS does a great job.