Posts Tagged ‘com’

Must have software on freshly installed windows – Essential Software after fresh Windows install

Friday, March 18th, 2016

Install-update-multiple-programs-applications-at-once-using-ninite

If you're into IT industry even if you don't like installing frequently Windows or you're completely Linux / BSD user, you will certainly have a lot of friends which will want help from you to re-install or fix their Windows 7 / 8 / 10 OS. At least this is the case with me every year, I'm kinda of obliged to install fresh windowses on new bought friends or relatives notebooks / desktop PCs.

Of course according to for whom the new Windows OS installed the preferrences of necessery software varies, however more or less there is sort of standard list of Windows Software which is used daily by most of Avarage Computer user, such as:
 

Not to forget a good candidate from the list to install on new fresh windows Installation candidates are:

  • Winrar
  • PeaZIP
  • WinZip
  • GreenShot (to be able to easily screenshot stuff and save pictures locally and to the cloud)
  • AnyDesk (non free but very functional alternative to TeamViewer) to be able to remotely access remote PC
  • TightVNC
  • ITunes / Spotify (for people who have also iPhone smart phone)
  • DropBox or pCloud (to have some extra cloud free space)
  • FBReader (for those reading a lot of books in different formats)
  • Rufus – Rufus is an efficient and lightweight tool to create bootable USB drives. It helps you to create BIOS or UEFI bootable devices. It helps you to create Windows TO Go drives. It provides support for various disk, format, and partition.
  • Recuva is a data recovery software for Windows 10 (non free)
  • EaseUS (for specific backup / restore data purposes but unfortunately (non free)
  • For designers
  • Adobe Photoshop
  • Adobe Illustrator
  • f.lux –  to control brightness of screen and potentially Save your eyes
  • ImDisk virtual Disk Driver
  • KeePass / PasswordSafe – to Securely store your passwords
  • Putty / MobaXterm / SecureCRT / mPutty (for system administrators and programmers that has to deal with Linux / UNIX)

I tend to install on New Windows installs and thus I have more or less systematized the process.

I try to usually stick to free software where possible for each of the above categories as a Free Software enthusiast and luckily nowadays there is a lot of non-priprietary or at least free as in beer software available out there.

For Windows sysadmins or College and other public institutions networks including multiple of Windows Computers which are not inside a domain and also for people in computer repair shops where daily dozens of windows pre-installs or a set of software Automatic updates are  necessery make sure to take a look at Ninite

ninite-automate-windows-program-deploy-and-update-on-new-windows-os-openoffice-screenshot

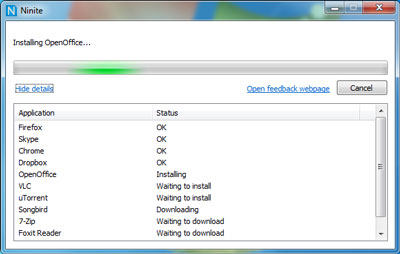
As official website introduces Ninite:

Ninite – Install and Update All Your Programs at Once

Of course as Ninite is used by organizations as NASA, Harvard Medical School etc. it is likely the tool might reports your installed list of Windows software and various other Win PC statistical data to Ninite developers and most likely NSA, but this probably doesn't much matter as this is probably by the moment you choose to have installed a Windows OS on your PC.

ninite-choises-to-build-an-install-package-with-useful-essential-windows-software-screenshot
 

For Windows System Administrators managing small and middle sized network PCs that are not inside a Domain Controller, Ninite could definitely save hours and at cases even days of boring install and maintainance work. HP Enterprise or HP Inc. Employees or ex-employees would definitely love Ninite, because what Ninite does is pretty much like the well known HP Internal Tool PC COE.

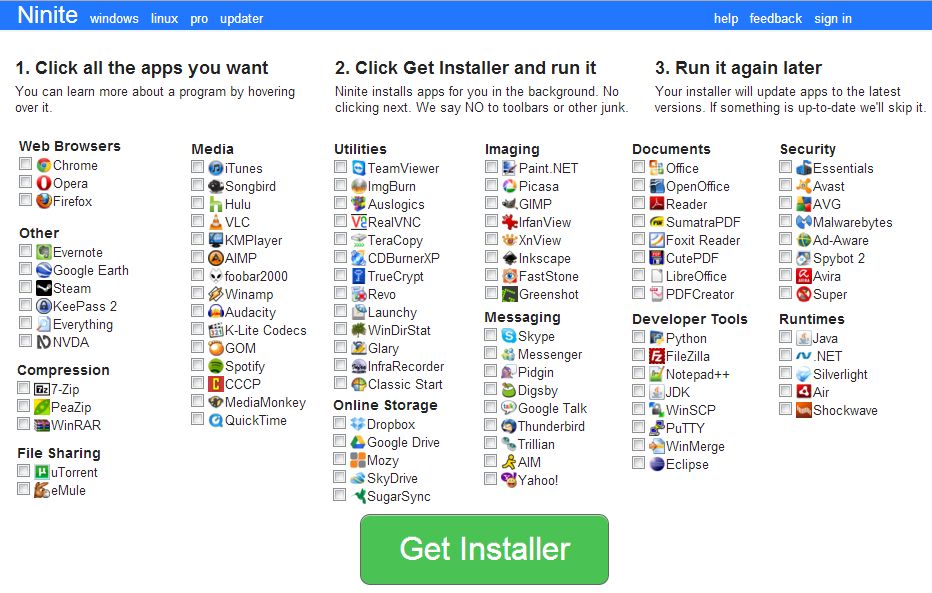
Ninite could also prepare an installer containing multiple applications based on the choice on Ninite's website, so that's also a great thing especially if you need to deploy a different type of Users PCs (Scientific / Gamers / Working etc.)

Perhaps there are also other useful things to install on a new fresh Windows installations, if you're using something I'm missing let me know in comments.

Install and configure rkhunter for improved security on a PCI DSS Linux / BSD servers with no access to Internet

Wednesday, November 10th, 2021

install-and-configure-rkhunter-with-tightened-security-variables-rkhunter-logo

rkhunter or Rootkit Hunter scans systems for known and unknown rootkits. The tool is not new and most system administrators that has to mantain some good security servers perhaps already use it in their daily sysadmin tasks.

It does this by comparing SHA-1 Hashes of important files with known good ones in online databases, searching for default directories (of rootkits), wrong permissions, hidden files, suspicious strings in kernel modules, commmon backdoors, sniffers and exploits as well as other special tests mostly for Linux and FreeBSD though a ports for other UNIX operating systems like Solaris etc. are perhaps available. rkhunter is notable due to its inclusion in popular mainstream FOSS operating systems (CentOS, Fedora,Debian, Ubuntu etc.).

Even though rkhunter is not rapidly improved over the last 3 years (its last Official version release was on 20th of Febuary 2018), it is a good tool that helps to strengthen even further security and it is often a requirement for Unix servers systems that should follow the PCI DSS Standards (Payment Card Industry Data Security Standards).

Configuring rkhunter is a pretty straight forward if you don't have too much requirements but I decided to write this article for the reason there are fwe interesting options that you might want to adopt in configuration to whitelist any files that are reported as Warnings, as well as how to set a configuration that sets a stricter security checks than the installation defaults. 

1. Install rkhunter .deb / .rpm package depending on the Linux distro or BSD

  • If you have to place it on a Redhat based distro CentOS / Redhat / Fedora

[root@Centos ~]# yum install -y rkhunter


  • On Debian distros the package name is equevallent to install there exec usual:

root@debian:~# apt install –yes rkhunter

  • On FreeBSD / NetBSD or other BSD forks you can install it from the BSD "World" ports system or install it from a precompiled binary.

freebsd# pkg install rkhunter

One important note to make here is to have a fully functional Alarming from rkhunter, you will have to have a fully functional configured postfix / exim / qmail whatever mail server to relay via official SMTP so you the Warning Alarm emails be able to reach your preferred Alarm email address. If you haven't installed postfix for example and configure it you might do.

– On Deb based distros 

[root@Centos ~]#yum install postfix


– On RPM based distros

root@debian:~# apt-get install –yes postfix


and as minimum, further on configure some functional Email Relay server within /etc/postfix/main.cf
 

# vi /etc/postfix/main.cf
relayhost = [relay.smtp-server.com]

2. Prepare rkhunter.conf initial configuration


Depending on what kind of files are present on the filesystem it could be for some reasons some standard package binaries has to be excluded for verification, because they possess unusual permissions because of manual sys admin monification this is done with the rkhunter variable PKGMGR_NO_VRFY.

If remote logging is configured on the system via something like rsyslog you will want to specificly tell it to rkhunter so this check as a possible security issue is skipped via ALLOW_SYSLOG_REMOTE_LOGGING=1. 

In case if remote root login via SSH protocol is disabled via /etc/ssh/sshd_config
PermitRootLogin no variable, the variable to include is ALLOW_SSH_ROOT_USER=no

It is useful to also increase the hashing check algorithm for security default one SHA256 you might want to change to SHA512, this is done via rkhunter.conf var HASH_CMD=SHA512

Triggering new email Warnings has to be configured so you receive, new mails at a preconfigured mailbox of your choice via variable
MAIL-ON-WARNING=SetMailAddress


# vi /etc/rkhunter.conf

PKGMGR_NO_VRFY=/usr/bin/su

PKGMGR_NO_VRFY=/usr/bin/passwd

ALLOW_SYSLOG_REMOTE_LOGGING=1

# Needed for corosync/pacemaker since update 19.11.2020

ALLOWDEVFILE=/dev/shm/qb-*/qb-*

# enabled ssh root access skip

ALLOW_SSH_ROOT_USER=no

HASH_CMD=SHA512

# Email address to sent alert in case of Warnings

MAIL-ON-WARNING=Your-Customer@Your-Email-Server-Destination-Address.com

MAIL-ON-WARNING=Your-Second-Peronsl-Email-Address@SMTP-Server.com

DISABLE_TESTS=os_specific


Optionally if you're using something specific such as corosync / pacemaker High Availability cluster or some specific software that is creating /dev/ files identified as potential Risks you might want to add more rkhunter.conf options like:
 

# Allow PCS/Pacemaker/Corosync
ALLOWDEVFILE=/dev/shm/qb-attrd-*
ALLOWDEVFILE=/dev/shm/qb-cfg-*
ALLOWDEVFILE=/dev/shm/qb-cib_rw-*
ALLOWDEVFILE=/dev/shm/qb-cib_shm-*
ALLOWDEVFILE=/dev/shm/qb-corosync-*
ALLOWDEVFILE=/dev/shm/qb-cpg-*
ALLOWDEVFILE=/dev/shm/qb-lrmd-*
ALLOWDEVFILE=/dev/shm/qb-pengine-*
ALLOWDEVFILE=/dev/shm/qb-quorum-*
ALLOWDEVFILE=/dev/shm/qb-stonith-*
ALLOWDEVFILE=/dev/shm/pulse-shm-*
ALLOWDEVFILE=/dev/md/md-device-map
# Needed for corosync/pacemaker since update 19.11.2020
ALLOWDEVFILE=/dev/shm/qb-*/qb-*

# tomboy creates this one
ALLOWDEVFILE="/dev/shm/mono.*"
# created by libv4l
ALLOWDEVFILE="/dev/shm/libv4l-*"
# created by spice video
ALLOWDEVFILE="/dev/shm/spice.*"
# created by mdadm
ALLOWDEVFILE="/dev/md/autorebuild.pid"
# 389 Directory Server
ALLOWDEVFILE=/dev/shm/sem.slapd-*.stats
# squid proxy
ALLOWDEVFILE=/dev/shm/squid-cf*
# squid ssl cache
ALLOWDEVFILE=/dev/shm/squid-ssl_session_cache.shm
# Allow podman
ALLOWDEVFILE=/dev/shm/libpod*lock*


3. Set the proper mirror database URL location to internal network repository


Usually  file /var/lib/rkhunter/db/mirrors.dat does contain Internet server address where latest version of mirrors.dat could be fetched, below is how it looks by default on Debian 10 Linux.

root@debian:/var/lib/rkhunter/db# cat mirrors.dat 
Version:2007060601
mirror=http://rkhunter.sourceforge.net

As you can guess a machine that doesn't have access to the Internet neither directly, neither via some kind of secure proxy because it is in a Paranoic Demilitarized Zone (DMZ) Network with many firewalls. What you can do then is setup another Mirror server (Apache / Nginx) within the local PCI secured LAN that gets regularly the database from official database on http://rkhunter.sourceforge.net/ (by installing and running rkhunter –update command on the Mirror WebServer and copying data under some directory structure on the remote local LAN accessible server, to keep the DB uptodate you might want to setup a cron to periodically copy latest available rkhunter database towards the http://mirror-url/path-folder/)

# vi /var/lib/rkhunter/db/mirrors.dat

local=http://rkhunter-url-mirror-server-url.com/rkhunter/1.4/


A mirror copy of entire db files from Debian 10.8 ( Buster ) ready for download are here.

Update entire file property db and check for rkhunter db updates


# rkhunter –update && rkhunter –propupdate

[ Rootkit Hunter version 1.4.6 ]

Checking rkhunter data files…
  Checking file mirrors.dat                                  [ Skipped ]
  Checking file programs_bad.dat                             [ No update ]
  Checking file backdoorports.dat                            [ No update ]
  Checking file suspscan.dat                                 [ No update ]
  Checking file i18n/cn                                      [ No update ]
  Checking file i18n/de                                      [ No update ]
  Checking file i18n/en                                      [ No update ]
  Checking file i18n/tr                                      [ No update ]
  Checking file i18n/tr.utf8                                 [ No update ]
  Checking file i18n/zh                                      [ No update ]
  Checking file i18n/zh.utf8                                 [ No update ]
  Checking file i18n/ja                                      [ No update ]


rkhunter-update-propupdate-screenshot-centos-linux


4. Initiate a first time check and see whether something is not triggering Warnings

# rkhunter –check

rkhunter-checking-for-rootkits-linux-screenshot

As you might have to run the rkhunter multiple times, there is annoying Press Enter prompt, between checks. The idea of it is that you're able to inspect what went on but since usually, inspecting /var/log/rkhunter/rkhunter.log is much more easier, I prefer to skip this with –skip-keypress option.

# rkhunter –check  –skip-keypress


5. Whitelist additional files and dev triggering false warnings alerts


You have to keep in mind many files which are considered to not be officially PCI compatible and potentially dangerous such as lynx browser curl, telnet etc. might trigger Warning, after checking them thoroughfully with some AntiVirus software such as Clamav and checking the MD5 checksum compared to a clean installed .deb / .rpm package on another RootKit, Virus, Spyware etc. Clean system (be it virtual machine or a Testing / Staging) machine you might want to simply whitelist the files which are incorrectly detected as dangerous for the system security.

Again this can be achieved with

PKGMGR_NO_VRFY=

Some Cluster softwares that are preparing their own /dev/ temporary files such as Pacemaker / Corosync might also trigger alarms, so you might want to suppress this as well with ALLOWDEVFILE

ALLOWDEVFILE=/dev/shm/qb-*/qb-*


If Warnings are found check what is the issue and if necessery white list files due to incorrect permissions in /etc/rkhunter.conf .

rkhunter-warnings-found-screenshot

Re-run the check until all appears clean as in below screenshot.

rkhunter-clean-report-linux-screenshot

Fixing Checking for a system logging configuration file [ Warning ]

If you happen to get some message like, message appears when rkhunter -C is done on legacy CentOS release 6.10 (Final) servers:

[13:45:29] Checking for a system logging configuration file [ Warning ]
[13:45:29] Warning: The 'systemd-journald' daemon is running, but no configuration file can be found.
[13:45:29] Checking if syslog remote logging is allowed [ Allowed ]

To fix it, you will have to disable SYSLOG_CONFIG_FILE at all.
 

SYSLOG_CONFIG_FILE=NONE

How to move transfer binary files encoded with base64 on Linux with Copy Paste of text ASCII encoded string

Monday, October 25th, 2021

base64-encode-decode-binary-files-to-transfer-between-servers-base64-artistic-logo

If you have to work on servers in a protected environments that are accessed via multiple VPNs, Jump hosts or Web Citrix and you have no mean to copy binary files to your computer or from your computer because you have all kind of FTP / SFTP or whatever Data Copy clients disabled on remote jump host side or CITRIX server and you still are looking for a way to copy files between your PC and the Remote server Side.
Or for example if you have 2 or more servers that are in a special Demilitarized Network Zones ( DMZ ) and the machines does not have SFTP / FTP / WebServer or other kind of copy protocol service that can be used to copy files between the hosts and you still need to copy some files between the 2 or more machines in a slow but still functional way, then you might not know of one old school hackers trick you can employee to complete the copy of files between DMZ-ed Server Host A lets say with IP address (192.168.50.5) -> Server Host B (192.168.30.7). The way to complete the binary file copy is to Encode the binary on Server Host A and then, use cat  command to display the encoded string and copy whole encoded cat command output  to your (local PC buffer from where you access the remote side via SSH via the CITRIX or Jump host.). Then decode the encoded file with an encoding tool such as base64 or uuencode. In this article, I'll show how this is done with base64 and uuencode. Base64 binary is pretty standard in most Linux / Unix OS-es today on most Linux distributions it is part of the coreutils package.
The main use of base64 encoding to encode non-text Attachment files to Electronic Mail, but for our case it fits perfectly.
Keep in mind, that this hack to copy the binary from Machine A to Machine B of course depends on the Copy / Paste buffer being enabled both on remote Jump host or Citrix from where you reach the servers as well as your own PC laptop from where you access the remote side.

base64-character-encoding-string-table

Base64 Encoding and Decoding text strings legend

The file copy process to the highly secured PCI host goes like this:
 

1. On Server Host A encode with md5sum command

[root@serverA ~]:# md5sum -b /tmp/inputbinfile-to-encode
66c4d7b03ed6df9df5305ae535e40b7d *inputbinfile-to-encode


As you see one good location to encode the file would be /tmp as this is a temporary home or you can use alternatively your HOME dir

but you have to be quite careful to not run out of space if you produce it anywhere 🙂


2. Encode the binary file with base64 encoding

 [root@serverB ~]:# base64 -w0 inputbinfile-to-encode > outputbin-file.base64

The -w0 option is given to disable line wrapping. Line wrapping is perhaps not needed if you will copy paste the data.

base64-encoded-binary-file-text-string-linux-screenshot

Base64 Encoded string chunk with line wrapping

For a complete list of possible accepted arguments check here.

3. Cat the inputbinfile-to-encode just generated to display the text encoded file in your SecureCRT / Putty / SuperPutty etc. remote ssh access client

[root@serverA ~]:# cat /tmp/inputbinfile-to-encode
f0VMRgIBAQAAAAAAAAAAAAMAPgABAAAAMGEAAAAAAABAAAAAAAAAACgXAgAAAAAAAAAAA
EAAOAALAEAAHQAcAAYAAAAEAAA ……………………………………………………………… cTD6lC+ViQfUCPn9bs


4. Select the cat-ted string and copy it to your PC Copy / Paste buffer


If the bin file is not few kilobytes, but few megabytes copying the file might be tricky as the string produced from cat command would be really long, so make sure the SSH client you're using is configured to have a large buffer to scroll up enough and be able to select the whole encoded string until the end of the cat command and copy it to Copy / Paste buffer.


5. On Server Host B paste the bas64 encoded binary inside a newly created file

Open with a text editor vim / mc or whatever is available

[root@serverB ~]:# vi inputbinfile-to-encode

Some very paranoid Linux / UNIX systems might not have even a normal text editor like 'vi' if you happen to need to copy files on such one a useful thing is to use a simple cat on the remote side to open a new File Descriptor buffer, like this:

[root@server2 ~]:# cat >> inputbinfile-to-encode <<'EOF'
Paste the string here


6. Decode the encoded binary with base64 cmd again

[root@serverB ~]:# base64 –decode outputbin-file.base64 > inputbinfile-to-encode


7. Set proper file permissions (the same as on Host A)

[root@serverB ~]:#  chmod +x inputbinfile-to-encode


8. Check again the binary file checksum on Host B is identical as on Host A

[root@serverB ~]:# md5sum -b inputbinfile-to-encode
66c4d7b03ed6df9df5305ae535e40b7d *inputbinfile-to-encode

As you can md5sum match on both sides so file should be OK.


9. Encoding and decoding files with uuencode


If you are lucky and you have uuencode installed (sharutils) package is present on remote machine to encode lets say an archived set of binary files in .tar.gz format do:

Prepare the archive of all the files you want to copy with tar on Host A:

[root@Machine1 ~]:#  tar -czvf /bin/whatever /usr/local/bin/htop /usr/local/bin/samhain /etc/hosts archived-binaries-and-configs.tar.gz

[root@Machine1 ~]:# uuencode archived-binaries-and-configs.tar.gz archived-binaries-and-configs.uu

Cat / Copy / paste the encoded content as usual to a file on Host B:

Then on Machine 2 decode:

[root@Machine2 ~]:# uuencode -c < archived-binaries-and-configs.tar.gz.uu


Conclusion


In this short method I've shown you a hack that is used often by script kiddies to copy over files between pwn3d machines, a method which however is very precious and useful for sysadmins like me who has to admin a paranoid secured servers that are placed in a very hard to access environments.

With the same method you can encode or decode not only binary file but also any standard input/output file content. base64 encoding is quite useful stuff to use also in bash scripts or perl where you want to have the script copy file in a plain text format . Datas are encoded and decoded to make the data transmission and storing process easier. You have to keep in mind always that Encoding and Decoding are not similar to encryption and decryption as encr. deprytion gives a special security layers to the encoded that. Encoded data can be easily revealed by decoding, so if you need to copy between the servers very sensitive data like SSL certificates Private RSA / DSA key, this command line utility tool better to be not used for sesitive data copying.


Apache disable requests to not log to access.log Logfile through SetEnvIf and dontlog httpd variables

Monday, October 11th, 2021

apache-disable-certain-strings-from-logging-to-access-log-logo

Logging to Apache access.log is mostly useful as this is a great way to keep log on who visited your website and generate periodic statistics with tools such as Webalizer or Astats to keep track on your visitors and generate various statistics as well as see the number of new visitors as well most visited web pages (the pages which mostly are attracting your web visitors), once the log analysis tool generates its statistics, it can help you understand better which Web spiders visit your website the most (as spiders has a predefined) IP addresses, which can give you insight on various web spider site indexation statistics on Google, Yahoo, Bing etc. . Sometimes however either due to bugs in web spiders algorithms or inconsistencies in your website structure, some of the web pages gets double visited records inside the logs, this could happen for example if your website uses to include iframes.

Having web pages accessed once but logged to be accessed twice hence is erroneous and unwanted, and though that usually have to be fixed by the website programmers, if such approach is not easily doable in the moment and the website is running on critical production system, the double logging of request can be omitted thanks to a small Apache log hack with SetEnvIf Apache config directive. Even if there is no double logging inside Apache log happening it could be that some cron job or automated monitoring scripts or tool such as monit is making periodic requests to Apache and this is garbling your Log Statistics results.

In this short article hence I'll explain how to do remove certain strings to not get logged inside /var/log/httpd/access.log.

1. Check SetEnvIf is Loaded on the Webserver
 

On CentOS / RHEL Linux:

# /sbin/apachectl -M |grep -i setenvif
AH00558: httpd: Could not reliably determine the server's fully qualified domain name, using localhost.localdomain. Set the 'ServerName' directive globally to suppress this message
 setenvif_module (shared)


On Debian / Ubuntu Linux:

/usr/sbin/apache2ctl -M |grep -i setenvif
AH00548: NameVirtualHost has no effect and will be removed in the next release /etc/apache2/sites-enabled/000-default.conf:1
 setenvif_module (shared)


2. Using SetEnvIf to omit certain string to get logged inside apache access.log


SetEnvIf could be used either in some certain domain VirtualHost configuration (if website is configured so), or it can be set as a global Apache rule from the /etc/httpd/conf/httpd.conf 

To use SetEnvIf  you have to place it inside a <Directory …></Directory> configuration block, if it has to be enabled only for a Certain Apache configured directory, otherwise you have to place it in the global apache config section.

To be able to use SetEnvIf, only in a certain directories and subdirectories via .htaccess, you will have defined in <Directory>

AllowOverride FileInfo


The general syntax to omit a certain Apache repeating string from keep logging with SetEnvIf is as follows:
 

SetEnvIf Request_URI "^/WebSiteStructureDirectory/ACCESS_LOG_STRING_TO_REMOVE$" dontlog


General syntax for SetEnvIf is as follows:

SetEnvIf attribute regex env-variable

SetEnvIf attribute regex [!]env-variable[=value] [[!]env-variable[=value]] …

Below is the overall possible attributes to pass as described in mod_setenvif official documentation.
 

  • Host
  • User-Agent
  • Referer
  • Accept-Language
  • Remote_Host: the hostname (if available) of the client making the request.
  • Remote_Addr: the IP address of the client making the request.
  • Server_Addr: the IP address of the server on which the request was received (only with versions later than 2.0.43).
  • Request_Method: the name of the method being used (GET, POST, etc.).
  • Request_Protocol: the name and version of the protocol with which the request was made (e.g., "HTTP/0.9", "HTTP/1.1", etc.).
  • Request_URI: the resource requested on the HTTP request line – generally the portion of the URL following the scheme and host portion without the query string.

Next locate inside the configuration the line:

CustomLog /var/log/apache2/access.log combined


To enable filtering of included strings, you'll have to append env=!dontlog to the end of line.


CustomLog /var/log/apache2/access.log combined env=!dontlog


You might be using something as cronolog for log rotation to prevent your WebServer logs to become too big in size and hard to manage, you can append env=!dontlog to it in same way.

If you haven't used cronolog is it is perhaps best to show you the package description.

server:~# apt-cache show cronolog|grep -i description -A10 -B5
Version: 1.6.2+rpk-2
Installed-Size: 63
Maintainer: Debian QA Group <packages@qa.debian.org>
Architecture: amd64
Depends: perl:any, libc6 (>= 2.4)
Description-en: Logfile rotator for web servers
 A simple program that reads log messages from its input and writes
 them to a set of output files, the names of which are constructed
 using template and the current date and time.  The template uses the
 same format specifiers as the Unix date command (which are the same
 as the standard C strftime library function).
 .
 It intended to be used in conjunction with a Web server, such as
 Apache, to split the access log into daily or monthly logs:
 .
   TransferLog "|/usr/bin/cronolog /var/log/apache/%Y/access.%Y.%m.%d.log"
 .
 A cronosplit script is also included, to convert existing
 traditionally-rotated logs into this rotation format.

Description-md5: 4d5734e5e38bc768dcbffccd2547922f
Homepage: http://www.cronolog.org/
Tag: admin::logging, devel::lang:perl, devel::library, implemented-in::c,
 implemented-in::perl, interface::commandline, role::devel-lib,
 role::program, scope::utility, suite::apache, use::organizing,
 works-with::logfile
Section: web
Priority: optional
Filename: pool/main/c/cronolog/cronolog_1.6.2+rpk-2_amd64.deb
Size: 27912
MD5sum: 215a86766cc8d4434cd52432fd4f8fe7

If you're using cronolog to daily rotate the access.log and you need to filter out the strings out of the logs, you might use something like in httpd.conf:


CustomLog "|/usr/bin/cronolog –symlink=/var/log/httpd/access.log /var/log/httpd/access.log_%Y_%m_%d" combined env=!dontlog


3. Disable Apache logging access.log from certain USERAGENT browser
 

You can do much more with SetEnvIf for example you might want to omit logging requests from a UserAgent (browser) to end up in /dev/null (nowhere), e.g. prevent any Website requests originating from Internet Explorer (MSIE) to not be logged.

SetEnvIf User_Agent "(MSIE)" dontlog

CustomLog /var/log/apache2/access.log combined env=!dontlog


4. Disable Apache logging from requests coming from certain FQDN (Fully Qualified Domain Name) localhost 127.0.0.1 or concrete IP / IPv6 address

SetEnvIf Remote_Host "dns.server.com$" dontlog

CustomLog /var/log/apache2/access.log combined env=!dontlog


Of course for this to work, your website should have a functioning DNS servers and Apache should be configured to be able to resolve remote IPs to back resolve to their respective DNS defined Hostnames.

SetEnvIf recognized also perl PCRE Regular Expressions, if you want to filter out of Apache access log requests incoming from multiple subdomains starting with a certain domain hostname.


SetEnvIf Remote_Host "^example" dontlog

– To not log anything coming from localhost.localdomain address ( 127.0.0.1 ) as well as from some concrete IP address :

SetEnvIf Remote_Addr "127\.0\.0\.1" dontlog

SetEnvIf Remote_Addr "192\.168\.1\.180" dontlog

– To disable IPv6 requests that be coming at the log even though you don't happen to use IPv6 at all

SetEnvIf Request_Addr "::1" dontlog

CustomLog /var/log/apache2/access.log combined env=!dontlog


– Note here it is obligatory to escape the dots '.'


5. Disable robots.txt Web Crawlers requests from being logged in access.log

SetEnvIf Request_URI "^/robots\.txt$" dontlog

CustomLog /var/log/apache2/access.log combined env=!dontlog

Using SetEnvIfNoCase to read incoming useragent / Host / file requests case insensitve

The SetEnvIfNoCase is to be used if you want to threat incoming originators strings as case insensitive, this is useful to omit extraordinary regular expression SetEnvIf rules for lower upper case symbols.

SetEnvIFNoCase User-Agent "Slurp/cat" dontlog
SetEnvIFNoCase User-Agent "Ask Jeeves/Teoma" dontlog
SetEnvIFNoCase User-Agent "Googlebot" dontlog
SetEnvIFNoCase User-Agent "bingbot" dontlog
SetEnvIFNoCase Remote_Host "fastsearch.net$" dontlog

Omit from access.log logging some standard web files .css , .js .ico, .gif , .png and Referrals from own domain

Sometimes your own site scripts do refer to stuff on your own domain that just generates junks in the access.log to keep it off.

SetEnvIfNoCase Request_URI "\.(gif)|(jpg)|(png)|(css)|(js)|(ico)|(eot)$" dontlog


SetEnvIfNoCase Referer "www\.myowndomain\.com" dontlog

CustomLog /var/log/apache2/access.log combined env=!dontlog


6. Disable Apache requests in access.log and error.log completely


Sometimes at rare cases the produced Apache logs and error log is really big and you already have the requests logged in another F5 Load Balancer or Haproxy in front of Apache WebServer or alternatively the logging is not interesting at all as the Web Application served written in ( Perl / Python / Ruby ) does handle the logging itself. 
I've earlier described how this is done in a good amount of details in previous article Disable Apache access.log and error.log logging on Debian Linux and FreeBSD

To disable it you will have to comment out CustomLog or set it to together with ErrorLog to /dev/null in apache2.conf / httpd.conf (depending on the distro)
 

CustomLog /dev/null
ErrorLog /dev/null


7. Restart Apache WebServer to load settings
 

An important to mention is in case you have Webserver with multiple complex configurations and there is a specific log patterns to omit from logs it might be a very good idea to:

a. Create /etc/httpd/conf/dontlog.conf / etc/apache2/dontlog.conf
add inside all your custom dontlog configurations
b. Include dontlog.conf from /etc/httpd/conf/httpd.conf / /etc/apache2/apache2.conf

Finally to make the changes take affect, of course you will need to restart Apache webserver depending on the distro and if it is with systemd or System V:

For systemd RPM based distro:

systemctl restart httpd

or for Deb based Debian etc.

systemctl apache2 restart

On old System V scripts systems:

On RedHat / CentOS etc. restart Apache with:
 

/etc/init.d/httpd restart


On Deb based SystemV:
 

/etc/init.d/apache2 restart


What we learned ?
 

We have learned about SetEnvIf how it can be used to prevent certain requests strings getting logged into access.log through dontlog, how to completely stop certain browser based on a useragent from logging to the access.log as well as how to omit from logging certain requests incoming from certain IP addresses / IPv6 or FQDNs and how to stop robots.txt from being logged to httpd log.


Finally we have learned how to completely disable Apache logging if logging is handled by other external application.
 

Install and enable Sysstats IO / DIsk / CPU / Network monitoring console suite on Redhat 8.3, Few sar useful command examples

Tuesday, September 28th, 2021

linux-sysstat-monitoring-logo


Why to monitoring CPU, Memory, Hard Disk, Network usage etc. with sysstats tools?
 

Using system monitoring tools such as Zabbix, Nagios Monit is a good approach, however sometimes due to zabbix server interruptions you might not be able to track certain aspects of system performance on time. Thus it is always a good idea to 
Gain more insights on system peroformance from command line. Of course there is cmd tools such as iostat and top, free, vnstat that provides plenty of useful info on system performance issues or bottlenecks. However from my experience to have a better historical data that is systimized and all the time accessible from console it is a great thing to have sysstat package at place. Since many years mostly on every server I administer, I've been using sysstats to monitor what is going on servers over a short time frames and I'm quite happy with it. In current company we're using Redhats and CentOS-es and I had to install sysstats on Redhat 8.3. I've earlier done it multiple times on Debian / Ubuntu Linux and while I've faced on some .deb distributions complications of making sysstat collect statistics I've come with an article on Howto fix sysstat Cannot open /var/log/sysstat/sa no such file or directory” on Debian / Ubuntu Linux
 

Sysstat contains the following tools related to collecting I/O and CPU statistics:
iostat
Displays an overview of CPU utilization, along with I/O statistics for one or more disk drives.
mpstat
Displays more in-depth CPU statistics.
Sysstat also contains tools that collect system resource utilization data and create daily reports based on that data. These tools are:
sadc
Known as the system activity data collector, sadc collects system resource utilization information and writes it to a file.
sar
Producing reports from the files created by sadc, sar reports can be generated interactively or written to a file for more intensive analysis.

My experience with CentOS 7 and Fedora to install sysstat it was pretty straight forward, I just had to install it via yum install sysstat wait for some time and use sar (System Activity Reporter) tool to report collected system activity info stats over time.
Unfortunately it seems on RedHat 8.3 as well as on CentOS 8.XX instaling sysstats does not work out of the box.

To complete a successful installation of it on RHEL 8.3, I had to:

[root@server ~]# yum install -y sysstat


To make sysstat enabled on the system and make it run, I've enabled it in sysstat

[root@server ~]# systemctl enable sysstat


Running immediately sar command, I've faced the shitty error:


Cannot open /var/log/sysstat/sa18:
No such file or directory. Please check if data collecting is enabled”


Once installed I've waited for about 5 minutes hoping, that somehow automatically sysstat would manage it but it didn't.

To solve it, I've had to create additionally file /etc/cron.d/sysstat (weirdly RPM's post install instructions does not tell it to automatically create it)

[root@server ~]# vim /etc/cron.d/sysstat

# run system activity accounting tool every 10 minutes
0 * * * * root /usr/lib64/sa/sa1 60 59 &
# generate a daily summary of process accounting at 23:53
53 23 * * * root /usr/lib64/sa/sa2 -A &


  • /usr/local/lib/sa1 is a shell script that we can use for scheduling cron which will create daily binary log file.
  • /usr/local/lib/sa2 is a shell script will change binary log file to human-readable form.


[root@server ~]# chmod 600 /etc/cron.d/sysstat

[root@server ~]# systemctl restart sysstat


In a while if sysstat is working correctly you should get produced its data history logs inside /var/log/sa

[root@server ~]# ls -al /var/log/sa 


Note that the standard sysstat history files on Debian and other modern .deb based distros such as Debian 10 (in  y.2021) is stored under /var/log/sysstat

Here is few useful uses of sysstat cmds


1. Check with sysstat machine history SWAP and RAM Memory use


To lets say check last 10 minutes SWAP memory use:

[hipo@server yum.repos.d] $ sar -W  |last -n 10
 

Linux 4.18.0-240.el8.x86_64 (server)       09/28/2021      _x86_64_        (8 CPU)

12:00:00 AM  pswpin/s pswpout/s
12:00:01 AM      0.00      0.00
12:01:01 AM      0.00      0.00
12:02:01 AM      0.00      0.00
12:03:01 AM      0.00      0.00
12:04:01 AM      0.00      0.00
12:05:01 AM      0.00      0.00
12:06:01 AM      0.00      0.00

[root@ccnrlb01 ~]# sar -r | tail -n 10
14:00:01        93008   1788832     95.06         0   1357700    725740      9.02    795168    683484        32
14:10:01        78756   1803084     95.81         0   1358780    725740      9.02    827660    652248        16
14:20:01        92844   1788996     95.07         0   1344332    725740      9.02    813912    651620        28
14:30:01        92408   1789432     95.09         0   1344612    725740      9.02    816392    649544        24
14:40:01        91740   1790100     95.12         0   1344876    725740      9.02    816948    649436        36
14:50:01        91688   1790152     95.13         0   1345144    725740      9.02    817136    649448        36
15:00:02        91544   1790296     95.14         0   1345448    725740      9.02    817472    649448        36
15:10:01        91108   1790732     95.16         0   1345724    725740      9.02    817732    649340        36
15:20:01        90844   1790996     95.17         0   1346000    725740      9.02    818016    649332        28
Average:        93473   1788367     95.03         0   1369583    725074      9.02    800965    671266        29


2. Check system load? Are my processes waiting too long to run on the CPU?

[root@server ~ ]# sar -q |head -n 10
Linux 4.18.0-240.el8.x86_64 (server)       09/28/2021      _x86_64_        (8 CPU)

12:00:00 AM   runq-sz  plist-sz   ldavg-1   ldavg-5  ldavg-15   blocked
12:00:01 AM         0       272      0.00      0.02      0.00         0
12:01:01 AM         1       271      0.00      0.02      0.00         0
12:02:01 AM         0       268      0.00      0.01      0.00         0
12:03:01 AM         0       268      0.00      0.00      0.00         0
12:04:01 AM         1       271      0.00      0.00      0.00         0
12:05:01 AM         1       271      0.00      0.00      0.00         0
12:06:01 AM         1       265      0.00      0.00      0.00         0


3. Show various CPU statistics per CPU use
 

On a multiprocessor, multi core server sometimes for scripting it is useful to fetch processor per use historic data, 
this can be attained with:


[hipo@server ~ ] $ mpstat -P ALL
Linux 4.18.0-240.el8.x86_64 (server)       09/28/2021      _x86_64_        (8 CPU)

06:08:38 PM  CPU    %usr   %nice    %sys %iowait    %irq   %soft  %steal  %guest  %gnice   %idle
06:08:38 PM  all    0.17    0.02    0.25    0.00    0.05    0.02    0.00    0.00    0.00   99.49
06:08:38 PM    0    0.22    0.02    0.28    0.00    0.06    0.03    0.00    0.00    0.00   99.39
06:08:38 PM    1    0.28    0.02    0.36    0.00    0.08    0.02    0.00    0.00    0.00   99.23
06:08:38 PM    2    0.27    0.02    0.31    0.00    0.06    0.01    0.00    0.00    0.00   99.33
06:08:38 PM    3    0.15    0.02    0.22    0.00    0.03    0.01    0.00    0.00    0.00   99.57
06:08:38 PM    4    0.13    0.02    0.20    0.01    0.03    0.01    0.00    0.00    0.00   99.60
06:08:38 PM    5    0.14    0.02    0.27    0.00    0.04    0.06    0.01    0.00    0.00   99.47
06:08:38 PM    6    0.10    0.02    0.17    0.00    0.04    0.02    0.00    0.00    0.00   99.65
06:08:38 PM    7    0.09    0.02    0.15    0.00    0.02    0.01    0.00    0.00    0.00   99.70


sar-sysstat-cpu-statistics-screenshot

Monitor processes and threads currently being managed by the Linux kernel.

[hipo@server ~ ] $ pidstat

pidstat-various-random-process-statistics

[hipo@server ~ ] $ pidstat -d 2


pidstat-show-processes-with-most-io-activities-linux-screenshot

This report tells us that there is few processes with heave I/O use Filesystem system journalling daemon jbd2, apache, mysqld and supervise, in 3rd column you see their respective PID IDs.

To show threads used inside a process (like if you press SHIFT + H) inside Linux top command:

[hipo@server ~ ] $ pidstat -t -p 10765 1 3

Linux 4.19.0-14-amd64 (server)     28.09.2021     _x86_64_    (10 CPU)

21:41:22      UID      TGID       TID    %usr %system  %guest   %wait    %CPU   CPU  Command
21:41:23      108     10765         –    1,98    0,99    0,00    0,00    2,97     1  mysqld
21:41:23      108         –     10765    0,00    0,00    0,00    0,00    0,00     1  |__mysqld
21:41:23      108         –     10768    0,00    0,00    0,00    0,00    0,00     0  |__mysqld
21:41:23      108         –     10771    0,00    0,00    0,00    0,00    0,00     5  |__mysqld
21:41:23      108         –     10784    0,00    0,00    0,00    0,00    0,00     7  |__mysqld
21:41:23      108         –     10785    0,00    0,00    0,00    0,00    0,00     6  |__mysqld
21:41:23      108         –     10786    0,00    0,00    0,00    0,00    0,00     2  |__mysqld

10765 – is the Process ID whose threads you would like to list

With pidstat, you can further monitor processes for memory leaks with:

[hipo@server ~ ] $ pidstat -r 2


4. Report paging statistics for some old period


[root@server ~ ]# sar -B -f /var/log/sa/sa27 |head -n 10
Linux 4.18.0-240.el8.x86_64 (server)       09/27/2021      _x86_64_        (8 CPU)

15:42:26     LINUX RESTART      (8 CPU)

15:55:30     LINUX RESTART      (8 CPU)

04:00:01 PM  pgpgin/s pgpgout/s   fault/s  majflt/s  pgfree/s pgscank/s pgscand/s pgsteal/s    %vmeff
04:01:01 PM      0.00     14.47    629.17      0.00    502.53      0.00      0.00      0.00      0.00
04:02:01 PM      0.00     13.07    553.75      0.00    419.98      0.00      0.00      0.00      0.00
04:03:01 PM      0.00     11.67    548.13      0.00    411.80      0.00      0.00      0.00      0.00


5.  Monitor Received RX and Transmitted TX network traffic perl Network interface real time
 

To print out Received and Send traffic per network interface 4 times in a raw

sar-sysstats-network-traffic-statistics-screenshot
 

[hipo@server ~ ] $ sar -n DEV 1 4


To continusly monitor all network interfaces I/O traffic

[hipo@server ~ ] $ sar -n DEV 1


To only monitor a certain network interface lets say loopback interface (127.0.0.1) received / transmitted bytes

[hipo@server yum.repos.d] $  sar -n DEV 1 2|grep -i lo
06:29:53 PM        lo      0.00      0.00      0.00      0.00      0.00      0.00      0.00      0.00
06:29:54 PM        lo      0.00      0.00      0.00      0.00      0.00      0.00      0.00      0.00
Average:           lo      0.00      0.00      0.00      0.00      0.00      0.00      0.00      0.00


6. Monitor block devices use
 

To check block devices use 3 times in a raw
 

[hipo@server yum.repos.d] $ sar -d 1 3


sar-sysstats-blockdevice-statistics-screenshot
 

7. Output server monitoring data in CSV database structured format


For preparing a nice graphs with Excel from CSV strucuted file format, you can dump the collected data as so:

 [root@server yum.repos.d]# sadf -d /var/log/sa/sa27 — -n DEV | grep -v lo|head -n 10
server-name-fqdn;-1;2021-09-27 13:42:26 UTC;LINUX-RESTART    (8 CPU)
# hostname;interval;timestamp;IFACE;rxpck/s;txpck/s;rxkB/s;txkB/s;rxcmp/s;txcmp/s;rxmcst/s;%ifutil
server-name-fqdn;-1;2021-09-27 13:55:30 UTC;LINUX-RESTART    (8 CPU)
# hostname;interval;timestamp;IFACE;rxpck/s;txpck/s;rxkB/s;txkB/s;rxcmp/s;txcmp/s;rxmcst/s;%ifutil
server-name-fqdn;60;2021-09-27 14:01:01 UTC;eth1;19.42;16.12;1.94;1.68;0.00;0.00;0.00;0.00
server-name-fqdn;60;2021-09-27 14:01:01 UTC;eth0;7.18;9.65;0.55;0.78;0.00;0.00;0.00;0.00
server-name-fqdn;60;2021-09-27 14:01:01 UTC;eth2;5.65;5.13;0.42;0.39;0.00;0.00;0.00;0.00
server-name-fqdn;60;2021-09-27 14:02:01 UTC;eth1;18.90;15.55;1.89;1.60;0.00;0.00;0.00;0.00
server-name-fqdn;60;2021-09-27 14:02:01 UTC;eth0;7.15;9.63;0.55;0.74;0.00;0.00;0.00;0.00
server-name-fqdn;60;2021-09-27 14:02:01 UTC;eth2;5.67;5.15;0.42;0.39;0.00;0.00;0.00;0.00

To graph the output data you can use Excel / LibreOffice's Excel equivalent Calc or if you need to dump a CSV sar output and generate it on the fly from a script  use gnuplot 


What we've learned?


How to install and enable on cron sysstats on Redhat and CentOS 8 Linux ? 
How to continuously monitor CPU / Disk and Network, block devices, paging use and processes and threads used by the kernel per process ?  
As well as how to export previously collected data to CSV to import to database or for later use inrder to generate graphic presentation of data.
Cheers ! 🙂


Remove “Windows 7 PC is out of Support” annoying reoccuring warning popup alert

Friday, September 10th, 2021

Windows-7-End-of-life-pc-is-out-of-support-removal-rip-win-7

Since January 15th 2020, Windows 7 which reached its End of Life (EOL)  and is no longer Supported. Windows 7 Service Pack 1 Starter, Home Basic, Home Premium, and Professional installations will display the message


"Your Windows 7 PC is out of support".

The use of Windows 7, since 2020 is steadily declining but some hard core maniacs, who refuse to be in tune with latest fashion do still roll Windows 7 on dedicated VPS Servers (running on Xen / VMWare etc.).
With the reach of End of Support, people who still run Windows 7 have no longer the usual Operating system provided.

  • No security updates
  • No software updates
  • No tech support

Even though running End of Support system is quite dangerous and you might get hacked easily by autometed bot, still for some custom uses and if the Windows 7 Runs behind a solid firewall it could be considered relatively safe.

Microsoft hence made their Windows (remote controlled system) to have an annoying pop up window with the "YOUR WINDOWS 7 PC IS OUT OF SUPPORT" as shown in below screenshot:

windows-7-disable-pc-is-out-of-support-popup-annoying-message-screenshot.

For those who don't plan to migrate from Windows 7 to Windows 10, this message becomes quickly very annoying especially if you happen to access remotely your Windows 7 VPS and use it for simple things as browsing a few news websites or you're a marketer and you use the Windows for accessing Amazon / Ebay from a different country as many Marketers do to access General Webstores emulating access from a remote location. 


Disable "Your Windows 7 PC is out of support" popup alert
 

Luckily it is possible to disable this annoying Your Windows 7 pop-up alert by setting a value key in Windows Registry
DiscontinueEOS to 1.

To do so launch from Administrator command  line cmd.exe prompt (or start it from Windows start menu):

regedit

1. Open Windows Registry Editor and navigate to

HKEY_CURRENT_USER\Software\Microsoft\Windows\CurrentVersion\EOSNotify.

 You will need to set the DWORD DiscontinueEOS value to 1 in the Windows Registry
 

windows-7-disable-pc-is-out-of-support-popup-eosnotify-dword-registry-03-600x366

windows-7-disable-pc-is-out-of-support-popup-discontinueEOS-registry-modify

–  In case EOSNotify key is not available, right-click the CurrentVersion key and select New > Key and name it EOSNotify.

windows-7-disable-pc-is-out-of-support-popup-EOSNotify-create-new-key-600x367

2. Right click anywhere in the right pane and select New > DWORD (32-bit) Value and name it DiscontinueEOS.

3. Set Value data to 1 and click OK.

windows-7-disable-pc-is-out-of-support-popup-edit-dword-32-bit-value-regedit-screenshot.

4. When the new value has been set, Restart the Windows7 computer / Virtual machine, to make sure registry setting take effect.

windows-7-disable-pc-is-out-of-support-popup-discontninueEOS-reg-dword-0x000000001-600x248


To automate the procedure in large environments, you can create a small script using the reg  command load the Registry key or use Windows GPO (Group Policy Object) to enforce the setting across all Active Directory PC members.
 

[HKEY_CURRENT_USER\Software\Microsoft\Windows\CurrentVersion\EOSNotify]
"DiscontinueEOS"=dword:00000001
custom GPO in Active Directory.

To avoid potential issues using a non supported OS, you should start planning to upgrade your Windows 7 clients to Windows 10.

That's it ! Out of support Windows 7  alert should no longer bug you 🙂

Saint Georgi of Sofia “the Newest” Bulgarian Confessor Christian saint martyred 1534 AD during reign of Turkish Sultan Selim in Medieval Serdika (Sofia)

Tuesday, June 1st, 2021

Saint-Martyr-George-of-Sofia-Georgi-Sofijski-in-traditional-wear-kalpak

Troparion, voice 4
With a soul wounded by the love of your God, the wise George the Glorious, he preached to the ungodly, Christ God, trampled with his feeth, the Turkish heresy; and when he adorned himself with the crown of martyrdom, you ascended to the heavenly multitudes: ask Christ God to preserve your homeland, this city (Sofia) and the people who always worship your deeds.

On 26-th of May the Bulgarian Orthodox Church celebrates the memory of one of the great Bulgarian Martyr saints Saint Georgi the Newest.
С~тый Геԝ̀ргїй Софїѝскїй Новѣ̀йшїй) St. Georgi (The Bulgarian equivalent name of George) is one of the 3 saints holding the name Georgi which has confessed Christianity refused to accept islam and accepted Martyrdom for Christ in period of 1396 till year 1530 and one of the 9 famous Sofia city saints. Saint Georgi of Sofia the Newest was named after the highly venerated in Bulgarian just like in whole Christian world saint George.

saint-Georgi-Sofijski-saint-great-martyr-George-and-The-Mother-of-God-iconostasis

St. Georgi was born in the city of Medieval Sofia (Sredetz), fortress of Serdika today’s Sofia in a family of Ivan and Maria – a wealthy and society recognized family of that time. He has born after a fervent and lengthly prayers of his parents who couldn’t have children for a long time and has been given a kid by the prayers of Saint Great Martyr George
It is important to say Georgi (the newest) celebrated on 26-th of May is a different saint from St. Georgi called “the new” whose memory in the Church is commemorated on 11-th of February.

saint-Georgi-Sofijski-noveishij-icon

Miracle making icon of saint Georgi Sofiyski (currently in the Church in yard of Alexandrovska Hospital Sofia)

The young Georgi quickly learned to write and read, a skills that only the most educated people usually coming from noble families could do. His favourite activity
in his free time when he was not in help of his parents was reading the Holy Scriptures.
He was grown by his parents in Christian goodness and fervency for the Christian faith.

Sveti_Georgi_Novi-Sofijski-wall-painting-icon-st-George-Sofia
Aged 25 he orphaned as his beloved father passed away to Christ. Georgi posessesed an extraordinary beauty, sharp mind and virtues, seeing the young man in his grief the local Turkish authorities tried as they usually do to attract the youngster to the islamic faith to make their way to interact with Georgi and do their business easier and most importantly have Georgi in their auhotirities congregation consisting only of people belonging to the islam as it was up to the Ottoman Turkish consistution law of the day.

To attract Georgi, turks first tried with hypocritical kindness and a care for the young to help him raise in the power of authorities of the city, not succeeding with that they have, they have forcefully wrapper the Muslim turban on his head and proclaimed him officially Muslim. Feeling offended by the ungodly deed of this enemies of Christ, immediately the saint throw the imposed turban on the ground and trampled on it.
The enraged muslim crowd seing his public offence for the prophet Muhammed handed him over to the Qadi in the court.

Neither the seductive promises of high office nor the cruel tortures could break the unshakable firmness of his Christian faith. The judge ordered that his body be cut into strips from head to toe and that the wounds received be scorched with dirty candles, which made the martyr’s body so hot that his face could not be seen. But all efforts were in vain.

The final verdict of the judge followed – Georgi to be hanged on the main barn in the city of Sofia, where there was a furnace for melting iron and copper ore. The execution command also stated that his body should remain on the gallows for three days in order to begin to decay, so that the faith of the Christians in the incorruptible relics of the saints and in the resurrection of the dead to be refuted and hence disgrace christianity. However, exhausted from his suffering mrtr. Georgi died at the hands of the executioners before they managed to hang him. To fulfill the command turks, anyhow hung him on a rope to show the sentence has been successfully carried out.

For three days the body hung on the gallows without any sign of decomposition, and on the contrary, an unusual fragrance of the holy relics of the martyr wafted through the barn. His mother sat under the gallows and grieving his beloved son hugged her son’s legs, staying next three three days to her son. The hanging took place on May 26, 1530 (according to other document sources in 1534). Thus on 26th of may the Church set a service in memoriam.

Ancient-Church-ROtonda-St-George-Sofia-Bulgaria

5-th Century Church of Rotonda St. George Centre of Sofia

The-Grave-of-Saint-Georgi-Sofiyski-Grobat-na-sv-Georgi-nai-novi

Saint Georgi Sofiyski / Saint George of Sofia the Newest grave near Rotonda Church Saint George in City Center of Sofia, Bulgari

After the expiration of the sentence, the kadi handed over the body of the martyr to be buried in a Christian way, and the burial was solemnly performed by the then Metropolitan of Sofia Jeremiah in the church “St. the great martyr George the Victorious ”. Now these relics are in obscurity. The mother of the martyr died on the 40th day of George’s death and was buried at her son’s feet.

These events took place during the reign of Sultan Suleiman I Kanuni (the Legislator) also known as Suleiman the Magnificent. This “Golden Age” for the Ottoman Empire was a time of unheard of atrocities against Christians in the territory of the empire and very difficult times for the Bulgarian people. The reign of Suleiman I and his father Selim I was a time of obscurantism and severe persecution of the Christian population, a time during which many Christian new martyrs on Balkans had the courage to defend their faith.

saint-Georgi-Sofijski-newest-icon-painting

The capture, trial and torture of St. George of Sofia The latest took place near the then Sofia. Today the place is located in the yard of the famous Alexandrovska Hospital which was a King’s hospital during the times of Kingdom of Bulgaria after liberation took place from the Turks in 1878 y.. The exact location where martyrdom occured is between street St. Georgi Sofiyski ”and“ Pencho Slaveykov ”Blvd.

There was a large stone cross with an inscription on the site, which a few years after 1944, due to the risk of being destroyed, was collected by Sofia priests and is still preserved in the altar of the church “St. Georgi Pobedonosets ”on Blvd. Partriarch Euthymius”. Until the 1940s, a liturgical procession was held from the place of death of the saint to the Rotunda on May 26.
Nowadays happily, the old Lithia tradition is being renewed and a small Lithia is conducted by Bulgarian Orthodox Christian clergy and layman.

In the garden next to the building of the Second Surgical Clinic there was a stone cross, which indicated the place and history of the martyrdom of the saint, and today a temple was built in honor of the saint.

Church-of-saint-Georgi-Sofijski-in-Alexandrovska-hospital-Sofia-Bulgaria-the-place-of-martyrdom-of-saint-Georgi-Sofijski
source: Lives of the Saints. Synodal Publishing House, Sofia, 1991, edited by Parthenius, Bishop of Lefkada and Archimandrite Dr. Athanasius (Bonchev).

Saint_Georgi-naj-novi_Sofijski

HOLY MARTYR GEORGE OF SOFIA THE NEWEST, PRAY GOD FOR US!

Adding custom user based host IP aliases load custom prepared /etc/hosts from non root user on Linux – Script to allow define IPs that doesn’t have DNS records to user preferred hostname

Wednesday, April 14th, 2021

adding-custom-user-based-host-aliases-etc-hosts-logo-linux

Say you have access to a remote Linux / UNIX / BSD server, i.e. a jump host and you have to remotely access via ssh a bunch of other servers
who have existing IP addresses but the DNS resolver recognized hostnames from /etc/resolv.conf are long and hard to remember by the jump host in /etc/resolv.conf and you do not have a way to include a new alias to /etc/hosts because you don't have superuser admin previleges on the hop station.
To make your life easier you would hence want to add a simplistic host alias to be able to easily do telnet, ssh, curl to some aliased name like s1, s2, s3 … etc.


The question comes then, how can you define the IPs to be resolvable by easily rememberable by using a custom User specific /etc/hosts like definition file? 

Expanding /etc/hosts predefined host resolvable records is pretty simple as most as most UNIX / Linux has the HOSTALIASES environment variable
Hostaliases uses the common technique for translating host names into IP addresses using either getaddrinfo(3) or the obsolete gethostbyname(3). As mentioned in hostname(7), you can set the HOSTALIASES environment variable to point to an alias file, and you've got per-user aliases

create ~/.hosts file

linux:~# vim ~/.hosts

with some content like:
 

g google.com
localhostg 127.0.0.1
s1 server-with-long-host1.fqdn-whatever.com 
s2 server5-with-long-host1.fqdn-whatever.com
s3 server18-with-long-host5.fqdn-whatever.com

linux:~# export HOSTALIASES=$PWD/.hosts

The caveat of hostaliases you should know is this will only works for resolvable IP hostnames.
So if you want to be able to access unresolvable hostnames.
You can use a normal alias for the hostname you want in ~/.bashrc with records like:

alias server-hostname="ssh username@10.10.10.18 -v -o stricthostkeychecking=no -o passwordauthentication=yes -o UserKnownHostsFile=/dev/null"
alias server-hostname1="ssh username@10.10.10.19 -v -o stricthostkeychecking=no -o passwordauthentication=yes -o UserKnownHostsFile=/dev/null"
alias server-hostname2="ssh username@10.10.10.20 -v -o stricthostkeychecking=no -o passwordauthentication=yes -o UserKnownHostsFile=/dev/null"

then to access server-hostname1 simply type it in terminal.

The more elegant solution is to use a bash script like below:

# include below code to your ~/.bashrc
function resolve {
        hostfile=~/.hosts
        if [[ -f “$hostfile” ]]; then
                for arg in $(seq 1 $#); do
                        if [[ “${!arg:0:1}” != “-” ]]; then
                                ip=$(sed -n -e "/^\s*\(\#.*\|\)$/d" -e "/\<${!arg}\>/{s;^\s*\(\S*\)\s*.*$;\1;p;q}" "$hostfile")
                                if [[ -n “$ip” ]]; then
                                        command "${FUNCNAME[1]}" "${@:1:$(($arg-1))}" "$ip" "${@:$(($arg+1)):$#}"
                                        return
                                fi
                        fi
                done
        fi
        command "${FUNCNAME[1]}" "$@"
}

function ping {
        resolve "$@"
}

function traceroute {
        resolve "$@"
}

function ssh {
        resolve "$@"
}

function telnet {
        resolve "$@"
}

function curl {
        resolve "$@"
}

function wget {
        resolve "$@"
}


Now after reloading bash login session $HOME/.bashrc with:

linux:~# source ~/.bashrc

ssh / curl / wget / telnet / traceroute and ping will be possible to the defined ~/.hosts IP addresses just like if it have been defined global wide on System in /etc/hosts.

Enjoy
 

Listing installed RPMs by vendor installed on CentOS / RedHat Linux

Friday, January 8th, 2021

Listing installed RPMs by vendor installed on CentOS / RedHat Linux

Listing installed RPMs by vendor is useful sysadmin stuff if you have third party software installed that is not part of official CentOS / RedHat Linux and you want to only list this packages, here is how this is done


[root@redhat ~]# rpm -qa –qf '%{NAME} %{VENDOR} %{PACKAGER} \n' | grep -v 'CentOS' | sort

criu Virtuozzo Virtuozzo (http://www.virtuozzo.com/support/)
gskcrypt64 IBM IBM
gskssl64 IBM IBM
ipxe-roms-qemu Virtuozzo Virtuozzo (http://www.virtuozzo.com/support/)
libevent (none) (none)
libguestfs-appliance Virtuozzo Virtuozzo (http://www.virtuozzo.com/support/)
libguestfs-tools-c Virtuozzo Virtuozzo (http://www.virtuozzo.com/support/)
libguestfs Virtuozzo Virtuozzo (http://www.virtuozzo.com/support/)
libprlcommon Virtuozzo Virtuozzo (http://www.virtuozzo.com/support/)
libprlsdk-python Virtuozzo Virtuozzo (http://www.virtuozzo.com/support/)
libprlsdk Virtuozzo Virtuozzo (http://www.virtuozzo.com/support/)
libprlxmlmodel Virtuozzo Virtuozzo (http://www.virtuozzo.com/support/)
libtcmu Virtuozzo Virtuozzo (http://www.virtuozzo.com/support/)
libvcmmd Virtuozzo Virtuozzo (http://www.virtuozzo.com/support/)
libvirt-client Virtuozzo Virtuozzo (http://www.virtuozzo.com/support/)
libvirt-daemon-config-nwfilter Virtuozzo Virtuozzo (http://www.virtuozzo.com/support/)
libvirt-daemon-driver-interface Virtuozzo Virtuozzo (http://www.virtuozzo.com/support/)
libvirt-daemon-driver-network Virtuozzo Virtuozzo (http://www.virtuozzo.com/support/)
libvirt-daemon-driver-nodedev Virtuozzo Virtuozzo (http://www.virtuozzo.com/support/)
libvirt-daemon-driver-nwfilter Virtuozzo Virtuozzo (http://www.virtuozzo.com/support/)
libvirt-daemon-driver-qemu Virtuozzo Virtuozzo (http://www.virtuozzo.com/support/)
libvirt-daemon-driver-storage-core Virtuozzo Virtuozzo (http://www.virtuozzo.com/support/)
libvirt-daemon-driver-storage Virtuozzo Virtuozzo (http://www.virtuozzo.com/support/)
libvirt-daemon-kvm Virtuozzo Virtuozzo (http://www.virtuozzo.com/support/)
libvirt-daemon Virtuozzo Virtuozzo (http://www.virtuozzo.com/support/)
libvirt-libs Virtuozzo Virtuozzo (http://www.virtuozzo.com/support/)
libvirt-python Virtuozzo Virtuozzo (http://www.virtuozzo.com/support/)
libvirt Virtuozzo Virtuozzo (http://www.virtuozzo.com/support/)
libvzctl Virtuozzo Virtuozzo (http://www.virtuozzo.com/support/)
libvzevent Virtuozzo Virtuozzo (http://www.virtuozzo.com/support/)
openvz-logos Virtuozzo Virtuozzo (http://www.virtuozzo.com/support/)
p7zip-plugins Fedora Project Fedora Project
ploop-lib Virtuozzo Virtuozzo (http://www.virtuozzo.com/support/)
ploop Virtuozzo Virtuozzo (http://www.virtuozzo.com/support/)
prlctl Virtuozzo Virtuozzo (http://www.virtuozzo.com/support/)
prl-disk-tool Virtuozzo Virtuozzo (http://www.virtuozzo.com/support/)
prl-disp-service Virtuozzo Virtuozzo (http://www.virtuozzo.com/support/)
python2-lockfile Fedora Project Fedora Project
python2-psutil Fedora Project Fedora Project
python-daemon Fedora Project Fedora Project
python-subprocess32 Virtuozzo Virtuozzo (http://www.virtuozzo.com/support/)
qemu-img-vz Virtuozzo Virtuozzo (http://www.virtuozzo.com/support/)
qemu-kvm-common-vz Virtuozzo Virtuozzo (http://www.virtuozzo.com/support/)
qemu-kvm-vz Virtuozzo Virtuozzo (http://www.virtuozzo.com/support/)
qt Virtuozzo Virtuozzo (http://www.virtuozzo.com/support/)
rkhunter Fedora Project Fedora Project
seabios-bin Virtuozzo Virtuozzo (http://www.virtuozzo.com/support/)
seavgabios-bin Virtuozzo Virtuozzo (http://www.virtuozzo.com/support/)
spfs Virtuozzo Virtuozzo (http://www.virtuozzo.com/support/)
TIVsm-API64 IBM (none)
TIVsm-APIcit IBM (none)
TIVsm-BAcit IBM (none)
TIVsm-BA IBM (none)
vcmmd Virtuozzo Virtuozzo (http://www.virtuozzo.com/support/)
vmauth Virtuozzo Virtuozzo (http://www.virtuozzo.com/support/)
vzctl Virtuozzo Virtuozzo (http://www.virtuozzo.com/support/)
vzkernel Virtuozzo Virtuozzo (http://www.virtuozzo.com/support/)
vztt_checker Virtuozzo Virtuozzo (http://www.virtuozzo.com/support/)
vztt-lib Virtuozzo Virtuozzo (http://www.virtuozzo.com/support/)
vztt Virtuozzo Virtuozzo (http://www.virtuozzo.com/support/)
zabbix-agent (none) (none)


That instructs rpm to output each package's name and vendor, then we exclude those from "Red Hat, Inc." (which is the exact string Red Hat conveniently uses in the "vendor" field of all RPMs they pacakge).

By default, rpm -qa uses the format '%{NAME}-%{VERSION}-%{RELEASE}', and it's nice to see version and release, and on 64-bit systems, it's also nice to see the architecture since both 32- and 64-bit packages are often installed. Here's how I did that:

[root@redhat ~]# rpm -qa –qf '%{NAME}-%{VERSION}-%{RELEASE}.%{ARCH} %{VENDOR} %{PACKAGER} \n' | grep -v 'CentOS' | sort

criu-3.10.0.23-1.vz7.x86_64 Virtuozzo Virtuozzo (http://www.virtuozzo.com/support/)
gskcrypt64-8.0-55.17.x86_64 IBM IBM
gskssl64-8.0-55.17.x86_64 IBM IBM
ipxe-roms-qemu-20170123-1.git4e85b27.1.vz7.5.noarch Virtuozzo Virtuozzo (http://www.virtuozzo.com/support/)
libevent-2.0.22-1.rhel7.x86_64 (none) (none)
libguestfs-1.36.10-6.2.vz7.12.x86_64 Virtuozzo Virtuozzo (http://www.virtuozzo.com/support/)
libguestfs-appliance-1.36.10-6.2.vz7.12.x86_64 Virtuozzo Virtuozzo (http://www.virtuozzo.com/support/)
libguestfs-tools-c-1.36.10-6.2.vz7.12.x86_64 Virtuozzo Virtuozzo (http://www.virtuozzo.com/support/)
libprlcommon-7.0.162-1.vz7.x86_64 Virtuozzo Virtuozzo (http://www.virtuozzo.com/support/)
libprlsdk-7.0.226-2.vz7.x86_64 Virtuozzo Virtuozzo (http://www.virtuozzo.com/support/)
libprlsdk-python-7.0.226-2.vz7.x86_64 Virtuozzo Virtuozzo (http://www.virtuozzo.com/support/)
libprlxmlmodel-7.0.80-1.vz7.x86_64 Virtuozzo Virtuozzo (http://www.virtuozzo.com/support/)
libtcmu-1.2.0-16.2.vz7.x86_64 Virtuozzo Virtuozzo (http://www.virtuozzo.com/support/)
libvcmmd-7.0.22-3.vz7.x86_64 Virtuozzo Virtuozzo (http://www.virtuozzo.com/support/)
libvirt-3.9.0-14.vz7.38.x86_64 Virtuozzo Virtuozzo (http://www.virtuozzo.com/support/)
libvirt-client-3.9.0-14.vz7.38.x86_64 Virtuozzo Virtuozzo (http://www.virtuozzo.com/support/)
libvirt-daemon-3.9.0-14.vz7.38.x86_64 Virtuozzo Virtuozzo (http://www.virtuozzo.com/support/)
libvirt-daemon-config-nwfilter-3.9.0-14.vz7.38.x86_64 Virtuozzo Virtuozzo (http://www.virtuozzo.com/support/)
libvirt-daemon-driver-interface-3.9.0-14.vz7.38.x86_64 Virtuozzo Virtuozzo (http://www.virtuozzo.com/support/)
libvirt-daemon-driver-network-3.9.0-14.vz7.38.x86_64 Virtuozzo Virtuozzo (http://www.virtuozzo.com/support/)
libvirt-daemon-driver-nodedev-3.9.0-14.vz7.38.x86_64 Virtuozzo Virtuozzo (http://www.virtuozzo.com/support/)
libvirt-daemon-driver-nwfilter-3.9.0-14.vz7.38.x86_64 Virtuozzo Virtuozzo (http://www.virtuozzo.com/support/)
libvirt-daemon-driver-qemu-3.9.0-14.vz7.38.x86_64 Virtuozzo Virtuozzo (http://www.virtuozzo.com/support/)
libvirt-daemon-driver-storage-3.9.0-14.vz7.38.x86_64 Virtuozzo Virtuozzo (http://www.virtuozzo.com/support/)
libvirt-daemon-driver-storage-core-3.9.0-14.vz7.38.x86_64 Virtuozzo Virtuozzo (http://www.virtuozzo.com/support/)
libvirt-daemon-kvm-3.9.0-14.vz7.38.x86_64 Virtuozzo Virtuozzo (http://www.virtuozzo.com/support/)
libvirt-libs-3.9.0-14.vz7.38.x86_64 Virtuozzo Virtuozzo (http://www.virtuozzo.com/support/)
libvirt-python-3.9.0-1.vz7.1.x86_64 Virtuozzo Virtuozzo (http://www.virtuozzo.com/support/)
libvzctl-7.0.506-1.vz7.x86_64 Virtuozzo Virtuozzo (http://www.virtuozzo.com/support/)
libvzevent-7.0.7-5.vz7.x86_64 Virtuozzo Virtuozzo (http://www.virtuozzo.com/support/)
openvz-logos-70.0.13-1.vz7.noarch Virtuozzo Virtuozzo (http://www.virtuozzo.com/support/)
p7zip-plugins-16.02-10.el7.x86_64 Fedora Project Fedora Project
ploop-7.0.137-1.vz7.x86_64 Virtuozzo Virtuozzo (http://www.virtuozzo.com/support/)
ploop-lib-7.0.137-1.vz7.x86_64 Virtuozzo Virtuozzo (http://www.virtuozzo.com/support/)
prlctl-7.0.164-1.vz7.x86_64 Virtuozzo Virtuozzo (http://www.virtuozzo.com/support/)
prl-disk-tool-7.0.43-1.vz7.x86_64 Virtuozzo Virtuozzo (http://www.virtuozzo.com/support/)
prl-disp-service-7.0.925-1.vz7.x86_64 Virtuozzo Virtuozzo (http://www.virtuozzo.com/support/)
python2-lockfile-0.11.0-17.el7.noarch Fedora Project Fedora Project
python2-psutil-5.6.7-1.el7.x86_64 Fedora Project Fedora Project
python-daemon-1.6-4.el7.noarch Fedora Project Fedora Project
python-subprocess32-3.2.7-1.vz7.5.x86_64 Virtuozzo Virtuozzo (http://www.virtuozzo.com/support/)
qemu-img-vz-2.10.0-21.7.vz7.67.x86_64 Virtuozzo Virtuozzo (http://www.virtuozzo.com/support/)
qemu-kvm-common-vz-2.10.0-21.7.vz7.67.x86_64 Virtuozzo Virtuozzo (http://www.virtuozzo.com/support/)
qemu-kvm-vz-2.10.0-21.7.vz7.67.x86_64 Virtuozzo Virtuozzo (http://www.virtuozzo.com/support/)
qt-4.8.7-2.vz7.2.x86_64 Virtuozzo Virtuozzo (http://www.virtuozzo.com/support/)
rkhunter-1.4.6-2.el7.noarch Fedora Project Fedora Project
seabios-bin-1.10.2-3.1.vz7.3.noarch Virtuozzo Virtuozzo (http://www.virtuozzo.com/support/)
seavgabios-bin-1.10.2-3.1.vz7.3.noarch Virtuozzo Virtuozzo (http://www.virtuozzo.com/support/)
spfs-0.09.0010-1.vz7.x86_64 Virtuozzo Virtuozzo (http://www.virtuozzo.com/support/)
TIVsm-API64-8.1.11-0.x86_64 IBM (none)
TIVsm-APIcit-8.1.11-0.x86_64 IBM (none)
TIVsm-BA-8.1.11-0.x86_64 IBM (none)
TIVsm-BAcit-8.1.11-0.x86_64 IBM (none)
vcmmd-7.0.160-1.vz7.x86_64 Virtuozzo Virtuozzo (http://www.virtuozzo.com/support/)
vmauth-7.0.10-2.vz7.x86_64 Virtuozzo Virtuozzo (http://www.virtuozzo.com/support/)
vzctl-7.0.194-1.vz7.x86_64 Virtuozzo Virtuozzo (http://www.virtuozzo.com/support/)
vzkernel-3.10.0-862.11.6.vz7.64.7.x86_64 Virtuozzo Virtuozzo (http://www.virtuozzo.com/support/)
vzkernel-3.10.0-862.20.2.vz7.73.29.x86_64 Virtuozzo Virtuozzo (http://www.virtuozzo.com/support/)
vztt-7.0.63-1.vz7.x86_64 Virtuozzo Virtuozzo (http://www.virtuozzo.com/support/)
vztt_checker-7.0.2-1.vz7.i686 Virtuozzo Virtuozzo (http://www.virtuozzo.com/support/)
vztt_checker-7.0.2-1.vz7.x86_64 Virtuozzo Virtuozzo (http://www.virtuozzo.com/support/)
vztt-lib-7.0.63-1.vz7.x86_64 Virtuozzo Virtuozzo (http://www.virtuozzo.com/support/)
zabbix-agent-3.2.11-1.el7.x86_64 (none) (none)