Posts Tagged ‘configure’

Report haproxy node switch script useful for Zabbix or other monitoring

Tuesday, June 9th, 2020

zabbix-monitoring-logo
For those who administer corosync clustered haproxy and needs to build monitoring in case if the main configured Haproxy node in the cluster is changed, I've developed a small script to be integrated with zabbix-agent installed to report to a central zabbix server via a zabbix proxy.
The script  is very simple it assumed DC1 variable is the default used haproxy node and DC2 and DC3 are 2 backup nodes. The script is made to use crm_mon which is not installed by default on each server by default so if you'll be using it you'll have to install it first, but anyways the script can easily be adapted to use pcs cmd instead.

Below is the bash shell script:

UserParameter=active.dc,f=0; for i in $(sudo /usr/sbin/crm_mon -n -1|grep -i 'Node ' |awk '{ print $2 }'); do ((f++)); DC[$f]="$i"; done; \
DC=$(sudo /usr/sbin/crm_mon -n -1 | grep 'Current DC' | awk '{ print $1 " " $2 " " $3}' | awk '{ print $3 }'); \
if [ “$DC” == “${DC[1]}” ]; then echo “1 Default DC Switched to ${DC[1]}”; elif [ “$DC” == “${DC[2]}” ]; then \
echo "2 Default DC Switched to ${DC[2]}”; elif [ “$DC” == “${DC[3]}” ]; then echo “3 Default DC: ${DC[3]}"; fi


To configure it with zabbix monitoring it can be configured via UserParameterScript.

The way I configured  it in Zabbix is as so:


1. Create the userpameter_active_node.conf

Below script is 3 nodes Haproxy cluster

# cat > /etc/zabbix/zabbix_agentd.d/userparameter_active_node.conf

UserParameter=active.dc,f=0; for i in $(sudo /usr/sbin/crm_mon -n -1|grep -i 'Node ' |awk '{ print $2 }'); do ((f++)); DC[$f]="$i"; done; \
DC=$(sudo /usr/sbin/crm_mon -n -1 | grep 'Current DC' | awk '{ print $1 " " $2 " " $3}' | awk '{ print $3 }'); \
if [ “$DC” == “${DC[1]}” ]; then echo “1 Default DC Switched to ${DC[1]}”; elif [ “$DC” == “${DC[2]}” ]; then \
echo "2 Default DC Switched to ${DC[2]}”; elif [ “$DC” == “${DC[3]}” ]; then echo “3 Default DC: ${DC[3]}"; fi

Once pasted to save the file press CTRL + D


The version of the script with 2 nodes slightly improved is like so:
 

UserParameter=active.dc,f=0; for i in $(sudo /usr/sbin/crm_mon -n -1|grep -i 'Node ' |awk '{ print $2 }' | sed -e 's#:##g'); do DC_ARRAY[$f]=”$i”; ((f++)); done; GET_CURR_DC=$(sudo /usr/sbin/crm_mon -n -1 | grep ‘Current DC’ | awk ‘{ print $1 ” ” $2 ” ” $3}’ | awk ‘{ print $3 }’); if [ “$GET_CURR_DC” == “${DC_ARRAY[0]}” ]; then echo “1 Default DC ${DC_ARRAY[0]}”; fi; if [ “$GET_CURR_DC” == “${DC_ARRAY[1]}” ]; then echo “2 Default Current DC Switched to ${DC_ARRAY[1]} Please check “; fi; if [ -z “$GET_CURR_DC” ] || [ -z “$DC_ARRAY[1]” ]; then printf "Error something might be wrong with HAProxy Cluster on  $HOSTNAME "; fi;


The haproxy_active_DC_zabbix.sh script with a bit of more comments as explanations is available here 
2. Configure access for /usr/sbin/crm_mon for zabbix user in sudoers


# vim /etc/sudoers

zabbix          ALL=NOPASSWD: /usr/sbin/crm_mon


3. Configure in Zabbix for active.dc key Trigger and Item

active-node-switch1

Fix FTP active connection issues “Cannot create a data connection: No route to host” on ProFTPD Linux dedicated server

Tuesday, October 1st, 2019

proftpd-linux-logo

Earlier I've blogged about an encounter problem that prevented Active mode FTP connections on CentOS
As I'm working for a client building a brand new dedicated server purchased from Contabo Dedi Host provider on a freshly installed Debian 10 GNU / Linux, I've had to configure a new FTP server, since some time I prefer to use Proftpd instead of VSFTPD because in my opinion it is more lightweight and hence better choice for a small UNIX server setups. During this once again I've encounted the same ACTIVE FTP not working from FTP server to FTP client host machine. But before shortly explaining, the fix I find worthy to explain briefly what is ACTIVE / PASSIVE FTP connection.


1. What is ACTIVE / PASSIVE FTP connection?
 

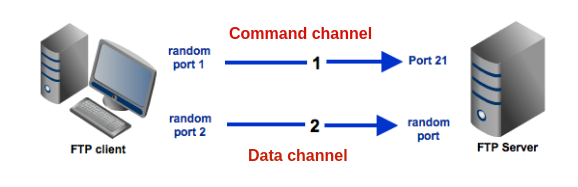
Whether in active mode, the client specifies which client-side port the data channel has been opened and the server starts the connection. Or in other words the default FTP client communication for historical reasons is in ACTIVE MODE. E.g.
Client once connected to Server tells the server to open extra port or ports locally via which the overall FTP data transfer will be occuring. In the early days of networking when FTP protocol was developed security was not of such a big concern and usually Networks did not have firewalls at all and the FTP DATA transfer host machine was running just a single FTP-server and nothing more in this, early days when FTP was not even used over the Internet and FTP DATA transfers happened on local networks, this was not a problem at all.

In passive mode, the server decides which server-side port the client should connect to. Then the client starts the connection to the specified port.

But with the ever increasing complexity of Internet / Networks and the ever tightening firewalls due to viruses and worms that are trying to own and exploit networks creating unnecessery bulk loads this has changed …

active-passive-ftp-explained-diagram
 

2. Installing and configure ProFTPD server Public ServerName

I've installed the server with the common cmd:


apt –yes install proftpd


And the only configuration changed in default configuration file /etc/proftpd/proftpd.conf  was
ServerName          "Debian"

I do this in new FTP setups for the logical reason to prevent the multiple FTP Vulnerability Scan script kiddie Crawlers to know the exact OS version of the server, so this was changed to:


ServerName "MyServerHostname"


Though this is the bad security through obscurity practice doing so is a good practice.
 

3. Create iptable firewall rules to allow ACTIVE FTP mode


But anyways, next step was to configure the firewall to be allowed to communicate on TCP PORT 21 and 20 to incoming source ports range 1024:65535 (to enable ACTIVE FTP) on firewal level with iptables on INPUT and OUTPUT chain rules, like this:


iptables -A INPUT -p tcp –sport 1024:65535 -d 0/0 –dport 21 -m state –state NEW,ESTABLISHED -j ACCEPT
iptables -A INPUT -p tcp -s 0/0 –sport 1024:65535 -d 0/0 –dport 20 -m state –state NEW,ESTABLISHED -j ACCEPT
iptables -A OUTPUT -p tcp -s 0/0 –sport 21 -d 0/0 –dport 1024:65535 -m state –state ESTABLISHED -j ACCEPT
iptables -A OUTPUT -p tcp -s 0/0 –sport 20 -d 0/0 –dport 1024:65535 -m state –state ESTABLISHED,RELATED -j ACCEPT


Talking about Active and Passive FTP connections perhaps for novice Linux users it might be worthy to say few words on Active and Passive FTP connections

Once firewall has enabled FTP Active / Passive connections is on and FTP server is listening, to test all is properly configured check iptable rules and FTP listener:
 

/sbin/iptables -L INPUT |grep ftp
ACCEPT     tcp  —  anywhere             anywhere             tcp spts:1024:65535 dpt:ftp state NEW,ESTABLISHED
ACCEPT     tcp  —  anywhere             anywhere             tcp spts:1024:65535 dpt:ftp-data state NEW,ESTABLISHED
ACCEPT     tcp  —  anywhere             anywhere             tcp dpt:ftp
ACCEPT     tcp  —  anywhere             anywhere             tcp dpt:ftp-data

netstat -l | grep "ftp"
tcp6       0      0 [::]:ftp                [::]:*                  LISTEN    


4. Loading nf_nat_ftp module and net.netfilter.nf_conntrack_helper (for backward compitability)


Next step of course was to add the necessery modules nf_nat_ftp nf_conntrack_sane that makes FTP to properly forward ports with respective Firewall states on any of above source ports which are usually allowed by firewalls, note that the range of ports given 1024:65535 might be too much liberal for paranoid sysadmins and in many cases if ports are not filtered, if you are a security freak you can use some smaller range such as 60000-65535.


Here is time to say for sysadmins who haven't recently had a task to configure a new (unecrypted) File Transfer Server as today Secure FTP is almost alltime used for file transfers for the sake of security might be puzzled to find out the old Linux kernel ip_conntrack_ftp which was the standard module used to make FTP Active connections work is substituted nowadays with  nf_nat_ftp and nf_conntrack_sane.

To make the 2 modules permanently loaded on next boot on Debian Linux they have to be added to /etc/modules

Here is how sample /etc/modules that loads the modules on next system boot looks like

cat /etc/modules
# /etc/modules: kernel modules to load at boot time.
#
# This file contains the names of kernel modules that should be loaded
# at boot time, one per line. Lines beginning with "#" are ignored.
softdog
nf_nat_ftp
nf_conntrack_sane


Next to say is that in newer Linux kernels 3.x / 4.x / 5.x the nf_nat_ftp and nf_conntrack-sane behaviour changed so  simply loading the modules would not work and if you do the stupidity to test it with some FTP client (I used gFTP / ncftp from my Linux desktop ) you are about to get FTP No route to host errors like:


Cannot create a data connection: No route to host


cannot-create-a-data-connection-no-route-to-host-linux-error-howto-fix


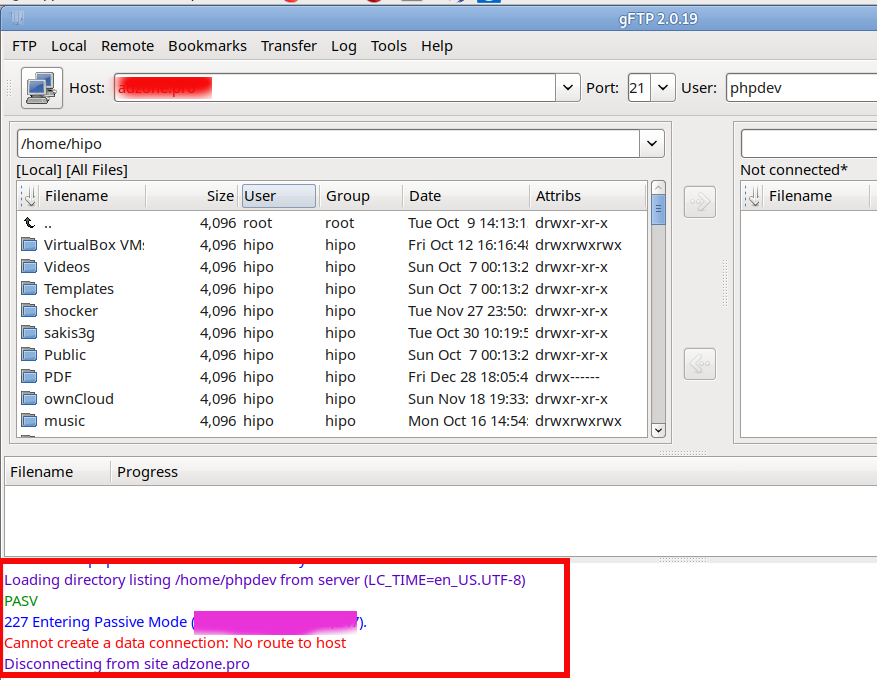
Sometimes, instead of No route to host error the error FTP client might return is:


227 entering passive mode FTP connect connection timed out error


To make the nf_nat_ftp module on newer Linux kernels hence you have to enable backwards compatibility Kernel variable


/proc/sys/net/netfilter/nf_conntrack_helper


echo 1 > /proc/sys/net/netfilter/nf_conntrack_helper


To make it permanent if you have enabled /etc/rc.local legacy one single file boot place as I do on servers – for how to enable rc.local on newer Linuxes check here

or alternatively add it to load via sysctl

sysctl -w net.netfilter.nf_conntrack_helper=1

And to make change permanent (e.g. be loaded on next boot)

echo 'net.netfilter.nf_conntrack_helper=1' >> /etc/sysctl.conf


5. Enable PassivePorts in ProFTPD or PassivePortRange in PureFTPD


Last but not least open /etc/proftpd/proftpd.conf find PassivePorts config value (commented by default) and besides it add the following line:


PassivePorts 60000 65534


Just for information if instead of ProFTPd you experience the error on PureFTPD the configuration value to set in /etc/pure-ftpd.conf is:
 

PassivePortRange 30000 35000


That's all folks, give the ncftp / lftp / filezilla or whatever FTP client you prefer and test it the FTP client should be able to talk as expected to remote server in ACTIVE FTP mode (and the auto passive mode) will be not triggered anymore, nor you will get a strange errors and failure to connect in FTP clients as gftp.

Cheers 🙂

How to configure VIVACOM 3g USB ( internet ) modem HUAWEI Mobile broadband E173 on Debian and Ubuntu GNU / Linux

Wednesday, July 4th, 2012

sakis3g-configure-usb-modem-kdialog-shot

I've been given a HUAWEI Mobile Broadband E173 USB 3g model. The USB modem contains a flash USB Storage segment storing a little install program dedicated to make the modem work fine on Microsoft Windows XP / Vista / 7 and probably other M$ OSes. I'm a long time DebianGNU / Linux user and as a free software enthusiast I ofcourse wanted to be able to use Vivacom's 3G USB Modem on my Linux powered notebook.

Thanksfully as I've red on Vivacom's website the modem supports Linux OS 🙂

For those unaware in Bulgaria there are currently 3 major GSM network providers providing 3G internet this are;;;
 

  • VIVACOM – The ex Government ran national company BTC (Bulgarian Telecommunication Company)
  • M-Tel – The first GSM network provider that entered Bulgaria around year 1995
  • GLOBUL – The 3rd and last GSM mobile and net provider entered last and not so much used by Bulgarians today

Until today I had no experience in running any 3G modems on Linux, neither I had used the 3 networks 3G internet to determine which one is best, however I've been given for temporal use a VIVACOM 3G internet modem today so I proceeded to try installing it on my Debian host.

My Linux system is a bit strangely configured as I use wicd network connection manager -( wicd-gtk ) to manage wireless and LAN connections instead of the standard installed GNOME network manager – available through package ( network-manager-gnome ).

The reason I use wicd is not that it is so much better than GNOME network manger but rather for historical reasons because few years past I had impression it works better in connecting me to wireless networks. Another reason why I choosed wicd back then was the nice looking stats …

I tried plugging in the Vivacom USB 3G modem stick and checked in wicd to see if I can see a possibility to connect to the mobile opeartor 3G network but unfortunately nothing appeared.

Though the 3G adsl modem was unavailable straing in wicd, checking about it in the list of attached USB devices I could see it detected, e.g.:

noah:~# lsusb |grep -i huawei
Bus 001 Device 007: ID 12d1:1c05 Huawei Technologies Co., Ltd.

This was at least a good sign pointing me to the thoughts that the modem is probably gonna work.

I did a quick Google search to see if other people succeded running the device on a Linux host and came across a few blog posts in Bulgarian explaining a "success story" on Ubuntu Linux through using a tweakened shell script – sakis3g. For more on how the script works and script download check out Sakis3g

Here is a quote from sakis3g's website describing the script:
 

It automagically setups your USB or Bluetooth™ modem, and may even detect operator settings.
You should try it when anything else fails!

Sakis3g has different versions designed for for plenty of spacific hware architectures i.e. for (i386, amd64, armv4t, armv5t).
There is also a version of the script which by the way contains a combination of bash shell scripting instruction and some binary exec data.

To run sakis3g on my laptop I did:

1. Download sakis3g

My notebook architecture is 64 bit so I download and used the amd64 version of the script;;;

hipo@noah:~$ mkdir sakis3g
hipo@noah:~$ cd sakis3g
hipo@noah:~/sakis3g$ wget http://www.sakis3g.org/versions/latest/amd64/sakis3g.gz

I've made also a mirror of sakis3g i386, 64 bit and all architecture the mirrors just in case it disappears in future. The mirror versions of sakis3g are here:

a. sakis3g i386 b. sakis3g amd64 c. sakis3g all architectures source

2. Unarchive and make it executable

After downloading it as it is in gzip I had to do the usual de-gzipping and making the file executable;;;

hipo@noah:~/sakis3g$ /bin/gzip -d sakis3g.gz
hipo@noah:~/sakis3g$ chmod +x sakis3g

The script is then ready to run by either clicking twice on it or (as I prefer for debugging reasons to run it in terminal):

hipo@noah:~$ ./sakis3g

Something that I have wondered a bit was the dialog where I had to fill in some data of some variable APN abbreviation for – (Access Point Name)

The APN host for VIVACOM mobile internet is;;;
APN: internet.vivacom.bg

I've used the Windows configuration progrma to gather also the following data that I thought might be important for configuring the 3G adsl modem on the Linux host;;;

Auth: *99#
User: VIVACOM
pass: VIVACOM

Here are all the configuration screenshots I've taken from sakis3g and all the data that I filled in.
Next the following tiny window appeared on screen:

Sakis3g configure usb modem kdialog shot 1 VIVACOM USB Modem Sakis 3g Shot 2 sakis 3g usb modem vivacom connect screenshot 2 vivacom 3g modem linux sakis3g enter pin dialog shot 4 Sending pin screenshot 5 sakis3g APN Dialog sakis3g screenshot 6sakis3g Internet Linux VIVACOM screenshot 7sakis3g Debian GNU Linux VIVACOM 3g Internet screenshot 8sakis3g initializing modem screenshot 9sakis3g successful connect to VIVACOM mobile 3g usb adls modem shot 10

Well that's all folks, now sakis3g succesfully connected to the I_net via an (PPP) VPN connection tunnel here is data from ifconfig command showing the succesful 3G connection to VIVACOM;;;

noah:~# /sbin/ifconfig ppp0
ppp0 Link encap:Point-to-Point Protocol
inet addr:10.58.146.232 P-t-P:10.64.64.64 Mask:255.255.255.255
UP POINTOPOINT RUNNING NOARP MULTICAST MTU:1500 Metric:1
RX packets:2066 errors:1 dropped:0 overruns:0 frame:0
TX packets:1609 errors:0 dropped:0 overruns:0 carrier:0
collisions:0 txqueuelen:3
RX bytes:2232058 (2.1 MiB) TX bytes:341693 (333.6 KiB)

The internet via the 3G connection is not blazing fast but good enough to check your mail or read some webpages. VIVACOM currently has different (traffic limited packages) for their 3G internet, I'm not sure which package exactly is the 3G USB stick modem but probably the "quick" internet connection that is now would slow down once the traffic limit is reached …
Hope this post helps someone to configure 3G internet on VIVACOM in Debian and Ubuntu Linux. Though I've tested sakis3g on Debian it should work with no hassles on any other GNU Linux distribution that has bash installed.

How to connect to WiFi network using console or terminal on GNU / Linux

Wednesday, November 2nd, 2011

iwlist-screenshot-howto-connect-to-wifi-in-text-console-linux-wpasupplicant

Sometimes its useful to connect to Wireless Networks using console . The reasons for that might be many, one possible reason is to be able to debug, Wireless connection failures or simply omit the use of the many available GUI wifi connection programs.

As a first step before connecting in terminal is to look up for the wifi networks available for connection, this is done with cmd:

linux:~# iwlist wlan0 scanning
wlan0 Scan completed :
Cell 01 - Address: 00:24:01:90:8F:38
Channel:7
Frequency:2.442 GHz (Channel 7)
Quality=70/70 Signal level=-39 dBm
Encryption key:on
ESSID:"magdanoz"
Bit Rates:1 Mb/s; 2 Mb/s; 5.5 Mb/s; 11 Mb/s
Bit Rates:6 Mb/s; 9 Mb/s; 12 Mb/s; 48 Mb/s; 18 Mb/s
24 Mb/s; 36 Mb/s; 54 Mb/s
Mode:Master
Extra:tsf=000000034f5c786b
Extra: Last beacon: 68ms ago
IE: Unknown: 00086D616764616E6F7A
IE: Unknown: 010482848B96
IE: Unknown: 030107
IE: Unknown: 32080C1218602430486C
IE: Unknown: CC0700CC020000018A
IE: Unknown: CC0700CC0300000100
IE: WPA Version 1
Group Cipher : TKIP
Pairwise Ciphers (2) : TKIP CCMP
Authentication Suites (1) : PSK
IE: IEEE 802.11i/WPA2 Version 1
Group Cipher : TKIP
Pairwise Ciphers (2) : TKIP CCMP
Authentication Suites (1) : PSK
Cell 02 - Address: 00:1E:2A:60:5E:DC
Channel:1
...

To just list the ESSID s of the wifi networks:

linux:~# iwlist wlan0 scanning|grep -i 'essid'
ESSID:"magdanoz"
ESSID:"default"
ESSID:"todorov"
ESSID:"BTC-ADSL"
ESSID:"Zahari"
ESSID:"Drago"

1. Connecting to Open Wireless Network

Now from the above output it is clear 6 wifi networks are available for connection. The default wifi network from the list is an Open network (e.g. without pass). To connect to it I use cmd:

linux:~# /sbin/iwconfig wlan0 essid 'default'
linux:~# /sbin/iwconfig wlan0 key open

After connected to configure IP, Gateway and DNS from a DHCP server running on the WIFI router, dhclient cmd is used:

linux:~# /sbin/dhclient wlan0

2. Connecting to WEP 64bit / 128bit encrypted network

linux:~# /sbin/iwconfig wlan0 key 1234-5678-9101-1213

3. Connecting to WPA / WPA2 encrypted wifi network

To connect to WPA or WPA2 encrypted network its necessery to have installed wpasupplicant package. The name of the package might vary in different distributions on Debian and Ubuntu, the name of the package is wpasupplicant, on Fedora, CentOS and RHEL the package that has to be in is wpa_supplicant :
After having installed the wpa_supplicant to connect to the network with ESSID name magdanoz , wpa_passphrase is used first:

linux:~# /usr/bin/wpa_passphrase magdanoz Secret_Wifi_Password | tee -a /etc/wpa_supplicant.conf
network={
ssid="magdanoz"
#psk="Secret_Wifi_Password"
psk=6f7590250c4496ff7bf8dd25199ac3bb5a614d4bc069975aa884bcf084da73bc
}

As you see in above command the secret password key is generated printed on the screen and then added to /etc/wpa_supplicant.conf , necessery to establish the wireless connection with wpa_supplicant with cmd:

linux:~# /sbin/wpa_supplicant wpa_supplicant -d wext -i wlan0 -c /etc/wpa_supplicant.conf -B

-d wext instructs wpa_supplicant to use (Linux wireless extension driver).
-B tells wpa_supplicant to background the connection to prevent the wireless connection to drop off, if the console / terminal from which it is launched gets closed.

In case of succesful connection with wpa_supplicant , once again IP, Gateway and DNS is configured fetching the settings from the wifi hotspot dhcp server:

linux:~# /sbin/dhclient wlan0

General information about the wireless network and info related to the established connection can be obtained with /usr/bin/iwconfig :

linux:~# /sbin/iwconfig
lo no wireless extensions.
eth0 no wireless extensions.
wlan0 IEEE 802.11abg ESSID:"magdanoz"
Mode:Managed Frequency:2.442 GHz Access Point: 00:24:00:90:8F:38
Bit Rate=54 Mb/s Tx-Power=15 dBm
Retry long limit:7 RTS thr:off Fragment thr:off
Encryption key:off
Power Management:off
Link Quality=70/70 Signal level=-39 dBm
Rx invalid nwid:0 Rx invalid crypt:0 Rx invalid frag:0
Tx excessive retries:0 Invalid misc:0 Missed beacon:0

To configure the exact channel over which the wireless connection will be established again is done with iwconfig, for instance to configure wlan0 wifi connection established to be on wifi channel 7:

linux:~# /sbin/iwconfig wlan0 channel 11

By default iwconfig is set to automatically set the channel based on connected network ESSID , if the channel is modified to some specific number to revert it back use:

linux:~# /sbin/iwconfig wlan0 channel auto
 

How to install and configure torbutton on Debian / Anonymizing Iceweasel, Firefox on Debian GNU/Linux

Thursday, August 5th, 2010

Tor Onion Logo

There is a quite a buzz online recently about the implications breach of personal privacy by simple browing online.
A week ago I've blogged On How to improve your web browser security for better personal identity
Though there is probably a plenty of more things to be done on guaranteeing your anonymous identity online, the article lacked to mention one very one vital project related with anonymity – the tor Anonymity online project
The project offer the user the right to be anonymous online through a complex constantly expanding network of volunteers which voluntary install and grant access to the installed tor server to be used as a proxy from their computers.
A very thorough explanation on what is tor can be red here
Enabling tor on your personal computer would at least guarantee you that every now and then your traffic browser network traffic (request) would flow through a random tor servers located on a different worldly geographic locations.
Usually the traffic to a destination host would pass through 5 tor network nodes. Where the traffic is unecrypted between last node and the 4th node, while in the other four ones it's completely crypted.
This makes your tracking almost impossible if it's based on technologies like for instance Maxmind's Geoip or Geonames's geographical data base because every now and then you'll appear to be coming to the end point referrar web server originating from a different tor node ip address

The tor server is a free software licensed under the GPL and this is also a good assurance because everybody is able to have a look on the code and this is a further guarantee that the software doesn't include a malicious ways for a middle users to sniff on your traffic.

The tor project has even built a pre-bundled browser ready to be worn by yourself on a usb stick, so you can quickly start using the tor anonymous network on any random computer anywhere.
The tor browser page is available here also Tor Browser Bundle for Windows is available here
Tor server is available for both Windows, Mac OS X, Linux and Linux/BSD Unix
Of course tor is not perfect it opens some other possible doors for attackers which are much less likely to occur if you don't use it, however in general it's better off with tor than without it.

One serious reason for not reason for not using Tor might be that it's usually many times slower than normal browser since, it routes traffic through a different tor network nodes.
So if you decide to go on and use it you better be patient and calm 🙂

Since I'm a Debian user and I really do value my privacy I decided to start using Tor.
In order to start using Tor it's usually necessary to configure your browser to use The TorButoon Firefox browserextension

Nevertheless on Debian GNU/Linux if you try to go the straigh way as explained on Tor's website install the TorButton and configure it to work in cooperation with the polipo caching proxy
You will be not able to browse after enabling straight the tor plugin.
If you try the up-mentioned approach you're probably about to come to errors like:
"the proxy server is refusing connections"
,
Proxy error: 502 Disconnected operation and object not in cache
or
504 Connect to superquizgames.com:80 failed: SOCKS error: host unreachableThe following error occurred while trying to access http://yourwebsite.com/:504 Connect to superquizgames.com:80 failed: SOCKS error: host unreachable

In order to properly install configure and enable the TorButton on my Debian GNU/Linux I had to get through the following steps:

1. Install the polipo caching proxy

debian:~# apt-get install polipo

2. Download and overwrite default polipo configuration with the one from torproject.org

This is necessary to configure in order to have polipo adapted to work with tor, so issue the following commands:

debian:~# cd /etc/polipo
debian:~# wget https://svn.torproject.org/svn/torbrowser/trunk/build-scripts/config/polipo.conf
debian:~# mv config config.bak
debian:~# mv polipo.conf config

3. Restart polipo for the new config settings to take affect

debian:~# /etc/init.d/polipo restart

4. Install the iceweasel-torbutton browser extension

debian:~# apt-get install iceweasel-torbutton

The iceweasel-torbutton will also install you the tor package which is evidently required for the torbutton to operate.
Now you should be ready to go, you can enable the tor use from the tor button which should appear in your browser in the bottom right corner of your browser.
It should look something similar to:

Tor Button screenshot in Iceweasel

Tor Enable/Disable Iceweasel browser Button

To test your Tor Configuration you can use the Test Settings button which is straight available from TorButton's preferences

From here after it might be a good idea to play with the TorButton security settings and configure it according to your liking, bear in mind that you should have a solid knowledge on how browsers work and some basic Internet protocols before you start tampering this options.
If tou don't know what you do you better stop and don't tamper with the torbutton security options.
The only one that you will most probably want to untick is The Disable plugins during Tor usage , stopping this option will allow you to have a flash video streaming display properly, otherwise you won't be able to use , Vbox etc.
Below you see a screenshot of the TorButton Security Settings dialog.

TorButton properties Dialog

To open up this dialog you need to navigate to the TorButto and choose preferences with the right mouse buttons 🙂
Hope this article is informative to somebody out there.
User feedback is mostly welcome! Cheers 🙂

How to check who is flooding your Apache, NGinx Webserver – Real time Monitor statistics about IPs doing most URL requests and Stopping DoS attacks with Fail2Ban

Wednesday, August 20th, 2014

check-who-is-flooding-your-apache-nginx-webserver-real-time-monitoring-ips-doing-most-url-requests-to-webserver-and-protecting-your-webserver-with-fail2ban

If you're Linux ystem administrator in Webhosting company providing WordPress / Joomla / Drupal web-sites hosting and your UNIX servers suffer from periodic denial of service attacks, because some of the site customers business is a target of competitor company who is trying to ruin your client business sites through DoS or DDOS attacks, then the best thing you can do is to identify who and how is the Linux server being hammered. If you find out DoS is not on a network level but Apache gets crashing because of memory leaks and connections to Apache are so much that the CPU is being stoned, the best thing to do is to check which IP addresses are causing the excessive GET / POST / HEAD requests in logged.
 

There is the Apachetop tool that can give you the most accessed webserver URLs in a refreshed screen like UNIX top command, however Apachetop does not show which IP does most URL hits on Apache / Nginx webserver. 


1. Get basic information on which IPs accesses Apache / Nginx the most using shell cmds


Before examining the Webserver logs it is useful to get a general picture on who is flooding you on a TCP / IP network level, with netstat like so:
 

# here is howto check clients count connected to your server
netstat -ntu | awk '{print $5}' | cut -d: -f1 | sort | uniq -c | sort -n


If you get an extensive number of connected various IPs / hosts (like 10000 or something huge as a number), depending on the type of hardware the server is running and the previous scaling planned for the system you can determine whether the count as huge as this can be handled normally by server, if like in most cases the server is planned to serve a couple of hundreds or thousands of clients and you get over 10000 connections hanging, then your server is under attack or if its Internet server suddenly your website become famous like someone posted an article on some major website and you suddenly received a tons of hits.


There is a way using standard shell tools, to get some basic information on which IP accesses the webserver the most with:

tail -n 500 /var/log/apache2/access.log | cut -d' ' -f1 | sort | uniq -c | sort -gr

Or if you want to keep it refreshing periodically every few seconds run it through watch command:

watch "tail -n 500 /var/log/apache2/access.log | cut -d' ' -f1 | sort | uniq -c | sort -gr"

monioring-access-hits-to-webserver-by-ip-show-most-visiting-apache-nginx-ip-with-shell-tools-tail-cut-uniq-sort-tools-refreshed-with-watch-cmd


Another useful combination of shell commands is to Monitor POST / GET / HEAD requests number in access.log :
 

 awk '{print $6}' access.log | sort | uniq -c | sort -n

     1 "alihack<%eval
      1 "CONNECT
      1 "fhxeaxb0xeex97x0fxe2-x19Fx87xd1xa0x9axf5x^xd0x125x0fx88x19"x84xc1xb3^v2xe9xpx98`X'dxcd.7ix8fx8fxd6_xcdx834x0c"
      1 "x16x03x01"
      1 "xe2
      2 "mgmanager&file=imgmanager&version=1576&cid=20
      6 "4–"
      7 "PUT
     22 "–"
     22 "OPTIONS
     38 "PROPFIND
   1476 "HEAD
   1539 "-"
  65113 "POST
 537122 "GET


However using shell commands combination is plenty of typing and hard to remember, plus above tools does not show you, approximately how frequenty IP hits the webserver


2. Real-time monitoring IP addresses with highest URL reqests with logtop


Real-time monitoring on IP addresses with highest URL requests is possible with no need of "console ninja skills"  through – logtop.


2.1 Install logtop on Debian / Ubuntu and deb derivatives Linux


a) Installing Logtop the debian way

LogTop is easily installable on Debian and Ubuntu in newer releases of Debian – Debian 7.0 and Ubuntu 13/14 Linux it is part of default package repositories and can be straightly apt-get-ed with:

apt-get install –yes logtop

b) Installing Logtop from source code (install on older deb based Linuxes)

On older Debian – Debian 6 and Ubuntu 7-12 servers to install logtop compile from source code – read the README installation instructions or if lazy copy / paste below:

cd /usr/local/src
wget https://github.com/JulienPalard/logtop/tarball/master
mv master JulienPalard-logtop.tar.gz
tar -zxf JulienPalard-logtop.tar.gz

cd JulienPalard-logtop-*/
aptitude install libncurses5-dev uthash-dev

aptitude install python-dev swig

make python-module

python setup.py install

make

make install


mkdir -p /usr/bin/
cp logtop /usr/bin/


2.2 Install Logtop on CentOS 6.5 / 7.0 / Fedora / RHEL and rest of RPM based Linux-es

b) Install logtop on CentOS 6.5 and CentOS 7 Linux

– For CentOS 6.5 you need to rpm install epel-release-6-8.noarch.rpm
 

wget http://dl.fedoraproject.org/pub/epel/6/x86_64/epel-release-6-8.noarch.rpm
rpm -ivh epel-release-6-8.noarch.rpm
links http://dl.fedoraproject.org/pub/epel/6/SRPMS/uthash-1.9.9-6.el6.src.rpm
rpmbuild –rebuild
uthash-1.9.9-6.el6.src.rpm
cd /root/rpmbuild/RPMS/noarch
rpm -ivh uthash-devel-1.9.9-6.el6.noarch.rpm


– For CentOS 7 you need to rpm install epel-release-7-0.2.noarch.rpm


links http://download.fedoraproject.org/pub/epel/beta/7/x86_64/repoview/epel-release.html
 

Click on and download epel-release-7-0.2.noarch.rpm

rpm -ivh epel-release-7-0.2.noarch
rpm –import /etc/pki/rpm-gpg/RPM-GPG-KEY-EPEL-7
yum -y install git ncurses-devel uthash-devel
git clone https://github.com/JulienPalard/logtop.git
cd logtop
make
make install


2.3 Some Logtop use examples and short explanation


logtop shows 4 columns as follows – Line number, Count, Frequency, and Actual line


The quickest way to visualize which IP is stoning your Apache / Nginx webserver on Debian?


tail -f access.log | awk {'print $1; fflush();'} | logtop


logtop-check-which-ip-is-making-most-requests-to-your-apache-nginx-webserver-linux-screenshot

On CentOS / RHEL

tail -f /var/log/httpd/access_log | awk {'print $1; fflush();'} | logtop


Using LogTop even Squid Proxy caching server access.log can be monitored.
To get squid Top users by IP listed:


tail -f /var/log/squid/access.log | awk {'print $1; fflush();'} | logtop


logtop-visualizing-top-users-using-squid-proxy-cache
 

Or you might visualize in real-time squid cache top requested URLs
 

tail -f /var/log/squid/access.log | awk {'print $7; fflush();'} | logtop


visualizing-top-requested-urls-in-squid-proxy-cache-howto-screenshot


3. Automatically Filter IP addresses causing Apache / Nginx Webservices Denial of Service with fail2ban
 

Once you identify the problem if the sites hosted on server are target of Distributed DoS, probably your best thing to do is to use fail2ban to automatically filter (ban) IP addresses doing excessive queries to system services. Assuming that you have already installed fail2ban as explained in above link (On Debian / Ubuntu Linux) with:
 

apt-get install –yes fail2ban


To make fail2ban start filtering DoS attack IP addresses, you will have to set the following configurations:
 

vim /etc/fail2ban/jail.conf


Paste in file:
 

[http-get-dos]
 
enabled = true
port = http,https
filter = http-get-dos
logpath = /var/log/apache2/WEB_SERVER-access.log
# maxretry is how many GETs we can have in the findtime period before getting narky
maxretry = 300
# findtime is the time period in seconds in which we're counting "retries" (300 seconds = 5 mins)
findtime = 300
# bantime is how long we should drop incoming GET requests for a given IP for, in this case it's 5 minutes
bantime = 300
action = iptables[name=HTTP, port=http, protocol=tcp]


Before you paste make sure you put the proper logpath = location of webserver (default one is /var/log/apache2/access.log), if you're using multiple logs for each and every of hosted websites, you will probably want to write a script to automatically loop through all logs directory get log file names and automatically add auto-modified version of above [http-get-dos] configuration. Also configure maxtretry per IP, findtime and bantime, in above example values are a bit low and for heavy loaded websites which has to serve thousands of simultaneous connections originating from office networks using Network address translation (NAT), this might be low and tuned to prevent situations, where even the customer of yours can't access there websites 🙂

To finalize fail2ban configuration, you have to create fail2ban filter file:

vim /etc/fail2ban/filters.d/http-get-dos.conf


Paste:
 

# Fail2Ban configuration file
#
# Author: http://www.go2linux.org
#
[Definition]
 
# Option: failregex
# Note: This regex will match any GET entry in your logs, so basically all valid and not valid entries are a match.
# You should set up in the jail.conf file, the maxretry and findtime carefully in order to avoid false positives.
 
failregex = ^<HOST> -.*"(GET|POST).*
 
# Option: ignoreregex
# Notes.: regex to ignore. If this regex matches, the line is ignored.
# Values: TEXT
#
ignoreregex =


To make fail2ban load new created configs restart it:
 

/etc/init.d/fail2ban restart


If you want to test whether it is working you can use Apache webserver Benchmark tools such as ab or siege.
The quickest way to test, whether excessive IP requests get filtered – and make your IP banned temporary:
 

ab -n 1000 -c 20 http://your-web-site-dot-com/

This will make 1000 page loads in 20 concurrent connections and will add your IP to temporary be banned for (300 seconds) = 5 minutes. The ban will be logged in /var/log/fail2ban.log, there you will get smth like:

2014-08-20 10:40:11,943 fail2ban.actions: WARNING [http-get-dos] Ban 192.168.100.5
2013-08-20 10:44:12,341 fail2ban.actions: WARNING [http-get-dos] Unban 192.168.100.5

Mount remote Linux SSHFS Filesystem harddisk on Windows Explorer SWISH SSHFS file mounter and a short evaluation on what is available to copy files to SSHFS from Windows PC

Monday, February 22nd, 2016

swish-mount-and-copy-files-from-windows-to-linux-via-sshfs-mount

I'm forced to use Windows on my workbook and I found it really irritating, that I can't easily share files in a DropBox, Google Drive, MS OneDrive, Amazon Storage or other cloud-storage free remote service. etc.
I don't want to use DropBox like non self-hosted Data storage because I want to keep my data private and therefore the only and best option for me was to make possible share my Linux harddisk storage
dir remotely to the Windows notebook.

I didn't wanted to setup some complex environment such as Samba Share Server (which used to be often a common option to share file from Linux server to Windows), neither wanted to bother with  installing FTP service and bother with FTP clients, or configuring some other complex stuff such as WebDav – which BTW is an accepted and heavily used solution across corporate clients to access read / write files on a remote Linux servers.
Hence, I made a quick research what else besides could be used to easily share files and data from Windows PC / notebook to a home brew or professional hosting Linux server.

It turned out, there are few of softwares that gives a similar possibility for a home lan small network Linux / Windows hybrid network users such, here is few of the many:

  • SyncThingSyncthing is an open-source file synchronization client/server application, written in Go, implementing its own, equally free Block Exchange Protocol. The source code's content-management repository is hosted on GitHub


    syncthing-logo

  • OwnCloud – ownCloud provides universal access to your files via the web, your computer or your mobile devices


    owncloud-logo

  • Seafile – Seafile is a file hosting software system. Files are stored on a central server and can be synchronized with personal computers and mobile devices via the Seafile client. Files can also be accessed via the server's web interface


seafile-client-in-browser

I've checked all of them and give a quick try of Syncthing which is really easy to start, just download the binary launch it and configure it under https://Localhost:8385 URL from a browser on the Linux server.
Syncthing seemed to be nice and easy to configure solution to be able to Sync files between Server A (Windows) and Server B(Linux) and guess many would enjoy it, if you want to give it a try you can follow this short install syncthing article.
However what I didsliked in both SyncThing and OwnCloud and Seafile and all of the other Sync file solutions was, they only supported synchronization via web and didn't seemed to have a Windows Explorer integration and did required
the server to run more services, posing another security hole in the system as such third party softwares are not easily to update and maintain.

Because of that finally after rethinking about some other ways to copy files to a locally mounted Sync directory from the Linux server, I've decided to give SSHFS a try. Mounting SSHFS between two Linux / UNIX hosts is
quite easy task with SSHFS tool

In Windows however the only way I know to transfer files to Linux via SSHFS was with WinSCP client and other SCP clients as well as the experimental:

As well as few others such as ExpandDrive, Netdrive, Dokan SSHFS (mirrored for download here)
I should say that I first decided to try copying few dozen of Gigabyte movies, text, books etc. using WinSCP direct connection, but after getting a couple of timeouts I was tired of WinSCP and decided to look for better way to copy to remote Linux SSHFS.
However the best solution I found after a bit of extensive turned to be:

SWISH – Easy SFTP for Windows

Swish is very straight forward to configure compared to all of them you download the .exe which as of time of writting is at version 0.8.0 install on the PC and right in My Computer you will get a New Device called Swish next to your local and remote drives C:/ D:/ , USBs etc.

swish-new-device-to-appear-in-my-computer-to-mount-sshfs

As you see in below screenshot two new non-standard buttons will Appear in Windows Explorer that lets you configure SWISH

windows-mount-sshfs-swish-add-sftp-connection-button-screenshot

Next and final step before you have the SSHFS remote Linux filesystem visible on Windows Xp / 7 / 8 / 10 is to fill in remote Linux hostname address (or even better fill in IP to get rid of possible DNS issues), UserName (UserID) and Direcory to mount.

swish-new-fill-in-dialog-to-make-new-linux-sshfs-mount-directory-possible-on-windows

Then you will see the SSHFS moutned:

swish-sshfs-mounted-on-windows

You will be asked to accept the SSH host-key as it used to be unknown so far

swish-mount-sshfs-partition-on-windows-from-remote-linux-accept-key

That's it now you will see straight into Windows Explorer the remote Linux SSHFS mounted:

remote-sshfs-linux-filesystem-mounted-in-windows-explorer-with-swish

Once setupped a Swish connection to copy files directly to it you can use the Send to Embedded Windows dialog, as in below screenshot

swish-send-to-files-windows-screenshot

The only 3 problem with SWISH are:

1. It doesn't support Save password, so on every Windows PC reboot when you want to connect to remote Linux SSHFS, you will have to retype remote login user pass.
Fron security stand point this is not such a bad thing, but it is a bit irritating to everytime type the password without an option to save permanently.
The good thing here is you can use Launch Key Agent
as visible in above screenshot and set in Putty Key Agent your remote host SSH key so the passwordless login will work without any authentication at
all however, this might open a security hole if your Win PC gets infected by virus, which might delete something on remote mounted SSHFS filesystem so I personally prefer to retype password on every boot.

2. it is a bit slow so if you're planning to Transfer large amounts of Data as hundreds of megabytes, expect a very slow transfer rate, even in a Local  10Mbit Network to transfer 20 – 30 GB of data, it took me about 2-3 hours or so.
SWISH is not actively supported and it doesn't have new release since 20th of June 2013, but for the general work I need it is just perfect, as I don't tent to be Synchronizing Dozens of Gigabytes all the time between my notebook PC and the Linux server.

3. If you don't use the established mounted connection for a while or your computer goes to sleep mode after recovering your connection to remote Linux HDD if opened in Windows File Explorer will probably be dead and you will have to re-enable it.

For Mac OS X users who want to mount / attach remote directory from a Linux partitions should look in fuguA Mac OS X SFTP, SCP and SSH Frontend

I'll be glad to hear from people on other good ways to achieve same results as with SWISH but have a better copy speed while using SSHFS.

Windows “God Mode” one shortcut to see and configure all setttings in Microsoft Windows 7 / 8 / 10 – Windows Master Control Panel hidden feature

Monday, January 25th, 2016

GodMode-secret-master-control-panel-in-windows-operating-system
One very handy "secret" feature of Windows Operating System which is very useful to people who administrate a dozen of Windows servers daily is called "God Mode".
The idea behind "God Mode" is pretty simple it aims to give you maximum control and viability concentrated in one single Window interface.

God Mode was quite a lot ranted over the past years so it is likely that many of my blog readers are already aware of that Windows secret, but for those who didn't it will be
nice to check it out. To see the God Mode Windows functionality just create a New Folder in Windows Desktop or Anywhere on the Windows PC and Rename the New Folder to:
 

GodMode.{ED7BA470-8E54-465E-825C-99712043E01C}

Windows-7-God-mode-screenshot-or-how-to-easily-get-one-point-of-control-in-windows-OS

By creating folder witth his text string you will be able to do almost everything you ever tend to do on Windows from changing the outlook of theme and mouse cursor, changing,
Win explorer's folder's options, modify fonts, change cursor blink rate, get windows performance tools and information, add / remove programs, modify language, modify
firewall settings and in short do everything that is provided by Control Panel + some other goodies like Administrative Tools, Restore Options, Event logs etc. grouped in a fantastic readable manner.
GodMode naming says it all more or less it aims to give you "Godlike" accessibility to the Windows. Of course to be able to properly use the feature you will have to create
the Folder named GodMode.{ED7BA470-8E54-465E-825C-99712043E01C} with Administrator user.
The GodMode is available in Windows OSes since quite a long (2007) and is documented officially by Microsoft

Another alternative shortcut that gives the Godmode Master control panel is:
 

God.{ed7ba470-8e54-465e-825c-99712043e01c}


Enjoy 🙂