Posts Tagged ‘copy paste’
Thursday, October 26th, 2023 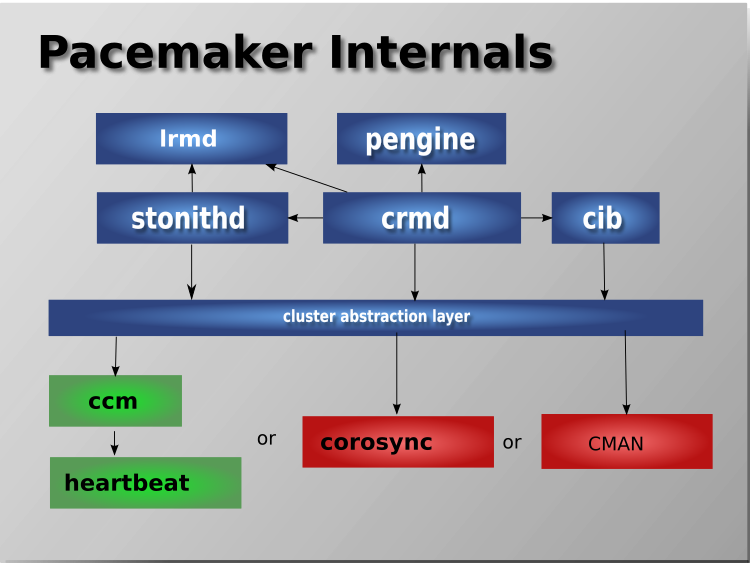
The aim of this article is to illustrate how to literally migrate a an Haproxy PCS Pacemaker / Corosync Cluster configurations from old Virtual Machines that due to time passed become unsupported (The Operating System end of life (EOF)) has reached to a new ones.
This is quite a complex task especially as you usually need to setup the Hypervisor hosts with VMWare / Xen / KVM / OpenVZ or whatever kind of virtualization is to be used. Then setup the correct network interfaces IPs failover the heartbeat lines over which the cluster will work to prevent Split Brain scenartions, the Network Bonding interfaces to guarantee a higher amount of higher availability as well as physically install and update all the cluster software on the new built Linux hosts that will be members of the new cluster in setup.
All this configuration from scratch of a PCS Corosync cluster is a very lenght topic which I'll try to cover in some of my next articles. In short to migrate the cluster from old machines to new once all this predescribed steps are in line.
You will need to.
1. Create backup of old cluster configuration
2. Migrate the backup to a new built VM Machine hosts
3. Import the cluster configuration into the PCS Cluster.
Bear in mind that this article discusses a migration of CentOS Linux release 7.9.2009 with its shipped versions of corosync / pacemaker and pcs
How to create cluster config backup and migrate to new VM
1. Dump cluster assuming that is a Quality Assuare or Pre – Production host to create full cluster config backup
[root@old-cluster-machine ~]# pcs config backup old-cluster-machine.pcs.config.bak
2. Dump cluster Production full configuration
[root@old-cluster-machine1 ~]# pcs config backup old-cluster-machine1.pcs.config.bak
This command will output a backup of
old-cluster-machine1.pcs.config.bak.tar.bz2
3. Migrate a cluster identical config to the new Virtual machines
Usually this moval of produced backup files with pcs config backup commands can be copied with something like FTP / SFTP or SSL-ed / TLS-ed protocol. However if you have to move the configuration files from a paranoid Citrix environment that doesn't allow you to have any SFTP / SSH or FTP kind of transfer protocol from the location where the old config lays to the new ones.
A simple encoding of the binary format dumped configuration to plain text files can be done and files, can be moved via a simple copy / paste operation (a bit of a hack) 🙂
Encode the cluster config to be able to migrate configuration in plain text via a simple Copy / Paste operation.
[root@old-cluster-machine ~]# base64 config backup old-cluster-machine.pcs.config.bak > old-cluster-machine.pcs.config.bak.tgz.b64
[root@old-cluster-machine1 ~]# base64 old-cluster-machine1.pcs.config.bak.tar.bz2 > old-cluster-machine1.pcs.config.bak.tgz.b64
[root@old-cluster-machine ~]# cat old-cluster-machine.pcs.config.bak.tgz.b64
…
(Copy output and Paste to new host VM) /root/haproxy-cluster-backup)
[root@old-cluster-machine1 ~]# cat old-cluster-machine1.pcs.config.bak.tgz.b64
…
(Copy output and Paste to new host VM) /root/haproxy-cluster-backup)
Login to the new hosts, where configs has to be migrated and restore the files with base64
For QA / Preprod to restore backup config
[root@dkv-newqa-vm ~]# mkdir /root/haproxy-cluster-backup
[root@dkv-newqa-vm ~]# cd /root/haproxy-cluster-backup
[root@dkv-newqa-vm ~]# base64 -d old-cluster-machine.config.bak.tgz.b64 > old-cluster-machine.pcs.config.bak.tar.bz2
[root@dkv-newqa-vm ~]# tar -jxvf old-cluster-machine.pcs.config.bak.tar.bz2
ak.tar.bz2
version.txt
pcs_settings.conf
corosync.conf
cib.xml
pacemaker_authkey
uidgid.d/
For Prod to restore backup config
[root@dkv-newprod-vm ~]# mkdir /root/haproxy-cluster-backup
[root@dkv-newprod-vm ~]# cd /root/haproxy-cluster-backup
[root@dkv-newprod-vm ~]# base64 -d old-cluster-machine.config.bak.tgz.b64 > old-cluster-machine1.pcs.config.bak.tar.bz2
ak.tar.bz2
version.txt
pcs_settings.conf
corosync.conf
cib.xml
pacemaker_authkey
uidgid.d/
N!B! An Useful hin is on RHEL 8 Linux's shipped pcs command version has also a very useful command with which you can simply dump completly the config of the cluster in straight commands which you can run directly on the new VM machines where you have migrated.
The command to print out commands that would add existing cluster resources on Redhat 8:
# pcs resource config –output-format=cmd
Another useful command for cluster migration is cibadmin
i.e. to dump cluster xml config
#cibadmin –q > cluster.xml
Later you can import the prior xml dump with it.
# cibadmin –replace –xml-file cib.xml
Tags: backup files, bak, command, configuration files, copy paste, dump, How to, location, migrate, root, setup, tar, tgz, xml
Posted in Clusters, Curious Facts, Linux | 1 Comment »
Monday, January 10th, 2022 
My experience with enabling virtualbox additions guest tools on many of the separate Linux distributions throughout time is pretty bad as it always is a pain in the ass to enable fully functional full screen and copy paste for Virtualbox…
For those who installed it for a first time vbox guest addition tools for Virtualbox are additional software components added so the Emulated Operating system
could allow better screen resolution and better mouse integration support.
So far I've installed virtualbox additions tools to CentOS 7 and Debian Linux various releases and faced complications there as well.
Few days ago my colleague Georgi Stoyanov have installed CentOS 8.3 with current version of VirtualBox 6.1 (vesrsion from beginning of 2022) and he has also shared had issues with enabling the CentOS 8.3 Linux to work with guestadditions but eventually found a resolution.
Thus he has shared with me the solution and I share it with you, so hopefully someone else could enable Guesttools on his CentOS 8.3 with less digging online.
The error received is:
# ./VBoxLinuxAdditions.run
Trying to install Guest Additions in RHEL 8.3.
VirtualBox Guest Additions: Starting.
VirtualBox Guest Additions: Building the VirtualBox Guest Additions kernel
modules. This may take a while.
VirtualBox Guest Additions: To build modules for other installed kernels, run
VirtualBox Guest Additions: /sbin/rcvboxadd quicksetup
VirtualBox Guest Additions: or
VirtualBox Guest Additions: /sbin/rcvboxadd quicksetup all
VirtualBox Guest Additions: Building the modules for kernel
4.18.0-193.el8.x86_64.
VirtualBox Guest Additions: Look at /var/log/vboxadd-setup.log to find out what
went wrong
ValueError: File context for /opt/VBoxGuestAdditions-6.0.20/other/mount.vboxsf already defined
VirtualBox Guest Additions: Running kernel modules will not be replaced until
the system is restarted
Press Return to close this window…
No idea what to do next. Been trying for sometime.
To enable guestaddtions in CentOS 8.3, e.g. get arount the error you have to:
1. Install all necessery dependncies RPMs required by GuestAddition tools
# dnf install tar bzip2 kernel-devel-$(uname -r) kernel-headers perl gcc make elfutils-libelf-devel
# dnf -y install gcc automake make kernel-headers dkms bzip2 libxcrypt-compat kernel-devel perl
2. Run below semanage and restorecon commands
# semanage fcontext -d /opt/VBoxGuestAdditions-/other/mount.vboxsf
# restorecon /opt/VBoxGuestAdditions-/other/mount.vboxsf
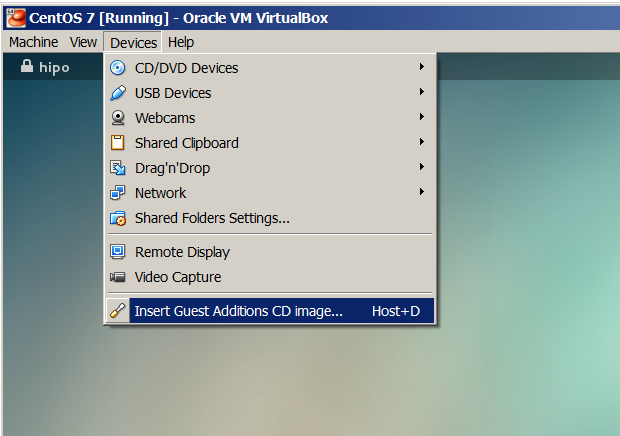
3. Insert Virtualbox guest additions ISO and Run it
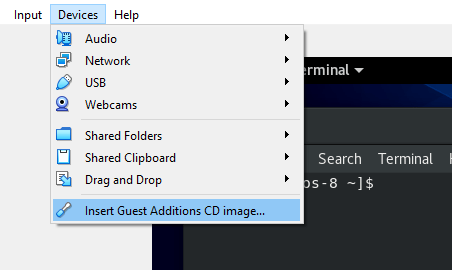
Devices -> Insert Guest Additions CD Image
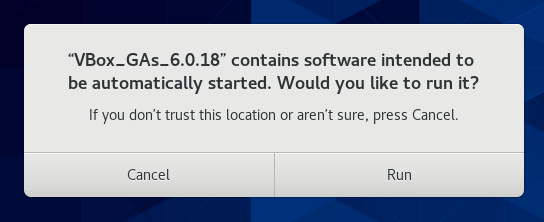
Click Run button to exec Vbox_GAs_6.0.18 script or run it manually
or mount it manually with mount command and execute the VBoxLinuxAdditions.run to do so:
$ cd /run/media/`whoami`/VB*
$ su
# ./VBoxLinuxAdditions.run
Installing additional modules …
VirtualBox Guest Additions: Building the VirtualBox Guest Additions kernel modules. This may take a while.
VirtualBox Guest Additions: Running kernel modules will not be replaced until the system is restarted
VirtualBox Guest Additions: Starting.
4. Reboot the VM
# reboot
5. Check and Confirm Virtualbox guest additions are properly installed and running
# lsmod | grep vbox
…
6. Enable Copy / Paste from to Virttual Machine e.g. Shared Clipboard / Shared Folder etc.
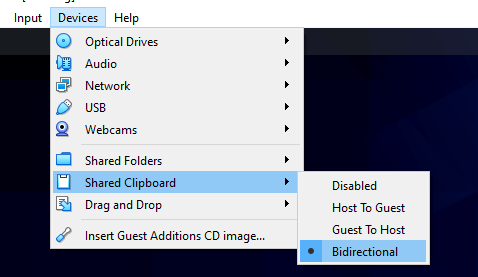
The three options most useful besides the support for FullScreen OS emulation by Virtualbox to enable right after
guesttools is on are:
1. Devices -> Shared Clipboard -> Bidirectional
2. Devices -> Drag and Drop -> Bidirectional
3. Devices -> Shared Folders -> Shared Folder Settings
Tags: additions, CentOS, copy paste, enable, fullscreen, installed, Installing, log, mount, org, Reboot, Redhat, resolution, sudo, support, vm
Posted in Linux, Various, Virtual Machines | No Comments »
Monday, October 25th, 2021 
If you have to work on servers in a protected environments that are accessed via multiple VPNs, Jump hosts or Web Citrix and you have no mean to copy binary files to your computer or from your computer because you have all kind of FTP / SFTP or whatever Data Copy clients disabled on remote jump host side or CITRIX server and you still are looking for a way to copy files between your PC and the Remote server Side.
Or for example if you have 2 or more servers that are in a special Demilitarized Network Zones ( DMZ ) and the machines does not have SFTP / FTP / WebServer or other kind of copy protocol service that can be used to copy files between the hosts and you still need to copy some files between the 2 or more machines in a slow but still functional way, then you might not know of one old school hackers trick you can employee to complete the copy of files between DMZ-ed Server Host A lets say with IP address (192.168.50.5) -> Server Host B (192.168.30.7). The way to complete the binary file copy is to Encode the binary on Server Host A and then, use cat command to display the encoded string and copy whole encoded cat command output to your (local PC buffer from where you access the remote side via SSH via the CITRIX or Jump host.). Then decode the encoded file with an encoding tool such as base64 or uuencode. In this article, I'll show how this is done with base64 and uuencode. Base64 binary is pretty standard in most Linux / Unix OS-es today on most Linux distributions it is part of the coreutils package.
The main use of base64 encoding to encode non-text Attachment files to Electronic Mail, but for our case it fits perfectly.
Keep in mind, that this hack to copy the binary from Machine A to Machine B of course depends on the Copy / Paste buffer being enabled both on remote Jump host or Citrix from where you reach the servers as well as your own PC laptop from where you access the remote side.
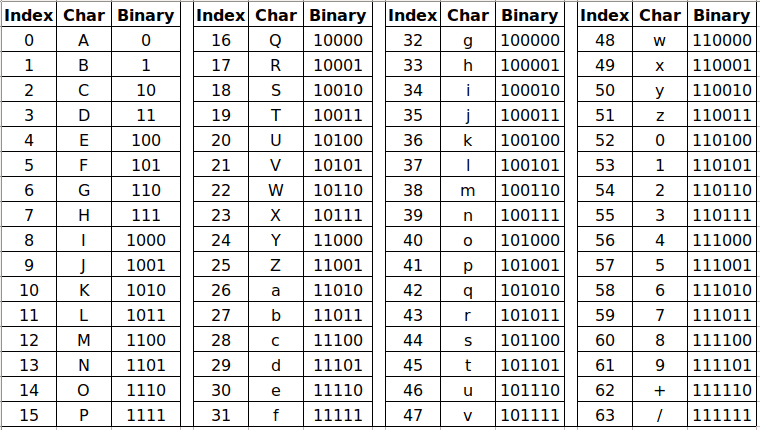
Base64 Encoding and Decoding text strings legend
The file copy process to the highly secured PCI host goes like this:
1. On Server Host A encode with md5sum command
[root@serverA ~]:# md5sum -b /tmp/inputbinfile-to-encode
66c4d7b03ed6df9df5305ae535e40b7d *inputbinfile-to-encode
As you see one good location to encode the file would be /tmp as this is a temporary home or you can use alternatively your HOME dir
but you have to be quite careful to not run out of space if you produce it anywhere 🙂
2. Encode the binary file with base64 encoding
[root@serverB ~]:# base64 -w0 inputbinfile-to-encode > outputbin-file.base64
The -w0 option is given to disable line wrapping. Line wrapping is perhaps not needed if you will copy paste the data.
Base64 Encoded string chunk with line wrapping
For a complete list of possible accepted arguments check here.
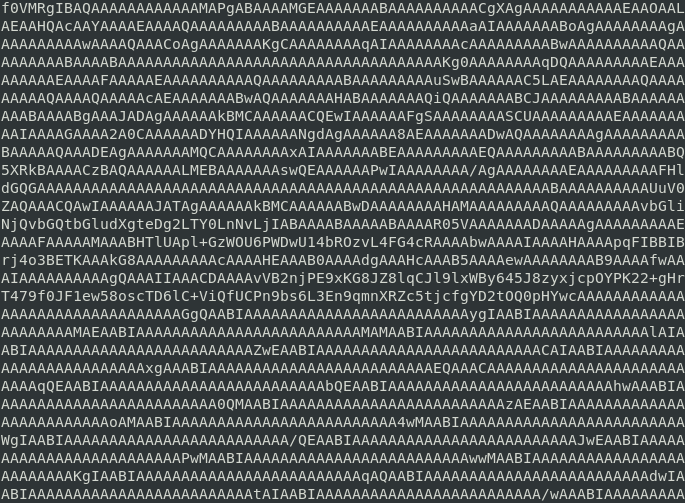
3. Cat the inputbinfile-to-encode just generated to display the text encoded file in your SecureCRT / Putty / SuperPutty etc. remote ssh access client
[root@serverA ~]:# cat /tmp/inputbinfile-to-encode
f0VMRgIBAQAAAAAAAAAAAAMAPgABAAAAMGEAAAAAAABAAAAAAAAAACgXAgAAAAAAAAAAA
EAAOAALAEAAHQAcAAYAAAAEAAA ……………………………………………………………… cTD6lC+ViQfUCPn9bs
4. Select the cat-ted string and copy it to your PC Copy / Paste buffer
If the bin file is not few kilobytes, but few megabytes copying the file might be tricky as the string produced from cat command would be really long, so make sure the SSH client you're using is configured to have a large buffer to scroll up enough and be able to select the whole encoded string until the end of the cat command and copy it to Copy / Paste buffer.
5. On Server Host B paste the bas64 encoded binary inside a newly created file
Open with a text editor vim / mc or whatever is available
[root@serverB ~]:# vi inputbinfile-to-encode
Some very paranoid Linux / UNIX systems might not have even a normal text editor like 'vi' if you happen to need to copy files on such one a useful thing is to use a simple cat on the remote side to open a new File Descriptor buffer, like this:
[root@server2 ~]:# cat >> inputbinfile-to-encode <<'EOF'
Paste the string here
6. Decode the encoded binary with base64 cmd again
[root@serverB ~]:# base64 –decode outputbin-file.base64 > inputbinfile-to-encode
7. Set proper file permissions (the same as on Host A)
[root@serverB ~]:# chmod +x inputbinfile-to-encode
…
8. Check again the binary file checksum on Host B is identical as on Host A
[root@serverB ~]:# md5sum -b inputbinfile-to-encode
66c4d7b03ed6df9df5305ae535e40b7d *inputbinfile-to-encode
As you can md5sum match on both sides so file should be OK.
9. Encoding and decoding files with uuencode
If you are lucky and you have uuencode installed (sharutils) package is present on remote machine to encode lets say an archived set of binary files in .tar.gz format do:
Prepare the archive of all the files you want to copy with tar on Host A:
[root@Machine1 ~]:# tar -czvf /bin/whatever /usr/local/bin/htop /usr/local/bin/samhain /etc/hosts archived-binaries-and-configs.tar.gz
[root@Machine1 ~]:# uuencode archived-binaries-and-configs.tar.gz archived-binaries-and-configs.uu
Cat / Copy / paste the encoded content as usual to a file on Host B:
Then on Machine 2 decode:
[root@Machine2 ~]:# uuencode -c < archived-binaries-and-configs.tar.gz.uu
Conclusion
In this short method I've shown you a hack that is used often by script kiddies to copy over files between pwn3d machines, a method which however is very precious and useful for sysadmins like me who has to admin a paranoid secured servers that are placed in a very hard to access environments.
With the same method you can encode or decode not only binary file but also any standard input/output file content. base64 encoding is quite useful stuff to use also in bash scripts or perl where you want to have the script copy file in a plain text format . Datas are encoded and decoded to make the data transmission and storing process easier. You have to keep in mind always that Encoding and Decoding are not similar to encryption and decryption as encr. deprytion gives a special security layers to the encoded that. Encoded data can be easily revealed by decoding, so if you need to copy between the servers very sensitive data like SSL certificates Private RSA / DSA key, this command line utility tool better to be not used for sesitive data copying.
Tags: access, Ascii, binary files, chmod, com, copy paste, home, How to, linux?, match, move, plain, Select, servers, Set, tar, text, text ascii, transfer, unix, use
Posted in Curious Facts, Hacks, Linux, System Administration, Various | No Comments »
Thursday, September 6th, 2018 
Copy / Pasting has become a vital part of our digital lifes, not having it in our days is insane, most of our System Administration jobs / Programmer or Office (Secretary) stuff daily without Copy / Paste is a unthinkable.
Lately I have been playing with Virtual Machines as I need to test some Dev Ops related stuff I install Jenkins write and test scripts and tools inside a VM, for that to happen I needed a working VM and because I am a Free Software supporter my VM of choice is usually Virtualbox. Even though Virtualbox is not the best and most performance efficient Virtual Machine out there for a small tasks and home usage dev / testing it does a great job, I have faced a problem with Copy / Pasting not working in VBox between the VM -> Guest OS, that's why I decided to write this step by step guide to help people who face the same issue.
For people who are starting with Oracle VirtualBox and you just have Created a New Virtual Machine and installed GNU / Linux or FreeBSD one common set back problem you will experience is the the Copy / Paste functionality between the VM Host Machine and the Guest won't be working out of the box. That's pretty much annoying thing and since usually one installs different Virtual Machines with different Operating Systems as a test bed for Software installs on top of various versions of OSes the lack of Copy, Paste functionality which is not there by default makes copy / pasting programming code / commands etc. between your local Desktop notebook or remote server Machine and the VBox Virtualized Guest mostly unusuable …
Besides that integration (sharing resources / improved VM performance) between the Host (which is for example your Desktop notebook or PC) and the Virtualized Operating system be it some kind of UNIX (FreeBSD) etc. is not optimal until you enable an extra integration between VirtualBox and your (Host OS – that in my case is Debian 9 GNU / Linux but it can be Microsoft Windows XX as well or any other *nix like OS).In order for this Integration between your Host OS and Guest OS and Copy / Paste features between the two to work you need to Enable Guest Additions CD image (Software) that is part of VirtualBox installation on the Host OS and once enabled to mount (Attach the Vbox provided Virtual CD) from within the Guest OS (that in my case is another Debian 9 Stretch Linux that is installed inside the VM) and run a script that will install the necessery VirtualBox software inside the Guest OS Linux.
This is done in 3 easy steps:
STEP 1: Enable Vbox (Guest Additions CD Image)

Devices -> Insert Guest Additions CD image
2. Enable Shared Clipboard and Drag and Drop from the Virtual Machine
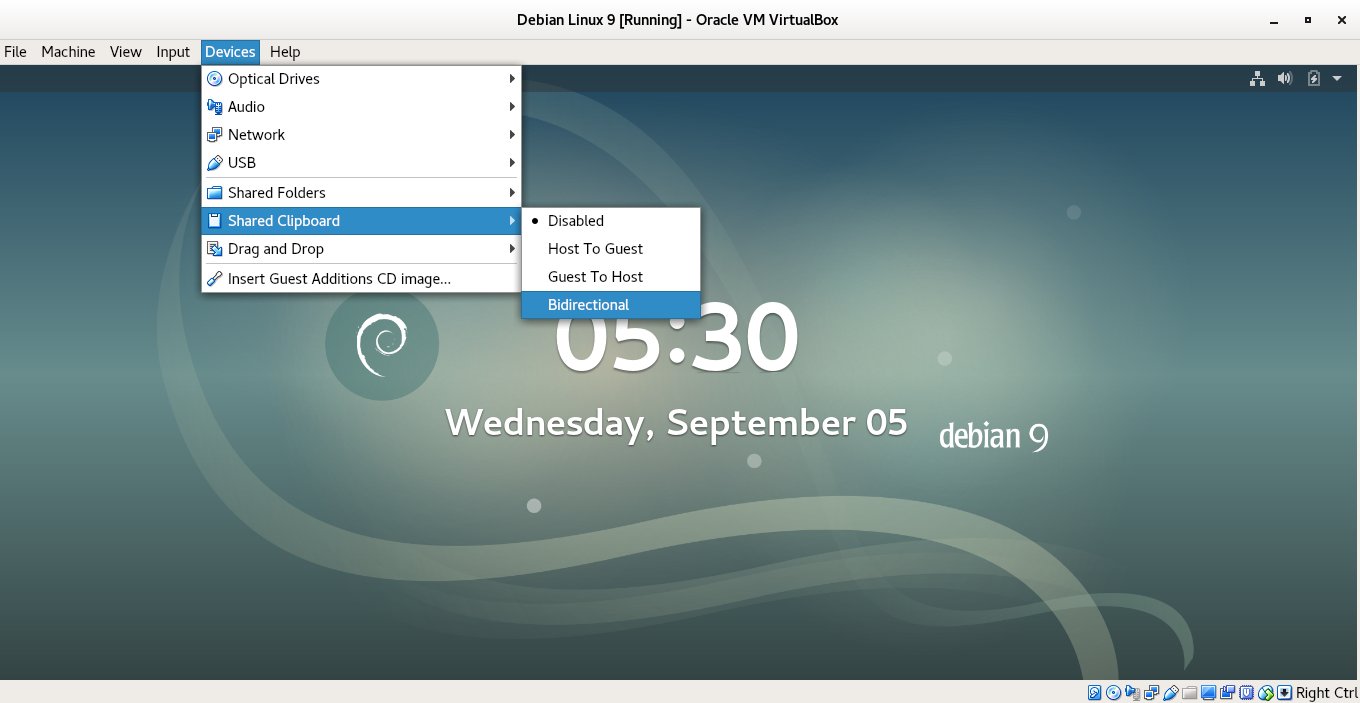
Devices -> Shared Clipboard -> Bidirectional

Devices -> Drag and Drop -> Bidirectional
3. Install development packages that are required by VBoxLinuxAdditions.run script
a) First thing is to use Virtual Box program interface menu and enable Insert Guest Additions CD Image option (assuming that you have the Linux Guest OS running).
Devices -> Insert Guest Additions CD image
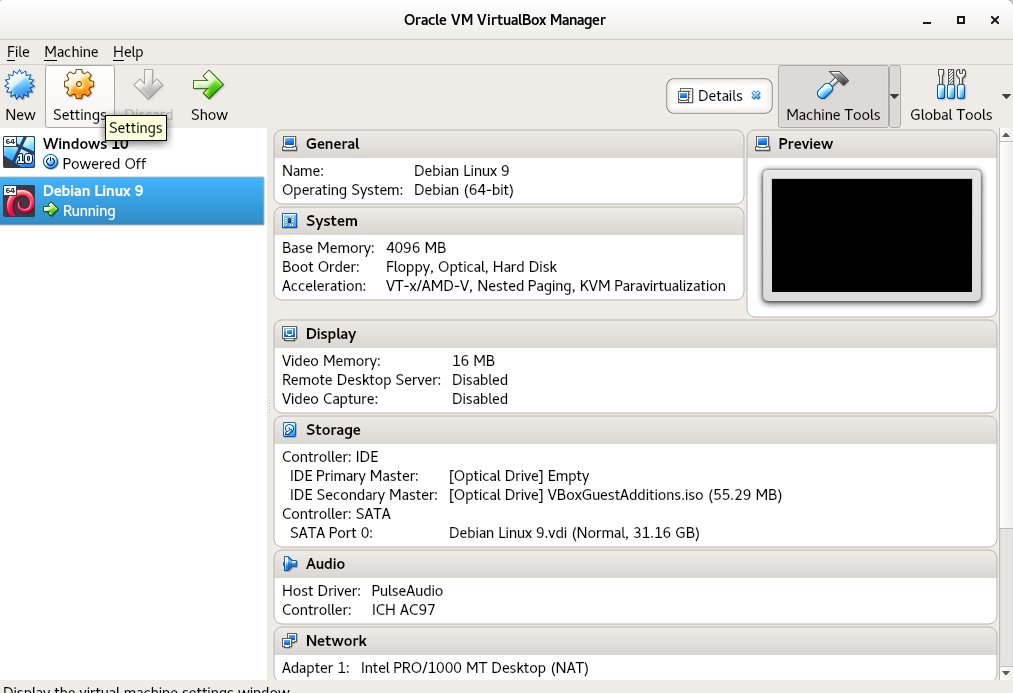
You can do it also from main VirtualBox interface (without having a Virtual machine running) by clicking over the desired Guest OS or pressting CTRL + S key combination
b) Next step is to mount the Virtual CD Guest Additions inside the Guest OS VM
To mount the Virtual content provided by the just ticked VBOX "Insert Guest Additions CD" menu, inside the Guest OS Linux, you have to run simple mount command:
root@debian:~# mount /media/cdrom1
mount: /dev/sr1 is write-protected, mounting read-only
c) Install necessery packages that VBoxLinuxAdditions.run will use
Further on VBoxLinuxAdditions.run (additions script) that adds the integration between the Host operating system and the Guest OS depends on some essential tools necessery for building (compiling) / developing software on Linux, this are:
1.) build-essential – a meta package that will install the following set of packages:
dpkg-dev fakeroot g++ g++-6 libalgorithm-diff-perl libalgorithm-diff-xs-perl libalgorithm-merge-perl libdpkg-perl libfakeroot libfile-fcntllock-perl libstdc++-6-dev
which are necessery for creation .deb packages, compiling code and other various activitions. a) build-essential is a very important Debian based distro package and if you happen to be new to Linux or just starting learning how to develop programs on Linux, you will soon realize you will need it installed across almost all Linux OS hosts you maintain or develop on …
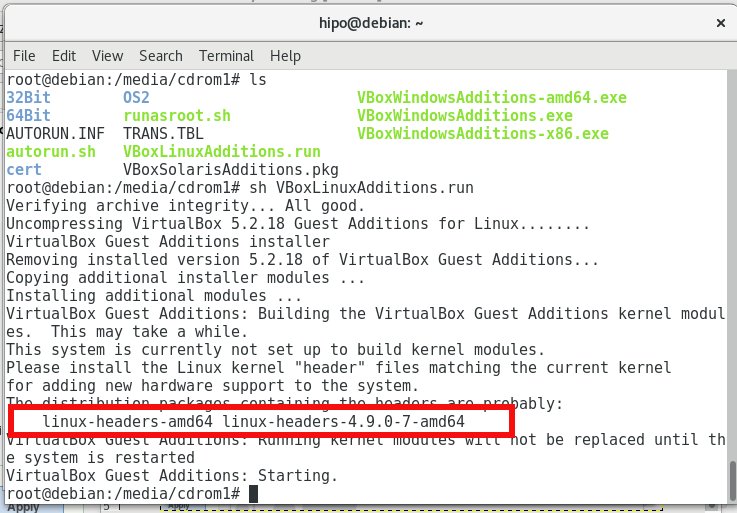
root@debian:~# apt-get install –yes build-essential linux-headers-$(uname -r) gcc perl make
2.) The linux-headers package in my case that it is is linux-headers-4.9.0-7-amd64 is important as it provides kernel header files that are necessery when compiling and integrating kernel modules VBoxLinuxAdditions.run script depends on it as it builds a kernel module that adds the integration (that enables Copy / Paste and performance inprovements) between the Host VM machine and Guest OS
3.) gcc perl packages this two provides the C compiler and perl scripting programming language interpreter which are also used by VBoxLinuxAdditions.run script.
Now run VBoxLinuxAdditions.run:
As you see in above screenshot the
root@debian:~#
root@debian:/media/cdrom1# sh VBoxLinuxAdditions.run
Verifying archive integrity… All good.
Uncompressing VirtualBox 5.2.18 Guest Additions for Linux……..
VirtualBox Guest Additions installer
Removing installed version 5.2.18 of VirtualBox Guest Additions…
Copying additional installer modules …
Installing additional modules …
VirtualBox Guest Additions: Building the VirtualBox Guest Additions kernel modules. This may take a while.
VirtualBox Guest Additions: Running kernel modules will not be replaced until the system is restarted
VirtualBox Guest Additions: Starting.
If everything is fine you should get command output like above.
Above are the steps given to follow on current latest Debian Linux 9.5 (Stretch) as a Guest OS (this tutorial should be working also on Ubuntu / Mint and other deb package based distributions for RPM package based Linuxes Fedora / CentOS check out my previous toturial how to enable Linux Guest Virtualbox Addition on Redhat based distos.)
P. S.
What about Mac OS X since it is based on FreeBSD and it includes a lot of GNU licensing programs?
If you wonder whether on Mac OS X you don't need to run guest additions script such as (VBoxLinuxAdditions.run) on Mac Host -> Guest OS integration is done only by enabling the feature from VBox GUI interface via:
Devices -> Insert Guest Additions CD Image
What about enabling Copy / Paste on Linux Host VirtualBox hosting a Windows Guest OS?
Enabling Copy / Paste on a Windows Virtual Machine (I wrote about it earlier here), follows the same steps as in this tutorial.
The only difference is instead of running the VBoxLinuxAdditions.sh you have to navigate to the CD from Windows Explorer and run the appropriate .exe file depending on your architecture (X86 or 64 bit), the files to run on the virtual CDROM are one of the 3:
1. VBoxWindowsAdditions-amd64.exe
2. VBoxWindowsAdditions.exe
3. VBoxWindowsAdditions-x86.exe
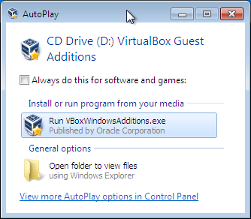
Follow the click through interface and you will have the Copy / Paste between your Linux -> Windows OS working.
Happy Copy / Pasting ! 🙂
Tags: copy paste, copy paste virtualbox, copy paste virtualbox linux, copy paste virtualbox windows, enable virtualbox copy paste, guest os, host os, howto, virtualbox mac os x, virtualization
Posted in Linux, Linux and FreeBSD Desktop, Virtual Machines | 1 Comment »
Tuesday, May 8th, 2012 
I believe, the quickest way to take notes on Linux and BSD and later view the notes is to use the command line.
A very easy simple way to keep record of various short notes is just to use a simple text editor like (vim) and store each note in a separate file in lets say ~/notes/ directory.
Actually, I'm using this way to take notes and store sensitive info for various important information I need for further reference, since 5 years or so..
Opening a new text editor for each note and then doing cd ~/notes/; ls |grep -i 'string' is a bit time consuming.
Fortunately there is a quick two shell functions hack that shortens time for note taking. The following two bash functions has to be added in ~/.bashrc:
n() {

vim ~/notes/"$*".txt

}

nls() {

ls -c ~/notes/ | grep "$1"

}
Copy / Paste this two functions in the beginning or the end of ~/.bashrc in order to use them.
Also if ~/notes directory is not existing, yet create it:
hipo@noah:~$ mkdir notes
To make the two new input functions active across opened bash shells on console or terminal either re-login or reread the .bashrc by "sourcing it", e.g.
hipo@noah:~$ source ~/.bashrc
Afterwards, note taking becomes a piece of cake to store a new note with login credentials (user/password) for a new registration to a random named website, type something like:
hipo@noah:~$ n my_website_name-user-pass
This will open for editting ~/.notes/my_website_name-user-pass.txt, type the new desired note content and do save and exit from vim (press esc and type :x!.
Then to get a quick list of all previously stored notes use:
hipo@noah:~$ nls website

my_website_name-user-pass.txt
If you already have a directory containing subdirectories with various taken notes (like me), you will need to use an improved version nls written by Jason Ryan, the nls improved is like this:
nls () { tree -CR --noreport ~/notes | awk '{

if ((NR >) gsub(/.txt/,"")); if

(NF==1) print $1; else if (NF==2)

print $2; else if (NF==3)

printf " %s\n", $3}';

}
This two functions, were not my creation but was suggested in Linux Magazine issue 135 article entitled Command-line task managers and note-taking tools written by Dmitri Popov.
Hope this two functions, will be helpful to console geeks out there.
Tags: Auto, BSD, cake, consuming, copy paste, cr, Draft, file, freebsd, gnu linux, hack, hipo, important information, info, information, input functions, jason ryan, Linux, login, login credentials, mkdir, need, nls, noah, opening, password, piece, piece of cake, sensitive info, Shell, shell functions, shells, something, store, subdirectories, terminal, text, time, time consuming, Tip Quick Note, txtIf, type, use, vim, websitemy
Posted in Curious Facts, Linux, System Administration, vim editor | 2 Comments »
Wednesday, January 14th, 2015 
Getting a snapshot of all active plugins and keeping it for future in case if you install some broken plugin and you have to renable all enabled plugins from scratch is precious thing in WordPress.
… It is really annoying when you decide to try to enable few new plugins and out of a sudden your WordPress site / blog starts hanging (when accessed in browser)…
To fix it you have to Disable All Plugins and Re-enable all that used to work. However if you don't keep a copy of the plugins which were previously working and you're like me and have 109 plugins installed of which only 50 are in (Active) state / used. It could take you a day or two until you come up with a similar list to the ones you previously used … Thanksfully there is some prevention you can take by dumping a list of all plugins that are currently active and in later time only enable those in the list.
# mysql -u root -p
Enter password:
mysql> USE blog_db;
Here is the output I get in the moment:
mysql> DESCRIBE wp_options;
+————–+———————+——+—–+———+—————-+
| Field | Type | Null | Key | Default | Extra |
+————–+———————+——+—–+———+—————-+
| option_id | bigint(20) unsigned | NO | PRI | NULL | auto_increment |
| option_name | varchar(64) | NO | UNI | | |
| option_value | longtext | NO | | NULL | |
| autoload | varchar(20) | NO | | yes | |
+————–+———————+——+—–+———+—————-+
mysql> SELECT * FROM wp_options WHERE option_name = 'active_plugins';
| 38 | active_plugins | a:50:{i:0;s:45:"add-to-any-subscribe/add-to-any-subscribe.php";i:1;s:19:"akismet/akismet.php";i:2;s:43:"all-in-one-seo-pack/all_in_one_seo_pack.php";i:3;s:66:"ambrosite-nextprevious-post-link-plus/ambrosite-post-link-plus.php";i:4;s:49:"automatic-tag-selector/automatic-tag-selector.php";i:5;s:27:"autoptimize/autoptimize.php";i:6;s:35:"bm-custom-login/bm-custom-login.php";i:7;s:45:"ckeditor-for-wordpress/ckeditor_wordpress.php";i:8;s:47:"comment-info-detector/comment-info-detector.php";i:9;s:27:"comments-statistics/dcs.php";i:10;s:31:"cyr2lat-slugs/cyr2lat-slugs.php";i:11;s:49:"delete-duplicate-posts/delete-duplicate-posts.php";i:12;s:45:"ewww-image-optimizer/ewww-image-optimizer.php";i:13;s:34:"feedburner-plugin/fdfeedburner.php";i:14;s:39:"feedburner-widget/widget-feedburner.php";i:15;s:63:"feedburner_feedsmith_plugin_2.3/FeedBurner_FeedSmith_Plugin.php";i:16;s:21:"feedlist/feedlist.php";i:17;s:39:"force-publish-schedule/forcepublish.php";i:18;s:50:"google-analytics-for-wordpress/googleanalytics.php";i:19;s:81:"google-sitemap-generator-ultimate-tag-warrior-tags-addon/UTWgoogleSitemaps2_1.php";i:20;s:36:"google-sitemap-generator/sitemap.php";i:21;s:24:"headspace2/headspace.php";i:22;s:29:"my-link-order/mylinkorder.php";i:23;s:27:"php-code-widget/execphp.php";i:24;s:43:"post-plugin-library/post-plugin-library.php";i:25;s:35:"post-to-twitter/post-to-twitter.php";i:26;s:28:"profile-pics/profile-pic.php";i:27;s:27:"redirection/redirection.php";i:28;s:42:"scripts-to-footerphp/scripts-to-footer.php";i:29;s:29:"sem-dofollow/sem-dofollow.php";i:30;s:33:"seo-automatic-links/seo-links.php";i:31;s:23:"seo-slugs/seo-slugs.php";i:32;s:41:"seo-super-comments/seo-super-comments.php";i:33;s:31:"similar-posts/similar-posts.php";i:34;s:21:"sociable/sociable.php";i:35;s:44:"strictly-autotags/strictlyautotags.class.php";i:36;s:16:"text-control.php";i:37;s:19:"tidy-up/tidy_up.php";i:38;s:37:"tinymce-advanced/tinymce-advanced.php";i:39;s:33:"tweet-old-post/tweet-old-post.php";i:40;s:33:"w3-total-cache/w3-total-cache.php";i:41;s:44:"widget-settings-importexport/widget-data.php";i:42;s:54:"wordpress-23-related-posts-plugin/wp_related_posts.php";i:43;s:23:"wp-minify/wp-minify.php";i:44;s:27:"wp-optimize/wp-optimize.php";i:45;s:33:"wp-post-to-pdf/wp-post-to-pdf.php";i:46;s:29:"wp-postviews/wp-postviews.php";i:47;s:55:"wp-simple-paypal-donation/wp-simple-paypal-donation.php";i:48;s:46:"wp-social-seo-booster/wpsocial-seo-booster.php";i:49;s:31:"wptouch-pro-3/wptouch-pro-3.php";} | yes |
Copy and paste this CVS format data to a text file or a Word document for later reference ..
To restore back to normal only active WordPress plugins, first launch following SQL query to disable all enabled wordpress plugins:
UPDATE wp_options SET option_value = 'a:0:{}' WHERE option_name = 'active_plugins';
To restore above "backupped" list of active WP plugins you have to copy paste the saved content and paste it into above UPDATE query substituting option_value=' ' with the backupped string.
P.S. – This query should work on WordPress 3.x on older wordpress ver 2.x use instead:
UPDATE wp_options SET option_value = ' ' WHERE option_name = 'active_plugins';
Because pasting the backupped Active plugins list CSV is a messy and unreadable from command line it is recommended for clarity to use PHPMyAdmin frontend (whenever it is available) on server. This little hint is a real time-saver and saves a lot of headaches. Before proceeding to any Db UPDATE SQL queries always backup your Blog database, with time structure of WordPress data changes!, so in future releases this method might not be working, however if it helped you and works on your version please drop a comment with WordPress version on which this helped you.
Enjoy! 🙂
Tags: Backup Save Enabled Plugins Restore Enabled Active, copy, copy paste, day, Enabled, How to, list, php, time, update, version, wordpress plugins, working
Posted in MySQL, System Administration, Various, Web and CMS, Wordpress | 1 Comment »
Wednesday, May 28th, 2014 
If you need to use Virtual Machine to run some testing on heterogenous Operating Systems and you have chosen VMWare as a Virtual Machine. You will soon notice some of Virtual Machines functionality like copy between host operating system and Virtual Machine, true fullscreen mode and most importantly Copy paste between your host operating system and VMWare is not working. I'm not too much into Virtualization these days so for me it was truely shocking that a proprietary software like VMWare, claimed to be the best and most efficient Virtual Machine nowadays is not supporting copy / paste, fullscreen and copy between host and guest OS. For those arguing why I'm using VMWare at all as it is proprietary and there is already free software Virtual Machines like QEMU and Oracle's VirtualBox its simply because now I have the chance to install and use VMWare 9 Enterprise on my work place at HP with a free Corporate license – in other words I'm using VMWare just for the sake of educating myself and would always recommend VirtualBox for those looking for good substitute free alternative to VMWare.
Before trying out VMWare, I tried Virtualbox to emulate Linux on my HP work PC running Windows with VirtualBox I was having issues with keyboard not working (because of lack of support of USB, no full screen support and lack of copy / paste between OS-es), I've just recently understood this is not because Virtualbox is bad Virtualization solution but because I forgot to install VirtualBox Oracle VM VirtualBox Extension Pack which allows support for USB, enables copy paste and full screen support. The equivalent to Virtualbox Oracle VM VirtualBox in VMWare world is called VMWare-Tools and once the guest operating system is installed inside VMWare VM, its necessary to install vmware-tools to enable better screen resolution and copy paste.
In Windows Virtual Machine installation of vmware-tools is pretty straight forward you go through VMWare's menus
VM -> Install Vmware-tools
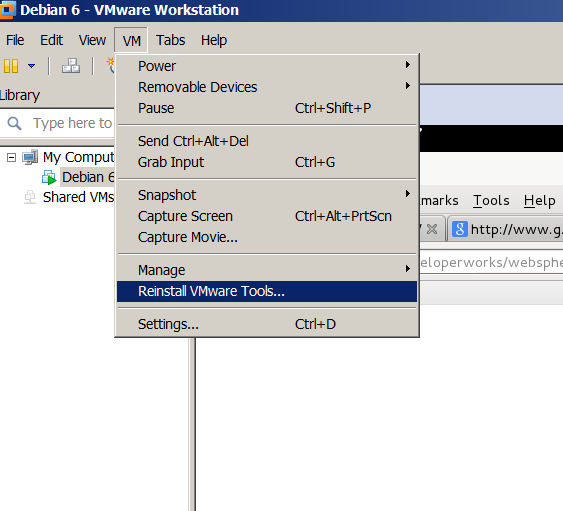
follow the instructions and you're done, however as always installing VMWare-tools on Linux is little bit more complicated you need to run few commands from Linux installed inside the Virtual Machine to install vmware-tools. Here is how vmware-tools is installed on Debian / Ubuntu / Linux Mint and rest of Debian based operating systems:
1. Install Build essentials and gcc You need to have this installed some developer tools as well as GCC compiler in order for the vmware-tools to compile a special Linux kernel module which enables extra support (integration) between the VMWare VM and the installed inside VM Linux distro
apt-get install --yes build-essential gcc

...
2. Install appropriate Linux headers corresponding to current Linux OS installed kernel
apt-get install --yes linux-headers-$(uname -r)

....
3. Mount CD (Virtual) Content to obtain the vmware-tools version for your Linux
Be sure to have first checked from VMWare menus on menus VM -> Intall Vmware Tools
This step is a little bit strange but just do it without too much questioning …
mount /dev/cdrom /mnt/

umount /media/cdrom0/

mount /media/cdrom

mount /dev/sr0 /mnt/cdrom/

mount /dev/sr0 /mnt/
Note that /dev/sr0, might already be mounted and sometimes it might be necessary to unmount it first (don't remember exactly if I unmounted it or not)
4. Copy and Untar VMwareTools-9.2.0-799703.tar.gz
cp -rpf /media/cdrom/VMwareTools-9.2.0-799703.tar.gz /tmp/

cd /tmp/

tar -zxvvf VMwareTools-9.2.0-799703.tar.gz

...
5. Run vmware-tools installer
cd vmware-tools-distrib/

./vmware-install.pl
You will be asked multiple questions you can safely press enter to answer with default settings to all settings, hopefully if all runs okay this will make VMWare Tools installed
Creating a new VMware Tools installer database using the tar4 format.
Installing VMware Tools.
In which directory do you want to install the binary files?
[/usr/bin]
What is the directory that contains the init directories (rc0.d/ to rc6.d/)?
[/etc]
What is the directory that contains the init scripts?
[/etc/init.d]
In which directory do you want to install the daemon files?
[/usr/sbin]
In which directory do you want to install the library files?
[/usr/lib/vmware-tools]
The path "/usr/lib/vmware-tools" does not exist currently. This program is
going to create it, including needed parent directories. Is this what you want?
[yes]
In which directory do you want to install the documentation files?
[/usr/share/doc/vmware-tools]
The path "/usr/share/doc/vmware-tools" does not exist currently. This program
is going to create it, including needed parent directories. Is this what you
want? [yes]
The installation of VMware Tools 9.2.0 build-799703 for Linux completed
successfully. You can decide to remove this software from your system at any
time by invoking the following command: "/usr/bin/vmware-uninstall-tools.pl".
Before running VMware Tools for the first time, you need to configure it by
invoking the following command: "/usr/bin/vmware-config-tools.pl". Do you want
this program to invoke the command for you now? [yes]
Initializing…
Making sure services for VMware Tools are stopped.
Stopping VMware Tools services in the virtual machine:
Guest operating system daemon: done
Unmounting HGFS shares: done
Guest filesystem driver: done
[EXPERIMENTAL] The VMware FileSystem Sync Driver (vmsync) is a new feature that creates backups of virtual machines. Please refer to the VMware Knowledge Base for more details on this capability. Do you wish to enable this feature?
[no]
Before you can compile modules, you need to have the following installed…
make
gcc
kernel headers of the running kernel
Searching for GCC…
Detected GCC binary at "/usr/bin/gcc-4.6".
The path "/usr/bin/gcc-4.6" appears to be a valid path to the gcc binary.
Would you like to change it? [no]
Searching for a valid kernel header path…
Detected the kernel headers at "/lib/modules/3.2.0-4-amd64/build/include".
The path "/lib/modules/3.2.0-4-amd64/build/include" appears to be a valid path
to the 3.2.0-4-amd64 kernel headers.
Would you like to change it? [no]
The vmblock enables dragging or copying files between host and guest in a
Fusion or Workstation virtual environment. Do you wish to enable this feature?
[no] yes
make: Leaving directory `/tmp/vmware-root/modules/vmblock-only'
No X install found.
Creating a new initrd boot image for the kernel.
update-initramfs: Generating /boot/initrd.img-3.2.0-4-amd64
Checking acpi hot plug done
Starting VMware Tools services in the virtual machine:
Switching to guest configuration: done
VM communication interface: done
VM communication interface socket family: done
File system sync driver: done
Guest operating system daemon: done
The configuration of VMware Tools 8.6.10 build-913593 for Linux for this
running kernel completed successfully.
You must restart your X session before any mouse or graphics changes take
effect.
You can now run VMware Tools by invoking "/usr/bin/vmware-toolbox-cmd" from the
command line or by invoking "/usr/bin/vmware-toolbox" from the command line
during an X server session.
To enable advanced X features (e.g., guest resolution fit, drag and drop, and
file and text copy/paste), you will need to do one (or more) of the following:
1. Manually start /usr/bin/vmware-user
2. Log out and log back into your desktop session; and,
3. Restart your X session.
Enjoy,
–the VMware team
Found VMware Tools CDROM mounted at /mnt. Ejecting device /dev/sr0 …
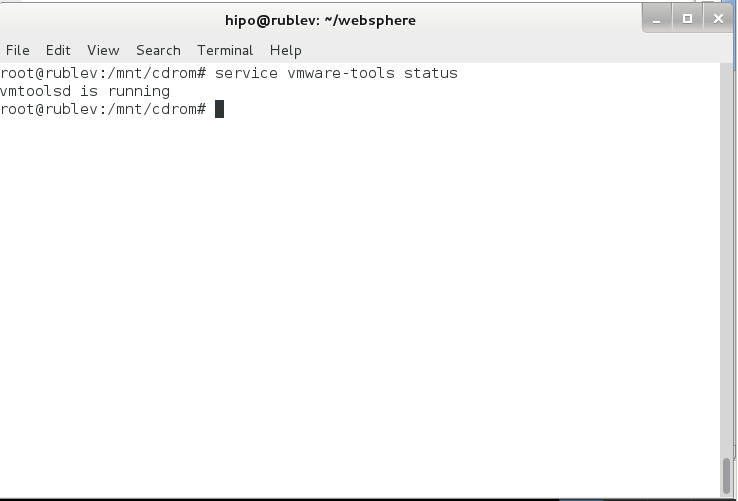
.To make sure vmware-tools compiled modules are loaded into Linux kernel inside VM, restart the Virtual Machine. Once Linux boots again and you login to gnome-terminal to check what is vmware-tools status (e.g. if properly loaded) run:
service vmware-tools status

vmtoolsd is running
This method of installing works on Debian 7 (Wheezy) but same steps should work on any Ubuntu and rest of Debian derivatives. For Redhat (RPM) based Linux distributions to install vmware-tools after mounting cdrom drive following above instructions you will have an rpm package instead of .tar.gz archive so all you have to do is install the rpm, e.g. launch smth. like:
rpm -Uhv /mnt/cdrom/VMwareTools-9.2.0-799703.i386.rpm
Cheers 😉
Tags: checking, copy paste, Debian, Debian Ubuntu Linux Mint, directory, fullscreen, host, kernel, mount dev, need, operating systems, proprietary software, running, testing, usr bin, virtual machines, working
Posted in Everyday Life, Various, Windows | No Comments »
Thursday, July 17th, 2014 
If you decided to use Redhat based Linux distribution inside Virtualbox Virtual Machine on Windows 7 / 8, first thing to do right after installing the Linux guest OS is to install Virtualbox Guest Additions. Earlier I've blogged How to enable virtualbox VM Windows XP fullscreen mode on Virtualbox running on Ubuntu now I need it vice versa a Linux OS living inside Virtual Machine running on top of Windows 7 Enterprise. need to enable Full-screen mode. Another reason why Vboxadditions should be installed right after Linux install is complete is for performance reasons and better integration between host OS and guest OS. Virtualbox Guest Additions enables mouse's copy / paste functions to work between Win and Virtualized Linux as well as enables arbitrary screen resolutions (resizing VM guest window) etc. On Windows versions of Virtualbox to install Vbox Guest Additions it is no longer necessery to download and mount a separate vbox-guest-additions ISO file, this is handled by Virtualbox itself.
The steps described here for installation of VirtualBox Guest Additions are tested and prooved as working on current latest CentOS 6.5, however they should be working (with or without minor modifications) in rest of RPM based Linux distributions
Fedora 20, 19, 18, 17, 16, 15, 14, 13, 12, CentOS 6.5, 6.4, 6.3, 6.2, 6.1, 6.0, 5.10 and Redhat Enterprise Linux (RHEL) 6.5, 6.4, 6.3, 6.2, 6.1, 6, 5.10 VirtualBox version installed on Windows 7 host is 4.3.14 build.
Devices -> Drag'n'Drop (Bidirectional)
Devices -> Share Clipboard (Bidirectional)
1. Installing VirtualBox GuestAdditions on CentOS 7, Redhat, Fedora
a) become superuser
su root
[root@centos~:]#
b) Mount Virtualbox provided Guest additions into virtual cdrom /dev/cdrom
From VirtualBox click on
Devices -> Install Guest Additions
mkdir /media/VirtualBoxGuestAdditions
mount -r /dev/cdrom /media/VirtualBoxGuestAdditions
c) Update to the latest Linux kernel with yum
yum -y update kernel*
Then to boot up into the updated kernel – restart the system
shutdown -r now
d) Install Kernel headers bzip dkms bzip2
yum install -y gcc kernel-devel kernel-headers dkms make bzip2 perl
…
If you're installing VirtualBox Guest Additions on CentOS 6 or RHEL 5, you will have to install also below 2 rpms:
## CentOS 6 and Red Hat (RHEL) 5 ##
rpm -Uvh http://dl.fedoraproject.org/pub/epel/6/i386/epel-release-6-8.noarch.rpm
## CentOS 5 and Red Hat (RHEL) 5 ##
rpm -Uvh http://dl.fedoraproject.org/pub/epel/5/i386/epel-release-5-4.noarch.rpm
e) export KERN_DIR to just installed kernel source
For CentOS 7 export following KERN_DIR
## Current running kernel on Fedora, CentOS 7 and Red Hat (RHEL) 7 ##
KERN_DIR=/usr/src/kernels/`uname -r`
export KERN_DIR
For older CentOS and RHEL 5 export
## Current running kernel on CentOS 5 and Red Hat (RHEL) 5 ##
KERN_DIR=/usr/src/kernels/`uname -r`-`uname -m`
export KERN_DIR
f) Download VBoxAdditions 4.3.14 iso from Virtualbox website
I've made mirror of VBoxGuestAdditions_4.3.14.iso for download here:
mkdir /usr/share/virtualbox
cd /usr/share/virtualbox
wget http://dlc.sun.com.edgesuite.net/virtualbox/4.3.14/VBoxGuestAdditions_4.3.14.iso
…
g) Mount the iso
mount -t iso9660 VBoxGuestAdditions_4.3.14.iso /media/VirtualBoxGuestAdditions/
h) Compile and Install Virtualbox GuestAdditions kernel modules
For both 32-bit and 64-bit systems run one and the same shell script:
cd /media/VirtualBoxGuestAdditions
./VBoxLinuxAdditions.run
Verifying archive integrity… All good.
Uncompressing VirtualBox 4.3.14_RC1 Guest Additions for Linux…………
VirtualBox Guest Additions installer
Removing installed version 4.3.14_RC1 of VirtualBox Guest Additions…
Copying additional installer modules …
Installing additional modules …
Removing existing VirtualBox non-DKMS kernel modules [ OK ]
Building the VirtualBox Guest Additions kernel modules
Building the main Guest Additions module [ OK ]
Building the shared folder support module [ OK ]
Building the OpenGL support module [ OK ]
Doing non-kernel setup of the Guest Additions [ OK ]
You should restart your guest to make sure the new modules are actually used
Installing the Window System drivers
Installing X.Org Server 1.15 modules [ OK ]
Setting up the Window System to use the Guest Additions [ OK ]
You may need to restart the hal service and the Window System (or just restart
the guest system) to enable the Guest Additions.
Installing graphics libraries and desktop services componen[ OK ]
l) Restart the CentOS Virtual Machine
reboot
Now get a beer and celebrate the full-screen / USB / Webcamera enabled support ! 🙂
This article is possible thanks to earlier article called Virtualbox guest additions on Fedora CentOS and Redhat.
http://www.if-not-true-then-false.com/2010/install-virtualbox-guest-additions-on-fedora-centos-red-hat-rhel/
Tags: building, CentOS, copy paste, Linux, Redhat, rhel, right, rpm, screen resolutions, shared folder, Virtualbox Guest Additions, VirtualBoxGuestAdditions, Window System, Windows, working
Posted in Everyday Life, Various, Virtual Machines | 5 Comments »
Tuesday, October 14th, 2014 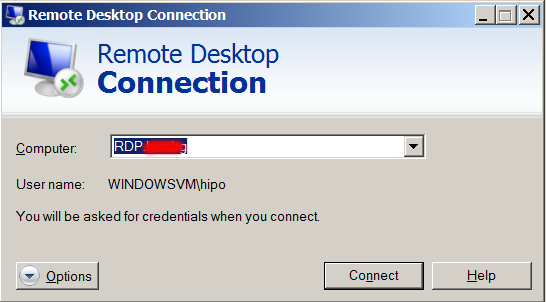
Just had a task to install Tomcat 7, Java JRE 1.7 and .NET Framework 3.5 and MS Visual C++ x86 on a Windows 2008 RC2 system situated behind a firewalled network NAT. To do the installation I had to use a special jump host (which was also a MS Windows system). The end system where installation had to occur did not have access to the Internet was in special DMZ-ed network so to install above 3 software packages I had to transfer them from my notebook to install host.
To depic what had to happen, I had to:
Transfer files from (host A – my notebook) -> via host (B – jump host) to host (C – the end install host).
Default Windows RDP Client command (mstsc.exe) supports transferring files between host A and RDP-ed host B via standard file copy / paste, so I tried transferring files between my work Windows PC to (jump host B), by copy pasting the files, but as the DotNetFx35Client.exe file was 261 Megabytes and the network between host A and B has some shapings and network firewalls the file transfer timed out. Copy / Paste method via RDP Protocol by default, doesn’t support Transfer Resume thus in order to transfer the 261 MB file, I tried Sharing C:Temp Folder and transfer that way, but unfortunately I didn’t have the permissions in that Windows Domain to create sharings (even though on the remote system I was already logged in with admin accounts). I’ve consulted a colleague on advise on how to transfer the files and I was told about a Win RDP client option to share drives.
Here is how to share your PC drive letters C: D: E: etc. via Remote Desktop Protocol
1. Run mstsc.exe
2. Click the Options button
3. Click Local Resources tab
4. Click More button
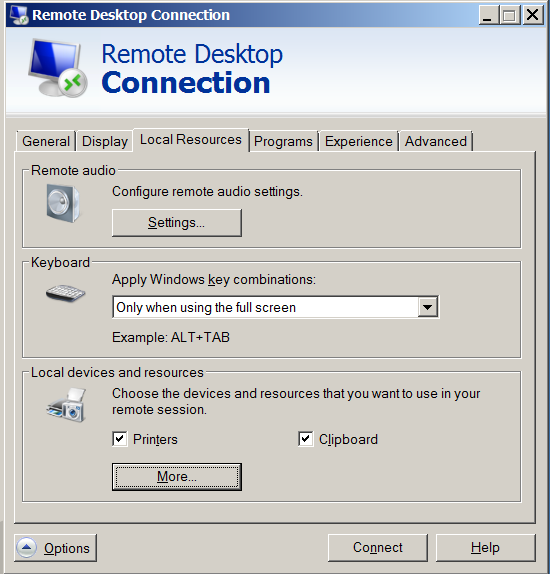
5. Click on Drives
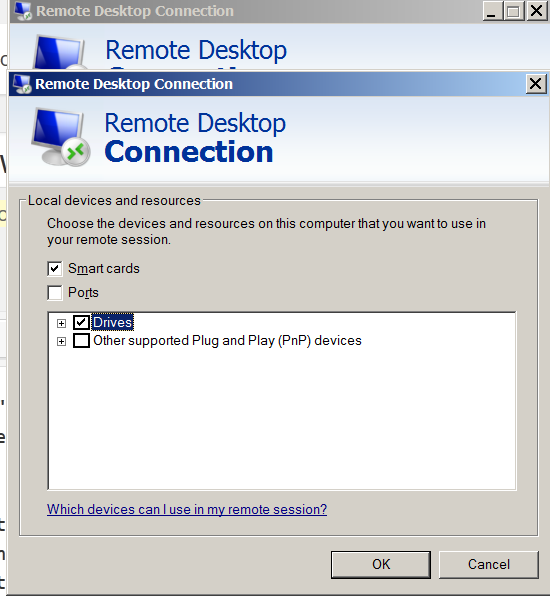
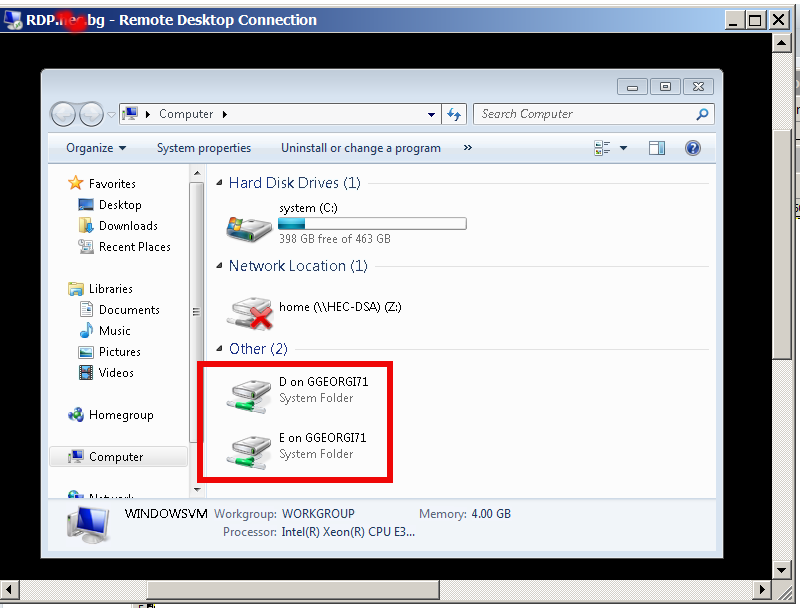
Then after connecting to the Remote RDP host, all your local PC drive partitions C: D: E: will be visible as (attached) ones in mounted in My Computer / MS Explorer with assigned new drive letters
Once, I transferred the .NET Framework 3.5 while using the installer I was notified that .NET Framework 3.5 is by default included in Windows 8 and I need only to enable it.
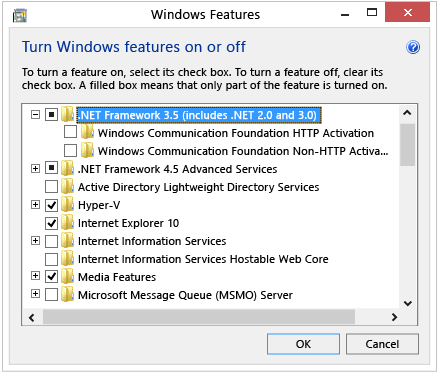
To enable .NET Framework 3.5 in Windows 8 from Control Panel
Choose Programs, and then choose Turn Windows features on or off.
Select the .NET Framework 3.5 (includes .NET 2.0 and 3.0) check box.
Tags: copy paste, default, end, exe, file transfer, host, How to, jump, NAT, network, Pc, RDP, share
Posted in System Administration, Various, Windows | No Comments »
Sunday, October 30th, 2011 
Have you ever been in need to execute some commands scheduled via a crontab, every let’s say 5 seconds?, naturally this is not possible with crontab, however adding a small shell script to loop and execute a command or commands every 5 seconds and setting it up to execute once in a minute through crontab makes this possible.
Here is an example shell script that does execute commands every 5 seconds:
#!/bin/bash
command1_to_exec='/bin/ls';

command2_to_exec='/bin/pwd';

for i in $(echo 1 2 3 4 5 6 7 8 9 10 11); do

sleep 5;

$command1_to_exec; $command2_to_exec;

done
This script will issue a sleep every 5 seconds and execute the two commands defined as $command1_to_exec and $command2_to_exec
Copy paste the script to a file or fetch exec_every_5_secs_cmds.sh from here
The script can easily be modified to execute on any seconds interval delay, the record to put on cron to use with this script should look something like:
# echo '* * * * * /path/to/exec_every_5_secs_cmds.sh' | crontab -
Where of course /path/to/exec_every_5_secs_cmds.sh needs to be modified to a proper script name and path location.
Another way to do the on a number of seconds program / command schedule without using cron at all is setting up an endless loop to run/refresh via /etc/inittab with a number of predefined commands inside. An example endless loop script to run via inittab would look something like:
while [ 1 ]; do

/bin/ls

sleep 5;

done
To run the above sample never ending script using inittab, one needs to add to the end of inittab, some line like:
mine:234:respawn:/path/to/script_name.sh
A quick way to add the line from consone would be with echo:
echo 'mine:234:respawn:/path/to/script' >> /etc/inittab
Of course the proper paths, should be put in:
Then to load up the newly added inittab line, inittab needs to be reloaded with cmd:
# init q
I've also red, some other methods suggested to run programs on a periodic seconds basis using just cron, what I found in stackoverflow.com's as a thread proposed as a solution is:
* * * * * /foo/bar/your_script

* * * * * sleep 15; /foo/bar/your_script

* * * * * sleep 30; /foo/bar/your_script

* * * * * sleep 45; /foo/bar/your_script
One guy, even suggested a shorted way with cron:
0/15 * * * * * /path/to/my/script
Tags: bashcommand, basis, com, command, command2, copy, copy paste, course, cron, crontab, echo 1, echo echo, endless loop, exec, file, foo, foo bar, freebsd, gnu linux, How to, init, inittab, interval, line, Linux, location, loop, mine, minute, name, nbsp, number, Path, predefined commands, pwd, record, refresh, respawn, run, script, script name, secs, SHA, Shell, shell script, sleep, something, stackoverflow, thread, time, time interval, way
Posted in Linux, Linux and FreeBSD Desktop, System Administration, Various | 1 Comment »


