Posts Tagged ‘copy’

How to make a mirror of website on GNU / Linux with wget / Few tips on wget site mirroring

Wednesday, February 22nd, 2012

how-to-make-mirror-of-website-on-linux-wget

Everyone who used Linux is probably familiar with wget or has used this handy download console tools at least thousand of times. Not so many Desktop GNU / Linux users like Ubuntu and Fedora Linux users had tried using wget to do something more than single files download.
Actually wget is not so popular as it used to be in earlier linux days. I've noticed the tendency for newer Linux users to prefer using curl (I don't know why).

With all said I'm sure there is plenty of Linux users curious on how a website mirror can be made through wget.
This article will briefly suggest few ways to do website mirroring on linux / bsd as wget is both available on those two free operating systems.

1. Most Simple exact mirror copy of website

The most basic use of wget's mirror capabilities is by using wget's -mirror argument:

# wget -m http://website-to-mirror.com/sub-directory/

Creating a mirror like this is not a very good practice, as the links of the mirrored pages will still link to external URLs. In other words link URL will not pointing to your local copy and therefore if you're not connected to the internet and try to browse random links of the webpage you will end up with many links which are not opening because you don't have internet connection.

2. Mirroring with rewritting links to point to localhost and in between download page delay

Making mirror with wget can put an heavy load on the remote server as it fetches the files as quick as the bandwidth allows it. On heavy servers rapid downloads with wget can significantly reduce the download server responce time. Even on a some high-loaded servers it can cause the server to hang completely.
Hence mirroring pages with wget without explicity setting delay in between each page download, could be considered by remote server as a kind of DoS – (denial of service) attack. Even some site administrators have already set firewall rules or web server modules configured like Apache mod_security which filter requests to IPs which are doing too frequent HTTP GET /POST requests to the web server.
To make wget delay with a 10 seconds download between mirrored pages use:

# wget -mk -w 10 -np --random-wait http://website-to-mirror.com/sub-directory/

The -mk stands for -m/-mirror and -k / shortcut argument for –convert-links (make links point locally), –random-wait tells wget to make random waits between o and 10 seconds between each page download request.

3. Mirror / retrieve website sub directory ignoring robots.txt "mirror restrictions"

Some websites has a robots.txt which restricts content download with clients like wget, curl or even prohibits, crawlers to download their website pages completely.

/robots.txt restrictions are not a problem as wget has an option to disable robots.txt checking when downloading.
Getting around the robots.txt restrictions with wget is possible through -e robots=off option.
For instance if you want to make a local mirror copy of the whole sub-directory with all links and do it with a delay of 10 seconds between each consequential page request without reading at all the robots.txt allow/forbid rules:

# wget -mk -w 10 -np -e robots=off --random-wait http://website-to-mirror.com/sub-directory/

4. Mirror website which is prohibiting Download managers like flashget, getright, go!zilla etc.

Sometimes when try to use wget to make a mirror copy of an entire site domain subdirectory or the root site domain, you get an error similar to:

Sorry, but the download manager you are using to view this site is not supported.
We do not support use of such download managers as flashget, go!zilla, or getright

This message is produced by the site dynamic generation language PHP / ASP / JSP etc. used, as the website code is written to check on the browser UserAgent sent.
wget's default sent UserAgent to the remote webserver is:
Wget/1.11.4

As this is not a common desktop browser useragent many webmasters configure their websites to only accept well known established desktop browser useragents sent by client browsers.
Here are few typical user agents which identify a desktop browser:
 

  • Mozilla/5.0 (Windows NT 6.1; rv:6.0) Gecko/20110814 Firefox/6.0
  • Mozilla/5.0 (X11; Linux i686; rv:6.0) Gecko/20100101 Firefox/6.0
  • Mozilla/6.0 (Macintosh; I; Intel Mac OS X 11_7_9; de-LI; rv:1.9b4) Gecko/2012010317 Firefox/10.0a4
  • Mozilla/5.0 (Windows NT 6.1; Win64; x64; rv:2.2a1pre) Gecko/20110324 Firefox/4.2a1pre

etc. etc.

If you're trying to mirror a website which has implied some kind of useragent restriction based on some "valid" useragent, wget has the -U option enabling you to fake the useragent.

If you get the Sorry but the download manager you are using to view this site is not supported , fake / change wget's UserAgent with cmd:

# wget -mk -w 10 -np -e robots=off \
--random-wait
--referer="http://www.google.com" \--user-agent="Mozilla/5.0 (Windows; U; Windows NT 5.1; en-US; rv:1.8.1.6) Gecko/20070725 Firefox/2.0.0.6" \--header="Accept:text/xml,application/xml,application/xhtml+xml,text/html;q=0.9,text/plain;q=0.8,image/png,*/*;q=0.5" \--header="Accept-Language: en-us,en;q=0.5" \--header="Accept-Encoding: gzip,deflate" \--header="Accept-Charset: ISO-8859-1,utf-8;q=0.7,*;q=0.7" \--header="Keep-Alive: 300"

For the sake of some wget anonimity – to make wget permanently hide its user agent and pretend like a Mozilla Firefox running on MS Windows XP use .wgetrc like this in home directory.

5. Make a complete mirror of a website under a domain name

To retrieve complete working copy of a site with wget a good way is like so:

# wget -rkpNl5 -w 10 --random-wait www.website-to-mirror.com

Where the arguments meaning is:
-r – Retrieve recursively
-k – Convert the links in documents to make them suitable for local viewing
-p – Download everything (inline images, sounds and referenced stylesheets etc.)
-N – Turn on time-stamping
-l5 – Specify recursion maximum depth level of 5

6. Make a dynamic pages static site mirror, by converting CGI, ASP, PHP etc. to HTML for offline browsing

It is often websites pages are ending in a .php / .asp / .cgi … extensions. An example of what I mean is for instance the URL http://php.net/manual/en/tutorial.php. You see the url page is tutorial.php once mirrored with wget the local copy will also end up in .php and therefore will not be suitable for local browsing as .php extension is not understood how to interpret by the local browser.
Therefore to copy website with a non-html extension and make it offline browsable in HTML there is the –html-extension option e.g.:

# wget -mk -w 10 -np -e robots=off \
--random-wait \
--convert-links http://www.website-to-mirror.com

A good practice in mirror making is to set a download limit rate. Setting such rate is both good for UP and DOWN side (the local host where downloading and remote server). download-limit is also useful when mirroring websites consisting of many enormous files (documental movies, some music etc.).
To set a download limit to add –limit-rate= option. Passing by to wget –limit-rate=200K would limit download speed to 200KB.

Other useful thing to assure wget has made an accurate mirror is wget logging. To use it pass -o ./my_mirror.log to wget.
 

Speeding up Apache through apache2-mpm-worker and php5-cgi on Debian / How to improve Apache performance and decrease server memory consumption

Friday, March 18th, 2011

speeding up apache through apache2-mpm-worker and php5-cgi on Debian Linux / how to improve apache performance and decrease server responce time
By default most Apache running Linux servers on the Internet are configured to use with the mpm prefork apache module
Historically prefork apache module is the predecessor of the worker module therefore it's believed to be a way more tested and reliable, if you need a critical reliable webserver configuration.

However from my experience by so far with the Apache MPM Worker I can boldly say that many of the rumors concerning the unreliabity of apache2-mpm-worker are just myths.

The old way Apache handles connections e.g. the mod prefork is the well known way that high amount of the daemons on Linux and BSD are still realying on.
When prefork is a used by Apache, every new TCP/IP connection arriving at your Linux server on the Apache configured port let's say on port 80 is being served by Apache in a way that the Apache process (mother process) parent does fork a new Apache parent copy in order to serve the new request.
Thus by using the prefork Apache needs to fork new process (if it doesn't have already an empty forked one waiting for connections) and serve the HTTP request of the new client, after the request of the client is completed the newly forked Apache usually dies (even though it again depends on the way the Apache server is configured via the Apache configuration – apache2.conf / httpd.conf etc.).

Now you can imagine how slow and memory consuming it is that all the time the parent Apache process spawns new processes, kills old ones etc. in order to fulfill the client requests.

Now just to compare the Apace mpm prefork does not use the old forking way, but relies on a few Apache processes which handles all the requests without constantly being destroyed and recreated like with the prefork module.
This saves operations and system resources, threaded programming has already been proven to be more efficient way to handle tasks and is heavily adopted in GUI programming for instance in Microsoft Windows, Mac OS X, Linux Gnome, KDE etc.

There is plenty of information and statistical data which compares Apache running with prefork and respectively worker modules online.
As the goal of this article is not to went in depths with this kind of information I would not say more on it but let you explore online a bit more about them in case if you're interested.

The purpose of this article is to explain in short how to substitute the Apache2-MPM-Prefork and how your server performance could benefit out of the use of Apache2-MPM-Worker.
On Debian the default Apache process serving module in Apache 1.3x,Apache 2.0x and 2.2x is prefork thus the installation of apache2-mpm-worker is not "a standard way" to install Apache

Deciding to swith from the default Debian apache-mpm-prefork to apache-mpm-worker is quite a serious and responsible decision and in some cases might cause troubles, if you have decided to follow my article be sure to consider all the possible negative consequences of switching to the apache worker !

Now after having said a bunch of info which might be not necessary with the experienced system admin I'll continue on with the steps to install the apache2-mpm-worker.

1. Install the apache2-mpm-worker

debian:~# apt-get install apache2-mpm-worker php5-cgi
Reading state information... Done
The following packages were automatically installed and are no longer required:
The following packages will be REMOVED apache2-mpm-prefork libapache2-mod-php5
The following NEW packages will be installed apache2-mpm-worker
0 upgraded, 1 newly installed, 2 to remove and 46 not upgraded.
Need to get 0B/259kB of archives.After this operation, 6193kB disk space will be freed.

As you can notice in below's text confirmation which will appear you will have to remove the apache2-mpm-prefork and the apache2-mpm-worker modules before you can proceed to install the apache2-mpm-prefork.

You might ask yourself if I remove my installed libphp how would I be able to use my Apache with my PHP based websites? And why does the apt package manager requires the libapache2-mod-php5 to get removed.
The explanation is simple apache2-mpm-worker is not thread safe, in other words scripts which does use the php fork(); function would not work correctly with the Apache worker module and will probably be leading to PHP and Apache crashes.
Therefore in order to install the apache mod worker it's necessary that no libapache2-mod-php5 is existent on the system.
In order to have a PHP installed on the server again you will have to use the php5-cgi deb package, this is the reason in the above apt-get command I'm also requesting apt to install the php5-cgi package next to apache2-mpm-worker.

2. Enable the cgi and cgid apache modules

debian:~# a2enmod cgi
debian:~# a2enmod cgid

3. Activate the mod_actions apache modules

debian:~# cd /etc/apache2/mods-enabled
debian:~# ln -sf ../mods-available/actions.load
debian:~# ln -sf ../mods-available/actions.conf

4. Add configuration options in order to enable mod worker to use the newly installed php5-cgi

Edit /etc/apache2/mods-available/actions.conf vim, mcedit or nano (e.g. your editor of choice and add inside:

&ltIfModule mod_actions.c>
Action application/x-httpd-php /cgi-bin/php5
</IfModule>

After completing all the above instructions, you might also need to edit your /etc/apache2/apache2.conf to tune up, how your Apache mpm worker will serve client requests.
Configuring the <IfModule mpm_worker_module> in apache2.conf is necessary to optimize your newly installed mpm_worker module for performance.

5. Configure the mod_worker_module in apache2.conf One example configuration for the mod worker is:

<IfModule mpm_worker_module>
StartServers 2
MaxClients 150
MinSpareThreads 25
MaxSpareThreads 75
ThreadsPerChild 25
MaxRequestsPerChild 0
</IfModule>

Consider the fact that this configuration is just a sample and it's in no means configured for serving Apache requests for high load Apache servers and you need to further play with the values to have a good results on your server.

6. Check that all is fine with your Apache configurations and no syntax errors are encountered

debian:~# /usr/sbin/apache2ctl -t
Syntax OK

If you get something different from Syntax OK track the error and fix it before you're ready to restart the Apache server.

7. Now restart the Apache server

debian:~# /etc/init.d/apache2 restart

All should run fine and hopefully your PHP scripts should be interpreted just fine through the php5-cgi instead of the libapache2-mod-php5.
Using the /usr/bin/php5-cgi will increase with some percentage your server CPU load but on other hand will drasticly decrease the Webserver memory consumption.
That's quite logical because the libapache2-mod-hp5 is loaded once during apache server whether a new instance of /usr/bin/php5-cgi is invoked during each of Apache requests via the mod worker.

There is one serious security flow coming with php5-cgi, DoS against a server processing scripts through php5-cgi is much easier to be achieved.
An example for a denial attack which could affect a website running with mod worker and php5-cgi, could be simulated from a simple user with a web browser which holds up the f5 or ctrl + r browser page refresh buttons.
In that case whenever php5-cgi is used the CPU load would rise drastic, one possible solution to this denial of service issues is by installing and using libapache2-mod-evasive like so:

8. Install libapache2-mod-evasive

debian:~# apt-get install libapache2-mod-evasive
The Apache mod evasive module is a nice apache module to minimize HTTP DoS and brute force attacks.
Now with mod worker through the php5-cgi, your apache should start serving requests more efficiently than before.
For some performance reasons some might even want to try out the fastcgi with the worker to boost the Apache performance but as I have never tried that I can't say how reliable a a mod worker with a fastcgi would be.

N.B. ! If you have some specific php configurations within /etc/php5/apache2/php.ini you will have to set them also in /etc/php5/cgi/php.ini before you proceed with the above instructions to install Apache otherwise your PHP scripts might not work as expected.

Mod worker is also capable to work with the standard mod php5 Apache module, but if you decide to go this route you will have to recompile your PHP lib manually from source as in Debian this option is not possible with the default php library.
This installation worked fine on Debian Lenny but suppose the same installation should work fine on Debian Squeeze as well as Debian testing/unstable.
Feedback on the afore-described mod worker installation is very welcome!

How rescue unbootable Windows PC, Windows files through files Network copy to remote server shared Folder using Hirens Boot CD

Saturday, November 12th, 2011

hirens-boot-cd-logo-how-to-rescue-unbootable-pc-with-hirens-bootcd
I'm rescuing some files from one unbootable Windows XP using a livecd with Hirens Boot CD 13

In order to rescue the three NTFS Windows partitions files, I mounted them after booting a Mini Linux from Hirens Boot CD.

Mounting NTFS using Hirens BootCD went quite smoothly to mount the 3 partitions I used cmds:

# mount /dev/sda1 /mnt/sda1
# mount /dev/sda2 /mnt/sda2
# mount /dev/sdb1 /mnt/sdb1

After the three NTFS file partitions are mounted I used smbclient to list all the available Network Shares on the remote Network Samba Shares Server which by the way possessed the NETBIOS name of SERVER 😉

# smbclient -L //SERVER/
Enter root's password:
Domain=[SERVER] OS=[Windows 7 Ultimate 7600] Server=[Windows 7 Ultimate 6.1]

Sharename Type Comment
——— —- ——-
!!!MUSIC Disk
ADMIN$ Disk Remote Admin
C$ Disk Default share
Canon Inkjet S9000 (Copy 2) Printer Canon Inkjet S9000 (Copy 2)
D$ Disk Default share
Domain=[SERVER] OS=[Windows 7 Ultimate 7600] Server=[Windows 7 Ultimate 6.1]
Server Comment
——— ——-
Workgroup Master
——— ——-

Further on to mount the //SERVER/D network samba drive – (the location where I wanted to transfer the files from the above 3 mounted partitions):

# mkdir /mnt/D
# mount //192.168.0.100/D /mnt/D
#

Where the IP 192.168.0.100 is actually the local network IP address of the //SERVER win smb machine.

Afterwards I used mc to copy all the files I needed to rescue from all the 3 above mentioned win partitions to the mounted //SERVER/D
 

Create Routine mirror copy of milw0rm & packetstorm exploits database

Wednesday, January 13th, 2010

Few weeks ago, I’ve built a small script and put it to
execute in cron in order to have an up2date local copy of
milw0rm. Ofcourse that’s pretty handy for several reasons.
For example milw0rm may go down and the exploit database tobe lost forever. This once happened with hack.co.za which ceasedto exist several years ago, even though it has one of thegreatest exploits database for it’s time.
Luckily I did a copy of hack.co.za, knowing that it’s gone
day might come here is the mirror archive of hack.co.za database
Anyways back to the main topic which was creating routine mirror
copy of milw0rm exploits database.
Here is the small script that needs to be setup on cron in order tohave periodic copy of milw0rm exploits database.
#!/usr/local/bin/bash# Download milw0rm exploitsdownload_to='/home/hipo/exploits';milw0rm_archive_url='http://milw0rm.com/sploits/milw0rm.tar.bz2';milw0rm_archive_name='milw0rm.tar.bz2';if [ ! -d '/home/hipo/exploits' ]; thenmkdir -p $download_to;ficd $download_to;wget -q $milw0rm_archive_url;tar -jxvvf $milw0rm_archive_name;rm -f $milw0rm_archive_name;exit 0 The script is available as wellfor download via milw0rm_exploits_download.sh
To make the script operational I’ve set it up to execute via cron with
the following cron record:
00 1 * * * /path_to_script/milw0rm_exploits_download.sh >/dev/null 2>&1 Here is another shell code I used to download all packetstormsecurity exploits frompacketstormsecurity’s website:
#!/usr/local/bin/bash# Download packetstormsecurity exploits# uses jot in order to run in freebsdpacketstorm_download_dir='/home/hipo/exploits';if [ ! -d "$packetstorm_download" ]; thenmkdir -p "$packetstorm_download";for i in $(jot 12); do wget http://www.packetstormsecurity.org/0"$i"11-exploits/0"$i"11-exploits.tgz; done
The script can be obtained also via following link (packetstormsecurity_expl_db_download.sh)

Another interesting tutorial that relates to the topic of building local
mirrors (local exploit database) is an article I found on darkc0de.com’s
website calledHow to build a local exploit database
The article explains thoroughly
howto prepare packetstormsecurity exploits database mirrorand
how to mirror milw0rm through python scripts.
Herein I include links to the 2 mirror scripts:
PacketStorm Security Mirror Script
milw0rm archive mirror script
Basicly the milw0rm archive script is identical to the small shellscript
I’ve written and posted above in the article. However I believe there is
one advantage of the shellscript it doesn’t require you
to have python installed 🙂

Linux: How to change recursively directory permissions to executable (+x) flag

Monday, September 2nd, 2013

change recursively permissions of directories and subdirectories Linux and Unix with find command
I had to copy large directory from one Linux server to windows host via SFTP proto (with WinSCP). However some of directories to be copied lacked executable flag, thus WinSCP failed to list and copy them.

Therefore I needed way to set recursively, all sub-directories under directory /mirror (located on Linux server) to +x executable flag.

There are two ways to do that one is directly through find cmd, second by using find with xargs
Here is how to do it with find:

# find /mirror -type d -exec chmod 755 {} + Same done with find + xargs:

# find /path/to/base/dir -type d -print0 | xargs -0 chmod 755
To change permissions only to all files under /mirror server directory with find

# find /path/to/base/dir -type f -exec chmod 644 {} +

Same done with find + xargs:
# find /path/to/base/dir -type f -print0 | xargs -0 chmod 644

Also, tiny shell script that recursively changes directories permissions (autochmod_directories.sh) is here

Adding Comments & Google search plugins to nanoblogger

Thursday, July 30th, 2009

Ever wondered how you can add comments option to nanoblogger just like any normal blogging software like wordpress do support? Cause I did, Today I wandered around in google a bit until I can make it.In order to make all this workable I choose the nbcom nanoblogger plugin.Here’s what led me to success.First prepare yourself to loose a couple of hours! It’s more complicated or at least it was more complicated than I expected to add a simple plugin as this.Second, You’ll need the following nbcom 1.1 archive .
Right after that you’ll need to untar it and rename hdrs.tmpl and consts.tmpl to *.php, edit them and remove all the unneeded “/” back slashes. Copy the content of nbcom-1.1 dir to the document root of your nanoblogger. Make sure to edit blog.conf and have all the necessary like BLOG_URL, BLOG_ADMIN=”session”, DB_PASS=”password_of_sql_user_session”, yes I forgot to mention that you’ll need to read the INSTALL file contained in the nbcom archive and follow the instructions for creation of user and database that nbcom would use in the future. There are described like 7+ files more you need to edit and if you’re lucky like I was you’ll have nanoblogger+comments support up and running! Hooray! Wish you Good luck.
Secondly probably you have wondered how to make nanoblogger has a normal search field just like any normal php based blogger software out there. It took me like an hour before I came to the enlightenment. First I had downloaded the google.sh script mirrored for you to make your life easier here .
Next copy the file to your nanoblogger plugins directory.
And last you have to edit the templates/main_index.htm file and add the content that is as commented in the google.sh file. If you’re lucky again you’ll have nanoblogger with this two valuable plugins working. EnjoyEND—–

How to get a list and Backup (Save Enabled Plugins) / Restore Enabled (Active) plugins in WordPress site with SQL query

Wednesday, January 14th, 2015

get-list-and-backup-restore-enabled-active-plugins-only-in-wordpress-with-sql-mysql-query

Getting a snapshot of all active plugins and keeping it for future in case if you install some broken plugin and you have to renable all enabled plugins from scratch is precious thing in WordPress.

… It is really annoying when you decide to try to enable few new plugins and out of a sudden your WordPress site / blog starts hanging (when accessed in browser)…

To fix it you have to Disable All Plugins and Re-enable all that used to work. However if you don't keep a copy of the plugins which were previously working and you're like me and have 109 plugins installed of which only 50 are in (Active) state / used. It could take you a day or two until you come up with a similar list to the ones you previously used … Thanksfully there is some prevention you can take by dumping a list of all plugins that are currently active and in later time only enable those in the list.


# mysql -u root -p
Enter password:

mysql> USE blog_db;

Here is the output I get in the moment:
 

mysql> DESCRIBE wp_options;
+————–+———————+——+—–+———+—————-+
| Field        | Type                | Null | Key | Default | Extra          |
+————–+———————+——+—–+———+—————-+
| option_id    | bigint(20) unsigned | NO   | PRI | NULL    | auto_increment |
| option_name  | varchar(64)         | NO   | UNI |         |                |
| option_value | longtext            | NO   |     | NULL    |                |
| autoload     | varchar(20)         | NO   |     | yes     |                |
+————–+———————+——+—–+———+—————-+


mysql> SELECT * FROM wp_options WHERE option_name = 'active_plugins';

|        38 | active_plugins | a:50:{i:0;s:45:"add-to-any-subscribe/add-to-any-subscribe.php";i:1;s:19:"akismet/akismet.php";i:2;s:43:"all-in-one-seo-pack/all_in_one_seo_pack.php";i:3;s:66:"ambrosite-nextprevious-post-link-plus/ambrosite-post-link-plus.php";i:4;s:49:"automatic-tag-selector/automatic-tag-selector.php";i:5;s:27:"autoptimize/autoptimize.php";i:6;s:35:"bm-custom-login/bm-custom-login.php";i:7;s:45:"ckeditor-for-wordpress/ckeditor_wordpress.php";i:8;s:47:"comment-info-detector/comment-info-detector.php";i:9;s:27:"comments-statistics/dcs.php";i:10;s:31:"cyr2lat-slugs/cyr2lat-slugs.php";i:11;s:49:"delete-duplicate-posts/delete-duplicate-posts.php";i:12;s:45:"ewww-image-optimizer/ewww-image-optimizer.php";i:13;s:34:"feedburner-plugin/fdfeedburner.php";i:14;s:39:"feedburner-widget/widget-feedburner.php";i:15;s:63:"feedburner_feedsmith_plugin_2.3/FeedBurner_FeedSmith_Plugin.php";i:16;s:21:"feedlist/feedlist.php";i:17;s:39:"force-publish-schedule/forcepublish.php";i:18;s:50:"google-analytics-for-wordpress/googleanalytics.php";i:19;s:81:"google-sitemap-generator-ultimate-tag-warrior-tags-addon/UTWgoogleSitemaps2_1.php";i:20;s:36:"google-sitemap-generator/sitemap.php";i:21;s:24:"headspace2/headspace.php";i:22;s:29:"my-link-order/mylinkorder.php";i:23;s:27:"php-code-widget/execphp.php";i:24;s:43:"post-plugin-library/post-plugin-library.php";i:25;s:35:"post-to-twitter/post-to-twitter.php";i:26;s:28:"profile-pics/profile-pic.php";i:27;s:27:"redirection/redirection.php";i:28;s:42:"scripts-to-footerphp/scripts-to-footer.php";i:29;s:29:"sem-dofollow/sem-dofollow.php";i:30;s:33:"seo-automatic-links/seo-links.php";i:31;s:23:"seo-slugs/seo-slugs.php";i:32;s:41:"seo-super-comments/seo-super-comments.php";i:33;s:31:"similar-posts/similar-posts.php";i:34;s:21:"sociable/sociable.php";i:35;s:44:"strictly-autotags/strictlyautotags.class.php";i:36;s:16:"text-control.php";i:37;s:19:"tidy-up/tidy_up.php";i:38;s:37:"tinymce-advanced/tinymce-advanced.php";i:39;s:33:"tweet-old-post/tweet-old-post.php";i:40;s:33:"w3-total-cache/w3-total-cache.php";i:41;s:44:"widget-settings-importexport/widget-data.php";i:42;s:54:"wordpress-23-related-posts-plugin/wp_related_posts.php";i:43;s:23:"wp-minify/wp-minify.php";i:44;s:27:"wp-optimize/wp-optimize.php";i:45;s:33:"wp-post-to-pdf/wp-post-to-pdf.php";i:46;s:29:"wp-postviews/wp-postviews.php";i:47;s:55:"wp-simple-paypal-donation/wp-simple-paypal-donation.php";i:48;s:46:"wp-social-seo-booster/wpsocial-seo-booster.php";i:49;s:31:"wptouch-pro-3/wptouch-pro-3.php";} | yes      |

Copy and paste this CVS format data to a text file or a Word document for later reference ..

To restore back to normal only active WordPress plugins, first launch following SQL query to disable all enabled wordpress plugins:

UPDATE wp_options SET option_value = 'a:0:{}' WHERE option_name = 'active_plugins';

To restore above "backupped" list of active WP plugins you have to copy paste the saved content and paste it into above UPDATE query substituting option_value=' ' with the backupped string.

P.S. – This query should work on WordPress 3.x on older wordpress ver 2.x use instead:

UPDATE wp_options SET option_value = ' ' WHERE option_name = 'active_plugins';

Because pasting the backupped Active plugins list CSV is a messy and unreadable from command line it is recommended for clarity to use PHPMyAdmin frontend (whenever it is available) on server. This little hint is a real time-saver and saves a lot of headaches. Before proceeding to any Db UPDATE SQL queries always backup your Blog database, with time structure of WordPress data changes!, so in future releases this method might not be working, however if it helped you and works on your version please drop a comment with WordPress version on which this helped you.

Enjoy! 🙂


Stop contact form spam emails in Joomla, Disable “E-mail a copy of this message to your own address.” in Joomla

Friday, April 11th, 2014

email-copy-of-this-message-to-your-own-address_Contact_email_form
If you happen to have installed Joomla based website and setup a contact form and everything worked fine until recently but suddenly your server starts mysteriously acting as a spam relay – even though email server is perfectly secured against spam.
You probably have some issue with a website email contact form hacked or some vulnerability which allowed hackers to upload spammer php script.

I have a website based on Joomla and just until recently everything was okay until I noticed there are tons of spam flying out from my Qmail mail server (which is configured to check spam with Spamassassin has Bayesian Filtering, Distributed Checksum Claring House, Python Razor and plenty of custom anti-spam rules.

It was just yesterday I ended into that situation, then after evaluating all the hosted website, I've realized Spam issues are caused by an Old Joomla Website Contact form!

There were two issues in the form

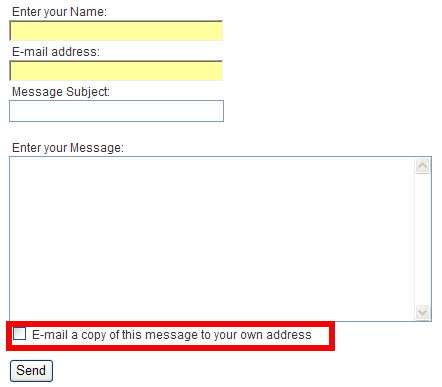
in the contact form you have the field with a tick:

1. Well Known Joomla Form Vulnerability
Currently all Joomla (including 1.5.22 and 1.6 versions) are vulnerable to a serious spam relay problem as described in the official Joomla site.

There is a quick dirty workaround fix to contact form vulnerability –  disable a Joomla Comonent in ../joomla/components/com_mailto/

To disable it I had to:

cd /var/www/joomla/components
mv com_mailto com_mailtoNOT_USED

Above solution was described under a post resolve joomla spam relay earlier by Anatoliy Dimitrov (after checking closely the website it happened he is a colleague at HP 🙂 )

2. Second issue causing high amount of spam sent over the email server
was: "E-mail a copy of this message to your own address." contact form tick, which was practically enabling any Spammer with a list to inect emails and spam via the form sending copies to any email out on the internet!

You would definitely want to disable  "E-mail a copy of this message to your own address."
I wonder why ever any Joomla developer came up with this "spam form"?? 

joomla-disable-email-copy-of-this-message-to-your-own-address

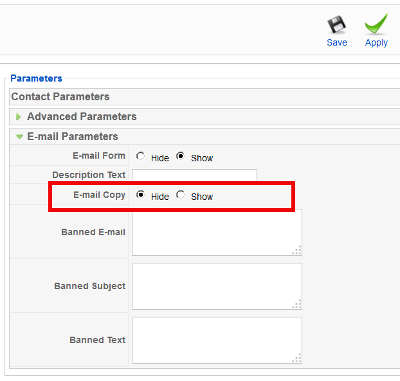
Here is the solution to this:

1. Login to Joomla Admin with admin account
2. Goto Components -> Contacts -> Contacts
3. Click on the relevant Contact form
4. Under Contact Parameters go to Email Parameters
5. Change field E-mail Copy from Show to Hide and click Apply button

And Hooray the E-mail a copy of this message to your own address will be gone from contact form! 🙂

I've seen already plenty of problematic hacked servers and scripts before with Joomla in my last job in International University College – where joomla was heavy used, but I never experienced Joomla Security issues myself 'till know, in future I'm planning to never ever use joomla. Though it is an easy CMS system to setup a website its quite complicated to learn the menus – I remember when creating the problematic website it took me days until I properly setup all the menus and find all joomla components … besides these there is no easy way to migrate between different versions major releases in Joomla like in Wordperss, I guess this Mail Security Issue absolutely convinced me to quit using that piece of crap in future.

In mean Time another very serious Apache security flaw leaked on the Internet just few days ago – The OpenSSL Hearbleed Bug. Thanksfully I'm not running SSL anywhere on my website but many systems are affecting making most of your SSL communication with your Internet banking, E-mail etc. in danger. If you're running Apache with SSL make sure you test it for this vulnerability. Here is description of Heartbleed SSL Critical Vulnerability.

heartbleed_ssl_remote_vulnerability_logo

"The Heartbleed Bug is a serious vulnerability in the popular OpenSSL cryptographic software library. This weakness allows stealing the information protected, under normal conditions, by the SSL/TLS encryption used to secure the Internet. SSL/TLS provides communication security and privacy over the Internet for applications such as web, email, instant messaging (IM) and some virtual private networks (VPNs).

The Heartbleed bug allows anyone on the Internet to read the memory of the systems protected by the vulnerable versions of the OpenSSL software. This compromises the secret keys used to identify the service providers and to encrypt the traffic, the names and passwords of the users and the actual content. This allows attackers to eavesdrop on communications, steal data directly from the services and users and to impersonate services and users."

11


Find all hidden files in Linux, Delete, Copy, Move all hidden files

Tuesday, April 15th, 2014

search-find-all-hidden-files-linux-delete-all-hidden-files
Listing hidden files is one of the common thing to do as sys admin. Doing manipulations with hidden files like copy / delete / move is very rare but still sometimes necessary here is how to do all this.

1. Find and show (only) all hidden files in current directory

find . -iname '.*' -maxdepth 1

maxdepth – makes files show only in 1 directory depth (only in current directory), for instance to list files in 2 subdirectories use -maxdepth 3 etc.

echo .*;

Yeah if you're Linux newbie it is useful to know echo command can be used instead of ls.
echo * command is very useful on systems with missing ls (for example if you mistakenly deleted it 🙂 )

2. Find and show (only) all hidden directories, sub-directories in current directory

To list all directories use cmd:

find /path/to/destination/ -iname ".*" -maxdepth 1 -type d

3. Log found hidden files / directories

find . -iname ".*" -maxdept 1 -type f | tee -a hidden_files.log

find . -iname ".*" -maxdepth 1 type d | tee -a hidden_directories.log
4. Delete all hidden files in current directory

cd /somedirectory
find . -iname ".*" -maxdepth 1 -type f -delete

5. Delete all hidden files in current directory

cd /somedirectory
find . -iname ".*" -maxdepth 1 -type d -delete

6. Copy all hidden files from current directory to other "backup" dir

find . -iname ".*" -maxdepth 1 -type f -exec cp -rpf '{}' directory-to-copy-to/ ;

7. Copy and move all hidden sub-directories from current directory to other "backup" dir

find . -iname ".*" -maxdepth 1 -type d -exec cp -rpf '{}' directory-to-copy-to/ ;

– Moving all hidden sub-directories from current directory to backup dir

find . -iname ".*" -maxdepth 1 -type d -exec mv '{}' directory-to-copy-to/ ;


How to split / rar in parts large data archive files on Linux and Windows – Transfer big files across servers located in DMZ rescticted areas

Friday, November 28th, 2014

how-to-split-rar-in-parts-large-data-archive-files-on-Linux-and-Windows-Transfer-big-files-across-servers-in-firewalled-restricted-areas

I was working on a Application Migration Project whose goal was to Install a business application called Asset Guardian and then move current company Data from the old server to the new AppServer.
F
or that purpose the company vendor Asset Guardian shipped to a Public access FTP, a huge (12GB) ZIP archive file which had to be transferred into a well secured DMZ-ed corporation network with various implemented Traffic Shaping Network policies, a resctrictive firewall allowing access to Internal Network only and to Few (Restrictive configured) Proxy Server IPs on port 80 and 8080.

One of the proxy servers allowed access to the Internet and I set this one and tried downloading the Huge Archive file  with the Windows 2012 server default browser Internet Explorer 10, though the download started it kept slow between ~ 300 – 500KB sec and when reached 3.4GB download failed. I tried resuming the download but as the remote Public FTP server where files resides doesn't support FTP RESUME function.
I thought it might be that Internet Explorer is badly managing the download so, I go forward and installed Portable Firefox (mirrored version 33.1.1 is here). Re-running download with firefox also failed, so the next logical step was for me to try downloading with Windows version of Wget (Wget) and with Portable Free Download Manager 3.9.14.1481 (mirrored here) using both of them was unable to complete download (probably due to firewall or Proxy screwing the proxy inspected traffic) thus I had to look for another way to copy the enormous archive into the company network.

To get around the issue I tried to download the file from FTP to another Server running Apache and tried re-downloading the big file archive (Asset-Guardian-data.zip) from Apache Webserver via HTTP protocol, this download method didn't work neither using plain HTTP protocol for download when downloaded file reached (3.4GB), thus I realized this is due to restrictive Proxy servers (dropping file downloads) bigger than  3.4GBs).

Then to be able to transfer the huge 12GB file, it seems the only left option was to to chop the big file on smaller file chunks and transfer them one by one.
In my case I had the Asset-Guardian-Files.zip transferred already to the Apache (Webserver) host which is running Linux so basicly the task was to Transfer Big archive file between the SuSE Linux Enterprise Server (SLES) 11 and Windows 2012 Server.

Quickesy way to do that is by using UNIX split command, i.e.:

split -b 1024m Asset-Guardian-Files.zip


The outputted files each 1GB are with naming (xaa, xab, xac, xad, xae, xaf, gaf etc.) in same folder where split command is run:

To later merge the files on the Windows 2012 server (copy) command is used:

copy /b file1 + file2 + file3 + file4 filetogether


In my case the command to issue on Win 2012 server was:

copy /b xaa + xab + xac + xae + xae + xaf + xaf + xag xah xai xaj xak Asset-Guardian-files.zip


This method to chop and transfer the file is most simple one and it doesn't require the two servers to have WinRAR or Console RAR / unrar installed.

If instead of Copy Huge File from Linux -> Windows host you need to copy too big file (lets say 100GB) between 2 Windows servers (Windows server host A and Windows server Host B – both situated in different firewall corporate networks) you will need to download to Win Host A and use Windows UNIX split equivalent tool called sfk (The Swiss File Knife) , sfk has port also for Mac OS so in case of need for need for migrating huge archive file from Mac OS X host it will serve as Linux's split – I've made SFK (current version) mirror here.

Another way to cut the 12GB file in parts and transfer to destination host via HTTP was to use rar (on the Linux host), then download the file on Win 2012 server and use Winrar Portable Free to extract the multiple files:

To make archive separate in parts set out to certain size out of a huge file with rar on Linux use:

cd /var/www
rar -a -v1000000k Asset_Guardian_Files.splitted.rar /var/www/Asset_Guardian_Files.zip

10000000Kbs = 10000000/1024 = 976MBs, hence rar produced parts will be sized to 976MB rar parts.

To find out archives check for *splitted*.rar in your /var/www

ls -al /var/www/*splitted*.rar
-rw-r–r– 1 root root 1048576 ное 28 18:34 Asset-Guardian-Files.splitted.part1.rar
-rw-r–r– 1 root root 1048576 ное 28 18:34 Asset-Guardian-Files.splitted.part2.rar
-rw-r–r– 1 root root 1048576 ное 28 18:34 Asset-Guardian-Files.splitted.part3.rar
-rw-r–r– 1 root root 1048576 ное 28 18:34 Asset-Guaridna-Filse.splitted.part4.rar


Then to download the files M$ Win 2012 server IE (http://my-linux-host.com/Asset-Guardian-Files.splitted.part1.rar, http://my-linux-host.com/Asset-Guardian-Files.splitted.part2.rar. etc.)

Thanks God, Problem Solved 🙂