Posts Tagged ‘custom’
Wednesday, June 27th, 2012 
1.: Don't use a ring tone or use a short landline phone ringtone on incoming calls
In the past, we all had a local stand line phones, most of the landline phones rung using a very specific ring sound which was almost identical on all phones around the world. This ringing tone used was following some telephone standards. The result was everyone could distinguish a ringing phone in a room or closed space and tell for sure, this sound is generated by a phone. Nowdays with the boom of cellular phone ringtones, there is almost noone who uses a standard old-fashioned telephone ringtone as a ring melody.
The consequence of this is in our minds we start loosing the boundary between whether communicating on the phone or communicating without it.
In younger people this boundary between phone line and a physical communication is more evident than in adults (as youngsters has grown in society where mobile was used everywhere). The implication of this is more and more people are starting to perceive mobile communication as so natural as the person to person communication. Spending big part of the day talking over the phone mostly senseless things, not being consciously aware that this is done due to a heavy phone addiction and repeating behaviour trait stored sub-consciously.
Today everyone chooses a custom mobile phone ringtone melody (popular or impopular) song and sets it up to be a standard incoming call signal. As you can guess there are consequences on the mind, as the ringtone set is heard ten times or more a day during each and every phone call. The result is just like with alcoholics or drug addicts, the more you take from a certain "good" the more attached you become to it. Hence the more we listen to a certain song chunk daily on incoming calls, the sub-conscious becomes dependent on hearing this sound at least a number of times daily. If a day passes without no-one calling us and we don't hear the ringtone indicating a call the sub-conscious stored dependency starts popping up and we could start feeling lonely and we feel like calling someone (and we often do). Obviously this is dependency and even if someone might argue me this is a severe addiction which as every other addiction could be very dangerous and hard to fight.
As I prior said due to the fact that the phone use dependency is built in our minds starting with the phone ring melody, we can reduce this dependency by switching off the phone ringtone completely or at least changing it to a unique beep which is not likely to be heard or seen somewhere in your surrounding environment.
By setting the ringtone to some popular song we see on (TV, Radio or Internet on daily basis) this might become a trigger for us to associate hearing this sound with talking on the phone and hence make you increase the time you spend on the phone ,,, so be careful ,,,,
2.:: Stop Mobile Beeps and sounds on menu navigation
All new mobiles sold on the market are configured to have buzzling sounds on events and various beeps on keypad lock / unlock and menu navigation.
This sounds are there mostly to make you more alert and concentrated on using your mobile and often as a consequence whether one uses his mobile his awareness is comletely taken by the phone screen (you're totally "absorbed" by the phone use).
Besides designed to alert you the Managers and CEO's who decided to have a heavy beep sounds on mobiles made it having probably something else on mind? The beeps on keypad navigation makes the user emotionally and sub-consciously attached to the Cell Phone. The idea here is like in popular music streamed on radios and TVs and mostly everywhere …. The more you listen to a song, the higher the mind trait it leaves in you, so later when one hears a music pattern or a whole song, which he / she listened already thousands of times this brings back "good" old memories. It is very simple actually our minds are constructed in a way that the mor certain "information" is heard / saw / smell the bigger the mind influence this leaves on us. Back to the mobile sounds, the more you use the mobile phone with turned on sounds, the more addicted and mind stucked the beep and melodies during use of the cell phone becomes in the mind. For example many people take a look at their mobile automatically (without being consciously aware) and do the activity of (unlock) and (lock) the phone screen not knowing they do it automatic. More or less we all do such an auto-mated learned behaviour because of the subconscious dependency that is built in our minds. Whether we lock and unlock the mobile phone almost robotically, we do it because our sub-conscious mind plays a trick on us and "force" us to do a previous learned activity (association in our mind with the unlock / lock beep sound).
3.::: Use your mobile in different ways
Any modern mobile is quite advanced in functionality and there is more than one way to initiate a phone call. E.g. the mobile has a shortcut buttons assigned to do quick phone calls, quickly evoke SMS menu etc.
Learn them and occasionally use the shortcut buttons instead of the menu navigation. Our minds like changing patterns and doing things different.
Even if you have no chance to do a things via a certain menu, you can always change the position of the phone screen to different distance to eyesight 🙂 You can for example type on the keypad following the menu steps by watching from left or right eye periphery or you can use the menus with your phone screen turned backwards 🙂 If you're used to type on the keypad or touch screen with right hand try doing it with the left hand 🙂
This will take time but the fun worths it. Plus the most valuable thing in using the mobile in different ways each time is there is no specific inflicting pattern associated in your mind and hence the depepdency set in your sub-conscious mind on phone use is lesser.
Actually there are too many various "hacks" one could come up with on how to use mobile as differently as possible. It is up to your imagination. Though using the mobile "each-time-different" can be sometimes more time-consuming it surely makes your phone use amusing.
Tags: alcoholics, Auto, beep, boundary, call signal, callsIn, chunk, closed space, consequence, custom, dependency, Draft, drug addicts, everyone, good, GSM, implication, incoming call, incoming calls, keypad, landline phone, menu, Mobile, mobile communication, nowdays, old fashioned telephone, old fashioned telephone ringtone, person, person communication, person to person, phone ringtones, physical communication, quot, Ring, ring tone, ringing phone, ringing tone, ringtone, screen, senseless things, someone, spending, three ways, trait
Posted in Business Management, Everyday Life, Various | No Comments »
Tuesday, November 21st, 2006 I’ve decided to use my blog in the end. The Last week we were with Habib for some time. He is a nice company we speaked about his Grand Father who did some miracles through the power of 2 Gins.
A lot of people with various diseases were cured with the help of 2 Jins he has power over. P.S. In the Quran Jins are spirits created from fire after God created the Angels due to the quran Jins are spirits which are with free will just like us humans and they could go for good or bad,
From Christian perspective so far as I’m Christian the Christians think Jins for Demons but are they Demons or not only God knows, because his Grand Father did a lot of nice things for the people was praying and fasting a lot and was trying to love everybody, well he was a muslim but I guess God can save everybody through Christ Jesus in his own way.
Then We talked about what the bible the life. Habib explained something very interesting of what the muslim myth says about why people do cough. Myth says that when God created in the beginning everything he put (soul/spirit) when breading to the body of soil, before that the soul was happily living with God in Heaven and the soul is not being conforted by living in a dying body because you know it can hurt, you feel cold stuff like that, so often when a born to human being is being given an Angel from God comes and puts the soul in the body through the nose then locks the entrance to be sure the soul won’t try to go out, and because the soul tries to get out we cough :]].
In Friday night or the Saturdays I can’t exactly we went to mino with Mitko we saw Gosho/Geni there he was drunk this time he did not repeat “on my head” like a parrot, this time the saying was “baba yaga”;]. I’m thinking again about stopping the cigars but we’ll see.
Yesterday I was in Mitko and we was able to run WarCraft 3 under GNU/Linux Fedora Core 6. His brother was extraordinary happy he will be able to play WC3 :]. During the day there was tons of work for me. There were problems with one of our mail servers mail.design.bg.
One of the ValueWeb’s Caching DNSes was down the other was resolving hosts awfully slow. So I read some about djbdns as a caching DNS and installed it on two of the servers on (backup-serv1.design.bg and backup-server2.design.bg). then switched all the NSes our servers in USA use to my new djb caching dnses, I was amazed djbdns is really a nice bit of soft it’s really a fast caching NS. I use it for first time and I really like it from the beginning. I experienced some problems before starting daemontools properly on two of the machines because of the errorno-patch that redhats and fedoras should apply to compile successfully daemontools. I thought our problems with the mail server was mainly because of the slow DNS resolves, but after setting up the new djbdns and configured all the servers to use them still the response of the mail server when there are connects to port 25 was very slow. I was able to isolate the problem in the evening I spoke with a guy (greycat) in irc.freenode.net in #qmail. About my problem and he pointed me to the RBLs I use at my qmail-smtpd run. So using the method of exclusion. Removing all the RBLs and started putting them one by one I discovered one of the RBL Hosts I used was lagging dnsbl.antispam.or.id (maybe due to slow DNS resolves). If you’re using it my advice is not to. When Removed it from my run file all started working perfectly. The last days I’m doing a lot of stuff around the qmail. I loaded some custom spam rules from SARE (SA Rules Emposium) to reduce spam and wrote some my own custom rules due to the spam I receive in my Mailbox.
More and more I realize how hard is to be a good mail server administrator. Oh yes I almost forgot I ran my own qmailmrtg two days ago it graphs nicely lot of very precious info about the mail server’s load, queue, pop3 concurrency etc. etc. and I also ran qsstats nice qmail-scanner statistics grapher program. Because of all the work I missed shool yesterday. I need to read now about this business plan and know more about it I can’t even imagine how I’ll graduate ever :].
Tags: being, body, christ jesus, christian perspective, cough, custom, demons, DNS, everybody, everything, Father, fedora core 6, Gins, gnu linux, god in heaven, Gosho, habib, HEAD, Heaven, help, jins, linux fedora core, linux fedora core 6, m christian, miracles, Mitko, muslim, nice company, nice things, perspective, power, quot, saturdays, something, soul spirit, time, warcraft 3, work, yaga
Posted in Everyday Life | No Comments »
Tuesday, May 20th, 2008 The day started a bit normal. I did my morning excercise, then I prayed. I spoke with Dzemil (A macedonian colleague of mine) and we set up a meeting for 12:30, I ate. I received few calls from the office with requests to do few little things. At 12:30 I met Dzemil at the College restaurant. We spend some time talking with him and another turkish colleague. Then we went to speak with Bozhidar Bozhkov about the applications for Holland, what is the procedure of transfering from the college here to Arnhem Business School etc. Laters I went home and did some work on the servers and red and did my fourth cisco test. I went to my cousin and after that went to Javor, we went out with Ina and Javor for a coffee to Kukla. Afterwards I went home and played with Dynamips. For all that wonder what the hack Dynamips is. Well Dynamics is a Cisco emulator just like VMWare is an OS emulator with the exception that Dynamics is builded to run only Cisco’s IOS. I found that nice Video tutorial Cisco Router Emulation Software Dynamips Video Tutorial, check it out here Here . Since I needed a Cisco IOS image and I’m not a Cisco customer I used torrents to download a collection of Cisco ISO’s and used one of the isos to make it work on my Windows Vista. I have problems running it because of lack of permissions, caused by the famous UAC ( User Access Control ). The solution for me was to use a privileged command prompt and start, both the Dynamips sever and my custom configured simple1.net which connected to the server and loaded the cisco image. There is also a very nice and extended tutorial on the topic of Dynamips it’s located Here . Alto today tested the previously installed Wireshark. Wireshark is a very nice substitute for iptraf for windows it has a nice and easy to use graphical interface, supports capturing and has lot of traffic analysis possibilities I strongly recommend it to anyone coming from a Linux/BSD background like me and searching for a nice Windows substitute for iptraf. Check out wireshark on the following URL . Now I’m going to change the topic and say a few words for my spiritual state. Today it was a hard day. I was tempted by the devil to think bad thoughts and did sinned for which I search forgiveness. Life it so hard I realize it more and more day by day. Very often old spirits which tormented me for a long time are trying to come back. I haven’t smoked today also and again thanks for that should fly to God who delived me from this terrible vice. As a conclusion I should say that for everything I should thanks to God and pray for him to forgive my unfaithfulness. END—–
Tags: Alto, Bozhkov, Business, business school, cisco, cisco customer, cisco ios, cisco test, coffee, colleague, Cousin, custom, customer, download, Dynamips, emulation, emulation software, emulator, exception, graphical interface, hack, iptraf, isos, Laters, School, software, substitute, test, time, topic, torrents, traffic analysis, uac, User, user access control, video tutorial, wireshark, work
Posted in Everyday Life | No Comments »
Friday, September 30th, 2011 Its common thing that CMS systems and many developers custom .htaccess cause issues where websites depending on mod_rewrite fails to work properly. Most common issues are broken redirects or mod_rewrite rules, which behave differently among the different mod_rewrite versions which comes with different versions of Apache.
Everytime there are such problems its necessery that mod_rewrite’s RewriteLog functionality is used.
Even though the RewriteLog mod_rewrite config variable is well described on httpd.apache.org , I decided to drop a little post here as I’m pretty sure many novice admins might not know about RewriteLog config var and might benefit of this small article.
Enabling mod_rewrite requests logging of requests to the webserver and process via mod_rewrite rules is being done either via the specific website .htaccess (located in the site’s root directory) or via httpd.conf, apache2.conf etc. depending on the Linux / BSD linux distribution Apache config file naming is used.
To enable RewriteLog near the end of the Apache configuration file its necessery to place the variables in apache conf:
1. Edit RewriteLog and place following variables:
RewriteLogLevel 9

RewriteLog /var/log/rewrite.log
RewriteLogLevel does define the level of logging that should get logged in /var/log/rewrite.log
The higher the RewriteLogLevel number defined the more debugging related to mod_rewrite requests processing gets logged.
RewriteLogLevel 9 is actually the highest loglevel that can be. Setting the RewriteLogLevel to 0 will instruct mod_rewrite to stop logging. In many cases a RewriteLogLevel of 3 is also enough to debug most of the redirect issues, however I prefer to see more, so almost always I use RewriteLogLevel of 9.
2. Create /var/log/rewrite.log and set writtable permissions
a. Create /var/log/rewrite.log
freebsd# touch /var/log/rewrite.log
b. Set writtable permissons
Either chown the file to the user with which the Apache server is running, or chmod it to permissions of 777.
On FreeBSD, chown permissions to allow webserver to write in file, should be:
freebsd# chown www:www /var/log/rewrite.log
On Debian and alike distros:
debian:~# chown www-data:www-data /var/log/rewrite.log
On CentOS, Fedora etc.:
[root@centos ~]# chown httpd:httpd /var/log/rewrite.log
On any other distribution, you don’t want to bother to check the uid:gid, the permissions can be set with chmod 777, e.g.:
linux# chmod 777 /var/log/rewrite.log
Next after RewriteLog is in conf to make configs active the usual webserver restart is required.
To restart Apache On FreeBSD:
freebsd# /usr/local/etc/rc.d/apache2 restart

...
To restart Apache on Debian and derivatives:
debian:~# /etc/init.d/apache2 restart

...
On Fedora and derivive distros:
[root@fedora ~]# /etc/init.d/httpd restart

...
Its common error to forget to set proper permissions to /var/log/rewrite.log this has puzzled me many times, when enabling RewriteLog’s logging.
Another important note is when debugging for mod_rewrite is enabled, one forgets to disable logging and after a while if the /var/log partition is placed on a small partition or is on an old server with less space often the RewriteLog fills in the disk quickly and might create website downtimes. Hence always make sure RewriteLog is disabled after work rewrite debugging is no longer needed.
The way I use to disable it is by commenting it in conf like so:
#RewriteLogLevel 9

#RewriteLog /var/log/rewrite.log
Finally to check, what the mod_rewrite processor is doing on the fly its handy to use the well known tail -f
linux# tail -f /var/log/rewrite.log
A bunch of time in watching the requests, should be enough to point to the exact problem causing broken redirects or general website malfunction.
Cheers 😉
Tags: apache config, apache configuration, benefit, BSD, CentOS, cms systems, config, custom, developers, file, functionality, httpd apache, init, level, Linux, loglevel, logOn, logRewriteLogLevel, mod, necessery, novice, number, partition, permissonsEither, place, processing, root, root directory, Set, small article, Solve, uid, variables
Posted in SEO, System Administration, Web and CMS | 4 Comments »
Tuesday, December 6th, 2011 Even though, I rarely use Windows to connect to remote servers using SSH or Telnet protocols in some cases I’m forced to do that (in cases I’m away from my Linux notebook). I’m doing my best to keep away from logging anywhere via SSH using Windows as when using Windows you never know what kind of spyware, malware or Viruses is already on the system, not to mention Microsoft are sniffing a lot if not everything which is typed on the keyboard… Anyways, usually I use Putty as a quick way to access a remote SSH, however pitily PuTTY lacks an embedded functionality for Tabs and each new connection to a server I had to run a new instance of PuTTY. This is okay if you need to access a single server but in some cases where access to multple servers is necessery lacking the tab functionality and starting 10 times putty is really irritating and one forgets what kind of connection is present on which PuTTY instance.
Earlier on, I’ve blogged about the existence of PuTTY Connection Manager PuTTY add-on program which is a PuTTY wrapper which enables PuTTY to be used with Connection Tabs feature, however installing two programs is quite inconvenient, especially if you have to do this every few days (in case if travelling a lot).
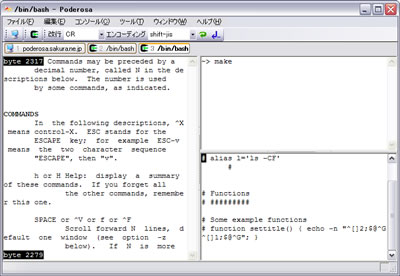
Luckily there is another terminal emulator free program for Windows called PodeRoSA which natively supports a tabbed Secure Shell connections.
If you want to get some experience with it check out Poderosa’s website , here is also a screenshot of the program running few ssh encrypted connections in tabs on a Windows host.
Another good reason that one might consider using Poderosa instead of PuTTY is the Apache License under which Poderosa is developed. Currently the Apache License is compatible with GPL free software license which makes the program fully free software. The PuTTY license is under BSD and MIT and some other weird custom license not 100% compatible with GPL and hence PuTTY can be considered less free software in terms of freedom.
Tags: apache license, blogged, BSD, connection, custom, everything, existence, feature, few days, free software license, freedom, functionality, good reason, host, instance, keyboard, Linux, linux notebook, Malware, Microsoft, multple, necessery, Putty, reason, screenshot, secure shell, servers, Shell, software, tab, tabs, telnet protocols, terminal, terminal emulator, Viruses, wrapper
Posted in System Administration, Windows | 2 Comments »
Saturday, January 14th, 2012 Mounting ISO files in Linux is easy with mount cmd, however remembering the exact command one has to issue is a hard task because mounting ISO files is not a common task.
Mounting ISO files directly by clicking on the ISO file is very nice, especially for lazy people uninitiated with the command line 😉
Besides that I'm sure many Windows users are curious if there is an equivallent program to DaemonTools for Linux / BSD*?
The answer to this question is YES!
There are two major programs which can be used as a DaemonTools substitute on Linux:
These are FuriousISOMount and AcetoneISO
AcetoneISO is more known and I've used it some long time ago and if I'm correct it used to be one of the first ISO Mount GUI programs for Linux. There is a project called GMount-ISO / (GMountISO) which of the time of writting this article seems to be dead (at least I couldn't find the source code).
Luckily FuriousISOMount and AcetoneISO are pretty easy to install and either one of the two is nowdays existing in most Linux distributions.
Probably the programs can also be easily run on BSD platform also quite easily using bsd linux emulation.
If someone has tried something to mount GUIs in Free/Net/OpenBSD, I'll be interesting to hear how?
1. Mount ISO files GUI in GNOME with Furius ISO Mount
FuriousISOMount is a simple Gtk+ interface to mount -t iso9660 -o loop command.
To start using the program on Debian / Ubuntu install with apt;
debian:~# apt-get install furiusisomount

The following extra packages will be installed:

fuseiso fuseiso9660 libumlib0

The following NEW packages will be installed:

furiusisomount fuseiso fuseiso9660 libumlib0
…
To access the program in GNOME after install use;
Applications -> Accessories -> Furious ISO Mount
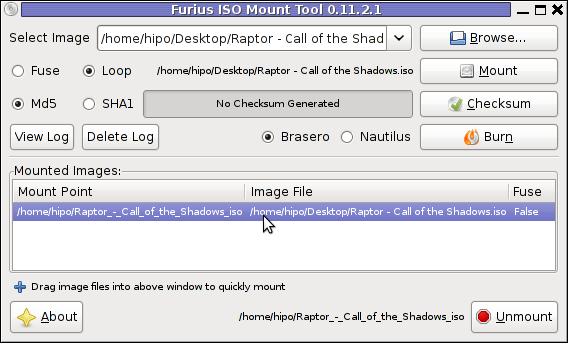
When mounting it is important to choose Loop option to mount the iso instead of Fuse
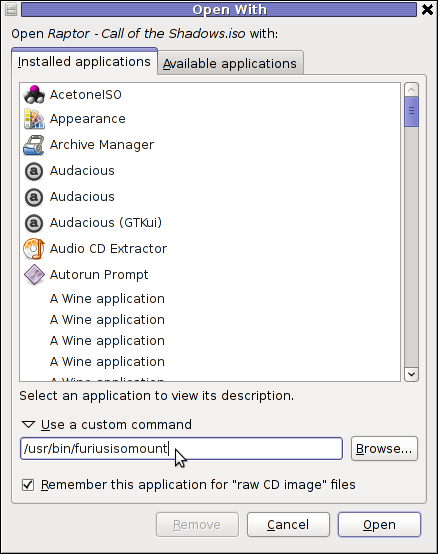
After the program is installed to associate the (.iso) ISO files, to permanently be opened with furiusisomount roll over the .iso file and choose Open With -> Other Application -> (Use a custom command) -> furiusisomount
2. Mount ISO Files in KDE Graphical Environment with AcetoneISO
AcetoneISO is build on top of KDE's QT library and isway more feature rich than furiousisomount.
Installing AcetoneISO Ubuntu and Debian is done with:
debian:~# apt-get install acetoneiso

The following NEW packages will be installed:

acetoneiso gnupg-agent gnupg2 libksba8 pinentry-gtk2 pinentry-qt4

0 upgraded, 6 newly installed, 0 to remove and 35 not upgraded.

Need to get 3,963 kB of archives.

After this operation, 8,974 kB of additional disk space will be used.

...
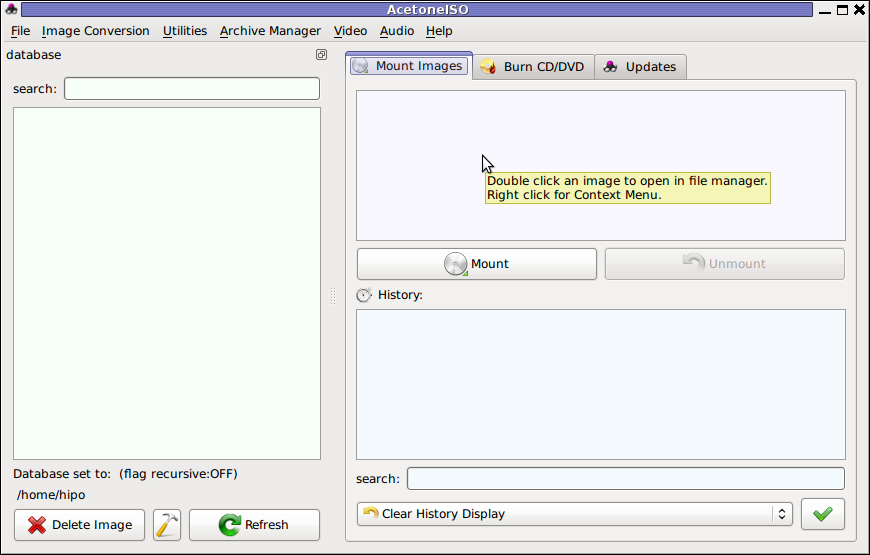
AcetoneISO supports:
- conversion between different ISO formats
- burn images to disc
- split ISO image volumes
- encrypt images
- extract password protected files
Complete list of the rich functionality AcetoneISO offers is to be found on http://www.acetoneteam.org/viewpage.php?page_id=6
To start the program via the GNOME menus use;
Applications -> Accessories -> Sound & Video -> AcetoneISO
I personally don't like AcetoneISO as I'm not a KDE user and I see the functionality this program offers as to rich and mostly unnecessery for the simple purpose of mounting an ISO.
3. Mount ISO image files using the mount command
If you're a console guy and still prefer mounting ISO with the mount command instead of using fancy gui stuff use:
# mount -t iso9660 -o loop /home/binary/someiso.iso /home/username/Iso_Directory_Name
Tags: AcetoneISO, Auto, BSD, cmd, custom, debian gnu, Draft, emulation, exact command, file, Files, Free, GMount-ISO, Gnome, graphical environment, gtk interface, guis, image files, ISO, iso file, iso files, iso9660, libumlib, long time, loop command, most linux distributions, nbsp, Open, OpenBSD, option, platform, roll, someone, something, source code, substitute, time, Ubuntu, windows users, YES
Posted in Gnome, Linux, Linux and FreeBSD Desktop, Linux Audio & Video | No Comments »
Thursday, January 26th, 2012 I needed to enable automatic passwordless login in my Debian GNU/Linux …
GNOME and GDM desktop environments developed a lot through the last few years, achieving these simple task was doable only through gdm manual configurations. Nowdays creatiion of user to login without any password is easy via easy to use GUI program.
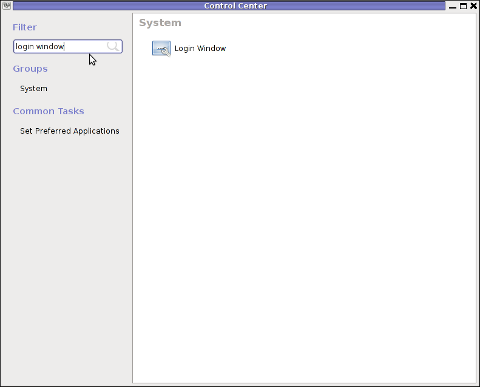
In this article I'll explain, few ways to enable automatic login in GNOMEThe quickest way is to navigate in GNOMEs gnome-control-center -> Login Window submenu
To do so launch gnome-control-center – press (ALT+F2) keys and type in gnome-control-center, or launch via command line in gnome-terminal or xterm:
hipo@debian:~$ gnome-control-center
While inside the control center find en launch the Login Window as in the screenshot below:
Login Window configuration can be also done directly by launching gdmsetup from command line e.g.:
hipo@debian:~$ /usr/sbin/gdmsetup

...
gdmsetup will further pop up a window asking to type in the root password to allow you to customize, how gdm will deal with user logins.
For who might not know gnome well architecture, gdmsetup is part of the gdm (Gnome Display Manager) package and is the default login program used to login the end user in most of the modern Linux based distributions as well as BSDs. gdm logins the users on many of the free software OS desktop environments like GNOME, LXDE, XFCE… Just to name a few of the many Linuces counting on GDM to handle the user logins: Ubuntu, Xubuntu, Fedora, Debian, Linux Mint, OpenSUSE etc.
Once the Login Windows Prefences appears go to the Security tab.
As you can see in the screenshot, what you can do with gdmsetup it is pretty self-explanatory:
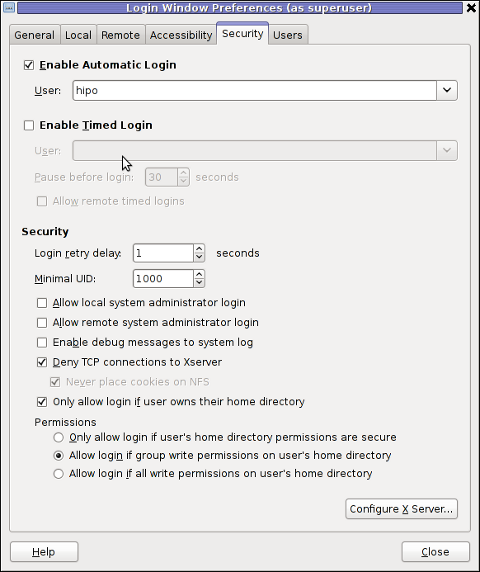
The two options of interests for user authorization without pass are:
a. Enable Automatic Login
To enable:- put a tick on Enable Automatic Login
– from user dropdown menu, choose the user which has to be configured
b. Enable Timed Login
Enable Automatic Login lets the user login without any user password input, immediately after the configured username is typed in (if gdm is with type username prompt).
In case where the usernames are represented by Avatars, (like its in most user friendly Linux distributions), once clicked avatar the user is logged in.
When Enable Timed Login is ticked and a username is choosen or typed, instead of immediately logging the user on click or username input, the user logging is delayed with a number of set seconds .
Enabling the Automatic and / or Timed Login is doable also using few simple configurations directives in /etc/gdm/custom.conf. In many distros /etc/gdm/custom.conf will be not existing and hence the file has to be created.
To enable delayed autologin without password for a user using gdm config:
Create the file with a text editor ( vim, joe, nano )whatever your favourity and place inside:
[daemon]

TimedLoginEnable=true

TimedLogin=hipo

TimedLoginDelay=30
The above gdm config vars can also be placed inside /etc/gdm/gdm.conf but for the sake of clarity its better if custom.conf is used.
If you don't want to bother with a text editor copy paste inside any terminal lets say mlterm :
echo '[daemon]' >> /etc/gdm/custom.conf
echo 'TimedLoginEnable=true' >> /etc/gdm/custom.conf
echo 'TimedLogin=hipo' >> /etc/gdm/custom.conf
echo 'TimedLoginDelay=30' >> /etc/gdm/custom.conf
To enable auto-login for a user on a first PC boot in /etc/gdm/custom.conf put:
[daemon]

AutomaticLoginEnable=true

AutomaticLogin=hipo
An auto login can also be done by using the TimedLoginDelay gdm config directive by putting insetad of the previous code a code like:
[daemon]

TimedLoginEnable=true

TimedLogin=hipo

TimedLoginDelay=0
Where hipo is my desired username that will autolog, and as you see the LoginDelay is 0 (e.g. no gdm login delay)
I attempted to also allow autologin for several users with some cinfigurations like:
[daemon]

AutomaticLoginEnable=true

AutomaticLogin=hipo

AutomaticLogin=other-username
as well as configurations like:
[daemon]

TimedLoginEnable=true

TimedLogin=hipo

TimedLogin=other-username

TimedLoginDelay=0
In gdm3, the location of GDM config files should be /etc/gdm3/ directory, anyways the configurations directives should be working just like in gdm2
After any configuration changes to gdm.conf or custom.conf to load the new settings in gdm a gdm daemon restart is necessery with cmd:
root@debian:~# /etc/init.d/gdm restart

...
Note that, weirdly not using the gdm init script and trying to kill -HUP $(pidof gdm) / killall -9 gdm will not make gdm to load its new configurations. So always restart via /etc/init.d/gdm restart after gdm conf change.
Another alternative method to achieve login without a password input is by creating a passwordless user account on the system. This method is not recommended though, especially for machines with real IP addresses visible from the Internet (with lets say enabled) SSHD access.
Using a passwordless system account can expose the system to a severe security risk!!! Anyways, for systems not running telnet/sshd or any other system remote access service creating a user without an empty password might be not such a bad idea.
To make a user auto login without any password input /etc/shadow file (storing all user account information) needs an edit.
This is an example user entry taken from /etc/shadow:
test:$6$OPdvXArZ$ktujC6bBh9JNaCz8E9v61yNeWcJHqQiuNk8eBzevcwcIl8KFvQzJ6aBCvVpIs0Lf5MAbHjjqftUeN9crWUfxs.:15275:0:99999:7:::Now to make the test user login directly without any pass input, one can just remove his encrypted password string. After the change the user line in /etc/shadow, should be:
test::15275:0:99999:7:::
If the user is created just from scratch e.g. (a new user) that needs to login passwordless in GDM, create it without password:
root@debian:~# adduser -d newusername
To sum it up the good thing about the remove password hash method to auto login a user is that it will allow user or users login across all Display Managers (not only GDM specific).
The bad side is it is very insecure and therefore in most times a really bad practice.
I guess the described ways to login without password in Gdm on FreeBSD should similar, unfortunately right now I have not access to BSD running desktop to test it. If someone has tested it and can confirm it works it will be great to drop a comment.
Tags: Alt, architecture, Auto, automatic login, center, config, control, custom, customize, debian gnu, Desktop, desktop environments, distributions, Draft, dropdown menu, fedora, file, GDM, Gnome, gnome control center, gnomes, GNOMEThe, gnu linux, launch, linux gnome, login, login windows, logins, manual configurations, mint, password, root, screenshot, security tab, text, tick, TimedLoginDelay, type, username, window, window configuration, xterm
Posted in Gnome, Linux, Linux and FreeBSD Desktop, Linux Audio & Video, Various | No Comments »
Friday, December 3rd, 2010 ‘ve used the RSForms to build some custom Joomla Contact forms.
The RSForms was recommended to me by a friend and actually it’s a pretty cool and quick way to create forms.
I’ve installed it and played a bit with it to create a custom forms for one of the website I had to bring up just recently.
After the contact form was ready however there was a problem with sending emails. It took me quite a while to find out how to solve the problemwith contact not able to mail whatever is filled in.
First time I tried the RSForms after filling in the details and pressing the submit button,I got the error message;
Could not instantiate mail function.
I should say that, I’m running a QMAIL email server on the server where I have the Joomla & RSForms installed and configured.
I’ve came up with a solution to this issue after some research in Google
In order to solve that you will have to login to your Joomla administrator and
Navigate to:
Site -> Global Configuration -> Server
Whenever it opens up you should be seing the Mail Settings on the bottom right corner;
From there you will have to change the Mailer from PHP Mail Function to SMTP Server
To give you a better idea check out the screenshot of the Mail Settings below:
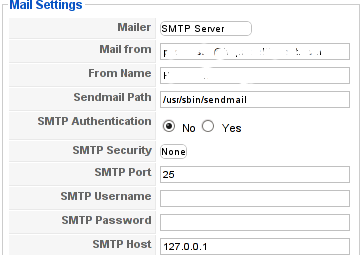
Changing this simple setting resolved the Could not instantiate mail function for me.
Right after I tested the RSForms to send my filled in form content but this time the PHPMAILER_RECIPIENTS_FAILED message was there;
This error was caused actually by a mistake I made in the configuration of the Custom RSForm I have prepared;
In Components -> RSForm!Pro -> Manage forms whenever I was preparing my form I’ve made a mistake in the User Emails customized field in my custom prepared form in the To: field I had a wrong variable set (a different value was set from the E-mail caption I’ve set on).
Solving this solved the issue. Even though the PHPMAILER_RECIPIENTS_FAILED was gone now, next I was unpleasently surprised by another error message which prevented the Contact form to properly send the input data:
Now I had to fight with the error;
PHPMAILER_FROM_FAILED
It took me a while and a lot of forums reading before I figure it out again my custom prepared RSForm had an issue;
The problem was in the Admin Emails customization of the form in the From: fill in box I had mistakenly typed in proper email, setting a proper email there solved the issue;
I’ve red online many suggested solutions to the issue which dealt with changes in the the file joomla/components/com_contact/controller.php around line 112, 162 etc.
I should say that before I found and solved the actual problem I’ve tried modifing this file also but with zero success.
Sometimes Linux is so complicated, it really pisses me of, why is not life easier? 😐
Tags: amp, bottom right corner, Button, Components, contact forms, content, cool, custom, email server, Emails, error message, file, form, function, Global, global configuration, google, How to fix "Could not instantiate mail function", login, mail function, mail settings, Manage, mistake, php, phpmailer, PHPMAILER_RECIPIENTS_FAILED and PHPMAILER_FROM_FAILED on Joomla and RSforms, problemwith, RECIPIENTS, screenshot, site, time, User, value
Posted in Joomla, Programming, System Administration, Various | 2 Comments »
Thursday, June 2nd, 2011 he Joomla CMS default behaviour is that Page titles of the Joomla Articles created are always set to the page Title assigned to each of the articles.
This is not very good behaviour in terms of SEO, as the page title of each link on the main page is different and there is no continuous repeating pattern in all of the joomla pages.
Everyone that has even basic idea of SEO knows that page titles are very important weight factor to make indexing inside Search Engines succesful.
There is a well know SEO rule which is the more reoccuring pattern one has in his page titles, more is stressed on the keywords contained in the title.
As I said for some weird reason Joomla has no common page Title for all my the created Article pages linked via the Main Menu*
Thus in order to improve this bad default Joomla SEO behaviour one has to change the default auto assigned titles for created pages, manually.
Two things are necessery to change each of the joomla already existing TITLES.
1. Go to each of the pages (.e.g. Home etc.) and change the Parameters System Page Title settings
After logging in with administrator in Joomla, navigate to
Menus -> Main Menu*
Further on choose a menu item from all your existing items, let’s say Home and click on it.
On the left side below the Save, Apply, Close and Help buttons you will notice the menus:
Parameters (Basic), Parameters (Component), Parameters (System)
When clicked on Parameters (System) a submenu will appear:
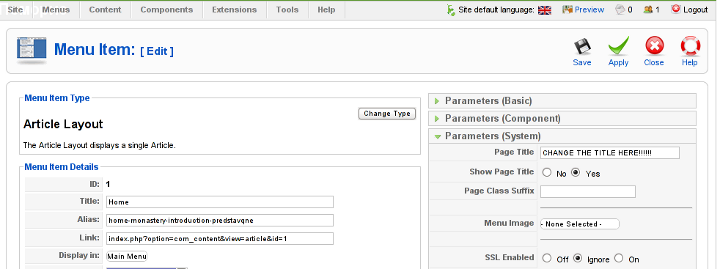
Above is a screenshot of the up-described Parameters (System) [Page Title] location
You need to change where it reads on the screenshot CHANGE THE TITLE HERE !!!!!! 😉
After entering your own desired page title go and save the article via the Apply or Save button (also visible in the screenshot).
Now as the custom Page Title is set, next step is to enable the custom Page Title for the respective Article in Article Manager
2. Enable custom Page Title for created pages in Joomla
Go to the Article Manager by following the menus:
Content -> Article Manager
Select the Article of which you want to change the Page Title to some custom text and click over it.
As the article opens for edit in an html editor, navigate to Parameters (Advanced) tab and therein change the Show Title from default setting value:
Use Global
to
Yes
Once again use the Save or Apply button to confirm the new settings and open your website in a new tab, try to browse and check the title of the articles parameters just edited. It should show up in the Title (page heading) the custom input Title.
Now repeat the same procedure for all pages (Articles), existing in Joomla to attune the Page Titles to some Google friendly strings and enjoy the better Search engine indexing which should likely follow.
Tags: article manager, Auto, Button, cms, Component, component parameters, custom, default behaviour, Draft, everyone, Global, good behaviour, home, indexing, location, menu, menus, necessery, page, page titles, Parameters, reason, screenshot, Search, search engines, SEO, show, submenu, tab, text, value, weird reason
Posted in Joomla, Various, Web and CMS | No Comments »
Thursday, January 12th, 2012 
Christmas has just passed away. As a Christian I was curious what is the reason in so many Christian countries, we decorate Pine trees and I did a quick research on the topic. In this small article, I'll present my findings.
Observing the Christmas Pine Tree tradition has been quite ancient and probably according to many sources dates back to the XIIth century.
The first written records of a Christmas tree are of an anonymous Frenchman who visited Strasbourg, Germany in 1601. His description of the decoratd pine tree says like "wafers and golden sugar-twists (Barley sugar), roses cut out of many-colored paper, apples, gold foil and sweets."
Later in the 1800s, the local German Christmas pine tree tradition was spread across America by German emmigrants.
In UK the Pine tree decorating tradition appeard in 1841, where a royalty (Prince Albert) decorated his castle (Winston Castle).
A little later after the Queen Victoria adopted the pine tree, United Kingdom citizens started to decorate pine trees for themselves, folliwng the highly regarded Queen.
Usually the pine tree has historically been decorated with gifts as well as an Bright star is put atop.
One of the Christian interpretations for the Christmas tree is that it represents the same Cross (tree) on which Christ was crucifixed. Then after Christ's resurrection because of (or through that) tree, the humanity received the Lord big spiritual blessings. These blessings are represented by the gifts decorated on the Fir tree. The pine tree itself is in Christianity a reference for the symbol of Salvation that we received came from the Holy Cross, where our saviour was crucified.
The Fir is decorated with lights to represent the joy and the lights of Christmas (that burns in our hearts), the star atop the tree is a reminder of the Star that rised in the East during the night of Christ's birth as we read in the gospels.

Decorating Pine trees is commonly observed mostly in Roman Catholic Church and often followed by some protestant denominations and less used in Orthodox Church (though this is changing nowdays).
In Eastern Europe, the Christmas tree appeared quite  late and the whole concept was unknown in the Orthodox Christian countries, just until the end of the 19th century.
With the recent severe globalization the pine tree was silenty adopted in almost all parts of the world, including even communist countries and even sometimes in muslim ones.

Unfortunately, the relation between the Fir tree and our Christian faith is little known today and with the years to come it will be less and less associated with Christianity.
Here are few interesting legends which I found explaining, some of the possible roots of the Christmas tree decoration:
1. Legend of the Pine Tree Saving the Holy Family
When the Holy family was pursued by Herod's soldiers, many plants offered to provide them with shelter.
One such plant was the Pine tree. With Mary too weary to travel any longer, the family stopped at the edge of a forest to rest.
A gnarled old Pine which had grown hollow with the years invited them to rest within its trunk.
Then, it closed its branches down upon them, keeping the family safe until the soldiers had passed.
Upon leaving, the Christ Child blessed the Pine and the imprint of his tiny hand was left forever in the tree's fruit… the Pine cone.
If a cone is cut lengthwise, the hand may still be seen.
2. Pine tree and Easter Legend

There is a legend that pine trees "know" when it's Easter.
The pine trees start their new growth in the weeks before Easter.
If you look at the tops of the pine trees two weeks before Easter you'll see the yellow shoots.
As the days get closer to Easter Sunday, the tallest shoot will branch off and form a cross.
By the time Easter Sunday comes around, you will see that most of the pine trees will have small yellow crosses on all of the tallest shoots.
This really happens we live where there are lots of pines,
and each year this actually happens, it is amazing to watch,
and the process of the new growth appears as crosses on the ends
of each branch.
I've not personally observed that, but according to people who live in pine tree forest areas this is a fact.
3. Legend about M. Luther and the Pine tree
Martin Luther, founder of the Protestant religion, was taking a stroll through the woods late one night.
The sky was clear and many stars were shining through the branches of the trees,
giving the impression of twinkling lights.
Luther was so captivated and inspired by the beautiful brilliance of the sight
that he cut down a small evergreen and brought it home.
He recreated the stars by placing candles upon the tree's branches to imitate
their radiance and presented it to his children.
This story explains why, the pine tree become so wide spread initially in the "western world", as it gives some connection between the Pine tree and Protestant Christianity.
4. The Children Legend of the Fir Tree (Kids Story)
On the night of the Christ Child's birth, all living creatures, both flora and fauna, traveled to Bethlehem bearing gifts.
The Olive tree, for example, brought its fruit and the Palm tree its dates.
But the little Fir tree had no gift and was so tired that it was unable to resist when the larger trees pushed it into the background and hid it from view.
But then, a nearby Angel took pity and commanded a cluster of stars to descend and rest upon its delicate boughs.
When the Baby Jesus beheld this lovely lighted tree, he smiled and blessed it,
declaring henceforth that Fir trees should always be filled with lights at
Christmastime to please little children.
When Christianity first came to Northern Europe, three personages representing
virtues were dispatched from Heaven to place lights on the original Christmas tree.
These personages were Faith, Hope and Charity.
Their search was long, since they were required to find a tree as high as hope, as great as love and as sweet as charity.
In addition, the tree had to bear the sign of the cross on every bough.
Their search finally ended in the forests of the North where they found the Fir.
Lit by the radiance of the stars, it became the first Christmas tree.
The triangular design of the Fir has also been usedto describe the Holy Trinity of God the Father, The Son and The Holy Spirit.
Eventually, converts began to revere the Fir as God's Tree…as they had once revered the Oak.
By the Twelfth Century it was being hung, upside-down, from ceilings at Christmastime
in Central Europe, as a symbol of Christianity.
5. The Paradise Tree Legend
A very old and delightful European custom centers around decorating a Fir tree with apples and small white wafers which represents the Holy Eucharist.
These wafers were later replaced by small pieces of pastry cut into the shapes of stars, angels, hearts, flowers and bells.
Eventually additional pastries were introduced bearing the shapes of men, birds, roosters and other animals.
During the middle Ages, around the Eleventh century, religious theater was born.
One of the most popular plays …
The German mystery play concerned Adam and Eve and their fall and expulsion from the Garden of Eden, represented by a Fir tree hung with apples.
This tree was symbolic of both the Tree of Life and the Tree of Discernment of Good and Evil, which stood in the center of Paradise.
The play ended with the prophecy of a coming Saviour. For this reason, it was often enacted during Advent.
The one piece of scenery, the "Paradeisbaum" or "Paradise Tree" become a popular object and was often set up in churches.
Eventually it also found its way in private homes and became symbol of the Saviour.
Since the tree was representative not only to Paradise and the fall of man, but also the premise of salvation.
It was hung not merely with apples, but with bread of wafers (Holy Eucharist) and often sweet to represent the sweetness of redemption.
In some areas of Bavaria, fir branches and little trees decorated with lights, apples and tinsel are still called "Paradeis".
According to some other Christian legends, it was a Fir tree that grew as the Tree of Life in the Garden of Eden.
When Eve plucked its fruit, the foliage and flowers shrank to nothing but needles.
Only on the night of Nativity would the Fir tree bloom again a moment marked perhaps by the Christmas tree we Christians use.
Of course these are just legends and as with every legend there is plenty of romantism included.
Nevertheless I consider most legends similar to proverbs contain deep truth and contain truthful facts. Moreover knowing the legends of our forefathers connect us to who and what we are and from antropological point of view is precious knowledge, we should try to sustain and spread to our children.
Tags: Auto, birth, Bright, Catholic, center, Child, Christ, christian countries, christian interpretations, christmas christmas, christmas pine, christmas time, christmas trees, city, Cross, custom, Customs, Decorating, description, Draft, East, emmigrants, fir point, fir tree, foil, forest, german christmas, gold foil, height, Herod, hill, img, imprint, kingdom citizens, legend of the christmas tree, Lord, muslim, nbsp, pine trees, prince albert, protestant, queen victoria, quot, radiance, reason, resurrection, rised, Roman, roman catholic church, Salvation, saviour, Search, shelter, spiritual, spiritual blessings, story, sugar roses, symbol, symbol of salvation, time, topic, tree, tree tradition, XIIth, xiith century
Posted in Christianity, Everyday Life, Various | 1 Comment »


