 I remember GNU / Linux, 11 years from now, times when ALSA was not standardly shipped with Linux.
Back then ALSA still lacked good support for many SoundCards and was still a "baby project".
In that time what we used to have sound on Linux was OSS – Open Sound System. OSS emerged right after the first ever Linux sound system VoxWare (formerly known as the Linux Sound Driver).
Back in those days OSS was used for multimedia support on both GNU / Linux and BSD based free OSes. It was few years later when I heard and used ALSA for a fist time and it wasn't really a love from first sigth.
One can easily find out by the name ALSA it is a system especially built for the Linux kernel and that's one of the reasosn why *BSD systems has their custom separate sound system.
There is plenty of reasons why OSS was substituted with ALSA. Main reason was its commercial like license, OSS wasn't completely "open source" GPLed (free software), there was resctions on use of OSS for commercial goals.
With its emerge ALSA started to push away OSS slowly. Somewhere in 2003, alsa has officially entered the Linux kernel source and until 2005 it was the default standard for all GNU / Linux operating systems.
As of time of writting ALSA has become the only sound system to have support for multiple sound card devices for Linux.
My experiences with ALSA, however ain't so nice if I take a look in my past experiences.
Since the very beginning of using ALSA, I had plenty of troubles with configuring properly my sound card not to mention, even after configuring it the MIDI support was not there.
Besides all the troubles main problems were stemming from the many applications still written to use OSS as sound system and hence with those sound was impossible with ALSA.The most problematic thing about apps written with OSS in mind was all of them tried to stream sound via /dev/dsp (OSS Digital Sound Processor), since alsa did not used /dev/dsp those programs was soundless.
On the other hand OSS was creating issues as well, one severe problem with OSS was the inability to stream multiple sounds simultaneously, because each sound stream required to pass voice through /dev/dsp and usually there was only one /dev/dsp.
The message;
/dev/dsp: Device or resource busy
and the proceeding irritation that used to annoy us in the early GNU / Linux days had of course some raw workarounds hacks but generally the workaround did not fix problems always.
Introduction of alsa free us from /dev/dsp issues but on the other handy has created a whole ocean of new BIG problems …
ALSA has modular structure and this imposes a great problem nowdays. The modular architecture is generally a good idea, however the way this was implemented within ALSA is far away from clear and easy to understand by the end user and therefore makes it very unintuitive and obscure.
Alsa misses simplicity which somehow was partially in the days of OSS. Thinking over the general situation with Linux multimedia nowdays, I believe it was exactly ALSA Project responsible for the so delayed mass Desktop Linux adoption.
Many long year standing Linux users had certainly had the alsa troubles during new system installs (correct me if I'm wrong).
The only fix to multiple soundcard initialization problems was to download alsa source and compile from source and hence made it hard and discouraging for people giving Linux a try.
This kind of ALSA "brokenness" pattern continues even to this very day (in Debian) Linux and probably building the alsa system from source is among the good practices to have a functional Linux sound system…
With all said the historic reason why ALSA was not quickly adopted and still is not a preferred default system for many applications ported to Free Software OSes by commercial company vendors is clear. Its simply not working out of the box …
Hope some ALSA developers will read this post work on changing the crazy structure of ALSA over complexity. ALSA needs automate way to solve issues with itself, the configuration should be more trivial and unified if Linux has to become more attractive for Desktop adoption.
Anyways, after the few words of history and indicating my pesonal observations on ALSA. I will proceed and explain few things on how ALSA can be configured to support and play nice with OSS dependant programs as well some basic explanations on common incompatibility between esd and pulseaudio and how this can be fixed;.
To assure nowdays OSS API built programs and games would work with Alsa its necessery to have installed;
ALSA wrapper for OSS applications
On Debian, Ubuntu, Fedora and most Linux distributions the Alsa OSS compatability layer comes under a (deb / rpm) package named alsa-oss
To install OSS compatability on Debian, Ubuntu and the like Debian based distributions issue:
debian:~# apt-get install alsa-oss alsaplayer-oss

...
On Fedora and other rpm based distributions install is with:
[root@fedora ~]# yum install alsa-oss alsaplayer-oss

...
alsa-oss provides with a command called aoss that should be used to work around some issues with old applications still depending on OSS:
hipo@debian:~$ aoss programName
Using aoss is helpful especially in situations if you have to run programs which deal with MIDI and others which somehow want to use /dev/dsp
There is also alternative way to enable alsa native support for MIDI and OSS by loading 3 kernel modules:
debian:~# modprobe snd-seq-oss

debian:~# modprobe snd-pcm-oss

debian:~# modprobe snd-mixer-oss
Note! The three modules has to be separately build using kernel source at most cases and does not come with most Linux distributions, so on many installations (including my current), they will be missing. If for you they load properly or you have customly build them add them also to load on system boot, like so:
echo 'snd-seq-oss' >> /etc/modules

echo 'snd-pcm-oss' >> /etc/modules

echo 'snd-mixer-oss' >> /etc/modules
The Linux sound situation becomes even more messy when ESD enters the scene. Many of the novice new Linux users certainly don't remember (Enlightened Sound Daemon) . ESD historically preceded PulseAudio . Hence it will be good to mention ESD was used for few years in GNOME and in around 2006-2007 it was substituted by PulseAudio.
Many applications, however who was ported or written for Linux especially (the proprietary ported ones) was already built to work with ESD and even though newer GNOME releases was fully using pulseaudio, this (non free software apps and games) were still depending on ESD.
The situation was partially fixed by creation of module for pulseaudio which added emulation support for esd . This was done by a module library for pulseaudio called libprotocol-esound.so
The package for almost all Linux distributions which does the esd emulation via pulse is pulseaudio-esound-compat . In latest Fedora Linux pulseaudio-esound-compat is installed by default.
In Debian and other Linux distributions it might need to be installed via apt with;
debian:~# apt-get install pulseaudio-esound-compat

...
pulseaudio-esound-compat solves some of the ESD app incompability but not always …
Handy tool also worthy to mention in solving PulseAudio, OSS incompatibility issues is padsp
padsp is helpful in solving obsolete issues with OSS applications (trying to access /dev/dsp) and therefore unable to communicate with Pulseaudio
padsp – is a PulseAudio OSS Wrapper.
An example where padsp is helpful is in case of /dev/dsp errors like:
/dev/dsp: Device or resource busy

Could not open /dev/dsp
Another common problem with sound on Linux is when running windows applications (running windows games with wine).
Quite often sound fails to work since wine tries to directly communicate with alsa and fails because alsa sound channel is taken by pulseaudio.
To workaround wine issues with pulseaudio, one of the solutions is to temporary stop pulseaudio, before running the wine emulated application:
hipo@debian:~$ pulseaudio --kill
Later on when the windows wine emulation is completed, pulseaudio has to be started once again in order to make Pulseaudio applications produce sound again, e.g. one has to issue:
hipo@debian:~$ pulseaudio --start
Alternative way to workaround wine sound issues is by using a script to kill pulseaudio every second. Here is fix_pulseaudio_wine_sound_probs.sh script
This script was reported by many people as fix to problems with wine games failing to play sounds and music, anyhow I personally prefer using the stop / start pulseaudio method.
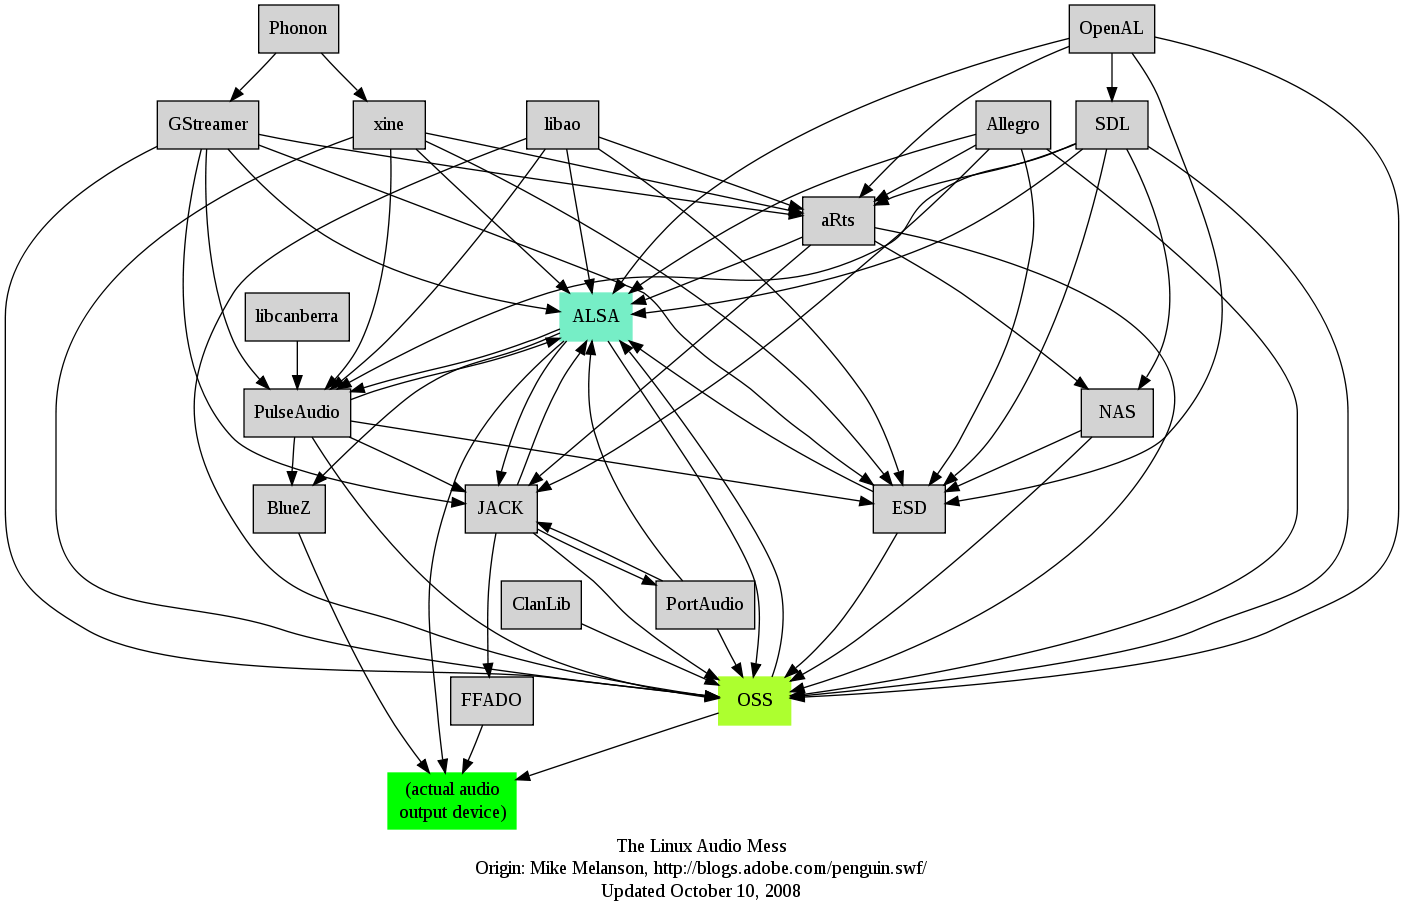
The picture below is taken from Wikipedia and illustrates, clearly the intergalactical complexity of sound systems on Gnu / Linux and BSD
I just hope one day this (OSS, ALSA, esd, Pulseaudio) mess will be over! In the mean time I hope my suggested work arounds helps someone. If someone has a better more unified script or solution please share in comments


How to install and configure Jabber Server (Ejabberd) on Debian Lenny GNU / Linux
Wednesday, December 28th, 2011I've recently installed a jabber server on one Debian Lenny server and hence decided to describe my installations steps hoping this would help ppl who would like to run their own jabber server on Debian . After some research of the jabber server softwares available, I decided to install Ejabberd
The reasons I choose Ejabberd is has rich documentation, good community around the project and the project in general looks like one of the best free software jabber servers available presently. Besides that ejabberd doesn't need Apache or MySQL and only depends on erlang programming language.
Here is the exact steps I followed to have installed and configured a running XMPP jabber server.
1. Install Ejabberd with apt
The installation of Ejabberd is standard, e.g.:
debian:~# apt-get --yes install ejabberd
Now as ejabberd is installed, some minor configuration is necessery before the server can be launched:
2. Edit /etc/ejabberd/ejabberd.cfg
Inside I changed the default settings for:
a) Uncomment%%override_acls.. Changed:
%%%% Remove the Access Control Lists before new ones are added.%%%%override_acls.to
%%

%% Remove the Access Control Lists before new ones are added.

%%

override_acls.
b) Admin User from:
%% Admin user

{acl, admin, {user, "", "example.com"}}.
to
%% Admin user

{acl, admin, {user, "admin", "jabber.myserver-host.com"}}.
c) default %% Hostname of example.com to my real hostname:
%% Hostname

{hosts, ["jabber.myserver-host.com"]}.
The rest of the configurations in /etc/ejabberd/ejabberd.cfg can stay like it is, though it is interesting to read it carefully before continuing as, there are some config timings which might prevent the XMPP server from user brute force attacks as well as few other goodies like for example (ICQ, MSN , Yahoo etc.) protocol transports.
3. Add iptables ACCEPT traffic (allow) rules for ports which are used by Ejabberd
The minimum ACCEPT rules to add are:
/sbin/iptables -A INPUT -p tcp -m tcp --dport 22 -j ACCEPT

/sbin/iptables -A INPUT -p tcp -m tcp --dport 5222 -j ACCEPT

/sbin/iptables -A INPUT -p udp -m udp --dport 5222 -j ACCEPT

/sbin/iptables -A INPUT -p tcp -m tcp --dport 5223 -j ACCEPT

/sbin/iptables -A INPUT -p udp -m udp --dport 5223 -j ACCEPT

/sbin/iptables -A INPUT -p tcp -m tcp --dport 5269 -j ACCEPT

/sbin/iptables -A INPUT -p udp -m udp --dport 5269 -j ACCEPT

/sbin/iptables -A INPUT -p tcp -m tcp --dport 5280 -j ACCEPT

/sbin/iptables -A INPUT -p udp -m udp --dport 5280 -j ACCEPT

/sbin/iptables -A INPUT -p tcp -m tcp --dport 4369 -j ACCEPT

/sbin/iptables -A INPUT -p udp -m udp --dport 4369 -j ACCEPT

/sbin/iptables -A INPUT -p tcp -m tcp --dport 53873 -j ACCEPT
Of course if there is some specific file which stores iptables rules or some custom firewall these rules has to be added / modified to fit appropriate place or chain.
4. Restart ejabberd via init.d script
debian:~# /etc/init.d/ejabberd restart

Restarting jabber server: ejabberd is not running. Starting ejabberd.
5. Create ejabberd necessery new user accounts
debian:~# /usr/sbin/ejabberdctl register admin jabber.myserver-host.com mypasswd1
etc.debian:~# /usr/sbin/ejabberdctl register hipo jabber.myserver-host.com mypasswd2
debian:~# /usr/sbin/ejabberdctl register newuser jabber.myserver-host.com mypasswd3
debian:~# /usr/sbin/ejabberdctl register newuser1 jabber.myserver-host.com mypasswd4
...
ejabberdctl ejabberd server client (frontend) has multiple other options and the manual is a good reading.
One helpful use of ejabberdctl is:
debian:~# /usr/sbin/ejabberdctl status

Node ejabberd@debian is started. Status: started

ejabberd is running
ejabberctl can be used also to delete some existent users, for example to delete the newuser1 just added above:
debian:~# /usr/sbin/ejabberdctl unregister newuser jabber.myserver-host.com
6. Post install web configurations
ejabberd server offers a web interface listening on port 5280, to access the web interface right after it is installed I used URL: http://jabber.myserver-host.com:5280/admin/
To login to http://jabber.myserver-host.com:5280/admin/ you will need to use the admin username previously added in this case:
admin@jabber.myserver-host.com mypasswd1
Anyways in the web interface there is not much of configuration options available for change.
7. Set dns SRV records
I'm using Godaddy 's DNS for my domain so here is a screenshot on the SRV records that needs to be configured on Godaddy:
In the screenshto Target is the Fually qualified domain hostname for the jabber server.
Setting the SRV records for the domain using Godaddy's DNS could take from 24 to 48 hours to propagate the changes among all the global DNS records so be patient.
If instead you use own custom BIND DNS server the records that needs to be added to the respective domain zone file are:
_xmpp-client._tcp 900 IN SRV 5 0 5222 jabber.myserver-host.com.

_xmpp-server._tcp 900 IN SRV 5 0 5269 jabber.myserver-host.com.

_jabber._tcp 900 IN SRV 5 0 5269 jabber.myserver-host.com.
8. Testing if the SRV dns records for domain are correct
debian:~$ nslookup
> set type=SRV

> jabber.myserver-host.com

 ...
> myserver-host.com
If all is fine above nslookup request should return the requested domain SRV records.
You might be wondering what is the purpose of setting DNS SRV records at all, well if your jabber server has to communicate with the other jabber servers on the internet using the DNS SRV record is the way your server will found the other ones and vice versa.
DNS records can also be checked with dig for example
$ dig SRV _xmpp-server._tcp.mydomain.net
[…]
;; QUESTION SECTION:
;_xmpp-server._tcp.mydomain.net. IN SRV
;; ANSWER SECTION:
_xmpp-server._tcp.mydomain.net. 259200 IN SRV 5 0 5269 jabber.mydomain.net.
;; ADDITIONAL SECTION:
jabber.mydomain.net. 259200 IN A 11.22.33.44
;; Query time: 109 msec
;; SERVER: 212.27.40.241#53(212.27.40.241)
;; WHEN: Sat Aug 14 14:14:22 2010
;; MSG SIZE rcvd: 111
9. Debugging issues with ejabberd
Ejabberd log files are located in /var/log/ejabberd , you will have to check the logs in case of any issues with the jabber XMPP server. Here is the three files which log messages from ejabberd:
debian:~$ ls -1 /var/log/ejabberd/

ejabberd.log

erl_crash.dump

sasl.log
I will not get into details on the logs as the best way to find out about them is to read them 😉
10. Testing ejabberd server with Pidgin
To test if my Jabber server works properly I used Pidgin universal chat client . However there are plenty of other multiplatform jabber clients out there e.g.: Psi , Spark , Gajim etc.
Here is a screenshot of my (Accounts -> Manage Accounts -> Add) XMPP protocol configuration
Tags: admin, apache, best free software, brute force, cfg, com, configure, custom, default hostname, default settings, DNS, doesn, dport, ejabberd, ejabberdctl, exact steps, file, GNU, goodies, hostname, hosts, init, INPUT, Install, installation, Jabber, Linux, Lists, mypasswd, necessery, override, ports, ppl, programming language, Protocol, quot, quot quot, rich documentation, server, servers, software, tcp, transports, uncomment, User, xmpp
Posted in Linux, System Administration, Various | 8 Comments »