Posts Tagged ‘data’

Monitoring Linux hardware Hard Drives / Temperature and Disk with lm_sensors / smartd / hddtemp and Zabbix Userparameter lm_sensors report script

Thursday, April 30th, 2020

monitoring-linux-hardware-with-software-temperature-disk-cpu-health-zabbix-userparameter-script

I'm part of a  SysAdmin Team that is partially doing some minor Zabbix imrovements on a custom corporate installed Zabbix in an ongoing project to substitute the previous HP OpenView monitoring for a bunch of Legacy Linux hosts.
As one of the necessery checks to have is regarding system Hardware, the task was to invent some simplistic way to monitor hardware with the Zabbix Monitoring tool.  Monitoring Bare Metal servers hardware of HP / Dell / Fujituse etc. servers  in Linux usually is done with a third party software provided by the Hardware vendor. But as this requires an additional services to run and sometimes is not desired. It was interesting to find out some alternative Linux native ways to do the System hardware monitoring.
Monitoring statistics from the system hardware components can be obtained directly from the server components with ipmi / ipmitool (for more info on it check my previous article Reset and Manage intelligent  Platform Management remote board article).
With ipmi
 hardware health info could be received straight from the ILO / IDRAC / HPMI of the server. However as often the Admin-Lan of the server is in a seperate DMZ secured network and available via only a certain set of routed IPs, ipmitool can't be used.

So what are the other options to use to implement Linux Server Hardware Monitoring?

The tools to use are perhaps many but I know of two which gives you most of the information you ever need to have a prelimitary hardware damage warning system before the crash, these are:
 

1. smartmontools (smartd)

Smartd is part of smartmontools package which contains two utility programs (smartctl and smartd) to control and monitor storage systems using the Self-Monitoring, Analysis and Reporting Technology system (SMART) built into most modern ATA/SATA, SCSI/SAS and NVMe disks

Disk monitoring is handled by a special service the package provides called smartd that does query the Hard Drives periodically aiming to find a warning signs of hardware failures.
The downside of smartd use is that it implies a little bit of extra load on Hard Drive read / writes and if misconfigured could reduce the the Hard disk life time.


linux:~#  /usr/sbin/smartctl -a /dev/sdb2
smartctl 6.6 2017-11-05 r4594 [x86_64-linux-4.19.0-5-amd64] (local build)
Copyright (C) 2002-17, Bruce Allen, Christian Franke, www.smartmontools.org

=== START OF INFORMATION SECTION ===
Device Model:     KINGSTON SA400S37240G
Serial Number:    50026B768340AA31
LU WWN Device Id: 5 0026b7 68340aa31
Firmware Version: S1Z40102
User Capacity:    240,057,409,536 bytes [240 GB]
Sector Size:      512 bytes logical/physical
Rotation Rate:    Solid State Device
Device is:        Not in smartctl database [for details use: -P showall]
ATA Version is:   ACS-3 T13/2161-D revision 4
SATA Version is:  SATA 3.2, 6.0 Gb/s (current: 3.0 Gb/s)
Local Time is:    Thu Apr 30 14:05:01 2020 EEST
SMART support is: Available – device has SMART capability.
SMART support is: Enabled

=== START OF READ SMART DATA SECTION ===
SMART overall-health self-assessment test result: PASSED

General SMART Values:
Offline data collection status:  (0x00) Offline data collection activity
                                        was never started.
                                        Auto Offline Data Collection: Disabled.
Self-test execution status:      (   0) The previous self-test routine completed
                                        without error or no self-test has ever
                                        been run.
Total time to complete Offline
data collection:                (  120) seconds.
Offline data collection
capabilities:                    (0x11) SMART execute Offline immediate.
                                        No Auto Offline data collection support.
                                        Suspend Offline collection upon new
                                        command.
                                        No Offline surface scan supported.
                                        Self-test supported.
                                        No Conveyance Self-test supported.
                                        No Selective Self-test supported.
SMART capabilities:            (0x0002) Does not save SMART data before
                                        entering power-saving mode.
                                        Supports SMART auto save timer.
Error logging capability:        (0x01) Error logging supported.
                                        General Purpose Logging supported.
Short self-test routine
recommended polling time:        (   2) minutes.
Extended self-test routine
recommended polling time:        (  10) minutes.

SMART Attributes Data Structure revision number: 1
Vendor Specific SMART Attributes with Thresholds:
ID# ATTRIBUTE_NAME          FLAG     VALUE WORST THRESH TYPE      UPDATED  WHEN_FAILED RAW_VALUE
  1 Raw_Read_Error_Rate     0x0032   100   100   000    Old_age   Always       –       100
  9 Power_On_Hours          0x0032   100   100   000    Old_age   Always       –       2820
 12 Power_Cycle_Count       0x0032   100   100   000    Old_age   Always       –       21
148 Unknown_Attribute       0x0000   100   100   000    Old_age   Offline      –       0
149 Unknown_Attribute       0x0000   100   100   000    Old_age   Offline      –       0
167 Unknown_Attribute       0x0000   100   100   000    Old_age   Offline      –       0
168 Unknown_Attribute       0x0012   100   100   000    Old_age   Always       –       0
169 Unknown_Attribute       0x0000   100   100   000    Old_age   Offline      –       0
170 Unknown_Attribute       0x0000   100   100   010    Old_age   Offline      –       0
172 Unknown_Attribute       0x0032   100   100   000    Old_age   Always       –       0
173 Unknown_Attribute       0x0000   100   100   000    Old_age   Offline      –       0
181 Program_Fail_Cnt_Total  0x0032   100   100   000    Old_age   Always       –       0
182 Erase_Fail_Count_Total  0x0000   100   100   000    Old_age   Offline      –       0
187 Reported_Uncorrect      0x0032   100   100   000    Old_age   Always       –       0
192 Power-Off_Retract_Count 0x0012   100   100   000    Old_age   Always       –       16
194 Temperature_Celsius     0x0022   034   052   000    Old_age   Always       –       34 (Min/Max 19/52)
196 Reallocated_Event_Count 0x0032   100   100   000    Old_age   Always       –       0
199 UDMA_CRC_Error_Count    0x0032   100   100   000    Old_age   Always       –       0
218 Unknown_Attribute       0x0032   100   100   000    Old_age   Always       –       0
231 Temperature_Celsius     0x0000   097   097   000    Old_age   Offline      –       97
233 Media_Wearout_Indicator 0x0032   100   100   000    Old_age   Always       –       2104
241 Total_LBAs_Written      0x0032   100   100   000    Old_age   Always       –       1857
242 Total_LBAs_Read         0x0032   100   100   000    Old_age   Always       –       1141
244 Unknown_Attribute       0x0000   100   100   000    Old_age   Offline      –       32
245 Unknown_Attribute       0x0000   100   100   000    Old_age   Offline      –       107
246 Unknown_Attribute       0x0000   100   100   000    Old_age   Offline      –       15940

SMART Error Log Version: 1
No Errors Logged

SMART Self-test log structure revision number 1
No self-tests have been logged.  [To run self-tests, use: smartctl -t]

Selective Self-tests/Logging not supported


2. hddtemp


Usually if smartd is used it is useful to also use hddtemp which relies on smartd data.
 The hddtemp program monitors and reports the temperature of PATA, SATA
 or SCSI hard drives by reading Self-Monitoring Analysis and Reporting
 Technology (S.M.A.R.T.)
information on drives that support this feature.
 

linux:~# /usr/sbin/hddtemp /dev/sda1
/dev/sda1: Hitachi HDS721050CLA360: 31°C
linux:~# /usr/sbin/hddtemp /dev/sdc6
/dev/sdc6: KINGSTON SV300S37A120G: 25°C
linux:~# /usr/sbin/hddtemp /dev/sdb2
/dev/sdb2: KINGSTON SA400S37240G: 34°C
linux:~# /usr/sbin/hddtemp /dev/sdd1
/dev/sdd1: WD Elements 10B8: S.M.A.R.T. not available


3. lm-sensors / i2c-tools 

 Lm-sensors is a hardware health monitoring package for Linux. It allows you
 to access information from temperature, voltage, and fan speed sensors.
i2c-tools
was historically bundled in the same package as lm_sensors but has been seperated cause not all hardware monitoring chips are I2C devices, and not all I2C devices are hardware monitoring chips.

The most basic use of lm-sensors is with the sensors command


linux:~# sensors
i350bb-pci-0600
Adapter: PCI adapter
loc1:         +55.0 C  (high = +120.0 C, crit = +110.0 C)


coretemp-isa-0000
Adapter: ISA adapter
Physical id 0:  +28.0 C  (high = +78.0 C, crit = +88.0 C)
Core 0:         +26.0 C  (high = +78.0 C, crit = +88.0 C)
Core 1:         +28.0 C  (high = +78.0 C, crit = +88.0 C)
Core 2:         +28.0 C  (high = +78.0 C, crit = +88.0 C)
Core 3:         +28.0 C  (high = +78.0 C, crit = +88.0 C)


On CentOS Linux useful tool is also  lm_sensors-sensord.x86_64 – A Daemon that periodically logs sensor readings to syslog or a round-robin database, and warns of sensor alarms.

In Debian Linux there is also the psensors-server (an HTTP server providing JSON Web service which can be used by GTK+ Application to remotely monitor sensors) useful for developers
psesors-server

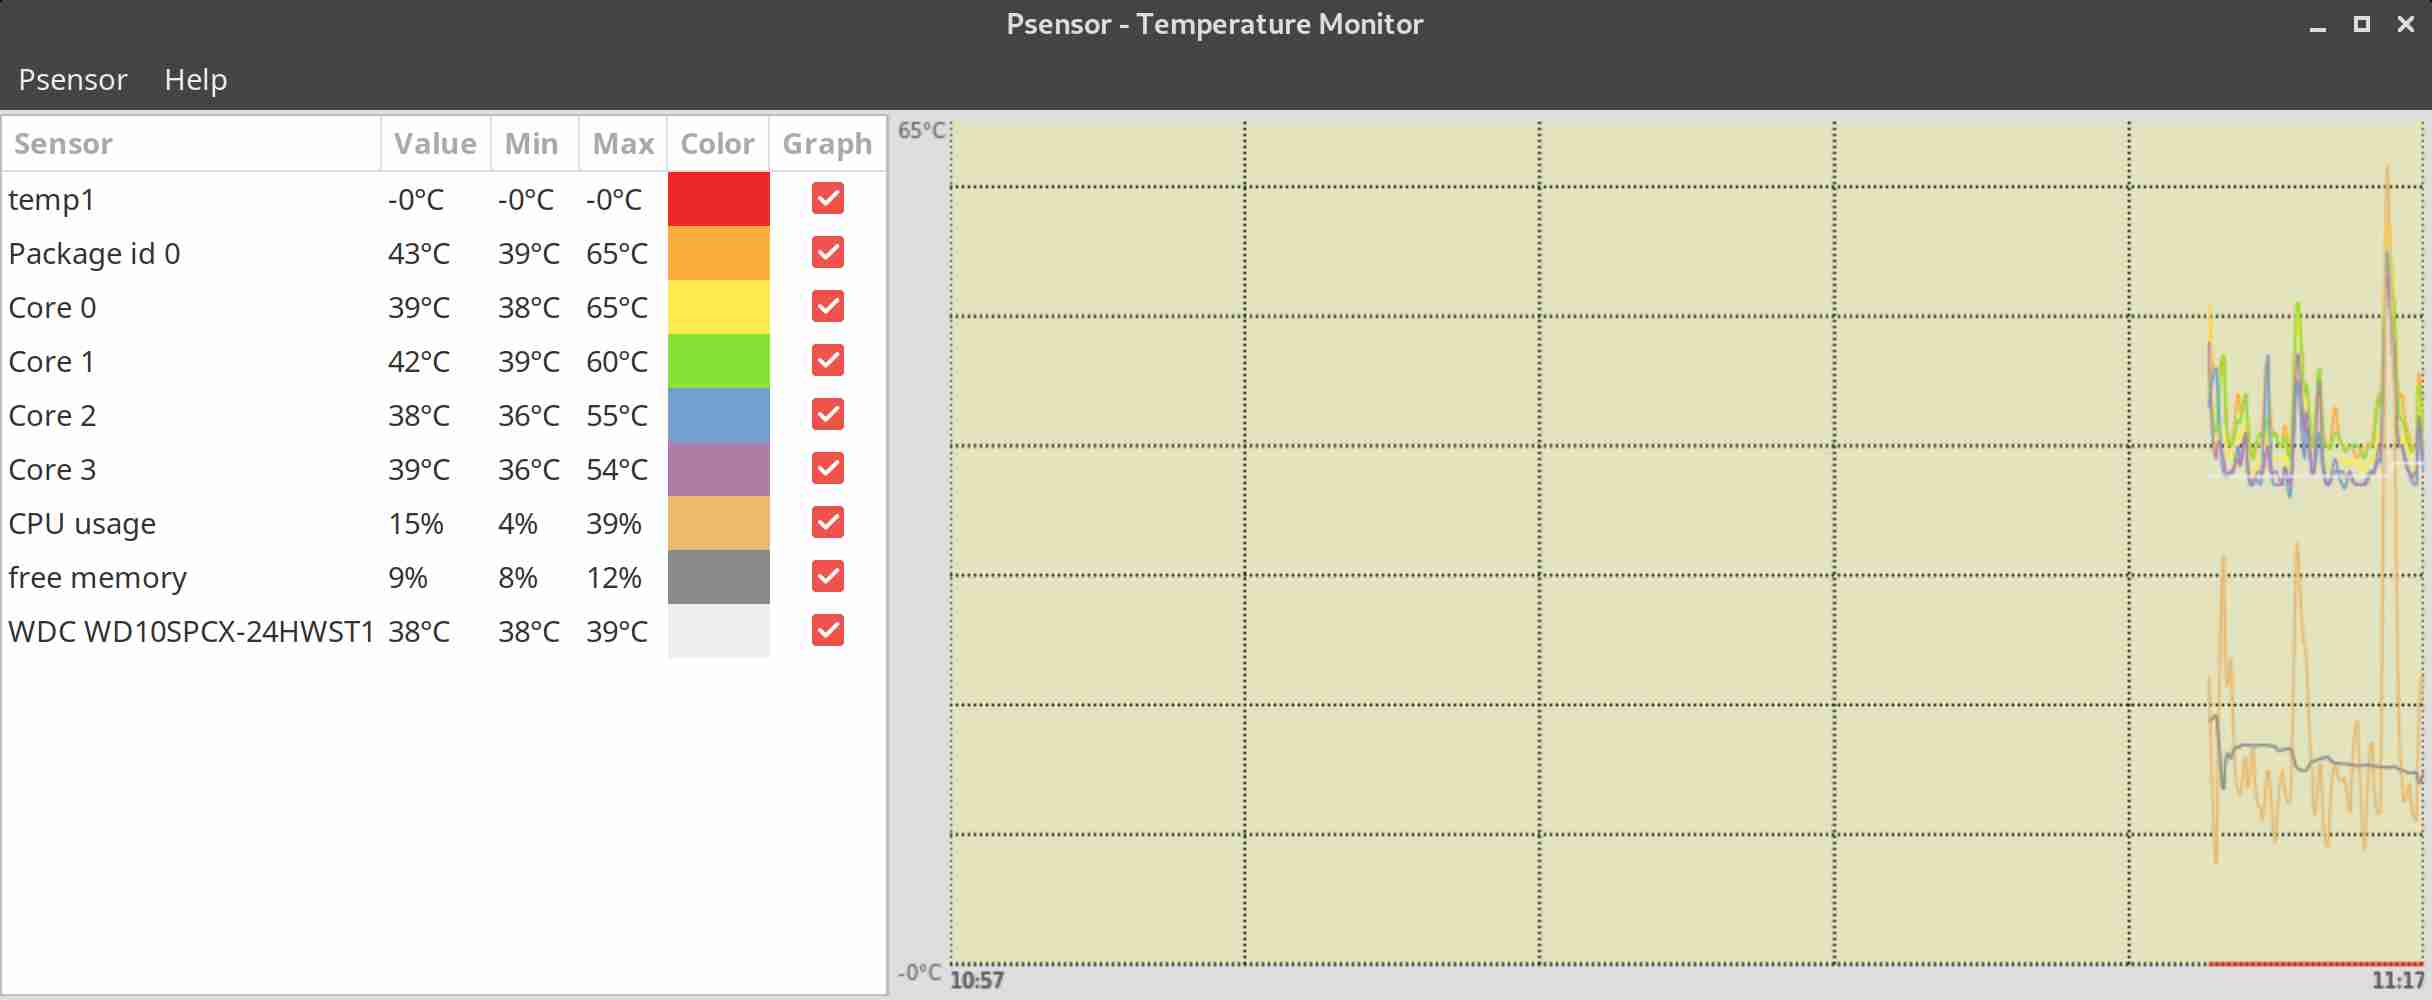
psensor-linux-graphical-tool-to-check-cpu-hard-disk-temperature-unix

If you have a Xserver installed on the Server accessed with Xclient or via VNC though quite rare,
You can use xsensors or Psensora GTK+ (Widget Toolkit for creating Graphical User Interface) application software.

With this 3 tools it is pretty easy to script one liners and use the Zabbix UserParameters functionality to send hardware report data to a Company's Zabbix Sserver, though Zabbix has already some templates to do so in my case, I couldn't import this templates cause I don't have Zabbix Super-Admin credentials, thus to work around that a sample work around is use script to monitor for higher and critical considered temperature.
Here is a tiny sample script I came up in 1 min time it can be used to used as 1 liner UserParameter and built upon something more complex.

SENSORS_HIGH=`sensors | awk '{ print $6 }'| grep '^+' | uniq`;
SENSORS_CRIT=`sensors | awk '{ print $9 }'| grep '^+' | uniq`; ;SENSORS_STAT=`sensors|grep -E 'Core\s' | awk '{ print $1" "$2" "$3 }' | grep "$SENSORS_HIGH|$SENSORS_CRIT"`;
if [ ! -z $SENSORS_STAT ]; then
echo 'Temperature HIGH';
else 
echo 'Sensors OK';
fi 

Of course there is much more sophisticated stuff to use for monitoring out there


Below script can be easily adapted and use on other Monitoring Platforms such as Nagios / Munin / Cacti / Icinga and there are plenty of paid solutions, but for anyone that wants to develop something from scratch just like me I hope this
article will be a good short introduction.
If you know some other Linux hardware monitoring tools, please share.

Create SFTP CHROOT Jail User for data transfer to better Linux shared web hosting server security

Monday, December 3rd, 2018

Adding user SFTP access to a Linux system is often required and therefore a must for multi users or web hosting environments it is an absolute requirement to have SFTP  user space separation ( isolation ) out of the basic Linux system environment this is done using a fake CHROOT Jail.

Purpose of this article is to show how to create SFTP Chroot JAIL in few easy configurations.

By isolating each user into his own space you will protect the users to not eventually steal or mistakenly leak information such as user credentials / passwords etc.

Besides that it is useful to restrict the User to his own File / Web Space to have granted only access to Secure FTP (SFTP) only and not SSH login access and togheter with the chroot jail environment to protect your server from being attempted to be hacked (rooted / exploited) through some (0day) zero-day kernel 1337 vulnerability.

1. Setup Chrooted file system and do the bind mount in /etc/fstab
 

# chown root:root /mnt/data/share
# chmod 755 /mnt/data/share
# mkdir -p /sftp/home
# mount -o bind /mnt/data/share /sftp/home

Next add to /etc/fstab (e.g. vim /etc/fstab) and add following line:
 

/mnt/data/share /sftp/home  none   bind   0   0


To mount it next:
 

# mount -a


/mnt/data/share is a mounted HDD in my case but could be any external attached storage


2. Create User and sftpgroup group and add your new SFTP Jailed user accounts to it

To achieve SFTP only CHROOT Jail environment you need some UNIX accounts new group created such as sftpgroup and use it to assign proper ownership / permissions to newly added SFTP restricted accounts.
 

# groupadd sftpgroup


Once the group exists, next step is to create the desired username / usernames with useradd command and assign it to sftpgroup:


# adduser sftp-account1 -s /sbin/nologin -d /sftp/home
# passwd sftp-account1


usermod -G sftpgroup sftp-account1


Above both commands could be also done in one line with adduser


# adduser sftp-account1 -g sftpgroup -s /sbin/nologin -d /sftp/home

Note the /sbin/nologin which is set to prevent SSH logins but still allow access via sftp / scp data transfer clients Once the user exists it is a good idea to prepare the jailed environment under a separate directory under root File system system lets say in /sftp/home/

3. Set proper permissions to User chrooted /home folder

# mkdir -p /sftp/home
# mkdir /sftp/home/sftp-account1
# chown root:root /sftp/
# chown sftp-account1:sftpgroup /sftp/home/sftp-account1

For each new created uesr (in this case sftp-account1) make sure the permissions are properly set to make the files readable only by the respective user.

# chmod 700 -R /sftp/home/sftp-account1

For every next created user don't forget to do the same 3. Modify SSHD configuration file to add Chroot match rules Edit /etc/ssh/sshd_config file and to the end of it add below configuration:

# vim /etc/ssh/sshd_config
Subsystem sftp internal-sftp     
Match Group sftpgroup   
ChrootDirectory /sftp/home   
ForceCommand internal-sftp   
X11Forwarding no   
AllowTcpForwarding no


Restart sshd to make the new settings take effect, to make sure you don't ed up with no access (if it is a remote server) run the sshd daemon on a secondary port like so:
 

# /usr/sbin/sshd -p 2208 &

Then restart sshd – if it is old Linux with Init V support

# /etc/init.d/sshd restart

– For systemd Linux systems

# systemctl restart sshd


4. Verify Username (sftp-account1) could login only via SFTP and his environment is chrooted


ssh sftp-account1@www.pc-freak.net

This service allows sftp connections only.
Connection to 83.228.93.76 closed.


sftp sftp-account1@www.pc-freak.net Connected to 83.228.93.76. sftp>


5. Closure

The quick summary of What we have achieved with below is:

restrict Linux users from having no /bin/shell access but still have Secure FTP copy in few steps to summarize them

a. create new user and group for SFTP chrooted restricted access only
b. set proper permissions to make folder accessible only by user itself
c. added necessery sshd config and restarted sshd to make it working d. tested configuration

This short guide was based on documentation on Arch Linux's wiki SFTP chroot you can check it here.

Mail send from command line on Linux and *BSD servers – useful for scripting

Monday, September 10th, 2018

mail-send-email-from-command-line-on-linux-and-freebsd-operating-systems-logo

Historically Email sending has been very different from what most people use it in the Office, there was no heavy Email clients such as Outlook Express no MX Exchange, no e-mail client capabilities for Calendar and Meetings schedule as it is in most of the modern corporate offices that depend on products such as Office 365 (I would call it a connectedHell 365 days a year !).

There was no free webmail and pop3 / imap providers such as Mail.Yahoo.com, Gmail.com, Hotmail.com, Yandex.com, RediffMail, Mail.com the innumerous lists goes and on.
Nope back in the day emails were doing what they were originally supposed to like the post services in real life simply send and receive messages.

For those who remember that charming times, people used to be using BBS-es (which were basicly a shared set-up home system as a server) or some of the few University Internal Email student accounts or by crazy sysadmins who received their notification and warnings logs about daemon (services) messages via local DMZ-ed network email servers and it was common to read the email directly with mail (mailx) text command or custom written scripts … It was not uncommon also that mailx was used heavily to send notification messages on triggered events from logs. Oh life was simple and clear back then, and even though today the email could be used in a similar fashion by hard-core old school sysadmins and Dev Ops / simple shell scriptings tasks or report cron jobs such usage is already in the deep history.

The number of ways one could send email in text format directly from the GNU / Linux / *BSD server to another remote mail MTA node (assuming it had properly configured Relay server be it Exim or Postifix) were plenty.

In this article I will try to rewind back some of the UNIX history by pinpointing a few of the most common ways, one used to send quick emails directly from a remote server connection terminal or lets say a cheap VPS few cents server, through something like (SSH or Telnet) etc.
 

1. Using the mail command client (part of bsd-mailx on Debian).
 

In my previous article Linux: "bash mail command not found" error fix
I ended the article with a short explanation on how this is done but I will repeat myself one more time here for the sake of clearness of this article.

root@linux:~# echo "Your Sample Message Body" | mail -s "Whatever … Message Subject" remote_receiver@remote-server-email-address.com


The mail command will connect to local server TCP PORT 25 on local configured MTA and send via it. If the local MTA is misconfigured or it doesn't have a proper MX / PTR DNS records etc. or not configure as a relay SMTP remote mail will not get delivered. Sent Email should be properly delivered at remote recipient address.

How to send HTML formatted emails using mailx command on Linux console / terminal shell using remote server through SSH ?

Connect to remote SSH server (VPS), dedicated server, home Linux router etc. and run:


root@linux:~# mailx -a 'Content-Type: text/html'
      -s "This is advanced mailx indeed!" < email_content.html
      "first_email_to_send_to@gmail.com, mail_recipient_2@yahoo.com"


email_content.html should be properly formatted (at best w3c standard compliant) HTML.

Here is an example email_content.html (skeleton file)


    To: your_customer@gmail.com
    Subject: This is an HTML message
    From: marketing@your_company.com
    Content-Type: text/html; charset="utf8"

    <html>
    <body>
    <div style="
        background-color:
        #abcdef; width: 300px;
        height: 300px;
        ">
    </div>
Whatever text mixed with valid email HTML tags here.
    </body>
    </html>


Above command sends to two email addresses however if you have a text formatted list of recipients you can easily use that file with a bash shell script for loop and send to multiple addresses red from lets say email_addresses_list.txt .

To further advance the one liner you can also want to provide an email attachment, lets say the file email_archive.rar by using the -A email_archive.rar argument.


root@linux:~# mailx -a 'Content-Type: text/html'
      -s "This is advanced mailx indeed!" -A ~/email_archive.rar < email_content.html
      "first_email_to_send_to@gmail.com, mail_recipient_2@yahoo.com"


For those familiar with Dan Bernstein's Qmail MTA (which even though a bit obsolete is still a Security and Stability Beast across email servers) – mailx command had to be substituted with a custom qmail one in order to be capable to send via qmail MTA daemon.
 

2. Using sendmail command to send email
 

Do you remember that heavy hard to configure MTA monster sendmail ? It was and until this very day is the default Mail Transport Agent for Slackware Linux.

Here is how we were supposed to send mail with it:


[root@sendmail-host ~]# vim email_content_to_be_delivered.txt


Content of file should be something like:

Subject: This Email is sent from UNIX Terminal Email

Hi this Email was typed in a file and send via sendmail console email client
(part of the sendmail mail server)

It is really fun to go back in the pre-history of Mail Content creation 🙂


[root@sendmail-host ~]# sendmail -v user_name@remote-mail-domain.com  < /tmp/email_content_to_be_delivered.txt


-v argument provided, will make the communication between the mail server and your mail transfer agent visible.
 

3. Using ssmtp command to send mail
 

ssmtp MTA and its included shell command was used historically as it was pretty straight forward you just launch it on the command line type on one line all your email and subject and ship it (by pressing the CTRL + D key combination).

To give it a try you can do:


root@linux:~# apt-get install ssmtp
Reading package lists… Done
Building dependency tree       
Reading state information… Done
The following additional packages will be installed:
  libgnutls-openssl27
The following packages will be REMOVED:
  exim4-base exim4-config exim4-daemon-heavy
The following NEW packages will be installed:
  libgnutls-openssl27 ssmtp
0 upgraded, 2 newly installed, 3 to remove and 1 not upgraded.
Need to get 239 kB of archives.
After this operation, 3,697 kB disk space will be freed.
Do you want to continue? [Y/n] Y
Get:1 http://ftp.us.debian.org/debian stretch/main amd64 ssmtp amd64 2.64-8+b2 [54.2 kB]
Get:2 http://ftp.us.debian.org/debian stretch/main amd64 libgnutls-openssl27 amd64 3.5.8-5+deb9u3 [184 kB]
Fetched 239 kB in 2s (88.5 kB/s)         
Preconfiguring packages …
dpkg: exim4-daemon-heavy: dependency problems, but removing anyway as you requested:
 mailutils depends on default-mta | mail-transport-agent; however:
  Package default-mta is not installed.
  Package mail-transport-agent is not installed.
  Package exim4-daemon-heavy which provides mail-transport-agent is to be removed.


(Reading database … 169307 files and directories currently installed.)
Removing exim4-daemon-heavy (4.89-2+deb9u3) …
dpkg: exim4-config: dependency problems, but removing anyway as you requested:
 exim4-base depends on exim4-config (>= 4.82) | exim4-config-2; however:
  Package exim4-config is to be removed.
  Package exim4-config-2 is not installed.
  Package exim4-config which provides exim4-config-2 is to be removed.
 exim4-base depends on exim4-config (>= 4.82) | exim4-config-2; however:
  Package exim4-config is to be removed.
  Package exim4-config-2 is not installed.
  Package exim4-config which provides exim4-config-2 is to be removed.

Removing exim4-config (4.89-2+deb9u3) …
Selecting previously unselected package ssmtp.
(Reading database … 169247 files and directories currently installed.)
Preparing to unpack …/ssmtp_2.64-8+b2_amd64.deb …
Unpacking ssmtp (2.64-8+b2) …
(Reading database … 169268 files and directories currently installed.)
Removing exim4-base (4.89-2+deb9u3) …
Selecting previously unselected package libgnutls-openssl27:amd64.
(Reading database … 169195 files and directories currently installed.)
Preparing to unpack …/libgnutls-openssl27_3.5.8-5+deb9u3_amd64.deb …
Unpacking libgnutls-openssl27:amd64 (3.5.8-5+deb9u3) …
Processing triggers for libc-bin (2.24-11+deb9u3) …
Setting up libgnutls-openssl27:amd64 (3.5.8-5+deb9u3) …
Setting up ssmtp (2.64-8+b2) …
Processing triggers for man-db (2.7.6.1-2) …
Processing triggers for libc-bin (2.24-11+deb9u3) …


As you see from above output local default Debian Linux Exim is removed …

Lets send a simple test email …


hipo@linux:~# ssmtp user@remote-mail-server.com
Subject: Simply Test SSMTP Email
This Email was send just as a test using SSMTP obscure client
via SMTP server.
^d


What is notable about ssmtp is that even though so obsolete today it supports of STARTTLS (email communication encryption) that is done via its config file


/etc/ssmtp/ssmtp.conf


4. Send Email from terminal using Mutt client
 

Mutt was and still is one of the swiff army of most used console text email clients along with Alpine and Fetchmail to know more about it read here

Mutt supports reading / sending mail from multiple mailboxes and capable of reading IMAP and POP3 mail fetch protocols and was a serious step forward over mailx. Its syntax pretty much resembles mailx cmds.


root@linux:~# mutt -s "Test Email" user@example.com < /dev/null


Send email including attachment a 15 megabytes MySQL backup of Squirrel Webmail


root@linux:~# mutt  -s "This is last backup small sized database" -a /home/backups/backup_db.sql user@remote-mail-server.com < /dev/null


5. Using simple telnet to test and send email (verify existence of email on remote SMTP)
 

As a Mail Server SysAdmin this is one of my best ways to test whether I had a server properly configured and even sometimes for the sake of fun I used it as a hack to send my mail 🙂
telnet is and will always be a great tool for doing SMTP issues troubleshooting.
 

It is very useful to test whether a remote SMTP TCP port 25 is opened or a local / remote server firewall prevents connections to MTA.

Below is an example connect and send example using telnet to my local SMTP on www.pc-freak.net (QMail powered (R) 🙂 )
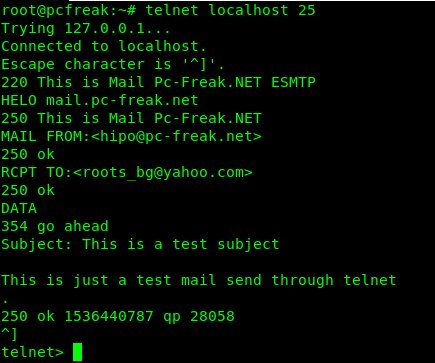
sending-email-using-telnet-command-howto-screenshot


root@pcfreak:~# telnet localhost 25
Trying 127.0.0.1…
Connected to localhost.
Escape character is '^]'.
220 This is Mail Pc-Freak.NET ESMTP
HELO mail.www.pc-freak.net
250 This is Mail Pc-Freak.NET
MAIL FROM:<hipo@www.pc-freak.net>
250 ok
RCPT TO:<roots_bg@yahoo.com>
250 ok
DATA
354 go ahead
Subject: This is a test subject


This is just a test mail send through telnet
.
250 ok 1536440787 qp 28058
^]
telnet>


Note that the returned messages are native to qmail, a postfix would return a slightly different content, here is another test example to remote SMTP running sendmail or postfix.


root@pcfreak:~# telnet mail.servername.com 25
Trying 127.0.0.1…
Connected to localhost.localdomain (127.0.0.1).
Escape character is '^]'.
220 mail.servername.com ESMTP Sendmail 8.13.8/8.13.8; Tue, 22 Oct 2013 05:05:59 -0400
HELO yahoo.com
250 mail.servername.com Hello mail.servername.com [127.0.0.1], pleased to meet you
mail from: systemexec@gmail.com
250 2.1.0 hipo@www.pc-freak.net… Sender ok
rcpt to: hip0d@yandex.ru
250 2.1.5 hip0d@yandex.ru… Recipient ok
data
354 Enter mail, end with "." on a line by itself
Hey
This is test email only


Thanks
.
250 2.0.0 r9M95xgc014513 Message accepted for delivery
quit
221 2.0.0 mail.servername.com closing connection
Connection closed by foreign host.


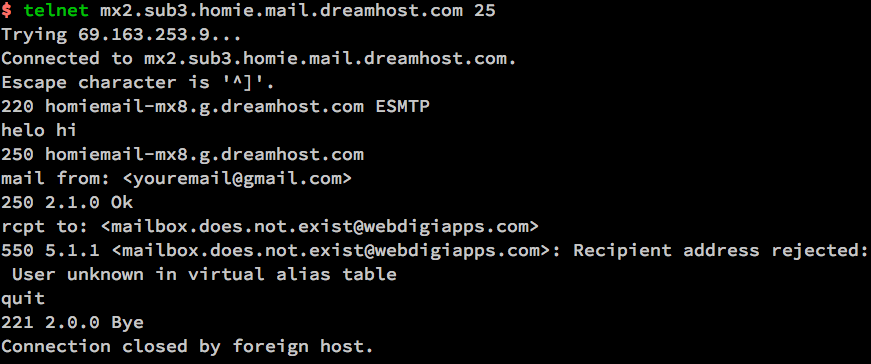
It is handy if you want to know whether remote MTA server has a certain Emailbox existing or not with telnet by simply trying to send to a certian email and checking the Email server returned output (note that the message returned depends on the remote MTA version and many qmails are configured to not give information on the initial SMTP handshake but returns instead a MAILER DAEMON failure error sent back to your sender address. Some MX servrers are still vulnerable to this attack yet, historically dreamhost.com. Below attack screenshot is made at the times before dreamhost.com fixed the brute force email issue.
Terminal-Verify-existing-Email-with-telnet

6. Using simple netcat TCP/IP Swiss Army Knife to test and send email in console

netcat-logo-a-swiff-army-knife-of-the-hacker-and-security-expert-logo
Other tool besides telnet of testing remote / local SMTP is netcat tool (for reading and writting data across TCP and UDP connections).

The way to do it is analogous but since netcat is not present on most Linux OSes by default you need to install it through the package manager first be it apt or yum etc.

# apt-get –yes install netcat


First lets create a new file test_email_content.txt using bash's echo cmd.


# echo 'EHLO hostname
MAIL FROM: hip0d@yandex.ru
RCPT TO:   solutions@www.pc-freak.net
DATA
From: A tester <hip0d@yandex.ru>
To:   <solutions@www.pc-freak.net>
Date: date
Subject: A test message from test hostname


Delete me, please
.
QUIT
' >>test_email_content.txt


# netcat -C localhost 25 < test_email_content.txt


220 This is Mail Pc-Freak.NET ESMTP
250-This is Mail Pc-Freak.NET
250-STARTTLS
250-SIZE 80000000
250-PIPELINING
250 8BITMIME
250 ok
250 ok
354 go ahead
451 See http://pobox.com/~djb/docs/smtplf.html.

Because of its simplicity and the fact it has a bit more capabilities in reading / writing data over network it was no surprise it was among the favorite tools not only of crackers and penetration testers but also a precious debug tool for the avarage sysadmin. netcat's advantage over telnet is you can push-pull over the remote SMTP port (25) a non-interactive input.


7. Using openssl to connect and send email via encrypted channel


root@linux:~# openssl s_client -connect smtp.gmail.com:465 -crlf -ign_eof

    ===
               Certificate negotiation output from openssl command goes here
        ===

        220 smtp.gmail.com ESMTP j92sm925556edd.81 – gsmtp
            EHLO localhost
        250-smtp.gmail.com at your service, [78.139.22.28]
        250-SIZE 35882577
        250-8BITMIME
        250-AUTH LOGIN PLAIN XOAUTH2 PLAIN-CLIENTTOKEN OAUTHBEARER XOAUTH
        250-ENHANCEDSTATUSCODES
        250-PIPELINING
        250-CHUNKING
        250 SMTPUTF8
            AUTH PLAIN *passwordhash*
        235 2.7.0 Accepted
            MAIL FROM: <hipo@pcfreak.org>
        250 2.1.0 OK j92sm925556edd.81 – gsmtp
            rcpt to: <systemexec@gmail.com>
        250 2.1.5 OK j92sm925556edd.81 – gsmtp
            DATA
        354  Go ahead j92sm925556edd.81 – gsmtp
            Subject: This is openssl mailing

            Hello nice user
            .
        250 2.0.0 OK 1339757532 m46sm11546481eeh.9
            quit
        221 2.0.0 closing connection m46sm11546481eeh.9
        read:errno=0


8. Using CURL (URL transfer) tool to send SSL / TLS secured crypted channel emails via Gmail / Yahoo servers and MailGun Mail send API service


Using curl webpage downloading advanced tool for managing email send might be  a shocking news to many as it is idea is to just transfer data from a server.
curl is mostly used in conjunction with PHP website scripts for the reason it has a Native PHP implementation and many PHP based websites widely use it for download / upload of user data.
Interestingly besides support for HTTP and FTP it has support for POP3 and SMTP email protocols as well
If you don't have it installed on your server and you want to give it a try, install it first with apt:
 

root@linux:~# apt-get install curl


To learn more about curl capabilities make sure you check cURL –manual arg.
 

root@linux:~# curl –manual


a) Sending Emails via Gmail and other Mail Public services

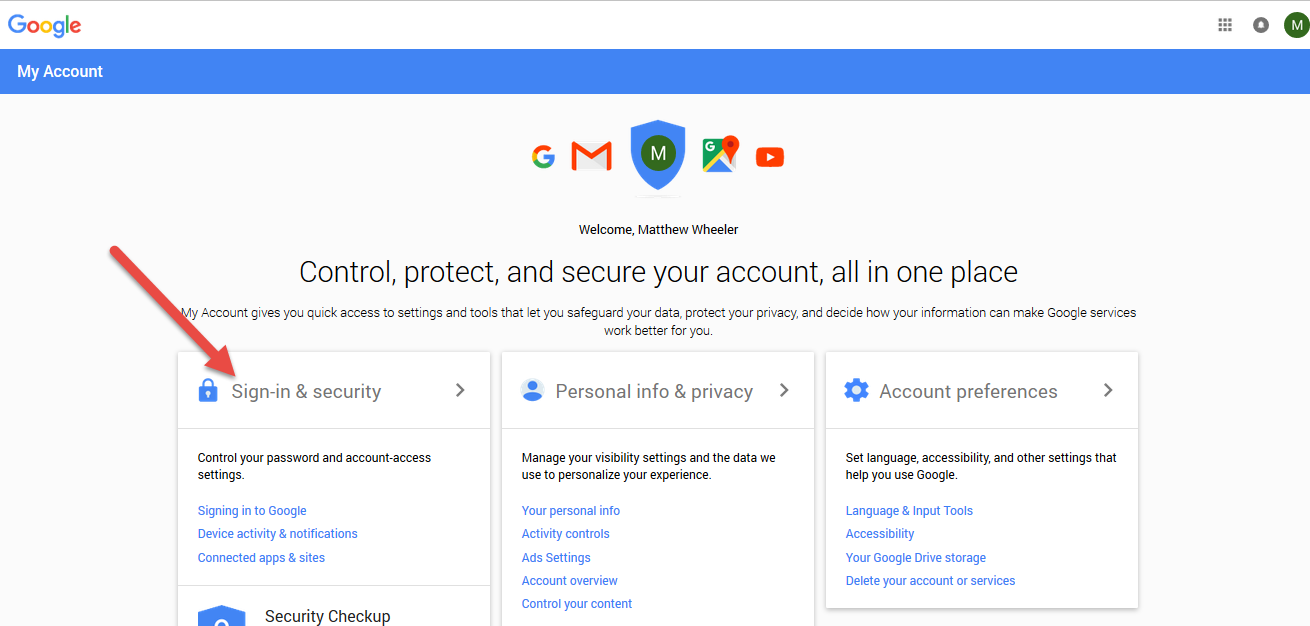
Curl is capable to send emails from terminal using Gmail and Yahoo Mail services, if you want to give that a try.
gmail-settings-google-allow-less-secure-apps-sign-in-to-google-screenshot

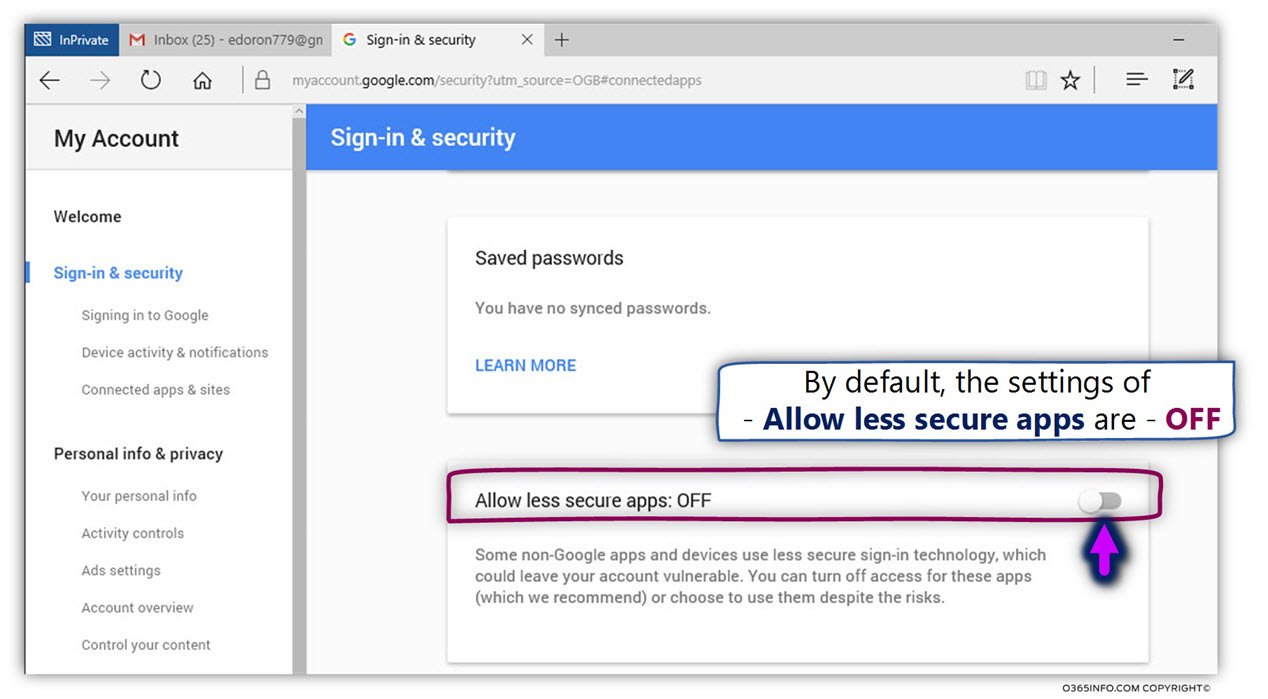
Go to myaccount.google.com URL and login from the web interface choose Sign in And Security choose Allow less Secure Apps to be -> ON and turn on access for less secure apps in Gmail. Though I have not tested it myself so far with Yahoo! Mail, I suppose it should have a similar security settings somewhere.

Here is how to use curl to send email via Gmail.
Gmail-password-Allow-less-secure-apps-ON-screenshot-howto-to-be-able-to-send-email-with-text-commands-with-encryption-and-outlook


root@linux:~# curl –url 'smtps://smtp.gmail.com:465' –ssl-reqd \
  –mail-from 'your_email@gmail.com' –mail-rcpt 'remote_recipient@mail.com' \
  –upload-file mail.txt –user 'your_email@gmail.com:your_accout_password'


b) Sending Emails using Mailgun.com (Transactional Email Service API for developers)

To use Mailgun to script sending automated emails go to Mailgun.com and create account and generate new API key.

Then use curl in a similar way like below example:


curl -sv –user 'api:key-7e55d003b…f79accd31a' \
    https://api.mailgun.net/v3/sandbox21a78f824…3eb160ebc79.mailgun.org/messages \
    -F from='Excited User <developer@yourcompany.com>' \
    -F to=sandbox21a78f824…3eb160ebc79.mailgun.org \
    -F to=user_acc@gmail.com \
    -F subject='Hello' \
    -F text='Testing Mailgun service!' \
   –form-string html='<h1>EDMdesigner Blog</h1><br /><cite>This tutorial helps me understand email sending from Linux console</cite>' \
    -F attachment=@logo_picture.jpg


The -F option that is heavy present in above command lets curl (Emulate a form filled in button in which user has pressed the submit button).
For more info of the options check out man curl.


9. Using swaks command to send emails from


root@linux:~# apt-cache show swaks|grep "Description" -B 10
Package: swaks
Version: 20170101.0-1
Installed-Size: 221
Maintainer: Andreas Metzler <ametzler@debian.org>
Architecture: all
Depends: perl
Recommends: libnet-dns-perl, libnet-ssleay-perl
Suggests: perl-doc, libauthen-sasl-perl, libauthen-ntlm-perl
Description-en: SMTP command-line test tool
 swaks (Swiss Army Knife SMTP) is a command-line tool written in Perl
 for testing SMTP setups; it supports STARTTLS and SMTP AUTH (PLAIN,
 LOGIN, CRAM-MD5, SPA, and DIGEST-MD5). swaks allows one to stop the
 SMTP dialog at any stage, e.g to check RCPT TO: without actually
 sending a mail.
 .
 If you are spending too much time iterating "telnet foo.example 25"
 swaks is for you.
Description-md5: f44c6c864f0f0cb3896aa932ce2bdaa8


root@linux:~# apt-get instal –yes swaks

root@linux:~# swaks –to mailbox@example.com -s smtp.gmail.com:587
      -tls -au <user-account> -ap <account-password>


The -tls argument (in order to use gmail encrypted TLS channel on port 587)

If you want to hide the password not to provide the password from command line so (in order not to log it to user history) add the -a options.

10. Using qmail-inject on Qmail mail servers to send simple emails

Create new file with content like:
 

root@qmail:~# vim email_file_content.text
To: user@mail-example.com
Subject: Test


This is a test message.
 

root@qmail:~# cat email_file_content.text | /var/qmail/bin/qmail-inject


qmail-inject is part of ordinary qmail installation so it is very simple it even doesn't return error codes it just ships what ever given as content to remote MTA.
If the linux host where you invoke it has a properly configured qmail installation the email will get immediately delivered. The advantage of qmail-inject over the other ones is it is really lightweight and will deliver the simple message more quickly than the the prior heavy tools but again it is more a Mail Delivery Agent (MDA) for quick debugging, if MTA is not working, than for daily email writting.

It is very useful to simply test whether email send works properly without sending any email content by (I used qmail-inject to test local email delivery works like so).
 

root@linux:~# echo 'To: mailbox_acc@mail-server.com' | /var/qmail/bin/qmail-inject


11. Debugging why Email send with text tool is not being send properly to remote recipient

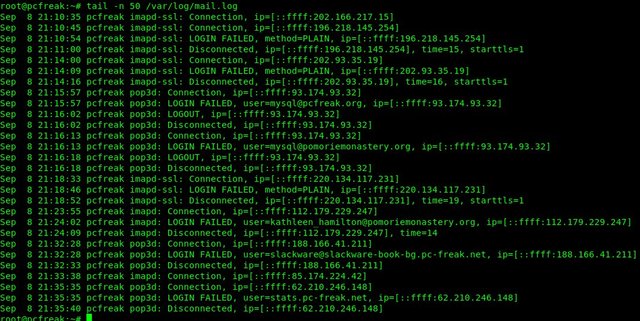
If you use some of the above described methods and email is not delivered to remote recipient email addresses check /var/log/mail.log (for a general email log and postfix MTAs – the log is present on many of the Linux distributions) and /var/log/messages or /var/log/qmal (on Qmail installations) /var/log/exim4 (on servers running Exim as MTA).
https://www.pc-freak.net/images/linux-email-log-debug-var-log-mail-output

 Closure

The ways to send email via Linux terminal are properly innumerous as there are plenty of scripted tools in various programming languages, I am sure in this article,  also missing a lot of pre-bundled installable distro packages. If you know other interesting ways / tools to send via terminal I would like to hear it.

Hope you enjoyed, happy mailing !

How to fully recover deleted files on ext3 Debian Linux partition – undelete files from ext3 filesystems with ext3grep

Monday, March 7th, 2011

In order to recover fully data by mistake or on purpose deleted on Debian GNU/Linux there is a tool called ext3grep which is able to completely recover data by innodes.

Recovering the deleted files data is very easy and can be done via some livecd after installing the ext3grep tool.

In my case I used the Back Track Linux distribution to recover my data. Recovery is still in process and it appears all or at least most of my data is about to be recovered.

For the recovery procedure all necessary is an external partition in ext3 or ext3 where the recovered data from the ext3 device can be stored.

My partition was about 20GB and since I had no external hard dive to store the data to I used the sshfs to mount remotely a hard drive via the networking using the sshfs program to make the ssh mount for more see my previous post Howto mount remote server ssh filesystem using sshfs

The Backtrack livecd linux security distribution is missing the ext3grep tool thus I had to first install the tool after booting the livecd on the notebook to succeed in that it was necessary to install the e2fslibs-dev package through the command:

debian:~# apt-get install e2fslibs-dev

Further on I've downloaded the latest version of the ext3grep and untarred the archive and compiled it with the commands:

debian:~# ./configure && make && make install
Then I used the simple commands:

debian:~# cd /mnt/res
debian:~# ext3grep --restore-all /dev/sda8

to launch the recovery.
Where in the above commands /mnt/res is the mountpoint location where I wanted to have all my data recovered and the /dev/sda8 is the device from which I wanted to recover my data.

It takes a bit long until the recovery is completed and with 20 gigabytes of data about 5, 6 hours might be necessary for the data to be recovered but the main point is it recovers.

Who were our ancestors – Genetic history of Europe – DNA – Truth or Machination from IGENEA

Tuesday, March 5th, 2013

genetic-history-of-europe-Percentage_of_major_Y-DNA_haplogroups_in_Europe

As I've said earlier in my blog posts, I keep deep interest into the origin of things. Thus I'm quite interested into the origin of Bulgarian nation and rest of European nations. I've stumbled across a project called IGENEA which aims at researching into DNA of nations and determining to what kind of ancestry nation is most likely to be. The data provided by IGENEA is put into question by a lot of Historians for the reason the method of IGENEA is based merely on scientific logic and scientifical data which can't be 100% proven and there is also hypothesis as part of it. One other thing is IGENEA project has commercial side, as they offer DNA tests that can be done at home and later analyzed in iGENEA laboratory and tell you individually who are your most likely ancestors and where you're most likely to find your relatives. Igenea claism they can tell you if your DNA somehow links to famous people like Napoleon Bonapart, Michael Jackson, Nicole Kidman or even the Popoe 😉

Though of course as everything in this life the results one gets from igenea are finally based on faith, as mostly all in life is based on faith.

Though below video data might be incorrect, some general data provided for some Northern Europe nations looks trustworthy. For those interested to know exactly how IGENEA testing and analysis is done check here
As I'm a Christian and I firmly believe God Created all I support the Creationism theory, I look in the data a bit sceptical for the reason many of the results and conclusions driven from IGENEA project lay on believes in Darwin's theory credibility. Everyone who seriously considered to know where we come from has already questioned the credibility of Evolution. Anyone who digged deep already knows there are a lot of problems with Darwin's theory which are unsolvable by modern archeology 'little' species findings. Also it is big problem with the idea that man came from Africa, that credibiliy of such claims is and will probably forever stay one big Hypothesis.
Enjoy, the highly specular findings of IGENEA in below video


Who were our ancestors- Genetic history of Europe – DNA – Truth or Machination from IGENEA.

Mass Media equals Mind Control / Watching Television or Movies can put you into a Hypnotic like state

Monday, May 21st, 2012

mass-media-and-mind-control-the-modern-slaves

I'm still heavily researching on Mind Control Applications as well as how the our brains could be intentionally mislead to do not our will.
I myself am not watching TV for years now and I know pretty well the TV programs are one big non-sense. Loosing interest into television came natural for me as sometime in my development in life I found I can use computer to gather a data of my preference. As computers and internet gave me more control over choice what I want to learn I quit watching TV completely. However now I'm starting to realize even though I haven't watched TV for a long time the fact that I have watched plenty of Television as a child has unintentionally influenced me as a purpose.

The real way how television influence us and makes us prone to suggestability is through putting the watched in a state similar to a hypnosis. I personally don't believe in the hypnosis as it is an occult practice and I think Christians are not suspectable to be influenced in the same way as non-Christians as it is up to God to decide how a certain technology will influence the individual. However most of us people nowdays are not a regular church attendants and we don't regularly pray and ask God for mercies and blessings therefore this makes us away from God and makes us more vulnerable to satanic agendas like hypnotism to be able to have influence on us….
Also by TV and modern pop culture, we have been encouraged to not stick to our cultural roots but to separate ourselves and accept an empty non-sense ideology that doesn't have any core besides money and consumerims.
In that sense the TV and medias plays the most significant role nowdays.

Mass Media = Mind Control – a video explaining in short how the TV and Mass medias are used to create similar or identical ideas in masses

The internet as lately we're hearing about PIPA, SOPA and all kind of legislations regulations corrupted 0politicians try to vote for could be soon filtered too. If that happens the situation with using computers to inform ourselves will be not so much different than with TV's and other medias.
Anyways even today the internet is heavily regulated as the biggest newspapers like New Your Times, BBC, Guardian are only publishing materials approved by the directors and compatible with the companies owners agendas…

Anyways we are not helpless as we can educate people and show them the real face of the things, so they can finally realize that this whole deception and anti-religious propaganda on the TV and vows for a life without rules is the greatest deception of our age.

WIth TVs, radios, music, Mobiles, Ipads, IPhones or nomatter what kind of latest technology we can never be happy while living without God.

Another good video worhty to see I've found on youtube is called
TV = Mind Control, unfortunately the video is not emebeddable so to see it you would have to copy paste this link: http://youtu.be/Nq9Gg7A-YEE

GNU / Linux Widgets (gdesklets, screenlets) – Apple MacoSX / Microsoft Vista like Widgets

Tuesday, September 15th, 2009

Screenlet Widget
I’m staying in a friend’s place for few days. Nasko a friend of mine has apple pc and showed me some nice features of the apple MacBook’s Mac OS X. One of the features I liked was the Apple Widgets which are helpful in facilitating the work with your pc. The same widgets are also included in Windows Vista (I always disabled that when used Vista).
Anyways I wondered if there is a way to have the same shiny widgets running on my Debian GNU/Linux.
I first found Gdesklets which basicly is a collection of Widgets for the Linux Gnome desktop written in Python. To run the gdesklet after installation
I had to issue the command:
$ gdesklets .Then in the tray a small tray puzzle icon appears. I sort of wondered a bit until I figured out how to add some gdesklet widgets.
To do that I had to select
“Manage Desklets” and through the gdesklets shell
to click twice the widget I would like to add to the desktop and thendrag it to the exact desktop place I would like it to have it positioned.
I have to emphasize gdesklets widgets are very, very buggy. Many of the widgets I tried crashed the whole application.
After which I had to manually kill the gdesklets app
and delete all it’s temporary files located in
~/.gdesklets directory. Many of the apps that didn’t crashed the gdesklets that required extra data from lmsensors never worked even though I have working version of lmsensors.
I suspect some of the widgets which failed to gather data from lmsensors cause
My notebook is Lenovo Thinkpad R61 and uses some custom features from the thinkpad_acpi kernel module
. Another possible reason for the crashes and misworkings of some components of gdesklets could be because I’m currently running Debian Unstable.

After being a bit disappointment from gdesklets experience.
I went looking further for some Linux widgets alternative.
Next widget related gnome prog I stucked on was jackfield . This one is said to have worked with Apple’s Widgets I don’t believe it does any more since it’s not actively developed anymore.
I tried the jackfield python program with no luck. The untarred archive of it was really messy and what was even worse was it lacked any documentation.
Hence I continued my quest for widgets just to came across a real working Gnome widget application.
Just to find Screenlets! .
I’ve red somewhere that Screenlets is based on jacfield.
The current release of Gnome Screenlets which by the way is officially part of gnome-look.org is 0.1.2. I was pleased to find the application worked pretty decent.
Screenlets includes many, many widgets:
Here is a link containg a list of all the screenlets widgets
.If you like to have a general idea of how screenlets looks like please check out the screenlet in action screenshots
END—–

Web Development & System Administration Company DreamupWeb

Tuesday, September 8th, 2009

I’ve noticed an ex-colleague as well as a friend of mine’s recently started company who does provide just Wonderful Web Development, SQL database and data processing System Administration services.The new company is named dreamupweb . The whole project looks quitepromising. The already completeled projects do testify the good quality work of the company.END—–

Mount remote Linux SSHFS Filesystem harddisk on Windows Explorer SWISH SSHFS file mounter and a short evaluation on what is available to copy files to SSHFS from Windows PC

Monday, February 22nd, 2016

swish-mount-and-copy-files-from-windows-to-linux-via-sshfs-mount

I'm forced to use Windows on my workbook and I found it really irritating, that I can't easily share files in a DropBox, Google Drive, MS OneDrive, Amazon Storage or other cloud-storage free remote service. etc.
I don't want to use DropBox like non self-hosted Data storage because I want to keep my data private and therefore the only and best option for me was to make possible share my Linux harddisk storage
dir remotely to the Windows notebook.

I didn't wanted to setup some complex environment such as Samba Share Server (which used to be often a common option to share file from Linux server to Windows), neither wanted to bother with  installing FTP service and bother with FTP clients, or configuring some other complex stuff such as WebDav – which BTW is an accepted and heavily used solution across corporate clients to access read / write files on a remote Linux servers.
Hence, I made a quick research what else besides could be used to easily share files and data from Windows PC / notebook to a home brew or professional hosting Linux server.

It turned out, there are few of softwares that gives a similar possibility for a home lan small network Linux / Windows hybrid network users such, here is few of the many:

  • SyncThingSyncthing is an open-source file synchronization client/server application, written in Go, implementing its own, equally free Block Exchange Protocol. The source code's content-management repository is hosted on GitHub


    syncthing-logo

  • OwnCloud – ownCloud provides universal access to your files via the web, your computer or your mobile devices


    owncloud-logo

  • Seafile – Seafile is a file hosting software system. Files are stored on a central server and can be synchronized with personal computers and mobile devices via the Seafile client. Files can also be accessed via the server's web interface


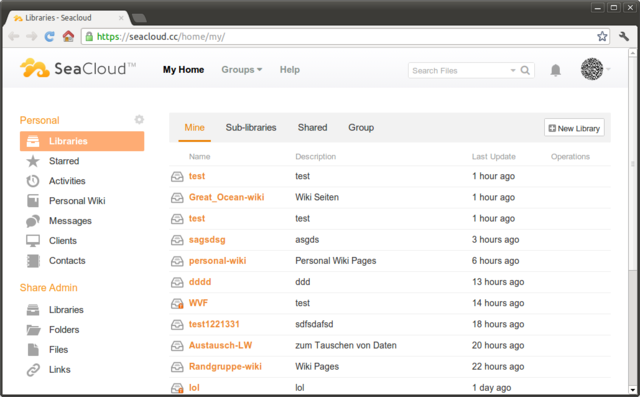
seafile-client-in-browser

I've checked all of them and give a quick try of Syncthing which is really easy to start, just download the binary launch it and configure it under https://Localhost:8385 URL from a browser on the Linux server.
Syncthing seemed to be nice and easy to configure solution to be able to Sync files between Server A (Windows) and Server B(Linux) and guess many would enjoy it, if you want to give it a try you can follow this short install syncthing article.
However what I didsliked in both SyncThing and OwnCloud and Seafile and all of the other Sync file solutions was, they only supported synchronization via web and didn't seemed to have a Windows Explorer integration and did required
the server to run more services, posing another security hole in the system as such third party softwares are not easily to update and maintain.

Because of that finally after rethinking about some other ways to copy files to a locally mounted Sync directory from the Linux server, I've decided to give SSHFS a try. Mounting SSHFS between two Linux / UNIX hosts is
quite easy task with SSHFS tool

In Windows however the only way I know to transfer files to Linux via SSHFS was with WinSCP client and other SCP clients as well as the experimental:

As well as few others such as ExpandDrive, Netdrive, Dokan SSHFS (mirrored for download here)
I should say that I first decided to try copying few dozen of Gigabyte movies, text, books etc. using WinSCP direct connection, but after getting a couple of timeouts I was tired of WinSCP and decided to look for better way to copy to remote Linux SSHFS.
However the best solution I found after a bit of extensive turned to be:

SWISH – Easy SFTP for Windows

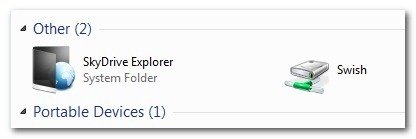
Swish is very straight forward to configure compared to all of them you download the .exe which as of time of writting is at version 0.8.0 install on the PC and right in My Computer you will get a New Device called Swish next to your local and remote drives C:/ D:/ , USBs etc.

swish-new-device-to-appear-in-my-computer-to-mount-sshfs

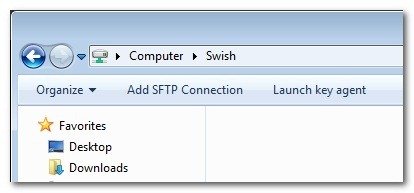
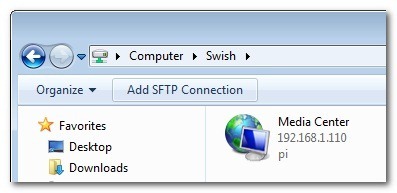
As you see in below screenshot two new non-standard buttons will Appear in Windows Explorer that lets you configure SWISH

windows-mount-sshfs-swish-add-sftp-connection-button-screenshot

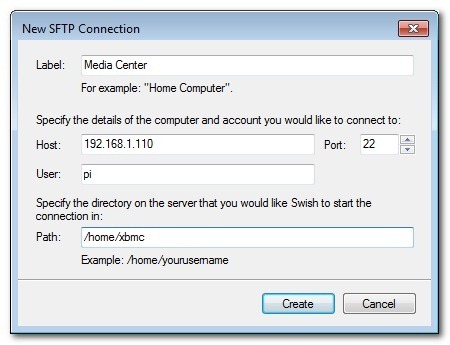
Next and final step before you have the SSHFS remote Linux filesystem visible on Windows Xp / 7 / 8 / 10 is to fill in remote Linux hostname address (or even better fill in IP to get rid of possible DNS issues), UserName (UserID) and Direcory to mount.

swish-new-fill-in-dialog-to-make-new-linux-sshfs-mount-directory-possible-on-windows

Then you will see the SSHFS moutned:

swish-sshfs-mounted-on-windows

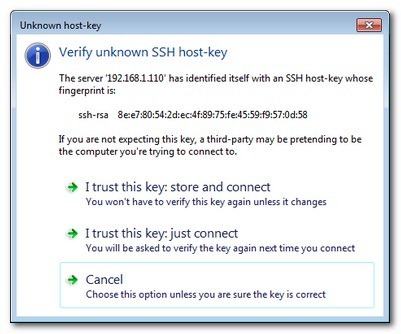
You will be asked to accept the SSH host-key as it used to be unknown so far

swish-mount-sshfs-partition-on-windows-from-remote-linux-accept-key

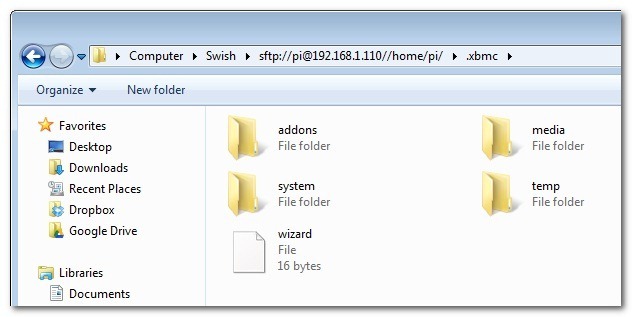
That's it now you will see straight into Windows Explorer the remote Linux SSHFS mounted:

remote-sshfs-linux-filesystem-mounted-in-windows-explorer-with-swish

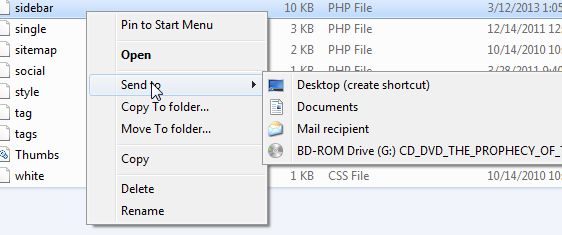
Once setupped a Swish connection to copy files directly to it you can use the Send to Embedded Windows dialog, as in below screenshot

swish-send-to-files-windows-screenshot

The only 3 problem with SWISH are:

1. It doesn't support Save password, so on every Windows PC reboot when you want to connect to remote Linux SSHFS, you will have to retype remote login user pass.
Fron security stand point this is not such a bad thing, but it is a bit irritating to everytime type the password without an option to save permanently.
The good thing here is you can use Launch Key Agent
as visible in above screenshot and set in Putty Key Agent your remote host SSH key so the passwordless login will work without any authentication at
all however, this might open a security hole if your Win PC gets infected by virus, which might delete something on remote mounted SSHFS filesystem so I personally prefer to retype password on every boot.

2. it is a bit slow so if you're planning to Transfer large amounts of Data as hundreds of megabytes, expect a very slow transfer rate, even in a Local  10Mbit Network to transfer 20 – 30 GB of data, it took me about 2-3 hours or so.
SWISH is not actively supported and it doesn't have new release since 20th of June 2013, but for the general work I need it is just perfect, as I don't tent to be Synchronizing Dozens of Gigabytes all the time between my notebook PC and the Linux server.

3. If you don't use the established mounted connection for a while or your computer goes to sleep mode after recovering your connection to remote Linux HDD if opened in Windows File Explorer will probably be dead and you will have to re-enable it.

For Mac OS X users who want to mount / attach remote directory from a Linux partitions should look in fuguA Mac OS X SFTP, SCP and SSH Frontend

I'll be glad to hear from people on other good ways to achieve same results as with SWISH but have a better copy speed while using SSHFS.

How to Remove Firefox TABS all time Moving Backward / Forward (Waiting) Wheel cursor – Browser and OS Wheel Ring cursor might affect hypnotically

Monday, September 7th, 2015

remove-firefox-tabs-all-time-annoying-moving-back-forward-waiting-wheel-cursor-browser-and-ring-cursor-might-affect-you-hypnotically

I've been annoying for quite a long time by the the Clockwise moving backward and Forward Wheel (Ring) on Top of browser Tabs everytime I navigate to a new Internet domain or request a resource on the Net.

I'm aware that seeing the wheel all the time move back and forward is a very bad manipulation technique that is often used in advertisements in old movies and some advertisements in the start of the video . I'm talking about the infamous backward counting technique in a Circle (it was moer commonly used in the dawn of Television) aiming to induce watchers mind into hypnotic state …

back-counting-10-9-8-7-manipulation-technique-to-make-your-mind-susceptible

Those who have a degree in psychology or have been into marketing or human resources fields or any field involved where you have to influence the masses are already aware of the backward counting methology which has been practiced heavily by hypnosis practisioners such as Sigmund Freud, to induce any kind of hypnotic state the hypnotist always asks the object of hypnotism to watch closely into a moving back and forwards clock, often accompanied by counting backwards …

Well my Theory here is that the same techniques is well aware of those who planned Windows OS in which if you remember the Sand Clock has been substituted in Windows 7 / 8 and Windows 10 with the rotating back and foward Wheel for the reason that this aims to influence people mind to go into Alpha state from Beta state and thus make them feel more relaxed while doing stuff on the PC.

One thing to mention here is Back and Forward wheel is not only into OS level it has been heavily adopted by leading Software as a Service (SAS) UIs such as Google's and probably more importantly Youtube (have you noticed the Cycling Wheel when waiting for a Youtube movie to Load), the Wheel is also heavily incoruprated in most if not all biggest Websites on the Net. Even If you have noticed these days Google's Cycling (Waiting) Wheel is not only Cycling but has the colorful programming incorporated.

google-wheel-color-programming-example

Well probably many people who use computers daily did not really realize that the Computer OS and Programs GUI Interface they're using is influencing their mind and some famous psychological methods such as color programming and hypnotic tricks could be used more or less.

In that regard as a Firefox user I decided to change tne Back and Forward Wheel with another one which will not trigger my subconsciousness / mind all the time while browing on the Net into Alpha State. As I'm not a Firefox expert and my quick research on search Engines on how to achieve changing or removing the Browser Tabs all time turning wheel did not led me to nothing positive, I've consulted the experts in irc.freenode.net #firefox.

As always the guys were helpful and pointed me out to UserStyles.org website's Static-Throbbler CSS. I've mirrored the CSS script under a name remove-firefox-tab-wheel-script.css in case if UserSpace.org disappears in future, below is also a paste of the script:

@namespace url(https://www.mozilla.org/keymaster/gatekeeper/there.is.only.xul); @-moz-document url(chrome://browser/content/browser.xul) { .tab-throbber { list-style-image: url('data:image/png;base64,iVBORw0KGgoAAAANSUhEUgAAABAAAAAQCAMAAAAoLQ9TAAAABGdBTUEAALGPC/xhBQAAACBjSFJNAAB6JgAAgIQAAPoAAACA6AAAdTAAAOpgAAA6mAAAF3CculE8AAAB5lBMVEUAAADMzMzr6+v////t7e1paWmYmJiampqPj4+IiIiQkJCgoKCPj49qamqQkJB2dnacnJyAgIBfX19aWlpZWVlgYGB/f399fX2Hh4eFhYWZmZlycnJaWlpjY2Nubm56enp6enptbW1XV1dxcXGbm5uAgIBiYmKenp5ra2taWlpxcXGLi4uXl5eKioqPj4+NjY1wcHBZWVlra2uYmJhiYmKBgYFbW1t1dXWSkpKEhIR6enpsbGyBgYFubm6CgoKZmZlzc3NYWFiPj4+YmJhmZmaLi4uGhoagoKC4uLi0tLSnp6eIiIhmZmafn5+RkZFcXFx1dXWZmZl8fHzt7e3////r6+uUlJRycnJbW1uQkJCHh4d4eHiKioqxsbFubm6NjY15eXlYWFiHh4dXV1d4eHiGhoZycnKvr6+JiYl4eHiGhoaOjo6MjIxxcXHq6uqjo6N5eXmVlZVzc3OcnJxfX1+JiYl7e3tra2upqamIiIiNjY1kZGReXl6YmJiOjo59fX1YWFiSkpKAgIB2dnaYmJh0dHRoaGhqamqSkpKSkpKLi4uWlpaPj49wcHBpaWlhYWGCgoKamppwcHBjY2Nubm57e3tiYmKYmJiZmZl9fX1ZWVl+fn6bm5t1dXWOjo6GhoaNjY3///+wXn5TAAAAoXRSTlMAAAAAAAYLIzM6MiENBgEII0ZzeXtzRgcBByZhe29iWFlhe2ElBwYiY3pgRzMwNkZfemIkBUZ7XzktHyAdICs3X3sMI29KLgkJCApFbSAxe2E2IAQBAzVgeTE7WjUIHTFZejp8WzIiBy5YOzM1IwMKIDVgInRKMSALKUducyINSHw6LRo2XwZjMi0vNUhgYwYHJWFuYVhuJiNGeUUjCDI6MyoACaoAAAABYktHRAMRDEzyAAABFklEQVQY02NgYGBkZWPn4OTk4ubhZWIAAj5+AUEhYRERYVExdnEJZgZGSSlpGVk5eQVFWSVlFVUmBjV1DU0tbR1dXT19A0MjYxMGNlMzcwtLK2sbWzt7B0cxJwZnURdXNxt3D08vaztvH1FfBj//gMAg92DmkFAv27DwiEiGKLPoGJtYZgaGkNi4+ITEJIao5JTUNA+gAHO6dUamYRZDtpl0Tq5XXghzaH5BYZGmH0NxiUtpWXlFuqdXXGVVdU0tQ119g3Rjk5V1c0FlS6uIIBtDm3G7iFZVR2dXd0+vYZ96PwPLhImTlCZPUZg6ZZrIpOmSjAzMEuIzZorOcnScVTN7zlw+kHeZeJ18582fv6CWjZWRgQEA0vJCZaR0FWsAAAAldEVYdGRhdGU6Y3JlYXRlADIwMTMtMDYtMjhUMDc6NDE6NDItMDY6MDC7fUviAAAAJXRFWHRkYXRlOm1vZGlmeQAyMDEzLTA2LTI4VDA3OjQxOjUxLTA2OjAwN2LpXQAAABN0RVh0U29mdHdhcmUASmFwbmcgcjExOSfos2EAAAAASUVORK5CYII=') !important; animation-name: none !important; } .tab-throbber[progress] { list-style-image: url('data:image/png;base64,iVBORw0KGgoAAAANSUhEUgAAABAAAAAQCAMAAAAoLQ9TAAAABGdBTUEAALGPC/xhBQAAACBjSFJNAAB6JgAAgIQAAPoAAACA6AAAdTAAAOpgAAA6mAAAF3CculE8AAABs1BMVEUAAAAAkwAAnwAAmAAAmQAAnQAAiQAAkgAAkAAEnAQHogcHpwcHpgcGogYEmwQAkAAAkQAAiAAAjAAAkQAEnQQMqwwhwiEhxyEiyCIgwiAMrAwEnQQAkQAEnAQauRohyCEdxh0SwRIRvxEPvw8ZxRkjyCMFnQUEnAQVuhUhyCESwRIFuAUBsAEArQABrwEBsAEMuQwRwREjyCMVuRUEnAQNrQ0TwRMBsAEAqwAAqAABsAERwREiyCIQrhAexh4CuAIDtwMbxhsgwiAEmwQGogYjxiMTwhMBrwETwRMhxiEGoQYMqAwhxyEOvg4ArQAArwAPvg8kyCQMpwwnyCcPvg8AqgAArAAOvg4hxyEMqAwGoQYkxyQVwhUBrgEBrwEjxiMGogYEmwQhwiEcxhwMuQwArQAAqwAGuAYexh4gwiAEnAQRrhEjyCMRwREBrwEBrwETwRMixyINrQ0EnAQVuRUjyCMSwRIDuAMBrgEArAAKuAohyCEEmwQFnAUauRoZxRkSwRIRvxERwREcxRwhyCEEnAQAkAAMqwwhxiEixyIgwiAMqwwHpQcHpgcHoQcEmwT////fHmrrAAAAkHRSTlMAAAAAAAAHIzBXbHZ1bFMxJAcNJ1iAo6amooBZJl2Zpp6Ui4mep11WmKWSZygXFylmk6aYWYCRMQkKL5Kngp1iZ52jVG6nkyeUpm53qo0WF4uodqqMExOMqXZwp5UmJKhvVaSfag0MaZ6kWISplC4wk6iCWpqolWklEmanV1+boJeNlqCoXyeDqKmlgnh5blghd7i+AAAAAWJLR0SQeAqODAAAAPRJREFUGNNjYGBgY+fg5OLm4eXjFxBkAAIhYRFRMXEJCXFJKWkZIaC8jKycvIKikrKiiqqcmrAgg4C6hqaWto6unr6BoZGxiQADh6mEmbkFIwMDk6WVtY0tPwOnmJ29BQMYWDo4OjkzuLi6uTNCBJj1PTy9GLx9fP0YoMA/IDCIwTs4JBQmEBYeEckQFR0TywLhs8Z5xCcwJCYlp6RCBNLSMzKzGPizc3LzUkHWpuUXFBbxMwgUl5SWlVeEVsZVKVaX1AgwCArX1uXUN4Q3NjW31LW2sQE9J1PcntnRWdjR1W0iLAQyS1CAP9Grp7evn58dKA8Ayh0xsydWuvQAAAAldEVYdGRhdGU6Y3JlYXRlADIwMTMtMDYtMjhUMDc6NDE6NTEtMDY6MDBGP1HhAAAAJXRFWHRkYXRlOm1vZGlmeQAyMDEzLTA2LTI4VDA3OjQxOjUyLTA2OjAwBorzwAAAABN0RVh0U29mdHdhcmUASmFwbmcgcjExOSfos2EAAAAASUVORK5CYII=') !important; } }

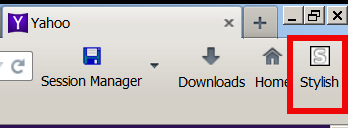
To use the script you will first need to install the Stylish FF plugin, then:

Stylish-FireFox-plugin-screenshot-Windows-7-OS
 

1. Enable Stylish plugin and Restart firefox when prompted
2. Click on Write New Style
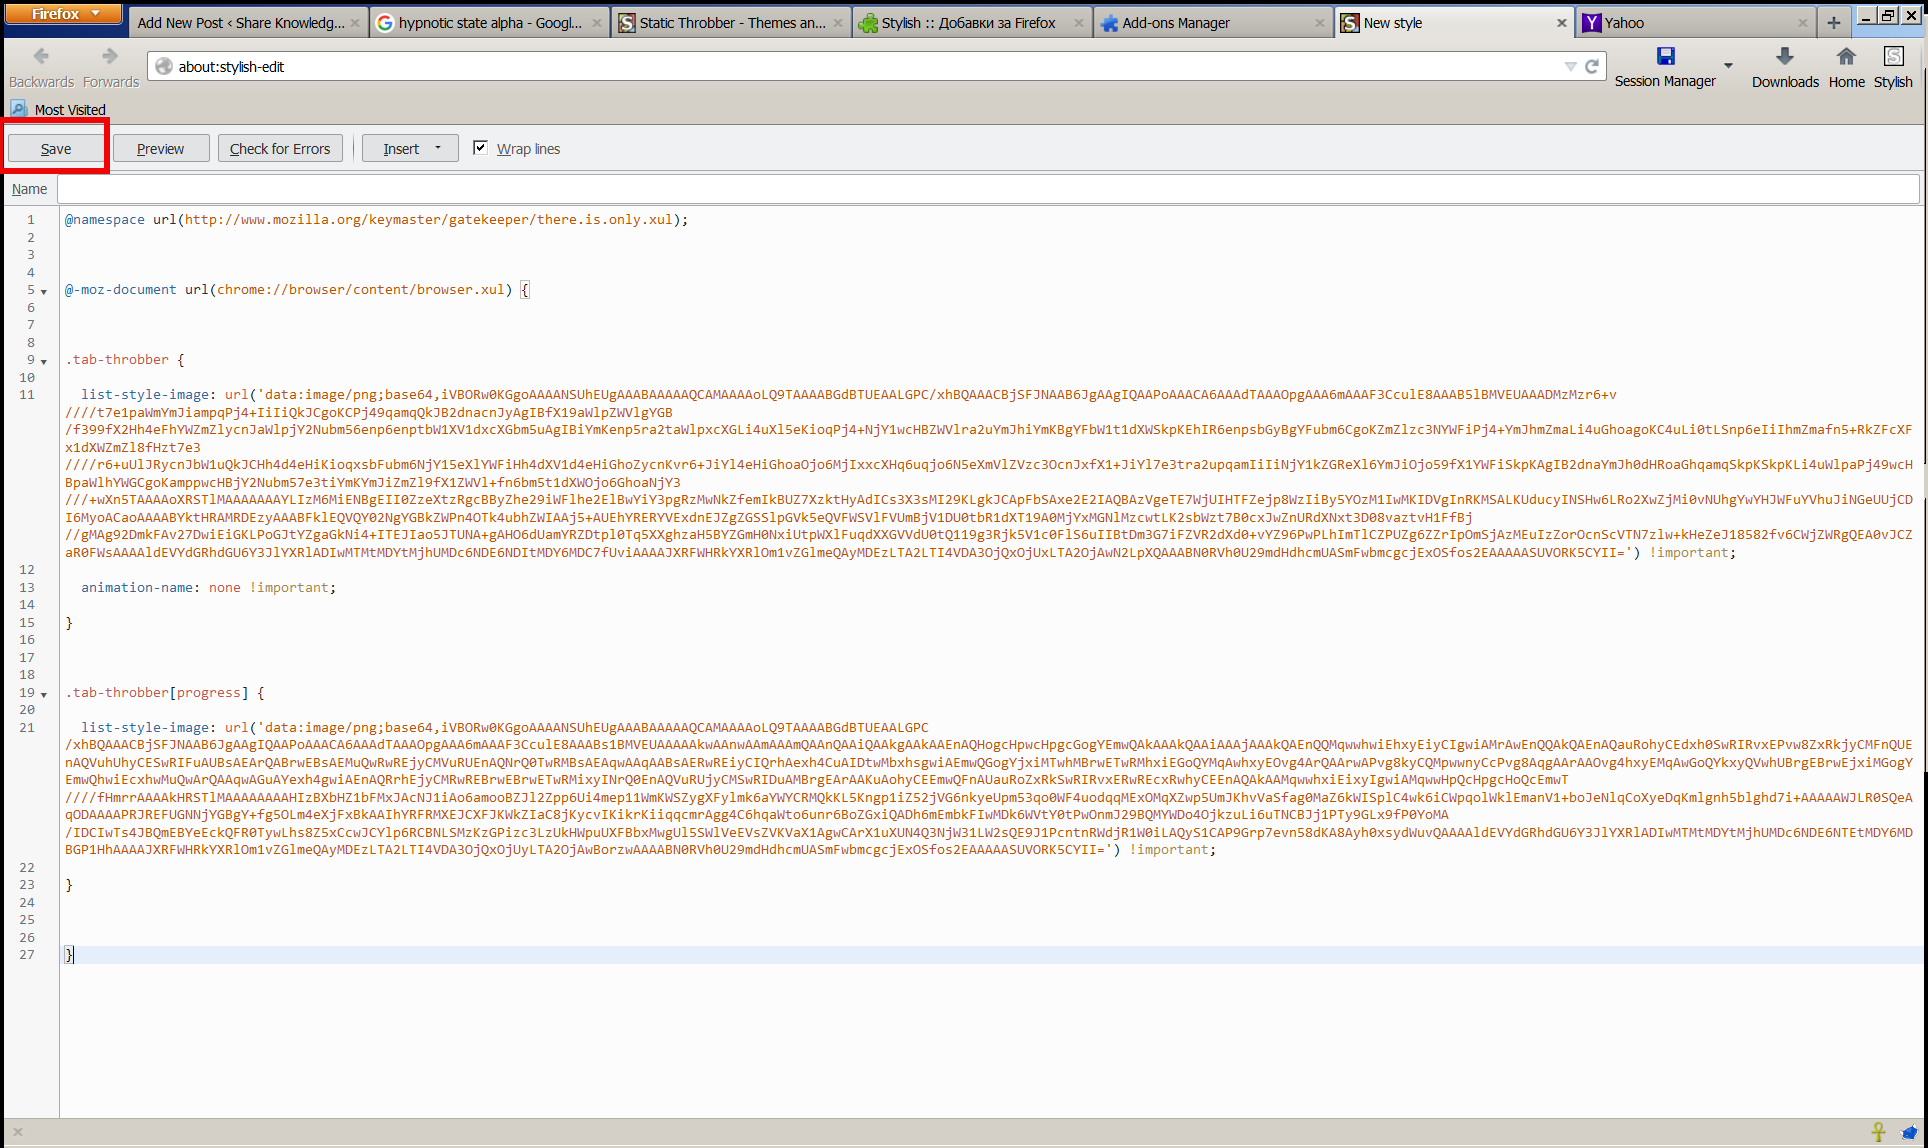
3. Paste above CSS script and click on Save button


stylish-static-throbbler-css-script-change-back-forward-rotating-tab-wheel-on-Firefox-howto

Now instead of the moving wheel you will get just a circle appearing as a static image while the page is loading.

If you want to absolutely remove any circles or images and show nothing when loading, e.g. not have any mean to monitor whether page is loaded or not, but also make it easier for the eye I even finally decided to completely remove the all time moving Wheel from Firefox Tabs even the static picture out using below CSS script with Stylish:
 

@namespace url(https://www.mozilla.org/keymaster/gatekeeper/there.is.only.xul); @-moz-document url(chrome://browser/content/browser.xul) { .tab-throbber { list-style-image: none !important; animation-name: none !important; } .tab-throbber[progress] { list-style-image: none !important; } }

After all even after removing the FF Tabs wheel, there is the Status being printed down the webpage, showing text based the connection status. I find this kind of page loading status much less agressive and preferrable, than the current verions Firefox 4 onwards ..

One other thing I do to prevent the annoying Windows OS default Theme wheel is to change it to the old fashioned sand clock as well as bring back the theme of Windows 7 / 8 to Classic Theme of Win 2000, as I believe this reduced the level of zoombification the PC imposes on self 🙂

Enjoy!