Posts Tagged ‘deb packages’

Getting Console and Graphical hardware system information on Linux with cpuinfo, neofetch, CPU-X (CPU-Z Unix alternative), I-nex and inxi

Tuesday, September 17th, 2019

getting-console-information-and-graphical-hardware-system-information-Linux-cpuinfo-neofetch-cpu-x-i-nex-1

Earlier I've wrote extensive article on how to get hardware information on Linux using tools such as dmidecode, hardinfo, lshw, hwinfo, x86info and biosdecode but there are few other hardware reporting tools for Linux worthy to mention that has been there for historical reasons such as cpuinfo as we as some new shiny ones such as neofetch (a terminal / console hardware report tool as well the CPU-X and I-Nex  which is Linux equivalent to the all known almost standard for Windows hardware detection CPU-Z worthy to say few words about.
 

1. cpuinfo


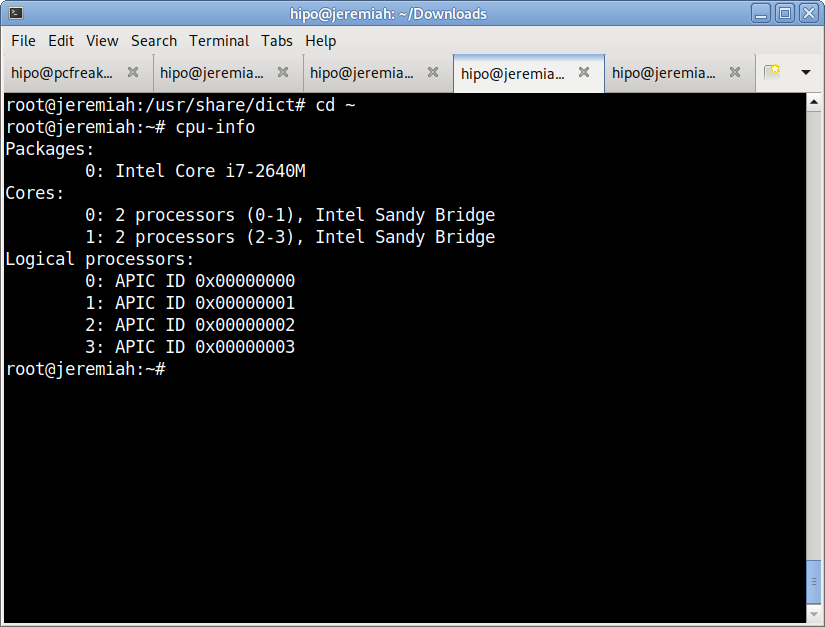
Perhaps the most basic tool to give you a brief information about your Processor type (model) number of Cores and Logical Processors is cpuinfo

I remember cpuinfo has been there since the very beginning on almost all Linux distributions's repository, nowadays its popularity of the days when the kings on the Linux OS server scenes were Slackware, Caldera OpenLinux and Redhat 6.0 Linux and Debian 3.0  declined but still for scripting purposes it is handy small proggie.

To install and run it in Debian  / Ubuntu / Mint Linux etc.:


aptitude install -y cpuinfo

/usr/bin/cpu-info


Linux-get-processor-system-info-in-console-cpu-info


2. neofetch


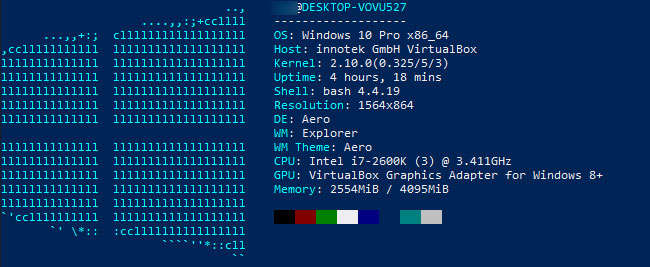
The next one worthy to install and check is neofetch (a cross-platform and easy-to-use system information
 command line script that collects your Linux system information and display it on the terminal next to an image, it could be your distributions logo or any ascii art of your choice.)

The cool thing about neofetch is besides being able to identify the System server / desktop hardware parameters, it gives some basic info about number of packages installed on the system, memory free and in use, used kernel and exact type of System (be it Dell PowerEdge Model XX, IBM eSeries Model / HP Proliant Model etc.

neofetch-OS-hardware-information-Linux-ascii-system-info-desktop-notebook

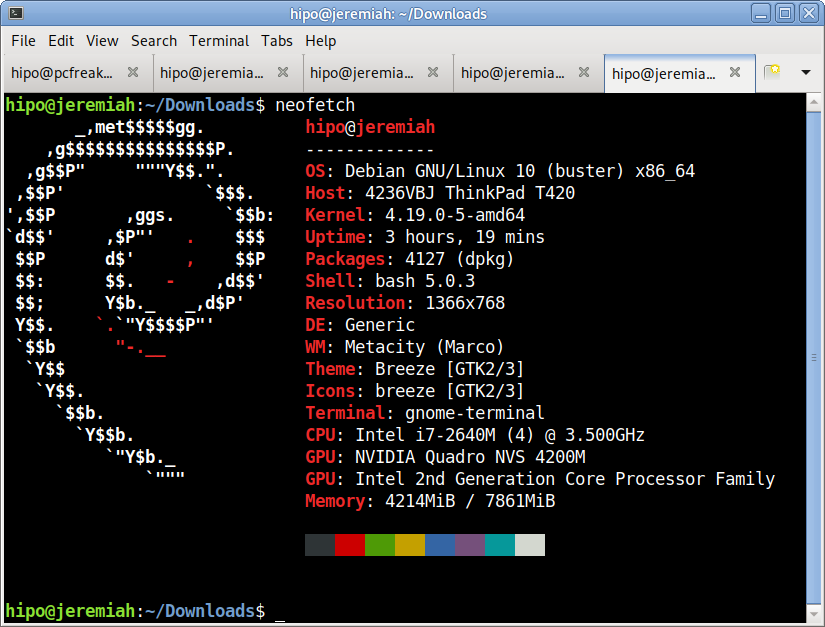
neofetch info generated on my home used Lenovo Thikpad T420

neofetch-OS-hardware-information-Linux-ascii-system-info-pcfreak-home-server
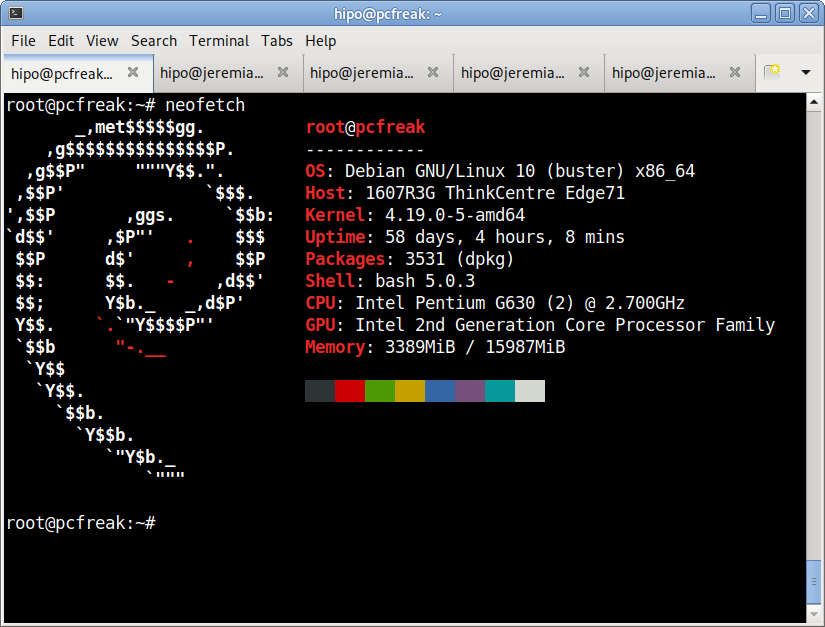
neofetch info from www.pc-freak.net running current machine

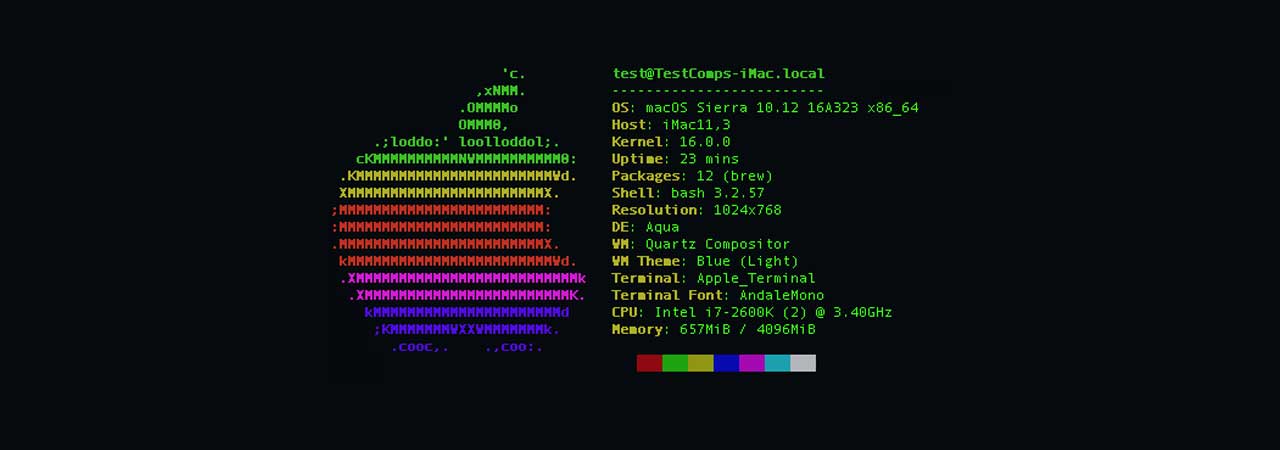
neofetch even supports Mac OS X and Windows OS ! 🙂

To install neofetch on Mac OS X:
 

/usr/bin/ruby -e "$(curl -fsSL https://raw.githubusercontent.com/Homebrew/install/master/install)"


or via Mac ported packages using brew

brew install neofetch


neofetch-screenshot-from-Mac-OS-X

neofetch is even installable on Windows OS that has the scoop command line installer tool installer manager with below PowerShell code in cmd.exe (Command line):

powershell Set-ExecutionPolicy RemoteSigned -scope CurrentUser
iex (new-object net.webclient).downloadstring('https://get.scoop.sh')
scoop install git
scoop install neofetch

neofetch-microsoft-windows-hardware-command-line-report-tool-screenshot


By the way Scoop was quite a finding for me and it is pretty handy to install plenty of useful command line Linux / UNIX tools, such as curl, wget, git etc. in the same easy straight forward way as a standard yum or apt-get on Windows (without explicitly installing things as GnuWin and CygWin).
 

3. CPU-X graphical user interface hardware report Linux GUI alternative to Windows CPU-Z


The packages for CPU-X are a bit outdated and even though there are rpm packages for Fedora, OpenSuSE and .deb package for Debian for Debian, Ubuntu and ArchLinux (pacman), there is no up to date version for Debian 10 and the package builds distributed for different Linux distros are a bit outdated.

Thus to install CPU-X on any Linux distribution it is perhaps best to use the portable version (static binary) of CPU-X.
It is currently available on https://github.com/X0rg/CPU-X/releases

To install latest portable version of CPU-X

wget https://github.com/X0rg/CPU-X/releases/download/v3.2.4/CPU-X_v3.2.4_portable.tar.gz

mkdir CPU-X
cd CPU-X

tar -zxvvf CPU-X_v3.2.4_portable.tar.gz
-rwxr-xr-x yohan/users 4563032 2019-01-13 22:15 CPU-X_v3.2.4_portable.bsd64
-rwxr-xr-x yohan/users 5484968 2019-01-13 22:15 CPU-X_v3.2.4_portable.linux64


cp -rpf CPU-X_v3.2.4_portable.linux64 /usr/local/bin/
ln -sf /usr/local/bin/CPU-X_v3.2.4_portable.linux64 /usr/local/bin/cpu-x


Next run as superuser (root)
 

hipo@jeremiah:~$ su -c 'cpu-x'


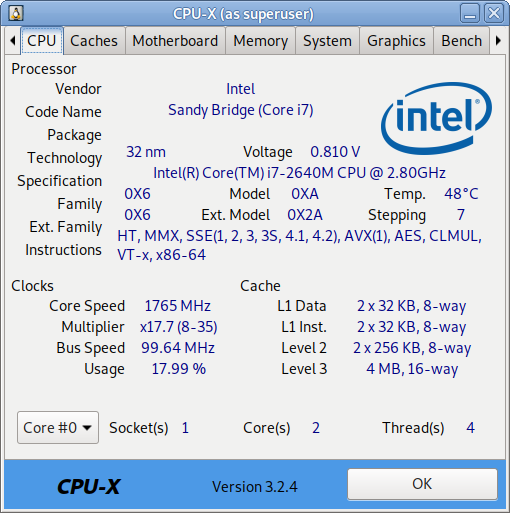
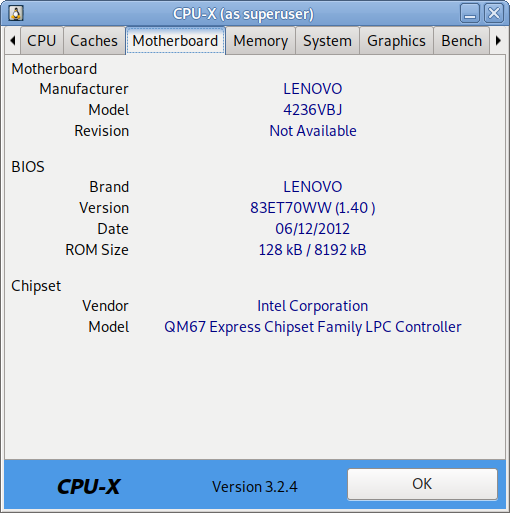
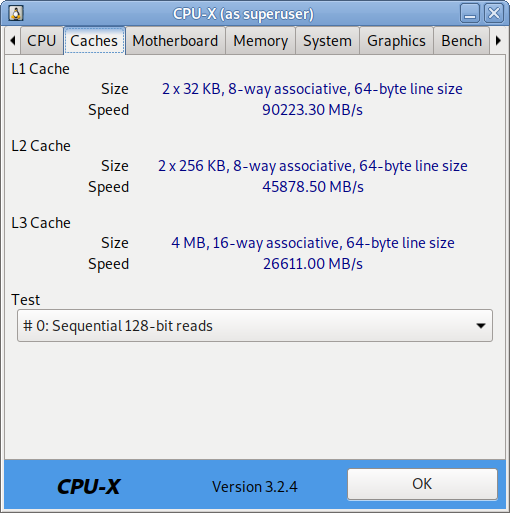
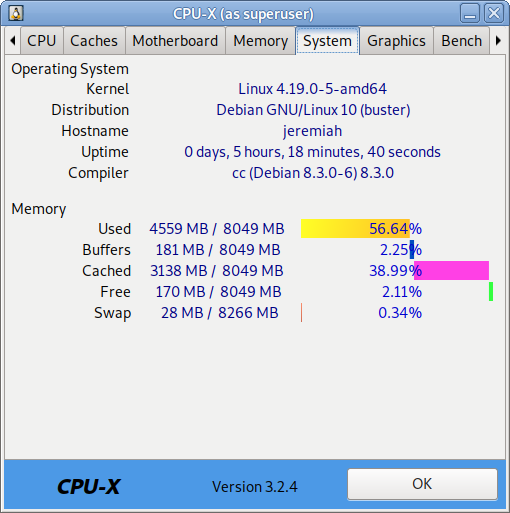
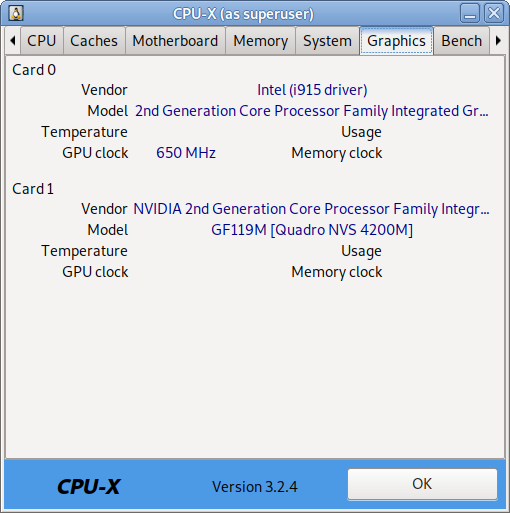
As seen from below screenshots cpu-x reports a lot of concrete specific hardware data on:

  • Processor
  • Motherboard
  • Memory
  • System
  • Graphic card
  • Performance

cpu-x-cpu-cpu-z-alternative-linux-screenshot-CPU-info

cpu-x-cpu-cpu-z-alternative-linux-screenshot-caches-info

cpu-x-cpu-cpu-z-alternative-linux-screenshot-Motherboard-info

cpu-x-cpu-cpu-z-alternative-linux-screenshot-memory-info

cpu-x-cpu-cpu-z-alternative-linux-screenshot-system-info

cpu-x-cpu-cpu-z-alternative-linux-screenshot-graphics-info

CPU-X can be installed also on FreeBSD very easily by just installing from BSD port tree sysutils/cpu-x/
It is also said to work on other *BSDs, NetBSD, OpenBSD Unixes but I guess this will require a manual compilation based on FreeBSD's port Makefile.

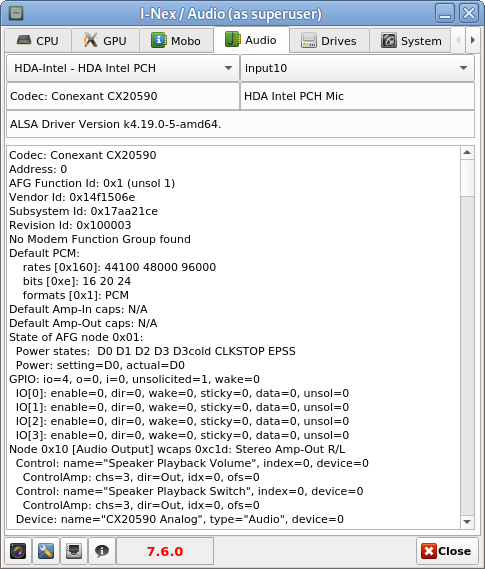
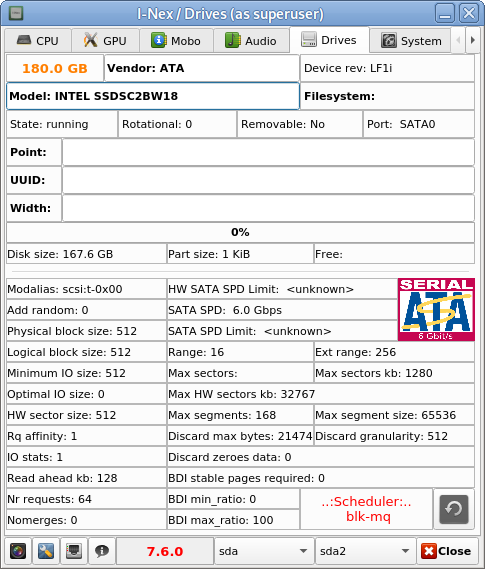
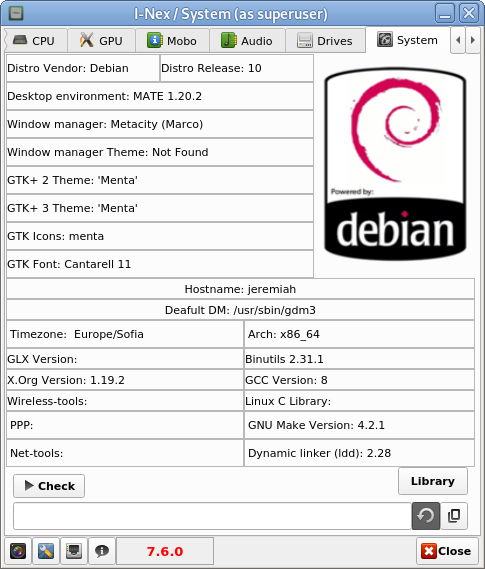
4. I-Nex another GUI alternative to CPU-Z for UNIX / Linux

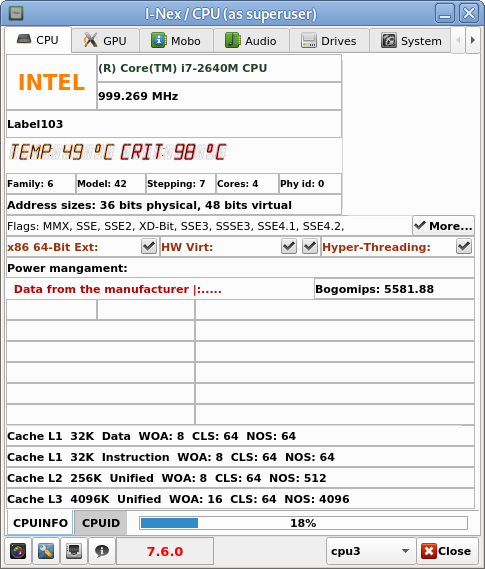
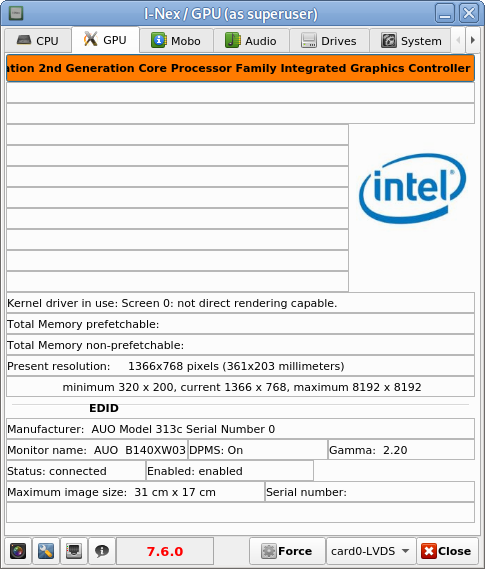
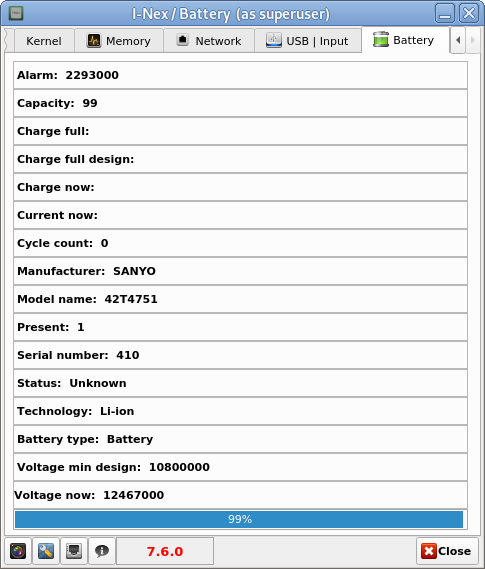
I-Nex is even more useful for general hardware reporting as it reports many hardware specifications not reported by CPU-X such as Battery type and Model Name  (if the hardware report is on a laptop), info on USB devices slots or plugged USB devices brand and specifications, the available Network devices on the system (MAC Addresses) of each of it, Installed and used drivers on Hard Disk (ATA / SATA / SCSI / SSD), HW Sector size, Logical Block size, HDD Sectors count and other specific Hard Drive data as well as information on available Audio (Sound Blaster) devices (HDA-Intel), used Codecs, loaded kernel ALSA driver, Video card used and most importantly indicators on Processor reported CPU (temperature).


To install I-nex

Go to https://launchpad.net/i-nex or any of the mirror links where it resides and install the respective package, in my case, I was doing the installation on Debian Linux, so fetched current latest amd64 package which as of moment of writting this article is i-nex_7.6.0-0-bzr977-20161012-ubuntu16.10.1_amd64.deb , next installed it with dpkg
 

dpkg -i i-nex_7.6.0-0-bzr977-20161012-ubuntu16.10.1_amd64.deb


As the package was depending on some other .deb packages, which failed to install to install the missing ones I had to further run
 

apt –fix-broken install

i-nex-cpu-info-linux-hardware-info-program


hre

I-Nex thermal indicators about CPU temperature on a Linux Desktop notebook

i-nex-gpu-info-linux-hardware-info-program

i-nex-mobo-info-linux-hardware-info-program

i-nex-audio-info-linux-hardware-info-program

i-nex-drivers-info-linux-hardware-info-program

i-nex-system-info-linux-hardware-info-program

i-nex-battery-info-linux-hardware-info-program


There are other Hardware identification report tools such as CUDA-Z that are useful to check if you have Nvidia Video Card hardware Installed on the PC to check the status of CUDA enabled GPUs, useful if working with nVidia Geforce, Quadro, Tesla cards and ION chipsets.

If you use it however be aware that CUDA-Z is not compatible with 3rd-party linux drivers for NVidia so make sure you have the current official Nvidia version.


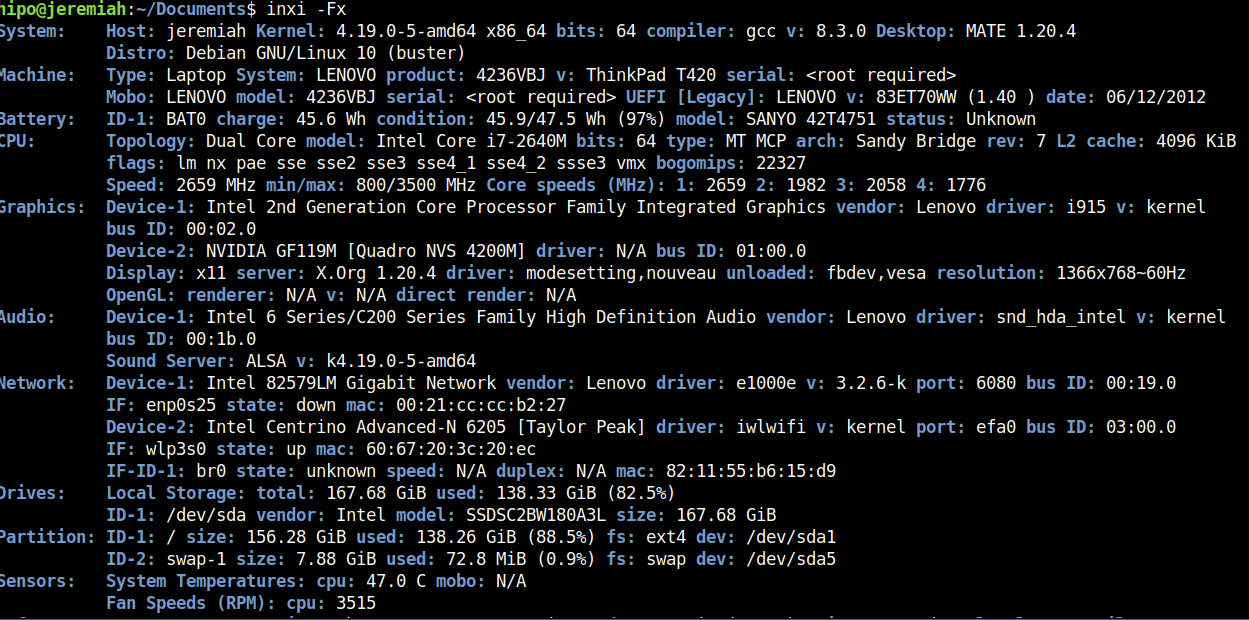
5. Inxi full featured system information script


Inxi is a 10000 lines mega bash script that fetches hardware details from multiple different sources in /proc /sys and from commands on the system, and generates a beautiful looking console report that non technical users can read easily.

inxi-10-k-mega-bash-shell-script-reporting-on-installed-system-computer-hardware


inxi -Fx


inxi-report-on-installed-hardware-on-my-lenovo-thinkpad-home-laptop

Each of the pointed above tools has different method of collection of Hardware information from various resources e.g. – kernel loaded modules, dmesg, files like /proc/meminfo /proc/version /proc/scsi/scsi /proc/partitions.
Hence some of the tools are likely to report more info than otheres, so in case if some information you need regarding the system plugged in hardware is missing you can perhaps obtain it from another program. Most Linux distribution desktop provided GNOME package are including Hardinfo gui tool, but in many cases above mentioned tools are likely to add even more on info on what is inside your PC Box.
If you're aware of others tools that are useful not mentioned here please share it.

Install and use personal Own Cloud on Debian Linux for better shared data security – OwnCloud a Free Software replacement for Google Drive

Thursday, August 23rd, 2018

owncloud-self-hosted-cloud-file-sharing-and-storage-service-for-gnu-linux-howto-install-on-debian

Basicly I am against the use of any Cloud type of service but as nowadays Cloud usage is almost inevitable and most of the times you need some kind of service to store and access remotely your Data from multiple devices such as DropBox, Google Drive, iCloud etc. and using some kind of infrastructure to execute high-performance computing is invitable just like the Private Cloud paid services online are booming nowdays, I decided to give a to research and test what is available as a free software in the field of Clouding (your data) 🙂

Undoubfully, it is really nice fact that there are Free Software / Open Source alternatives to run your Own personal Cloud to store your data from multiple locations on a single point.

The most popular and leading Cloud Collaboration service (which is OpenSource but unfortunately not under GPLv2 / GPV3 – e.g. not fully free software) is OwnCloud.

ownCloud is a flexible self-hosted PHP and Javascript based web application used for data synchronization and file sharing (where its remote file access capabilites are realized by Sabre/Dav an open source WebDav server.
OwnCloud allows end user to easily Store / Manage files, Calendars, Contacts, To-Do lists (user and group administration via OpenID and LDAP), public URLs can be easily, created, the users can interact with browser-based ODF (Open Document Format) word processor , there is a Bookmarking, URL Shortening service integrated, Gallery RSS Feed and Document Viewer tools such as PDF viewer etc. which makes it a great alternative to the popular Google Drive, iCloud, DropBox etc.

The main advantage of using a self-hosted Cloud is that Your data is hosted and managed by you (on your server and your hard drives) and not by some God knows who third party provider such as the upmentioned.
In other words by using OwnCloud you manage your own data and you don't share it ot on demand with the Security Agencies with CIA, MI6, Mussad … (as it is very likely most of publicly offered Cloud storage services keeps track on the data stored on them).

The other disadvantage of Cloud Computing is that the stored data on such is usually stored on multiple servers and you can never know for sure where your data is physically located, which in my opinion is way worse than the option with Self Hosted Cloud where you know where your data belongs and you can do whatever you want with your data keep it secret / delete it or share it on your demand.

OwnCloud has its clients for most popular Mobile (Smart Phone) platforms – an Android client is available in Google Play Store as well as in Apple iTunes besides the clients available for FreeBSD OS, the GNOME desktop integration package and Raspberry Pi.

For those who are looking for additional advanced features an Enterprise version of OwnCloud is also available aiming business use and included software support.

Assuming you have a homebrew server or have hired a dedidacted or VPS server (such as the Ones we provide) ,Installing OwnCloud on GNU / Linux is a relatively easy
task and it will take no more than 15 minutes to 2 hours of your life.
In that article I am going to give you a specific instructions on how to install on Debian GNU / Linux 9 but installing on RPM based distros is similar and straightfoward process.
 

1. Install MySQL / MariaDB database server backend
 

By default OwnCloud does use SQLite as a backend data storage but as SQLite stores its data in a file and is becoming quickly slow, is generally speaking slowre than relational databases such as MariaDB server (or the now almost becoming obsolete MySQL Community server).
Hence in this article I will explain how to install OwnCloud with MariaDB as a backend.

If you don't have it installed already, e.g. it is a new dedicated server install MariaDB with:
 

server:~# apt-get install –yes mariadb-server


Assuming you're install on a (brand new fresh Linux install – you might want to install also the following set of tools / services).


server:~# systemctl start mariadb
server:~# systemctl enable mariadb
server:~# mysql_secure_installation


mysql_secure_installation – is to finalize and secure MariaDB installation and set the root password.
 

2. Create necessery database and users for OwnCloud to the database server
 

linux:~# mysql -u root -p
MariaDB [(none)]> CREATE DATABASE owncloud CHARACTER SET utf8;
MariaDB [(none)]> GRANT ALL PRIVILEGES ON owncloud.* TO 'owncloud'@'localhost' IDENTIFIED BY 'owncloud_passwd';
MariaDB [(none)]> FLUSH PRIVILEGES;
MariaDB [(none)]> \q


3. Install Apache + PHP necessery deb packages
 

As of time of writting the article on Debian 9.0 the required packages for a working Apache + PHP install for OwnCloud are as follows.


server:~# apt-get install –yes apache2 mariadb-server libapache2-mod-php7.0 \
openssl php-imagick php7.0-common php7.0-curl php7.0-gd \
php7.0-imap php7.0-intl php7.0-json php7.0-ldap php7.0-mbstring \
php7.0-mcrypt php7.0-mysql php7.0-pgsql php-smbclient php-ssh2 \
php7.0-sqlite3 php7.0-xml php7.0-zip php-redis php-apcu


4. Install Redis to use as a Memory Cache for accelerated / better performance ownCloud service


Redis is an in-memory kept key-value database that is similar to Memcached so OwnCloud could use it to cache stored data files. To install latest redis-server on Debian 9:
 

server:~# apt-get install –yes redis-server

5. Install ownCloud software packages on the server

Unfortunately, default package repositories on Debian 9 does not provide owncloud server packages but only some owncloud-client packages are provided, that's perhaps the packages issued by owncloud does not match debian packages.

As of time of writting this article, the latest available OwnCloud server  version package for Debian is OC 10.

a) Add necessery GPG keys

The repositories to use are provided by owncloud.org, to use them we need to first add the necessery gpg key to verify the binaries have a legit checksum.
 

server:~# wget -qO- https://download.owncloud.org/download/repositories/stable/Debian_9.0/Release.key | sudo apt-key add –


b) Add owncloud.org repositories in separete sources.list file


server:~# echo 'deb https://download.owncloud.org/download/repositories/stable/Debian_9.0/ /' | sudo tee /etc/apt/sources.list.d/owncloud.list


c) Enable https transports for the apt install tool


server:~# apt-get –yes install apt-transport-https


d) Update Debian apt cache list files and install the pack


server:~# apt-get update


server:~# apt-get install –yes owncloud-files


By default owncloud store file location is /var/www/owncloud but on many servers that location is not really appropriate because /var/www might be situated on a hard drive partition whose size is not big enough, if that's the case just move the folder to another partition and create a symbolic link in /var/www/owncloud pointing to it …


6. Create necessery Apache configurations to make your new self-hosted cloud accessible
 

a) Create Apache config file


server:~# vim /etc/apache2/sites-available/owncloud.conf


Alias /owncloud "/var/www/owncloud/"

<Directory /var/www/owncloud/>
Options +FollowSymlinks
AllowOverride All

<IfModule mod_dav.c>
Dav off
</IfModule>

SetEnv HOME /var/www/owncloud
SetEnv HTTP_HOME /var/www/owncloud

</Directory>

b) Enable Mod_Dav (WebDAV) if it is not enabled yet


server:~# ln -sf ../mods-available/dav_fs.conf
server:~# ln -sf ../mods-available/dav_fs.load
server:~# ln -sf ../mods-available/dav.load
server:~# ln -sf ../mods-available/dav_lock.load

c) Set proper permissions for /var/www/owncloud to make upload work properly


chown -R www-data: /var/www/owncloud/


d) Restart Apache WebServer (to make new configuration affective)


server:~# /etc/init.d/apache2 restart


7. Finalize  OwnCloud Install
 

Access OwnCloud Web Interface to finish the database creation and set the administrator password for the New Self-Hosted cloud
 

http://Your_server_ip_address/owncloud/

By default the Web interface is accessible in unencrypted (insecure) http:// it is a recommended practice (if you already don't have an HTTPS SSL certificate install for the IP or the domain to install one either a self-signed certificate or even better to use LetsEncrypt CertBot to easily create a valid SSL for free for your domain


installing-OwnCloud-Web-Config-User-Pass-interface-Owncloud-10-on-Debian-9-Linux-howto

Just fill in in your desired user / pass and pass on the database user / password / db name (if required you can set also a different location for the data directory from the default one /var/www/owncloud/data.

Click Finish Setup and That's all folks!

owncloud-server-web-ui-interface

OwnCloud is successfully installed on the server, you can now go and download a Mobile App or Desktop application for whatever OS you're using and start using it as a Dropbox replacement. In a certain moment you might want to consult also the official UserManual documentation as you would probably need further information on how to manage your owncloud.

Enjoy !

How to get rid of Debian and Ubuntu GNU / Linux obsolete configuration files and system directories

Wednesday, October 19th, 2011

debian_ubuntu-linux-get-rid-of-obsolete-files
I've been using Debian GNU / Linux on my Thinkpad laptop for almost 3 years and half. Initially the Debian version which I had installed was a stable Debian Lenny. As I was mostly dissatisfied of the old versions of the programs, I migrated to testing / unstable
Testing / unstables shipped program versions were a bit better but still back in the day I wanted to get advantage of the latest program versions so for a while I switched to unstable .
Later I regretted for this bad idea, after the migration to Unstable, it was too buggy to run on a notebook one uses for everyday work.
Then to revert back to a bit stable I downgraded to testing unstable again.
When Debian launched Debian Squeeze I set in my /etc/apt/sources.list file software repositories to be the one for the stable Debian Squeeze.

As you can see, I've done quite a lot of "experiments" and "excersises". Many packages were installed, then removed, some became obsolete with time others I just temporary installed out of curiosity. Anyways as a result I ended up with many packages uninstalled / removed , which still kept some of their directory structres and configurations on the machine.

Today, I decided to check how many of these obsolete packages are still present in dpkg database and I was shocked to find out 412 debs were still in my package database! To check the number I used cmd:

root@noah:~# dpkg -l | grep -i '^rcs.*$'|wc -l

Considering the tremendous number of packs waiting to be purged, I decided to get rid of this old and already unnecessery files for the sake of clarity, besides that removing the old already uninstalled packages removes old configuration files, readmes, directories and frees some little space and therefore frees some inodes 😉

Before proceeding to remove them, I carefully reviewed and all the package names which I was about to completely purge in order to make sure there is no package with a configuration files I might need in future:

root@noah:~# dpkg -l |grep -i '^rcs.*$'
...
After reviewing all the deb packages possessing the rc – (remove candidate) flag, I used the following bash one liners to remove the obsolete deb packages:

root@noah:~# for i in $(dpkg -l |grep -i '^rcs.*$'|awk '{ print $2 }'); do echo dpkg --purge $i done...
root@noah:~# for i in $(dpkg -l |grep -i '^rcs.*$'|awk '{ print $2 }'); do dpkg --purge $i done

First line will just print out what will be purged with dpkg , so after I checked it out I used the second one to purge all the RC packs.

Installing XMMS on Debian Squeeze from a Package / Installing XMMS on Debian – the debian way

Tuesday, July 17th, 2012

installing xmms on debian squeeze linux playing free software song green skin screenshot

I use Debian Linux for my desktop for quite some time; Even though there are plenty of MP3 / CD players around in Debian, I’m used to the good old XMMS, hence I often prefer to use XMMS to play my music instead of newer players like RhythmBox or audacious.
Actually audacious is not bad substitute for XMMS and is by default part of Debian but to me it seems more buggy and tends to crash during playing some music formats more than xmms ….

As most people might know, XMMS is no longer supported in almost all modern Linux distributions, so anyone using Debian, Ubuntu or other deb derivative Linux would have to normally compile it from source.
Compiling from source is time consuming and I think often it doesn’t pay back the effort. Thanksfully, though not officially supported by Debian crew XMMS still can be installed using a deb xmms prebuilt package repository kindly provided by a hacker fellow knuta.

Using the pre-build deb packages, installing xmms on new Debian installs comes to:

debian:~# echo 'deb http://www.pvv.ntnu.no/~knuta/xmms/squeeze ./' >> /etc/apt/sources.list
debian:~# echo 'deb-src http://www.pvv.ntnu.no/~knuta/xmms/squeeze ./' >> /etc/apt/sources.list
debian:~# apt-get update && apt-get -y install xmms

There are also deb xmms built for Ubuntu, so Ubuntu users could install xmms using repositories:

deb http://www.pvv.ntnu.no/~knuta/xmms/karmic ./
deb-src http://www.pvv.ntnu.no/~knuta/xmms/karmic ./
That’s all now xmms is ready to use. Enjoy 🙂

How to copy / clone installed packages from one Debian server to another

Friday, April 13th, 2012

1. Dump all installed server packages from Debian Linux server1

First it is necessery to dump a list of all installed packages on the server from which the intalled deb packages 'selection' will be replicated.

debian-server1:~# dpkg --get-selections \* > packages.txt

The format of the produced packages.txt file will have only two columns, in column1 there will be the package (name) installed and in column 2, the status of the package e.g.: install or deinstall

Note that you can only use the –get-selections as root superuser, trying to run it with non-privileged user I got:

hipo@server1:~$ dpkg --set-selections > packages.txt
dpkg: operation requires read/write access to dpkg status area

2. Copy packages.txt file containing the installed deb packages from server1 to server2

There is many way to copy the packages.txt package description file, one can use ftp, sftp, scp, rsync … lftp or even copy it via wget if placed in some Apache directory on server1.

A quick and convenient way to copy the file from Debian server1 to server2 is with scp as it can also be used easily for an automated script to do the packages.txt file copying (if for instance you have to implement package cloning on multiple Debian Linux servers).

root@debian-server1:~# scp ./packages.txt hipo@server-hostname2:~/packages.txt
The authenticity of host '83.170.97.153 (83.170.97.153)' can't be established. RSA key fingerprint is 38:da:2a:79:ad:38:5b:64:9e:8b:b4:81:09:cd:94:d4. Are you sure you want to continue connecting (yes/no)? yes Warning: Permanently added '83.170.97.153' (RSA) to the list of known hosts. hipo@83.170.97.153's password:
packages.txt

As this is the first time I make connection to server2 from server1, I'm prompted to accept the host RSA unique fingerprint.

3. Install the copied selection from server1 on server2 with apt-get or dselect

debian-server2:/home/hipo# apt-get update
...
debian-server2:/home/hipo# apt-get upgrade
Reading package lists... Done
Building dependency tree
Reading state information... Done
debian-server2:/home/hipo# dpkg --set-selections < packages.txt
debian-server2:/home/hipo# apt-get -u dselect-upgrade --yes

The first apt-get update command assures the server will have the latest version of the packages currently installed, this will save you from running an outdated versions of the installed packages on debian-server2

Bear in mind that using apt-get sometimes, might create dependency issues. This is depending on the exact package names, being replicated in between the servers

Therefore it is better to use another approach with bash for loop to "replicate" installed packages between two servers, like so:

debian-server2:/home/hipo# for i in $(cat packages.txt |awk '{ print $1 }'); do aptitude install $i; done

If you want to automate the questioning about aptitude operations pass on the -y

debian-server2:/home/hipo# for i in $(cat packages.txt |awk '{ print $1 }'); do aptitude -y install $i; done

Be cautious if the -y is passed as sometimes some packages might be removed from the server to resolve dependency issues, if you need this packages you will have to again install them manually.

4. Mirroring package selection from server1 to server2 using one liner

A quick one liner, that does replicate a set of preselected packages from server1 to server2 is also possible with either a combination of apt, ssh, awk and dpkg or with ssh + dpkg + dselect :

a) One-liner code with apt-get unifying the installed packages between 2 or more servers

debian-server2:~# apt-get --yes install `ssh root@debian-server1 "dpkg -l | grep -E ^ii" | awk '{print $2}'`
...

If it is necessery to install on more than just debian-server2, copy paste the above code to all servers you want to have identical installed packages as with debian-server1 or use a shor for loop to run the commands for each and every host of multiple servers group.

In some cases it might be better to use dselect instead as in some situations using apt-get might not correctly solve the package dependencies, if encountering problems with dependencies better run:

debian-server2:/home/hipo# ssh root@debian-server1 'dpkg --get-selections' | dpkg --set-selections && dselect install

As you can see using this second dselect installed "package" mirroring is also way easier to read and understand than the prior "cryptic" method with apt-get, hence I personally think using dselect method is a better.

Well that's basically it. If you need to synchronize also configurations, either an rsync/scp shell script, should be used with all defined server1 config files or in case if a cloning of packages between identical server machines is necessery dd or some other tool like Norton Ghost could be used.
Hope this helps, someone.

How to reduce spam in PHPBB based internet forum on Debian GNU / Linux

Monday, March 26th, 2012

phpbb reduce spam bot registrations on Debian Linux tiny script

I had to install two PHPBB based internet forums, some long time ago. Since long time passed and I haven't checked what's happening with them I just noticed. They start filling up spam threads. The phpbb installations are done using the standard shipped deb packages in Debian Linux Lenny.

After checking online, I found one smart solution to . The idea is very simple most spam bots are written in a way that they don't have a properly set timezone. Therefore the quickest way to get rid of spam bots which try to auto register and put spam content inside the a forum category or post is to add a simple if condition in php to check the browser set timezone:

The file to add the php if condition is ucp_register.phpThe phpbb package install places default phpbb path on Debian is /usr/share/phpbb3/ and hence the file I had to modify is located in:

/usr/share/phpbb3/www/includes/ucp/ucp_register.php

To make the TZ check one needs to modify ../www/includes/ucp/ucp_register.php and look for php array definition:

$data = array(
'username' => utf8_normalize_nfc(request_var('username', '', true)),
'new_password' => request_var('new_password', '', true),
'password_confirm' => request_var('password_confirm', '', true),
'email' => strtolower(request_var('email', '')),
'email_confirm' => strtolower(request_var('email_confirm', '')),
'confirm_code' => request_var('confirm_code', ''),
'lang' => basename(request_var('lang', $user->lang_name)),
'tz' => request_var('tz', (float) $timezone),
);

Right after this chunk of code add the if condition code which is like so:

if ($data['tz'] == '-12.00')
{
die('Die, bot! Die.');
}

From now onwards, any attempt for new user registration with an incorrect timezone of -12.00 will be immediately stopped while the forum spammer bot will be offered an empty page 🙂

Another good practice is to disable Birthday Listing from phpbb Admin Control panel (ACP). Go to menus:

ACP -> General -> Board Settings -> Enable Birthday listing: (No)

Enable birthday listing phpbb forum screenshot

I like disabling birthday listing, as when it is enabled and you have some spammer registrations, which even though didn't succeeded to contaminate your forum content has specified a birthday and therefore there profiles gets popping up each different day on the main page of the forum.
This will not eradicate all spammer bots, but at least will significantly decrease spammer bot registrations.

Install grsecurity kernel security from binary package (without kernel recompile) on Debian and Ubuntu

Monday, July 26th, 2010

GRsecurity is since long time known that it is a next generation armouring agains 0 day local kernel exploits as well as variousof other cracker attacks.
Grsecurity is an innovative approach to security utilizing a multi-layered detection, prevention, and containment model. It is licensed under the GNU GPL.
GRSecurity is linux kernel patch which has to be applied to the kernel before compile time. However we’ve been lucky and somebody has taken the time and care to prepare linux image binary deb packages for Debian and Ubuntu .

Some of the key grsecurity features are :

  • An intelligent and robust Role-Based Access Control (RBAC) system that can generate least privilege policies for your entire system with no configuration
  • Change root (chroot) hardening
  • /tmp race prevention
  • Prevention of arbitrary code execution, regardless of the technique used (stack smashing, heap corruption, etc)
  • Prevention of arbitrary code execution in the kernel
  • Reduction of the risk of sensitive information being leaked by arbitrary-read kernel bugs
  • A restriction that allows a user to only view his/her processes
  • Security alerts and audits that contain the IP address of the person causing the alert

To install from the http://debian.cr0.org/ grsecurity patched kernel image repository use the following steps:

1. Include in your /etc/apt/sources.list

deb http://ubuntu.cr0.org/repo/ kernel-security/
deb http://debian.cr0.org/repo/ kernel-security/

Directly from the bash command line execute:

debian:~# echo "deb http://ubuntu.cr0.org/repo/ kernel-security/" >> /etc/apt/sources.list
debian:~# echo "deb http://debian.cr0.org/repo/ kernel-security/" >> /etc/apt/sources.list

2. Add the debian.cr0.org repository gpg key to the trusted repositories key ring

Download the repository’s gpg key , check it (it has been signed with the repository owner GPG key )

Thence from to include the gpg key to the trusted repos key issue:

debian:~# apt-key add kernel-security.asc

3. Install the linux-image-grsec package itself

Currently to install on my x86_amd64 Debian Squeeze/Sid and possibly on Debian Lenny I’ve issued:


debian:~# apt-get update
debian:~# apt-get install linux-image-2.6.32.15-1-grsec

Now simply restarting your system and choosing the Linux kernel patched with the GRsecurity kernel patch from Grub should enable you to start using the grsecurity patched kernel.
Though this tutorial is targetting Debian it’s very likely that the grsecurity hardened kernel installation on Debian will be analogous.

Play Nintendo Super Mario Bros on Linux (Secret Mario Chronicles) and SuperTux

Monday, May 2nd, 2011

Super Mario for Linux, Super Mario Chronicles

Are you looking for free software version of the old-school absolute Nintendo classic Super Mario Bros. ? 🙂

If you’re an old-school geek gamer like me you definitely do 😉
I was lucky to find Secret Mario Chronicles a Linux version of Super Mario while I was browsing through all the available for installation Linux games in aptitude .

The game is really great and worthy to be played. It’s even a better copy of the classical arcade game than SuperTux (another Mario like Linux clone game)

Super Tux A Super Mario Bros. clone for Linux

Both Super Mario Chronicles and Super Mario Bros are available for installation as .deb packages in the repositories of Ubuntu and Debian and most likely the other Debian direvative Linux distrubtion.

To install and play the games out of the box, if you’re a Debian or Ubuntu user, just issue:

linux:~# apt-get install smc supertux

The other good news are that both of the games’s engine, music and graphics are GPLed 🙂

To Launch the games after installation in GNOME I’ve used the menus:

Applications -> Games -> Super Mario Chronicles
andApplications -> Games -> Arcade -> SuperTux

The games can also be launched from terminal with commands:

debian:~$ smc
debian:~$ supertux

The only thing I don’t like about Super Mario Chronicles is that it doesn’t have a good music and only sounds, just to compare SuperTux has an awesome level music.
Along with being an absolute classic I should say that these two games are one of the really good arcade games produced for Linux and if I have to rank them as a gamer among all the other boring arcade games today available for Linux this two ones ranks in the top 10 arcade games prdocuced for Linux

Enjoy and drop me a thanks comment 😉 !

How to install and configure Canon Pixma iP3300 printer for color printing on Ubuntu and Debian Linux

Tuesday, March 29th, 2011

I’ve recently was asked by my cousin to install and configure her Canon Pixma iP3300 on Ubuntu Linux version 9.10 (Karmic) since the printer was not initialized properly by default.

After a bit of investigation and experimentation, I finally found the way to install and configure the Canon Pixma iP3300

Here is a step by step howto for all those who are suffering with the same annoying issue:

1. Install some preliminary deb packages

ubuntu:~# apt-get update
ubuntu:~# apt-get install alien libxml++1.0-dev libpng12-0 libpng12-dev libgtk1.2 libgtk1.2-common

2. Create a new canon directory

ubuntu:~# mkdir canon

3. Download the libraries and printer drivers in rpm (required by linux’s cups printing system

I’ve made a mirror of the packages, as it was a bit hard to find the packages, i hope mirroring them will guarantee the packages won’t suddenly disappear from the net.

I’ve mirrored a whole bunch of linux drivers which are for various Canon printers
However the files which are necessary for making the Pixma ip3300 to work out on Ubuntu or Debian are:

  • cnijfilter-common-2.70-1.i386.rpm
  • cnijfilter-ip3300-2.70-1.i386.rpm

In some cases on an AMD64 (64 bit Linux architecture), you might also need the file:

  • cnijfilter-common-2.70-1.src.rpm
  • To straight download the ip3300 necessary files in the just created directory canon in step 2 issue the cmd:

    ubuntu:~# cd canon
    ubuntu:/canon# wget https://www.pc-freak.net/files/canon-linux-drivers/cnijfilter-common-2.70-1.i386.rpm
    ...
    ubuntu:/canon# wget https://www.pc-freak.net/files/canon-linux-drivers/cnijfilter-common-2.70-1.src.rpm
    ...
    ubuntu:/canon# wget https://www.pc-freak.net/files/canon-linux-drivers/cnijfilter-ip3300-2.70-1.i386.rpm
    ...

    As you have seen in step 1, we have installed the alien tool which will be used to convert the rpm packages to .tgz (tar.gz) files.

    The reason why I’m converting to .tgz instead of directly converting to .deb package is that two of the files are built for the i386 architecture, the ubuntu where I wanted to install them has installed an amd64 version of Ubuntu (a 64bit release of Ubuntu).

    As the Ubuntu is amd64 version whether I try to convert the .rpm files to .deb packages like so:

    ubuntu:/canon# alien --to-deb cnijfilter-common-2.70-1.i386.rpm

    I got the error:

    cnijfilter-common-2.70-1.i386.rpm is for architecture i386 ; the package cannot be built on this system

    As I said earlier to get around this issue, 4. Use alien to convert my .rpm to .tgz :

    ubuntu:~# alien --to-tgz cnijfilter-common-2.70-1.i386.rpm
    cnijfilter-common-2.70.tgz generated
    ubuntu:~# alien --to-tgz cnijfilter-ip3300-2.70-1.i386.rpm
    cnijfilter-ip3300-2.70.tgz generated

    5. Untar the .tgz cnijfilter archives

    ubuntu:/canon# tar -zxvf cnijfilter-ip3300-2.70.tgz
    ...
    ubuntu:/canon# tar -zxvvf cnijfilter-common-2.70.tgz
    ....

    The above files unarchive will extract you a directory called usr/ , now you will need to manually copy the files from this directory to the correct locations, here are the commands to issue to do that:

    6. Copy extracted drivers to correct locations

    ubuntu:/canon# cd usr
    ubuntu:/canon/usr# cp -rpf lib/* /usr/lib
    ubuntu:/canon/usr# cp -rpf local/* /usr/local/
    ubuntu:/canon/usr# cp -rpf local/bin/* /usr/bin/
    ubuntu:/canon/usr# cp -rpf local/share/* /usr/share/

    7. Create symbolink links to libtiff and libpng as a fix up

    ubuntu:/canon/usr# ln -s /usr/lib/libtiff.so.4 /usr/lib/libtiff.so.3
    ubuntu:/canon/usr# ln -s /usr/lib/libpng.so /usr/lib/libpng.so.3
    ubuntu:/canon/usr# ln -s /usr/lib/libtiff.so.2 /usr/lib/libtiff.so.1
    8. Make the Ubuntu be aware of the newly installed libraries

    ubuntu:/canon/usr# ldconfig

    9. Restart the cups printing server

    ubuntu:/canon/usr# /etc/init.d/cups restart
    * Restarting Common Unix Printing System: cupsd

    So far so good by now, your Ubuntu or Debian system should be able to initilize your Canon Pixma iP3300 , next step is to configure your printer to be able to print correctly in color mode.

    What I did straight after my correct installation was to test the printer. The tests went fine with printing black and white or (Greyscale), however whether I tried to test printing in color mode, my printed images and colors were completely distorted!

    It took me a bit of try/fails until I succeeded with the printer to print in colors.

    There are few settings which has to be tuned right after install to make the Pixma iP3300 print in color on Linux

    Here are the few things which I had to tune from System -> Administration > Printing

    10. Configure in Administration -> Printing the following options

    Change the default set resolution for the printer from Automatic which is the printer default to:

    Resolution: 300x300DPI

    By the default the Pixma ip3300 will try to print out with the highest resolution possible 600x600DPI, however the Linux drivers doesn’t seem to support this resolution, if the 600x600DPI resolution is used the result is the distorted color picture print outs.

    Further on configure the Color Model option:

    Color Model: RGB Color or
    Color Model: CMYK

    Now your Canon Pixma iP3300 printer should be printing fine both in black and white and in color on your Ubuntu/Debian Linux.

    I believe this little install tutorial should be working just fine for all kind of Debian Linux direvatives 😉
    Enjoy printing and don’t forget Print as less as possible, Save a Tree! 😉