Posts Tagged ‘Debian Ubuntu’

How to check who is flooding your Apache, NGinx Webserver – Real time Monitor statistics about IPs doing most URL requests and Stopping DoS attacks with Fail2Ban

Wednesday, August 20th, 2014

check-who-is-flooding-your-apache-nginx-webserver-real-time-monitoring-ips-doing-most-url-requests-to-webserver-and-protecting-your-webserver-with-fail2ban

If you're Linux ystem administrator in Webhosting company providing WordPress / Joomla / Drupal web-sites hosting and your UNIX servers suffer from periodic denial of service attacks, because some of the site customers business is a target of competitor company who is trying to ruin your client business sites through DoS or DDOS attacks, then the best thing you can do is to identify who and how is the Linux server being hammered. If you find out DoS is not on a network level but Apache gets crashing because of memory leaks and connections to Apache are so much that the CPU is being stoned, the best thing to do is to check which IP addresses are causing the excessive GET / POST / HEAD requests in logged.
 

There is the Apachetop tool that can give you the most accessed webserver URLs in a refreshed screen like UNIX top command, however Apachetop does not show which IP does most URL hits on Apache / Nginx webserver. 


1. Get basic information on which IPs accesses Apache / Nginx the most using shell cmds


Before examining the Webserver logs it is useful to get a general picture on who is flooding you on a TCP / IP network level, with netstat like so:
 

# here is howto check clients count connected to your server
netstat -ntu | awk '{print $5}' | cut -d: -f1 | sort | uniq -c | sort -n


If you get an extensive number of connected various IPs / hosts (like 10000 or something huge as a number), depending on the type of hardware the server is running and the previous scaling planned for the system you can determine whether the count as huge as this can be handled normally by server, if like in most cases the server is planned to serve a couple of hundreds or thousands of clients and you get over 10000 connections hanging, then your server is under attack or if its Internet server suddenly your website become famous like someone posted an article on some major website and you suddenly received a tons of hits.


There is a way using standard shell tools, to get some basic information on which IP accesses the webserver the most with:

tail -n 500 /var/log/apache2/access.log | cut -d' ' -f1 | sort | uniq -c | sort -gr

Or if you want to keep it refreshing periodically every few seconds run it through watch command:

watch "tail -n 500 /var/log/apache2/access.log | cut -d' ' -f1 | sort | uniq -c | sort -gr"
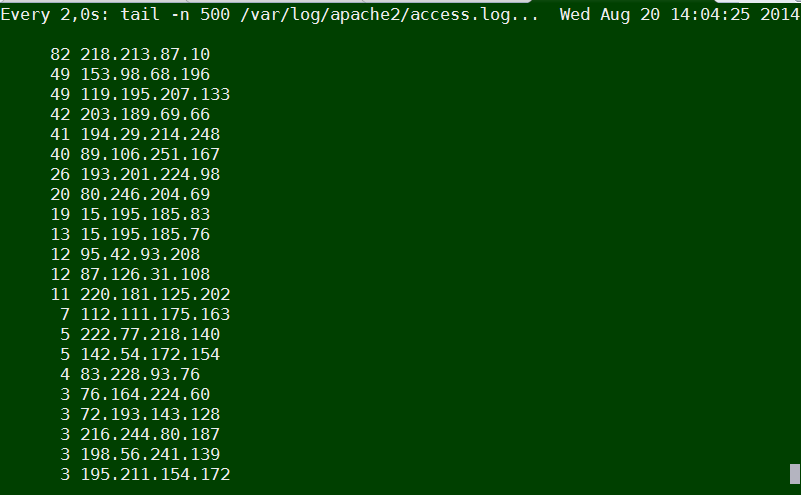
monioring-access-hits-to-webserver-by-ip-show-most-visiting-apache-nginx-ip-with-shell-tools-tail-cut-uniq-sort-tools-refreshed-with-watch-cmd


Another useful combination of shell commands is to Monitor POST / GET / HEAD requests number in access.log :
 

 awk '{print $6}' access.log | sort | uniq -c | sort -n

     1 "alihack<%eval
      1 "CONNECT
      1 "fhxeaxb0xeex97x0fxe2-x19Fx87xd1xa0x9axf5x^xd0x125x0fx88x19"x84xc1xb3^v2xe9xpx98`X'dxcd.7ix8fx8fxd6_xcdx834x0c"
      1 "x16x03x01"
      1 "xe2
      2 "mgmanager&file=imgmanager&version=1576&cid=20
      6 "4–"
      7 "PUT
     22 "–"
     22 "OPTIONS
     38 "PROPFIND
   1476 "HEAD
   1539 "-"
  65113 "POST
 537122 "GET


However using shell commands combination is plenty of typing and hard to remember, plus above tools does not show you, approximately how frequenty IP hits the webserver


2. Real-time monitoring IP addresses with highest URL reqests with logtop


Real-time monitoring on IP addresses with highest URL requests is possible with no need of "console ninja skills"  through – logtop.


2.1 Install logtop on Debian / Ubuntu and deb derivatives Linux


a) Installing Logtop the debian way

LogTop is easily installable on Debian and Ubuntu in newer releases of Debian – Debian 7.0 and Ubuntu 13/14 Linux it is part of default package repositories and can be straightly apt-get-ed with:

apt-get install –yes logtop

b) Installing Logtop from source code (install on older deb based Linuxes)

On older Debian – Debian 6 and Ubuntu 7-12 servers to install logtop compile from source code – read the README installation instructions or if lazy copy / paste below:

cd /usr/local/src
wget https://github.com/JulienPalard/logtop/tarball/master
mv master JulienPalard-logtop.tar.gz
tar -zxf JulienPalard-logtop.tar.gz

cd JulienPalard-logtop-*/
aptitude install libncurses5-dev uthash-dev

aptitude install python-dev swig

make python-module

python setup.py install

make

make install


mkdir -p /usr/bin/
cp logtop /usr/bin/


2.2 Install Logtop on CentOS 6.5 / 7.0 / Fedora / RHEL and rest of RPM based Linux-es

b) Install logtop on CentOS 6.5 and CentOS 7 Linux

– For CentOS 6.5 you need to rpm install epel-release-6-8.noarch.rpm
 

wget http://dl.fedoraproject.org/pub/epel/6/x86_64/epel-release-6-8.noarch.rpm
rpm -ivh epel-release-6-8.noarch.rpm
links http://dl.fedoraproject.org/pub/epel/6/SRPMS/uthash-1.9.9-6.el6.src.rpm
rpmbuild –rebuild
uthash-1.9.9-6.el6.src.rpm
cd /root/rpmbuild/RPMS/noarch
rpm -ivh uthash-devel-1.9.9-6.el6.noarch.rpm


– For CentOS 7 you need to rpm install epel-release-7-0.2.noarch.rpm


links http://download.fedoraproject.org/pub/epel/beta/7/x86_64/repoview/epel-release.html
 

Click on and download epel-release-7-0.2.noarch.rpm

rpm -ivh epel-release-7-0.2.noarch
rpm –import /etc/pki/rpm-gpg/RPM-GPG-KEY-EPEL-7
yum -y install git ncurses-devel uthash-devel
git clone https://github.com/JulienPalard/logtop.git
cd logtop
make
make install


2.3 Some Logtop use examples and short explanation


logtop shows 4 columns as follows – Line number, Count, Frequency, and Actual line


The quickest way to visualize which IP is stoning your Apache / Nginx webserver on Debian?


tail -f access.log | awk {'print $1; fflush();'} | logtop
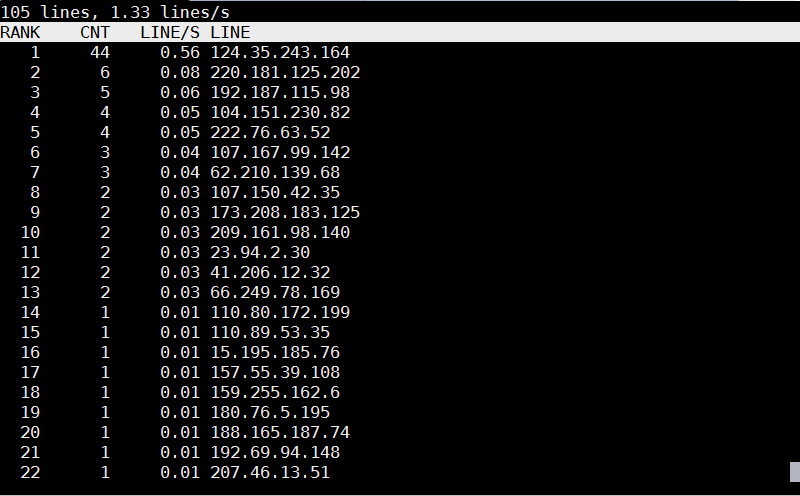


logtop-check-which-ip-is-making-most-requests-to-your-apache-nginx-webserver-linux-screenshot

On CentOS / RHEL

tail -f /var/log/httpd/access_log | awk {'print $1; fflush();'} | logtop


Using LogTop even Squid Proxy caching server access.log can be monitored.
To get squid Top users by IP listed:


tail -f /var/log/squid/access.log | awk {'print $1; fflush();'} | logtop
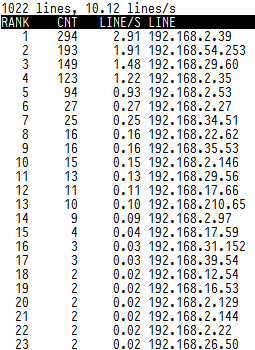

logtop-visualizing-top-users-using-squid-proxy-cache
 

Or you might visualize in real-time squid cache top requested URLs
 

tail -f /var/log/squid/access.log | awk {'print $7; fflush();'} | logtop


visualizing-top-requested-urls-in-squid-proxy-cache-howto-screenshot


3. Automatically Filter IP addresses causing Apache / Nginx Webservices Denial of Service with fail2ban
 

Once you identify the problem if the sites hosted on server are target of Distributed DoS, probably your best thing to do is to use fail2ban to automatically filter (ban) IP addresses doing excessive queries to system services. Assuming that you have already installed fail2ban as explained in above link (On Debian / Ubuntu Linux) with:
 

apt-get install –yes fail2ban


To make fail2ban start filtering DoS attack IP addresses, you will have to set the following configurations:
 

vim /etc/fail2ban/jail.conf


Paste in file:
 

[http-get-dos]
 
enabled = true
port = http,https
filter = http-get-dos
logpath = /var/log/apache2/WEB_SERVER-access.log
# maxretry is how many GETs we can have in the findtime period before getting narky
maxretry = 300
# findtime is the time period in seconds in which we're counting "retries" (300 seconds = 5 mins)
findtime = 300
# bantime is how long we should drop incoming GET requests for a given IP for, in this case it's 5 minutes
bantime = 300
action = iptables[name=HTTP, port=http, protocol=tcp]


Before you paste make sure you put the proper logpath = location of webserver (default one is /var/log/apache2/access.log), if you're using multiple logs for each and every of hosted websites, you will probably want to write a script to automatically loop through all logs directory get log file names and automatically add auto-modified version of above [http-get-dos] configuration. Also configure maxtretry per IP, findtime and bantime, in above example values are a bit low and for heavy loaded websites which has to serve thousands of simultaneous connections originating from office networks using Network address translation (NAT), this might be low and tuned to prevent situations, where even the customer of yours can't access there websites 🙂

To finalize fail2ban configuration, you have to create fail2ban filter file:

vim /etc/fail2ban/filters.d/http-get-dos.conf


Paste:
 

# Fail2Ban configuration file
#
# Author: http://www.go2linux.org
#
[Definition]
 
# Option: failregex
# Note: This regex will match any GET entry in your logs, so basically all valid and not valid entries are a match.
# You should set up in the jail.conf file, the maxretry and findtime carefully in order to avoid false positives.
 
failregex = ^<HOST> -.*"(GET|POST).*
 
# Option: ignoreregex
# Notes.: regex to ignore. If this regex matches, the line is ignored.
# Values: TEXT
#
ignoreregex =


To make fail2ban load new created configs restart it:
 

/etc/init.d/fail2ban restart


If you want to test whether it is working you can use Apache webserver Benchmark tools such as ab or siege.
The quickest way to test, whether excessive IP requests get filtered – and make your IP banned temporary:
 

ab -n 1000 -c 20 http://your-web-site-dot-com/

This will make 1000 page loads in 20 concurrent connections and will add your IP to temporary be banned for (300 seconds) = 5 minutes. The ban will be logged in /var/log/fail2ban.log, there you will get smth like:

2014-08-20 10:40:11,943 fail2ban.actions: WARNING [http-get-dos] Ban 192.168.100.5
2013-08-20 10:44:12,341 fail2ban.actions: WARNING [http-get-dos] Unban 192.168.100.5

Removing exim and installing qmail / Generate and install pseudo mta dummy package on Debian / Ubuntu etc. .deb based Linux

Thursday, March 10th, 2016

debian-dummy-mta-package-install-howto-tux-mail-nice-mascot
If you happen to be installing Qmail Mail server on a Debian or Ubuntu (.deb) based Linux, you will notice by default there will be some kind of MTA (Mail Transport Agent) already installed mail-transfer-agent package will be installed and because of Debian .deb package depedency to have an MTA always installed on the system you will be unable to remove Exim MTA without installing some other MTA (Postix / Qmail) etc.

This will be a problem for those like me who prefer to compile and install Qmail from source, thus to get around this it is necessery to create a dummy package that will trick the deb packaging depencies that actually mta-local MTA package is present on the server.

The way to go here is to use equivs (Circumvent debian package dependencies):
 

debian:~# apt-cache show equivs|grep -i desc -A 10

Description: Circumvent Debian package dependencies
 This package provides a tool to create trivial Debian packages.
 Typically these packages contain only dependency information, but they
 can also include normal installed files like other packages do.
 .
 One use for this is to create a metapackage: a package whose sole
 purpose is to declare dependencies and conflicts on other packages so
 that these will be automatically installed, upgraded, or removed.
 .
 Another use is to circumvent dependency checking: by letting dpkg
 think a particular package name and version is installed when it

Btw creating a .deb dummy package will be necessery in many other cases when you have to install from some third party debian repositories or some old and alrady unmaintaned deb-src packages for the sake of making some archaic software to resurrect somewhere, so sooner or later even if you're not into Mail servers you will certainly need equivs.

Then install equivs and go on proceeding creating the dummy mail-transport-agent package
 

debian:~# cd /tmp debian:~# cp -rpf /usr/share/doc/equivs/examples/mail-transport-agent.ctl . debian:~# equivs-build mail-transport-agent.ctl


Above command will build and package /tmp/mta-local_1.0_all.deb dummy package.
So continue and install it with dpkg as you use to install debian packages


debian:~# dpkg -i /tmp/mta-local_1.0_all.deb


From then on you can continue your standard LWQ – Life with Qmail or any other source based qmail installation with:


./config-fast mail.yourmaildomain.net


So that's it now .deb packaging system consistency will be complete so standard security package updates with apt-get and aptitude updates or dpkg -i third party custom software insatlls will not be breaking up any more.

Hope that helped someone 🙂


Make Apache webserver fix spelling mistyped URL errors and serve files case insensitive with mod_speling

Wednesday, July 16th, 2014

make_apache_fix_mistyped_spelling_urls_errors_and_serve_files_case_insensitive_mod_speling_logo
On most if not all modern GNU / Linux distributions, Apache webserver comes preinstalled with mod_speling.

What mod_speling does is it tries to find and serve files and directories for non-existing  (404 return code) urls with a similar name to passed URL. Other thing mod_speling does is it serves files case-insensitive, even though the UNIX / Linux filesystems are built to understand files case-sensitive.

mod_speling is a very useful module especially when files are being pushed (synchronized) to Apache visible from web document folder from operating systems like Windows whose filesystem doesn't store files case sensitive.

Let me give you a small example on M$ Windows a create file NewFile.html, NEWFILE.HTML, NeWfIlE.Html etc. are one and the same file newfile.html and not 3 different files like it is usually on UNIX / Linux filesystems.

If you happen to migrate old static Websites from Microsoft Internet Information Services (IIS) to UNIX / Linux based hosting. Often Html coders which create websites on Windows platform doesn't respect in website hyperlinks case-sensitive, because anyways Windows FS is case-insetive, thus moving the website to Linux host with Apache the website/s will end up with many 404 error pages, whose fixing for big static websites will be a real pain in the ass.

Also there might be need for mod_speling module enabled, for PHP / Python / Perl websites developed on MS Windows platform and tested on Windows host and then officially to be deployed on Linux.

Note that mod_speling name as a funny thing as actually the module is also converting mis-pelled / mis-typed Apache URLs:

If for example, someone tried to link to your website from a forum mistyping the URL address with mod_speling the mistyped URL could still be handled to open the real existing URL:

Lets say you have URL:
 

http://your-domain.com/files/what-Ever-fle.php


and the actual URL is:

http://your-domain.com/files/what-Ever-file.php


mod_speling will make Apache scan in /files/ for any files with similar name to what-Ever-fle.php and will open any similar matched file name, preventing you from the normal 404 error and therefore often serving exactly what it has to. Of course such a behavior could be unwanted in same cases for CMSes, which depend on 404 error code for proper operating, so be very sure when configuring mod_speling that this is exactly what you need.

mod_speling can be also useful sometimes for Search Engine Optimization – SEO, as it will show less 404 pages to Crawler search engine bots.

1. Enable mod_speling module on Debian GNU / Linux and Ubuntu

Enabling mod_speling in Apache in Debian / Ubuntu etc. debian based Linuxes is done with either creating symlink from /etc/apache2/mods-available/speling.load to /etc/apache2/mods-enabled/speling.load :
 

ln -sf /etc/apache2/mods-available/speling.load /etc/apache2/mods-enabled/speling.load

Or by using a2enmodDebian apache module enabling script:
 

a2ensite sitename


To enable mod_speling mis-speling resolve feature config directive is:


CheckSpelling on


To disable case sensitivity – as I said earlier helpful for migrations from Microsoft Windows hosts to Linux, use directive:

CheckCaseOnly on


To enable both use:

<IfModule mod_speling.c>
    CheckCaseOnly on
    CheckSpelling on
</IfModule>

Enabling mod_speling case-insensitivity and fixing mistypes in URL could be done from .htaccess, for any <Directory> (vhost) with enabled .htaccess with

AllowOverride All

To enable it for default set host in new Apache install place it in /etc/apache2/apache2.conf and /etc/apache2/sites-enabled/000-default

Then as usual to make the configuration changes take affect, restart Apache:
 

/etc/init.d/apache2 restart


2. Enablig mod_speling on CentOS, RHEL and Fedora Linux


Most of RPM based Linux distributions have already mod_speling by default in Apache, so there will be no need to explicitly enable the module within HTTPD.

To check whether mod_speling is already enabled in httpd issue:
 

/usr/sbin/httpd -M |grep -i mod_speling


If you don't get no output from command this means the module is not enabled. This is the case with CentOS Linux 6.5 for example …

To enable mod_speling on Apache level add in /etc/httpd/conf/httpd.conf

LoadModule speling_module modules/mod_speling.so

and restart webserver
 

/etc/init.d/httpd restart


If you get instead
 

/usr/sbin/httpd -M |grep -i mod_speling
speling_module (shared)


Then it is already loaded in HTTPD to enable the module for default domain add to /etc/httpd/conf/httpd.conf – within (<Directory "/var/www/html">),

<IfModule mod_speling.c>
    CheckCaseOnly on
    CheckSpelling on
</IfModule>

Or if you want to make it active for specific directories within /var/www/html/whatever-dir use either new <Directory ..> directive within Apache config, or enable .htaccess processing with AllowOverride All and place them in .htaccess . For complete mod_speling reference check on Apache's official website

Improve Website Apache Webserver SEO without Website source code moficitations with Google PageSpeed module on Debian, Ubuntu, CentOS, Fedora and SuSE Linux

Thursday, December 18th, 2014

Improve-website-apache-webserver-seo-without-website-source-code-modifications-with-Google-PageSpeed-Apache-module

For hosting companies and even personal website speed performance becomes increasingly important factor that gives higher and higher weight on overall PageRank and is one of the key things for Successful Site Search Engine Optimization (positioning) in Search Engines of a not specially SEO friendly crafted website.

Virtually all Google / Yahoo / Bing,  Yahoo  etc. Search Engines give better pagerank to websites which load faster and has little or no downtimes, for the reason a faster loading time of a website pages means better user experience and is indicator that the website is well maintained. 

Often websites deployed written for purpose of a business-es or just community CMS / Blog Website Open Source systems such as Joomla, Drupal and WordPress by default are not made to provide fantastic speed right after deploy without install of custom plugins and website tuning, i.e.:

  • Content size optimization (gzipping)
  • More efficient way to deliver CSS / Javascript (MinifyJS / CSS files into single ones
  • HTML optimization
  • Stripping (useful) page Comments
  • Adding <head> if missing on pages etc.

. Therefore as I said in many of my previous LAMP Optimization articles page  (opening) speed could make really Bad Users / Clients experience when the site grows too big or is badly optimized it gives degraded page speed times (often page loads 20 / 30 seconds waiting for the page to load!). Having Pages lagging on big information sites or EShos has both Ruining Company's Image on the market and quickly convinces the user to use another service from the already thosands available and thus drives out (potential) customers.

As Programming code maintainance and improvement is usually very costly, companies that want to save money or can't afford it (because of the shrinking budgets dictacted by the global economic crisis), the best thing to do is to ask your sysadmin to Squeeze the Best out of the WebService and Servers without major (Backend Code) infrastructural changes.

To  Speed up Apache and create Proper Page Caching without installing on server external PHP Caching modules such as Eaccelerator  / PHP APC caching and without
extra CMS modules
such as lets say WordPress W3 Total Cache there is Google Develop Apache Webserver external module – PageSpeed.

Here is Google Pagespeed Module overview :
 

PageSpeed speeds up your site and reduces page load time. This open-source webserver module automatically applies web performance best practices to pages and associated assets (CSS, JavaScript, images) without requiring that you modify your existing content or workflow.


What does Apache Google PageSpeed actually does?
 

  • Automatic website and asset optimization
  • Latest web optimization techniques
  • 40+ configurable optimization filters
  • Free, open-source, and frequently updated
  • Deployed by individual sites, hosting providers, CDNs


1. Install PageSpeed on Debian / Ubuntu, deb derivatives) Linux

a) Download and install module 

On 64 bit deb based Linux:

cd /usr/local/src
wget https://dl-ssl.google.com/dl/linux/direct/mod-pagespeed-stable_current_amd64.deb 
dpkg -i mod-pagespeed-stable_current_amd64.deb
apt-get -f install


On 32 bit Linux:

cd /usr/local/src
wget https://dl-ssl.google.com/dl/linux/direct/mod-pagespeed-stable_current_i386.deb
dpkg -i 
direct/mod-pagespeed-stable_current_i386.deb
apt-get -f install


b) Restart Apache
 

sudo /etc/init.d/apache2 restart

Important files and folders placed on server by deb installer are:

/usr/bin/pagespeed_js_minify – binary that does Javascript minification
/etc/apache2/mods-available/pagespeed.conf – Pagespeed config
/etc/apache2/mods-available/pagespeed.load – Load module directives in Apache
/etc/cron.daily/mod-pagespeed – mod_pagespeed cron script for checking and installing latest updates.
/var/cache/mod_pagespeed – Mod Pagespeed cahing folder (useful to install memcached to increase even further caching performance)
/var/log/pagespeed – Directory to store pagespeed log files


2. Install PageSpeed on (RPM based CentOS, Fedora, RHEL / SuSE Linux)


RPM 64 bit package install:
 

rpm -Uvh https://dl-ssl.google.com/dl/linux/direct/mod-pagespeed-beta_current_x86_64.rpm


32 bit pack version:
 

rpm -Uvh https://dl-ssl.google.com/dl/linux/direct/mod-pagespeed-stable_current_i386.rpm


Modify pagespeed mod config 

Restart Apache

sudo /etc/init.d/httpd restart


Important config files and folders created during RPM install are:

  • /etc/cron.daily/mod-pagespeed : mod_pagespeed cron script for checking and installing latest updates.
  • /etc/httpd/conf.d/pagespeed.conf : The main configuration file for Apache.
  • /usr/lib/httpd/modules/mod_pagespeed.so : mod_pagespeed module for Apache.
  • /var/www/mod_pagespeed/cache : File caching direcotry for web sites.
  • /var/www/mod_pagespeed/files : File generate prefix for web sites.

3. Configuring Google PageSpeed module


To configure PageSpeed you can either edit the package installed bundled pagespeed.conf (/etc/apache2/mods-available/pagspeed.conf,  /etc/httpd/conf.d/pagespeed.conf) or insert configuration items inside Apache VirtualHosts config files or even if you need flexibility and you don't have straight access to Apache config files (on shared hosting servers where module is available) through .htaccess.
Anyways try to avoid adding pagespeed directives to .htaccess as it will be too slow and inefficient.

Configuration is managed by setting different so-called "Rewrite Levels". Default behavior is to use Level of "Corefilters.", a set of filters (module behavior configs) which according to Google is safe for use. PageSpeed Filters is a set of actions applied to Web Delivered files.

Default config setting is hence:
 

ModPagespeedRewriteLevel CoreFilters

Disabling default set of filters is done with:
 

ModPagespeedRewriteLevel PassThrough

"Corefilters" default filter set as of time of writting this article:
 

add_head
combine_css
convert_jpeg_to_progressive
convert_meta_tags
extend_cache
flatten_css_imports
inline_css
inline_import_to_link
inline_javascript
rewrite_css
rewrite_images
rewrite_javascript
rewrite_style_attributes_with_url

Complete documentation on Configuring PageSpeed Filters is here.

If caching is turned on, default PageSped caching is configured in /var/cache/mod_pagespeed/
Enabling someof the non-Corefilters that sometimes are useful for SEO (reduce of served / returned pagesize) are:
 

ModPagespeedEnableFilters pedantic,remove_comments

By default pagespeed does some things (such as inline_css, inline_javascript and rewrite_images (Optimize, removing Excess pixels).  My litle experience with pagespeed shows in some cases this could break websites), so I found for my case useful to disable some of the filters:


vim /etc/apache2/mods-available/pagespeed.conf


ModPagespeedDisableFilters rewrite_images,convert_jpeg_to_progressive,inline_css,inline_javascript


4. Testing if PageSpeed is Enabled pagespeed_admin

By default PageSpeed has Admin which by default is only allowed to be accessed from server localhost (127.0.0.1) to get basic statistics either install text browser like lynx / elinks or add more access IPs again in pagespeed config / vhosts pagespeed.conf include more Allow lines like below:


    <Location /pagespeed_admin>
        Order allow,deny
        Allow from localhost
        Allow from 127.0.0.1
        Allow from 192.168.1.1
        Allow from xxx.xxx.xxx.xxx

        #Allow from All
        SetHandler pagespeed_admin
    </Location>
    <Location /pagespeed_global_admin>
        Order allow,deny
        Allow from localhost
        Allow from 127.0.0.1

        Allow from 192.168.1.1
        Allow from xxx.xxx.xxx.xxx
        SetHandler pagespeed_global_admin
    </Location>


Once configured pagespeed_admin access it with favourite browser on:

http://127.0.0.1/pagespeed_admin
http://127.0.0.1/pagespeed_global_admin

improve-website-apache-webserver-seo-without-source-code-modifications-google-pagespeed_admin_panel

Other way to test it is enabled is by creating php file with good old <? phpinfo(); ?> – PHP stats enabled / disabled features code:

pagespeed-in-phpinfo-x-mod-pagespeed-output-screenshot-apache-webserver

I've also tested also pagespeed unstable release, but experienced some segmentation faults in both error.log and access.log so finally decided to keep using stable release.

PageSpeed is a great way to boost your server sites performance, however it comes on certain costs as expect your server CPU Load to jump drastically, (in my case it jumped more than twice), there are Linux servers where enabling the module could totally stone the servers, so before implementing the module on a Production system environment, always first test thouroughfully with loaded pagespeed on UAT (testing) environment with AB or Siege (Apache Benchmarking Tools).