Posts Tagged ‘Desktop’

Text Monitoring of connection server (traffic RX / TX) business in ASCII graphs with speedometer / Easy Monitor network traffic performance

Friday, May 4th, 2012

While reading some posts online related to MS-Windows TcpViewnetwork traffic analyzing tool. I've came across very nice tool for tracking connection speed for Linux (Speedometer). If I have to compare it, speedometer is somehow similar to nethogs and iftop bandwidth network measuring utilities .

What differentiates speedometer from iftop / nethogs / iptraf is it is more suitable for visualizing a network file or data transfers.
The graphs speedometer draws are way easier to understand, than iftop graphs.

Even complete newbies can understand it with no need for extraordinary knowledge in networking. This makes Speedometer, a top tool to visually see the amount of traffic flowing through server network interface (eth0) … (eth1) etc.

What speedometer shows is similar to the Midnight Commander's (mc) file transfer status bar, except the statistics are not only for a certain file transfer but can show overall statistics over server passing network traffic amount (though according to its manual it can be used to also track individual file transfers).

The simplicity for basic use makes speedometer nice tool to track for network congestion issues on Linux. Therefore it is a  must have outfit for every server admin. Below you see a screenshot of my terminal running speedometer on a remote server.
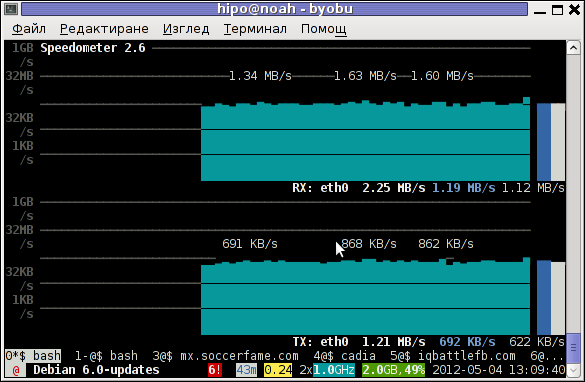
Speedometer ascii traffic track server network business screenshot in byobu screen like virtual terminal emulator

1. Installing speedometer on Debian / Ubuntu and Debian derivatives

For Debian and Ubuntu server administrators speedometer is already packaged as a deb so its installation is as simple as:

debian:~# apt-get --yes install speedometer
....

2. Installing speedometer from source for other Linux distributions CentOS, Fedora, SuSE etc.

Speedometer is written in python programming language, so in order to install and use on other OS Linux platforms, it is necessery to have installed (preferably) an up2date python programming language interpreter (python ver. 2.6 or higher)..
Besides that it is necessary to have installed the urwid -( console user interface library for Python) available for download via excess.org/urwid/


Hence to install speedometer on RedHat based Linux distributions one has to follow these steps:

a) Download & Install python urwid library

[root@centos ~]# cd /usr/local/src
[root@centos src]# wget -q http://excess.org/urwid/urwid-1.0.1.tar.gz
[root@centos src]# tar -zxvvf urwid-1.0.1.tar.gz
....
[root@centos src]# cd urwid-1.0.1
[root@centos urwid-1.0.1]# python setup.py install
running install
running build
running build_py
creating build
creating build/lib.linux-i686-2.4
creating build/lib.linux-i686-2.4/urwid
copying urwid/tests.py -> build/lib.linux-i686-2.4/urwid
copying urwid/command_map.py -> build/lib.linux-i686-2.4/urwid
copying urwid/graphics.py -> build/lib.linux-i686-2.4/urwid
copying urwid/vterm_test.py -> build/lib.linux-i686-2.4/urwid
copying urwid/curses_display.py -> build/lib.linux-i686-2.4/urwid
copying urwid/display_common.py -> build/lib.linux-i686-2.4/urwid
....

b) Download and install python-setuptools

python-setuptools is one other requirement of speedometer, happily on CentOS and Fedora the rpm package is already there and installable with yum:

[root@centos ~]# yum -y install python-setuptools
....

c) Download and install Speedometer

[root@centos urwid-1.0.1]# cd /usr/local/src/
[root@centos src]# wget -q http://excess.org/speedometer/speedometer-2.8.tar.gz
[root@centos src]# tar -zxvvf speedometer-2.8.tar.gz
.....
[root@centos src]# cd speedometer-2.8
[root@centos speedometer-2.8]# python setup.py install
Traceback (most recent call last):
File "setup.py", line 26, in ?
import speedometer
File "/usr/local/src/speedometer-2.8/speedometer.py", line 112
n = n * granularity + (granularity if r else 0)
^

While running the CentOS 5.6 installation of speedometer-2.8, I hit the
"n = n * granularity + (granularity if r else 0)
error.

After consultation with some people in #python (irc.freenode.net), I've figured out this error is caused due the outdated version of python interpreter installed by default on CentOS Linux 5.6. On CentOS 5.6 the python version is:

[root@centos ~]# python -V
Python 2.4.3

As I priorly said speedometer 2.8's minimum requirement for a python to be at v. 2.6. Happily there is quick way to update python 2.4 to python 2.6 on CentOS 5.6, as there is an RPM repository maintained by Chris Lea which contains RPM binary of python 2.6.

To update python 2.4 to python 2.6:

[root@centos speedometer-2.8]# rpm -Uvh http://yum.chrislea.com/centos/5/i386/chl-release-5-3.noarch.rpm[root@centos speedometer-2.8]# rpm --import /etc/pki/rpm-gpg/RPM-GPG-KEY-CHL[root@centos speedometer-2.8]# yum install python26

Now the newly installed python 2.6 is executable under the binary name python26, hence to install speedometer:

[root@centos speedometer-2.8]# python26 setup.py install
[root@centos speedometer-2.8]# chown root:root /usr/local/bin/speedometer
[root@centos speedometer-2.8]# chmod +x /usr/local/bin/speedometer

[root@centos speedometer-2.8]# python26 speedometer -i 1 -tx eth0

The -i will instruct speedometer to refresh the screen graphs once a second.

3. Using speedometer to keep an eye on send / received traffic network congestion

To observe, the amount of only sent traffic via a network interface eth0 with speedometer use:

debian:~# speedometer -tx eth0

To only keep an eye on received traffic through eth0 use:

debian:~# speedometer -rx eth0

To watch over both TX and RX (Transmitted and Received) network traffic:

debian:~# speedometer -tx eth0 -rx eth0

If you want to watch in separate windows TX and RX traffic while  running speedometer you can run in separate xterm windows speedometer -tx eth0 and speedometer -rx eth0, like in below screenshot:
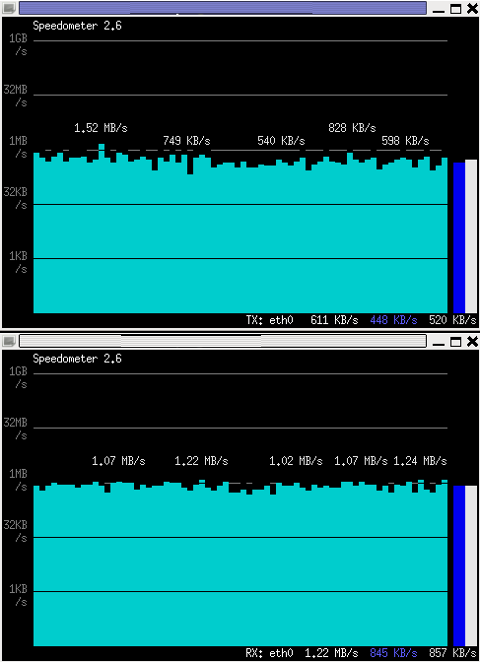
Monitor Received and Transmitted server Network traffic in two separate xterm windows with speedometer ascii graphs

4. Using speedometer to test network maximum possible transfer speed between server (host A) and server (host B)

The speedometer manual suggests few examples one of which is:

How fast is this LAN?

host-a$ cat /dev/zero | nc -l -p 12345
host-b$ nc host-a 12345 > /dev/null
host-b$ speedometer -rx eth0

When I red this example in speedometer's manual, it wasn't completely clear to me what the author really meant, but a bit after when I thought over the example I got his point.

The idea behind this example is that a constant stream of zeros taken from /dev/zero will be streamed over via a pipe (|) to nc which will bind a port number 12345, anyone connecting from another host machine, lets say a server with host host-b to port 12345 on machine host-a will start receiving the /dev/zero streamed content.

Then to finally measure the streamed traffic between host-a and host-b machines a speedometer is started to visualize the received traffic on network interface eth0, thus measuring the amount of traffic flowing from host-a to host-b

I give a try to the exmpls, using for 2 test nodes my home Desktop PC, Linux running  arcane version of Ubuntu and my Debian Linux notebook.

First on the Ubuntu PC I issued
 

hipo@hip0-desktop:~$ cat /dev/zero | nc -l -p 12345
 

Note that I have previously had installed the netcat, as nc is not installed by default on Ubuntu and Debian. If you, don't have nc installed yet, install it with:

apt-get –yes install netcat

"cat /dev/zero | nc -l -p 12345" will not produce any output, but will display just a blank line.

Then on my notebook I ran the second command example, given in the speedometer manual:
 

hipo@noah:~$ nc 192.168.0.2 12345 > /dev/null

Here the 192.168.0.2 is actually the local network IP address of my Desktop PC. My Desktop PC is connected via a normal 100Mbit switch to my routing machine and receives its internet via  NAT. The second test machine (my laptop), gets its internet through a WI-FI connection received by a Wireless Router connected via a UTP cable to the same switch to which my Desktop PC is connected.

Finally to test / get my network maximum thoroughput I had to use:

hipo@noah:~$ speedometer -rx wlan0

Here, I  monitor my wlan0 interface, as this is my (laptop) wireless card interface over which I have connectivity to my local network and via which through the the WI-FI router I get connected to the internet.

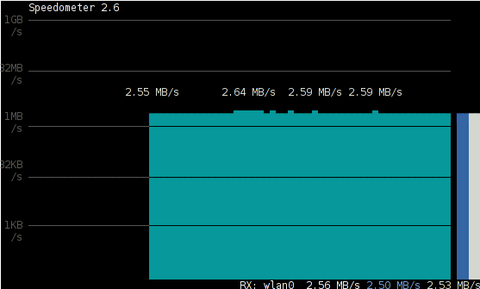
Below is a snapshot captured showing approximately what is the max network thoroughput from:

Desktop PC -> to my Thinkpad R61 laptop
Using Speedometer to test network thorougput between two network server hosts screenshot Debian Squeeze Linux

As you can see in the shot approximately the maximum network thoroughput is in between:
2.55MB/s min and 2.59MB/S max, the speed is quite low for a 100 MBit local network, but this is normal as most laptop wireless adapters hardly transfer traffic in more than 10 to 20 MBits per sec.

If the same nework thoroughput test is conducted between two machines both connected to a same 100 M/bit switch, the traffic should be at least a 8 MB/sec.

There is something, else to take in consideration that probably makes the provided example network thoroughput measuring a bit inaccurate. The fact that the /dev/zero content is stremed over is slowing down the zeroes sent over network because of the  pipe ( | ) use slows down the stream.

5. Using speedometer to visualize maximum writting speed to a local hard drive on Linux

In the speedometer manual, I've noticed another interesting application of this nifty tool.

speedometer can be used to track and visualize the maximum writing speed a hard disk drive or hard drive partition can support on Linux OS:

A copy paster from the manual text is as follows:

How fast can I write data to my filesystem? (with at least 1GB free)
dd bs=1000000 count=1000 if=/dev/zero of=bigfile &
speedometer bigfile

However, when I tried copy/pasting the example in terminal, to test the maximum writing speed to an external USB hard drive, only dd command was started and speedometer failed to initialize and display graphs of the file creation speed.

I've found a little "hack" that makes the man example work by adding a 3 secs sleep like so:

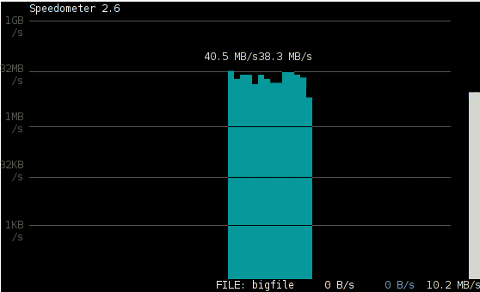
debian:/media/Expansion Drive# dd bs=1000000 count=1000 if=/dev/zero of=bigfile & sleep 3; speedometer bigfile

Here is a screenshot of the bigfile created by dd and tracked "in real time" by speedometer:
How fast is writting data to local USB expandable hard disk Debian Linux speedometer screenshot

Actually the returned results from this external USB drive are, quite high, the possible reason for that is it is connected to my laptop over an USB protocol verion 3.

6. Using Speedometer to keep an eye on file download in progress

This application of speedometer is mostly useless especially on Linux where it is used as a Desktop.

However in some occasions if files are transferred over ssh or in non interactive FTP / Samba file transfers between Linux servers it can come handy.

To visualize the download and writing speed of lets say FTP transferred .AVI movie (during the actual file transfer) on the download host issue:

# speedometer Download-Folder/What-goes-around-comes-around.avi

7. Estimating approximate time for file transfer

There is another section in the speedometer manual pointing of the program use to calculate the time remaining for a file transfer.

The (man speedometer) provided example text is:

How long it will take for my 38MB transfer to finish?
speedometer favorite_episode.rm $((38*1024*1024))

At first glimpse it hard to understand (like the other manual example). A bit of reasoning and I comprehend what the man author meant by the obscure calculation:

$((38*1024*1024))

This is a formula used in which 38 has to be substituted with the exact file size amount of the transferred file. The author manual used a 38MB file so this is why he put $((38* … in the formula.

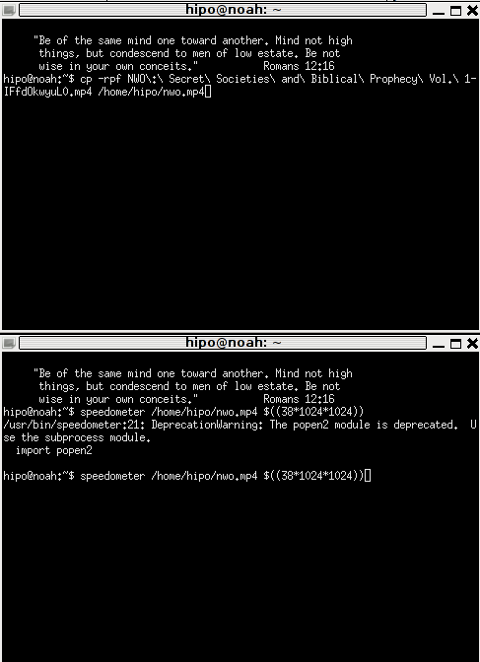
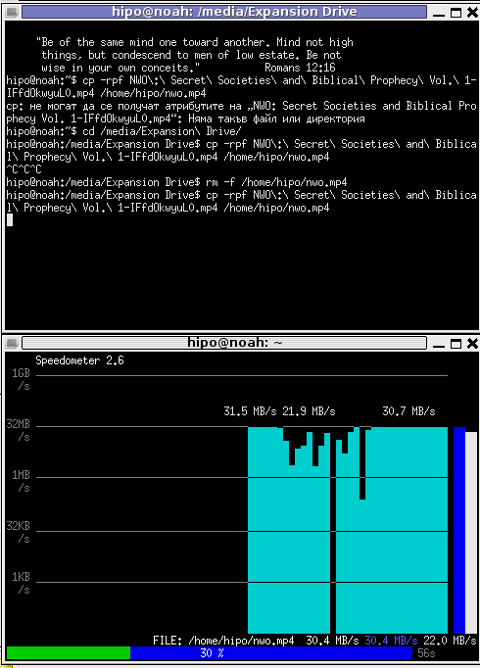
I give it a try – (just for the sake to see how it works) with a file with a size of 2500MB, in below two screenshot pictures I show my preparation to copy the file and the actual copying / "real time" transfer tracking with speedometer's status percentage completion bar.
xterm terminal copy file and estimate file copying operation speed on linux with speedometer preparation

Two xterm terminals one is copying a file the other one uses speedometer to estimate the time remaining to complete the file transfer from expansion USB hard drive to my laptop harddrive


How to disable Debian GNU / Linux (Squeeze) Apache 2 version reporting to improve security – Hide Apache server version

Friday, October 5th, 2012

Debian GNU / Linux's Apache default behavior is to report Apache server name, version and Linux distribution version and codename.
This is shown as a minor security leak in many Security Scanner (audit) software like Nessus. It reveals a vital information which could help malicious attacker later to use exploit if the version number in question is vulnerable.

The quickest way to check, either Apache versioning and distro info is disabled is with telnet:

hipo@noah:~/Desktop$ telnet www.pc-freak.net 80
Trying 83.228.93.76…
Connected to www.pc-freak.net.
Escape character is '^]'.
HEAD / HTTP/1.0

Connection closed by foreign host.
hipo@noah:~/Desktop$ telnet www.pc-freak.net 80
Trying 83.228.93.76…
Connected to www.pc-freak.net.
Escape character is '^]'.
HEAD / HTTP/1.0

HTTP/1.1 200 OK
Date: Fri, 05 Oct 2012 10:48:36 GMT
Server: Apache/2.2.16 (Debian)
X-Powered-By: PHP/5.3.3-7+squeeze14
Vary: Accept-Encoding
Connection: close
Content-Type: text/html

Disabling this Distro version codename and version number reporting on Debian is done by changing in file /etc/apache2/conf.d/security directives:


ServerTokens OS
ServerSignature On

to


ServerSignature Off
ServerTokens ProductOnly

Here important note to make is if you try adding:

ServerSignature Off and ServerTokens Prod straight in Debian general config /etc/apache2/apache2.conf, but did not change the settings set for the vars through /etc/apache2/conf.d/security; settings from /etc/apache2/conf.d/security will overwrite ServerSignature / ServerTokens settings set in /etc/apache2/apache2.conf

I tried this myself (forgotting about /etc/apache2/conf.d/security) and adding both variables straight in apache2.conf. After Apache restart Apache version number and type of distribution continued be returned by the WebServer.
I thought something specific changed in Debian Squeeze – Apache/2.2.16 so this two variables are probably not working so I did a quick research online seing other people complaining also unable to disable Apache ver and Linux distro version and looking for a reason why. Well anyways if you happen to also ponder, why ServerSignature Off and ServerTokens ProductOnly does not take effect keep in mind it is due to overwritten settings via /etc/apache2/conf.d/security, changing the values there and restarting Apache and you're done 🙂

To make sure 100% Apache is no longer returning exact version number and host installed distro type, use telnet again:

hipo@noah:~/Desktop$ telnet www.pc-freak.net 80
Trying 83.228.93.76…
Connected to www.pc-freak.net.
Escape character is '^]'.
HEAD / HTTP/1.0

Connection closed by foreign host.

MySQL SSL Configure Howto – How to Make MySQL communication secured

Wednesday, January 15th, 2014

mysql-over-ssl-how-to-configure-logo how to configure ssl on mysql server

Recently I've been asked How to make communication to MySQL database encrypted. The question was raised by a fellow developer who works on developing a Desktop standalone application in Delphi Programming Language with DevArt an (SQL Connection Component capable to connect Delphi applications to multiple databases like MySQL, Oracle, PostgreSQL, Interbase, Firebird etc.

Communicating in Secured form to MySQL database is not common task to do, as MySQL usually communicates to applications hosted on same server or applications to communicate to MySQL are in secured DMZ or administrated via phpMyAdmin web interface.

MySQL supports encrypted connections to itself using Secure Socket Layer (SSL) encryption. Setting up MySQL db to be communicated encrypted is a must for standalone Desktop applications which has to extract / insert data via remote SQL.
Configuring SQL to support communicated queries encrpytion is supported by default and easily configured on most standard Linux version distributions (Debian, RHEL, Fedora) with no need to recompile it.
1. Generate SSL Certificates

$ mkdir /etc/mysql-ssl && cd mysql-ssl

# Create CA certificate
$ openssl genrsa 2048 > ca-key.pem
$ openssl req -new -x509 -nodes -days 3600 \
         -key ca-key.pem -out ca-cert.pem

Create server certificate, remove passphrase, and sign it
server-cert.pem is public key, server-key.pem is private key
$ openssl req -newkey rsa:2048 -days 3600 \
         -nodes -keyout server-key.pem -out server-req.pem

$ openssl rsa -in server-key.pem -out server-key.pem
$ openssl x509 -req -in server-req.pem -days 3600 \
         -CA ca-cert.pem -CAkey ca-key.pem -set_serial 01 -out server-cert.pem

Create client certificate, remove passphrase, and sign it
client-cert.pem is public key and client-key.pem is private key
$ openssl req -newkey rsa:2048 -days 3600 \
         -nodes -keyout client-key.pem -out client-req.pem

$ openssl rsa -in client-key.pem -out client-key.pem
$ openssl x509 -req -in client-req.pem -days 3600 \
         -CA ca-cert.pem -CAkey ca-key.pem -set_serial 01 -out client-cert.pem

After generating the certificates, verify them:

$ openssl verify -CAfile ca-cert.pem server-cert.pem client-cert.pem
 

2. Add SSL support variables to my.cnf

Once SSL key pair files are generated in order to active SSL encryption support in MySQL server, add to (/etc/my.cnf,  /etc/mysql/my.cnf, /usr/local/etc/my.cnf … ) or wherever config is depending on distro

# SSL
ssl-ca=/etc/mysql-ssl/ca-cert.pem
ssl-cert=/etc/mysql-ssl/server-cert.pem
ssl-key=/etc/mysql-ssl/server-key.pem

3. Restart MySQL server

/etc/init.d/mysqld restart
...

4. Create SQL user to require SSL login

Create new user with access to database;

GRANT ALL ON Sql_User_DB.* TO Sql_User@localhost;
FLUSH PRIVILEGES;

To create administrator privileges user:

GRANT ALL PRIVILEGES ON *.* TO ‘ssluser’@'%’ IDENTIFIED BY ‘pass’ REQUIRE SSL;
FLUSH PRIVILEGES;

5. Test SSL Connection with MySQL CLI client or with few lines of PHP

To use mysql cli for testing whether SSL connection works:

$ mysql -u ssluser -p'pass' –ssl-ca /etc/mysql-ssl/client-cert.pem –ssl-cert /etc/mysql-ssl/client-key.pem

Once connected to MySQL to verify SSL connection works fine:

mysql> SHOW STATUS LIKE 'Ssl_Cipher';
 +---------------+--------------------+
| Variable_name | Value              |
 +---------------+--------------------+
| Ssl_cipher    | DHE-RSA-AES256-SHA |
+---------------+--------------------+

If you get this output this means MySQL SSL Connection is working as should.

Alternative way is to use test-mysqli-ssl.php script to test availability to mysql over SSL.

$conn=mysqli_init();
mysqli_ssl_set($conn, '/etc/mysql-ssl/client-key.pem', '/etc/mysql-ssl/client-cert.pem', NULL, NULL, NULL);
if (!mysqli_real_connect($conn, '127.0.0.1', 'ssluser', 'pass')) { die(); }
$res = mysqli_query($conn, 'SHOW STATUS like "Ssl_cipher"');
print_r(mysqli_fetch_row($res));
mysqli_close($conn);

Note: Change username password according to your user / pass before using the script

That's all now you have mysql communicating queries data over SSL


Torus Trooper – Cool 3D Tunnel Speed Up Spaceship game for Linux

Wednesday, December 18th, 2013

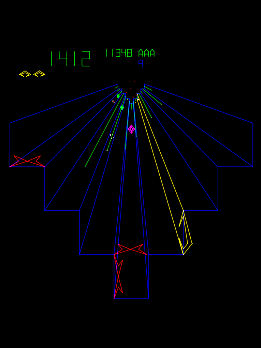
Torus Trooper linux tunnel 3d fast pace speed up game screenshot

Whether you're looking for a game to kill some time and enjoy the old "spaceship shoot and run games" check out Torus Trooper.
Originally game was developed for MS Windows and is remake of an old Atari Arcade Game Tempest.

Those who played Tempest know well that this game was revolution for its time and probably remember also a similar world famous Space Duel game.

Arcade atari old scool tunnel game tempest one of atari pre 3d game classics

Atari's Tempest Arcade game

The objective of Torus Trooper is mega simple as in most arcade games. You're speeding up through a tunnel all time with a spaceship with the only goal to kill as many enemies  as you can and survive as longer as possible. Playing the game you can get some memories of demoscene tracked music, future crew Second Reality / Unreal demos. Game was created by ABA GAMES company, authors Tumiki Fighters and GunRoar another 2 nice 2D Linux arcade games.

TUMIKI Fighters the boss level 1, 2d linux arcade game classic

Tumiki Fighters

Gunroar another cool linux arcade 2d game

GunRoar

Probably best thing of Torus Trooper is its nice graphics and superb demoscene like soundtrack.
I truely love the pace of the game, raising up the player adrenaline in minutes.
To install in a bundle Torus-Trooper Tumiki Fighters and Gunroar on Debian / Ubuntu Linux run the usual:

debian:~# apt-get install --yes torus-trooper tumiki-fighters gunroar
...

There is also a variation of torus-trooper called Torus Trooper, install and give it a try as well;

debian:~# apt-get install -yes torus-trooper-pure
...

In my humble opinion Torus-trooper is among golden games every Linux gamer should have installed on his Desktop.
Enjoy 🙂
 

Convert WAV to MP3 in command line with LAME on Linux

Friday, April 8th, 2011

I needed to convert a bunch of files from WAV to MP3 format on my Linux desktop.

I’ve placed all my wav files to the directory /home/hipo/wav

And then I issued the small one liner script to convert the .wav files to .mp3 using the niftly lame linux mp3 convertor.

Here is how I did it:

linux-desktop:~$ cd wav
linux-desktop:/home/hipo/wav$ for i in *.wav; do
new_name=$(echo $i |sed -e 's#wav#mp3#g');
lame -V0 -h -b 160 --vbr-new "$i" "$new_name";
done

After executing the little script you might go and have a coffee, if you have thousands of files, each file convertion takes about 10-15 seconds of time (speed depends on your CPU).

Here is some output from a lame convertion to mp3 taking place:

Encoding as 8 kHz single-ch MPEG-2.5 Layer III VBR(q=0)
Frame | CPU time/estim | REAL time/estim | play/CPU | ETA
27237/27237 (100%)| 0:12/ 0:12| 0:12/ 0:12| 155.89x| 0:00
64 [27237] ***************************************************************
----------------------------------------------
kbps mono % long switch short %
64.0 100.0 84.1 8.9 7.0
If you want to save my convertion quickly for a later, download my Convert WAV to mp3 from a directory with lame shell script here

Actually there are plenty of other ways to convert wav to mp3 on Linux through mplayer, ffmpeg even with mpg123.

There are also some GUI programs that could do the convertion like winff , however for some weird reason after installing WinFF on my debian it was not able to complete convertion to mp3?!
But it doesn’t matter, the good news is I did what I wanted to via the simple lame program and the above script, hope it helps somebody out there.

FreeBSD Desktop: Allow All system users to mount CDROM, DVD, USB Devices and other external devices

Friday, November 16th, 2012

freebsd allow all system users to mount CD DVD USB in GNOME and KDE desktop - freebsd power to serve logo

Users who use FreeBSD for multiple logins Desktop host or in universities multiple login Desktop  shared user PCs will have problems with mounting CD and DVD Roms, Usbs and other external devices. To mount any of those a root or toor superuser  will be required and this makes a really bad impression to the novice users, making them think FreeBSD is user unfriendly, where in reality it was just build to behave so with higher security in mind.
This ruins a whole user GNOME experience and disappoints the end user, especially if the user is just a person who needs to do some browsing and copy few files from and to the host.
This prevents udevd and auto mount in GNOME and  KDE GUI environments to be unable to automatically mount and unmount CD / DVDs and USBS where plugged or unplugged but instead just poping up permission errors whether CD or USB is attached.
Thanksfully, you can change this behavior to make FreeBSD a bit more user friendly and of course 'less secure' by few simple commands 🙂

Here is how:

freebsd# sysctl -w vfs.usermount=1

vfs.usermount: 0 -> 1

echo 'vfs.usermount=1' >> /etc/sysctl.conf

What is required next is to add all devices which will be mountable by all users in /dev/devfs.conf.

To get a list of devices do:
freebsd# camcontrol devlist

at scbus0 target 0 lun 0 (pass0,da0) at scbus1 target 3 lun 0 (pass1,sa0) at scbus1 target 6 lun 0 (pass2,cd0) #

Most USB devices are recognized and assigned as /dev/da0, and almost all CD and DVD Rom devices will be initialized by kernel as /dev/cd0, however if you get something different just set the appropriate vals.

a) Add permission records for CD / DVD ROM in /etc/devfs.conf
freebsd# echo 'own /dev/da0 root:operator' >> /etc/devfs.conf
freebsd# echo 'perm /dev/da00 0666' >> /etc/devfs.conf

b) Add permission records for USBs in /dev/devfs.conf

freebsd# echo '## allow member of operator to mount cdrom' >> /etc/devfs.conf
freebsd# echo 'own /dev/cd0 root:operator' >> /etc/devfs.conf
freebsd# echo 'perm /dev/cd0 0660' >> /etc/devfs.conf

To allow, all present system users to have access to mount USB, CD / DVD roms, it is necessery to add all users to the operator, group. This is a security bad practice as this will make allow all users to have extra permissions to binaries on the system owned or allowed to be accessed by operator group. However for home computers, where you, your sister and a bunch of good friends have accounts, security shouldn't be of a great concern.

If you know well all your users and you have disabled SSH on the system and security is not of top priority run:

freebsd# /usr/local/bin/bash
root@freebsd~# for i in /home/*; do user=$(echo $i|sed -e 's#/home/##g'); do \
pw groupmod operator -m $user; \
done

Onwards, you can check few users to see to see if they are added to operator group

freebsd$ id
uid=1001(hipo) gid=1001(hipo) groups=1001(hipo),0(wheel),5(operator)

Well that's all now your GNOME hal process – (Hardware Abstraction Layer) will be able to manage CD / DVDs and USBs with no more weird errors.

This article was inspired by cybercity's Allow normal users to mount CDROMs DVDs and USB devices. So thanks 'em for being a source of inspiration.

Enjoy 🙂

How to use Skype from Web from Windows PCs where stand alone desktop client is forbidden to install and use

Saturday, November 3rd, 2012

Skype web login screen - use skype from a web page, website to use skype, skype calls from the internet

I'm studying in HAN University (University of Applied Sciences Arnhem and Nijmegen). There they use Windows Domain Controller systems, where each student can login with his university access account from a Desktop PCs located in the University Library or few other Computer Labs and so called room places (they use to call boxes – where students can use a Desktop PC). Each student account is automatically logged in the central Windows Controller. All PCs in the domain controller are installed to run Windows 7 and user logins are bundled with a bunch of most useful programs, out of this Administrator choosen and university needs programs one cannot install or Run programs.

Therefore one can't Install and Run Skype Desktop Installer without Administrator access on the Domain Controller (group) and since normal user accounts like mine did not have such I'm unable to use Skype. As I need Skype daily not only for enjoyment but also to communicate with people with whom I work, I needed to be able to run Skype on this PCs. I suspected online there should be some possibility to use Skype via some Software as A Service (SAS) application and actually there is the server is called IMO.IM ( http://www.imo.im ) . It is a website via which user can login to a multitude of messengers i.e. :

IMO, Skype, Gtalk, AIM / ICQ, Yahoo, Steam, Jabber, Hyves, Facebook, VKontakte

Before I use the service I was a bit sceptical, cause probably there are many websites out there which are SCAM sites to collect Skype usernames and passwords, thanksfully imo.im turned to not one of this 🙂

skype via web page / use web skype client imo.im - nice web skype chat and skype calls

The interface of imo.im web Skype Clientis really great and very similar and even maybe a bit better than Skype's interface itself. Besides having support for Skype chat it also supports Skype Calls and maybe even Skype Calls with Camera?
I never tested Skype Calls though, so I can't positively confirm if they work or not, but if IMO Skype Calls are probably implemented using Adobe Flash most likely Skype calls should work fine too. Of course from security stand point it is very bad idea to login in imo.im, though password is transferred to it via ( Secure SSL https ) a person determined to sniff and decrypt your SSL connection can still do it if he tries hard. Moreover that probably imo.im, stores the login username and passwords of every user inside their database "for further reference" and "anti-fraud" government policies  🙂

GNOME Desktop environment turns 15 – Happy Birthday GNOME :)

Saturday, August 18th, 2012

Happy 15 birthday to GNOME project

On 15 August one day before Debian Linux birthday and Debian manifesto announcement another important project for free software realm came to existence. On 15 Aug 1997 Miguel de Icaza, posted announcement explaining the major goals of the GNOME – GNOME Desktop project
The original announcement of GNOME Desktop Project can be read here
Last year GNOME has went through severe ups and downs, it was criticized and decredited by many of the true “believers” in the project because of the drastic turn the project does. Lest the ups and down, GNOME project is one of the most succesful free software project and in my view the most succesful FOSS software GUI.

Its interesting fact two major free software projects celebrate birthdays with 1 day difference. This makes August a major month for free softwar 🙂 As a long term Debian and GNOME user I felt obliged to drop few lines in thanks and congrats to GNOME which powers my desktop for 8 years already.

Happy Birthday GNOME! Happy Free Software month ! 🙂
Debian and GNOME happy birthday anniversary

30 years anniversary of the first mass produced portable computer COMPAQ Grid Compass 1011

Thursday, July 19th, 2012

Grid Notebook Big screen logo

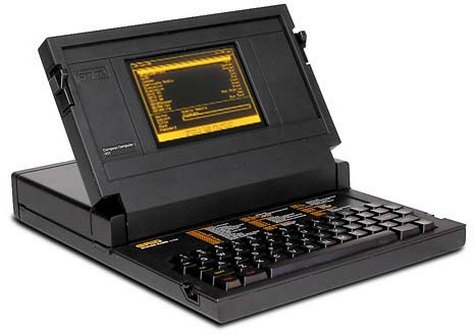
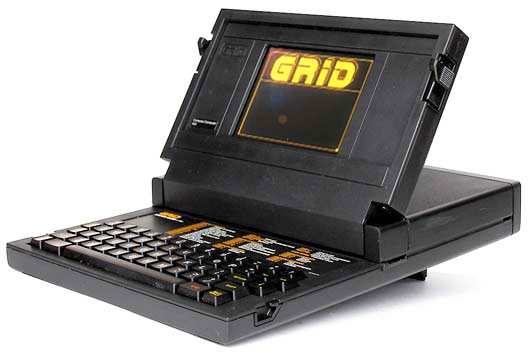
Today it is considered the modern laptop (portable computers) are turning 30 years old. The notebook grandparent is a COMPAQGRiD Compass 1011 – a “mobile computer” with a electroluminescent display (ELD) screen supporting resolution of 320×240 pixels. The screen allowed the user to use the computer console in a text resolution of 80×24 chars. This portable high-tech gadget was equipped with magnesium alloy case, an Inten 8086 CPU (XT processor) at 8Mhz (like my old desktop pravetz pc 😉 ), 340 kilobyte (internal non-removable magnetic bubble memory and even a 1,200 bit/s modem!

COMPAQ Grid Compass considered first laptop / notebook on earthy 30 anniversary of the portable computer

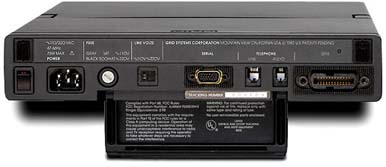
The machine was uniquely compatible for its time as one could easily attach devices such as floppy 5.25 inch drives and external (10 Meg) hard disk via IEEE-488 I/O compatible protocol called GPiB (General Purpose instrumental Bus).

First mass prdocued portable computer laptop grid COMPAQ 11011 back side input peripherals

The laptop had also unique small weight of only 5 kg and a rechargable batteries with a power unit (like modern laptops) connectable to a normal (110/220 V) room plug.

First notebook in World ever the COMPAQ grid Compass 1101,br />
The machine was bundled with an own specificly written OS GRiD-OS. GRID-OS could only run a specialized software so this made the application available a bit limited.
Shortly after market introduction because of the incompitablity of GRID-OS, grid was shipped with MS-DOS v. 2.0.
This primitive laptop computer was developed for serve mainly the needs of business users and military purposes (NASA, U.S. military) etc.

GRID was even used on Space Shuttles during 1980 – 1990s.
The price of the machine in April 1982 when GriD Compass was introduced was the shockingly high – $8150 dollars.

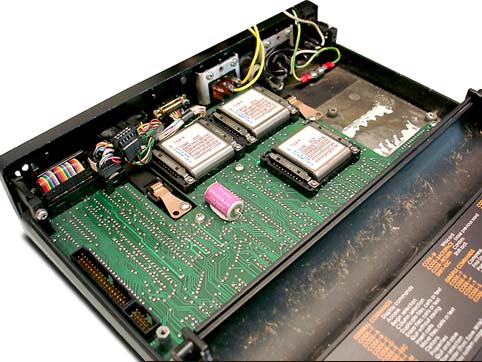
The machine hardware design is quite elegant as you can see on below pic:

 COMPAQ grid laptop 1101 bubbles internal memory

As a computer history geek, I’ve researched further on GRID Compass and found a nice 1:30 hour video telling in detailed presentation retelling the history.

Shortly after COMPAQ’s Grid Compass 1011’s introduction, many other companies started producing similar sized computers; one example for this was the Epson HX-20 notebook. 30 years later, probably around 70% of citizens on the globe owns a laptop or some kind of portable computer device (smartphone, tablet, ultra-book etc.).

Most of computer users owning a desktop nowdays, owns a laptop too for mobility reasons. Interestengly even 30 years later the laptop as we know it is still in a shape (form) very similar to its original predecessor. Today the notebook sales are starting to be overshadowed by tablets and ultra-books (for second quarter laptop sales raised 5% but if compared with 2011, the sales rise is lesser 1.8% – according to data provided by Digital Research agency). There are estimations done by (Forrester Research) pointing until the end of year 2015, sales of notebook substitute portable devices will exceed the overall sales of notebooks. It is manifested today the market dynamics are changing in favour of tabets and the so called next generation laptopsULTRA-BOOKS. It is a mass hype and a marketing lie that Ultra-Books are somehow different from laptops. The difference between a classical laptop and Ultra-Books is the thinner size, less weight and often longer battery use time. Actually Ultra-Books are copying the design concept of Mac MacBook Air trying to resell under a lound name.
Even if in future Ipads, Android tablets, Ultra-Books or whatever kind of mambo-jambo portable devices flood the market, laptops will still be heavily used in future by programmers, office workers, company employees and any person who is in need to do a lot of regular text editting, email use and work with corporative apps. Hence we will see a COMPAC Grid Compass 1011 notebook likes to be dominant until end of the decade.