Posts Tagged ‘email’
Thursday, March 25th, 2010 I faced the task of generating official Validated SSL Certificates by in mydaily duties as a System Administrator at cadiaholding.com . Though generating self-signedSSL certificate is comparatively easy task. It was a pain in the ass setting Apache version 2.2.9-10+lenny6to correctly serve pages through https:// protocol over openssl version 0.9.8g-15+lenny6.I’ll try to go through the whole process of Generating the certificate in order to help some other Debianusers out there to face less setbacks in such a simple task as installing a Trusted SSL Certificate issued(bought) by RapidSSL. Even though this article will mostly deal with SSL certificate issued by RapidSSL,it should be not a problem to apply this methodogy with Verisign or some of the other Geotrust issuedSecure Socket Layer certificates.
In generating the Validated certficate I used enom which is a domain name,ssl certificates, email and hosting company whole-saler.
Fron emon’s website after logging in and using the web interface, there are two major things required to fill inin order to issue your Trusted SSL certificate.
1. Fill in in a form a CSR file, this is usually generated on the Linux server using the openssl.
To issue the CSR file required by Enom use the following commands:
a. First we generate an DES3 RSA encrypted key which we will use next to generate the opeensl CSR file required by ENOM.
debian:~# /usr/bin/openssl genrsa -des3 -out www.domain.com.key 2048

Enter pass phrase for www.domain.com.key:
You’ll be required to fill in a pass-phrase that will be later be required to fill in before Apache servers starts or restarts,so make sure you fill something you either remember or you keep the password stored in a file.
You have to change also the www.domain.com.key in accordance with your domain name.
Now as we already have a proper generated DES3 RSA key afterwards it’s necessery to generate the CSR file with the openssl command line frontend.
So here is how:
debian:~# /usr/bin/openssl req -new -key /home/hipo/www.domain.com.key -out /home/hipo/www.domain.com.csr
Again in the above example change all the paths and file names as you wish.
It’s necessery that the end user fill in a number of questions related to the Certificate Signing Request.
Herein I’ll list what kind of prompts will emerge after executing the above command:
Enter pass phrase for /home/hipo/www.domain.com.key:

You are about to be asked to enter information that will be incorporated

into your certificate request.

What you are about to enter is what is called a Distinguished Name or a DN.

There are quite a few fields but you can leave some blank

For some fields there will be a default value,

If you enter '.', the field will be left blank.

-----

Country Name (2 letter code) [AU]:

State or Province Name (full name) [Some-State]:

Locality Name (eg, city) []:

Organization Name (eg, company) [Internet Widgits Pty Ltd]:

Organizational Unit Name (eg, section) []:

Common Name (eg, YOUR name) []:

Email Address []:

Please enter the following 'extra' attributes

to be sent with your certificate request

A challenge password []:

An optional company name []:
Note that you’ll hav eto fill in the pass phrase previously entered during the generation of the www.domain.com.key file.
In case if you’d like to read more thoroughly on the subject of howto create a Certificate Signing Request or (CSR) as we called it on multiple times, you can read About Certificate Signing Request (CSR) Generation Instructions – Apache SSL more in depth here
2. Hopefully following the above instructions you’ll now have a file named www.domain.csrJust open the www.domain.scr and copy paste it’s content to the ENOM website CSR * webform.
3. Further on select your Webserver type on Enom’s website:In our case we have to select Apache + ApacheSSL
4. What follows next is filling in your company contact information This is also required for proper certificate generation, you have to think twice before you fill in this data, take a note this can’t be changed later on without issuing a brand SSL new certificate.
Apart from the 3 major above requirements to fill in Enom there are some few more radio buttons to use to make some selections according to your personal preferences, however I won’t take time to dig in that and I’ll leave this to you.
After all the above is fulfilled you’ll have to submit your certificate details and choose an email address to which you will receive in a minute a RapidSSL Certificate Request Confirmation
Following a link from the email, will show you some basic information about the certificate about to be generated. That’s your final chance to cancel the issued Trusted Certificated.
If you’re absolutely sure the information about to enter the certificate is correct then you’ll have to follow a link and approve the certificate.
You’ll be informed that you’ll receive your certificate either through Certifier website (e.g. Enom’s website) or via another email.
I thought it’s more probable I receive it via email but anyways I was wrong. More thank 4 hours has passed since the certificate was issued and is available via Enom’s interface but I haven’t received nothing on my mail.
Therefore my friendly advice is to check about your brand new shiny Trusted Certificate on Emom’s website. I had mine ready in about 10 minutes after the CSR was issued.
Assuming that you’ve succesfully obtained the SSL Trusted certificate from RapidSSL what follows is setting up the certificate.
Initially I tried using documentation from RapidSSL website called Installing your SSL Certificate / Web Server Certificate / Secure Server Certificate from RapidSSL.com
I tried to configure one of my Virtualhost as shown in their example inserting in my /etc/apache/sites-available/www.domain.com file, few directives within the VirtualHost something like the shown below
SSLEngine on

# domain.com.crt cointains the Trusted SSL certificate generated and obtained by you from RapidSSL

SSLCertificateFile /etc/apache2/ssl/www.domain.com.crt

# www.domain.com.key contains the file used to generate the CSR file as described earlier in this post

SSLCertificateKeyFile /etc/apache2/ssl/www.domain.com.key
It is also possible insetad of using the SSLCertificateFile and SSLCertificateKeyFile directvies directives in Apache config to use:
Another alternative is to use
SSLCertificateFile /etc/ssl/certs/your-domain-name.crt
SSLCertificateKeyFile /etc/ssl/certs/your-domain-name.key
SSLCACertificateFile /etc/ssl/certs/gd_bundle.crt
The key file is the one generated earlier on the server and handed to the SSL regisrar, the files:
your-domain-name.crt and gd_bundle.crt files are provided by RapidSSL or from whatever SSL registrater the SSL was purchased.
After trying the above configuration and restarting apache with:
/etc/init.d/apache2 restart
Apache failed to start, it might be helpful to somebody out there the error I had in my apache error.log:
The error.log red the following:
[warn] RSA server certificate is a CA certificate (BasicConstraints: CA == TRUE !?)
After some 30 minutes or an hour of Googling on the error I came to the conclusion that the error is caused, becauseApache is supposed to work with .PEM files instead of the classical .CRT and .KEY files asnormally approached in most of the other Unix operating systems.
It took me a bit more of reading on the internet to find out that actually the .pem files so widely adopted in Debian simply contain both the www.domain.com.key file and the www.domain.com.crt key simply pasted one after another, this I also observed from the default Apache self-signed certificate that I believe comes with debian /etc/apache2/ssl/apache.pem .
So I copied both the content of my www.domain.com.key and www.domain.com.crt and store it in one file:
/etc/apache2/ssl/www.domain.com.pem
Also the following configuration:
SSLEngine on

SSLCertificateFile /etc/apache2/ssl/www.domain.com.pem
had to go in your
/etc/apache2/sites-enabled/www.domain.com
Last thing that’s left is to restart your Apache;
/etc/init.d/apache2 restart
Apache will prompt you for your certificate password entered by you during the www.domain.com.key generation. Type your password and with a bit of luck and hopefully with God’s help you’ll be having a Trusted Certificate on your webserver.
Last step is to check if the certificate is okay accessing your domain https://www.domain.com.
Well this is the end of the article, hope you enjoy.If you do please leave your comments, any corrections are also welcomed 🙂
Tags: administrator, apache servers, apache version, apache2, certficate, certificate, Certificates, com, company, contact, csr, DES, des3, domain, domain name, email, emon, enom, file, generation, geotrust, hipo, Hopefully, hosting company, howto, information, key, key file, lenny, linux server, methodogy, multiple times, necessery, official, openssl, pain in the ass, password, phrase, rapidssl, RSA, setbacks, socket layer, ssl certificate, system administrator, usr bin, verisign, web interface, whole saler, www
Posted in Computer Security, System Administration, Web and CMS | 30 Comments »
Friday, April 11th, 2014 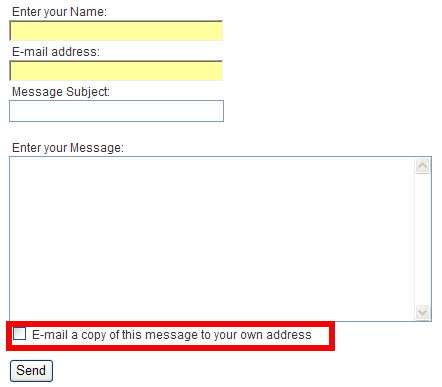
If you happen to have installed Joomla based website and setup a contact form and everything worked fine until recently but suddenly your server starts mysteriously acting as a spam relay – even though email server is perfectly secured against spam.
You probably have some issue with a website email contact form hacked or some vulnerability which allowed hackers to upload spammer php script.
I have a website based on Joomla and just until recently everything was okay until I noticed there are tons of spam flying out from my Qmail mail server (which is configured to check spam with Spamassassin has Bayesian Filtering, Distributed Checksum Claring House, Python Razor and plenty of custom anti-spam rules.
It was just yesterday I ended into that situation, then after evaluating all the hosted website, I've realized Spam issues are caused by an Old Joomla Website Contact form!
There were two issues in the form
in the contact form you have the field with a tick:
1. Well Known Joomla Form Vulnerability
Currently all Joomla (including 1.5.22 and 1.6 versions) are vulnerable to a serious spam relay problem as described in the official Joomla site.
There is a quick dirty workaround fix to contact form vulnerability – disable a Joomla Comonent in ../joomla/components/com_mailto/
To disable it I had to:
cd /var/www/joomla/components
mv com_mailto com_mailtoNOT_USED
Above solution was described under a post resolve joomla spam relay earlier by Anatoliy Dimitrov (after checking closely the website it happened he is a colleague at HP 🙂 )
2. Second issue causing high amount of spam sent over the email server
was: "E-mail a copy of this message to your own address." contact form tick, which was practically enabling any Spammer with a list to inect emails and spam via the form sending copies to any email out on the internet!
You would definitely want to disable "E-mail a copy of this message to your own address."
I wonder why ever any Joomla developer came up with this "spam form"??
Here is the solution to this:
1. Login to Joomla Admin with admin account
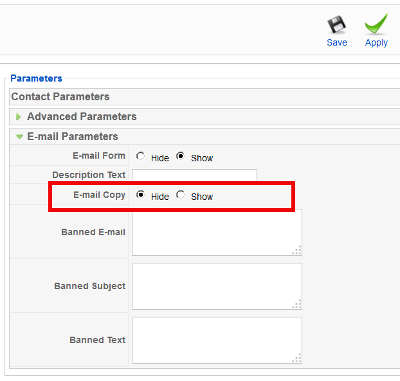
2. Goto Components -> Contacts -> Contacts
3. Click on the relevant Contact form
4. Under Contact Parameters go to Email Parameters
5. Change field E-mail Copy from Show to Hide and click Apply button
And Hooray the E-mail a copy of this message to your own address will be gone from contact form! 🙂
I've seen already plenty of problematic hacked servers and scripts before with Joomla in my last job in International University College – where joomla was heavy used, but I never experienced Joomla Security issues myself 'till know, in future I'm planning to never ever use joomla. Though it is an easy CMS system to setup a website its quite complicated to learn the menus – I remember when creating the problematic website it took me days until I properly setup all the menus and find all joomla components … besides these there is no easy way to migrate between different versions major releases in Joomla like in Wordperss, I guess this Mail Security Issue absolutely convinced me to quit using that piece of crap in future.
In mean Time another very serious Apache security flaw leaked on the Internet just few days ago – The OpenSSL Hearbleed Bug. Thanksfully I'm not running SSL anywhere on my website but many systems are affecting making most of your SSL communication with your Internet banking, E-mail etc. in danger. If you're running Apache with SSL make sure you test it for this vulnerability. Here is description of Heartbleed SSL Critical Vulnerability.

"The Heartbleed Bug is a serious vulnerability in the popular OpenSSL cryptographic software library. This weakness allows stealing the information protected, under normal conditions, by the SSL/TLS encryption used to secure the Internet. SSL/TLS provides communication security and privacy over the Internet for applications such as web, email, instant messaging (IM) and some virtual private networks (VPNs).
The Heartbleed bug allows anyone on the Internet to read the memory of the systems protected by the vulnerable versions of the OpenSSL software. This compromises the secret keys used to identify the service providers and to encrypt the traffic, the names and passwords of the users and the actual content. This allows attackers to eavesdrop on communications, steal data directly from the services and users and to impersonate services and users."
11
Tags: admin, Click, contact, copy, Disable E-mail, email, Email Parameters, form, International University College, Internet, Joomla, Joomla Admin, message, setup, solution, spam, SSL, Stop, vulnerability, website
Posted in System Administration, Web and CMS | 2 Comments »
Monday, August 25th, 2014 
I'm owning ZTE Blade 3 chineese brand mobile phone. I thought there is not a big deal to buy chineese mobile phone as it saves money but the good old saying: "The Cheap always is more expensive" came true to proof the old wisdom.
The phone runs some Android port of version 4.0.4 and generally it runs well for a couple of days, but after the increase of application the battery started discharging too quickly, I have to charge almost daily … also occasionally since I have turned synchronization of mobile phone numbers with Google from settings the ZTE Andorid phone started to randomly loose its contacts (after which I had to restore with proprietary application Dr. Fone). After a while I realized there is another fix, sometimes Contacts restore was also possible through using free application Contacts Sync Fix, but most of the times the only thing that could resolve the contacts is to dig for lost phonebook contacts with Dr. Fone …. Eventually I realized the Lost PhoneBook Contacts issue can be resolved by itself on a random principle so the missing phones issue sometimes solved by itself just by switching off complete the phone for some time and switching it on again after 12 hours?! Recently I found another alternative way to restore sudden (deleted) disappered phone numbers by:
Settings -> Profiles and Synchronization -> (Go to configured gmail account settings) -> Settings of Profile
Then
(Frequency of syncrhonization, messaging etc.) -> (click over the email address) -> Frequency of email check (every 4 hours)
Set the every 4 hours settings to Never and then after a minute or 2 (interval), set back the Never (opt) to every 4 hours
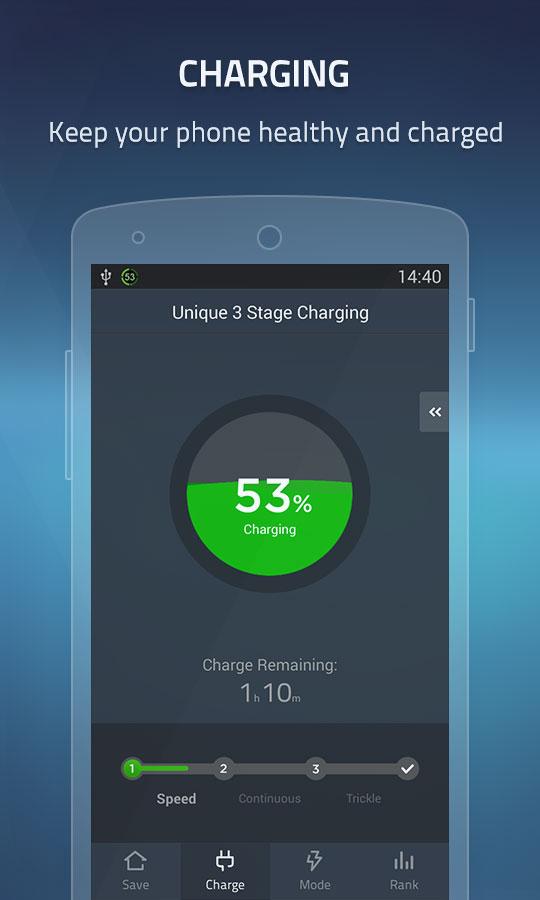
Since some time I started facing another more severe problem – random phone reboots after which the battery often kept at a critically low charged. The batter often fall to 40% or 50% charge from 99% / 100% charge, and after some time of talking over the phone the battery fall down to as low as 18% and in a short random time it fall to 9%, then after a reboot it uppered the charge to 35% or 45% and the oddities continued. My first guess was it could be the battery being broken, some colleagues at work advised me to completely discharge the battery so the phone couldn't boot and then try to charge it with Battery Doctor free Android Application. Battery Doctor has a special 3 stage charging:
1. Bulk Charge
The primary purpose of a battery charger is to recharge a battery. This first stage is typically where the highest voltage and amperage the charger is rated for will actually be used. The level of charge that can be applied without overheating the battery is known as the battery's natural absorption rate. For a typical 12 volt AGM battery, the charging voltage going into a battery will reach 14.6-14.8 volts.
Where first 80% of the battery are charged with a rapid electricity influx to battery once 80% of battery charge is reached charging is moved to the so Absorption Battery Charge
2. Absorption Charge
Smart chargers will detect voltage and resistance from the battery prior to charging. After reading the battery the charger determines which stage to properly charge at. Once the battery has reached 80%* state of charge, the charger will enter the absorption stage. At this point most chargers will maintain a steady voltage, while the amperage declines. The lower current going into the battery safely brings up the charge on the battery without overheating it. This charge phase takes much longer time to charge.
Then comes the final charging state Float Charge
3. Float Charge
Some chargers enter float mode as early as 85% state of charge but others begin closer to 95%. Either way, the float stage brings the battery all the way through and maintains the 100% state of charge. The voltage will taper down and maintain at a steady 13.2-13.4 volts, which is the maximum voltage a 12 volt battery can hold. This charging is also known as "trickle charging". Float Charging battery electricity influx is so small that you can leave the phone to charge in this mode for days (if you like).
But guess what, after I tried to completely discharge the battery, it discharged to a state where it auto rebooted just before Android boots and reboots again and again, after nothing happened for about 2 hours of leaving the phone to automatically rebooted I decided to try the Battery Doctor 3 stage charging without having my battery completely dried out. The 3 Stage Charging is also known as Android Battery Calibration process and as I heard it helped fix many people's battery which for some reason got their Android battery in a broken state without physically substituting it.
Unfortunately In my case using Battery Doctor didn't help … so after spending time to read on some forum threads finally found this one. There many Bulgarians complained for buying ZTE Blade III and Huawei variations from the 3 major stream bulgarian mobile phone operators – M-Tel, Vivacom and Globul and shortly after experiencing the strange random chineese smart phone reboots. Some suggested that the Android Kernel is causing the issues or the firmware and suggested Phone Software Reset, however as I red most people that tried to solve it that way reported this doesn't solve it. Many People said to have shipped the phone as it was in a warranty back to services and phones were given back often with flushed firmware and in a little while the problem re-occured, some reported of another strange fix – a tiny sticky thing which kept the battery more stable?!! 🙂

Yes I know it looks kinda of insane … as this little holder could be any piece of paper and many reported to have fix the random battery charge drop down by sticking a tiny piece of paper between the battery and mobile shell I try it myself and GUESS WHAT?? IT WORKED !!! :)))
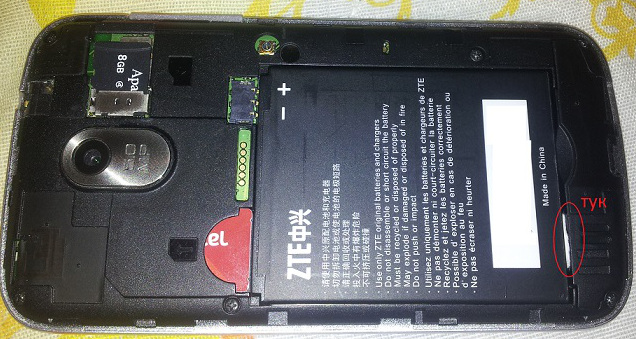
This is pretty much the Bulgarian and Russian primitive way to fix things but it works 🙂 I was exceedingly happy as I already have spend plenty of money for this mobile and I really was unwilling to buy another phone and it was out of warranty. I guess the whole issues started after I have occasionally dropped my phone on a couple of times on the ground and some little piece of plastic holding the battery eroded or whatever … Anyways the PAPER WAY WORKS! Cheers and hope this saves someone else out there from having to spend on new mobile!
Hooray !!! Thanks goes to the Lord Jesus Christ for Everything, for helping me solve it ! 🙂
Tags: Absorption Charge, Battery Doctor, Bulk Charge, chineese, Contacts Sync Fix, couple of days, electricity, email, fix random reboot android problem, Float Charge, guess, mobile phone, Set, spending time, state, thing, time, zte blade 3 fix random restarts
Posted in Curious Facts, Everyday Life, Mobile Phone Apps & Games, Various | 3 Comments »
Monday, February 17th, 2014 I'm using Mozilla Thunderbird over the last 5 years in my life. Just now in my new job place in Hewlett Packard, in order to have well functional mail (with exchange server) – I started using Microsoft Outlook.
Logically a little while after I started my work I have to update my Outlook E-mail signature to reflect my contact details (job position title, email, stand-alone / mobile phone, office address etc.). As of moment of writting I'm using Microsoft Outlook 14.0.6123.5001 (32 bit) part of Microsoft Office Professional Plus 2010.
Its a kind of irony that I had to use Microsoft products after all these years trying my best to avoid using Microsoft technologies but heh, this is life … Though this article will be a bit trivial I decided to blog it because already I had to change email signature for a 3rd time over the last 3 months and every now and then after a month time I tend to forget how I did it last time.
Here is how I changed Email Signature in Outlook:
1. Click on "New-Email" (located below File menu)
2. Click on "Insert" (menu tab)
3. Click on "Signature"
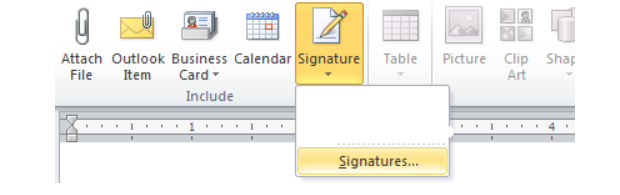
4. Click on "New" button
As you see Outlook is written in very intelligent manner 🙂
It is possible to have more than one signature and change them every now and then (I guess that's made for Schizophrenic people who like changing their signature a couple of times a day accepting different personalities 🙂 🙂 🙂
For already existing signatures just edit the old one – click on Edit Signature

http://www.clarion.edu/273437/
Perform steps 1-4 in ('Create Signatures') except click "Rename button instead of 'New' and begin typing new name.
Perform steps 1-4 in ('Create Signatures') except click 'Delete" button instead of 'New'.
Highlight signature name you wish to modify under
-
"Select Signature to Edit" then modify signature.
-
Click "Save" button to save any signature changes made.
Tags: bit, Click, Click Save, contact, Delete Signatures, Edit Signature, email, hewlett packard, How to, last, last time, Microsoft Outlook, Modify Signatures, mozilla thunderbird, New, Rename, Rename Signatures, signatures, time, update, www
Posted in Everyday Life, Outlook, Various, Windows | No Comments »
Monday, April 2nd, 2012 I've hit an interesting article explaining how to check unread gmail email messages in Linux terminal. The original article is here
Being able to read your latest gmail emails in terminal/console is great thing, especially for console geeks like me.
Here is the one liner script:
curl -u GMAIL-USERNAME@gmail.com:SECRET-PASSWORD \

--silent "https://mail.google.com/mail/feed/atom" | tr -d '\n' \

| awk -F '' '{for (i=2; i<=NF; i++) {print $i}}' \

| sed -n "s/
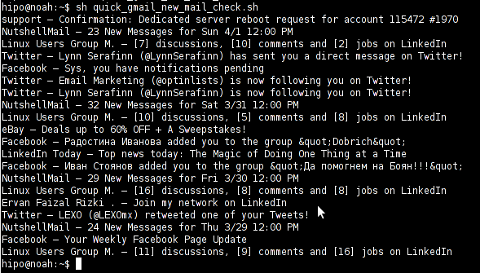
Linux Users Group M. – [7] discussions, [10] comments and [2] jobs on LinkedIn

Twitter – Lynn Serafinn (@LynnSerafinn) has sent you a direct message on Twitter!

Facebook – Sys, you have notifications pending

Twitter – Email Marketing (@optinlists) is now following you on Twitter!

Twitter – Lynn Serafinn (@LynnSerafinn) is now following you on Twitter!

NutshellMail – 32 New Messages for Sat 3/31 12:00 PM

Linux Users Group M. – [10] discussions, [5] comments and [8] jobs on LinkedIn

eBay – Deals up to 60% OFF + A Sweepstakes!

LinkedIn Today – Top news today: The Magic of Doing One Thing at a Time

NutshellMail – 29 New Messages for Fri 3/30 12:00 PM

Linux Users Group M. – [16] discussions, [8] comments and [8] jobs on LinkedIn

Ervan Faizal Rizki . – Join my network on LinkedIn

Twitter – LEXO (@LEXOmx) retweeted one of your Tweets!

NutshellMail – 24 New Messages for Thu 3/29 12:00 PM

Facebook – Your Weekly Facebook Page Update

Linux Users Group M. – [11] discussions, [9] comments and [16] jobs on LinkedIn
As you see this one liner uses curl to fetch the information from mail.google.com's atom feed and then uses awk and sed to parse the returned content and make it suitable for display.
If you want to use the script every now and then on a Linux server or your Linux desktop you can download the above code in a script file -quick_gmail_new_mail_check.sh here
Here is a screenshot of script's returned output:
A good use of a modified version of the script is in conjunction with a 15 minutes cron job to launch for new gmail mails and launch your favourite desktop mail client.
This method is useful if you don't want a constant hanging Thunderbird or Evolution, pop3 / imap client on your system to just take up memory or dangle down the window list.
I've done a little modification to the script to simply, launch a predefined email reader program, if gmail atom feed returns new unread mails are available, check or download my check_gmail_unread_mail.sh here
Bear in mind, on occasions of errors with incorrect username or password, the script will not return any errors. The script is missing a properer error handling.Therefore, before you use the script make sure:
gmail_username='YOUR-USERNAME';

gmail_password='YOUR-PASSWORD';
are 100% correct.
To launch the script on 15 minutes cronjob, put it somewhere and place a cron in (non-root) user:
# crontab -u root -e

...

*/15 * * * * /path/to/check_gmail_unread_mail.sh
Once you read your new emails in lets say Thunderbird, close it and on the next delivered unread gmail mails, your mail client will pop up by itself again. Once the mail client is closed the script execution will be terminated.
Consised that if you get too frequently gmail emails, using the script might be annoying as every 15 minutes your mail client will be re-opened.
If you use any of the shell scripts, make sure there are well secured (make it owned only by you). The gmail username and pass are in plain text, so someone can steal your password, very easily. For a one user Linux desktops systems as my case, security is not such a big concern, putting my user only readable script permissions (e.g. chmod 0700)is enough.
Tags: article, atom, Auto, awk, client, com, cron, Desktop, download, Draft, ebay, email, email marketing, email messages, facebook, Fri, geeks, Gmail, GMAIL-USERNAME, GNU, gnu linux, google, Group, https mail, liner, LinkedIn, Linux, linux server, linux users group, mail, marketing, news today, OFF, original article, password, quot, rizki, sat 3, script, SECRET-PASSWORD, terminal, thing, top news, twitter, username, Users, Weekly
Posted in Linux, System Administration, Various | 2 Comments »
Monday, March 26th, 2012 
I had to install two PHPBB based internet forums, some long time ago. Since long time passed and I haven't checked what's happening with them I just noticed. They start filling up spam threads. The phpbb installations are done using the standard shipped deb packages in Debian Linux Lenny.
After checking online, I found one smart solution to . The idea is very simple most spam bots are written in a way that they don't have a properly set timezone. Therefore the quickest way to get rid of spam bots which try to auto register and put spam content inside the a forum category or post is to add a simple if condition in php to check the browser set timezone:
The file to add the php if condition is ucp_register.phpThe phpbb package install places default phpbb path on Debian is /usr/share/phpbb3/ and hence the file I had to modify is located in:
/usr/share/phpbb3/www/includes/ucp/ucp_register.php
To make the TZ check one needs to modify ../www/includes/ucp/ucp_register.php and look for php array definition:
$data = array(

'username' => utf8_normalize_nfc(request_var('username', '', true)),

'new_password' => request_var('new_password', '', true),

'password_confirm' => request_var('password_confirm', '', true),

'email' => strtolower(request_var('email', '')),

'email_confirm' => strtolower(request_var('email_confirm', '')),

'confirm_code' => request_var('confirm_code', ''),

'lang' => basename(request_var('lang', $user->lang_name)),

'tz' => request_var('tz', (float) $timezone),

);
Right after this chunk of code add the if condition code which is like so:
if ($data['tz'] == '-12.00')

{

die('Die, bot! Die.');

}
From now onwards, any attempt for new user registration with an incorrect timezone of -12.00 will be immediately stopped while the forum spammer bot will be offered an empty page 🙂
Another good practice is to disable Birthday Listing from phpbb Admin Control panel (ACP). Go to menus:
ACP -> General -> Board Settings -> Enable Birthday listing: (No)
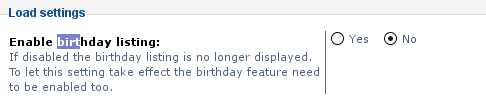
I like disabling birthday listing, as when it is enabled and you have some spammer registrations, which even though didn't succeeded to contaminate your forum content has specified a birthday and therefore there profiles gets popping up each different day on the main page of the forum.
This will not eradicate all spammer bots, but at least will significantly decrease spammer bot registrations.
Tags: array definition, Auto, checking, chunk, code 39, deb, deb packages, Debian, debian gnu, debian linux, Draft, email, forum, forum category, GNU, Internet, internet forum, internet forums, Linux, long time, online, PHPBB, smart solution, solution, spam, spam bots, threads, time
Posted in System Administration, Web and CMS | No Comments »
Monday, March 12th, 2012 
One of the WordPress websites hosted on our dedicated server produces all the time a wp-cron.php 404 error messages like:
xxx.xxx.xxx.xxx - - [15/Apr/2010:06:32:12 -0600] "POST /wp-cron.php?doing_wp_cron HTTP/1.0
I did not know until recently, whatwp-cron.php does, so I checked in google and red a bit. Many of the places, I've red are aa bit unclear and doesn't give good exlanation on what exactly wp-cron.php does. I wrote this post in hope it will shed some more light on wp-config.php and how this major 404 issue is solved..
So
what is wp-cron.php doing?
- wp-cron.php is acting like a cron scheduler for WordPress.
- wp-cron.php is a wp file that controls routine actions for particular WordPress install.
- Updates the data in SQL database on every, request, every day or every hour etc. – (depending on how it's set up.).
- wp-cron.php executes automatically by default after EVERY PAGE LOAD!
- Checks all pending comments for spam with Akismet (if akismet or anti-spam plugin alike is installed)
- Sends all scheduled emails (e.g. sent a commentor email when someone comments on his comment functionality, sent newsletter subscribed persons emails etc.)
- Post online scheduled articles for a day and time of particular day
Suppose you're writting a new post and you want to take advantage of WordPress functionality to schedule a post to appear Online at specific time:
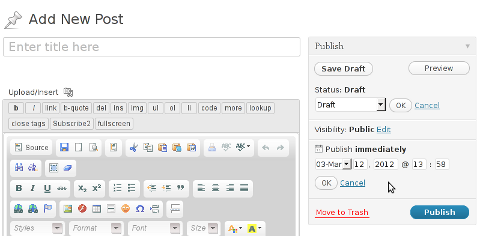
The Publish Immediately, field execution is being issued on the scheduled time thanks to the wp-cron.php periodic invocation.
Another example for wp-cron.php operation is in handling flushing of WP old HTML Caches generated by some wordpress caching plugin like W3 Total Cache
wp-cron.php takes care for dozens of other stuff silently in the background. That's why many wordpress plugins are depending heavily on wp-cron.php proper periodic execution. Therefore if something is wrong with wp-config.php, this makes wordpress based blog or website partially working or not working at all.
Our company wp-cron.php errors case
In our case the:
212.235.185.131 – – [15/Apr/2010:06:32:12 -0600] "POST /wp-cron.php?doing_wp_cron HTTP/1.0" 404
is occuring in Apache access.log (after each unique vistor request to wordpress!.), this is cause wp-cron.php is invoked on each new site visitor site request.
This puts a "vain load" on the Apache Server, attempting constatly to invoke the script … always returning not found 404 err.
As a consequence, the WP website experiences "weird" problems all the time. An illustration of a problem caused by the impoper wp-cron.php execution is when we are adding new plugins to WP.
Lets say a new wordpress extension is download, installed and enabled in order to add new useful functioanlity to the site.
Most of the time this new plugin would be malfunctioning if for example it is prepared to add some kind of new html form or change something on some or all the wordpress HTML generated pages.
This troubles are result of wp-config.php's inability to update settings in wp SQL database, after each new user request to our site.
So the newly added plugin website functionality is not showing up at all, until WP cache directory is manually deleted with rm -rf /var/www/blog/wp-content/cache/…
I don't know how thi whole wp-config.php mess occured, however my guess is whoever installed this wordpress has messed something in the install procedure.
Anyways, as I researched thoroughfully, I red many people complaining of having experienced same wp-config.php 404 errs. As I red, most of the people troubles were caused by their shared hosting prohibiting the wp-cron.php execution.
It appears many shared hostings providers choose, to disable the wordpress default wp-cron.php execution. The reason is probably the script puts heavy load on shared hosting servers and makes troubles with server overloads.
Anyhow, since our company server is adedicated server I can tell for sure in our case wordpress had no restrictions for how and when wp-cron.php is invoked.
I've seen also some posts online claiming, the wp-cron.php issues are caused of improper localhost records in /etc/hosts, after a thorough examination I did not found any hosts problems:
hipo@debian:~$ grep -i 127.0.0.1 /etc/hosts

127.0.0.1 localhost.localdomain localhost
You see from below paste, our server, /etc/hosts has perfectly correct 127.0.0.1 records.
Changing default way wp-cron.php is executed
As I've learned it is generally a good idea for WordPress based websites which contain tens of thousands of visitors, to alter the default way wp-cron.php is handled. Doing so will achieve some efficiency and improve server hardware utilization.
Invoking the script, after each visitor request can put a heavy "useless" burden on the server CPU. In most wordpress based websites, the script did not need to make frequent changes in the DB, as new comments in posts did not happen often. In most wordpress installs out there, big changes in the wordpress are not common.
Therefore, a good frequency to exec wp-cron.php, for wordpress blogs getting only a couple of user comments per hour is, half an hour cron routine.
To disable automatic invocation of wp-cron.php, after each visitor request open /var/www/blog/wp-config.php and nearby the line 30 or 40, put:
define('DISABLE_WP_CRON', true);
An important note to make here is that it makes sense the position in wp-config.php, where define('DISABLE_WP_CRON', true); is placed. If for instance you put it at the end of file or near the end of the file, this setting will not take affect.
With that said be sure to put the variable define, somewhere along the file initial defines or it will not work.
Next, with Apache non-root privileged user lets say www-data, httpd, www depending on the Linux distribution or BSD Unix type add a php CLI line to invoke wp-cron.php every half an hour:
linux:~# crontab -u www-data -e
0,30 * * * * cd /var/www/blog; /usr/bin/php /var/www/blog/wp-cron.php 2>&1 >/dev/null
To assure, the php CLI (Command Language Interface) interpreter is capable of properly interpreting the wp-cron.php, check wp-cron.php for syntax errors with cmd:
linux:~# php -l /var/www/blog/wp-cron.php

No syntax errors detected in /var/www/blog/wp-cron.php
That's all, 404 wp-cron.php error messages will not appear anymore in access.log! 🙂
Just for those who can find the root of the /wp-cron.php?doing_wp_cron HTTP/1.0" 404 and fix the issue in some other way (I'll be glad to know how?), there is also another external way to invoke wp-cron.php with a request directly to the webserver with short cron invocation via wget or lynx text browser.
– Here is how to call wp-cron.php every half an hour with lynxPut inside any non-privileged user, something like:
01,30 * * * * /usr/bin/lynx -dump "http://www.your-domain-url.com/wp-cron.php?doing_wp_cron" 2>&1 >/dev/null
– Call wp-cron.php every 30 mins with wget:
01,30 * * * * /usr/bin/wget -q "http://www.your-domain-url.com/wp-cron.php?doing_wp_cron"
Invoke the wp-cron.php less frequently, saves the server from processing the wp-cron.php thousands of useless times.
Altering the way wp-cron.php works should be seen immediately as the reduced server load should drop a bit.
Consider you might need to play with the script exec frequency until you get, best fit cron timing. For my company case there are only up to 3 new article posted a week, hence too high frequence of wp-cron.php invocations is useless.
With blog where new posts occur once a day a script schedule frequency of 6 up to 12 hours should be ok.
Tags: akismet, Auto, caches, checks, commentor, cr, cron, daySuppose, dedicated server, doesn, dozens, Draft, email, error messages, execution, exlanation, file, google, HTML, HTTP, invocation, localhost, nbsp, newsletter, operation, periodic execution, php, plugin, quot, request, scheduler, someone, something, spam, SQL, time, time thanks, Wordpress, wordpress plugins, wp
Posted in System Administration, Web and CMS, Wordpress | 3 Comments »
Friday, October 28th, 2011 One of the qmail servers I manage today has started returning strange errors in Squirrel webmail and via POP3/IMAP connections with Thunderbird.
What was rather strange is if the email doesn’t contain a link to a webpage or and attachment, e.g. mail consists of just plain text the mail was sent properly, if not however it failed to sent with an error message of:
Requested action aborted: error in processing Server replied: 451 qq temporary problem (#4.3.0)
After looking up in the logs and some quick search in Google, I come across some online threads reporting that the whole issues are caused by malfunction of the qmail-scanner.pl (script checking mail for viruses).
After a close examination on what is happening I found out /usr/sbin/clamd was not running at all?!
Then I remembered a bit earlier I applied some updates on the server with apt-get update && apt-get upgrade , some of the packages which were updated were exactly clamav-daemon and clamav-freshclam .
Hence, the reason for the error:
451 qq temporary problem (#4.3.0)
was pretty obvious qmail-scanner.pl which is using the clamd daemon to check incoming and outgoing mail for viruses failed to respond, so any mail which contained any content which needed to go through clamd for a check and returned back to qmail-scanner.pl did not make it and therefore qmail returned the weird error message.
Apparently for some reason apparently the earlier update of clamav-daemon failed to properly restart, the init script /etc/init.d/clamav-daemon .
Following fix was very simple all I had to do is launch clamav-daemon again:
linux:~# /etc/inid.d/clamav-daemon restart
Afterwards the error is gone and all mails worked just fine 😉
Tags: action, amp, cause and solution, checking, Clamav, clamd, daemon, email, examination, fine, fix, g mail, google, imap connections, init script, link, logs, mail, online, outgoing mail, pl script, processing, Qmail, qq, reason, Requested, scanner, Search, servers, solution, Squirrel, strange errors, Thunderbird, today, update, usr, Viruses, weird error message
Posted in Linux, Qmail, System Administration | No Comments »
Wednesday, August 24th, 2011 I’ve been playing with configuring a new nagios running on a Linux host which’s aim is to monitor few Windows servers.
The Linux host’s exim is configured to act as relay host to another SMTP server, so all email ending up in the Linux localhost on port 25 is forwarded to the remote SMTP.
The remote smtp only allows the Linux to send email only in case if a real existing username@theserverhostname.com is passed it, otherwise it rejects mail and does not sent properly the email.
As the newly configured Nagios installatio is supposed to do e-mail notification, I was looking for a way to change the default user with which Nagios sends mails, which is inherited directly after the username with which /usr/sbin/nagios3 and /usr/sbin/nrpe are running (on Debian this is nagios@theserverhostname.com).
Thanksfully, there is a work around, I’ve red some forum threads explaning that the username with whch nagios sends mail can be easily changed from /etc/nagios3/commands.cfg by passing the -a “From: custom_user@myserverhostname.com” to all occurance of /usr/bin/mail -s , its preferrable that the -a custom_user@myserverhostname.com is inserted before the -s “” subject option. Hence the occurance of mail command should be changed from:
| /usr/bin/mail -s "** $NOTIFICATIONTYPE$
To:
| /usr/bin/mail -a "From: custom_user@theserverhostname.com" -s "** $NOTIFICATIONTYPE$
Now to read it’s new configurations nagios requirs restart:
debian:~# /etc/init.d/nagios3 restart

...
Now in case of failed services or Hosts Down nagios will send it’s mail from the custom user custom_user@theserverhostname.com and nagios can can send mail properly via the remote relay SMTP host 😉
Tags: aim, com, command, custom, debian gnu, default user, e mail notification, email, exim, forum, forum threads, gnu linux, hosts, Linux, linux host, localhost, mail command, myserverhostname, nagios, notification, NOTIFICATIONTYPE, occurance, option, port, preferrable, relay, smtp server, Thanksfully, theserverhostname, username, usr, way, whch, windows servers, work
Posted in FreeBSD, Linux, System Administration | No Comments »
Monday, June 13th, 2011 I needed to check my mail via ssh connection, as my installed squirrelmail is curently broken and I’m away from my own personal computer.
I did some online research on how this can be achieved and thanksfully I finallyfound a way to check my pop3 and imap mailbox with a console client called alpine , better known in unix community under the name pine .
I installed pine on my Debian with apt:
debian:~# apt-get install alpine
Here is my pine configuration file .pinerc used to fetch my mail with pine:
a .pinerc conf file to check my pop3 mail
To use that file I placed it in my home directory ~/ , e.g.:
debian:~# wget https://www.pc-freak.net/files/.pinerc

...
To attune the pop3 server configuration in the sample .pinerc above one needs to change the value of:
inbox-path=
For example to configure pine to fetch mail from the pop3 server mail.www.pc-freak.net and store it locally in my home directory within a file called INBOX
I have configured the inbox-path .pinerc variable to look like so:
inbox-path={mail.www.pc-freak.net/pop3/user=hipo@www.pc-freak.net}INBOX
In above configuration’s inbox-path variable configuration the /pop3/ specifies I want to fetch my mail via the pop3 protocol , if one wants to use imap this has to be substituted with /imap/
The value user=hipo@www.pc-freak.net specifies my vpopmail created user which in my case is obviously hipo@www.pc-freak.net
The other variables which are good to be changed in .pinerc config are:
personal-name=
This variable has to be set to the name of the Email Sender which will be set, if pine is used to send email.
I also changed the user-domain variable as it’s used to set the domain name from which the pine client will send the emails from:
As my domain is www.pc-freak.net I’ve set the domain name variable to be:
user-domain=www.pc-freak.net
Now after launching pine it prompted me for my email password, putting in the pass did fetch all my new unread mails via pop3 protocol.
The only annoying thing was that each time I quit pine and start it up again, I’m now asked to enter the email password.
This behaviour is really shitty, but thanksfully one can easily workaround that by letting pine be constantly running detached in gni screen session.
Tags: alpine, Auto, case, client, community, Computer, conf, config, configuration file, configure, connection, domain pc, Draft, email, email password, email sender, example, file, finallyfound, freak, hipo, home directory, imap, inbox, mail, mailbox, name, online, own personal computer, password, personal name, pine configuration, pinerc, pop, pop3 mail, pop3 protocol, pop3 server, Protocol, screen, server configuration, server mail, session, squirrelmail, ssh, time, unix, unix community, value, variables, vpopmail, way, wget
Posted in Linux, Various | No Comments »


How to resolve (fix) WordPress wp-cron.php errors like “POST /wp-cron.php?doing_wp_cron HTTP/1.0″ 404” / What is wp-cron.php and what it does
Monday, March 12th, 2012One of the WordPress websites hosted on our dedicated server produces all the time a wp-cron.php 404 error messages like:
xxx.xxx.xxx.xxx - - [15/Apr/2010:06:32:12 -0600] "POST /wp-cron.php?doing_wp_cron HTTP/1.0
I did not know until recently, whatwp-cron.php does, so I checked in google and red a bit. Many of the places, I've red are aa bit unclear and doesn't give good exlanation on what exactly wp-cron.php does. I wrote this post in hope it will shed some more light on wp-config.php and how this major 404 issue is solved..
So
what is wp-cron.php doing?
Suppose you're writting a new post and you want to take advantage of WordPress functionality to schedule a post to appear Online at specific time:
The Publish Immediately, field execution is being issued on the scheduled time thanks to the wp-cron.php periodic invocation.
Another example for wp-cron.php operation is in handling flushing of WP old HTML Caches generated by some wordpress caching plugin like W3 Total Cache
wp-cron.php takes care for dozens of other stuff silently in the background. That's why many wordpress plugins are depending heavily on wp-cron.php proper periodic execution. Therefore if something is wrong with wp-config.php, this makes wordpress based blog or website partially working or not working at all.
Our company wp-cron.php errors case
In our case the:
212.235.185.131 – – [15/Apr/2010:06:32:12 -0600] "POST /wp-cron.php?doing_wp_cron HTTP/1.0" 404
is occuring in Apache access.log (after each unique vistor request to wordpress!.), this is cause wp-cron.php is invoked on each new site visitor site request.
This puts a "vain load" on the Apache Server, attempting constatly to invoke the script … always returning not found 404 err.
As a consequence, the WP website experiences "weird" problems all the time. An illustration of a problem caused by the impoper wp-cron.php execution is when we are adding new plugins to WP.
Lets say a new wordpress extension is download, installed and enabled in order to add new useful functioanlity to the site.
Most of the time this new plugin would be malfunctioning if for example it is prepared to add some kind of new html form or change something on some or all the wordpress HTML generated pages.WP cache directory is manually deleted with rm -rf /var/www/blog/wp-content/cache/…
This troubles are result of wp-config.php's inability to update settings in wp SQL database, after each new user request to our site.
So the newly added plugin website functionality is not showing up at all, until
I don't know how thi whole wp-config.php mess occured, however my guess is whoever installed this wordpress has messed something in the install procedure.
Anyways, as I researched thoroughfully, I red many people complaining of having experienced same wp-config.php 404 errs. As I red, most of the people troubles were caused by their shared hosting prohibiting the wp-cron.php execution.
It appears many shared hostings providers choose, to disable the wordpress default wp-cron.php execution. The reason is probably the script puts heavy load on shared hosting servers and makes troubles with server overloads.
Anyhow, since our company server is adedicated server I can tell for sure in our case wordpress had no restrictions for how and when wp-cron.php is invoked.
I've seen also some posts online claiming, the wp-cron.php issues are caused of improper localhost records in /etc/hosts, after a thorough examination I did not found any hosts problems:
hipo@debian:~$ grep -i 127.0.0.1 /etc/hosts
127.0.0.1 localhost.localdomain localhost
You see from below paste, our server, /etc/hosts has perfectly correct 127.0.0.1 records.
Changing default way wp-cron.php is executed
As I've learned it is generally a good idea for WordPress based websites which contain tens of thousands of visitors, to alter the default way wp-cron.php is handled. Doing so will achieve some efficiency and improve server hardware utilization.
Invoking the script, after each visitor request can put a heavy "useless" burden on the server CPU. In most wordpress based websites, the script did not need to make frequent changes in the DB, as new comments in posts did not happen often. In most wordpress installs out there, big changes in the wordpress are not common.
Therefore, a good frequency to exec wp-cron.php, for wordpress blogs getting only a couple of user comments per hour is, half an hour cron routine.
To disable automatic invocation of wp-cron.php, after each visitor request open /var/www/blog/wp-config.php and nearby the line 30 or 40, put:
define('DISABLE_WP_CRON', true);
An important note to make here is that it makes sense the position in wp-config.php, where define('DISABLE_WP_CRON', true); is placed. If for instance you put it at the end of file or near the end of the file, this setting will not take affect.
With that said be sure to put the variable define, somewhere along the file initial defines or it will not work.
Next, with Apache non-root privileged user lets say www-data, httpd, www depending on the Linux distribution or BSD Unix type add a php CLI line to invoke wp-cron.php every half an hour:
linux:~# crontab -u www-data -e
0,30 * * * * cd /var/www/blog; /usr/bin/php /var/www/blog/wp-cron.php 2>&1 >/dev/null
To assure, the php CLI (Command Language Interface) interpreter is capable of properly interpreting the wp-cron.php, check wp-cron.php for syntax errors with cmd:
linux:~# php -l /var/www/blog/wp-cron.php
No syntax errors detected in /var/www/blog/wp-cron.php
That's all, 404 wp-cron.php error messages will not appear anymore in access.log! 🙂
Just for those who can find the root of the /wp-cron.php?doing_wp_cron HTTP/1.0" 404 and fix the issue in some other way (I'll be glad to know how?), there is also another external way to invoke wp-cron.php with a request directly to the webserver with short cron invocation via wget or lynx text browser.
– Here is how to call wp-cron.php every half an hour with lynxPut inside any non-privileged user, something like:
01,30 * * * * /usr/bin/lynx -dump "http://www.your-domain-url.com/wp-cron.php?doing_wp_cron" 2>&1 >/dev/null
– Call wp-cron.php every 30 mins with wget:
01,30 * * * * /usr/bin/wget -q "http://www.your-domain-url.com/wp-cron.php?doing_wp_cron"
Invoke the wp-cron.php less frequently, saves the server from processing the wp-cron.php thousands of useless times.
Altering the way wp-cron.php works should be seen immediately as the reduced server load should drop a bit.
Consider you might need to play with the script exec frequency until you get, best fit cron timing. For my company case there are only up to 3 new article posted a week, hence too high frequence of wp-cron.php invocations is useless.
With blog where new posts occur once a day a script schedule frequency of 6 up to 12 hours should be ok.
Tags: akismet, Auto, caches, checks, commentor, cr, cron, daySuppose, dedicated server, doesn, dozens, Draft, email, error messages, execution, exlanation, file, google, HTML, HTTP, invocation, localhost, nbsp, newsletter, operation, periodic execution, php, plugin, quot, request, scheduler, someone, something, spam, SQL, time, time thanks, Wordpress, wordpress plugins, wp
Posted in System Administration, Web and CMS, Wordpress | 3 Comments »