Posts Tagged ‘fedora’

PHP: Better Webhosting Security – Disable exec(), exec_shell(), system(), popen(), eval() … shell fork functions

Sunday, June 23rd, 2013

increase php security better php security by disabling fork shell system and eval functions

If you work as System Administrator of WebHosting company, you definitely know how often it is that some automated cracker scripts (working as worms) intrude through buggy old crappy custom coded sites or unupdated obsolete Joomla / WordPress etc. installs. and run themselves trying to harvest for other vulnerable hosts. By default PHP enables running commands via shell with PHP functions like exec();, shell_exec(); , system();. and those script kiddie scripts use mainly this functions to spawn shell via vulnerable PHP app. Then scripts use whether php curl support is installed (i.e. php5-curl) to download and replicate itself to next vulnerable hop.

With that said it is a must after installing new Linux based server for hosting to disable this functions, to save yourself from future hassles …
Earlier, I blogged how to disable PHP system system(); and exec(); functions to raise Apache security using suhosin however this method requires php suhosin being used.

Yesterday, I had to configure new web hosting server with Debian 7, so I tried installing suhosin to use it to protect PHP from having enabled dangerous system();, eval(); exec(); .
I remember disabling system(); using suhosin php extension was working fine on older Debian releases, however in Debian 6.0, php5-suhosin package was causing severe Apache crashes and probably that's why in latest Debian Wheezy 7.0, php suhosin extension is no longer available. Therefore using suhosin method to disable system();, exec(); and other fork functions is no longer possible in Debian.

Since, suhosin is no longer there, I decided to use conventional PHP method via php.ini.

Here is how to do it

Edit:

/etc/php5/apache2/php.ini

debian:~# vim /etc/php5/apache2/php.ini
And near end of file placed:

disable_functions =exec,passthru,shell_exec,system,proc_open,
popen,curl_exec, curl_multi_exec,parse_ini_file,show_source

allow_url_fopen Off
allow_url_include Off

It is good to explain few of above functions – shell_exec, proc_open, popen, allow_url_fopen, show_source  and allow_url_include.

Disabling shell_exec – disables from PHP scripts executing commands with bash slash ` `, i.e. `ls`. proc_open and popen allows reading files from file system.

show_source – makes possible also reading other PHP source files or can be used to display content of other files from fs.

To read newly placed config vars in php.ini usual apache restart is necessary:

debian:~# /etc/init.d/apache2 restart
[….] Restarting web server: apache2
. ok

Further on tо test whether system();, exec();, passthru(); … etc. are disabled. Make new PHP file with content:

<?php
error_reporting(E_ALL);
$disabled_functions = ini_get('disable_functions');
if ($disabled_functions!='')
{
    $arr = explode(',', $disabled_functions);
    sort($arr);
    echo 'Disabled Functions:
        ';
    for ($i=0; $i<count($arr); $i++)
    {
        echo $i.' - '.$arr[$i].'<br />';
    }
}
else
{
    echo 'No functions disabled';
}
?>
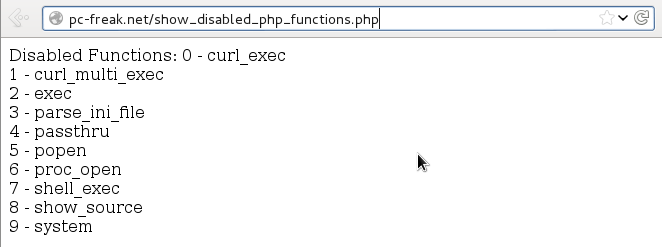
php show disabled functions screenshot improve php security by disabling shell spawn functions

Copy of above source code show_disabled_php_functions.php is here for download
. To test your Apache PHP configuration disabled functions download it with wget or curl and rename it to .php:

# cd /var/www # wget -q https://www.pc-freak.net/files/show_disabled_php_functions.php.txt
mv show_disabled_php_functions.php.txt show_disabled_php_functions.php

After disabling functions on those newly setup Debian hosting Apache webserver, I remembered, same functions were still active on another CentOS Linux server.

To disable it there as well, had to edit:

/etc/php.ini

[root@centos:~]# vim /etc/php.ini

And again place after last file line;

disable_functions =exec,passthru,shell_exec,system,proc_open,popen,
curl_exec, curl_multi_exec,parse_ini_file,show_source

allow_url_fopen Off
allow_url_include Off

Finally on CentOS host, had to restart Apache:

[root@centos:~]# /etc/init.d/httpd restart

For Security paranoids, there are plenty of other PHP functions to disable including, basic functions like ln, mv, mkdir, cp, cat etc.

Below is list of all functions to disable – only disable this whether you you're a PHP security freak and you're 100% some server hosted website will not use it:

disable_functions = "ln, cat, popen, pclose, posix_getpwuid, posix_getgrgid, posix_kill, parse_perms, system, dl, passthru, exec, shell_exec, popen, proc_close, proc_get_status, proc_nice, proc_open, escapeshellcmd, escapeshellarg, show_source, posix_mkfifo, mysql_list_dbs, get_current_user, getmyuid, pconnect, link, symlink, pcntl_exec, ini_alter, pfsockopen, leak, apache_child_terminate, posix_kill, posix_setpgid, posix_setsid, posix_setuid, proc_terminate, syslog, fpassthru, stream_select, socket_select, socket_create, socket_create_listen, socket_create_pair, socket_listen, socket_accept, socket_bind, socket_strerror, pcntl_fork, pcntl_signal, pcntl_waitpid, pcntl_wexitstatus, pcntl_wifexited, pcntl_wifsignaled, pcntl_wifstopped, pcntl_wstopsig, pcntl_wtermsig, openlog, apache_get_modules, apache_get_version, apache_getenv, apache_note, apache_setenv, virtual, chmod, file_upload, delete, deleted, edit, fwrite, cmd, rename, unlink, mkdir, mv, touch, cp, cd, pico"

How to create user with only FTP access on Linux

Saturday, May 11th, 2013

Linux access only to ftp How to prohibit ssh access on GNU Linux

Creating user with access only through FTP is vital in daily routine system administration job. The reason why it is good to disable SSH access to users which don't need it is of course better security. Disabling access to ssh shell for users which don't need it prevents you for user to run malicious code usually exploits or some DDoS Fork bombs – like the infamous Linux shell Denial of Service string;

:(){ :|:&};:

Better not try above string on productive server 😉
So back to the topic here how to add Linux FTP only user;

1. Create a regular user with adduser or useradd (depending) on GNU / Linux distribution

adduser is available across most Linux distributions nowadays, however I remember in past there was some distros which had useradd instead. Anyways for most adduser should be ok. As of time of writting both 3 main stream Linux distributions Slackware, Debian and Fedora has adduser.

linux:~#  adduser new-user-for-ftp-only

Adding user `new-user-for-ftp-only' …
Adding new group `new-user-for-ftp-only' (1006) …
Adding new user `new-user-for-ftp-only' (1005) with group `new-user-for-ftp-only' …
Creating home directory `/home/new-user-for-ftp-only' …
Copying files from `/etc/skel' …
Enter new UNIX password:
Retype new UNIX password:
passwd: password updated successfully
Changing the user information for new-user-for-ftp-only
Enter the new value, or press ENTER for the default
    Full Name []: New Linux User Only for FTP access  
    Room Number []:
    Work Phone []:
    Home Phone []:
    Other []:
Is the information correct? [Y/n] Y

linux:~#

2. Change user shell /bin/bash to /bin/false

Again depending on Linux distribution by default /bin/bash /bin/sh or /bin/whatever shell will get added. To make just created user access to SSH disabled. Change shell to /bin/false – a tiny program which just returns a FALSE value and quits immediately.

There are two ways to do so;

a) Edit directly /etc/passwd with vim / joe

linux:~# vim /etc/passwd

Go to end of file and find the record for user, should be smth like:


new-user-for-ftp-only:x:1005:1006:New Linux User Only for FTP access,,,:/home/new-user-for-ftp-only:/bin/bash

Change to;

new-user-for-ftp-only:x:1005:1006:New Linux User Only for FTP access,,,:/home/new-user-for-ftp-only:/bin/false

b) Use chsh cmd

linux:~# chsh new-user-for-ftp-only

Changing the login shell for new-user-for-ftp-only
Enter the new value, or press ENTER for the default
    Login Shell [/bin/bash]: /bin/false

linux:~# grep -i new-user-for-ftp-only /etc/passwd

new-user-for-ftp-only:x:1005:1006:New Linux User Only for FTP access,,,:/home/new-user-for-ftp-only:/bin/false

3. Testing if ssh access to new user is disabled

linux:~# ssh new-user-for-ftp-only@localhost

new-user-for-ftp-only@localhost's password:
Linux noah 2.6.32-5-amd64 #1 SMP Mon Feb 25 00:26:11 UTC 2013 x86_64

The programs included with the Debian GNU/Linux system are free software;
the exact distribution terms for each program are described in the
individual files in /usr/share/doc/*/copyright.

Debian GNU/Linux comes with ABSOLUTELY NO WARRANTY, to the extent
permitted by applicable law.
Connection to localhost closed.

Linux Currency convert GUI tool KeuroCalc / Convert world currencies Desktop Linux application, Convert USD to EUR

Thursday, April 25th, 2013

keurocalc Linux convert us dollars to euro and to rest of major world currencies

If you happen to run a small business or you're just an adventurer who use Linux for his notebook Desktop. Sooner or later you will end up needing Linux software to convert between world currencies. Some might argue that such a software is obsolete since already there are the Google Currency Converter and plenty of other (online) web currency converter sites. However for people like to use desktop applications like me it is much better to use a separate desktop tool which do currency convertion. If this is the case with and you happen to use Debian GNU / Linux, Ubuntu Fedora or any other main stream Linux distribution on your Linux powered Laptop or Tablet you will be surely happy to know about KEuroCalc – Universal Currency Converter. As all "K"-named starting Linux apps unfortunately keurocalc is using QT KDE graphic library and thus whenever used on GNOME it starts a bunch of KDE services (kedinit,klauncher, kded), however the load of this few on any modern notebook or PC is neglectably low so for most users the only disadvantage of kerocalc might be interface is looking a bit different compared to rest of Gnome GTK+ programs.

To install keurocalc on deb based Linuces e.g. – Debian / Ubuntu, ArchLinux ..:

noah:~# apt-cache show keurocalc|grep -i description -A 3

Description: universal currency converter and calculator – binary package
 KEurocalc is a universal currency converter and calculator.
 It downloads latest exchange rates directly from the
 European Central Bank and the Federal Reserve Bank of New York.
 

noah:~# apt-get install --yes keurocalc

Reading package lists… Done
Building dependency tree      
Reading state information… Done
The following NEW packages will be installed:
  keurocalc
0 upgraded, 1 newly installed, 0 to remove and 23 not upgraded.
Need to get 0 B/87.8 kB of archives.
After this operation, 319 kB of additional disk space will be used.
Selecting previously deselected package keurocalc.
(Reading database … 393466 files and directories currently installed.)
Unpacking keurocalc (from …/keurocalc_1.0.3-2_amd64.deb) …
Processing triggers for hicolor-icon-theme …
Processing triggers for man-db …
Processing triggers for menu …
Processing triggers for gnome-menus …
Processing triggers for desktop-file-utils …
Setting up keurocalc (1.0.3-2) …
Processing triggers for menu …

On Fedora, CentOS and rest of RPM based Linux distros keurocalc is installable too out of default package repositories:

[root@fedora ~]# yum -y -q install keurocalc
....


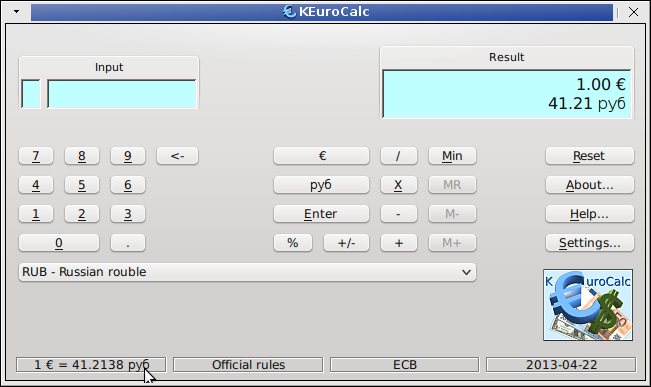
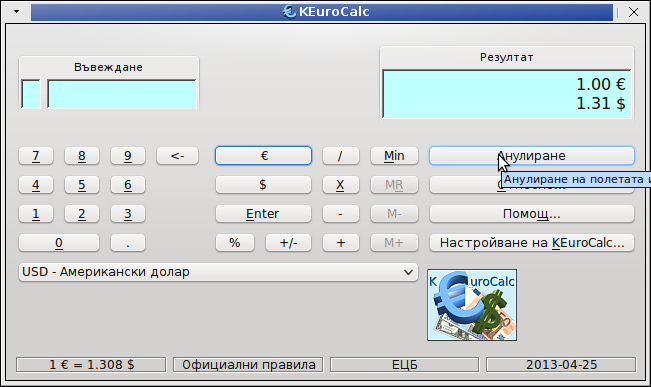
Here is a snapshot of keurocalc GUI interface;

Linux Universal Currency Converter Keurocalc

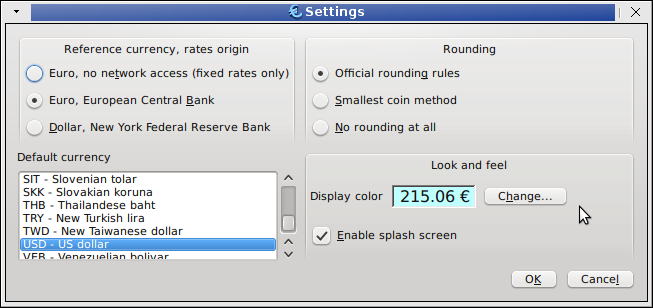
Keurocalc Linux universal currency converter settings screenshot

As you see from settings screenshot, information about rates can be obtained from 2 sources; – European Central Bank and New York Federal Reserve Bank. I give a try also to Euro, no network access (fixed rates only) method but unfortunately by choosing it you can only convert between Fixed Currencies (currencies which are already not in use – in EU member states who dropped their local currencies in favor of EURO).

I've tested the program and it works good, the disadvantage is convertion between some of the World currencies of countries with non-transparent planned (Soviet like) economies for example Belarus is not among app list of convertable currencies.

How to check what process is listening on network port with: lsof & fuser commands in Linux / BSD

Saturday, March 16th, 2013

It is a common thing for me as a Linux and FreeBSD sysadmin to know what process assignes to which port number? I'm sure many novice system administrators will end up sooner or later with same question. Knowing what kind of processes has listening to TCP and UDP protocol / ports is a must to have a proper configured Linux / BSD system. In Linux there are two commands ( lsof and fuser) with which you can get various extra PID information on running processes (i.e. get information which cannot otherwise be obtained via the usual ps and netstat  To use them on most Linux distributions, you will have to have them installed.

1. Install fuser / lsof on Linux / BSD

a) On RPM based Linux distros – Fedora, CentOS, RHEL, SuSE /sbin/fuser is usually part of base install psmisc rpm package, however /usr/sbin/lsof is not among standard installed rpms, so you have to manually install via yum:

[root@centos ~]# yum install -y lsof
….

b) On Deb based Linuxes (Debian, Ubuntu, Mint, ArchLinux etc.). both lsof and fuser has to be installed via a separate packages non-part of Debian base install packs.

server:~# apt-get --yes install lsof fuser
....

On Debian full path location of both is in /bin/fuser and /usr/bin/lsof.

Two tools are precious swiss army knife outfit to use, whether you doubt someone cracked into a server or in doubt you might have "hidden" cracker processes on server.

c) Install fuser on Free/Net/Open/ BSD

bsd# cd /usr/ports/sysutils/fuser
bsd# make install clean
....
bsd# cd /usr/ports/sysutils/lsof
bsd# make install clean
....

2. Using fuser and lsof to look up process PIDs assigned to port numbers

lsof name is derived from List Open Files, as we know in UNIX, GNU / Linux,  *BSD everything on the system is a file, thus to get all kind of information concerning all active files (i.e. ports, PIDs, procotols and process names;

server:~# lsof +M -i4 | less

COMMAND     PID     USER   FD   TYPE   DEVICE SIZE/OFF NODE NAME
portmap    1317   daemon    4u  IPv4     3930      0t0  UDP *:sunrpc[portmapper]
portmap    1317   daemon    5u  IPv4     3939      0t0  TCP *:sunrpc[portmapper] (LISTEN)
rpc.statd  1329    statd    4u  IPv4     3974      0t0  UDP *:657
rpc.statd  1329    statd    6u  IPv4     3983      0t0  UDP *:28530[status]
rpc.statd  1329    statd    7u  IPv4     3986      0t0  TCP *:58515[status] (LISTEN)
apache2    1625 www-data    3u  IPv4     5456      0t0  TCP *:www (LISTEN)
apache2    1625 www-data    4u  IPv4     5458      0t0  TCP *:https (LISTEN)
sshd       1918     root    3u  IPv4     4945      0t0  TCP *:ssh (LISTEN)
miniserv.  2155     root    5u  IPv4     5299      0t0  TCP *:20000 (LISTEN)
miniserv.  2155     root    6u  IPv4     5300      0t0  UDP *:20000
miniserv.  2161     root    6u  IPv4     5367      0t0  TCP *:webmin (LISTEN)
miniserv.  2161     root    7u  IPv4     5368      0t0  UDP *:10000
ntpd       2172      ntp   16u  IPv4     5395      0t0  UDP *:ntp
ntpd       2172      ntp   18u  IPv4     5402      0t0  UDP localhost:ntp
ntpd       2172      ntp   19u  IPv4     5403      0t0  UDP iqtest.soccerfame.com:ntp
ntpd       2172      ntp   20u  IPv4    16028      0t0  UDP secure.broomlake.com:ntp
apache2    4505 www-data    3u  IPv4     5456      0t0  TCP *:www (LISTEN)
apache2    4505 www-data    4u  IPv4     5458      0t0  TCP *:https (LISTEN)
apache2    4539 www-data    3u  IPv4     5456      0t0  TCP *:www (LISTEN)
apache2    4539 www-data    4u  IPv4     5458      0t0  TCP *:https (LISTEN)
apache2    4780 www-data    3u  IPv4     5456      0t0  TCP *:www (LISTEN)
apache2    4780 www-data    4u  IPv4     5458      0t0  TCP *:https (LISTEN)
apache2    4900 www-data    3u  IPv4     5456      0t0  TCP *:www (LISTEN)
apache2    4900 www-data    4u  IPv4     5458      0t0  TCP *:https (LISTEN)
apache2    4907 www-data    3u  IPv4     5456      0t0  TCP *:www (LISTEN)
apache2    4907 www-data    4u  IPv4     5458      0t0  TCP *:https (LISTEN)
apache2    4915 www-data    3u  IPv4     5456      0t0  TCP *:www (LISTEN)
apache2    4915 www-data    4u  IPv4     5458      0t0  TCP *:https (LISTEN)
apache2    5067 www-data    3u  IPv4     5456      0t0  TCP *:www (LISTEN)
apache2    5067 www-data    4u  IPv4     5458      0t0  TCP *:https (LISTEN)
apache2    5133 www-data    3u  IPv4     5456      0t0  TCP *:www (LISTEN)
apache2    5133 www-data    4u  IPv4     5458      0t0  TCP *:https (LISTEN)
apache2    5134 www-data    3u  IPv4     5456      0t0  TCP *:www (LISTEN)
apache2    5134 www-data    4u  IPv4     5458      0t0  TCP *:https (LISTEN)
apache2    5148 www-data    3u  IPv4     5456      0t0  TCP *:www (LISTEN)
apache2    5148 www-data    4u  IPv4     5458      0t0  TCP *:https (LISTEN)
apache2    5152 www-data    3u  IPv4     5456      0t0  TCP *:www (LISTEN)
apache2    5152 www-data    4u  IPv4     5458      0t0  TCP *:https (LISTEN)
apache2    5259 www-data    3u  IPv4     5456      0t0  TCP *:www (LISTEN)
apache2    5259 www-data    4u  IPv4     5458      0t0  TCP *:https (LISTEN)
apache2    5265 www-data    3u  IPv4     5456      0t0  TCP *:www (LISTEN)
apache2    5265 www-data    4u  IPv4     5458      0t0  TCP *:https (LISTEN)
apache2    5266 www-data    3u  IPv4     5456      0t0  TCP *:www (LISTEN)
apache2    5266 www-data    4u  IPv4     5458      0t0  TCP *:https (LISTEN)
apache2    5346 www-data    3u  IPv4     5456      0t0  TCP *:www (LISTEN)
apache2    5346 www-data    4u  IPv4     5458      0t0  TCP *:https (LISTEN)
apache2    5356 www-data    3u  IPv4     5456      0t0  TCP *:www (LISTEN)
apache2    5356 www-data    4u  IPv4     5458      0t0  TCP *:https (LISTEN)
apache2    5467 www-data    3u  IPv4     5456      0t0  TCP *:www (LISTEN)
apache2    5467 www-data    4u  IPv4     5458      0t0  TCP *:https (LISTEN)
apache2    5523 www-data    3u  IPv4     5456      0t0  TCP *:www (LISTEN)
apache2    5523 www-data    4u  IPv4     5458      0t0  TCP *:https (LISTEN)
apache2    5568 www-data    3u  IPv4     5456      0t0  TCP *:www (LISTEN)
apache2    5568 www-data    4u  IPv4     5458      0t0  TCP *:https (LISTEN)
apache2    5715 www-data    3u  IPv4     5456      0t0  TCP *:www (LISTEN)
apache2    5715 www-data    4u  IPv4     5458      0t0  TCP *:https (LISTEN)
apache2    5716 www-data    3u  IPv4     5456      0t0  TCP *:www (LISTEN)
apache2    5716 www-data    4u  IPv4     5458      0t0  TCP *:https (LISTEN)
apache2    5758 www-data    3u  IPv4     5456      0t0  TCP *:www (LISTEN)
apache2    5758 www-data    4u  IPv4     5458      0t0  TCP *:https (LISTEN)
apache2    5789 www-data    3u  IPv4     5456      0t0  TCP *:www (LISTEN)
apache2    5789 www-data    4u  IPv4     5458      0t0  TCP *:https (LISTEN)
apache2    6106 www-data    3u  IPv4     5456      0t0  TCP *:www (LISTEN)
apache2    6106 www-data    4u  IPv4     5458      0t0  TCP *:https (LISTEN)
apache2   16608 www-data    3u  IPv4     5456      0t0  TCP *:www (LISTEN)
apache2   16608 www-data    4u  IPv4     5458      0t0  TCP *:https (LISTEN)
apache2   16904 www-data    3u  IPv4     5456      0t0  TCP *:www (LISTEN)
apache2   16904 www-data    4u  IPv4     5458      0t0  TCP *:https (LISTEN)
apache2   17124 www-data    3u  IPv4     5456      0t0  TCP *:www (LISTEN)
apache2   17124 www-data    4u  IPv4     5458      0t0  TCP *:https (LISTEN)
apache2   17280 www-data    3u  IPv4     5456      0t0  TCP *:www (LISTEN)
apache2   17280 www-data    4u  IPv4     5458      0t0  TCP *:https (LISTEN)
apache2   20855 www-data    3u  IPv4     5456      0t0  TCP *:www (LISTEN)
apache2   20855 www-data    4u  IPv4     5458      0t0  TCP *:https (LISTEN)
apache2   20920 www-data    3u  IPv4     5456      0t0  TCP *:www (LISTEN)
apache2   20920 www-data    4u  IPv4     5458      0t0  TCP *:https (LISTEN)
apache2   21023 www-data    3u  IPv4     5456      0t0  TCP *:www (LISTEN)
apache2   21023 www-data    4u  IPv4     5458      0t0  TCP *:https (LISTEN)
apache2   22182 www-data    3u  IPv4     5456      0t0  TCP *:www (LISTEN)
apache2   22182 www-data    4u  IPv4     5458      0t0  TCP *:https (LISTEN)
apache2   23307 www-data    3u  IPv4     5456      0t0  TCP *:www (LISTEN)
apache2   23307 www-data    4u  IPv4     5458      0t0  TCP *:https (LISTEN)
apache2   23366 www-data    3u  IPv4     5456      0t0  TCP *:www (LISTEN)
apache2   23366 www-data    4u  IPv4     5458      0t0  TCP *:https (LISTEN)
apache2   23408 www-data    3u  IPv4     5456      0t0  TCP *:www (LISTEN)
apache2   23408 www-data    4u  IPv4     5458      0t0  TCP *:https (LISTEN)
apache2   23419 www-data    3u  IPv4     5456      0t0  TCP *:www (LISTEN)
apache2   23419 www-data    4u  IPv4     5458      0t0  TCP *:https (LISTEN)
apache2   23428 www-data    3u  IPv4     5456      0t0  TCP *:www (LISTEN)
apache2   23428 www-data    4u  IPv4     5458      0t0  TCP *:https (LISTEN)
apache2   23452 www-data    3u  IPv4     5456      0t0  TCP *:www (LISTEN)
apache2   23452 www-data    4u  IPv4     5458      0t0  TCP *:https (LISTEN)
apache2   23561 www-data    3u  IPv4     5456      0t0  TCP *:www (LISTEN)
apache2   23561 www-data    4u  IPv4     5458      0t0  TCP *:https (LISTEN)
apache2   23579 www-data    3u  IPv4     5456      0t0  TCP *:www (LISTEN)
apache2   23579 www-data    4u  IPv4     5458      0t0  TCP *:https (LISTEN)
apache2   23851 www-data    3u  IPv4     5456      0t0  TCP *:www (LISTEN)
apache2   23851 www-data    4u  IPv4     5458      0t0  TCP *:https (LISTEN)
apache2   24103 www-data    3u  IPv4     5456      0t0  TCP *:www (LISTEN)
apache2   24103 www-data    4u  IPv4     5458      0t0  TCP *:https (LISTEN)
apache2   24659 www-data    3u  IPv4     5456      0t0  TCP *:www (LISTEN)
apache2   24659 www-data    4u  IPv4     5458      0t0  TCP *:https (LISTEN)
sshd      25073     root    3u  IPv4 29855891      0t0  TCP iqtest.soccerfame.com:ssh->www.pc-freak.net:50176 (ESTABLISHED)
sshd      25084     hipo    3u  IPv4 29855891      0t0  TCP iqtest.soccerfame.com:ssh->www.pc-freak.net:50176 (ESTABLISHED)
apache2   25089 www-data    3u  IPv4     5456      0t0  TCP *:www (LISTEN)
apache2   25089 www-data    4u  IPv4     5458      0t0  TCP *:https (LISTEN)
apache2   26737 www-data    3u  IPv4     5456      0t0  TCP *:www (LISTEN)
apache2   26737 www-data    4u  IPv4     5458      0t0  TCP *:https (LISTEN)
apache2   27243 www-data    3u  IPv4     5456      0t0  TCP *:www (LISTEN)
apache2   27243 www-data    4u  IPv4     5458      0t0  TCP *:https (LISTEN)
apache2   27282 www-data    3u  IPv4     5456      0t0  TCP *:www (LISTEN)
apache2   27282 www-data    4u  IPv4     5458      0t0  TCP *:https (LISTEN)
apache2   27633 www-data    3u  IPv4     5456      0t0  TCP *:www (LISTEN)
apache2   27633 www-data    4u  IPv4     5458      0t0  TCP *:https (LISTEN)
apache2   28205 www-data    3u  IPv4     5456      0t0  TCP *:www (LISTEN)
apache2   28205 www-data    4u  IPv4     5458      0t0  TCP *:https (LISTEN)
apache2   29244 www-data    3u  IPv4     5456      0t0  TCP *:www (LISTEN)
apache2   29244 www-data    4u  IPv4     5458      0t0  TCP *:https (LISTEN)
apache2   29372 www-data    3u  IPv4     5456      0t0  TCP *:www (LISTEN)
apache2   29372 www-data    4u  IPv4     5458      0t0  TCP *:https (LISTEN)
apache2   29411 www-data    3u  IPv4     5456      0t0  TCP *:www (LISTEN)
apache2   29411 www-data    4u  IPv4     5458      0t0  TCP *:https (LISTEN)
apache2   29462 www-data    3u  IPv4     5456      0t0  TCP *:www (LISTEN)
apache2   29462 www-data    4u  IPv4     5458      0t0  TCP *:https (LISTEN)
apache2   29548 www-data    3u  IPv4     5456      0t0  TCP *:www (LISTEN)
apache2   29548 www-data    4u  IPv4     5458      0t0  TCP *:https (LISTEN)
apache2   30161 www-data    3u  IPv4     5456      0t0  TCP *:www (LISTEN)
apache2   30161 www-data    4u  IPv4     5458      0t0  TCP *:https (LISTEN)
apache2   31876 www-data    3u  IPv4     5456      0t0  TCP *:www (LISTEN)
apache2   31876 www-data    4u  IPv4     5458      0t0  TCP *:https (LISTEN)
apache2   31958 www-data    3u  IPv4     5456      0t0  TCP *:www (LISTEN)
apache2   31958 www-data    4u  IPv4     5458      0t0  TCP *:https (LISTEN)
apache2   32052 www-data    3u  IPv4     5456      0t0  TCP *:www (LISTEN)
apache2   32052 www-data    4u  IPv4     5458      0t0  TCP *:https (LISTEN)
apache2   32061 www-data    3u  IPv4     5456      0t0  TCP *:www (LISTEN)
apache2   32061 www-data    4u  IPv4     5458      0t0  TCP *:https (LISTEN)
apache2   32143 www-data    3u  IPv4     5456      0t0  TCP *:www (LISTEN)
apache2   32143 www-data    4u  IPv4     5458      0t0  TCP *:https (LISTEN)
apache2   32149 www-data    3u  IPv4     5456      0t0  TCP *:www (LISTEN)
apache2   32149 www-data    4u  IPv4     5458      0t0  TCP *:https (LISTEN)
apache2   32440 www-data    3u  IPv4     5456      0t0  TCP *:www (LISTEN)
apache2   32440 www-data    4u  IPv4     5458      0t0  TCP *:https (LISTEN)
apache2   32635 www-data    3u  IPv4     5456      0t0  TCP *:www (LISTEN)
apache2   32635 www-data    4u  IPv4     5458      0t0  TCP *:https (LISTEN)
apache2   32790 www-data    3u  IPv4     5456      0t0  TCP *:www (LISTEN)
apache2   32790 www-data    4u  IPv4     5458      0t0  TCP *:https (LISTEN)
apache2   40211 www-data    3u  IPv4     5456      0t0  TCP *:www (LISTEN)
apache2   40211 www-data    4u  IPv4     5458      0t0  TCP *:https (LISTEN)
apache2   40309 www-data    3u  IPv4     5456      0t0  TCP *:www (LISTEN)
apache2   40309 www-data    4u  IPv4     5458      0t0  TCP *:https (LISTEN)
apache2   40432 www-data    3u  IPv4     5456      0t0  TCP *:www (LISTEN)
apache2   40432 www-data    4u  IPv4     5458      0t0  TCP *:https (LISTEN)
apache2   40476 www-data    3u  IPv4     5456      0t0  TCP *:www (LISTEN)
apache2   40476 www-data    4u  IPv4     5458      0t0  TCP *:https (LISTEN)
apache2   46319     root    3u  IPv4     5456      0t0  TCP *:www (LISTEN)
apache2   46319     root    4u  IPv4     5458      0t0  TCP *:https (LISTEN)
apache2   46438 www-data    3u  IPv4     5456      0t0  TCP *:www (LISTEN)
apache2   46438 www-data    4u  IPv4     5458      0t0  TCP *:https (LISTEN)
apache2   46439 www-data    3u  IPv4     5456      0t0  TCP *:www (LISTEN)
apache2   46439 www-data    4u  IPv4     5458      0t0  TCP *:https (LISTEN)
apache2   46440 www-data    3u  IPv4     5456      0t0  TCP *:www (LISTEN)
apache2   46440 www-data    4u  IPv4     5458      0t0  TCP *:https (LISTEN)
apache2   46441 www-data    3u  IPv4     5456      0t0  TCP *:www (LISTEN)
apache2   46441 www-data    4u  IPv4     5458      0t0  TCP *:https (LISTEN)
apache2   46442 www-data    3u  IPv4     5456      0t0  TCP *:www (LISTEN)
apache2   46442 www-data    4u  IPv4     5458      0t0  TCP *:https (LISTEN)
apache2   46443 www-data    3u  IPv4     5456      0t0  TCP *:www (LISTEN)
apache2   46443 www-data    4u  IPv4     5458      0t0  TCP *:https (LISTEN)
apache2   46509     root    3u  IPv4     5456      0t0  TCP *:www (LISTEN)
apache2   46509     root    4u  IPv4     5458      0t0  TCP *:https (LISTEN)
apache2   46510     root    3u  IPv4     5456      0t0  TCP *:www (LISTEN)
apache2   46510     root    4u  IPv4     5458      0t0  TCP *:https (LISTEN)
apache2   46515     root    3u  IPv4     5456      0t0  TCP *:www (LISTEN)
apache2   46515     root    4u  IPv4     5458      0t0  TCP *:https (LISTEN)
apache2   51287 www-data    3u  IPv4     5456      0t0  TCP *:www (LISTEN)
apache2   51287 www-data    4u  IPv4     5458      0t0  TCP *:https (LISTEN)
apache2   51485 www-data    3u  IPv4     5456      0t0  TCP *:www (LISTEN)
apache2   51485 www-data    4u  IPv4     5458      0t0  TCP *:https (LISTEN)
apache2   51804 www-data    3u  IPv4     5456      0t0  TCP *:www (LISTEN)
apache2   51804 www-data    4u  IPv4     5458      0t0  TCP *:https (LISTEN)
named     54418     bind   20u  IPv4 31298857      0t0  TCP localhost:domain (LISTEN)
named     54418     bind   21u  IPv4 31298859      0t0  TCP iqtest.soccerfame.com:domain (LISTEN)
named     54418     bind   22u  IPv4 31298861      0t0  TCP secure.broomlake.com:domain (LISTEN)
named     54418     bind   23u  IPv4 31298865      0t0  TCP localhost:953 (LISTEN)
named     54418     bind  512u  IPv4 31298856      0t0  UDP localhost:domain
named     54418     bind  513u  IPv4 31298858      0t0  UDP iqtest.soccerfame.com:domain
named     54418     bind  514u  IPv4 31298860      0t0  UDP secure.broomlake.com:domain
named     54418     bind  515u  IPv4 31298864      0t0  UDP *:domain
proftpd   62010  proftpd    1u  IPv4 31306260      0t0  TCP *:ftp (LISTEN)
mysqld    62420    mysql   11u  IPv4 31306903      0t0  TCP *:mysql (LISTEN)
apache2   62582 www-data    3u  IPv4     5456      0t0  TCP *:www (LISTEN)
apache2   62582 www-data    4u  IPv4     5458      0t0  TCP *:https (LISTEN)
apache2   62845 www-data    3u  IPv4     5456      0t0  TCP *:www (LISTEN)
apache2   62845 www-data    4u  IPv4     5458      0t0  TCP *:https (LISTEN)
apache2   64748 www-data    3u  IPv4     5456      0t0  TCP *:www (LISTEN)
apache2   64748 www-data    4u  IPv4     5458      0t0  TCP *:https (LISTEN)

Above lsof command lists all active listening processes port number on UDP and TCP/IP 4 proto with the assigned process PID number (in second column). This is very useful if you find out to have listening service on port number and you cannot figure out what process name exactly is listening.

A classic example, where this is very helpful is if you have a listening process on SMTP port 25 and you cannot identify what kind of mail server is taking up the port? This has happened me many times on Debian Linux based hosts, which by default had priorly installed sendmail and I later removed sendmail to install Postfix or Exim SMTP.
To find out what is assigning port 25, you had to grep the protocol name from all binded host processes, like so:


server:~# lsof +M -i4 | grep -i smtp

exim4     17550     root    3u  IPv4 31577966      0t0  TCP localhost:smtp (LISTEN)

Whether you want to get information on Process ID, binding other random port lets say port 10000, following same logic you can grep it:

server:~# lsof +M -i4 |grep -i 10000
miniserv.  2161     root    7u  IPv4     5368      0t0  UDP *:10000

To get rid of a process for which you're unsure what kind of (/etc/init.d/service-name) init script is starting it, you can then use kill cmd to stop it;

server:~# kill -9 2161

Second approach to find out what kind of process is listening on a random port or socket, lets say port num 58515 is by using fuser.


server:~# netstat -ltn4
Active Internet connections (only servers)
Proto Recv-Q Send-Q Local Address           Foreign Address         State     
tcp        0      0 0.0.0.0:3306            0.0.0.0:*               LISTEN    
tcp        0      0 0.0.0.0:111             0.0.0.0:*               LISTEN    
tcp        0      0 0.0.0.0:80              0.0.0.0:*               LISTEN    
tcp        0      0 0.0.0.0:10000           0.0.0.0:*               LISTEN    
tcp        0      0 0.0.0.0:58515           0.0.0.0:*               LISTEN    
tcp        0      0 0.0.0.0:21              0.0.0.0:*               LISTEN    
tcp        0      0 77.92.85.71:53          0.0.0.0:*               LISTEN    
tcp        0      0 109.123.106.44:53       0.0.0.0:*               LISTEN    
tcp        0      0 127.0.0.1:53            0.0.0.0:*               LISTEN    
tcp        0      0 0.0.0.0:22              0.0.0.0:*               LISTEN    
tcp        0      0 127.0.0.1:953           0.0.0.0:*               LISTEN    
tcp        0      0 0.0.0.0:443             0.0.0.0:*               LISTEN    
tcp        0      0 0.0.0.0:20000           0.0.0.0:*               LISTEN    

Below netstat cmmand, lists all active listening processes on respective IP address and port for protocol TCPIP v.4.

Hence on to get more information on what process is listening on port 58515?

server:~#  fuser -v 58515/tcp

                     USER        PID ACCESS COMMAND
58515/tcp:           statd      1329 F…. rpc.statd

Once you know what is listening, whether you want to kill it this is also possible directly through fuser;


server:~# fuser -vk 58515/tcp

As a close-up, I will say fuser and lsof are two must have software tools on any productive server. It is among the critical applications admin has to install during initial server set-up. fuser and lsof helps me often in my sysadmin work, it was more than once I've used them to identify script-kiddies exploit scanners running as a standard process names, as well secretly listening on weird port number  cracker back-doors.

Hopefully this little article, helps someone learn something new. Plenty is written and will be written and if one takes the time to research he can learn much, much more. I'm sure my tiny article is nothing new under the sun for old-school admins, I still hope it will be of use to novice. I'm looking forward to hear if I'm missing some neat use or some interesting case, when lsof or fuser "saved your ass" 🙂
 

Secure delete files irreverseble on Debian and Fedora GNU / Linux

Thursday, February 21st, 2013

I just read an article in Linux-Magazine on Advanced File Management named – "Beyond the Basics". Most of what the article says is pretty trivial and known by any Linux enthusiast average user and administrator. There was one command mentioned shred which is probably not so well known among Free Software users shred allows the user to "secure delete files" / from the hard disk irreversible.

The tool is part of coreutils package and available across mostly all Linux distributions including Debian / Ubuntu debian derivatives and the RedHat based distros CentOS, Fedora, RHEL etc.

Just for info for those who don't know how to check, to which package a command belongs with rpm and dpkg, here is how;

[hipo@centos ~]$ rpm -qf /usr/bin/shred
coreutils-5.97-23.el5_4.2

hipo@debian:~$ dpkg -S /usr/bin/shred
coreutils: /usr/bin/shred

Here is how to delete a sample file ovewritting 3 times (-n2 – means 3 because in comuters we know we countr from 0 – 0 1 2 3), the z option fills up with zeros after overwritting the file ( just like seen on paste), -v option shows verbose what shred is doing and -u option truncates removes file after overwritting

noah:/var/tmp# shred -n2 -zvu crash20121113021508.txt
shred: crash20121113021508.txt: pass 1/3 (random)…
shred: crash20121113021508.txt: pass 2/3 (random)…
shred: crash20121113021508.txt: pass 3/3 (000000)…
shred: crash20121113021508.txt: removing
shred: crash20121113021508.txt: renamed to 00000000000000000000000
shred: 00000000000000000000000: renamed to 0000000000000000000000
shred: 0000000000000000000000: renamed to 000000000000000000000
shred: 000000000000000000000: renamed to 00000000000000000000
shred: 00000000000000000000: renamed to 0000000000000000000
shred: 0000000000000000000: renamed to 000000000000000000
shred: 000000000000000000: renamed to 00000000000000000
shred: 00000000000000000: renamed to 0000000000000000
shred: 0000000000000000: renamed to 000000000000000
shred: 000000000000000: renamed to 00000000000000
shred: 00000000000000: renamed to 0000000000000
shred: 0000000000000: renamed to 000000000000
shred: 000000000000: renamed to 00000000000
shred: 00000000000: renamed to 0000000000
shred: 0000000000: renamed to 000000000
shred: 000000000: renamed to 00000000
shred: 00000000: renamed to 0000000
shred: 0000000: renamed to 000000
shred: 000000: renamed to 00000
shred: 00000: renamed to 0000
shred: 0000: renamed to 000
shred: 000: renamed to 00
shred: 00: renamed to 0
shred: crash20121113021508.txt: removed
 

One common use of shred is by sysadmins who has to prepare old server containing lets say client data (SQL) – mail boxes or just file data and then sell it to third parties making sure data will be un-restorable for the new owner. Also shred is used a lot by crackers who set up "time bombs" activated on user activity or inactivity to destroy evidences in case of crackers PC is being captured by police. Though shred cannot guarantee 100% that deleted data can't be recoved within a special data recovery lab in most of cases it is enough to assure data with it will be almost impossible to recover.

How to keep track of All User accounts executed commands, highest CPU consumers and user times on Linux

Tuesday, February 5th, 2013

Linux accounting keeping an eye on all user run commands time accounting find cpu eaters

For people interested into statistics of how Linux existing users are spending, there log in times and what kind of commands each of users is executing, take a look at acct
acct is existing on all mainstream Linux distributions is a great sysadmin tool. acct is a great tool whether you have a system where a multitude of users you don't trust has to be monitored. It is an absolutely must have for anyone willing to run, lets say  experimental honeypot or  free shell host. acct is useful for paranoid sysadmins who like to always knows what there users are running as well as in situation where some of users is suspected to be a potential cracker trying to root the host.

Below is description of acct package on Debian:

# apt-cache show acct| grep -i description -A 8
Description: The GNU Accounting utilities for process and login accounting
 GNU Accounting Utilities is a set of utilities which reports and summarizes
 data about user connect times and process execution statistics.
 .
 "Login accounting" provides summaries of system resource usage based on connect
 time, and "process accounting" provides summaries based on the commands
 executed on the system.
 .
 The 'last' command is provided by the sysvinit package and not included here.

To start using acct, just install it with usual:

# apt-get install --yes acct

(Whether on Debian / Ubuntu Linux);

On Fedora, CentOS and RHEL and other RPM based Linuxes issue;

yum --y install psacct

On deb based Linux distributions, whether acct collects statistics is controlled via:

/etc/default/acct

# cat /etc/default/acct
# Defaults for acct

# If you want to keep acct installed, but not started automatically, set this
# variable to 0. Because /etc/cron.daily/acct calls the initscript daily, it is
# not sufficient to stop acct once after booting if your machine remains up.
ACCT_ENABLE="1"

# Amount of days that the logs are kept.
ACCT_LOGGING="30"

After installed to start collecting user "process accounting" data run acct via init script;

# /etc/init.d/acct start
Turning on process accounting, file set to '/var/log/account/pacct'.
Done..

The file gathering info on system usage, CPU load, user ran commands /var/log/account/psacct is a binary and unreadable tailing it with tail -f .

On CentOS / Fedora Linux to Enable acct account statistics gathering in future boot and from present moment on do;

# chkconfig psacct on
# /etc/init.d/psacct start

1. Find out all commands executed by Linux user account (lastcomm)

Once user accounting is running to get information of every command ever executed on user shell use lastcomm cmd. For example:

# lastcomm hipo

bash              F    hipo     pts/1      0.00 secs Tue Feb  5 00:20
bash              F    hipo     pts/1      0.03 secs Tue Feb  5 00:20
sed                    hipo     pts/1      0.00 secs Tue Feb  5 00:20
bash              F    hipo     pts/1      0.00 secs Tue Feb  5 00:20
uname                  hipo     pts/1      0.00 secs Tue Feb  5 00:20
bash              F    hipo     pts/1      0.00 secs Tue Feb  5 00:20
dircolors              hipo     pts/1      0.00 secs Tue Feb  5 00:20
bash              F    hipo     pts/1      0.00 secs Tue Feb  5 00:20
uname                  hipo     pts/1      0.00 secs Tue Feb  5 00:20
bash              F    hipo     pts/1      0.00 secs Tue Feb  5 00:20
ls                     hipo     pts/1      0.00 secs Tue Feb  5 00:20
bash              F    hipo     pts/1      0.00 secs Tue Feb  5 00:20
bash              F    hipo     pts/1      0.03 secs Tue Feb  5 00:20
sed                    hipo     pts/1      0.00 secs Tue Feb  5 00:20
bash              F    hipo     pts/1      0.00 secs Tue Feb  5 00:20
uname                  hipo     pts/1      0.00 secs Tue Feb  5 00:20
bash              F    hipo     pts/1      0.00 secs Tue Feb  5 00:20
id                     hipo     pts/1      0.00 secs Tue Feb  5 00:20
mesg                   hipo     pts/1      0.00 secs Tue Feb  5 00:20
verse                  hipo     pts/1      0.00 secs Tue Feb  5 00:20
cowrand                hipo     pts/1      0.00 secs Tue Feb  5 00:20
cowsay                 hipo     pts/1      0.03 secs Tue Feb  5 00:20
cowrand           F    hipo     pts/1      0.00 secs Tue Feb  5 00:20
head                   hipo     pts/1      0.00 secs Tue Feb  5 00:20
tail                   hipo     pts/1      0.00 secs Tue Feb  5 00:20
head                   hipo     pts/1      0.00 secs Tue Feb  5 00:20
ls                     hipo     pts/1      0.00 secs Tue Feb  5 00:20
cowrand           F    hipo     pts/1      0.00 secs Tue Feb  5 00:20
awk                    hipo     pts/1      0.00 secs Tue Feb  5 00:20
wc                     hipo     pts/1      0.00 secs Tue Feb  5 00:20
ls                     hipo     pts/1      0.00 secs Tue Feb  5 00:20

A lot of the initial commands shown to run on pts/1 is not actual commands, by the user but are just stuff run on user login time via /etc/bash.bashrc, /etc/profile, ~/.bashrc. ~/.bash_profile.

lastcomm displayed output from 2nd column is a special flag giving more information on how and for what purpose command was executed. In above output
F
– indicates the command run after a fork.
X – is returned if a command exit with SIGTERM (kill signal)
D – in case of generated command core dump (D is good one to look for whether checking a suspicious user profile, as it is so common exploits use core dumping to get root superuser access)
S – means the command is run with superuser privileges (this one you will see usually whether inspecting user profile of a cracker who run exploit using core dump – a lot of Ds followed by some shell code to run as superuser)

2. Get statistics on CPU use time of services (daemons) and user accounts

psacct is very handy, whether you have CPU server overloads and you have difficulty finding out what are the "CPU hungry processes". To get those use summarized accounting information tool;

# sa -m
                                     2619      31.06re       0.54cp         0avio      2907k
root                                 2448      30.19re       0.52cp         0avio      2817k
www-data                               33       0.06re       0.02cp         0avio      3687k
hipo                                   72       0.15re       0.01cp         0avio      6217k
qscand                                 11       0.36re       0.00cp         0avio      5326k
vpopmail                               48       0.25re       0.00cp         0avio      1486k
qmails                                  6       0.00re       0.00cp         0avio       968k
sshd                                    1       0.04re       0.00cp         0avio     12632k

-m (prints user summary).

3. Find all system users running certain commands

Another good use of lastcomm command is to grep over all users executed command for precise commands of interest. One very good use case is if you catch a system abuser running certain exploit or DoS tool on the host and you want to make sure no-one else on the system doesn't try running it.

# lastcomm ls
ls                     www-data __         0.00 secs Tue Feb  5 00:40
ls                     www-data __         0.00 secs Tue Feb  5 00:30
ls                     hipo     pts/7      0.00 secs Tue Feb  5 00:20
ls                     hipo     pts/1      0.00 secs Tue Feb  5 00:20
ls                     www-data __         0.00 secs Tue Feb  5 00:20
ls                     root     pts/0      0.00 secs Tue Feb  5 00:10
ls                     www-data __         0.00 secs Tue Feb  5 00:10
 

4. Get statistics of most active system users in hours

There is one tool called ac, which is similar in what it does to last command, just like last it uses /var/log/wtmp binary log file to get its user login times stats . The difference is ac provides more and better structured user login time length info.

Its very useful if you want to have idea, which user spends most time connected to host.

$ ac -p
    sic                                  4.86
    hipo                                 4.80
    root                                25.80
    play                                 0.02

To get general info on how much overall hours all existing users spend doing stuff on node;

$ ac total 35.61

To know which days from the month users were most active:

$ ac -d
Feb 1 total 14.54
Feb 2 total 0.97
Feb 3 total 12.47
Feb 4 total 5.96
Today total 1.73

Adding Teamviewer to auto start on Linux GNOME login

Friday, February 1st, 2013

Administrating Linux via graphical interface is not common, however sometimes it is necessery. There are plenty of ways to remotely administrate with GUI Linux. You can connect to remote Xserver and launch X session via xinit, connect via (Gnome Display Manager) GDM, use nomachine NX server / client (if you're on slow connection line) or use the good old Teamviewer.

As Teamviewer works pretty well on both Windows and Linux in last times I like using teamviewer as a standard. It is freeware and it often disconnects with the annoying Trial message, but in general for managing something quick on remote desktop it is nice.

To use teamviewer, you need to have it installed on the Linux host via deb or rpm:

Whether on Debian / Ubuntu use:


# wget http://www.teamviewer.com/download/version_8x/teamviewer_linux_x64.deb
.....
# dpkg -i teamviewer_linux_x64.deb
...
....


On Fedora, CentOS, RHEL run:

# wget -q http://www.teamviewer.com/download/teamviewer_linux.rpm
# rpm -Uvh teamviewer_linux.rpm
.....

Once package is installed teamviewer is installed in /opt/teamviewer/* there is a tiny wrapper run script in /usr/bin/teamviewer – evoking TeamViewer to be run via wine emulation.

Hence to make TeamViewer start on certain user GNOME login the script has to run on GNOME user login session.
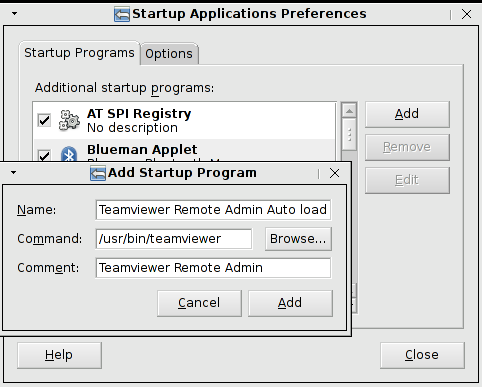
In both GNOME 2 and GNOME 3 what is run on user login is managed through gnome-session-properties thus /usr/bin/teamviewer has to be set to run through gnome-session-properties (to run it press ALT+F2 or type it directly in gnome-terminal)

user@linux:~$ gnome-session-properties

A window like in below screenshot pops up and from there Add TeamViewer.

Adding Teamviewer to auto start on Linux Debian Fedora CentOS GNOME non privileged user

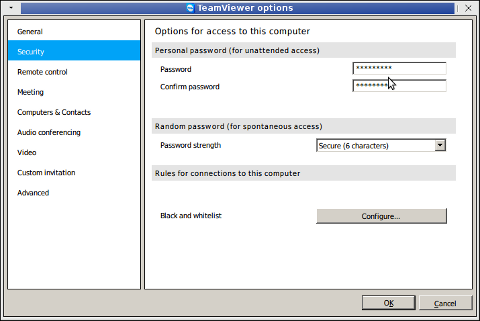
To be able to later connect via a Remote host with another TeamViewer peer launch TeamViewer and configure permanent password through menus:

Extras -> Options -> Security

teamviewer extras options security configuring teamviewier permanent password for ID

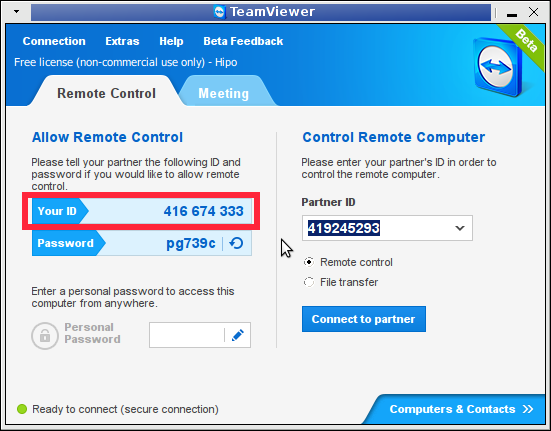
All left is to write down your Teamviewer Remote Connect ID and permanent set password

Teamviewer remote connect ID screnshot Linux

After next succesful GNOME login teamviewer will just pop-up. Enjoy

How to set password on a mysql server with no password via mysql command line interface

Monday, March 28th, 2011

Many Linux distributions’s offered MySQL server comes without a set default password, in practice you can freely login to the mysql server on a plain mysql server installation on Debian, Ubuntu or Fedora by simply issuing:

linux:~# mysql -u root
Enter password:

Pressing enter will straight let you in the mysql server. The same kind of behaviour is also probably true on BSD based and many other Unixes which have pre-installed or the option to install a new mysql server.

I remember in my past that I’ve even seen a productive mysql servers on a servers running CMS based websites which doesn’t have a root password set.

Some administrators doesn’t take the time to think about the implications of the no password mysql installation and therefore being in a hurry simply let the server without an administrator password.
This is very common for the most lame and uneducated ones. Many novice system administrators think that by installing a phpmyadmin and configuring a password on it’s web interface is equal to setting up the mysql server (daemon) a password.

Thus for all this the uneducated ones and for all those who already have noticed that their newly installed mysql server doesn’t have a password set I’ve decided to give an example how a new mysql server password can be set or how an existing mysql server pass can be changed to a new one

To make any password manipulations usually the mysql-client package does provide a very handy instrument called mysqladmin , mysqladmin has many possibilities among which is creating a new mysql server admin (root) password or changing a previously set mysql server password to a new one

1. Here is how you can set a new MySQL server password:

mysqladmin -u root 'password' YOURasddsaPASSWORDjqweHERE

2. If you need to change an already existing mysql password you need to provide just one more argument to mysqladmin:

mysqladmin -u root 'password' YOURasdfdsaNEWasddsaPASSWORD_HERE -pEnter password:

Whether the Enter password: field appears you will be required to fill in the original mysql server root password after which the password will be changed to the above string passed in to the mysqladmin command line ‘YOURasdfdsaNEWasddsaPASSWORD_HERE’

That’s all now you have either set a new password for the mysql server or have already changed your previous one.

How to record microphone input sound (only) using good old ffmpeg

Tuesday, December 25th, 2012

The good old ffmpeg, along with being able to capture sound and video from your Linux Desktop or a certain Window and Skype whatever WebCamera input is also able to record sound from both camera or embedded laptop microphone. Here is how:

# ffmpeg -f alsa -ac 2 -i pulse   -acodec pcm_s16le -vcodec libx264 -vpre lossless_ultrafast -threads 0  -y  myVOICE.wav

This as you can see from arguments, uses GNOME's pulseaudio (audio service) and ALSA. Sound is first streamed through alsa and then the sound inflow is passed to be processed and multipled in a separate sound channel by pulseaudio. This method though said to be working fine on Ubuntu Linux is not working well on some other Linux distributions like Debian if one is using ALSA configured to use a software sound multiplexor via the so called – alsa dsnoop interface (previously I write how to use it in order to make Skype and other programs use SoundBlaster proper – article is here)

Below is the output warning I got whether trying ffmpeg with -f alsa and -i pulse arguments:

hipo@noah:~/Desktop$ ffmpeg -f alsa -ac 2 -i pulse   -acodec pcm_s16le -vcodec libx264 -vpre lossless_ultrafast -threads 0  -y  myVOICE.wav
FFmpeg version SVN-r25838, Copyright (c) 2000-2010 the FFmpeg developers
  built on Sep 20 2011 17:00:01 with gcc 4.4.5
  configuration: --enable-libdc1394 --prefix=/usr --extra-cflags='-Wall -g ' --cc='ccache cc' --enable-shared --enable-libmp3lame --enable-gpl --enable-libvorbis --enable-pthreads --enable-libfaac --enable-libxvid --enable-postproc --enable-x11grab --enable-libgsm --enable-libtheora --enable-libopencore-amrnb --enable-libopencore-amrwb --enable-libx264 --enable-libspeex --enable-nonfree --disable-stripping --enable-avfilter --enable-libdirac --disable-decoder=libdirac --enable-libschroedinger --disable-encoder=libschroedinger --enable-version3 --enable-libopenjpeg --enable-libvpx --enable-librtmp --extra-libs=-lgcrypt --disable-altivec --disable-armv5te --disable-armv6 --disable-vis
  libavutil     50.33. 0 / 50.43. 0
  libavcore      0.14. 0 /  0.14. 0
  libavcodec    52.97. 2 / 52.97. 2
  libavformat   52.87. 1 / 52.87. 1
  libavdevice   52. 2. 2 / 52. 2. 2
  libavfilter    1.65. 0 /  1.65. 0
  libswscale     0.12. 0 /  0.14. 1
  libpostproc   51. 2. 0 / 51. 2. 0
[alsa @ 0x633160] capture with some ALSA plugins, especially dsnoop, may hang.

where concrete programs, are run which take use of OSS (Open Sound System) – an already obsolete sound architecture. By the way on current Debian / Fedora etc. Linux-es OSS is managed and played only, whether few kernel modules are already  pre-loaded, below are the ones as pasted from my Debian Squeeze:

# lsmod | grep -i oss
snd_pcm_oss            32591  0
snd_mixer_oss          12606  1 snd_pcm_oss
snd_pcm                60487  3 snd_hda_intel,snd_hda_codec,snd_pcm_oss
snd                    46526  15 snd_hda_codec_analog,snd_hda_intel,snd_hda_codec,snd_hwdep,snd_pcm_oss,snd_mixer_oss,snd_pcm,snd_rawmidi,snd_seq,snd_timer,snd_seq_device

The oss processed sound recording from ffmpeg is not working, well on my Linux, cause I have my custom (non-Debian) native binary Firefox downloaded and installed from Firefox's website.The browser is compiled to open automatically /dev/dsp which in practice uses the above-mentioned OSS listed modules, which on their behalf when used break out the sound processed by alsa and respectively pulseaudio (those who use Linux for longer time should remember in the times of OSS only one certain sound stream was possible to be processed / played on Linux historically before ALSA come to scene to be "defacto" standard kernel sound processor. Well ofcourse firefox developers who compiled the Firefox for Linux probably was using Slackware or some other Linux distro which probably used to play sound still via OSS or maybe they compiled it so thinking OSS because of its historical importance is still supported by more Linux distributions than alsa is. I like the custom compiled Firefox to run on my Debian instead of default Debian Squeeze (IceWeasel) cause firefox.org ,Firefox version is much newer and supports better latest HTML5  as well as it includes ability to download and apply automatic updates to the latest version provided by Firefox team. However I fou

Thus for Linux users like me using latest firefox binary from firefox.org (in parallel) with opened Firefox browser to record sound from Webcam or Embedded notebook mic the obsolete OSS has to be used, here is how:

# ffmpeg -f oss -ac 2 -i /dev/dsp   -acodec pcm_s16le -vcodec libx264 -vpre lossless_ultrafast -threads 0  -y  my-recorder-VOICE.wav

Enjoy ;)

How to find fastest RPM ( yum ) mirror on Fedora, CentOS and RHEL Linux

Wednesday, November 14th, 2012

Something very useful Fedora or RHEL users in terms is to configure YUM, download from quickest network speed package repository. On RHEL and Fedora developers made it be a piece of cake.

All you have to do is run command:

[root@centos]# yum install yum-fastestmirror


That's it the package installs one python script which, takes care of finding the closest RPM repository for your distro as well as check among a list of RPM mirrors which one is fastest and has lesser hosts ( hops ) to your system. It is pretty much like Debian's netselect (the tool on Debian which finds nearast fastest deb repository), except it is much simplistic. Once yum-fastestmirror package is installed you don't need to do nothing else, the script is loaded as a YUM plugin so it does all work on finding closest repository by itself. The list of all mirrors, among yum-fastestmirror will evaluate is: [root@centos ]# grep -i host /etc/yum/pluginconf.d/fastestmirror.conf
hostfilepath=/var/cache/yum/timedhosts.txt
maxhostfileage=10
[root@centos ]# wc -l /var/cache/yum/timedhosts.txt 50 /var/cache/yum/timedhosts.txt

The whole list of RPM package mirrors as of time of writing as taken from CentOS 5.6 is here