Posts Tagged ‘file transfers’

How to Copy large data directories between 2 Linux / Unix servers without direct ssh / ftp access between server1 and server2 other by using SSH, TAR and Unix pipes

Monday, April 27th, 2015

how-to-copy-large-data-directories-between-2-linux-unix-servers-without-direct-ssh-ftp-access-btween-each-other

In a Web application data migration project, I've come across a situation where I have to copy / transfer 500 Gigabytes of data from Linux server 1 (host A) to Linux server 2 (host B). However the two machines doesn't have direct access to each other (via port 22) for security reasons and hence I cannot use sshfs to mount remotely host dir via ssh and copy files like local ones.

As this is a data migration project its however necessery to migrate the data finding a way … Normal way companies do it is to copy the data to External Hard disk storage and send it via some Country Post services or some employee being send in Data center to attach the SAN to new server where data is being migrated However in my case this was not possible so I had to do it different.

I have access to both servers as they're situated in the same Corporate DMZ network and I can thus access both UNIX machines via SSH.

Thanksfully there is a small SSH protocol + TAR archiver and default UNIX pipe's capabilities hack that makes possible to transfer easy multiple (large) files and directories. The only requirement to use this nice trick is to have SSH client installed on the middle host from which you can access via SSH protocol Server1 (from where data is migrated) and Server2 (where data will be migrated).

If the hopping / jump server from which you're allowed to have access to Linux  servers Server1 and Server2 is not Linux and you're missing the SSH client and don't have access on Win host to install anything on it just use portable mobaxterm (as it have Cygwin SSH client embedded )

Here is how:
 

jump-host:~$ ssh server1 "tar czf – /somedir/" | pv | ssh server2 "cd /somedir/; tar xf


As you can see from above command line example an SSH is made to server1  a tar is used to archive the directory / directories containing my hundred of gigabytes and then this is passed to another opened ssh session to server 2  via UNIX Pipe mechanism and then TAR archiver is used second time to unarchive previously passed archived content. pv command which is in the middle is not obligitory though it is a nice way to monitor status about data transfer like below:
 

500GB 0:00:01 [10,5MB/s] [===================================================>] 27%


P.S. If you don't have PV installed install it either with apt-get on Debian:


debian:~# apt-get install –yes pv


Or on CentOS / Fedora / RHEL etc.


[root@centos ~]# yum -y install pv


Below is a small chunk of PV manual to give you better idea of what it does:

NAME
       pv – monitor the progress of data through a pipe

SYNOPSIS
       pv [OPTION] [FILE]…
       pv [-h|-V]

DESCRIPTION
       pv  allows  a  user to see the progress of data through a pipeline, by giving information such as time elapsed, percentage
       completed (with progress bar), current throughput rate, total data transferred, and ETA.

       To use it, insert it in a pipeline between two processes, with the appropriate options.  Its standard input will be passed
       through to its standard output and progress will be shown on standard error.

       pv  will  copy  each  supplied FILE in turn to standard output (- means standard input), or if no FILEs are specified just
       standard input is copied. This is the same behaviour as cat(1).

       A simple example to watch how quickly a file is transferred using nc(1):

              pv file | nc -w 1 somewhere.com 3000

       A similar example, transferring a file from another process and passing the expected size to pv:

              cat file | pv -s 12345 | nc -w 1 somewhere.com 3000


Note that with too big file transfers using PV will delay data transfer because everything will have to pass through another 2 pipes, however for file transfers up to few gigabytes its really nice to include it.

If you only need to transfer huge .tar.gz archive and you don't bother about traffic security (i.e. don't care whether transferred traffic is going through encrypted SSH tunnel and don't want to put an overhead to both systems for encrypting the data and you have some unfiltered ports between host 1 and host 2 you can run netcat on host 2 to listen for connections and forward .tar.gz content via netcat's port like so:
 

linux2:~$ nc -l -p 12345 > /path/destinationfile
linux2:~$ cat /path/sourcfile | nc desti.nation.ip.address 12345


Another way to transfer large data without having connection with server1 and server2 but having connection to a third host PC is to use rsync and good old SSH Tunneling, like so:
 

jump-host:~$ ssh -R 2200:Linux-server1:22 root@Linux-server2 "rsync -e 'ssh -p 2200' –stats –progress -vaz /directory/to/copy root@localhost:/copy/destination/dir"
Teracopy faster Windows copy or Save files from Windows PC with dying hard drive

Wednesday, July 3rd, 2013

TeraCopy logo copy files faster and prevent windows hangs up on broken hard disks
My sysadmin colleague mentioned today about TeraCopy. An application for Microsoft Windows designed to be used to Move or Copy  files. So why would one want to use Teracopy instead of normal Windows Explorer copy integrated soft? Reason is Teracopy is faster than MS Windows Copy / Move and uses dynamically adjusted buffers to reduce seek times. This asynchronous copying speeds up file transfers between physical HDDs.

More precious feature of TeraCopy is whether you have to Save data from hard disks with Bad Sectors, it can skip faulty files (stored on bad sectors) without triggering Windows to hang up or halt with the Blue Screen of Death.TeraCopy even can be setup to replace Windows Explorer (i.e. Shell Integration copy and move functions). Beside that it works well with Unicode encoded file names (Cyrillic, Chineese) etc.

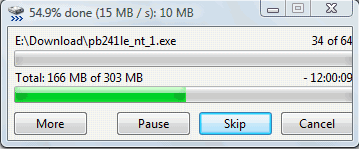
Teracopy copying files on Microsoft windows 7 substitutes default windows copy and move opeartions

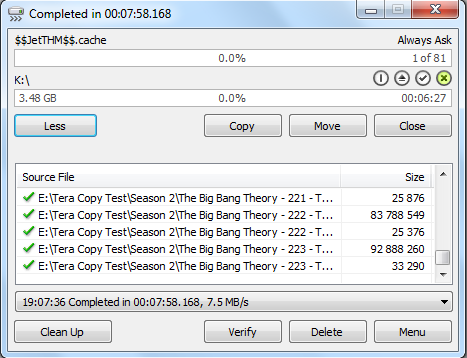
As of time of writting article, TeraCopy has support for all Windows NT (Windows XP / 2000) as well as for Windows 7 and 8. Whether a failure to copy file occurs it tries to recopy file several times in order to achieve copy success. After each file is copied a CRC check up value of file is calculated and matched. It also provides a way more verbose information on copied files than Windows default Copy. It is very useful in copying large files from system to system as file transfers complete time is significantly lower

teracopy with more information on copying files screenshot MS Windows

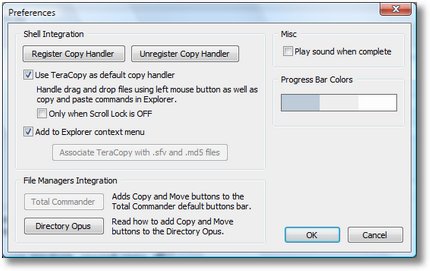
Once TeraCopy is installed it automatically does replace Explorer Copy and Move functions, hence after install every next Move or Copy operation is auto handled by it. In preferences the user could still revert back Copy / Move functions to Explorer original.

TeraCopy copy faster files and save files from broken win hdd preferences screenshot

Unfortunately TeraCopy is not-free software but freeware and can only be used to non-commercial use, for commercial use you have to purchase TeraCopy Pro version.

How to mount NTFS Windows XP filesystem on FreeBSD, NetBSD, OpenBSD

Friday, May 11th, 2012

Mounting NTFS hdd partitions on FreeBSD logo picture

A friend of mine bring home a Seagate External Hard Disk Drive using USB 3 as a communication media. I needed to attach the hard disk to my FreeBSD router to transfer him some data, the External HDD is formatted to use NTFS as a main file partition and hence to make the file transfers I had to somehow mount the NTFS partition on the HDD.

FreeBSD and other BSDs, just like Linux does not have embedded NTFS file system mount support.
In order to add an external write support for the plugged hdd NTFS I looked in the ports tree:

freebsd# cd /usr/ports
freebsd# make search name='ntfs'
Port: fusefs-ntfs-2010.10.2
Path: /usr/ports/sysutils/fusefs-ntfs
Info: Mount NTFS partitions (read/write) and disk images
Maint: ports@FreeBSD.org
B-deps: fusefs-libs-2.7.4 libiconv-1.13.1_1 libtool-2.4 libublio-20070103 pkg-config-0.25_1
R-deps: fusefs-kmod-0.3.9.p1.20080208_7 fusefs-libs-2.7.4 libiconv-1.13.1_1 libublio-20070103 pkg-config-0.25_1
WWW: http://www.tuxera.com/community/

Port: ntfsprogs-2.0.0_1
Path: /usr/ports/sysutils/ntfsprogs
Info: Utilities and library to manipulate NTFS partitions
Maint: ports@FreeBSD.org
B-deps: fusefs-libs-2.7.4 libiconv-1.13.1_1 libublio-20070103 pkg-config-0.25_1
R-deps: libublio-20070103 pkg-config-0.25_1
WWW: http://www.linux-ntfs.org/
freebs# cd sysutils/fusefs-ntfs/
freebsd# ls
Makefile distinfo files/ pkg-descr pkg-plist
freebsd# cat pkg-descr
The ntfs-3g driver is an open source, freely available read/write NTFS
driver, which provides safe and fast handling of the Windows XP, Windows
Server 2003 and Windows 2000 filesystems. Almost the full POSIX filesystem
functionality is supported, the major exceptions are changing the file
ownerships and the access rights.
WWW: http://www.tuxera.com/community/

Using ntfs-3g I managed to succeed mounting the NTFS on my old PC running FreeBSD ver. 7_2

1. Installing fuserfs-ntfs support on BSD

Before I can use ntfs-3g, to mount the paritition, I had to install fuserfs-ntfs bsd port, with:

freebsd# cd /usr/ports/sysutils/fusefs-ntfs
freebsd# make install clean
.....

I was curious if ntfsprogs provides other utilities to do the ntfs mount but whilst trying to install it I realized it is already installed as a dependency package to fusefs-ntfs.

fusefs-ntfs package provides a number of utilities for creating, mounting, fixing and doing various manipulations with Microsoft NTFS filesystems.

Here is a list of all the executable utilities helpful in NTFS fs management:

freebsd# pkg_info -L fusefs-ntfs\* | grep -E "/bin/|/sbin|README"
/usr/local/bin/lowntfs-3g
/usr/local/bin/ntfs-3g
/usr/local/bin/ntfs-3g.probe
/usr/local/bin/ntfs-3g.secaudit
/usr/local/bin/ntfs-3g.usermap
/usr/local/bin/ntfscat
/usr/local/bin/ntfscluster
/usr/local/bin/ntfscmp
/usr/local/bin/ntfsfix
/usr/local/bin/ntfsinfo
/usr/local/bin/ntfsls
/usr/local/sbin/mkntfs
/usr/local/sbin/ntfsclone
/usr/local/sbin/ntfscp
/usr/local/sbin/ntfslabel
/usr/local/sbin/ntfsresize
/usr/local/sbin/ntfsundelete
/usr/local/share/doc/ntfs-3g/README
/usr/local/share/doc/ntfs-3g/README.FreeBSD

The README and README.FreeBSD are wonderful, reading for those who want to get more in depth knowledge on using the up-listed utilities.

One utility, worthy to mention, I have used in the past is ntfsfix. ntfsfix resolve issues with NTFS partitions which were not unmounted on system shutdown (electricity outage), system hang up etc.

2. Start fusefs (ntfs) and configure it to auto load on system boot

Once fuserfs-ntfs is installed, if its necessery ntfs fs mounts to be permanently supported on the BSD system add fusefs_enable="YES" to /etc/rc.conf(the FreeBSD services auto load conf).

freebsd# echo 'fusefs_enable="YES"' >> /etc/rc.conf

One note to make here is that you need to have also dbus_enable="YES" and hald_enable="YES" in /etc/rc.conf, not having this two in rc.conf will prevent fusefs to start properly. Do a quick grep to make sure this two variables are enabled:

Afterwards fsusefs load up script should be run:

freebsd# /usr/local/etc/rc.d/fusefs start
Starting fusefs.

Another alternative way to load ntfs support on the BSD host is to directly load fuse.ko kernel module:

freebsd# /sbin/kldload fuse.ko

3. Mounting the NTFS partition

In my case, the Seagate hard drive was detected as da0, where the NTFS partition was detected as s1 (da0s1):

freebsd# dmesg|grep -i da0
da0 at umass-sim0 bus 0 target 0 lun 0
da0: Fixed Direct Access SCSI-4 device
da0: 40.000MB/s transfers
da0: 953869MB (1953525164 512 byte sectors: 255H 63S/T 121601C)br />GEOM_LABEL: Label for provider da0s1 is ntfs/Expansion Drive.
GEOM_LABEL: Label for provider da0s1 is ntfs/Expansion Drive.

Therefore further to mount it one can use mount_ntfs (to quickly mount in read only mode) or ntfs-3g for (read / write mode):

If you need to just quickly mount a disk drive to copy some data and umount it with no need for writting to the NTFS partition do;

freebsd# /sbin/mount_ntfs /dev/ad0s1 /mnt/disk

Note that mount_ntfs command is a native BSD command and have nothing to do with ntfs-3g. Therefore using it to mount NTFS is not the same as mounting it via ntfs-3g cmd

freebsd# /usr/local/bin/ntfs-3g -o rw /dev/da0s1 /mnt/disk/

Something, I've noticed while using ntfs-3g is, it fails to properly exit even when the ntfs-3g shell execution is over:

freebsd# ps ax |grep -i ntfs|grep -v grep
18892 ?? Is 0:00.00 /usr/local/bin/ntfs-3g -o rw /dev/da0s1 /mnt/disk/

I dunno if this is some kind of ntfs-3g bug or feature specific to all versions of FreeBSD or it is something local to FBSD 7.2

Thought ntfs-3g, keeps appearing in process list, praise God as of time of writting NTFS support on FreeBSD prooved to be stable.
Read / Write disk operations to the NTFS I tested it with works great. Just about 5 years ago I still remember write mode was still experimental. Now it seems NTFS mounts can be used with no hassle even on production machines.

4. Auto mounting NTFS partition on FreeBSD system boot

There are two approaches towards 'the problem' I can think of.
The better way to auto mount on boot (in my view) is through /etc/fstab use

If /etc/fstab + ntfs-3g is to be used, you will however change the default /sbin/mount_ntfs command to point to /usr/local/bin/ntfs-3g, i.e.:

freebsd# mv /sbin/mount_ntfs /sbin/mount_ntfs.orig
freebsd# ln -s /usr/local/bin/ntfs-3g /sbin/mount_ntfs

Then to mount /dev/da0s1 via /etc/fstab add line:

/dev/ad0s1 /mnt/disk ntfs rw,late 0 0

To not bother with text editor run:

freebsd# echo '/dev/ad0s1 /mnt/disk ntfs rw,late 0 0' >> /etc/fstab

I've red in posts in freebsd forums, there is also a way to use ntfs-3g for mounting partitions, without substituting the original bsd /sbin/mount_ntfs, the exact commands suggested to be used with no need to prior mv /sbin/mount_ntfs to /sbin/mount_ntfs.orig and link it to ntfs is:

/dev/ad0s1 /disk ntfs rw,mountprog=/usr/local/bin/ntfs-3g,late 0 0

For any other NTFS partitions, for instance /dev/ad0s2, /dev/ad2s1 etc. simply change the parititon name and mount points.

The second alternative to adding the NTFS to auto mount is through /etc/rc.local. /etc/rc.local content will be executed very late in system boot. :

echo '/usr/local/bin/ntfs-3g -o rw /dev/da0s1' >> /etc/rc.local

One disadvanage of using /etc/rc.local for mounting the partition is the hanging ntfs-3g in proc list:

freebsd# ps ax |grep -i ntfs|grep -v grep
18892 ?? Is 0:00.00 /usr/local/bin/ntfs-3g -o rw /dev/da0s1 /mnt/disk/

Though, I haven't tested it yet. Using the same methodology should be perfectly working on PC-BSD, DragonFlyBSD, NetBSD and OpenBSD.
I will be glad if someone who runs any of the other BSDs can confirm, following this instructions works fine on these BSDs too.