Posts Tagged ‘flags’

What is inode and how to find out which directory is eating up all your filesystem inodes on Linux, Increase inode count on a ext3 ext4 and ufs filesystems

Tuesday, August 20th, 2019

what-is-inode-find-out-which-filesystem-or-directory-eating-up-all-your-system-inodes-linux_inode_diagram

If you're a system administrator of multiple Linux servers used for Web serving delivery / Mail server sysadmin, Database admin or any High amount of Drives Data Storage used for backup servers infra, Data Repository administrator such as Linux hosted Samba / CIFS shares, etc. or using some Linux Hosting Provider to host your website or any other UNIX like Infrastructure servers that demands a storage of high number of files under a Directory  you might end up with the common filesystem inode depletion issues ( Maximum Inode number for a filesystem is predefined, limited and depending on the filesystem configured size).

In case a directory stored files end up exceding the amount of possible addressable inodes could prevent any data to be further assiged and stored on the Filesystem.

When a device runs out of inodes, new files cannot be created on the device, even though there may be plenty free space available and the first time it happened to me very long time ago I was completely puzzled how this is possible as I was not aware of Inodes existence  …

Reaching maximum inodes number (e.g. inode depletion), often happens on Busy Mail servers (receivng tons of SPAM email messages) or Content Delivery Network (CDN – Website Image caching servers) which contain many small files on EXT3 or EXT4 Journalled filesystems. File systems (such as Btrfs, JFS or XFS) escape this limitation with extents or dynamic inode allocation, which can 'grow' the file system or increase the number of inodes.


Hence ending being out of inodes could cause various oddities on how stored data behaves or communicated to other connected microservices and could lead to random application disruptions and odd results costing you many hours of various debugging to find the root cause of inodes (index nodes) being out of order.

In below article, I will try to give an overall explanation on what is an I-Node on a filesystem, how inodes of FS unit could be seen, how to diagnose a possible inode poblem – e.g.  see the maximum amount of inodes available per filesystem and how to prepare (format) a new filesystem with incrsed set of maximum inodes.


What are filesystem i-nodes?


This is a data structure in a Unix-style file system that describes a file-system object such as a file or a directory.
The data structure described in the inodes might vary slightly depending on the filesystem but usually on EXT3 / EXT4 Linux filesystems each inode stores the index to block that contains attributes and disk block location(s) of the object's data.
– Yes for those who are not aware on how a filesystem is structured on *nix it does allocate all stored data in logical separeted structures called data blocks. Each file stored on a local filesystem has a file descriptor, there are virtual unit structures file tables and each of the inodes that are a reference number has a own data structure (inode table).

Inodes / "Index" are slightly unusual on file system structure that stored the access information of files as a flat array on the disk, with all the hierarchical directory information living aside from this as explained by Unix creator and pioneer- Dennis Ritchie (passed away few years ago).

what-is-inode-very-simplified-explanation-diagram-data

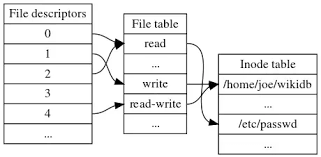
Simplified explanation on file descriptors, file table and inode, table on a common Linux filesystem

Here is another description on what is I-node, given by Ken Thompson (another Unix pioneer and father of Unix) and Denis Ritchie, described in their paper published in 1978:

"    As mentioned in Section 3.2 above, a directory entry contains only a name for the associated file and a pointer to the file itself. This pointer is an integer called the i-number (for index number) of the file. When the file is accessed, its i-number is used as an index into a system table (the i-list) stored in a known part of the device on which the directory resides. The entry found thereby (the file's i-node) contains the description of the file:…
    — The UNIX Time-Sharing System, The Bell System Technical Journal, 1978  "


What is typical content of inode and how I-nodes play with rest of Filesystem units?


The inode is just a reference index to a data block (unit) that contains File-system object attributes. It may include metadata information such as (times of last change, access, modification), as well as owner and permission data.


On a Linux / Unix filesystem, directories are lists of names assigned to inodes. A directory contains an entry for itself, its parent, and each of its children.

Structure-of-inode-table-on-Linux-Filesystem-diagram


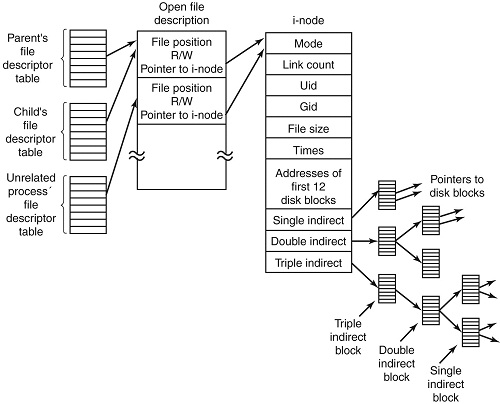
Structure of inode table-on Linux Filesystem diagram (picture source GeeksForGeeks.org)

  • Information about files(data) are sometimes called metadata. So you can even say it in another way, "An inode is metadata of the data."
  •  Inode : Its a complex data-structure that contains all the necessary information to specify a file. It includes the memory layout of the file on disk, file permissions, access time, number of different links to the file etc.
  •  Global File table : It contains information that is global to the kernel e.g. the byte offset in the file where the user's next read/write will start and the access rights allowed to the opening process.
  • Process file descriptor table : maintained by the kernel, that in turn indexes into a system-wide table of files opened by all processes, called the file table .

The inode number indexes a table of inodes in a known location on the device. From the inode number, the kernel's file system driver can access the inode contents, including the location of the file – thus allowing access to the file.

  •     Inodes do not contain its hardlink names, only other file metadata.
  •     Unix directories are lists of association structures, each of which contains one filename and one inode number.
  •     The file system driver must search a directory looking for a particular filename and then convert the filename to the correct corresponding inode number.

The operating system kernel's in-memory representation of this data is called struct inode in Linux. Systems derived from BSD use the term vnode, with the v of vnode referring to the kernel's virtual file system layer.


But enough technical specifics, lets get into some practical experience on managing Filesystem inodes.
 

Listing inodes on a Fileystem


Lets say we wan to to list an inode number reference ID for the Linux kernel (files):


root@linux: # ls -i /boot/vmlinuz-*
 3055760 /boot/vmlinuz-3.2.0-4-amd64   26091901 /boot/vmlinuz-4.9.0-7-amd64
 3055719 /boot/vmlinuz-4.19.0-5-amd64  26095807 /boot/vmlinuz-4.9.0-8-amd64


To list an inode of all files in the kernel specific boot directory /boot:


root@linux: # ls -id /boot/
26091521 /boot/


Listing inodes for all files stored in a directory is also done by adding the -i ls command flag:

Note the the '-1' flag was added to to show files in 1 column without info for ownership permissions


root@linux:/# ls -1i /boot/
26091782 config-3.2.0-4-amd64
 3055716 config-4.19.0-5-amd64
26091900 config-4.9.0-7-amd64
26095806 config-4.9.0-8-amd64
26091525 grub/
 3055848 initrd.img-3.2.0-4-amd64
 3055644 initrd.img-4.19.0-5-amd64
26091902 initrd.img-4.9.0-7-amd64
 3055657 initrd.img-4.9.0-8-amd64
26091756 System.map-3.2.0-4-amd64
 3055703 System.map-4.19.0-5-amd64
26091899 System.map-4.9.0-7-amd64
26095805 System.map-4.9.0-8-amd64
 3055760 vmlinuz-3.2.0-4-amd64
 3055719 vmlinuz-4.19.0-5-amd64
26091901 vmlinuz-4.9.0-7-amd64
26095807 vmlinuz-4.9.0-8-amd64


To get more information about Linux directory, file, such as blocks used by file-unit, Last Access, Modify and Change times, current External Symbolic or Static links for filesystem object:
 

root@linux:/ # stat /etc/
  File: /etc/
  Size: 16384         Blocks: 32         IO Block: 4096   catalog
Device: 801h/2049d    Inode: 6365185     Links: 231
Access: (0755/drwxr-xr-x)  Uid: (    0/    root)   Gid: (    0/    root)
Access: 2019-08-20 06:29:39.946498435 +0300
Modify: 2019-08-14 13:53:51.382564330 +0300
Change: 2019-08-14 13:53:51.382564330 +0300
 Birth: –


Within a POSIX system (Linux-es) and *BSD are more or less such, a file has the following attributes[9] which may be retrieved by the stat system call:

   – Device ID (this identifies the device containing the file; that is, the scope of uniqueness of the serial number).
    File serial numbers.
    – The file mode which determines the file type and how the file's owner, its group, and others can access the file.
    – A link count telling how many hard links point to the inode.
    – The User ID of the file's owner.
    – The Group ID of the file.
    – The device ID of the file if it is a device file.
    – The size of the file in bytes.
    – Timestamps telling when the inode itself was last modified (ctime, inode change time), the file content last modified (mtime, modification time), and last accessed (atime, access time).
    – The preferred I/O block size.
    – The number of blocks allocated to this file.


Getting more extensive information on a mounted filesystem


Most Linuxes have the tune2fs installed by default (in debian Linux this is through e2fsprogs) package, with it one can get a very good indepth information on a mounted filesystem, lets say about the ( / ) root FS.
 

root@linux:~# tune2fs -l /dev/sda1
tune2fs 1.44.5 (15-Dec-2018)
Filesystem volume name:   <none>
Last mounted on:          /
Filesystem UUID:          abe6f5b9-42cb-48b6-ae0a-5dda350bc322
Filesystem magic number:  0xEF53
Filesystem revision #:    1 (dynamic)
Filesystem features:      has_journal ext_attr resize_inode dir_index filetype needs_recovery sparse_super large_file
Filesystem flags:         signed_directory_hash
Default mount options:    (none)
Filesystem state:         clean
Errors behavior:          Continue
Filesystem OS type:       Linux
Inode count:              30162944
Block count:              120648960
Reserved block count:     6032448
Free blocks:              13830683
Free inodes:              26575654
First block:              0
Block size:               4096
Fragment size:            4096
Reserved GDT blocks:      995
Blocks per group:         32768
Fragments per group:      32768
Inodes per group:         8192
Inode blocks per group:   512
Filesystem created:       Thu Sep  6 21:44:22 2012
Last mount time:          Sat Jul 20 11:33:38 2019
Last write time:          Sat Jul 20 11:33:28 2019
Mount count:              6
Maximum mount count:      22
Last checked:             Fri May 10 18:32:27 2019
Check interval:           15552000 (6 months)
Next check after:         Wed Nov  6 17:32:27 2019
Lifetime writes:          338 GB
Reserved blocks uid:      0 (user root)
Reserved blocks gid:      0 (group root)
First inode:              11
Inode size:              256
Required extra isize:     28
Desired extra isize:      28
Journal inode:            8
First orphan inode:       21554129
Default directory hash:   half_md4
Directory Hash Seed:      d54c5a90-bc2d-4e22-8889-568d3fd8d54f
Journal backup:           inode blocks


Important note to make here is file's inode number stays the same when it is moved to another directory on the same device, or when the disk is defragmented which may change its physical location. This also implies that completely conforming inode behavior is impossible to implement with many non-Unix file systems, such as FAT and its descendants, which don't have a way of storing this invariance when both a file's directory entry and its data are moved around. Also one inode could point to a file and a copy of the file or even a file and a symlink could point to the same inode, below is example:

$ ls -l -i /usr/bin/perl*
266327 -rwxr-xr-x 2 root root 10376 Mar 18  2013 /usr/bin/perl
266327 -rwxr-xr-x 2 root root 10376 Mar 18  2013 /usr/bin/perl5.14.2

A good to know is inodes are always unique values, so you can't have the same inode number duplicated. If a directory is damaged, only the names of the things are lost and the inodes become the so called “orphan”, e.g.  inodes without names but luckily this is recoverable. As the theory behind inodes is quite complicated and is complicated to explain here, I warmly recommend you read Ian Dallen's Unix / Linux / Filesystems – directories inodes hardlinks tutorial – which is among the best academic Tutorials explaining various specifics about inodes online.


How to Get inodes per mounted filesystem


root@linux:/home/hipo# df -i
Filesystem       Inodes  IUsed   IFree IUse% Mounted on


dev             2041439     481   2040958   1% /dev
tmpfs            2046359     976   2045383   1% /run
tmpfs            2046359       4   2046355   1% /dev/shm
tmpfs            2046359       6   2046353   1% /run/lock
tmpfs            2046359      17   2046342   1% /sys/fs/cgroup
/dev/sdb5        1221600    2562   1219038   1% /usr/var/lib/mysql
/dev/sdb6        6111232  747460   5363772  13% /var/www/htdocs
/dev/sdc1      122093568 3083005 119010563   3% /mnt/backups
tmpfs            2046359      13   2046346   1% /run/user/1000


As you see in above output Inodes reported for each of mounted filesystems has a specific number. In above output IFree on every mounted FS locally on Physical installed OS Linux is good.


Here is an example on how to recognize a depleted Inodes on a OpenXen Virtual Machine with attached Virtual Hard disks.

linux:~# df -i
Filesystem         Inodes     IUsed      IFree     IUse%   Mounted on
/dev/xvda         2080768    2080768     0      100%    /
tmpfs             92187      3          92184   1%     /lib/init/rw
varrun            92187      38          92149   1%    /var/run
varlock            92187      4          92183   1%    /var/lock
udev              92187     4404        87783   5%    /dev
tmpfs             92187       1         92186   1%    /dev/shm


Finding files with a certain inode


At some cases if you want to check all the copy files of a certain file that have the same i-node pointer it is useful to find them all by their shared inode this is possible with simple find (below example is for /usr/bin/perl binary sharing same inode as perl5.28.1:


ls -i /usr/bin/perl
23798851 /usr/bin/perl*


 find /usr/bin -inum 435308 -print
/usr/bin/perl5.28.1
/usr/bin/perl


Find directory that has a large number of files in it?

To get an overall number of inodes allocated by a certain directory, lets say /usr /var


root@linux:/var# du -s –inodes /usr /var
566931    /usr
56020    /var/

To get a list of directories use by inode for a directory with its main contained sub-directories sorted from 1 till highest number use:
 

du -s –inodes * 2>/dev/null |sort -g


Usually running out of inodes means there is a directory / fs mounts that has too many (small files) that are depleting the max count of possible inodes.

The most simple way to list directories and number of files in them on the server root directory is with a small bash shell loop like so:
 

for i in /*; do echo $i; find $i |wc -l; done


Another way to identify the exact directory that is most likely the bottleneck for the inode depletion in a sorted by file count, human readable form:
 

find / -xdev -printf '%h\n' | sort | uniq -c | sort -k 1 -n


This will dump a list of every directory on the root (/) filesystem prefixed with the number of files (and subdirectories) in that directory. Thus the directory with the largest number of files will be at the bottom.


The -xdev switch is used to instruct find to narrow it's search to only the device where you're initiating the search (any other sub-mounted NAS / NFS filesystems from a different device will be omited).


Print top 10 subdirectories with Highest Inode Usage


Once identifed the largest number of files directories that is perhaps the issue, to further get a list of Top subdirectories in it with highest amount of inodes used, use below cmd:


for i in `ls -1A`; do echo "`find $i | sort -u | wc -l` $i"; done | sort -rn | head -10


To list more than 10 of the top inodes used dirs change the head -10 to whatever num needed.

N.B. ! Be very cautious when running above 2 find commands on a very large filesystems as it will be I/O Excessive and in filesystems that has some failing blocks this could create further problems.

To omit putting a high I/O load on a production filesystem, it is possible to also use du + very complex regular expression:
 

cd /backup
du –inodes -S | sort -rh | sed -n         '1,50{/^.\{71\}/s/^\(.\{30\}\).*\(.\{37\}\)$/\1…\2/;p}'


Results returned are from top to bottom.


How to Increase the amount of Inodes count on a new created volume EXT4 filesystem

Some FS-es XFS, JFS do have an auto-increase inode feature in case if their is physical space, whether otheres such as reiserfs does not have inodes at all but still have a field reported when queried for errors. But the classical Linux ext3 / ext4 does not have a way to increase the inode number on a live filesystem. Instead the way to do it there is to prepare a brand new filesystem on a Disk / NAS / attached storage.

The number of inodes at format-time of the block storage can be as high as 4 billion inodes. Before you create the new FS, you have to partition the new the block storage as ext4 with lets say parted command (or nullify the content of an with dd to clean up any previous existing data on a volume if there was already existing data:
 

parted /dev/sda


dd if=/dev/zero of=/dev/path/to/volume


  then format it with this additional parameter:


mkfs.ext4 -N 3000000000 /dev/path/to/volume


Here in above example the newly created filesystem of EXT4 type will be created with 3 Billion inodes !, for setting a higher number on older ext3 filesystem max inode count mkfs.ext3 could be used instead.

Bear in mind that 3 Billion number is a too high number and if you plan to have some large number of files / directories / links structures just raise it up to your pre-planning requirements for FS. In most cases it will be rarely anyone that want to have this number higher than 1 or 2 billion of inodes.

On FreeBSD / NetBSD / OpenBSD setting inode maximum number for a UFS / UFS2 (which is current default FreeBSD FS), this could be done via newfs filesystem creation command after the disk has been labeled with disklabel:


freebsd# newfs -i 1024 /dev/ada0s1d


Increase the Max Count of Inodes for a /tmp filesystem


Sometimes on some machines it is necessery to have ability to store very high number of small files (e.g. have a very large number of inodes) on a temporary filesystem kept in memory. For example some web applications served by Web Server Apache + PHP, Nginx + Perl-FastCGI are written in a bad manner so they kept tons of temporary files in /tmp, leading to issues with exceeded amount of inodes.
If that's the case to temporary work around you can increase the count of Inodes for /tmp to a very high number like 2 billions using:


mount -o remount,nr_inodes=<bignum> /tmp

To make the change permanent on next boot if needed don't forget to put the nr_inodes=whatever_bignum as a mount option for the temporary fs to /etc/fstab

Eventually, if you face this issues it is best to immediately track which application produced the mess and ask the developer to fix his messed up programs architecture.


Conclusion


It was explained on the very common issue of having maximum amount of inodes on a filesystem depleted and the unpleasent consequences of inability to create new files on living FS.
Then a general overview was given on what is inode on a Linux / Unix filesystem, what is typical content of inode, how inode addressing is handled on a FS. Further was explained how to get basic information about available inodes on a filesystem, how to get a filename/s based on inode number (with find), the well known way to determine inode number of a directory or file (with ls) and get more extensive information on a FS on inodes with tune2fs.
Also was explained how to identify directories containing multitudes of files in order to determine a sub-directories that is consuming most of the inodes on a filesystem. Finally it was explained very raughly how to prepare an ext4 filesystem from scratch with predefined number to inodes to much higher than the usual defaults by mkfs.ext3 / mkfs.ext4 and *bsds newfs as well as how to raise the number of inodes of /tmp tmpfs temporary RAM filesystem.

Virtualbox Shared folder set up on Linux between Host and Guest OS – Set up Virtualbox shared folder to Copy files from PC Host to Guest

Wednesday, September 12th, 2018

mount-shares-between-host-OS-and-guest-virtual-machine-howto-virtualbox-vbox-logo

How to set-up Virtualbox shared folder to Copy files from PC Host  and Guest Virtualized OS?

Running VirtualBox Host is an easy thing to set-up across all Operating Systems.  Once you have it sooner or later you will need to copy files from the VM Host OS (that in my case is GNU / Linux) to the virtualized Guest operating system (again in my case that's again another Linux ISO running indide the Virtual Machine).

Below are steps to follow To use Virtualbox Shared Folder functionality to copy files between VBox and your Desktop / server Linux install.

1. Install Virtualbox Guest Additions CD Image ISO

I've explained how to add the Guest Additions CD image thoroughfully in my previous article Howto enable Copy / Paste Virtualbox betwen Linux guest and Host OS
Anyways I'll repeat myself below for sake of clarity:

To do so use Oracle VBox menus (on the booted virtualized OS VBox window):


Devices -> Insert Guest additions CD Image


Mount the ISO inside the Linux Virtual Machine:

root@debian:~# mount /media/cdrom1/
 

If the mount fails and there are no files inside the mount point it might be because the virtualbox-dkms and virtualbox-guest-dkms packages might be missing on the Host OS.

To install them (on Debian GNU / Linux) assuming that you're using virtualbox default distro packages /etc/apt/sources.list :
 

apt-get install –yes -qq virtualbox-dkms virtualbox-guest-dkms


and run:


root@debian:/media/cdrom1# cd /media/cdrom1; sh VBoxLinuxAdditions.run


2. Create directory for Shared Folder that will be used to access Host / OS files from the Guest Virtualized OS
 

root@debian:~# mkdir /mnt/shared_folder


3. Map from VBox program interface Shared folder settings and Mount /mnt/shared_folder location

virtualbox-virtual-machine-devices-shared-folders-shared-folder-settings-linux-screenshot


Devices -> Shared Folder -> Shared Folder settings -> Transient Folders (click blue folder add small button right)


From Transient Folders add whatever directory you want to be shared from your local notebook / PC to the VM.

virtualbox-devices-Shared-Folder-Add-Shared-Folder-add-share-linux-screenshot
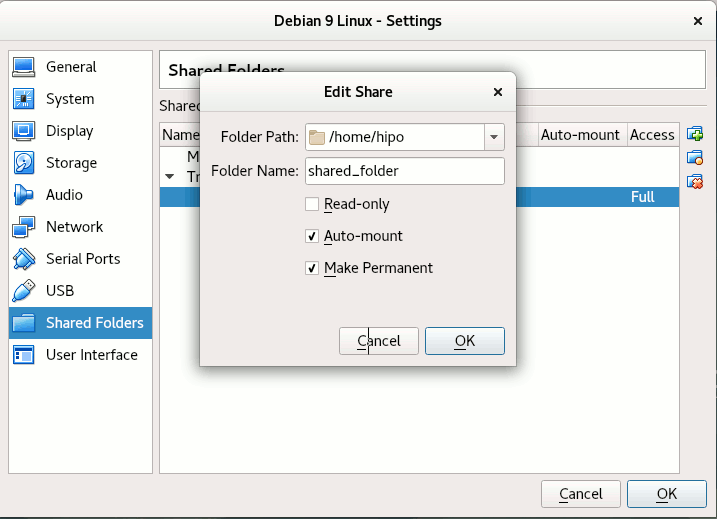
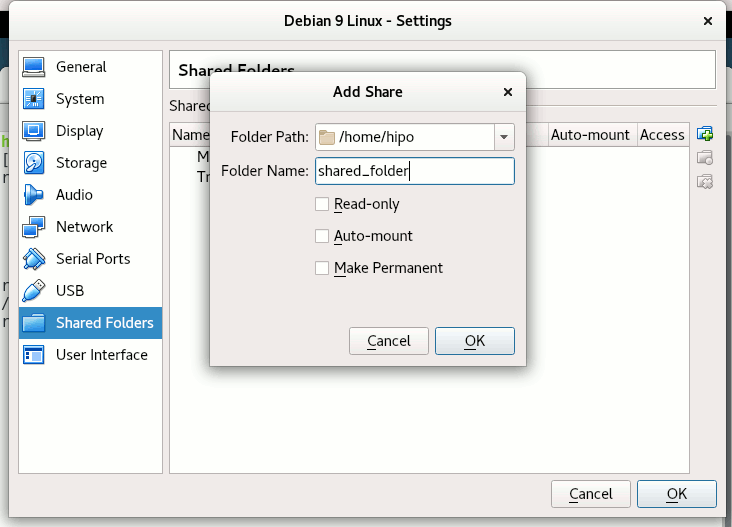
Depending on whether you would like to mount the shared folder only for reading files (choose Read Only) to make it a permanent shared folder (and not just for the one session of current running Virtual Machine until its killed use Make Permanent) or check Auto-Mount tick if you want the shared_folder mapping to be mounted on every VM boot.

Once the shared_folder directory location is set-up from GUI menu click OK and in order for the settings to take effect, you'll need to restart the VM Guest with Linux (use halt command from terminal) or Power Off the Machine via the VBox menus.

To mount use command like:

mount -t vboxsf name_of_folder_linked_from_vbox  /mnt/name_folder_guest_os/


mount-vboxsf-shared-folder-mnt-shared-linux-guest-screenshot

In my case I wanted to share home folder /home so the command I used is:

root@debian:~# mount -t vboxsf  shared_folder /mnt/shared_folder


If everything is fine your Host OS file content from /home will be visible (for read and write if you Mapped it so) 
under /mnt/shared_folder …

And as Turtles Ninja used to heavily say Cowabunga !!! 🙂
You have it mounted and ready for file share between Desktop -> Virtualized OS.


Bear in mind that above mount command has to run as root (superuser) to succeed.

You now could copy files from your Host OS (running the Virtual Machine) and the Guest OS (Virtualized OS) using /mnt/shared_folder mount point without problems.

The example is if you want to share files between VirtualBox installed Linux and the Guest (Desktop / server) OS, however at many cases mounting your Host OS directory for root users might be not very practical but, instead you might prefer to do the mount for specific non admin user, for example I prefer to do the shared folder mount with my pointed non-root username hipo.

Here is how to do above VM shared_folder mount for non-root user:

First you need to know the exact UID / GID (User ID / Group ID) of user, you can get that with id command:


hipo@linux:~$  id
uid=1000(hipo) gid=1000(hipo) groups=1000(hipo),24(cdrom),25(floppy),29(audio),30(dip),44(video),46(plugdev),108(netdev),114(bluetooth),115(lpadmin),119(scanner)


As you see UID / GID in my case are 1000 / 1000

hipo@linux:~$ sudo mount -t vboxsf -o rw,uid=1000,gid=1000 shared_folder /mnt/shared_folder


mount-virtual-box-shared_folder-with-non-administration-permissions-non-root-permissions-id-and-mount-command-screenshot-linux


4. Mounting configured shared_folder to automatically mount into the Guest OS Linux on every boot

a) Configuring shared_folder auto-mount using /etc/rc.local

If you need the shared_folder to automatically mount next-time you boot the virtual machine quickest way is to add the mount command to /etc/rc.local (on Debian 8 and Debian 9 and newer Ubuntu Linuxes rc.local is missing by default to enable it to work like it worked before read follow my previous article ).

b) Configuring auto-mount for shared_folder through /etc/fstab

The more professional way to auto-mount on emulated OS VM boot time,  you could add the vboxsf mount definitions to /etc/fstab with your favourite text-editor mcedit, nano, joe etc. … (for me that's vim).

Syntax of /etc/fstab is as follows:
 

<Device> <Mount Point> <Type> <Options> <Dump> <Pass>

root@linux:~# vim /etc/fstab


shared_folder /mnt/shared_folder                                vboxsf rw,uid=1000,gid=1000 0 0

Note that you will want to change 1000 / 1000, id / gid with the ones of the non-admin user you would like to add to mount it for.

A quick way to add it to /etc/fstab with a shell one-liner is with command
 

root@linux:~# echo 'shared_folder /mnt/shared_folder                                vboxsf rw,uid=1000,gid=1000 0  0' >> /etc/fstab

An alternative way to add a user to have permissions for vboxsf file system (without specifying the long -o uid=1000,gid=1000 options is to simply add the username in question to group vboxsf like so:

c) Adding non super user username to vboxsf group

root@linux:~# usermod -G vboxsf hipo
root@linux:~# grep -i vboxsf /etc/group
vboxsf:x:999:hipo


hipo@linux:~$ sudo mount -t vboxsf  shared_folder /mnt/shared_folder


without the extra arguments and the options to pass to /etc/fstab (for eventual requirement to auto mount the shared_folder) would be more simple e.g.:


echo 'shared_folder /mnt/shared_folder                                vboxsf ' >> /etc/fstab


One note to make here is if the uesr is added to vboxsf the line for /etc/fstab to auto mount to mount for root user and non-root will be identical.

Then you can get the /etc/fstab auto-mount configured tested by running:

c) Checking auto-mount is working

hipo@linux:~# mount -a
hipo@linux:~# mount |grep -i vboxsf
shared_folder on /mnt/shared_folder type vboxsf (rw,nodev,relatime)


5. What if you end up with mounting failed errors ? – What might be causing the mounting failed Protocol error (a few things to check to solve)


In case of troubles with the mount you might get an error like:

hipo@linux:~# mount -t vboxsf  share_folder /mnt/shared_folder

/sbin/mount.vboxsf: mounting failed with the error: Protocol error


This error might be caused because of Insert Guest Additions CD Image might be not properly enabled and installed using the ISO provided VBoxLinuxAdditions.sh shell script.
Other common reason you might get this error if you have mistyped the Folder name: given in Shared Folders -> Folder Path -> Add Share for example I have given shared_folder as a Map name but as you can see in above mount -t vboxsf, I've mistyped share_folder instead of the correct one shared_folder inserted.
In some VBox releases this error was caused by bugs in the Virtual Machine.
 

virtualbox-virtual-machine-shared-folder-transient-folder-add-folder-linux-VM-guest-linux

One useful tip is to be able to check whether a Virtualbox Virtual Machine has a configured shared_folder (if you're logging to manage the machine on remote server – nomatter whether you have logged in with VNC / Teamviewer / Citrix etc. or via SSH session.

To do so use VBoxControl as of time of writting usually located on most distributions under (/usr/bin/VBoxControl)


hipo@linux:~# VBoxControl sharedfolder list -automount
Oracle VM VirtualBox Guest Additions Command Line Management Interface Version 5.2.18
(C) 2008-2018 Oracle Corporation
All rights reserved.


Auto-mounted Shared Folder mappings (0):

No Shared Folders available.

You can use VBoxControl command to get set and list a number of settings on the VBox VM, here is an useful example with it where you get information about numerous VBox info values:


root@linux:~# VBoxControl guestproperty enumerate
Oracle VM VirtualBox Guest Additions Command Line Management Interface Version 5.2.18
(C) 2008-2018 Oracle Corporation
All rights reserved.


Name: /VirtualBox/GuestInfo/OS/Product, value: Linux, timestamp: 1536681633430852000, flags: <NULL>
Name: /VirtualBox/GuestInfo/Net/0/V4/IP, value: 10.0.2.15, timestamp: 1536681633438717000, flags: <NULL>
Name: /VirtualBox/HostInfo/GUI/LanguageID, value: en_US, timestamp: 1536697521395621000, flags: RDONLYGUEST
Name: /VirtualBox/GuestInfo/Net/0/MAC, value: 08002762FA1C, timestamp: 1536681633442120000, flags: <NULL>
Name: /VirtualBox/GuestInfo/OS/ServicePack, value: <NULL>, timestamp: 1536681633431259000, flags: <NULL>
Name: /VirtualBox/HostInfo/VBoxVerExt, value: 5.2.18, timestamp: 1536681619002646000, flags: TRANSIENT, RDONLYGUEST
Name: /VirtualBox/GuestInfo/Net/0/V4/Netmask, value: 255.255.255.0, timestamp: 1536681633440157000, flags: <NULL>
Name: /VirtualBox/GuestInfo/OS/Version, value: #1 SMP Debian 4.9.110-3+deb9u2 (2018-08-13), timestamp: 1536681633431125000, flags: <NULL>
Name: /VirtualBox/GuestAdd/VersionExt, value: 5.2.18, timestamp: 1536681633431582000, flags: <NULL>
Name: /VirtualBox/GuestAdd/Revision, value: 124319, timestamp: 1536681633432515000, flags: <NULL>
Name: /VirtualBox/HostGuest/SysprepExec, value: <NULL>, timestamp: 1536681619002355000, flags: TRANSIENT, RDONLYGUEST
Name: /VirtualBox/GuestInfo/OS/LoggedInUsers, value: 1, timestamp: 1536681673447293000, flags: TRANSIENT, TRANSRESET
Name: /VirtualBox/GuestInfo/Net/0/Status, value: Up, timestamp: 1536681633443911000, flags: <NULL>
Name: /VirtualBox/GuestInfo/Net/0/Name, value: enp0s3, timestamp: 1536681633445302000, flags: <NULL>
Name: /VirtualBox/HostGuest/SysprepArgs, value: <NULL>, timestamp: 1536681619002387000, flags: TRANSIENT, RDONLYGUEST
Name: /VirtualBox/GuestAdd/Version, value: 5.2.18, timestamp: 1536681633431419000, flags: <NULL>
Name: /VirtualBox/HostInfo/VBoxRev, value: 124319, timestamp: 1536681619002668000, flags: TRANSIENT, RDONLYGUEST
Name: /VirtualBox/GuestInfo/Net/0/V4/Broadcast, value: 10.0.2.255, timestamp: 1536681633439531000, flags: <NULL>
Name: /VirtualBox/HostInfo/VBoxVer, value: 5.2.18, timestamp: 1536681619002613000, flags: TRANSIENT, RDONLYGUEST
Name: /VirtualBox/GuestInfo/OS/LoggedInUsersList, value: hipo, timestamp: 1536681673446498000, flags: TRANSIENT, TRANSRESET
Name: /VirtualBox/GuestInfo/Net/Count, value: 1, timestamp: 1536698949773993000, flags: <NULL>
Name: /VirtualBox/GuestInfo/OS/Release, value: 4.9.0-7-amd64, timestamp: 1536681633431001000, flags: <NULL>
Name: /VirtualBox/GuestInfo/OS/NoLoggedInUsers, value: false, timestamp: 1536681673447965000, flags: TRANSIENT, TRANSRESET
Name: /VirtualBox/GuestAdd/HostVerLastChecked, value: 5.2.18, timestamp: 1536681702832389000, flags: <NULL>

Hope you enjoyed ! Have phun! 🙂

How to configure NTP server (ntpd) to synchronize server clock over the Internet on FreeBSD

Friday, February 10th, 2012


FreeBSD ntpd logo / How to configure ntpd to synchronize with internet time servers on FreeBSD

On FreeBSD ntpd , ntpdc , ntpdate , ntpq doesn't need to be installed via a specific package like on GNU/Linux as they're part of the FreeBSD world (binary standardly shipped with FreeBSD basis system).

The FreeBSD handbook has a chapter explaining thoroughfully on ntp on FreeBSD ,however for the lazy ones here is a short few steps tutorial on how to install and configure ntpd on bsd :

1. Copy sample ntp.conf file to /etc/

freebsd# cp -rpf /usr/src/etc/ntp.conf /etc/ntp/

No need for any modifications if you don't want to apply some specific restrictions on whom can access the ntpd server. If you update regularly the FreeBSD system with freebsd-update or directly by rebuilding the FreeBSD kernel / world adding restrictions might be not necessery..

If you check /usr/src/etc/ntp.conf you will notice freebsd project people are running their own ntp servers , by default ntpd will use this servers to fetch timing information. The exact server hosts which as of time of writting are used can be seen in ntp.conf and are:

server 0.freebsd.pool.ntp.org iburst maxpoll 9
server 1.freebsd.pool.ntp.org iburst maxpoll 9
server 2.freebsd.pool.ntp.org iburst maxpoll 9

2. Add ntpd daemon to load on system boot via /etc/rc.conf

By default ntpd is disabled on FreeBSD, you can see if it is disabled or enabled by invoking:

freebsd# /etc/rc.d/ntpd rcvar
# ntpd
ntpd_enable=NO

To Enable ntpd to get loaded each time it boots , following 3 lines has to be added in /etc/rc.conf .

ntpdate_enable="YES"
ntpdate_flags="europe.pool.ntp.org"
ntpd_enable="YES"

Quick way to add them is to use echo :

echo 'ntpdate_enable="YES" >> /etc/rc.conf
echo 'ntpdate_flags="europe.pool.ntp.org" >> /etc/rc.conf
echo 'ntpd_enable="YES" >> /etc/rc.conf

Now as the 3 rc.conf vars are set to "YES", the ntpd can be started. Without having this variables in /etc/rc.conf , "/etc/rc.d/ntpd start" will refuse to start ntpd.

3. Start the ntpd service

freebsd# /etc/rc.d/ntpd start
...

One interesting note to make is ntpd can also operate without specifying any config file (/etc/ntp.conf), the only requirement for the server to start is to have a properly set ntpdate server, like lets say (ntpdate_flags="europe.pool.ntp.org")

4. Permit only certain host or localhost to "talk" to the ntpd server

If you want to imply some ntp server restrictions, the configuration directives are same like on Linux:

To allow only a a host inside a local network with IP 192.168.0.2 as well as localhost, to be able to fetch time information via ntpd server put inside /etc/ntp.conf:

restrict 127.0.0.1
restrict 192.168.0.1 mask 255.255.255.0 nomodify notrap

If you want to prohibit ntpd to serve as a Network Time Server, to any other host except localhost, add in /etc/ntp.conf :

restrict default ignore

Allowing and denying certain hosts can be also done on pf (packet filter) or ipfw firewall level, and in my view is easier (and less confusing), than adding restrictions through ntp.conf. Besides that using directly the server firewall to apply restrictions is more secure. If for instance a remote exploit vulnerability is discovered affecting your ntpd server. this will not affect you externally as access to the UDP port 123 will be disabled on a firewall level.
Something good to mention is NTP servers communicate between each other using the UDP source/destination (port 123). Hence if the NTPD server has to be publicly accessible and there is a firewall already implemented, access to source/dest port 123 should be included in the configured firewall …

5. Check if the ntp server is running properly / ntp server query operations

[root@pcfreak /home/hipo]# ps axuww|grep -i ntp
root 15647 0.0 0.2 4672 1848 ?? Ss 2:49PM 0:00.04 /usr/sbin/ntpd -c /etc/ntp.conf -p /var/run/ntpd.pid -f /var/db/ntpd.drift

To query the now running ntpd server as well as set various configuration options "on the fly" (e.g. without need for ntp.conf edits and init script restart), a tool called ntpdc exists. ntpdc tool could be used to connect to localhost running ntpd as well as to connect and manage remotely a ntpd server.
The most basic use of ntpdc is to check (server peers).:
freebsd# ntpdc localhost
ntpdc> peers
remote local st poll reach delay offset disp
===================================================

kgb.comnet.bg 83.228.93.76 2 64 377 0.00282 -0.050575 0.06059
*billing.easy-la 83.228.93.76 2 64 377 0.01068 -0.057400 0.06770
=ns2.novatelbg.n 83.228.93.76 2 64 377 0.01001 -0.055290 0.06058

ntpdc has also a non-interactive interface, handy if there is a need for requests to a ntpd to be scripted. To check ntpd server peers non-interactively:

freebsd# ntpdc -p localhost
===================================================
kgb.comnet.bg 83.228.93.76 2 64 377 0.00284 -0.043157 0.06184
=billing.easy-la 83.228.93.76 2 64 377 0.01059 -0.042648 0.05811
*ns2.novatelbg.n 83.228.93.76 2 64 377 0.00996 -0.041097 0.06094

ntpdc has plenty of other ntpd query options, e.g. :

ntpdc> help
ntpdc commands:
addpeer controlkey fudge keytype quit timeout
addrefclock ctlstats help listpeers readkeys timerstats
addserver debug host loopinfo requestkey traps
addtrap delay hostnames memstats reset trustedkey
authinfo delrestrict ifreload monlist reslist unconfig
broadcast disable ifstats passwd restrict unrestrict
clkbug dmpeers iostats peers showpeer untrustedkey
clockstat enable kerninfo preset sysinfo version
clrtrap exit keyid pstats sysstats

ntpdc is an advanced query tool for ntpd , servers. Another tool exists called ntpq which syntax is almost identical to ntpdc . The main difference between the two is ntpq is a monitoring tool mostly used just for monitoring purposes, where ntpdc can also change plenty of things in the server configuration.

For people who want to learn more on ntpd the man page is a great reading , containing chapters describing thoroughfully exactly how NTPD time servers operate, etc.

How to delete entries from routing table on Linux

Thursday, July 7th, 2011

Every now and then I had to tamper routing tables in Linux and every time I had to do it I forgot how I did it last time so finally I decided to put it on my blog and find how I can delete from Linux routing table easier

Deleting a record from a wrong routing table on Linux is a piece of cake basicly, here is an example:

linux:~# route -n
Kernel IP routing table
Destination Gateway Genmask Flags Metric Ref Use Iface
192.168.0.1 0.0.0.0 255.255.255.0 U 0 0 0 eth0
169.254.0.0 0.0.0.0 255.255.0.0 U 0 0 0 eth0
0.0.0.0 192.168.0.1 0.0.0.0 UG 0 0 0 eth0

Let’s say this is the routing table and it’s incorrect as the routing through the node 169.254.0.0 should not be there.
Here is how the routing through 169.254.0.0 can be deleted:

linux:~# /sbin/route del -net 169.254.0.0 netmask 255.255.0.0

Now here is the difference after deletion:

linux:~# route -n
Kernel IP routing table
Destination Gateway Genmask Flags Metric Ref Use Iface
192.168.0.1 0.0.0.0 255.255.255.0 U 0 0 0 eth0
0.0.0.0 192.168.0.1 0.0.0.0 UG 0 0 0 eth0

If you want to delete the default gateway just use 0.0.0.0, e.g. -net 0.0.0.0 .. in above cmd example.
This would delete default gateway record from routing table which by the way in routing tables is marked with the UG flag.
Cheers 😉