Posts Tagged ‘gateway’

Automatic network restart and reboot Linux server script if ping timeout to gateway is not responding as a way to reduce connectivity downtimes

Monday, December 10th, 2018

automatic-server-network-restart-and-reboot-script-if-connection-to-server-gateway-inavailable-tux-penguing-ascii-art-bin-bash

Inability of server to come back online server automaticallyafter electricity / network outage

These days my home server  is experiencing a lot of issues due to Electricity Power Outages, a construction dig operations to fix / change waterpipe tubes near my home are in action and perhaps the power cables got ruptered by the digger machine.
The effect of all this was that my server networking accessability was affected and as I didn't have network I couldn't access it remotely anymore at a certain point the electricity was restored (and the UPS charge could keep the server up), however the server accessibility did not due restore until I asked a relative to restart it or under a more complicated cases where Tech aquanted guy has to help – Alexander (Alex) a close friend from school years check his old site here – alex.www.pc-freak.net helps a lot.to restart the machine physically either run a quick restoration commands on root TTY terminal or generally do check whether default router is reachable.

This kind of Pc-Freak.net downtime issues over the last month become too frequent (the machine was down about 5 times for 2 to 5 hours and this was too much (and weirdly enough it was not accessible from the internet even after electricity network was restored and the only solution to that was a physical server restart (from the Power Button).

To decrease the number of cases in which known relatives or friends has to  physically go to the server and restart it, each time after network or electricity outage I wrote a small script to check accessibility towards Default defined Network Gateway for my server with few ICMP packages sent with good old PING command
and trigger a network restart and system reboot
(in case if the network restart does fail) in a row.

1. Create reboot-if-nwork-is-downsh script under /usr/sbin or other dir

Here is the script itself:


#!/bin/sh
# Script checks with ping 5 ICMP pings 10 times to DEF GW and if so
# triggers networking restart /etc/inid.d/networking restart
# Then does another 5 x 10 PINGS and if ping command returns errors,
# Reboots machine
# This script is useful if you run home router with Linux and you have
# electricity outages and machine doesn't go up if not rebooted in that case

GATEWAY_HOST='192.168.0.1';

run_ping () {
for i in $(seq 1 10); do
    ping -c 5 $GATEWAY_HOST
done

}

reboot_f () {
if [ $? -eq 0 ]; then
        echo "$(date "+%Y-%m-%d %H:%M:%S") Ping to $GATEWAY_HOST OK" >> /var/log/reboot.log
    else
    /etc/init.d/networking restart
        echo "$(date "+%Y-%m-%d %H:%M:%S") Restarted Network Interfaces:" >> /tmp/rebooted.txt
    for i in $(seq 1 10); do ping -c 5 $GATEWAY_HOST; done
    if [ $? -eq 0 ] && [ $(cat /tmp/rebooted.txt) -lt ‘5’ ]; then
         echo "$(date "+%Y-%m-%d %H:%M:%S") Ping to $GATEWAY_HOST FAILED !!! REBOOTING." >> /var/log/reboot.log
        /sbin/reboot

    # increment 5 times until stop
    [[ -f /tmp/rebooted.txt ]] || echo 0 > /tmp/rebooted.txt
    n=$(< /tmp/rebooted.txt)
        echo $(( n + 1 )) > /tmp/rebooted.txt
    fi
    # if 5 times rebooted sleep 30 mins and reset counter
    if [ $(cat /tmprebooted.txt) -eq ‘5’ ]; then
    sleep 1800
        cat /dev/null > /tmp/rebooted.txt
    fi
fi

}
run_ping;
reboot_f;

You can download a copy of reboot-if-nwork-is-down.sh script here.

As you see in script successful runs  as well as its failures are logged on server in /var/log/reboot.log with respective timestamp.
Also a counter to 5 is kept in /tmp/rebooted.txt, incremented on each and every script run (rebooting) if, the 5 times increment is matched

a sleep is executed for 30 minutes and the counter is being restarted.
The counter check to 5 guarantees the server will not get restarted if access to Gateway is not continuing for a long time to prevent the system is not being restarted like crazy all time.
 

2. Create a cron job to run reboot-if-nwork-is-down.sh every 15 minutes or so 

I've set the script to re-run in a scheduled (root user) cron job every 15 minutes with following  job:

To add the script to the existing cron rules without rewriting my old cron jobs and without tempering to use cronta -u root -e (e.g. do the cron job add in a non-interactive mode with a single bash script one liner had to run following command:


{ crontab -l; echo "*/15 * * * * /usr/sbin/reboot-if-nwork-is-down.sh 2>&1 >/dev/null; } | crontab –


I know restarting a server to restore accessibility is a stupid practice but for home-use or small client servers with unguaranteed networks with a cheap Uninterruptable Power Supply (UPS) devices it is useful.

Summary

Time will show how efficient such a  "self-healing script practice is.
Even though I'm pretty sure that even in a Corporate businesses and large Public / Private Hybrid Clouds where access to remote mounted NFS / XFS / ZFS filesystems are failing a modifications of the script could save you a lot of nerves and troubles and unhappy customers / managers screaming at you on the phone 🙂


I'll be interested to hear from others who have a better  ideas to restore ( resurrect ) access to inessible Linux server after an outage.?
 

How to configure manually static IP address on Debian GNU/Linux / How to fix eth0 interface not brought up with error (networking restart is deprecated)

Friday, July 29th, 2011

I’ve recently had to manually assign a static IP address on one of the servers I manage, here is how I did it:             

debian:~# vim /etc/network/interfaces

Inside the file I placed:

# The primary network interface
allow-hotplug eth0
auto eth0
iface eth0 inet static address 192.168.0.2 netmask 255.255.255.0 broadcast 192.168.0.0 gateway 192.168.0.1 dns-nameservers 8.8.8.8 8.8.4.4 208.67.222.222 208.67.220.220

The broadcast and gateway configuration lines are not obligitory.
dns-nameservers would re-create /etc/resolv.conf file with the nameserver values specified which in these case are Google Public DNS servers and OpenDNS servers.

Very important variable is allow-hotplug eth0
If these variable with eth0 lan interface is omitted or missing (due to some some weird reason), the result would be the output you see from the command below:

debian:~# /etc/init.d/networking restart
Running /etc/init.d/networking restart is deprecated because it may not enable again some interfaces ... (warning).
Reconfiguring network interfaces...

Besides the /etc/init.d/networking restart is deprecated because it may not enable again some interfaces … (warning). , if the allow-hotplug eth0 variable is omitted the eth0 interface would not be brough up on next server boot or via the networking start/stop/restart init script.

My first reaction when I saw the message was that probably I’ll have to use invoke-rc.d, e.g.:
debian:~# invoke-rc.d networking restart
Running invoke-rc.d networking restart is deprecated because it may not enable again some interfaces ... (warning).

However as you see from above’s command output, running invoke-rc.d helped neither.

I was quite surprised with the inability to bring my network up for a while with the networking init script.
Interestingly using the command:

debian:~# ifup eth0

was able to succesfully bring up the network interface, whether still invoke-rc.d networking start failed.

After some wondering I finally figured out that the eth0 was not brought up by networking init script, because auto eth0 or allow-hotplug eth0 (which by the way are completely interchangable variables) were missing.

I added allow-hotplug eth0 and afterwards the networking script worked like a charm 😉

FreeBSD Jumbo Frames network configuration short how to

Wednesday, March 14th, 2012

FreeBSD Jumbo Frames Howto configure FreeBSD

Recently I wrote a post on how to enable Jumbo Frames on GNU / Linux , therefore I thought it will be useful to write how Jumbo Frames network boost can be achieved on FreeBSD too.

I will skip the details of what is Jumbo Frames, as in the previous article I have thoroughfully explained. Just in short to remind you what is Jumbo Frames and why you might need it? – it is a way to increase network MTU transfer frames from the MTU 1500 to MTU of 9000 bytes

It is interesting to mention that according to specifications, the maximum Jumbo Frames MTU possible for assignment are of MTU=16128
Just like on Linux to be able to take advantage of the bigger Jumbo Frames increase in network thoroughput, you need to have a gigabyt NIC card/s on the router / server.

1. Increasing MTU to 9000 to enable Jumbo Frames "manually"

Just like on Linux, the network tool to use is ifconfig. For those who don't know ifconfig on Linux is part of the net-tools package and rewritten from scratch especially for GNU / Linux OS, whether BSD's ifconfig is based on source code taken from 4.2BSD UNIX

As you know, network interface naming on FreeBSD is different, as there is no strict naming like on Linux (eth0, eth1, eth2), rather the interfaces are named after the name of the NIC card vendor for instance (Intel(R) PRO/1000 NIC is em0), RealTek is rl0 etc.

To set Jumbro Frames Maximum Transmission Units of 9000 on FreeBSD host with a Realtek and Intel gigabyt ethernet cards use: freebsd# /sbin/ifconfig em0 192.168.1.2 mtu 9000
freebsd# /sbin/ifconfig rl0 192.168.2.2 mtu 9000

!! Be very cautious here, as if you're connected to the system remotely over ssh you might loose connection to it because of broken routing.

To prevent routing loss problems, if you're executing the above two commands remotely, you better run them in GNU screen session:

freebsd# screen
freebsd# /sbin/ifconfig em0 192.168.1.2 mtu 9000; /sbin/ifconfig rl0 192.168.1.2 mtu 9000; \
/etc/rc.d/netif restart; /etc/rc.d/routed restart

2. Check MTU settings are set to 9000

If everything is fine the commands will return empty output, to check further the MTU is properly set to 9000 issue:

freebsd# /sbin/ifconfig -a|grep -i em0em0: flags=8843<UP,BROADCAST,RUNNING,SIMPLEX,MULTICAST> metric 0 mtu 9000freebsd# /sbin/ifconfig -a|grep -i rl0
rl0: flags=8843<UP,BROADCAST,RUNNING,SIMPLEX,MULTICAST> metric 0 mtu 9000

3. Reset routing for default gateway

If you have some kind of routing assigned for em0 and rl0, network interfaces they will be affected by the MTU change and the routing will be gone. To reset the routing to the previously properly assigned routing, you have to restart the BSD init script taking care for assigning routing on system boot time:

freebsd# /etc/rc.d/routing restart
default 192.168.1.1 done
add net default: gateway 192.168.1.1
Additional routing options: IP gateway=YES.

4. Change MTU settings for NIC card with route command

There is also a way to assign higher MTU without "breaking" the working routing, e.g. avoiding network downtime with bsd route command:

freebsd# grep -i defaultrouter /etc/rc.conf
defaultrouter="192.168.1.1"
freebsd# /sbin/route change 192.168.1.1 -mtu 9000
change host 192.168.1.1

5. Finding the new MTU NIC settings on the FreeBSD host

freebsd# /sbin/route -n get 192.168.1.1
route to: 192.168.1.1
destination: 192.168.1.1
interface: em0
flags: <UP,HOST,DONE,LLINFO,WASCLONED>
recvpipe sendpipe ssthresh rtt,msec rttvar hopcount mtu expire
0 0 0 0 0 0 9000 1009

6. Set Jumbo Frames to load automatically on system load

To make the increased MTU to 9000 for Jumbo Frames support permanent on a FreeBSD system the /etc/rc.conf file is used:

The variable for em0 and rl0 NICs are ifconfig_em0 and ifconfig_rl0.
The lines to place in /etc/rc.conf should be similar to:

ifconfig_em0="inet 192.168.1.1 netmask 255.255.255.0 media 1000baseTX mediaopt half-duplex mtu 9000"

Change in the above lines the gateway address 192.168.1.1 and the netmask 255.255.255.0 to yours corresponding gw and netmask.
Also in the above example you see the half-duplex ifconfig option is set insetad of full-duplex in order to prevent some duplex mismatches. A full-duplex could be used instead, if you're completely sure on the other side of the host is configured to support full-duplex connections. Otherwise if you try to set full-duplex with other side set to half-duplex or auto-duplex a duplex mismatch will occur. If this happens insetad of taking the advantage of the Increase Jumbo Frames MTU the network connection could become slower than originally with standard ethernet MTU of 1500. One other bad side if you end up with duplex-mismatch could be a high number of loss packets and degraded thoroughout …

7. Setting Jumbo Frames for interfaces assigning dynamic IP via DHCP

If you need to assign an MTU of 9000 for a gigabyt network interfaces, which are receiving its TCP/IP network configuration over DHCP server.
First, tell em0 and rl0 network interfaces to dynamically assign IP addresses via DHCP proto by adding in /etc/rc.conf:

ifconfig_em0="DHCP"
ifconfig_rl0="DHCP"

Secondly make two files /etc/start_if.em0 and /etc/start_if.rl0 and include in each file:

ifconfig em0 media 1000baseTX mediaopt full-duplex mtu 9000
ifconfig rl0 media 1000baseTX mediaopt full-duplex mtu 9000

Copy / paste in root console:

echo 'ifconfig em0 media 1000baseTX mediaopt full-duplex mtu 9000' >> /etc/start_if.em0
echo 'ifconfig rl0 media 1000baseTX mediaopt full-duplex mtu 9000' >> /etc/start_if.rl0

Finally, to load the new MTU for both interfaces, reload the IPs with the increased MTUs:

freebsd# /etc/rc.d/routing restart
default 192.168.1.1 done
add net default: gateway 192.168.1.1

8. Testing if Jumbo Frames is working correctly

To test if an MTU packs are transferred correctly through the network you can use ping or tcpdumpa.) Testing Jumbo Frames enabled packet transfers with tcpdump

freebsd# tcpdump -vvn | grep -i 'length 9000'

You should get output like:

16:40:07.432370 IP (tos 0x0, ttl 50, id 63903, offset 0, flags [DF], proto TCP (6), length 9000) 192.168.1.2.80 > 192.168.1.1.60213: . 85825:87285(1460) ack 668 win 14343
16:40:07.432588 IP (tos 0x0, ttl 50, id 63904, offset 0, flags [DF], proto TCP (6), length 9000) 192.168.1.2.80 > 192.168.1.1.60213: . 87285:88745(1460) ack 668 win 14343
16:40:07.433091 IP (tos 0x0, ttl 50, id 63905, offset 0, flags [DF], proto TCP (6), length 9000) 192.168.1.2.80 > 192.168.1.1.60213: . 23153:24613(1460) ack 668 win 14343
16:40:07.568388 IP (tos 0x0, ttl 50, id 63907, offset 0, flags [DF], proto TCP (6), length 9000) 192.168.1.2.80 > 192.168.1.1.60213: . 88745:90205(1460) ack 668 win 14343
16:40:07.568636 IP (tos 0x0, ttl 50, id 63908, offset 0, flags [DF], proto TCP (6), length 9000) 192.168.1.2.80 > 192.168.1.1.60213: . 90205:91665(1460) ack 668 win 14343
16:40:07.569012 IP (tos 0x0, ttl 50, id 63909, offset 0, flags [DF], proto TCP (6), length 9000) 192.168.1.2.80 > 192.168.1.1.60213: . 91665:93125(1460) ack 668 win 14343
16:40:07.569888 IP (tos 0x0, ttl 50, id 63910, offset 0, flags [DF], proto TCP (6), length 9000) 192.168.1.2.80 > 192.168.1.1.60213: . 93125:94585(1460) ack 668 win 14343

b.) Testing if Jumbo Frames are enabled with ping

Testing Jumbo Frames with ping command on Linux

linux:~# ping 192.168.1.1 -M do -s 8972
PING 192.168.1.1 (192.168.1.1) 8972(9000) bytes of data.
9000 bytes from 192.168.1.1: icmp_req=1 ttl=52 time=43.7 ms
9000 bytes from 192.168.1.1: icmp_req=2 ttl=52 time=43.3 ms
9000 bytes from 192.168.1.1: icmp_req=3 ttl=52 time=43.5 ms
9000 bytes from 192.168.1.1: icmp_req=4 ttl=52 time=44.6 ms
--- 192.168.0.1 ping statistics ---
4 packets transmitted, 4 received, 0% packet loss, time 3003ms
rtt min/avg/max/mdev = 2.397/2.841/4.066/0.708 ms

If you get insetad an an output like:

From 192.168.1.2 icmp_seq=1 Frag needed and DF set (mtu = 1500)

--- 192.168.1.1 ping statistics ---
0 packets transmitted, 0 received, +4 errors

This means a packets with maximum MTU of 1500 could be transmitted and hence something is not okay with the Jumbo Frames config.
Another helpful command in debugging MTU and showing which host in a hop queue support jumbo frames is Linux's traceroute

To debug a path between host and target, you can use:

linux:~# traceroute --mtu www.google.com
...

If you want to test the Jumbo Frames configuration from a Windows host use ms-windows ping command like so:

C:\>ping 192.168.1.2 -f -l 8972
Pinging 192.168.1.2 with 8972 bytes of data:
Reply from 192.168.1.2: bytes=8972 time=2ms TTL=255
Ping statistics for 192.168.1.2:
Packets: Sent = 4, Received = 4, Lost = 0 (0% loss),
Approximate round trip times in milli-seconds:
Minimum = 2ms, Maximum = 2ms, Average = 2ms

Here -l 8972 value is actually equal to 9000. 8972 = 9000 – 20 (20 byte IP header) – 8 (ICMP header)

Boost local network performance (Increase network thoroughput) by enabling Jumbo Frames on GNU / Linux

Saturday, March 10th, 2012

Jumbo Frames boost local network performance in GNU / Linux

So what is Jumbo Frames? and why, when and how it can increase the network thoroughput on Linux?

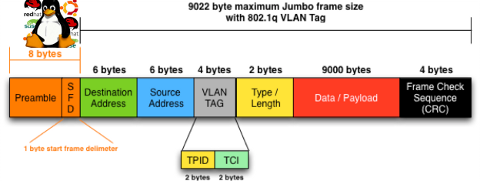
Jumbo Frames are Ethernet frames with more than 1500 bytes of payload. They can carry up to 9000 bytes of payload. Many Gigabit switches and network cards supports them.
Jumbo frames is a networking standard for many educational networks like AARNET. Unfortunately most commercial ISPs doesn't support them and therefore enabling Jumbo frames will rarely increase bandwidth thoroughput for information transfers over the internet.
Hopefully in the years to come with the constant increase of bandwidths and betterment of connectivity, jumbo frames package transfers will be supported by most ISPs as well.
Jumbo frames network support is just great for is small local – home networks and company / corporation office intranets.

Thus enabling Jumbo Frame is absolutely essential for "local" ethernet networks, where large file transfers occur frequently. Such networks are networks where, there is often a Video or Audio streaming with high quality like HD quality on servers running File Sharing services like Samba, local FTP sites,Webservers etc.

One other advantage of enabling jumbo frames is reduce of general server overhead and decrease in CPU load / (CPU usage), when transferring large or enormous sized files.Therefore having jumbo frames enabled on office network routers with GNU / Linux or any other *nix OS is vital.

Jumbo Frames traffic is supported in GNU / Linux kernel since version 2.6.17+ in earlier 2.4.x it was possible through external third party kernel patches.

1. Manually increase MTU to 9000 with ifconfig to enable Jumbo frames

debian:~# /sbin/ifconfig eth0 mtu 9000

The default MTU on most GNU / Linux (if not all) is 1500, to check the default set MTU with ifconfig:

linux:~# /sbin/ifconfig eth0|grep -i mtu
UP BROADCAST MULTICAST MTU:1500 Metric:1

To take advantage of Jumbo Frames, all that has to be done is increase the default Maximum Transmission Unit from 1500 to 9000

For those who don't know MTU is the largest physical packet size that can be transferred over the network. MTU is measured by default in bytes. If a information has to be transferred over the network which exceeds the lets say 1500 MTU (bytes), it will be chopped and transferred in few packs each of 1500 size.

MTUs differ on different netework topologies. Just for info here are the few main MTUs for main network types existing today:
 

  • 16 MBit/Sec Token Ring – default MTU (17914)
  • 4 Mbits/Sec Token Ring – default MTU (4464)
  • FDDI – default MTU (4352)
  • Ethernet – def MTU (1500)
  • IEEE 802.3/802.2 standard – def MTU (1492)
  • X.25 (dial up etc.) – def MTU (576)
  • Jumbo Frames – def max MTU (9000)

Setting the MTU packet frames to 9000 to enable Jumbo Frames is done with:

linux:~# /sbin/ifconfig eth0 mtu 9000

If the command returns nothing, this most likely means now the server can communicate on eth0 with MTUs of each 9000 and therefore the network thoroughput will be better. In other case, if the network card driver or card is not a gigabit one the cmd will return error:

SIOCSIFMTU: Invalid argument

2. Enabling Jumbo Frames on Debian / Ubuntu etc. "the Debian way"

a.) Jumbo Frames on ethernet interfaces with static IP address assigned Edit /etc/network/interfaces and you should have for each of the interfaces you would like to set the Jumbo Frames, records similar to:

Raising the MTU to 9000 if for one time can be done again manually with ifconfig

debian:~# /sbin/ifconfig eth0 mtu 9000

iface eth0 inet static
address 192.168.0.5
network 192.168.0.0
gateway 192.168.0.254
netmask 255.255.255.0
mtu 9000

For each of the interfaces (eth1, eth2 etc.), add a chunk similar to one above changing the changing the IPs, Gateway and Netmask.

If the server is with two gigabit cards (eth0, eth1) supporting Jumbo frames add to /etc/network/interfaces :

iface eth0 inet static
address 192.168.0.5
network 192.168.0.0
gateway 192.168.0.254
netmask 255.255.255.0
mtu 9000

iface eth1 inet static
address 192.168.0.6
network 192.168.0.0
gateway 192.168.0.254
netmask 255.255.255.0
mtu 9000

b.) Jumbo Frames on ethernet interfaces with dynamic IP obtained via DHCP

Again in /etc/network/interfaces put:

auto eth0
iface eth0 inet dhcp
post-up /sbin/ifconfig eth0 mtu 9000

3. Setting Jumbo Frames on Fedora / CentOS / RHEL "the Redhat way"

Enabling jumbo frames on all Gigabit lan interfaces (eth0, eth1, eth2 …) in Fedora / CentOS / RHEL is done through files:
 

  • /etc/sysconfig/network-script/ifcfg-eth0
  • /etc/sysconfig/network-script/ifcfg-eth1

etc. …
append in each one at the end of the respective config:

MTU=9000

[root@fedora ~]# echo 'MTU=9000' >> /etc/sysconfig/network-scripts/ifcfg-eth


a quick way to set Maximum Transmission Unit to 9000 for all network interfaces on on Redhat based distros is by executing the following loop:

[root@centos ~]# for i in $(echo /etc/sysconfig/network-scripts/ifcfg-eth*); do \echo 'MTU=9000' >> $i
done

P.S.: Be sure that all your interfaces are supporting MTU=9000, otherwise increase while the MTU setting is set will return SIOCSIFMTU: Invalid argument err.
The above loop is to be used only, in case you have a group of identical machines with Lan Cards supporting Gigabit networks and loaded kernel drivers supporting MTU up to 9000.

Some Intel and Realtek Gigabit cards supports only a maximum MTU of 7000, 7500 etc., so if you own a card like this check what is the max MTU the card supports and set it in the lan device configuration.
If increasing the MTU is done on remote server through SSH connection, be extremely cautious as restarting the network might leave your server inaccessible.

To check if each of the server interfaces are "Gigabit ready":

[root@centos ~]# /sbin/ethtool eth0|grep -i 1000BaseT
1000baseT/Half 1000baseT/Full

If you're 100% sure there will be no troubles with enabling MTU > 1500, initiate a network reload:

[root@centos ~]# /etc/init.d/network restart
...

4. Enable Jumbo Frames on Slackware Linux

To list the ethernet devices and check they are Gigabit ones issue:

bash-4.1# lspci | grep [Ee]ther
0c:00.0 Ethernet controller: D-Link System Inc Gigabit Ethernet Adapter (rev 11)
0c:01.0 Ethernet controller: D-Link System Inc Gigabit Ethernet Adapter (rev 11)

Setting up jumbo frames on Slackware Linux has two ways; the slackware way and the "universal" Linux way:

a.) the Slackware way

On Slackware Linux, all kind of network configurations are done in /etc/rc.d/rc.inet1.conf

Usual config for eth0 and eth1 interfaces looks like so:

# Config information for eth0:
IPADDR[0]="10.10.0.1"
NETMASK[0]="255.255.255.0"
USE_DHCP[0]=""
DHCP_HOSTNAME[1]=""
# Config information for eth1:
IPADDR[1]="10.1.1.1"
NETMASK[1]="255.255.255.0"
USE_DHCP[1]=""
DHCP_HOSTNAME[1]=""

To raise the MTU to 9000, the variables MTU[0]="9000" and MTU[1]="9000" has to be included after each interface config block, e.g.:

# Config information for eth0:
IPADDR[0]="172.16.1.1"
NETMASK[0]="255.255.255.0"
USE_DHCP[0]=""
DHCP_HOSTNAME[1]=""
MTU[0]="9000"
# Config information for eth1:
IPADDR[1]="10.1.1.1"
NETMASK[1]="255.255.255.0"
USE_DHCP[1]=""
DHCP_HOSTNAME[1]=""
MTU[1]="9000"

bash-4.1# /etc/rc.d/rc.inet1 restart
...

b.) The "Universal" Linux way

This way is working on most if not all Linux distributions.
Insert in /etc/rc.local:

/sbin/ifconfig eth0 mtu 9000 up
/sbin/ifconfig eth1 mtu 9000 up

5. Check if Jumbo Frames are properly enabled

There are at least two ways to display the MTU settings for eths.

a.) Using grepping the MTU from ifconfig

linux:~# /sbin/ifconfig eth0|grep -i mtu
UP BROADCAST MULTICAST MTU:9000 Metric:1
linux:~# /sbin/ifconfig eth1|grep -i mtu
UP BROADCAST MULTICAST MTU:9000 Metric:1

b.) Using ip command from iproute2 package to get MTU

linux:~# ip route get 192.168.2.134
local 192.168.2.134 dev lo src 192.168.2.134
cache mtu 9000 advmss 1460 hoplimit 64

linux:~# ip route show dev wlan0
192.168.2.0/24 proto kernel scope link src 192.168.2.134
default via 192.168.2.1

You see MTU is now set to 9000, so the two server lans, are now able to communicate with increased network thoroughput.
Enjoy the accelerated network transfers 😉


How to renew IP address, Add Routing and flush DNS cache on Windows XP / Vista / 7

Friday, November 25th, 2011

There are two handy Windows commands which can be used to renew IP address or flush prior cached DNS records which often create problems with resolving hosts.

1. To renew the IP address (fetch address from DHCP server) C:> ipconfig /release
C:> ipconfig /renew

In above cmd ipconfig /release will de-assign the IP address configured on all Windows LAN and Wireless interfaces, whether ipconfig /renew will send request for IP address to the DNS server.

To unassign and assign again IP address from DHCP server only for a particular LAN or WLAN card:

C:> ipconfig /release LAN
C:> ipconfig /renew LAN
C:> ipconfig /release WLAN
C:> ipconfig /renew WLAN

2. Adding specific routing to Windows

Windows has a Route command similar by syntax to Linux’s route command.
To add routing via a specific predefined IP addresses on Windows the commands should be something like:

C:> Route add 192.168.40.0 mask 255.255.255.0 192.168.41.253
C:> Route add 0.0.0.0 mask 0.0.0.0 192.168.41.254
The first command adds IP 192.168.40.0 in the network of 255 hosts to be routed via 192.168.41.253
The second one adds 192.168.41.254 as a default gateway for all outbound traffic from the Windows host.
To make permanent routing -p switch is used.
3. To clear Windows DNS cache (flush DNS cached records) C:> ipconfig /flushdns
This will clear all IP records corresponding to hostnames previously cached on the Windows host. Using ipconfig /flushdns is especially handy when IP address for a specific DNS host is changed. Flushing the Windows DNS cache can save us a lot of waiting before the domain example.com starts resolving to the new IP address let’s say 1.2.3.4 instead of the old one 2.2.2.2

How to make pptp VPN connection to use IPMI port (IPKVM / Web KVM) on Debian Linux

Wednesday, July 27th, 2011

If you have used KVM, before you certainly have faced the requirement asked by many Dedicated Server Provider, for establishment of a PPTP (mppe / mppoe) or the so called Microsoft VPN tunnel to be able to later access via the tunnel through a Private IP address the web based Java Applet giving control to the Physical screen, monitor and mouse on the server.

This is pretty handy as sometimes the server is not booting and one needs a further direct access to the server physical Monitor.
Establishing the Microsoft VPN connection on Windows is a pretty trivial task and is easily achieved by navigating to:

Properties > Networking (tab) > Select IPv4 > Properties > Advanced > Uncheck "Use default gateway on remote network".

However achiving the same task on Linux seemed to be not such a trivial, task and it seems I cannot find anywhere information or precise procedure how to establish the necessery VPN (ptpt) ms encrypted tunnel.

Thanksfully I was able to find a way to do the same tunnel on my Debian Linux, after a bunch of experimentation with the ppp linux command.

To be able to establish the IPMI VPN tunnel, first I had to install a couple of software packages, e.g.:

root@linux:~# apt-get install ppp pppconfig pppoeconf pptp-linux

Further on it was necessery to load up two kernel modules to enable the pptp mppe support:

root@linux:~# modprobe ppp_mppe
root@linux:~# modprobe ppp-deflate

I’ve also enabled the modules to be loading up during my next Linux boot with /etc/modules to not be bother to load up the same modules after reboot manually:

root@linux:~# echo ppp_mppe >> /etc/modules
root@linux:~# echo ppp-deflate >> /etc/modules

Another thing I had to do is to enable the require-mppe-128 option in /etc/ppp/options.pptp.
Here is how:

root@linux:~# sed -e 's$#require-mppe-128$require-mppe-128$g' /etc/ppp/options.pptp >> /tmp/options.pptp
root@linux:~# mv /tmp/options.pptp /etc/ppp/options.pptp
root@linux:~# echo 'nodefaultroute' >> /etc/ppp/options.pptp

In order to enable debug log for the ppp tunnel I also edited /etc/syslog.conf and included the following configuration inside:

root@linux:~# vim /etc/syslog.conf
*.=debug;
news.none;mail.none -/var/log/debug
*.=debug;*.=info;
*.=debug;*.=info;
root@linux:~# killall -HUP rsyslogd

The most important part of course is the command line with ppp command to connect to the remote IP via the VPN tunnel ;), here is how I achieved that:

root@linux:~# pppd debug require-mppe pty "pptp ipmiuk2.net --nolaunchpppd" file /etc/ppp/options.pptp user My_Dedi_Isp_Given_Username password The_Isp_Given_Password

This command, brings up the ppp interface and makes the tunnel between my IP and the remote VPN target host.

Info about the tunnel could be observed with command:

ifconfig -a ppp
ppp0 Link encap:Point-to-Point Protocol
inet addr:10.20.254.32 P-t-P:10.20.0.1 Mask:255.255.255.255
UP POINTOPOINT RUNNING NOARP MULTICAST MTU:1496 Metric:1
RX packets:7 errors:0 dropped:0 overruns:0 frame:0
TX packets:12 errors:0 dropped:0 overruns:0 carrier:0
collisions:0 txqueuelen:3
RX bytes:70 (70.0 B) TX bytes:672 (672.0 B)

One more thing before I could finally access the IPMI’s web interface via the private IP was to add routing to the private IP address via the tunnel other side IP address:

# 10.20.0.1 P-t-P IP address
ip route add 10.20.1.124/32 dev ppp0

Now logically one would thing the Web interface to login and use the Java Applet to connect to the server would be accessible but no IT wasn’t !

It took me a while to figure out what is the problem and if not the guys in irc.freenode.net ##networking helped me I would never really find out why http://10.20.1.124/ and https://10.20.1.124/ were inaccessible.

Strangely enough both ports 80 and 443 were opened on 10.20.1.124 and it seems like working, however though I can ping both 10.20.1.124 and 10.20.0.1 there was no possible way to access 10.20.1.124 with TCP traffic.

Routing to the Microsoft Tunnel was fine as I’ve double checked all was fine except whether I tried accessing the IPMI web interface the browser was trying to open the URL and keeps opening like forever.

Thanksfully after a long time of futile try outs, a tip was suggested by a good guy in freenode nick named ne2k

To make the TCP connection in the Microsoft Tunnel work and consequently be able to access the webserver on the remote IPMI host, one needs to change the default MTU set for the ppp0 tunnel interface.
Here is how:


ip link set ppp0 mtu 1438

And tadam! It’s done now IPKVM is accessible via http://10.20.1.124 or https://10.20.1.124 web interface. Horay ! 🙂

How to configure networking in CentOS, Fedora and other Redhat based distros

Wednesday, June 1st, 2011

On Debian Linux I’m used to configure the networking via /etc/network/interfaces , however on Redhat based distributions to do a manual configuration of network interfaces is a bit different.

In order to configure networking in CentOS there is a special file for each interface and some values one needs to fill in to enable networking.

These network adapters configuration files for Redhat based distributions are located in the files:

/etc/sysconfig/network-scripts/ifcfg-*

Just to give you and idea on the content of this network configuration file, here is how it looks like:

[root@centos:~ ]# cat /etc/sysconfig/network-scripts/ifcfg-eth0
# Broadcom Corporation NetLink BCM57780 Gigabit Ethernet PCIe
DEVICE=eth0
BOOTPROTO=static
DHCPCLASS=
HWADDR=00:19:99:9C:08:3A
IPADDR=192.168.0.1
NETMASK=255.255.252.0
ONBOOT=yes

This configuration is of course just for eth0 for other network card names and devices, one needs to look up for the proper file name which corresponds to the network interface visible with the ifconfig command.
For instance to list all network interfaces via ifconfig use:

[root@centos:~ ]# /sbin/ifconfig |grep -i 'Link encap'|awk '{ print $1 }'
eth0
eth1
lo

In this case there are only two network cards on my host.
The configuration files for the ethernet network devices eth0 and eth1 from below example are located in files /etc/sysconfig/network-scripts/ifcfg-eth{1,2}

/etc/sysconfig/network-scripts/ directory contains plenty of shell scripts related to Fedora networking.
This directory contains actually the networking boot time load up rules for fedora and CentOS hosts.

The complete list of options available which can be used in /etc/sysconfig/network-scripts/ifcfg-ethx is located in:
/usr/share/doc/initscripts-*/sysconfig.txt

, to quickly observe the documentation:

[root@centos:~ ]# less /usr/share/doc/initscripts-*/sysconfig.txt

One typical example of configuring a CentOS based host to possess a static IP address (192.168.1.5) and a gateway (192.168.1.1), which will be assigned in boot time during the /etc/init.d/network is loaded is:

[root@centos:~ ]# cat /etc/sysconfig/network-scripts/ifcfg-eth0
# Broadcom Corporation NetLink BCM57780 Gigabit Ethernet PCIe
IPV6INIT=no
BOOTPROTO=static
ONBOOT=yes
USERCTL=yes
TYPE=Ethernet
DEVICE=eth0
IPADDR=192.168.1.5
NETWORK=192.168.1.0
GATEWAY=192.168.1.1
BROADCAST=192.168.1.255
NETMASK=255.255.255.0

After some changes to the network configuration files are made, to load up the new rules a /etc/init.d/network script restart is necessery with the command:

[root@centos:~ ]# /etc/init.d/network restart

Of course one can always use /etc/rc.local script as universal way to configure network rules on a Redhat based host, however using methods like rc.local to load up, ifconfig or route rules in a Fedora would break the distribution logic and therefore is not recommended.

There is also a serious additional reason against using /etc/rc.local post init commands load up script.
If one uses rc.local to load up and configure the networing, the network will get initialized only after all the other scripts in /etc/init.d/ gets started.

Therefore using /etc/rc.local might also be DANGEROUS!, if used remotely via (ssh), supposedly it might completely fail to load the networking, if all bringing the server interfaces relies on it.

Here is an example, imagine that some of the script set in to load up during a CentOS boot up hangs and does continue to load forever (for example after some crucial software upate), as a consequence the /etc/rc.local script will never get executed as it only starts up after all the rest init scripts had succesfully completed execution.

A network eth1 interface configuration for a Fedora host which has to fetch it’s network settings automatically via DHCP is as follows:

[root@fedora:/etc/network:]# cat /etc/sysconfig/network-scripts/ifcfg-eth1
# Intel Corporation 82557/8/9 [Ethernet Pro 100]DEVICE=eth1
BOOTPROTO=dhcp
HWADDR=00:0A:E4:C9:7B:51
ONBOOT=yes

To sum it up I think Fedora’s /etc/sysconfig/network-scripts methodology to configure ethernet devices is a way inferior if compared to Debian.

In GNU/Debian Linux configuration of all networking is (simpler)!, everything related to networking is in one single file ( /etc/network/interfaces ), moreover getting all the thorough documentation for the network configurations options for the interfaces is available as a system wide manual (e.g. man interfaces).

Partially Debian interfaces configuration is a bit more complicated in terms of syntax if matched against Redhat’s network-scripts/ifcfg-*, lest that generally I still find Debian’s manual network configuration interface to be easier to configure networking manually vicommand line.

Universal way to configure a static IP address on ethernet lan (eth0) interface in Linux

Friday, April 29th, 2011

One of the most precious commands I ever learned to use in Linux is ifconfig and route .

They have saved my life in configuring the static IP based internet of numerous Desktop Linux computers & notebooks.

Though the usage is very much known by most of the people who are into Linux, I believe it’s likely that the newer people who entered the world of Linux or some Unix system administrators are still lacking the knowledge on how to manually configure their eth0 lan card, thus I thought it might be handy for someone to share it, I know that for most unix users & admins especially the advanced ones this post might be funny, so if you’re an advanced administrator just skip the post and don’t laught at it 😉

Now the universal commands (works on each and every Linux host) to configure manually static IP internet connection on Linux are:

linux:~# /sbin/ifconfig eth0 192.168.0.3 netmask 255.255.255.0
linux:~# /sbin/route add default gw 192.168.0.1
linux:~# echo 'nameserver 192.168.0.1' >> /etc/resolv.conf

I’ve used this simple commands on thousands ot Linux hosts and it’s still handy 🙂

In above example 192.168.0.3 is the static IP address provided by the ISP, netmask is the netmask and the second /sbin/route add default gw would set the default gateway to the example ip 192.168.0.1

The third final line would add up a resolver nameserver the Linux host would use.

Cheers 😉