Posts Tagged ‘hipo’

Share SCREEN terminal session in Linux / Screen share between two or more users howto

Wednesday, October 11th, 2017

share-screen-terminal-session-in-linux-share-linux-unix-shell-between-two-or-more-users


1. Short Intro to Screen command and what is Shared Screen Session

Do you have friends who want to learn some GNU / Linux or BSD basics remotely? Do you have people willing to share a terminal session together for educational purposes within a different network? Do you just want to have some fun and show off yourself between two or more users?

If the answer to the questions is yes, then continue on reading, otherwise if you're already aware how this is being done, just ignore this article and do something more joyful.

So let me start.

Some long time ago when I was starting to be a Free Software user and dedicated enthusiast, I've been given by a friend an interesting freeshell hosting access and I stumbled upon / observed an interesting phenomenon, multiple users like 5 or 10 were connected simultaneously to the same shell sharing their command line.

I can't remember what kind of shell I happen to be sharing with the other logged in users with the same account, was that bash / csh / zsh or another one but it doesn't matter, it was really cool to find out multiple users could be standing together on GNU / Linux and *BSD with the same account and use the regular shell for chatting or teaching each others  new Linux / Unix commands e.g. being able to type in shell simultaneously.

The multiple shared shell session was possible thanks to the screen command

For those who hear about screen for a first time, here is the package description:


# apt-cache show screen|grep -i desc -A 1
Description-en: terminal multiplexer with VT100/ANSI terminal emulation
 GNU Screen is a terminal multiplexer that runs several separate "screens" on

Description-md5: 2d86b86ed6058a04c540802e49312f40
Homepage: https://savannah.gnu.org/projects/screen
root@jericho:/usr/local/src/pure-python-otr# apt-cache show screen|grep -i desc -A 2
Description-en: terminal multiplexer with VT100/ANSI terminal emulation
 GNU Screen is a terminal multiplexer that runs several separate "screens" on
 a single physical character-based terminal. Each virtual terminal emulates a


Description-md5: 2d86b86ed6058a04c540802e49312f40
Homepage: https://savannah.gnu.org/projects/screen
Tag: hardware::input:keyboard, implemented-in::c, interface::text-mode,


There is plenty of things to use screen for as it provides you a way to open Virtual Terminals into a single ssh or physical console TTY login session and I've been in love with screen command since day 1 I found out about it.

To start using screen just invoke it into a shell and enter a screen command combinations that make various stuff for you.


2. Some of the most useful Daily Screen Key Combinations for the Sys Admin


To do use the various screen options, use the escape sequence (CTRL + Some Word), following by the command. For a full list of all of the available commands, run man screen, however
for the sake of interest below short listing shows some of most useful screen key combination invoked commands:


Ctrl-a a Passes a Ctrl-a through to the terminal session running within screen.
Ctrl-a c Create a new Virtual shell screen session within screen
Ctrl-a d Detaches from a screen session.
Ctrl-a f Toggle flow control mode (enable/disable Ctrl-Q and Ctrl-S pass through).
Ctrl-a k Detaches from and kills (terminates) the screen session.
Ctrl-a q Passes a Ctrl-q through to the terminal session running within screen (or use Ctrl-a f to toggle whether screen captures flow control characters).
Ctrl-a s Passes a Ctrl-s through to the terminal session running within screen (or use Ctrl-a f to toggle whether screen captures flow control characters).
Ctrl-a :kill Also detaches from and kills (terminates) the screen session.
Ctrl-a :multiuser on Make the screen session a multi-user session (so other users can attach).
Ctrl-a :acladd USER Allow the user specified (USER) to connect to a multi-user screen session.
Ctrl-a p Move around multiple opened Virtual terminals in screen (Move to previous)
Ctrl-a n Move backwards in multiple opened screen sessions under single shell connection


I have to underline strongly for me personally, I'm using the most


CTRL + A + D (to detach session),

CTRL + A + C to open new session within screen (I tend to open multiple sessions for multiple ssh connections with this),

CTRL + A + P, CTRL +  A + N – I use this twoto move around all my open screen Virtual sessions.
 

3. HOW TO ACTUALLY SHARE TERMINAL SESSION BETWEEN MULTIPLE USERS?


3.1 Configuring Shared Sessions so other users can connect

You need to  have a single user account on a Linux or Unix like server lets say that might be the /etc/passwd, /etc/shadow, /etc/group account screen and you have to give the password to all users to be participating into the shared screen shell session.

E.g. create new system account screen

root@jericho:~# adduser screen
Adding user `screen' …
Adding new group `screen' (1001) …
Adding new user `screen' (1001) with group `screen' …
The home directory `/home/screen' already exists.  Not copying from `/etc/skel'.
Enter new UNIX password:
Retype new UNIX password:
passwd: password updated successfully
Changing the user information for screen
Enter the new value, or press ENTER for the default
    Full Name []: Screen user to give users shared access to /bin/bash
    Room Number []:
    Work Phone []:
    Home Phone []:
    Other []:
Is the information correct? [Y/n] Y

Now distribute the user / pass pair around all users who are to be sharing the same virtual bash session via screen and instruct each of them to run:

hipo@jericho:~$  screen -d -m -S shared-session
hipo@jericho:~$

hipo@jericho:~$ screen -list

There is a screen on:
    4095.shared-session    (10.10.2017 20:22:22)    (Detached)
1 Socket in /run/screen/S-hipo.


3.2. Attaching to just created session
 

Simply login with as many users you need with SSH to the remote server and instruct them to run the following command to re-attach to the just created new session by you:

hipo@jericho:~$ screeen -x

That's all folks now everyone can type in simultaneously and enjoy the joys of the screen shared session.

If for some reasons more than one session is created by the simultaneously logged in users either as an exercise or by mistake i.e.:

hipo@jericho:~$ screen -list

There are screens on:
    4880.screen-session    (10.10.2017 20:30:09)    (Detached)
    4865.another-session    (10.10.2017 20:29:58)    (Detached)
    4847.hey-man    (10.10.2017 20:29:49)    (Detached)
    4831.another-session1    (10.10.2017 20:29:45)    (Detached)
4 Sockets in /run/screen/S-hipo.

You have to instruct everyone to connect actually to the exact session we need, as screen -x will ask them to what session they like to connect.

In that case to connect to screen-session, each user has to run with their account:

hipo@jericho:~$ screen -x shared-session


If under some circumstances it happened that there is more than one opened shared screen virtual session, for example screen -list returns:


hipo@jericho:~$ screen -list
There are screens on:
    5065.screen-session    (10.10.2017 20:33:20)    (Detached)
    4095.screen-session    (10.10.2017 20:30:08)    (Detached)

All users have to connect to the exact screen-session created name and ID, like so:

hipo@jericho:~$ screen -x 4095.screen-session


Here is the meaning of used options


-d option instructs screen to detach,
-m makes it multiuser session so other users can attach
-S argument is just to give the screen session a name
-list Sesssion gives the screen-session ID

Once you're over with screen session (e.g. all users that are learning and you show them stuff and ask them to test by themselves and have completed, scheduled tasks), to kill it just press CTRL + A + K
 

4. Share screen /bin/bash shell session with another user

Sharing screen session between different users is even more useful to the shared session of one user as you might have a *nix server with many users who might attach to your opened session directly, instead of being beforehand instructed to connect with a single user.

That's perfect also for educational purposes if you want to learn some Linux to a class of people, as you can use their ordinary accounts and show them stuff on a Linux / BSD  machine.

Assuming that you follow and created already screen-session with screen cmd

hipo@jericho:~$ screen -list
There is a screen on:
        5560.screen-session      (10.10.2017 20:41:06)   (Multi, attached)
1 Socket in /run/screen/S-hipo.

hipo@jericho:~$

Next attach to the session

bunny@jericho:~$ screen -r shared-session
bunny@jericho:~$ Ctrl-a :multiuser on
bunny@jericho:~$ Ctrl-a :acladd user2
bunny@jericho:~$ screen -x UserNameHere/shared-session
 

Here are 2 screenshots on what should happen if you had done above command combinations correctly:
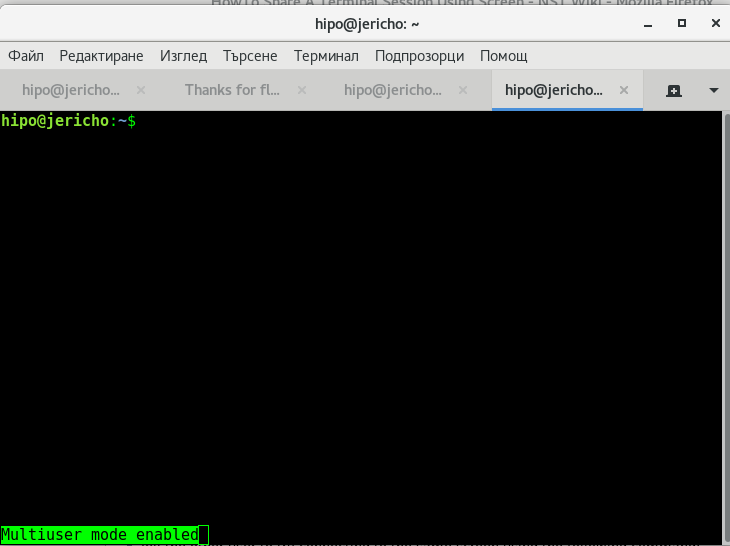
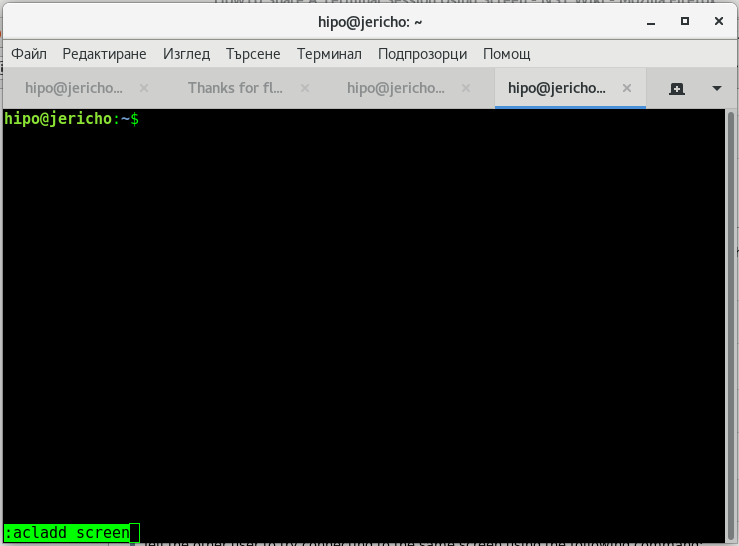
screen-share-session-to-multi-users-screenshot-multiuser-on-on-gnome-terminal2

screen-share-session-to-multi-users-screenshot-multiuser-on-on-gnome-terminal3

In order to be able to share screen Virtual terminal ( VTY ) sessions between separate (different) logged in users, you have to have screen command be suid (SUID bit for screen is disabled in most Linux distributions for security reasons).

Without making SUID the screen binary file, you are to get the error:

hipo@jericho:/home/hipo$ screen -x hipo/shared

Must run suid root for multiuser support.

If you are absolutely sure you know what you're doing here is how to make screen command sticky bit:


root@jericho:/home/hipo# which screen
root@jericho:/home/hipo# /usr/bin/screen
root@jericho:/home/hipo# root@jericho:/home/hipo# root@jericho:/home/hipo# chmod u+s $(which screen)
chmod 755 /var/run/screen
root@jericho:/home/hipo# rm -fr /var/run/screen/*
exit
How to search text strings only in hidden files dot (.) files within a directory on Linux and FreeBSD

Saturday, April 28th, 2012

how-to-search-hidden-files-linux-freebsd-logo_grep
If there is necessity to look for a string in all hidden files with all sub-level subdirectories (be aware this will be time consuming and CPU stressing) use:
 

hipo@noah:~$ grep -rli 'PATH' .*

./.gftp/gftprc
./.gftp/cache/cache.OOqZVP
….

Sometimes its necessery to only grep for variables within the first-level directories (lets say you would like to grep a 'PATH' variable set, string within the $HOME directory, the command is:

hipo@noah:~$ grep PATH .[!.]*

.profile:PATH=/bin:/usr/bin/:${PATH}
.profile:export PATH
.profile:# set PATH so it includes user's private bin if it exists
.profile: PATH="$HOME/bin:$PATH"
.profile.language-env-bak:# set PATH so it includes user's private bin if it exists
.profile.language-env-bak: PATH="$HOME/bin:$PATH"
.viminfo:?/PATH.xcyrillic: XNLSPATH=/usr/X11R6/lib/X11/nls
.xcyrillic: export XNLSPATH

The regular expression .[!.]*, means exclude any file or directory name starting with '..', e.g. match only .* files

Note that to use the grep PATH .[!.]* on FreeBSD you will have to use this regular expression in bash shell, the default BSD csh or tsch shells will not recognize the regular expression, e.g.:

grep PATH '.[!.]*'
grep: .[!.]*: No such file or directory

Hence on BSD, if you need to look up for a string within the home directory, hidden files: .profile .bashrc .bash_profile .cshrc run it under bash shell:

freebsd# /usr/local/bin/bash
[root@freebsd:/home/hipo]# grep PATH .[!.]*

.bash_profile:# set PATH so it includes user's private bin if it exists
.bash_profile:# PATH=~/bin:"${PATH}"
.bash_profile:# do the same with …

Another easier to remember, alternative grep cmd is:

hipo@noah:~$ grep PATH .*
.profile:PATH=/bin:/usr/bin/:${PATH}
.profile:export PATH
.profile:# set PATH so it includes user's private bin if it exists
.profile: PATH="$HOME/bin:$PATH"
….

Note that grep 'string' .* is a bit different in meaning, as it will not prevent grep to match filenames with names ..filename1, ..filename2 etc.
Though grep 'string' .* will work note that it will sometimes output some unwanted matches if filenames with double dot in the beginning of file name are there …
That's all folks 🙂

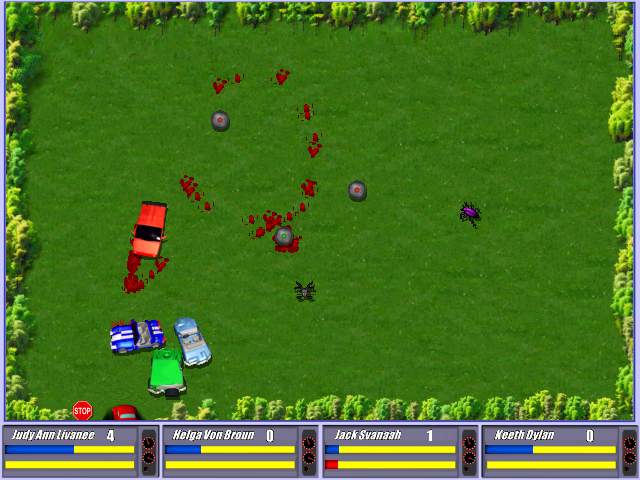
Linux release of the game Savage Wheels (Destruction Derby like game) is out!

Friday, September 17th, 2010

Savage Wheels Game for Linux

A close friend of mine Pro-Xex (a.k.a. Necroleak) has released Savage Wheels game for Linux.

The Savage Wheels game is a recreation of a game in a way similar to the good old Destruction Derby that most of the hard code old school arcade know very well.

The Savage Wheels has been an existant for a long time for a free download. However for a couple of years the Pro-XeX decided not to publish it’s code publicly, his considerations were that the code is too messy and not ready to go public.

For almost 2 years now the game source code has been existent openly for download from a source repository at google code

Though the source was there for download, until recently, the game source code was not ready to compile on Linux, though the game’s programming style used is 100% compatible with the Linux / BSD platform.

Right now the game is licensed under the MIT free software license
A few weeks before Peter (Pro-Xex) has contacted me and shared and told me the good news, that he has finally ported the game for the Linux platform and asked me to help him a bit with the game testing!
I thought this is pretty cool, but I was busy until this very day that I actually downloaded the compiled binary of Savage Wheels on my Debian Testing/Unstable (Squeeze/Sid) and gave it a try.

I’m running the 64 bit Debian release, featuring kernel version:

Linux noah 2.6.32-5-amd64 #1 SMP Wed Aug 25 13:59:41 UTC 2010 x86_64 GNU/Linux

Installing the game was a really easy all I had to do is download the archived binary of the game and untar it into a new directory I’ve created for the game.

hipo@noah:~$ mkdir savagewheels
hipo@noah:~$ cd savagewheels
hipo@noah:~/savagewheels$ wget -c http://savagewheels.googlecode.com/files/savagewheels-1.4-linux-x86.tar.gz
hipo@noah:~/savagewheels$ tar -zxvf savagewheels-1.4-linux-x86.tar.gz

It will take like few secs until the game source gets extracted:

To go and start up the game I directly tried executing the game main binary file savagewheels , like you can see below

hipo@noah:~/savagewheels$ ./savagewheels
./savagewheels: error while loading shared libraries: libfmod-3.75.so: cannot open shared object file: No such file or directory

The error in loading library was pretty unexpected, but counting the fact that I’m one of the first people that test the game on Linux I guess it’s pretty normal.
In order to resolve the missing shared library on game execution It was necessary to copy the libfmod-3.75.so to /usr/local/lib/

To do so I issued as a root user:

hipo@noah:/home/hipo/savagewheels# cp -rpf libfmod-3.75.so /usr/local/lib

In case if you don’t want to copy the libfmod-3.75.so into /usr/local/lib, it’s also possible to use the shell export command to specify the exact location of libfmod-3.75.so to your current known systemlibraries.

If you prefer it that way issue command:


hipo@noah:~/savagewheels$ export LD_LIBRARY_PATH=.:$LD_LIBRARY_PATH

Now when I invoked the savagewheels game binary once again:
hipo@noah:~/savagewheels$ ./savagewheels

the game poped up in a window.

As I’ve red in the Readme.html file it’s already noted there that by default the game would run in window mode instead of full screen due to some bugs or video drivers etc.
Happily it was indicated in the Readme file that in order to run it in fullscreen, it’s necessary to invoke the game binary with the -force-fullscreen option included, e.g. running it in fullscreen comes to:

hipo@noah:~/savagewheels$ ./savagewheels -force-fullscreen

At first I was a bit confused when the game poped up before I notice the left side menu which appears could be only reached with the mouse pointer. So I warn you that if you go to give the game a try you will probably wonder how to start up the game after the game entry window with menus appears.

Since the game is so new with Linux it has several bugs to be fixed, one of the bugs is that the Window in which the game pops up by default couldn’t be closed if you press the close window button.

Another thing I do notice is that when I play sometimes during a I crash another car, my car gets stucked for a while.

Another thing which is not very intuitive about the game is the player keys, they could be fount expolained in Readme.html

But I’ll post them here as well to facilitate my dear readers who might be willing to play the game immediately without reading boring docs 🙂

So Player 1 keys are:

arrow keys to move
UP (accelerate up)
LEFT (turn left) RIGHT (turn right)
DOWN (back gear)
RIGHT CTRL - to place landmines
DELETE - self destruction

I think giving the player 1 keys are enough for the player 2 control keys take a quick look in Readme.html

Here is the time to tell you that the game music is absolutely awesome!! So the game is worthy to play just because Pro-Xex has present the user with the wonderful soundtrack that is.

For some further general information related to the game you can read the Savage Wheels game Readme online from here

I would place the game among one of the best car crash games available currently for Linux, so if you’re a arcade game maniac you would probably have a great time with the game.

Create Routine mirror copy of milw0rm & packetstorm exploits database

Wednesday, January 13th, 2010

Few weeks ago, I’ve built a small script and put it to
execute in cron in order to have an up2date local copy of
milw0rm. Ofcourse that’s pretty handy for several reasons.
For example milw0rm may go down and the exploit database tobe lost forever. This once happened with hack.co.za which ceasedto exist several years ago, even though it has one of thegreatest exploits database for it’s time.
Luckily I did a copy of hack.co.za, knowing that it’s gone
day might come here is the mirror archive of hack.co.za database
Anyways back to the main topic which was creating routine mirror
copy of milw0rm exploits database.
Here is the small script that needs to be setup on cron in order tohave periodic copy of milw0rm exploits database.
#!/usr/local/bin/bash# Download milw0rm exploitsdownload_to='/home/hipo/exploits';milw0rm_archive_url='http://milw0rm.com/sploits/milw0rm.tar.bz2';milw0rm_archive_name='milw0rm.tar.bz2';if [ ! -d '/home/hipo/exploits' ]; thenmkdir -p $download_to;ficd $download_to;wget -q $milw0rm_archive_url;tar -jxvvf $milw0rm_archive_name;rm -f $milw0rm_archive_name;exit 0 The script is available as wellfor download via milw0rm_exploits_download.sh
To make the script operational I’ve set it up to execute via cron with
the following cron record:
00 1 * * * /path_to_script/milw0rm_exploits_download.sh >/dev/null 2>&1 Here is another shell code I used to download all packetstormsecurity exploits frompacketstormsecurity’s website:
#!/usr/local/bin/bash# Download packetstormsecurity exploits# uses jot in order to run in freebsdpacketstorm_download_dir='/home/hipo/exploits';if [ ! -d "$packetstorm_download" ]; thenmkdir -p "$packetstorm_download";for i in $(jot 12); do wget http://www.packetstormsecurity.org/0"$i"11-exploits/0"$i"11-exploits.tgz; done
The script can be obtained also via following link (packetstormsecurity_expl_db_download.sh)

Another interesting tutorial that relates to the topic of building local
mirrors (local exploit database) is an article I found on darkc0de.com’s
website calledHow to build a local exploit database
The article explains thoroughly
howto prepare packetstormsecurity exploits database mirrorand
how to mirror milw0rm through python scripts.
Herein I include links to the 2 mirror scripts:
PacketStorm Security Mirror Script
milw0rm archive mirror script
Basicly the milw0rm archive script is identical to the small shellscript
I’ve written and posted above in the article. However I believe there is
one advantage of the shellscript it doesn’t require you
to have python installed 🙂

How to take multiple screenshots with scrot and ImageMagick import commands in terminal on GNU / Linux and FreeBSD

Friday, January 13th, 2012

scrot and import are two commands, which can be used to take screenshot in terminal on Linux and FreeBSD:

To use scrot cmd to take screenshots on Ubuntu and Debian the scrot package has to be installed:

noah:~# apt-get install scrot
...

scrot should also be available on most other Linux distributions in the main repositories, I'll be glad to hear if someone has used it on Fedora, SUSE etc.

On FreeBSD, there is a port called scrot , to install on FreeBSD:

freebsd# cd /usr/ports/graphics/scrot
freebsd# make install clean
...

Scrot has plenty of nice arguments one can use to make a screenshot. Maybe the most handy one in my view is after a preliminary set delay before screenshot is taken.

To take screenshot with it after lets say 5 seconds delay before the screenshot:

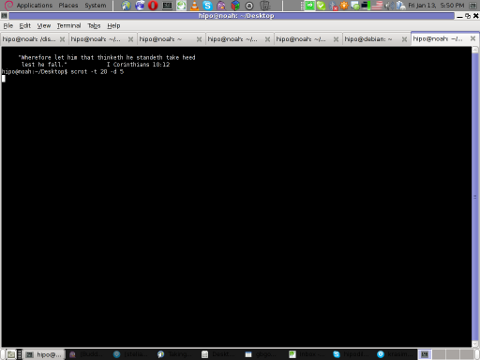
hipo@noah:~/Desktop$ scrot -t 20 -d 5

Screenshot scrot my debian Linux gnome-termina

To put an year, month and day and year followed by screen resolution with scrot :

hipo@noah:~$ scrot '%Y-%m-%d_$wx$h.png'

Another way to take a screenshot of screen with command is by using ImageMagick'simport image manipulation package.
To take screenshot of the current screen via terminal using import , type in xterm, gnome-termina or Gnome's Run Application (ALT+F2)

hipo@noah:~$ import -window root ScreenShot.png

To make import command to save the taken screenshot in a format (minute:hour:day:month:year)i :

hipo@noah:~$ import -window root $screenshot_dir/screenshot-$(date +%M_%k_%d_%m_%Y|sed -e 's/^ *//').png

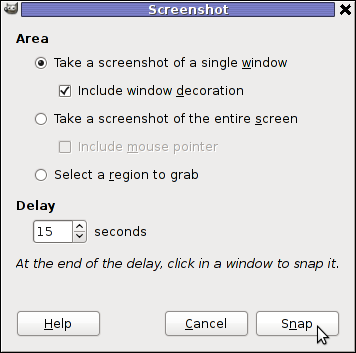
Taking a delayed screenshot is also possible via The GIMP via menus File -> Create -> Screenshot

GIMP Screenshot 15 seconds delay GIMP window screenshot

Now here is an interesting question, what if I would like to take periodic screenshots of what I do on my Desktop to take random movie scenes from a movie I watch with totem or vlc??

This task is quite easily achiavable with a little bash shell script, I wrote:

screenshot_dir='Screenshots';
seconds='60';
if [ ! -d "$screenshot_dir" ]; then
mkdir $screenshot_dir;
fi
while [ 1 ]; do
sleep $seconds;
(import -window root $screenshot_dir/screenshot-$(date +%M_%k_%d_%m_%Y|sed -e 's/^ *//').png) &
done

This script will take screenshot automatically to Screenshots/ directory every (1 min – 60 seconds)
You can also my downloads take_screenshot_every_60_secs_import.sh here

To use take_screenshot_every_60_secs_import.sh just issue the script inside xterm or gnome-terminal, after that simply use your computer as you normally would.
The script will take snapshots every minute and store all taken screenshots in Screenshots dir.

If you prefer to use scrot to take automatically the screenshots every lets say 5 minutes, you can use a script like:

screenshot_dir='Screenshots';
# 300 secs (5 mins)seconds='300';
if [ ! -d "$screenshot_dir" ]; then
mkdir $screenshot_dir;
fi
while [ 1 ]; do
sleep $seconds;
(scrot $screenshot_dir/'%Y-%m-%d_$wx$h.png') &
done

You can fetch take_screenshot_every_60_secs_scrot.sh here

The script using scrot is better in terms of efficiency, the system load scrot will put on your machine will be less.
Using some of this scripts will be handy if you need screenshots to Movies, Programs and favourite Free Software games.
Hope this is educative to someone 😉

How to resolve network issues with Java 6 JRE on Debian / Java proxy spawn on Debian sid not working by default – A Small tip on running WebScarab and Paros local Proxy on Debian’s Java

Wednesday, April 28th, 2010

In an attempt to use Paros Proxy and WebScarab on Debian I faced a shitty issues with Java’s Networking.

Neither of the forementioned Security Applications’s Local Proxy to be spawned by the Java server won’t work.

I assured my self there is nothing running on the ports 8080 on which the two Java applications attempted to run their local proxy server.
Being sure that nothing is listening on the 8080 port. I suspected that there is something wrong with Debian’s Java networking.
A quick search in Google pointed me to the Debian.Net’s forums where the issue was described as serious proxy error after updates .

The error that was returned by the ParosProxy Server on my Desktop Debian can be reviewed below:

hipo@noah:~/paros$ /usr/lib/jvm/java-6-sun-1.6.0.17/jre/bin/java -jar paros.jar
file:/home/hipo/paros/paros.jar
java.net.SocketException: Invalid argument
at java.net.PlainSocketImpl.socketBind(Native Method)
at java.net.PlainSocketImpl.bind(PlainSocketImpl.java:365)
at java.net.ServerSocket.bind(ServerSocket.java:319)
at java.net.ServerSocket.<init>(ServerSocket.java:185)
at org.parosproxy.paros.core.proxy.ProxyServer.createServerSocket(Unknown Source)
at org.parosproxy.paros.core.proxy.ProxyServer.startServer(Unknown Source)
at org.parosproxy.paros.control.Proxy.startServer(Unknown Source)
at org.parosproxy.paros.control.Control.init(Unknown Source)
at org.parosproxy.paros.control.Control.<init>(Unknown Source)
at org.parosproxy.paros.control.Control.initSingletonWithView(Unknown Source)
at org.parosproxy.paros.Paros.runGUI(Unknown Source)
at org.parosproxy.paros.Paros.run(Unknown Source)
at org.parosproxy.paros.Paros.main(Unknown Source)

All a man can grasp from the Error is that there is something wrong with running the Paros Proxy server.
So far so good since the last release of Paros Proxy originates back to the year 2006 and it’s not really supported this days at first I thought this could be causing the error.
By the way the paros proxy is available via the debian packaging system. So I use the packaged version of paros to install the Debian packaged version of Paros Proxy issue the cmd:

root@noah:~# apt-get install paros

In that manner of thoughts I decided to try out the newer more modern HTTP and HTTPS Security Analysing Application WebScarab

I followed the start up instructions on WebScarab’s Website in order to run the application.
It was really simple. All I had to do is download the webscarab-current.zip which of the time of writting this post is webscarab-20100414-0036 and then launch the Java Debian Virtual machine.

However though my hopes that WebScarab’s local Proxy server will be running fine I was unpleasently suprised by the error which shown below:

hipo@noah:~/webscarab-20100414-0036$ java -jar webscarab.jar
Help set not found
11:43:36 main(Proxy.parseListenerConfig): No proxies configured!?
11:43:39 Proxy(Proxy.run): Unable to start listener 127.0.0.1:8008

Ain’t pretty heh?! … Even nasty !

However I was lucky to find the solution in some 20 minutes, so hopefully it took you less to find this post.

The solution to the above Proxy Spawn Error with Paros and Webscarab on Debian Lenny’s Java 6 Sun Server is really simple and it comes to this:

1. edit /etc/sysctl.d/bindv6only.conf and change the value

net.ipv6.bindv6only = 1
# to
net.ipv6.bindv6only = 0

2. Restart procps

root@noah:/home/hipo/webscarab-20100414-0036# invoke-rc.d procps restart

Now launch once again either Paros Proxy or Webscarab, the Local Proxy Server by each of them will bind to either port 8008 (WebScarab) or port 8008 (Paros Proxy).

Howto install GeoTrust RapidSSL certificate on Debian Lenny / Squeeze / Wheezy Linux

Thursday, March 25th, 2010

I faced the task of generating official Validated SSL Certificates by in mydaily duties as a System Administrator at cadiaholding.com . Though generating self-signedSSL certificate is comparatively easy task. It was a pain in the ass setting Apache version 2.2.9-10+lenny6to correctly serve pages through https:// protocol over openssl version 0.9.8g-15+lenny6.I’ll try to go through the whole process of Generating the certificate in order to help some other Debianusers out there to face less setbacks in such a simple task as installing a Trusted SSL Certificate issued(bought) by RapidSSL. Even though this article will mostly deal with SSL certificate issued by RapidSSL,it should be not a problem to apply this methodogy with Verisign or some of the other Geotrust issuedSecure Socket Layer certificates.

In generating the Validated certficate I used enom which is a domain name,ssl certificates, email and hosting company whole-saler.
Fron emon’s website after logging in and using the web interface, there are two major things required to fill inin order to issue your Trusted SSL certificate.

1. Fill in in a form a CSR file, this is usually generated on the Linux server using the openssl.
To issue the CSR file required by Enom use the following commands:

a. First we generate an DES3 RSA encrypted key which we will use next to generate the opeensl CSR file required by ENOM.
debian:~# /usr/bin/openssl genrsa -des3 -out www.domain.com.key 2048
Enter pass phrase for www.domain.com.key:

You’ll be required to fill in a pass-phrase that will be later be required to fill in before Apache servers starts or restarts,so make sure you fill something you either remember or you keep the password stored in a file.
You have to change also the www.domain.com.key in accordance with your domain name.
Now as we already have a proper generated DES3 RSA key afterwards it’s necessery to generate the CSR file with the openssl command line frontend.
So here is how:

debian:~# /usr/bin/openssl req -new -key /home/hipo/www.domain.com.key -out /home/hipo/www.domain.com.csr

Again in the above example change all the paths and file names as you wish.
It’s necessery that the end user fill in a number of questions related to the Certificate Signing Request.
Herein I’ll list what kind of prompts will emerge after executing the above command:

Enter pass phrase for /home/hipo/www.domain.com.key:
You are about to be asked to enter information that will be incorporated
into your certificate request.
What you are about to enter is what is called a Distinguished Name or a DN.
There are quite a few fields but you can leave some blank
For some fields there will be a default value,
If you enter '.', the field will be left blank.
-----
Country Name (2 letter code) [AU]:
State or Province Name (full name) [Some-State]:
Locality Name (eg, city) []:
Organization Name (eg, company) [Internet Widgits Pty Ltd]:
Organizational Unit Name (eg, section) []:
Common Name (eg, YOUR name) []:
Email Address []:
Please enter the following 'extra' attributes
to be sent with your certificate request
A challenge password []:
An optional company name []:

Note that you’ll hav eto fill in the pass phrase previously entered during the generation of the www.domain.com.key file.
In case if you’d like to read more thoroughly on the subject of howto create a Certificate Signing Request or (CSR) as we called it on multiple times, you can read About Certificate Signing Request (CSR) Generation Instructions – Apache SSL more in depth here

2. Hopefully following the above instructions you’ll now have a file named www.domain.csrJust open the www.domain.scr and copy paste it’s content to the ENOM website CSR * webform.

3. Further on select your Webserver type on Enom’s website:In our case we have to select Apache + ApacheSSL

4. What follows next is filling in your company contact information This is also required for proper certificate generation, you have to think twice before you fill in this data, take a note this can’t be changed later on without issuing a brand SSL new certificate.

Apart from the 3 major above requirements to fill in Enom there are some few more radio buttons to use to make some selections according to your personal preferences, however I won’t take time to dig in that and I’ll leave this to you.
After all the above is fulfilled you’ll have to submit your certificate details and choose an email address to which you will receive in a minute a RapidSSL Certificate Request Confirmation

Following a link from the email, will show you some basic information about the certificate about to be generated. That’s your final chance to cancel the issued Trusted Certificated.
If you’re absolutely sure the information about to enter the certificate is correct then you’ll have to follow a link and approve the certificate.

You’ll be informed that you’ll receive your certificate either through Certifier website (e.g. Enom’s website) or via another email.
I thought it’s more probable I receive it via email but anyways I was wrong. More thank 4 hours has passed since the certificate was issued and is available via Enom’s interface but I haven’t received nothing on my mail.
Therefore my friendly advice is to check about your brand new shiny Trusted Certificate on Emom’s website. I had mine ready in about 10 minutes after the CSR was issued.

Assuming that you’ve succesfully obtained the SSL Trusted certificate from RapidSSL what follows is setting up the certificate.
Initially I tried using documentation from RapidSSL website called Installing your SSL Certificate / Web Server Certificate / Secure Server Certificate from RapidSSL.com
I tried to configure one of my Virtualhost as shown in their example inserting in my /etc/apache/sites-available/www.domain.com file, few directives within the VirtualHost something like the shown below

SSLEngine on
# domain.com.crt cointains the Trusted SSL certificate generated and obtained by you from RapidSSL
SSLCertificateFile /etc/apache2/ssl/www.domain.com.crt
# www.domain.com.key contains the file used to generate the CSR file as described earlier in this post
SSLCertificateKeyFile /etc/apache2/ssl/www.domain.com.key

It is also possible insetad of using the SSLCertificateFile and SSLCertificateKeyFile directvies directives in Apache config to use:


Another alternative is to use

SSLCertificateFile /etc/ssl/certs/your-domain-name.crt
SSLCertificateKeyFile /etc/ssl/certs/your-domain-name.key
SSLCACertificateFile /etc/ssl/certs/gd_bundle.crt

The key file is the one generated earlier on the server and handed to the SSL regisrar, the files:

your-domain-name.crt and gd_bundle.crt files are provided by RapidSSL or from whatever SSL registrater the SSL was purchased.

After trying the above configuration and restarting apache with:

/etc/init.d/apache2 restart

Apache failed to start, it might be helpful to somebody out there the error I had in my apache error.log:
The error.log red the following:

[warn] RSA server certificate is a CA certificate (BasicConstraints: CA == TRUE !?)

After some 30 minutes or an hour of Googling on the error I came to the conclusion that the error is caused, becauseApache is supposed to work with .PEM files instead of the classical .CRT and .KEY files asnormally approached in most of the other Unix operating systems.

It took me a bit more of reading on the internet to find out that actually the .pem files so widely adopted in Debian simply contain both the www.domain.com.key file and the www.domain.com.crt key simply pasted one after another, this I also observed from the default Apache self-signed certificate that I believe comes with debian /etc/apache2/ssl/apache.pem .
So I copied both the content of my www.domain.com.key and www.domain.com.crt and store it in one file:
/etc/apache2/ssl/www.domain.com.pem

Also the following configuration:
SSLEngine on
SSLCertificateFile /etc/apache2/ssl/www.domain.com.pem

had to go in your
/etc/apache2/sites-enabled/www.domain.com

Last thing that’s left is to restart your Apache;

/etc/init.d/apache2 restart

Apache will prompt you for your certificate password entered by you during the www.domain.com.key generation. Type your password and with a bit of luck and hopefully with God’s help you’ll be having a Trusted Certificate on your webserver.

Last step is to check if the certificate is okay accessing your domain https://www.domain.com.

Well this is the end of the article, hope you enjoy.If you do please leave your comments, any corrections are also welcomed 🙂