Posts Tagged ‘host’

MySQL: How to check user privileges and allowed hosts to connect with mysql cli

Wednesday, April 2nd, 2014

how-to-check-user-privileges-and-allowed-hosts-to-connect-with-mysql-cli

On a project there are some issues with root admin user unable to access the server from remote host and the most probable reason was there is no access to the server from that host thus it was necessary check mysql root user privilegse and allowed hosts to connect, here SQL query to do it:
 

mysql> select * from `user` where  user like 'root%';
+——————————–+——+——————————————-+————-+————-+————-+————-+————-+———–+————-+—————+————–+———–+————+—————–+————+————+————–+————+———————–+——————+————–+—————–+——————+——————+—————-+———————+——————–+——————+————+————–+———-+————+————-+————–+—————+————-+—————–+———————-+
| Host                           | User | Password                                  | Select_priv | Insert_priv | Update_priv | Delete_priv | Create_priv | Drop_priv | Reload_priv | Shutdown_priv | Process_priv | File_priv | Grant_priv | References_priv | Index_priv | Alter_priv | Show_db_priv | Super_priv | Create_tmp_table_priv | Lock_tables_priv | Execute_priv | Repl_slave_priv | Repl_client_priv | Create_view_priv | Show_view_priv | Create_routine_priv | Alter_routine_priv | Create_user_priv | Event_priv | Trigger_priv | ssl_type | ssl_cipher | x509_issuer | x509_subject | max_questions | max_updates | max_connections | max_user_connections |
+——————————–+——+——————————————-+————-+————-+————-+————-+————-+———–+————-+—————+————–+———–+————+—————–+————+————+————–+————+———————–+——————+————–+—————–+——————+——————+—————-+———————+——————–+——————+————+————–+———-+————+————-+————–+—————+————-+—————–+———————-+
| localhost                      | root | *5A07790DCF43AC89820F93CAF7B03DE3F43A10D9 | Y           | Y           | Y           | Y           | Y           | Y         | Y           | Y             | Y            | Y         | Y          | Y               | Y          | Y          | Y            | Y          | Y                     | Y                | Y            | Y               | Y                | Y                | Y              | Y                   | Y                  | Y                | Y          | Y            |          |            |             |              |             0 |           0 |               0 |                    0 |
| server737                        | root | *5A07790DCF43AC89820F93CAF7B03DE3F43A10D9 | Y           | Y           | Y           | Y           | Y           | Y         | Y           | Y             | Y            | Y         | Y          | Y               | Y          | Y          | Y            | Y          | Y                     | Y                | Y            | Y               | Y                | Y                | Y              | Y                   | Y                  | Y                | Y          | Y            |          |            |             |              |             0 |           0 |               0 |                    0 |
| 127.0.0.1                      | root | *5A07790DCF43AC89820F93CAF7B03DE3F43A10D9 | Y           | Y           | Y           | Y           | Y           | Y         | Y           | Y             | Y            | Y         | Y          | Y               | Y          | Y          | Y            | Y          | Y                     | Y                | Y            | Y               | Y                | Y                | Y              | Y                   | Y                  | Y                | Y          | Y            |          |            |             |              |             0 |           0 |               0 |                    0 |
| server737.server.myhost.net | root | *5A07790DCF43FC89820A93CAF7B03DE3F43A10D9 | Y           | Y           | Y           | Y           | Y           | Y         | Y           | Y             | Y            | Y         | Y          | Y               | Y          | Y          | Y            | Y          | Y                     | Y                | Y            | Y               | Y                | Y                | Y              | Y                   | Y                  | Y                | Y          | Y            |          |            |             |              |             0 |           0 |               0 |                    0 |
| server4586                        | root | *5A07790DCF43AC89820F93CAF7B03DE3F43A10D9 | N           | N           | N           | N           | N           | N         | N           | N             | N            | N         | N          | N               | N          | N          | N            | N          | N                     | N                | N            | N               | N                | N                | N              | N                   | N                  | N                | N          | N            |          |            |             |              |             0 |           0 |               0 |                    0 |
| server4586.myhost.net              | root | *5A07790DCF43AC89820F93CAF7B03DE3F43A10D9 | N           | N           | N           | N           | N           | N         | N           | N             | N            | N         | N          | N               | N          | N          | N            | N          | N                     | N                | N            | N               | N                | N                | N              | N                   | N                  | N                | N          | N            |          |            |             |              |             0 |           0 |               0 |                    0 |
+——————————–+——+——————————————-+————-+————-+————-+————-+————-+———–+————-+—————+————–+———–+————+—————–+————+————+————–+————+———————–+——————+————–+—————–+——————+——————+—————-+———————+——————–+——————+————+————–+———-+————+————-+————–+—————+————-+—————–+———————-+
6 rows in set (0.00 sec)

mysql> exit


Here is query explained:

select * from `user` where  user like 'root%'; query means:

select * – show all
from `user` – from user database
where user like 'root%' – where there is match in user column to any string starting with 'root*',
 

How to completely disable Replication in MySQL server 5.1.61 on Debian GNU / Linux

Monday, July 16th, 2012

Replication_mysql_disable

Some time ago on one of the Database MySQL servers, I've configured replication as it was required to test somethings. Eventually it turned out replication will be not used (for some reason) it was too slow and not fitting our company needs hence we needed to disable it.

It seemed logical to me that, simply removing any replication related directives from my.cnf and a restart of the SQL server will be enough to turn replication off on the Debian Linux host. Therefore I proceeded removed all replication configs from /etc/my/my.cnf and issued MySQL restart i. e.:

sql-server:~# /etc/init.d/mysql restart
....

This however didn't turned off replication,as I thought and in phpmyadminweb frontend interface, replication was still appearing to be active in the replication tab.

Something was still making the SQL server still act as an Replication Slave Host, so after a bit of pondering and trying to remember, the exact steps I took to make the replication work on the host I remembered that actually I issued:

mysql> START SLAVE;

Onwards I run:

mysql> SHOW SLAVE STATUS;
....

and found in the database the server was still running in Slave Replication mode

Hence to turn off the db host run as a Slave, I had to issue in mysql cli:

mysql> STOP SLAVE;
Query OK, 0 rows affected, 1 warning (0.01 sec)
mysql> RESET SLAVE;
Query OK, 0 rows affected, 1 warning (0.01 sec)

Then after a reload of SQL server in memory, the host finally stopped working as a Slave Replication host, e.g.

sql-server:~# /etc/init.d/mysql restart
....

After the restart, to re-assure myself the SQL server is no more set to run as MySQL replication Slave host:

mysql> SHOW SLAVE STATUS;
Empty set (0.00 sec)

Cheers 😉

‘host-name’ is blocked because of many connection errors; unblock with ‘mysqladmin flush-hosts’

Sunday, May 20th, 2012

mysql-logo-host-name-blocked-because-of-many-connection-errors
My home run machine MySQL server was suddenly down as I tried to check my blog and other sites today, the error I saw while trying to open, this blog as well as other hosted sites using the MySQL was:

Error establishing a database connection

The topology, where this error occured is simple, I have two hosts:

1. Apache version 2.0.64 compiled support externally PHP scripts interpretation via libphp – the host runs on (FreeBSD)

2. A Debian GNU / Linux squeeze running MySQL server version 5.1.61

The Apache host is assigned a local IP address 192.168.0.1 and the SQL server is running on a host with IP 192.168.0.2

To diagnose the error I've logged in to 192.168.0.2 and weirdly the mysql-server was appearing to run just fine:
 

debian:~# ps ax |grep -i mysql
31781 pts/0 S 0:00 /bin/sh /usr/bin/mysqld_safe
31940 pts/0 Sl 12:08 /usr/sbin/mysqld –basedir=/usr –datadir=/var/lib/mysql –user=mysql –pid-file=/var/run/mysqld/mysqld.pid –socket=/var/run/mysqld/mysqld.sock –port=3306
31941 pts/0 S 0:00 logger -t mysqld -p daemon.error
32292 pts/0 S+ 0:00 grep -i mysql

Moreover I could connect to the localhost SQL server with mysql -u root -p and it seemed to run fine. The error Error establishing a database connection meant that either something is messed up with the database or 192.168.0.2 Mysql port 3306 is not properly accessible.

My first guess was something is wrong due to some firewall rules, so I tried to connect from 192.168.0.1 to 192.168.0.2 with telnet:
 

freebsd# telnet 192.168.0.2 3306
Trying 192.168.0.2…
Connected to jericho.
Escape character is '^]'.
Host 'webserver' is blocked because of many connection errors; unblock with 'mysqladmin flush-hosts'
Connection closed by foreign host.

Right after the telnet was initiated as I show in the above output the connection was immediately closed with the error:

Host 'webserver' is blocked because of many connection errors; unblock with 'mysqladmin flush-hosts'Connection closed by foreign host.

In the error 'webserver' is my Apache machine set hostname. The error clearly states the problems with the 'webserver' apache host unable to connect to the SQL database are due to 'many connection errors' and a fix i suggested with mysqladmin flush-hosts

To temporary solve the error and restore my normal connectivity between the Apache and the SQL servers I logged I had to issue on the SQL host:

mysqladmin -u root -p flush-hostsEnter password:

Thogh this temporar fix restored accessibility to the databases and hence the websites errors were resolved, this doesn't guarantee that in the future I wouldn't end up in the same situation and therefore I looked for a permanent fix to the issues once and for all.

The permanent fix consists in changing the default value set for max_connect_error in /etc/mysql/my.cnf, which by default is not too high. Therefore to raise up the variable value, added in my.cnf in conf section [mysqld]:

debian:~# vim /etc/mysql/my.cnf
...
max_connect_errors=4294967295

and afterwards restarted MYSQL:

debian:~# /etc/init.d/mysql restart
Stopping MySQL database server: mysqld.
Starting MySQL database server: mysqld.
Checking for corrupt, not cleanly closed and upgrade needing tables..

To make sure the assigned max_connect_errors=4294967295 is never reached due to Apache to SQL connection errors, I've also added as a cronjob.

debian:~# crontab -u root -e
00 03 * * * mysqladmin flush-hosts

In the cron I have omitted the mysqladmin -u root -p (user/pass) input options because for convenience I have already stored the mysql root password in /root/.my.cnf

Here is how /root/.my.cnf looks like:

debian:~# cat /root/.my.cnf
[client]
user=root
password=a_secret_sql_password

Now hopefully, this would permanently solve SQL's 'failure to accept connections' due to too many connection errors for future.

Resolving “nf_conntrack: table full, dropping packet.” flood message in dmesg Linux kernel log

Wednesday, March 28th, 2012

nf_conntrack_table_full_dropping_packet
On many busy servers, you might encounter in /var/log/syslog or dmesg kernel log messages like

nf_conntrack: table full, dropping packet

to appear repeatingly:

[1737157.057528] nf_conntrack: table full, dropping packet.
[1737157.160357] nf_conntrack: table full, dropping packet.
[1737157.260534] nf_conntrack: table full, dropping packet.
[1737157.361837] nf_conntrack: table full, dropping packet.
[1737157.462305] nf_conntrack: table full, dropping packet.
[1737157.564270] nf_conntrack: table full, dropping packet.
[1737157.666836] nf_conntrack: table full, dropping packet.
[1737157.767348] nf_conntrack: table full, dropping packet.
[1737157.868338] nf_conntrack: table full, dropping packet.
[1737157.969828] nf_conntrack: table full, dropping packet.
[1737157.969928] nf_conntrack: table full, dropping packet
[1737157.989828] nf_conntrack: table full, dropping packet
[1737162.214084] __ratelimit: 83 callbacks suppressed

There are two type of servers, I've encountered this message on:

1. Xen OpenVZ / VPS (Virtual Private Servers)
2. ISPs – Internet Providers with heavy traffic NAT network routers
 

I. What is the meaning of nf_conntrack: table full dropping packet error message

In short, this message is received because the nf_conntrack kernel maximum number assigned value gets reached.
The common reason for that is a heavy traffic passing by the server or very often a DoS or DDoS (Distributed Denial of Service) attack. Sometimes encountering the err is a result of a bad server planning (incorrect data about expected traffic load by a company/companeis) or simply a sys admin error…

– Checking the current maximum nf_conntrack value assigned on host:

linux:~# cat /proc/sys/net/ipv4/netfilter/ip_conntrack_max
65536

– Alternative way to check the current kernel values for nf_conntrack is through:

linux:~# /sbin/sysctl -a|grep -i nf_conntrack_max
error: permission denied on key 'net.ipv4.route.flush'
net.netfilter.nf_conntrack_max = 65536
error: permission denied on key 'net.ipv6.route.flush'
net.nf_conntrack_max = 65536

– Check the current sysctl nf_conntrack active connections

To check present connection tracking opened on a system:

:

linux:~# /sbin/sysctl net.netfilter.nf_conntrack_count
net.netfilter.nf_conntrack_count = 12742

The shown connections are assigned dynamicly on each new succesful TCP / IP NAT-ted connection. Btw, on a systems that work normally without the dmesg log being flooded with the message, the output of lsmod is:

linux:~# /sbin/lsmod | egrep 'ip_tables|conntrack'
ip_tables 9899 1 iptable_filter
x_tables 14175 1 ip_tables

On servers which are encountering nf_conntrack: table full, dropping packet error, you can see, when issuing lsmod, extra modules related to nf_conntrack are shown as loaded:

linux:~# /sbin/lsmod | egrep 'ip_tables|conntrack'
nf_conntrack_ipv4 10346 3 iptable_nat,nf_nat
nf_conntrack 60975 4 ipt_MASQUERADE,iptable_nat,nf_nat,nf_conntrack_ipv4
nf_defrag_ipv4 1073 1 nf_conntrack_ipv4
ip_tables 9899 2 iptable_nat,iptable_filter
x_tables 14175 3 ipt_MASQUERADE,iptable_nat,ip_tables


II. Remove completely nf_conntrack support if it is not really necessery

It is a good practice to limit or try to omit completely use of any iptables NAT rules to prevent yourself from ending with flooding your kernel log with the messages and respectively stop your system from dropping connections.

Another option is to completely remove any modules related to nf_conntrack, iptables_nat and nf_nat.
To remove nf_conntrack support from the Linux kernel, if for instance the system is not used for Network Address Translation use:

/sbin/rmmod iptable_nat
/sbin/rmmod ipt_MASQUERADE
/sbin/rmmod rmmod nf_nat
/sbin/rmmod rmmod nf_conntrack_ipv4
/sbin/rmmod nf_conntrack
/sbin/rmmod nf_defrag_ipv4

Once the modules are removed, be sure to not use iptables -t nat .. rules. Even attempt to list, if there are any NAT related rules with iptables -t nat -L -n will force the kernel to load the nf_conntrack modules again.

Btw nf_conntrack: table full, dropping packet. message is observable across all GNU / Linux distributions, so this is not some kind of local distribution bug or Linux kernel (distro) customization.
 

III. Fixing the nf_conntrack … dropping packets error

– One temporary, fix if you need to keep your iptables NAT rules is:

linux:~# sysctl -w net.netfilter.nf_conntrack_max=131072

I say temporary, because raising the nf_conntrack_max doesn't guarantee, things will get smoothly from now on.
However on many not so heavily traffic loaded servers just raising the net.netfilter.nf_conntrack_max=131072 to a high enough value will be enough to resolve the hassle.

– Increasing the size of nf_conntrack hash-table

The Hash table hashsize value, which stores lists of conntrack-entries should be increased propertionally, whenever net.netfilter.nf_conntrack_max is raised.

linux:~# echo 32768 > /sys/module/nf_conntrack/parameters/hashsize
The rule to calculate the right value to set is:
hashsize = nf_conntrack_max / 4

– To permanently store the made changes ;a) put into /etc/sysctl.conf:

linux:~# echo 'net.netfilter.nf_conntrack_count = 131072' >> /etc/sysctl.conf
linux:~# /sbin/sysct -p

b) put in /etc/rc.local (before the exit 0 line):

echo 32768 > /sys/module/nf_conntrack/parameters/hashsize

Note: Be careful with this variable, according to my experience raising it to too high value (especially on XEN patched kernels) could freeze the system.
Also raising the value to a too high number can freeze a regular Linux server running on old hardware.

– For the diagnosis of nf_conntrack stuff there is ;

/proc/sys/net/netfilter kernel memory stored directory. There you can find some values dynamically stored which gives info concerning nf_conntrack operations in "real time":

linux:~# cd /proc/sys/net/netfilter
linux:/proc/sys/net/netfilter# ls -al nf_log/

total 0
dr-xr-xr-x 0 root root 0 Mar 23 23:02 ./
dr-xr-xr-x 0 root root 0 Mar 23 23:02 ../
-rw-r--r-- 1 root root 0 Mar 23 23:02 0
-rw-r--r-- 1 root root 0 Mar 23 23:02 1
-rw-r--r-- 1 root root 0 Mar 23 23:02 10
-rw-r--r-- 1 root root 0 Mar 23 23:02 11
-rw-r--r-- 1 root root 0 Mar 23 23:02 12
-rw-r--r-- 1 root root 0 Mar 23 23:02 2
-rw-r--r-- 1 root root 0 Mar 23 23:02 3
-rw-r--r-- 1 root root 0 Mar 23 23:02 4
-rw-r--r-- 1 root root 0 Mar 23 23:02 5
-rw-r--r-- 1 root root 0 Mar 23 23:02 6
-rw-r--r-- 1 root root 0 Mar 23 23:02 7
-rw-r--r-- 1 root root 0 Mar 23 23:02 8
-rw-r--r-- 1 root root 0 Mar 23 23:02 9


IV. Decreasing other nf_conntrack NAT time-out values to prevent server against DoS attacks

Generally, the default value for nf_conntrack_* time-outs are (unnecessery) large.
Therefore, for large flows of traffic even if you increase nf_conntrack_max, still shorty you can get a nf_conntrack overflow table resulting in dropping server connections. To make this not happen, check and decrease the other nf_conntrack timeout connection tracking values:

linux:~# sysctl -a | grep conntrack | grep timeout
net.netfilter.nf_conntrack_generic_timeout = 600
net.netfilter.nf_conntrack_tcp_timeout_syn_sent = 120
net.netfilter.nf_conntrack_tcp_timeout_syn_recv = 60
net.netfilter.nf_conntrack_tcp_timeout_established = 432000
net.netfilter.nf_conntrack_tcp_timeout_fin_wait = 120
net.netfilter.nf_conntrack_tcp_timeout_close_wait = 60
net.netfilter.nf_conntrack_tcp_timeout_last_ack = 30
net.netfilter.nf_conntrack_tcp_timeout_time_wait = 120
net.netfilter.nf_conntrack_tcp_timeout_close = 10
net.netfilter.nf_conntrack_tcp_timeout_max_retrans = 300
net.netfilter.nf_conntrack_tcp_timeout_unacknowledged = 300
net.netfilter.nf_conntrack_udp_timeout = 30
net.netfilter.nf_conntrack_udp_timeout_stream = 180
net.netfilter.nf_conntrack_icmp_timeout = 30
net.netfilter.nf_conntrack_events_retry_timeout = 15
net.ipv4.netfilter.ip_conntrack_generic_timeout = 600
net.ipv4.netfilter.ip_conntrack_tcp_timeout_syn_sent = 120
net.ipv4.netfilter.ip_conntrack_tcp_timeout_syn_sent2 = 120
net.ipv4.netfilter.ip_conntrack_tcp_timeout_syn_recv = 60
net.ipv4.netfilter.ip_conntrack_tcp_timeout_established = 432000
net.ipv4.netfilter.ip_conntrack_tcp_timeout_fin_wait = 120
net.ipv4.netfilter.ip_conntrack_tcp_timeout_close_wait = 60
net.ipv4.netfilter.ip_conntrack_tcp_timeout_last_ack = 30
net.ipv4.netfilter.ip_conntrack_tcp_timeout_time_wait = 120
net.ipv4.netfilter.ip_conntrack_tcp_timeout_close = 10
net.ipv4.netfilter.ip_conntrack_tcp_timeout_max_retrans = 300
net.ipv4.netfilter.ip_conntrack_udp_timeout = 30
net.ipv4.netfilter.ip_conntrack_udp_timeout_stream = 180
net.ipv4.netfilter.ip_conntrack_icmp_timeout = 30

All the timeouts are in seconds. net.netfilter.nf_conntrack_generic_timeout as you see is quite high – 600 secs = (10 minutes).
This kind of value means any NAT-ted connection not responding can stay hanging for 10 minutes!

The value net.netfilter.nf_conntrack_tcp_timeout_established = 432000 is quite high too (5 days!)
If this values, are not lowered the server will be an easy target for anyone who would like to flood it with excessive connections, once this happens the server will quick reach even the raised up value for net.nf_conntrack_max and the initial connection dropping will re-occur again …

With all said, to prevent the server from malicious users, situated behind the NAT plaguing you with Denial of Service attacks:

Lower net.ipv4.netfilter.ip_conntrack_generic_timeout to 60 – 120 seconds and net.ipv4.netfilter.ip_conntrack_tcp_timeout_established to stmh. like 54000

linux:~# sysctl -w net.ipv4.netfilter.ip_conntrack_generic_timeout = 120
linux:~# sysctl -w net.ipv4.netfilter.ip_conntrack_tcp_timeout_established = 54000

This timeout should work fine on the router without creating interruptions for regular NAT users. After changing the values and monitoring for at least few days make the changes permanent by adding them to /etc/sysctl.conf

linux:~# echo 'net.ipv4.netfilter.ip_conntrack_generic_timeout = 120' >> /etc/sysctl.conf
linux:~# echo 'net.ipv4.netfilter.ip_conntrack_tcp_timeout_established = 54000' >> /etc/sysctl.conf

How to install and configure djbdns from source as a Cachening Localhost Proxy resolver to increase resolving efficiency on Debian 6 Squeeze

Monday, August 1st, 2011

djbdns-logo-install-configure-djbdns-from-source-on-gnu-linux-to-accelerate-server-dns-resolving
It seems DjbDNS on Debian Squeeze has been not included as a Debian package. There is still possibility to install djbdns from an older deb package or install it from source. I however decided to install it from source as finding the old Debian package for Lenny and Etch takes time, plus I'm running an amd64 version of Debian and this might even more complicate the situation.
Installing it from source is not really a Debian way but at least it works.

In this article I assume that daemontools and ucspi-tcp are preliminary installed, if not one needs to install them with:

debian:~# apt-get install ucspi-tcp daemontools daemontools-run
...

The above two ones are required as DJBDNS is originally made to run through djb's daemontools.

Here is the exact step I took to have it installed as local caching DNS server on a Debian Squeeze server:

1. Download and untar DjbDNS

debian:~# wget -q http://cr.yp.to/djbdns/djbdns-1.05.tar.gz debian:~# tar -zxvvf djbdns-1.05.tar.gz
...

2. Add DjbDNS users to /etc/passwd

Creating the below two users is not arbitrary but it's recommendable.

echo 'dnscache:*:54321:54321:dnscache:/dev/null:/dev/null' >> /etc/passwd
echo 'dnslog:*:54322:54322:dnslog:/dev/null:/dev/null' >> /etc/passwd

3. Compile DJBDNS nameserver

First it's necessery to use the below echo command to work around a common Linux bug:

debian:~# cd djbdns-1.05
debian:/root/djbdns-1.05# echo gcc -O2 -include /usr/include/errno.h > conf-cc

Next let's make it:

debian:/root/djbdns-1.05# make

4. Install the compiled djbdns binaries

debian:/root/djbdns-1.05# make setup check
# here comes some long install related output

If no errors are produced by make setup check this means that the djbdns should have installed itself fine.

As installation is compileted it's a good idea to report about the newly installed DjbDNS server if running a mail server. This info is used by Dan Bernstein to gather statistical data about the number of installations of djbdns servers throughout the world.

5. Do some general configurations to the newly installed DJBDNS

Now let's copy the list of the IP addresses of the global DNS root servers in /etc/.

debian:/root/djbdns-1.05# cp -rpf dnsroots.global /etc/ debian:/root/djbdns-1.05# ./dnscache-conf dnscache dnslog /etc/dnscache 0.0.0.0

dnscache-conf will generate some default configuration files for djbdns in /etc/dnscache

Next allow the networks which should be able to use the just installed djbdns server as a caching server:

debian:/root/djbdns-1.05# cd /etc/dnscache/root/ip
debian:/etc/dnscache/root# touch 192.168.1
debian:/root/djbdns-1.05# touch 123.123

First command will allow all ips in range 192.168.1.* to be able to access the DNS server and the second command will allow all ips from 123.123.1-255.1-255 to be able to query the server.

Some further fine tunning can be done from the files:

/etc/dnscache/env/CACHESIZE and /etc/dnscache/env/DATALIMIT

As a last step, before it's running, we have to link the /etc/dnscache to daemontools like so:

debian:/root/djbdns-1.05# ln -sf /etc/dnscache /etc/service/dnscache

If the daemontools is not linked to be accessible via /etc/service it's also a good to link it there:

debian:~# ln -sf /etc/service /

Now the DJBDNS should be running fine, to test if it's running without errors through daemontools I used:

debian:~# ps ax|grep -i readproc
5358 pts/18 R+ 0:00 grep -i readproc
11824 ? S 0:00 readproctitle service errors: ...........

If no errors are displayed it's configured and running to also test if it's capable of resolving I used the host command:

debian:~# host www.pc-freak.net localhost
Using domain server:
Name: localhost
Address: 127.0.0.1#53
Aliases:

www.pc-freak.net has address 83.228.93.76
www.pc-freak.net mail is handled by 0 mail.www.pc-freak.net.

Now the DJBDNS is properly installed and if you test it for a while with time host somehost.com localhost , you will see how quick it is in resolving.

The advantage of running DJBDNS is it does not require almost no maintance, its rock solid and great just like all other Dan Bernstein's written software.
Enjoy 😉

Auto restart Apache on High server load (bash shell script) – Fixing Apache server temporal overload issues

Saturday, March 24th, 2012

auto-restart-apache-on-high-load-bash-shell-script-fixing-apache-temporal-overload-issues

I've written a tiny script to check and restart, Apache if the server encounters, extremely high load avarage like for instance more than (>25). Below is an example of a server reaching a very high load avarage:;

server~:# uptime
13:46:59 up 2 days, 18:54, 1 user, load average: 58.09, 59.08, 60.05
load average: 0.09, 0.08, 0.08

Sometimes high load avarage is not a problem, as the server might have a very powerful hardware. A high load numbers is not always an indicator for a serious problems. Some 16 CPU dual core (2.18 Ghz) machine with 16GB of ram could probably work normally with a high load avarage like in the example. Anyhow as most servers are not so powerful having such a high load avarage, makes the machine hardly do its job routine.

In my specific, case one of our Debian Linux servers is periodically reaching to a very high load level numbers. When this happens the Apache webserver is often incapable to serve its incoming requests and starts lagging for clients. The only work-around is to stop the Apache server for a couple of seconds (10 or 20 seconds) and then start it again once the load avarage has dropped to less than "3".

If this temporary fix is not applied on time, the server load gets increased exponentially until all the server services (ssh, ftp … whatever) stop responding normally to requests and the server completely hangs …

Often this server overloads, are occuring at night time so I'm not logged in on the server and one such unexpected overload makes the server unreachable for hours.
To get around the sudden high periodic load avarage server increase, I've written a tiny bash script to monitor, the server load avarage and initiate an Apache server stop and start with a few seconds delay in between.

#!/bin/sh
# script to check server for extremely high load and restart Apache if the condition is matched
check=`cat /proc/loadavg | sed 's/\./ /' | awk '{print $1}'`
# define max load avarage when script is triggered
max_load='25'
# log file
high_load_log='/var/log/apache_high_load_restart.log';
# location of inidex.php to overwrite with temporary message
index_php_loc='/home/site/www/index.php';
# location to Apache init script
apache_init='/etc/init.d/apache2';
#
site_maintenance_msg="Site Maintenance in progress - We will be back online in a minute";
if [ $check -gt "$max_load" ]; then>
#25 is load average on 5 minutes
cp -rpf $index_php_loc $index_php_loc.bak_ap
echo "$site_maintenance_msg" > $index_php_loc
sleep 15;
if [ $check -gt "$max_load" ]; then
$apache_init stop
sleep 5;
$apache_init restart
echo "$(date) : Apache Restart due to excessive load | $check |" >> $high_load_log;
cp -rpf $index_php_loc.bak_ap $index_php_loc
fi
fi

The idea of the script is partially based on a forum thread – Auto Restart Apache on High Loadhttp://www.webhostingtalk.com/showthread.php?t=971304Here is a link to my restart_apache_on_high_load.sh script

The script is written in a way that it makes two "if" condition check ups, to assure 100% there is a constant high load avarage and not just a temporal 5 seconds load avarage jump. Once the first if is matched, the script first tries to reduce the server load by overwritting a the index.php, index.html script of the website with a one stating the server is ongoing a maintenance operations.
Temporary stopping the index page, often reduces the load in 10 seconds of time, so the second if case is not necessery at all. Sometimes, however this first "if" condition cannot decrease enough the load and the server load continues to stay too high, then the script second if comes to play and makes apache to be completely stopped via Apache init script do 2 secs delay and launch the apache server again.

The script also logs about, the load avarage encountered, while the server was overloaded and Apache webserver was restarted, so later I can check what time the server overload occured.
To make the script periodically run, I've scheduled the script to launch every 5 minutes as a cron job with the following cron:

# restart Apache if load is higher than 25
*/5 * * * * /usr/sbin/restart_apache_on_high_load.sh >/dev/null 2>&1

I have also another system which is running FreeBSD 7_2, which is having the same overload server problems as with the Linux host.
Copying the auto restart apache on high load script on FreeBSD didn't work out of the box. So I rewrote a little chunk of the script to make it running on the FreeBSD host. Hence, if you would like to auto restart Apache or any other service on FreeBSD server get /usr/sbin/restart_apache_on_high_load_freebsd.sh my script and set it on cron on your BSD.

This script is just a temporary work around, however as its obvious that the frequency of the high overload will be rising with time and we will need to buy new server hardware to solve permanently the issues, anyways, until this happens the script does a great job 🙂

I'm aware there is also alternative way to auto restart Apache webserver on high server loads through using monit utility for monitoring services on a Unix system. However as I didn't wanted to bother to run extra services in the background I decided to rather use the up presented script.

Interesting info to know is Apache module mod_overload exists – which can be used for checking load average. Using this module once load avarage is over a certain number apache can stop in its preforked processes current serving request, I've never tested it myself so I don't know how usable it is. As of time of writting it is in early stage version 0.2.2
If someone, have tried it and is happy with it on a busy hosting servers, please share with me if it is stable enough?

Best Windows tools to Test (Benchmark) Hard Drives, SSD Drives and RAID Storage Controllers

Wednesday, April 23rd, 2014

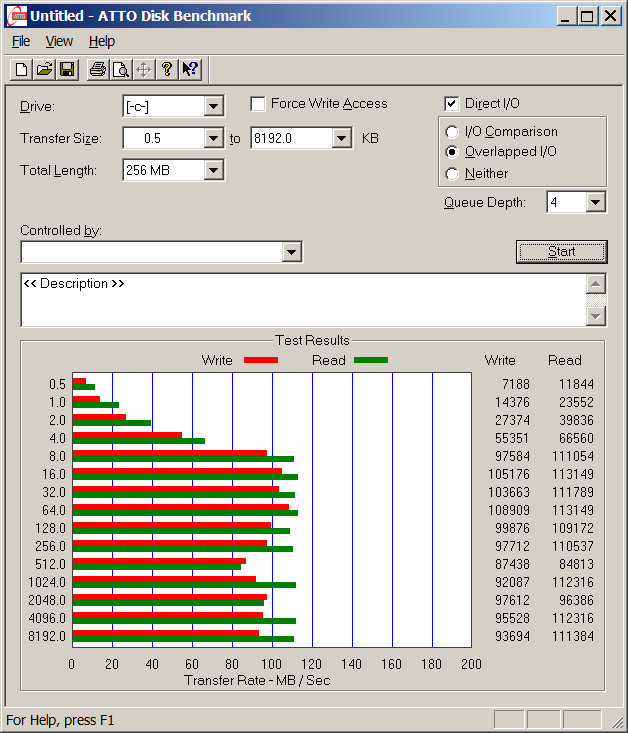
atto-windows-hard-disk-benchmark-freeware-tool-screenshot-check-hard-disk-speed-windows
Disk Benchmarking is very useful for people involved in Graphic Design, 3D modelling, system admins  and anyone willing to squeeze maximum of his PC hardware.

If you want to do some benchmarking on newly built Windows server targetting Hard Disk performance, just bought a new hard SSD (Solid State Drives) and you want to test how well Hard Drive I/O operations behave or you want to see a regular HDD benchmarking of group of MS Windows PCs and plan hardware optiomization, check out ATTO Disk Benchmark.

So why exactly ATTO Benchmark? – Cause it is one of the best Windows Free Benchmark tools on the internet.

ATTO is a widely-accepted Disk Benchmark freeware utility to help measure storage system performance. ATTO though being freeware is among top tools utilized in industry. It is very useful in comparing different Hard Disk vendors speed, measure Windows storage systems performance with various transfer sizes and test lengths for reads and writes.

ATTO Disk Benchmark is used by manufacturers of Hardware RAID controllers, its precious tool to test Windows storage controllers, host bus adapters (HBAs).

Here is ATTO Benchmark tool specifications (quote from their webstie):
 

  • Transfer sizes from 512KB to 8MB
  • Transfer lengths from 64KB to 2GB
  • Support for overlapped I/O
  • Supports a variety of queue depths
  • I/O comparisons with various test patterns
  • Timed mode allows continuous testing
  • Non-destructive performance measurement on formatted drives
  • Transfer sizes from 512KB to 8MB
  • Transfer lengths from 64KB to 2GB
  • Support for overlapped I/O
  • Supports a variety of queue depths
  • I/O comparisons with various test patterns
  • Timed mode allows continuous testing
  • Non-destructive performance measurement on formatted drives
  • – See more at: http://www.attotech.com/disk-benchmark/#sthash.rRlgSTOE.dpuf

Here is mirrored latest version of ATTO Disk for Download. Once you get your HDD statistics you will probably want to compare to other people results. On  TomsHardware's world famous Hardware geek site there are plenty of Hard Drives performance Charts

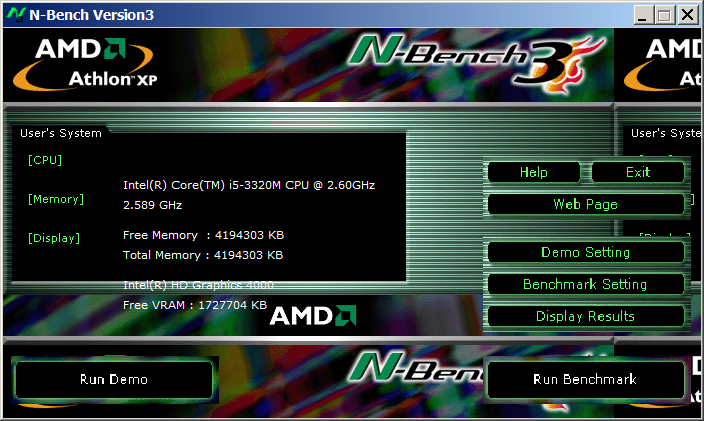
Of course there are other GUI alternatives to ATTO Benchmark one historically famous is NBench

NBench

nbench_benchmark_windows_hard-drive-cpu-and-memory

Nbench is nice little benchmarking program for Windows NT. Nbench reports the following components of performance:

CPU speed: integer and floating operations/sec
L1 and L2 cache speeds: MB/sec
main memory speed: MB/sec
disk read and write speeds: MB/sec

SMP systems and multi-tasking OS efficiency can be tested using up to 20 separate threads of execution.

For Console Geeks or Windows server admins there are also some ports of famous *NIX Hard Disk Benchmarking tools:

NTiogen

NTiogen benchmark was written by Symbios Logic, It's Windows NT port of their popular UNIX benchmark IOGEN. NTIOGEN is the parent processes that spawns the specified number of IOGEN processes that actually do the I/O.
The program will display as output the number of processes, the average response time, the number of I/O operations per second, and the number of KBytes per second. You can download mirror copy of Ntiogen here


There are plenty of other GUI and Console HDD Benchmarking Win Tools, i.e.:

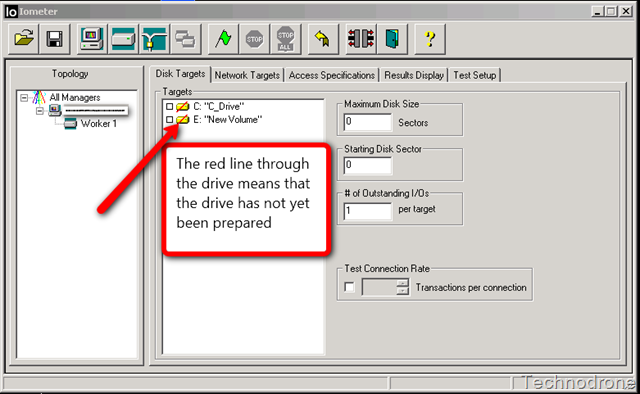
IOMeter (ex-developed by Intel and now abandoned available as open source available on SourceForge)

iometer-benchmark-disk-storage-speed-windows
 

Bench32 – Comprehensive benchmark that measures overall system performance under Windows NT or Windows 95, now obsolete not developed anymore abandoned by producer company.

ThreadMark32 – capable of bench (ex developed and supported by ADAPTEC) but also already unsupported

IOZone – filesystem benchmark tool. The benchmark generates and measures a variety of file operations. Iozone has been ported to many machines and runs under many operating systems.
 

N! B! Important note to make here is above suggested tools will provide you more realistic results than the proprietary vendor tools shipped by your hardware vendor. Using proprietary software produced by a single vendor makes it impossible to analyze and compare different hardwares, above HDD benchmarking tools are for "open systems", e.g. nomatter what the hardware producer is produced results can be checked against each other.
Another thing to consider is even though if you use any of above tools to test and compare two storage devices still results will be partially imaginary, its always best to conduct tests in Real Working Application Environments. If you're planning to launch a new services structure always test it first and don't rely on preliminary returned soft benchmarks.

if you know some other useful benchmarking software i'm missing please share.

Install VMWare tools on Debian and Ubuntu Linux – Enable VMWare Fullscreen and copy paste between OS host and Virtual machine

Wednesday, May 28th, 2014

install-vmware-tools-on-debian-gnu-linux-and-ubuntu-howto

If you need to use Virtual Machine to run some testing on heterogenous Operating Systems and you have chosen VMWare as a Virtual Machine. You will soon notice some of Virtual Machines functionality like copy between host operating system and Virtual Machine, true fullscreen mode and most importantly Copy paste between your host operating system and VMWare is not working. I'm not too much into Virtualization these days so for me it was truely shocking that a proprietary software like VMWare, claimed to be the best and most efficient Virtual Machine nowadays is not supporting copy / paste, fullscreen and copy between host and guest OS.  For those arguing why I'm using VMWare at all as it is proprietary and there is already free software Virtual Machines like QEMU and Oracle's VirtualBox its simply because now I have the chance to install and use VMWare 9 Enterprise on my work place at HP with a free Corporate license – in other words I'm using VMWare just for the sake of educating myself and would always recommend VirtualBox for those looking for good substitute free alternative to VMWare.

Before trying out VMWare, I tried Virtualbox to emulate Linux on my HP work PC running Windows with VirtualBox I was having issues with keyboard not working (because of lack of support of USB, no full screen support and lack of copy / paste between OS-es), I've just recently understood this is not because Virtualbox is bad Virtualization solution but because I forgot to install VirtualBox Oracle VM VirtualBox Extension Pack which allows support for USB, enables copy paste and full screen support. The equivalent to Virtualbox Oracle VM VirtualBox in VMWare world is called VMWare-Tools and once the guest operating system is installed inside VMWare VM, its necessary to install vmware-tools to enable better screen resolution and copy paste.
 

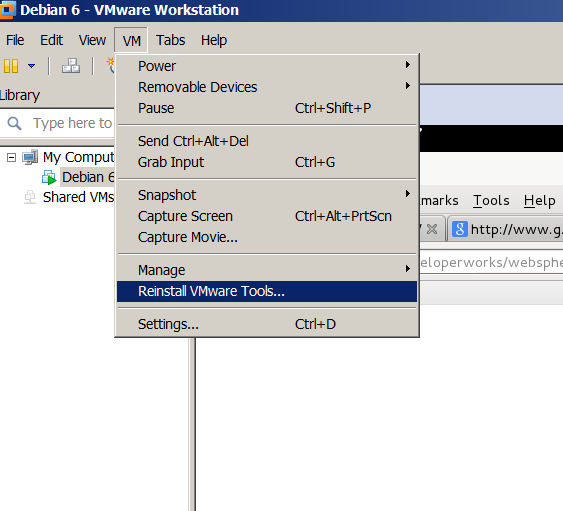
In Windows Virtual Machine installation of vmware-tools is pretty straight forward you go through VMWare's menus


VM -> Install Vmware-tools

install-vmware-tools-on-linux-guest-host-os-debian-redhat-screenshot

follow the instructions and you're done, however as always installing VMWare-tools on Linux is little bit more complicated you need to run few commands from Linux installed inside the Virtual Machine to install vmware-tools. Here is how vmware-tools is installed on Debian / Ubuntu / Linux Mint and rest of Debian based operating systems:

  1. Install Build essentials and gcc You need to have this installed some developer tools as well as GCC compiler in order for the vmware-tools to compile a special Linux kernel module which enables extra support (integration) between the VMWare VM and the installed inside VM Linux distro

apt-get install --yes build-essential gcc
...

2. Install appropriate Linux headers corresponding to current Linux OS installed kernel

apt-get install --yes linux-headers-$(uname -r)
....

3. Mount CD (Virtual) Content to obtain the vmware-tools version for your Linux

Be sure to have first checked from VMWare menus on menus VM -> Intall Vmware Tools
This step is a little bit strange but just do it without too much questioning …


mount /dev/cdrom /mnt/
umount /media/cdrom0/
mount /media/cdrom
mount /dev/sr0 /mnt/cdrom/
mount /dev/sr0 /mnt/


Note that /dev/sr0, might already be mounted and sometimes it might be necessary to unmount it first (don't remember exactly if I unmounted it or not)

4. Copy and Untar VMwareTools-9.2.0-799703.tar.gz

cp -rpf /media/cdrom/VMwareTools-9.2.0-799703.tar.gz /tmp/
cd /tmp/
tar -zxvvf VMwareTools-9.2.0-799703.tar.gz
...

5. Run vmware-tools installer

cd vmware-tools-distrib/
./vmware-install.pl

You will be asked multiple questions you can safely press enter to answer with default settings to all settings, hopefully if all runs okay this will make VMWare Tools installed
 

Creating a new VMware Tools installer database using the tar4 format.
Installing VMware Tools.
In which directory do you want to install the binary files?
[/usr/bin]
What is the directory that contains the init directories (rc0.d/ to rc6.d/)?
[/etc]
What is the directory that contains the init scripts?
[/etc/init.d]
In which directory do you want to install the daemon files?
[/usr/sbin]
In which directory do you want to install the library files?
[/usr/lib/vmware-tools]
The path "/usr/lib/vmware-tools" does not exist currently. This program is
going to create it, including needed parent directories. Is this what you want?
[yes]
In which directory do you want to install the documentation files?
[/usr/share/doc/vmware-tools]
The path "/usr/share/doc/vmware-tools" does not exist currently. This program
is going to create it, including needed parent directories. Is this what you
want? [yes]
The installation of VMware Tools 9.2.0 build-799703 for Linux completed
successfully. You can decide to remove this software from your system at any
time by invoking the following command: "/usr/bin/vmware-uninstall-tools.pl".
Before running VMware Tools for the first time, you need to configure it by
invoking the following command: "/usr/bin/vmware-config-tools.pl". Do you want
this program to invoke the command for you now? [yes]
Initializing…
Making sure services for VMware Tools are stopped.
Stopping VMware Tools services in the virtual machine:
Guest operating system daemon: done
Unmounting HGFS shares: done
Guest filesystem driver: done
[EXPERIMENTAL] The VMware FileSystem Sync Driver (vmsync) is a new feature that creates backups of virtual machines. Please refer to the VMware Knowledge Base for more details on this capability. Do you wish to enable this feature?
[no]
Before you can compile modules, you need to have the following installed…
make
gcc
kernel headers of the running kernel
Searching for GCC…
Detected GCC binary at "/usr/bin/gcc-4.6".
The path "/usr/bin/gcc-4.6" appears to be a valid path to the gcc binary.
Would you like to change it? [no]
Searching for a valid kernel header path…
Detected the kernel headers at "/lib/modules/3.2.0-4-amd64/build/include".
The path "/lib/modules/3.2.0-4-amd64/build/include" appears to be a valid path
to the 3.2.0-4-amd64 kernel headers.
Would you like to change it? [no]
The vmblock enables dragging or copying files between host and guest in a
Fusion or Workstation virtual environment. Do you wish to enable this feature?
[no] yes
make: Leaving directory `/tmp/vmware-root/modules/vmblock-only'

No X install found.
Creating a new initrd boot image for the kernel.
update-initramfs: Generating /boot/initrd.img-3.2.0-4-amd64
Checking acpi hot plug done
Starting VMware Tools services in the virtual machine:
Switching to guest configuration: done
VM communication interface: done
VM communication interface socket family: done
File system sync driver: done
Guest operating system daemon: done
The configuration of VMware Tools 8.6.10 build-913593 for Linux for this
running kernel completed successfully.
You must restart your X session before any mouse or graphics changes take
effect.
You can now run VMware Tools by invoking "/usr/bin/vmware-toolbox-cmd" from the
command line or by invoking "/usr/bin/vmware-toolbox" from the command line
during an X server session.
To enable advanced X features (e.g., guest resolution fit, drag and drop, and
file and text copy/paste), you will need to do one (or more) of the following:
1. Manually start /usr/bin/vmware-user
2. Log out and log back into your desktop session; and,
3. Restart your X session.
Enjoy,
–the VMware team
Found VMware Tools CDROM mounted at /mnt. Ejecting device /dev/sr0 …

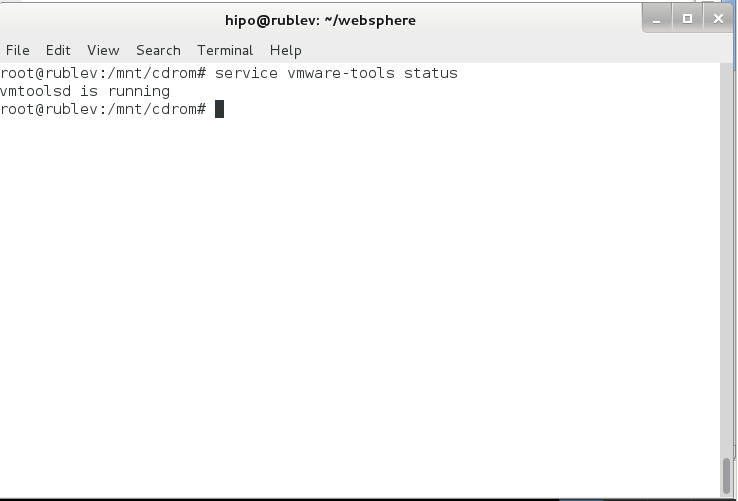
.To make sure vmware-tools compiled modules are loaded into Linux kernel inside VM, restart the Virtual Machine. Once Linux boots again and you login to gnome-terminal to check what is vmware-tools status (e.g. if properly loaded) run:

service vmware-tools status
vmtoolsd is running

install-vmware-tools-on-debian-gnu-linux-and-ubuntu-virtual-machine-screenshot

This method of installing works on Debian 7 (Wheezy) but same steps should work on any Ubuntu and rest of Debian derivatives. For Redhat (RPM) based Linux distributions to install vmware-tools after mounting cdrom drive following above instructions you will have an rpm package instead of .tar.gz archive so all you have to do is install the rpm, e.g. launch smth. like:

rpm -Uhv /mnt/cdrom/VMwareTools-9.2.0-799703.i386.rpm
Cheers 😉