Posts Tagged ‘hp’

How to check Linux server power supply state is Okay / How to find out a Linux Power Supply is broken

Wednesday, January 6th, 2021

2U-power-supplies-get-status-if-Power-supply-broken-information-linux-ipmitool

If you're a sysadmin and managing remotely Linux servers, every now and then if a machine is hanging without a reason it useful to check the server Power Supply state. I say that because often if the machine is mysteriously hanging and a standard Root Cause Analysis (RCA) on /var/log/messages /var/log/dmesg /var/log/boot etc. did not bring you to any different conclusion. The next step after you send a technician to reboot the machine is to check on Linux OS level whether Power Supply Unit (PSU) hardware on the machine does not have some issues.
As blogged earlier on how to use ipmitool to manage remote ILO remote boards etc. the ipmitool can also be used to check status of Server PSUs.

Below is example output of 2 PSU server whose Power Supplies are functioning normally.
 

[root@linux-server ~]# ipmitool sdr type "Power Supply"

PS Heavy Load    | 2Bh | ok  | 19.1 | State Deasserted
Power Supply 1   | 70h | ok  | 10.1 | Presence detected
Power Supply 2   | 71h | ok  | 10.2 | Presence detected
PS Configuration | 72h | ok  | 19.1 |
PS 1 Therm Fault | 75h | ok  | 10.1 | Transition to OK
PS 2 Therm Fault | 76h | ok  | 10.2 | Transition to OK
PS1 12V OV Fault | 77h | ok  | 10.1 | Transition to OK
PS2 12V OV Fault | 78h | ok  | 10.2 | Transition to OK
PS1 12V UV Fault | 79h | ok  | 10.1 | Transition to OK
PS2 12V UV Fault | 7Ah | ok  | 10.2 | Transition to OK
PS1 12V OC Fault | 7Bh | ok  | 10.1 | Transition to OK
PS2 12V OC Fault | 7Ch | ok  | 10.2 | Transition to OK
PS1 12Vaux Fault | 7Dh | ok  | 10.1 | Transition to OK
PS2 12Vaux Fault | 7Eh | ok  | 10.2 | Transition to OK
Power Unit       | 7Fh | ok  | 19.1 | Fully Redundant

Now if you have a server lets say on an old ProLiant DL360e Gen8 whose Power Supply is damaged, you will get an from ipmitool similar to:

[root@linux-server  systemd]# ipmitool sdr type "Power Supply"
Power Supply 1   | 30h | ok  | 10.1 | 100 Watts, Presence detected
Power Supply 2   | 31h | ok  | 10.2 | 0 Watts, Presence detected, Failure detected, Power Supply AC lost
Power Supplies   | 33h | ok  | 10.3 | Redundancy Lost


If you don't have ipmitool installed due to security or whatever but you have the hardware detection software dmidecode you can use it too to get the Power Supply state

[root@linux-server  systemd]# dmidecode -t chassis
# dmidecode 3.2
Getting SMBIOS data from sysfs.
SMBIOS 2.8 present.


Handle 0x0300, DMI type 3, 21 bytes
Chassis Information
        Manufacturer: HP
        Type: Rack Mount Chassis
        Lock: Not Present
        Version: Not Specified
        Serial Number: CZJ38201ZH
        Asset Tag:
        Boot-up State: Critical
        Power Supply State: Critical

        Thermal State: Safe
        Security Status: Unknown
        OEM Information: 0x00000000
        Height: 1 U
        Number Of Power Cords: 2
        Contained Elements: 0

To find only Power Supply info status on a server with dmideode.

# dmidecode –type 39

monitoring-power-supply-hardware-information-linux-ipmitool

Plug between the power supply and the mainboard voltage / coms ATX specification

This can also be used on a normal Linux desktop PCs which usually have only 1U (one power supply) on many of Ubuntus and Linux desktops where lshw (list hardaware information) is installed to get the machine PSUs status with lshw 

 root@ubuntu:~# lshw -c power
  *-battery               
       product: 45N1111
       vendor: SONY
       physical id: 1
       slot: Front
       capacity: 23200mWh
       configuration: voltage=11.1V
        Thermal State: Safe
        Security Status: Unknown
        OEM Information: 0x00000000
        Height: 1 U
        Number Of Power Cords: 2
        Contained Elements: 0


Finally to get an extensive information on the voltages of the Power Supply you can use the good old lm_sensors.

# apt-get install lm-sensors
# sensors-detect 
# service kmod start

# sensors
# watch sensors


As manually monitoring Power Supplies and other various data is dubious, finally you might want to use some centralized monitoring. For one example on that you might want to check my prior Zabbix to Monitor Hardware Hard Drive / Temperature and Disk with lm_sensors / smartd on Linux with Zabbix.

Remove pre-installed HP, Dell, Asus, Acer, Toshiba not needed default vendor software on a new bought PC notebook quickly with Decrap My Computer

Thursday, April 14th, 2016

remove-default-unneded-software-from-manufacturer-hp-asus-acer-dell-toshiba
While browsing today and looking for software to clean up all the spy software from my corporate HP laptop, I've come across an interesting tool called Decrap which aims at removing Bloatware from a Windows PC / notebook (mirrored here because original software site was down)

So what is Bloatware ?

The term Bloatware (also called jokingly crapware) is term is the one that was coined to describe, the default pre-installed software that comes to you together with Windows pre-installed OS by the hardware manufacturer.
I'm sure anyone who bought brand new branded PC or laptop over the last 10 years have already suffered the unwanted and unnecessery
bunch of software that comes pre-installed freeware programs aiming to help you in your daily work but in reality just slowing down your PC
and showing annoying popups or at best keeping useless in Windows system apptray.

Let me give you an example:

Cleanup (Remove) common ASUS, HP, Dell default  installed unneded (Bloatware) software

Many users may want to uninstall ASUS Crapware software such as ASUS Tutor, ASUS LifeFrame3, ASUS WebStorage and ASUSVibe.

Like Asus, HP computers often come preloaded with useless software from factory, example for this is HP Customer Service enhancements, HP Update, HP Total Care Setup and ProtectSmart.

If you buy Dell PC notebook soon you'll discover that there are several preloaded software (often unnecessery software) such as Dell Stage, Dell Digital Delivery and Dell DataSafe.

Toshiba computers and notebooks contain pre-loeaded "crapware" software from Toshiba.
Just to mention a few of those: Toshiba Disc Creator, Toshiba ReelTime, Service Station, Bulletin Board and Toshiba Assist.

Often there are fingerprint reader programs, Wi-Fi connection managers, Bluetooth managers, Audio Management sofware and other third party vendor software which tend to be not working as good as others softwares from third vendor, so Decrap is to help you to identify and remove these too in a easy GUI manner.

Non-experienced Computer users often leave the bloatware to hang around for even years and only if some relative that is an IT involved person / sysadmin / Even once you're aware that the Bloatware is on the system the ordinary user is hard to remove it as he is scared not to break the system.
Besides that fften this bloatware just soft comes so much integrated into Windows that removing it costs hours of tries and research online on
all the Bloatware components and even then could mislead you so you break the PC. programmer etc. comes home of such users finds out about the happily existing of the useless software on the notebook.


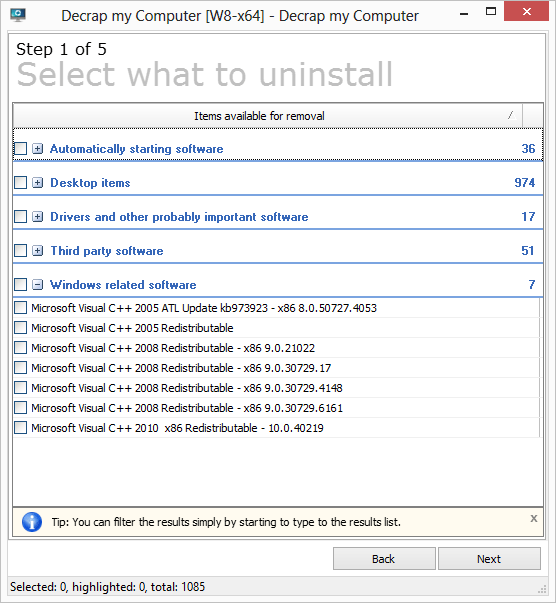
So here is Decrap My Computer coming at place aiming to help to remove the unnecessery Hardware vendor software in few easy (Click, Click, Click Next ..) steps.

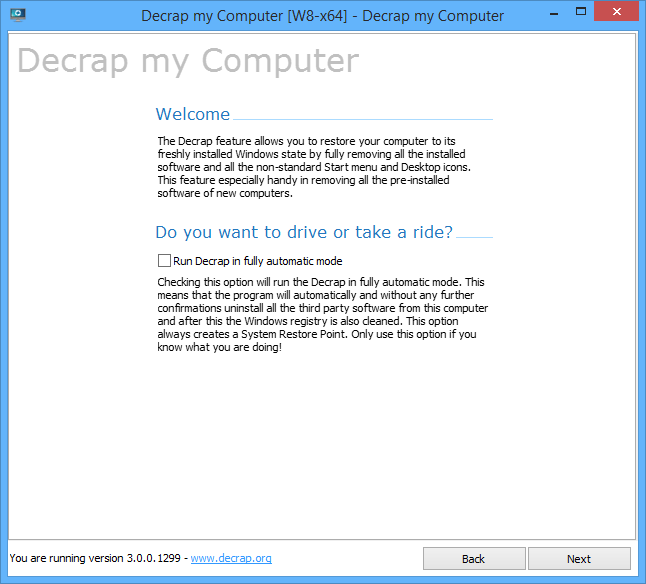
decrap-my-computer-clean-up-bloatware-crapware-on-windows-laptop-main-gui

Then decrap does silently all the complex operations and suggestions to make the HP, Dell, Asus, Toshiba manufacturer prebundled software to be stopped and uninstalled.
Decrap My Computer is a freeware, lightweight and easy to use and lets you safely remove crapware and bloatware, or any software, from any Windows PC.

Even for Old computers, Decrap comes handy for the unexperienced avarage user who used his laptop with this useless  default vendors programs silently killing the performance respectively user experience for years.

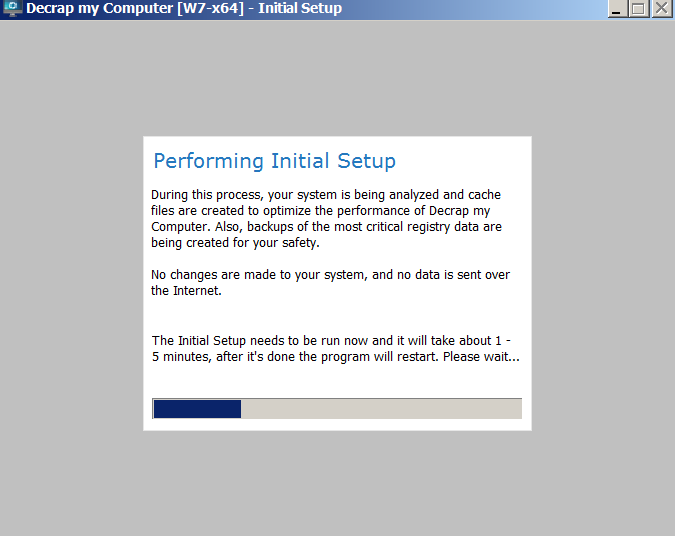
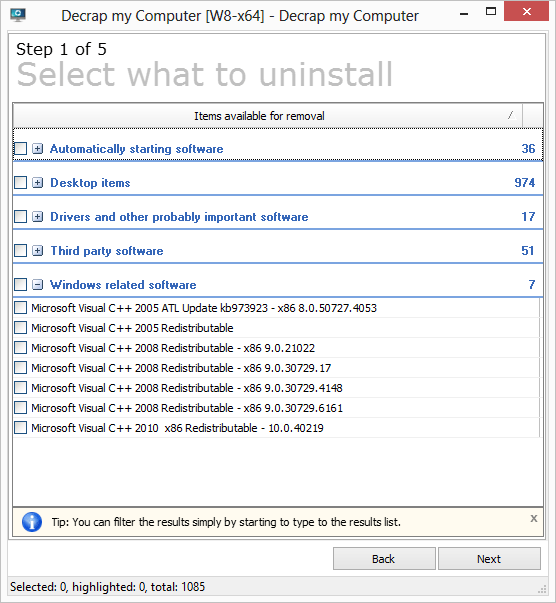
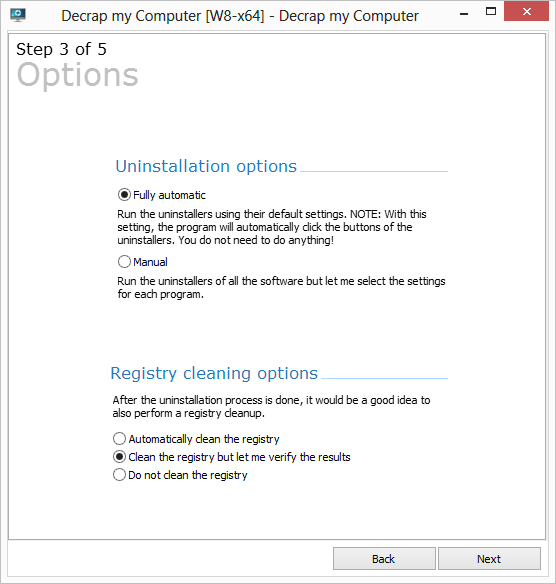
Using Decrap is quite intuitive PC is scanned for Bloatware and then after a backup Windows Restore Point is offered you're offered to review and Uninstall the unwanted softwares. There is also an automatic mode but those one still could be a bit dangerous, so use the automatic mode only on multiple machines with the same model  / brand notebooks that comes prebundled with same sofware after testing and confirming the automatic mode on 1 initial machine will not break up some needed functionality.

decrap-your-pc-clean-up-windows-from-hp-dell-toshiba-asus-bloatware-unuseful-programs

Here is few screenshots of the tool in action:
decrap-choose-what-default-laptop-manufacturer-software-you-want-to-clean-from-new-bought-pc

decrap-choose-what-default-laptop-manufacturer-software-you-want-to-clean-from-new-bought-pc-1

decrap-choose-what-default-laptop-manufacturer-software-you-want-to-clean-from-new-bought

Another good alternative (since decrap seems to be not maintained anymore) as I just leardned from Natasha Myles (thanks for pointing me about the broken link to decrap website) is SpeedUpPC more on speeding up old PC or laptop is her article 

How to Remove / Add SuSE Linux start service command

Thursday, July 2nd, 2015

opensuse-remove-add-new-service-geeko-suse-linux-mini-logo
If you happen to administer SUSE LINUX Enterprise Server 9 (x86_64) and you need to add or remove already existing /etc/init.d script or custom created Apache / Tomcat .. etc. service and you're already familiar with Fedora's / RHEL chkconfig, then the good news chkconfig is also available on SuSE and you can use in same way chkconfig to start / stop / enable / disable boot time services.

To list all available boot time init.d services use:
 

suse-linux:/etc # chkconfig –list


SuSEfirewall2_final       0:off  1:off  2:off  3:off  4:off  5:off  6:off
SuSEfirewall2_init        0:off  1:off  2:off  3:off  4:off  5:off  6:off
SuSEfirewall2_setup       0:off  1:off  2:off  3:off  4:off  5:off  6:off
Tivoli_lcfd1.bkp          0:off  1:off  2:off  3:off  4:off  5:off  6:off
activate_web_all          0:off  1:off  2:off  3:on   4:off  5:on   6:off
alsasound                 0:off  1:off  2:on   3:on   4:off  5:on   6:off
apache2                   0:off  1:off  2:off  3:off  4:off  5:off  6:off
apache2-eis               0:off  1:off  2:off  3:on   4:off  5:off  6:off
atd                       0:off  1:off  2:off  3:off  4:off  5:off  6:off
audit                     0:off  1:off  2:off  3:off  4:off  5:off  6:off
autofs                    0:off  1:off  2:off  3:off  4:off  5:off  6:off
autoyast                  0:off  1:off  2:off  3:off  4:off  5:off  6:off
boot.clock                0:off  1:off  2:off  3:off  4:off  5:off  6:off
boot.crypto               0:off  1:off  2:off  3:off  4:off  5:off  6:off
boot.device-mapper        0:off  1:off  2:off  3:off  4:off  5:off  6:off
boot.evms                 0:off  1:off  2:off  3:off  4:off  5:off  6:off
boot.idedma               0:off  1:off  2:off  3:off  4:off  5:off  6:off
boot.ipconfig             0:off  1:off  2:off  3:off  4:off  5:off  6:off
boot.isapnp               0:off  1:off  2:off  3:off  4:off  5:off  6:off
boot.klog                 0:off  1:off  2:off  3:off  4:off  5:off  6:off
boot.ldconfig             0:off  1:off  2:off  3:off  4:off  5:off  6:off
boot.loadmodules          0:off  1:off  2:off  3:off  4:off  5:off  6:off
boot.localfs              0:off  1:off  2:off  3:off  4:off  5:off  6:off
boot.localnet             0:off  1:off  2:off  3:off  4:off  5:off  6:off
boot.lvm                  0:off  1:off  2:off  3:off  4:off  5:off  6:off
boot.md                   0:off  1:off  2:off  3:off  4:off  5:off  6:off
boot.multipath            0:off  1:off  2:off  3:off  4:off  5:off  6:off
boot.proc                 0:off  1:off  2:off  3:off  4:off  5:off  6:off
boot.restore_permissions  0:off  1:off  2:off  3:off  4:off  5:off  6:off
boot.rootfsck             0:off  1:off  2:off  3:off  4:off  5:off  6:off
boot.sched                0:off  1:off  2:off  3:off  4:off  5:off  6:off
boot.scpm                 0:off  1:off  2:off  3:off  4:off  5:off  6:off
boot.scsidev              0:off  1:off  2:off  3:off  4:off  5:off  6:off
boot.shm                  0:off  1:off  2:off  3:off  4:off  5:off  6:off
boot.swap                 0:off  1:off  2:off  3:off  4:off  5:off  6:off
boot.sysctl               0:off  1:off  2:off  3:off  4:off  5:off  6:off
boot.udev                 0:off  1:off  2:off  3:off  4:off  5:off  6:off
coldplug                  0:off  1:on   2:on   3:on   4:off  5:on   6:off


To then stop the service:
 

suse-linux:/etc # chkconfig gtiweb off


If you prefer to do it the SuSE way and learn a bit more on SuSE boot time process check out:


suse-linux:/etc # man insserv


Removing already existing SuSE start-up script from init.d start up with insserv is done with:

suse-linux:/etc # cd /etc/init.d/
suse-linux:etc/init.d # insserv -r gtiweb
insserv: script ipmi.hp: service ipmidrv already provided!
insserv: script boot.multipath.2008-10-29: service boot.multipath already provided!


To install a new custom written and placed into /etc/inti.d/ on SuSE's server boot time with insserv:


suse-linux:/etc/init.d/ # insserv your_custom_script_name

how to archive with Windows default zip (compress) algorithm

Tuesday, April 1st, 2014

windows-sent-to-compressed-file
I'm working on a decomissioning project (for those who hear decomissioning for a first time – in corporate world this means removal of service/s or assigned resources of a server or a physical server hardware that is not to be used in future or is obsolete). The decomissioning includes removal of Apache Tomcat (Software Configuration Item CI – in HP terms) from Microsoft Windows 2007 – Service Pack 2.
Part of decomissioning is of course to create backup of Tomcat Application server and for that I needed to create compressed archive of Tomcat instances. Usually I do archives on Windows using Winrar or Winzip but this time as the server productive server has the minimum installed there was no any external vendor produced archiving software available.

My memories from past were that there is a native compressing program embedded into Windows as I've unzipped compressed archives on Win hosts with no need for external WinZip. However until so far I never did .ZIP archive with no available external uncompress software.

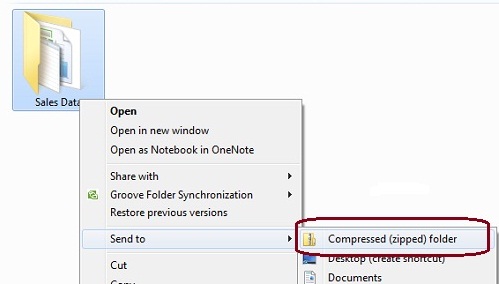
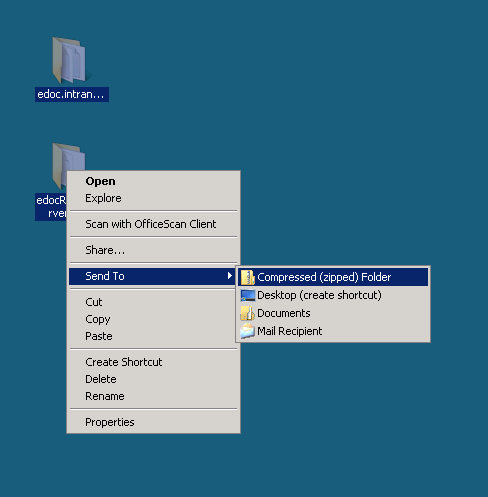
Using Winzip or Winrar so far to make archive from a number of files I used to select files to enter Archive press right mouse button and select Create Archive (Add To Archive) so I expected this will work whenever no Winrar, however there was no obvious button like this, so I googled a bit to find out how is that possible ending up on Article from Microsoft titled "Compress and uncompress files (zip files)", there is a dumb proof video teaching Compressing files with Microsoft default ZIP program is done by the the weird "Send To" menu 🙂 

Selecting files to enter Archive;
> (Click Right Mouse Button) -> (Send To Compressed Zipped Folder)

compress_zipped_folder_with_windows_default_archive_algorithm how to archive with windows default compress archive

Honestly If I didn't checked the net probably I will never think of looking it there.

How to pass ITIL preparation – Dumps, PC and Mobile Android software to prepare

Wednesday, April 30th, 2014

ITIL-service-design-serice-operations-service-transition
I'm just coming from my ITIL (Information Technology Infrastructure Library) Foundations Exam. ITIL Certification is mandatory for all HP employees and everybody in my team already passed it. Thanks God I passed the ITIL as well with 87.5%.

To prepare for the exam I used Dump files (files with questions and answers given to people on previous exams) and software that simulates testing Avanset Visual CertExam Manager on PC as well as VCE Exam Simulator for Mobile.

VCE Exam Simulator is a test engine designed specifically for certification exam preparation. It allows you to create, edit, and take practice tests in an environment very similar to an actual exam.

ITIL exam was held here in Sofia in Technologica EAD Study Center. ITIL exam is kindly paid by HP and costs $250. ITIL Foundation is first level of certification next one is ITIL intermediate.

In order to prepare for ITIL it took me about half a day reading the ITIL Dump files (you can download them here) and 2 days of actively simulating the exams mainly with VCE EXam Simulator on my Android based mobile.
For those who want to become ITIL professionals and are going to certify further in ITIL Intermediate I recommend check all the ITIL Books covering the ITIL v.3 exam (here).

If you have the time and you want to have in depth understanding on ITIL also download and watch this ITIL Exam preparation Videos.

Here are also ITIL Foundation v.3 Dumps for Visual Cert exam manager. By the way ITIL exam is nowadays is required for almost anyone employeed in middle or large sized IT companies so if you still don't know anything about it and you're working or you will be working in the IT field take a look at. Lastly when I was looking for job offers I've noticed there are already plenty of companies who either require the candidate to have an ITIL passed or count ITIL certified candidates advantageous.

Archive Outlook mail in Outlook 2010 to free space in your mailbox

Thursday, May 15th, 2014

outlook-archive-old-mail-to-prevent-out-of-space-problems-outlook-logo
If you're working in a middle or big sized IT company or corporation like IBM or HP, you're already sucked into the Outlook "mail whirlwind of corporate world" and daily flooded with tons of corporate spam emails with fuzzy business random terms like taken from Corporate Bullshit Generator

Many corporations, because probably of historic reasons still provide employees with small sized mailboxes half a gigabyte, a gigabyte or even in those with bigger user Mailboxes like in Hewlett Packard, this is usually no more than 2 Gigabytes.

This creates a lot of issues in the long term because usually mail communication in Inbox, Sent Items, Drafts Conversation History, Junk Email and Outbox grows up quickly and for a year or a year and a half, available Mail space fills up and you stop receiving email communication from customers. This is usually not too big problem if your Mailbox gets filled when you're in the Office (in office hours). However it is quite unpleasent and makes very bad impression to customers when you're in a few weeks Summar Holiday with no access to your mailbox and your Mailbox free space  depletes, then you don't get any mail from the customer and all the time the customer starts receiving emails disrupting your personal or company image with bouncing messages saying the "INBOX" is full.

To prevent this worst case scenario it is always a good idea to archive old mail communication (Items) to free up space in Outlook 2010 mailbox.
Old Outlook Archived mail is (Saved) exported in .PST outlook data file format. Later exported Mail Content and Contacts could be easily (attached) from those .pst file to Outlook Express, leaving you possibility to still have access to your old archived mail keeping the content on your hard drive instead on the Outlook Exchange Mailserver (freeing up space from your Inbox).

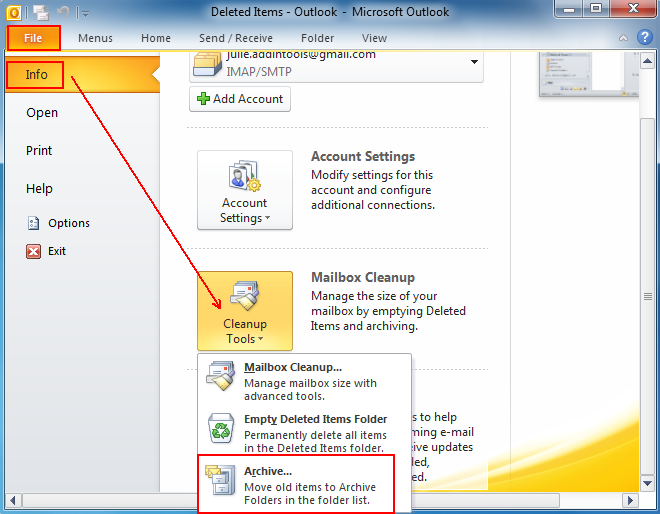
Here is how to archive your Outlook mail Calendar and contacts:

Archive-outlook-mail-in-microsoft-outlook-2010-free-space-in-your-mailbox

1. Click on the "File" tab on the top horizontal bar.Select "Cleanup Tools" from the options.

2. Click "Cleanup Tools" from the options.

3. Click on the "Archive this folder and all subfolders" option.

4. Select what to archive (e.g. Inbox, Drafts, Sent Items, Calendar whatever …)

5. Choose archive items older than (this is quite self-explanatory)

6. Select the location of your archive file (make sure you palce the .PST file into directory you will not forget later)

That's all now you have old mails freed up from Outlook Exchange server. Now make sure you create regular backups ot old-archived-mail.pst file you just created, it is a very good idea to upload this folder to encrypted file system on USB stick or use something like TrueCrypt to encrypt the file and store it to external hard drive, if you already don't have a complete backup corporate solution backuping up all your Laptop content.

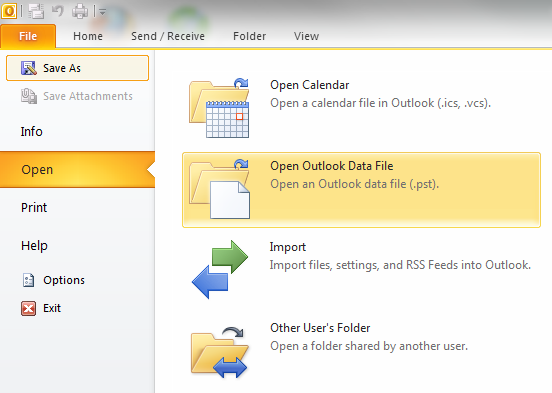
Later Attaching or detaching exported .PST file in Outlook is done from:

File -> Open -> Open Outlook Data File

outlook-open-backupped-pst-datafile-archive-importing-to-outlook-2010


Once .PST file is opened and attached in Left Inbox pane you will have the Archived old mail folder appear.


outlook-archived-mail-pannel-screenshot-windows-7
You can change Archived name (like I did to some meaningful name) like I've change it to Archives-2013 by right clicking on it (Data File properties -> Advanced)

Use apt-get with Proxy howto – Set Proxy system-wide in Linux shell and Gnome

Friday, May 16th, 2014

linux-apt-get-configure-proxy-howto-set-proxy-systemwide-in-linux

I juset setup a VMWare Virtual Machine on my HP notebook and installed Debian 7.0 stable Wheezy. Though VMWare identified my Office Internet and configured automatically NAT, I couldn't access the internet from a browser until I remembered all HP traffic is going through a default set browser proxy.
After setting a proxy to Iceweasel, Internet pages started opening normally, however as every kind of traffic was also accessible via HP's proxy, package management with apt-get (apt-get update, apt-get install etc. were failing with errors):


# apt-get update

Ign cdrom://[Debian GNU/Linux 7.2.0 _Wheezy_ – Official i386 CD Binary-1 20131012-12:56] wheezy Release.gpg
Ign cdrom://[Debian GNU/Linux 7.2.0 _Wheezy_ – Official i386 CD Binary-1 20131012-12:56] wheezy Release
Ign cdrom://[Debian GNU/Linux 7.2.0 _Wheezy_ – Official i386 CD Binary-1 20131012-12:56] wheezy/main i386 Packages/DiffIndex
Ign cdrom://[Debian GNU/Linux 7.2.0 _Wheezy_ – Official i386 CD Binary-1 20131012-12:56] wheezy/main Translation-en_US
Err http://ftp.by.debian.org wheezy Release.gpg
  Could not connect to ftp.by.debian.org:80 (86.57.151.3). – connect (111: Connection refused)
Err http://ftp.by.debian.org wheezy-updates Release.gpg
  Unable to connect to ftp.by.debian.org:http:
Err http://security.debian.org wheezy/updates Release.gpg
  Cannot initiate the connection to security.debian.org:80 (2607:ea00:101:3c0b:207:e9ff:fe00:e595). – connect (101: Network is unreachable) [IP: 2607:ea00:101:3c0b:207:e9ff:fe00:e595 80]
Reading package lists…


This error is caused because apt-get is trying to directly access above http URLs and because port 80 is filtered out from HP Office, it fails in order to make it working I had to configure apt-get to use Proxy host – here is how:

a) Create /etc/apt/apt.conf.d/02proxy file (if not already existing)
and place inside:
 

Acquire::http::proxy::Proxy "https://web-proxy.cce.hp.com";
Acquire::ftp::proxy::Proxy "ftp://web-proxy.cce.hp.com";


To do it from console / gnome-terminal issue:
echo ''Acquire::http::Proxy "https://web-proxy.cce.hp.com:8088";' >> /etc/apt/apt.conf.d/02proxy
echo ''Acquire::ftp::Proxy "https://web-proxy.cce.hp.com:8088";' >> /etc/apt/apt.conf.d/02proxy

That's all now apt-get will tunnel all traffic via HTTP and FTP proxy host web-proxy.cce.hp.com and apt-get works again.

Talking about Proxyfing Linux's apt-get, its possible to also set proxy shell variables, which are red and understood by many console programs like Console browsers lynx, links, elinks  as well as wget and curl commands, e.g.:


export http_proxy=http://192.168.1.5:5187/
export https_proxy=$http_proxy
export ftp_proxy=$http_proxy
export rsync_proxy=$http_proxy
export no_proxy="localhost,127.0.0.1,localaddress,.localdomain.com"

For proxies protected with username and password export variables should look like so: echo -n "username:"
read -e username
echo -n "password:"
read -es password
export http_proxy="http://$username:$password@proxyserver:8080/"
export https_proxy=$http_proxy
export ftp_proxy=$http_proxy
export rsync_proxy=$http_proxy
export no_proxy="localhost,127.0.0.1,localaddress,.localdomain.com"

To make this Linux proxy settings system wide on Debian / Ubuntu there is the /etc/environment file add to it:
 

http_proxy=http://proxy.server.com:8080/
https_proxy=http://proxy.server.com:8080/
ftp_proxy=http://proxy.server.com:8080/
no_proxy="localhost,127.0.0.1,localaddress,.localdomain.com"
HTTP_PROXY=http://proxy.server.com:8080/
HTTPS_PROXY=http://proxy.server.com:8080/
FTP_PROXY=http://proxy.server.com:8080/
NO_PROXY="localhost,127.0.0.1,localaddress,.localdomain.com"


To make proxy global (systemwide) for most (non-Debian specific) Linux distributions shell environments create new file /etc/profile.d/proxy.sh and place something like:

function proxy(){
echo -n "username:"
read -e username
echo -n "password:"
read -es password
export http_proxy="http://$username:$password@proxyserver:8080/"
export https_proxy=$http_proxy
export ftp_proxy=$http_proxy
export rsync_proxy=$http_proxy
export no_proxy="localhost,127.0.0.1,localaddress,.localdomain.com"
echo -e "nProxy environment variable set."
}
function proxyoff(){
unset HTTP_PROXY
unset http_proxy
unset HTTPS_PROXY
unset https_proxy
unset FTP_PROXY
unset ftp_proxy
unset RSYNC_PROXY
unset rsync_proxy
echo -e "nProxy environment variable removed."
}

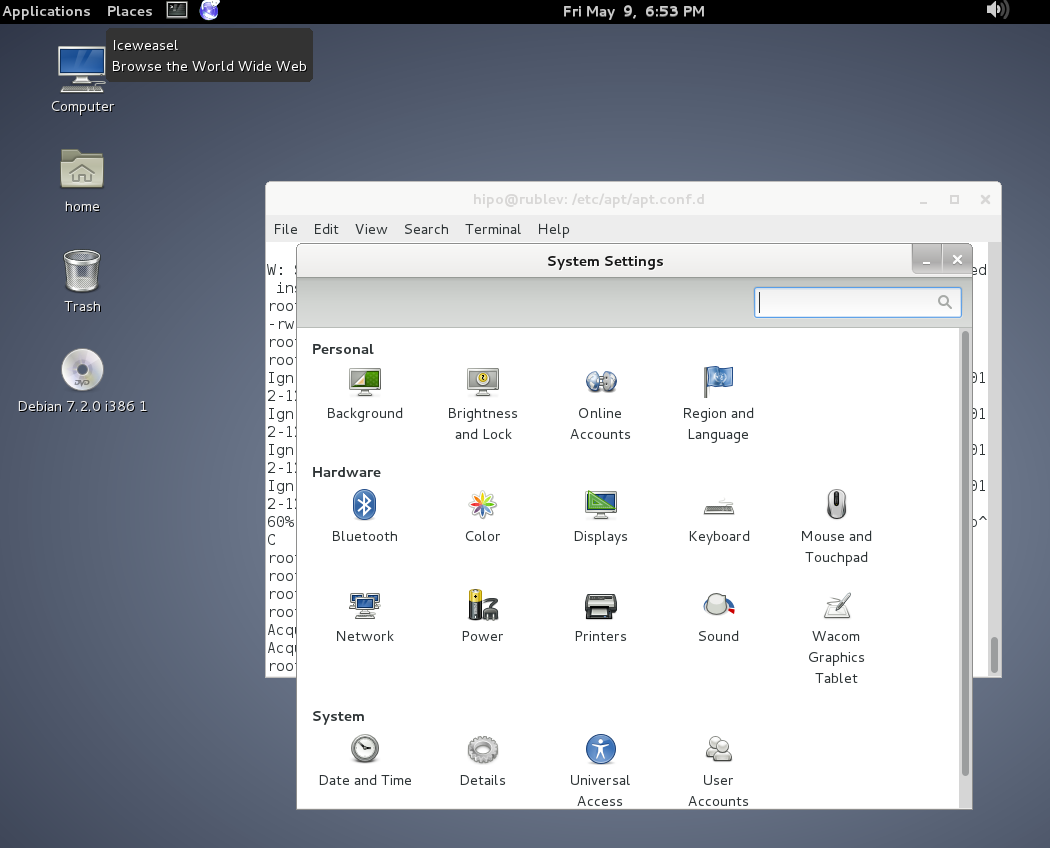
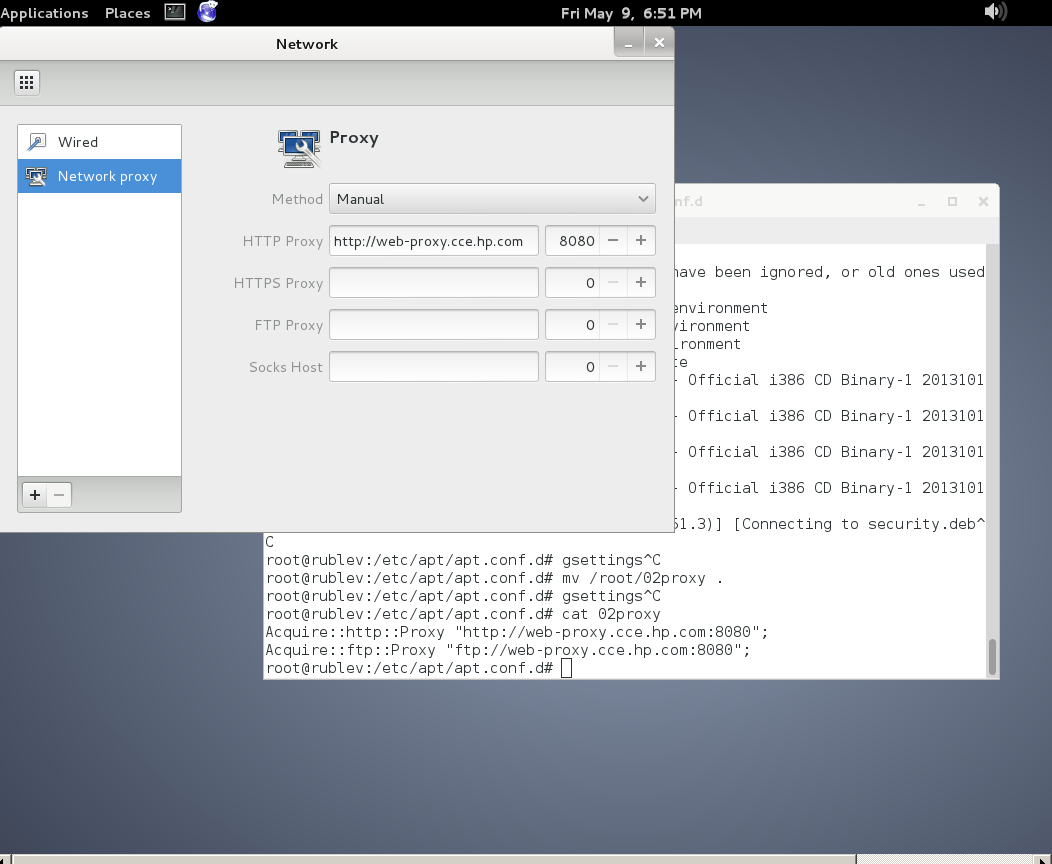
To set Global Proxy (make Proxy Systemwide) for a user in GNOME Desktop environment launch gnome-control-center

And go to Network -> Network Proxy

/images/gnome-configure-systemwide-proxy-howto-picture1

/images/gnome-configure-systemwide-proxy-howto-picture2

To make proxy settings also system wide for some GUI Gnome GTK3 applications

gsettings set org.gnome.system.proxy mode 'manual'
gsettings set org.gnome.system.proxy.http host 'your-proxy.server.com'
gsettings set org.gnome.system.proxy.http port 8080

ping “General Failure” no internet connection Windows 7 on HP work computer – Reasons for general failure and solution

Monday, May 26th, 2014

windows-7-general-failure-error-fix-on-hp-workbook
Out of a sudden today after running Malware Bytes – Free Anti-Malware & Internet Security Software, and after it found some Malware (Pup.Optional.Opencandy) and removed it it WI-FI internet on my work computer HP Elitebook 8470p mysteriously stopped working.

That's quite nasty because today I'm working from Home – well known among Hewlett Packard employees under WFH abbreviation. I couldn't connect normally to my home Access Point and tried pinging Google from command line just to get an error:
 

Transmit Failed: General Failure


and first I thought it is a wi-fi router related problem and restarted my WIFI RouterD-Link DI524. As I could normally connect to the WIFI and I see there is an internet IP assigned running:

ipconfig /all
...
Wireless LAN adapter Wireless Network Connection:
Connection-specific DNS Suffix . :
Description . . . . . . . . . . . : Intel(R) Centrino(R) Ultimate-N 6300 AGN
Physical Address. . . . . . . . . : 3C-A9-F4-4C-E7-98
DHCP Enabled. . . . . . . . . . . : Yes
Autoconfiguration Enabled . . . . : Yes
Link-local IPv6 Address . . . . . : fe80::5d2f:97b8:9e1a:2b13%63(Preferred)
IPv4 Address. . . . . . . . . . . : 192.168.2.159(Preferred)
Subnet Mask . . . . . . . . . . . : 255.255.255.0
Lease Obtained. . . . . . . . . . : May 23, 2014 14:19:01 PM
Lease Expires . . . . . . . . . . : May 30, 2014 14:32:49 PM
Default Gateway . . . . . . . . . : 192.168.2.1
DHCP Server . . . . . . . . . . . : 192.168.2.1
DHCPv6 IAID . . . . . . . . . . . : 1094494708
DHCPv6 Client DUID. . . . . . . . : 00-01-00-01-19-CB-1A-5D-A4-5D-36-5A-EB-84
DNS Servers . . . . . . . . . . . : 8.8.8.8
192.168.2.1
NetBIOS over Tcpip. . . . . . . . : Enabled

As you see in above output I have notebook IP, default gateway and DNS IP assigned – i.e. all seems fine, so as I got General Failure from pinging the Internet in order to make sure my Linux router is not the bottleneck I tried pinging Default GW

C:UsersGeorgi> ping 192.168.2.1 Pinging 192.168.2.1 with 32 bytes of data:
PING: transmit failed. General failure.
Ping statistics for 192.168.2.1:
Packets: Sent = 4, Received = 0, Lost = 4 (100% loss)

Just to realize I'm continually getting General Failure error

I tried trying to renew IPs, to make sure there is no some kind of IP assignment conflict with my other WIFI connected devices,reflushing DNS and resetting WinSock stack, hoping this could help:

> ipconfig /renew
> ipconfig /flushdns
> netsh winsock reset

Then I tried restarting the PC a couple of times, but unfortunately none of those helped the shitty error:
 

PING: Transmit failed. General Failure

continued …

I was totally out of idea .. and red some people managed to fix the issue after booting Windows into Safe mode with Networking. I tried booting in Safe mode, but as Hard Drive data is encrypted with Bitlocker encryption I was asked about some kinf of Serial Key – which I don't have at hand – hence I couldn't boot into Safe mode …

Here is moment to say even loopback device was returning "General Failure"!

I tried even connecting the laptop directly into my homelan with UTP cable, but though everything got connected, there was no local network and internet. I tried even connecting via Vivacom's mobile network 3G modem and even there I got the "General Failure" error …

Running out of options, I decided it might be that Malware Bytes broke something during Malware removal hence I put out back Quarantined Malware files – but this didn't solve it either.

solution-to-no-internet-general-failure-ping-error-firewall-off-screenshot.png

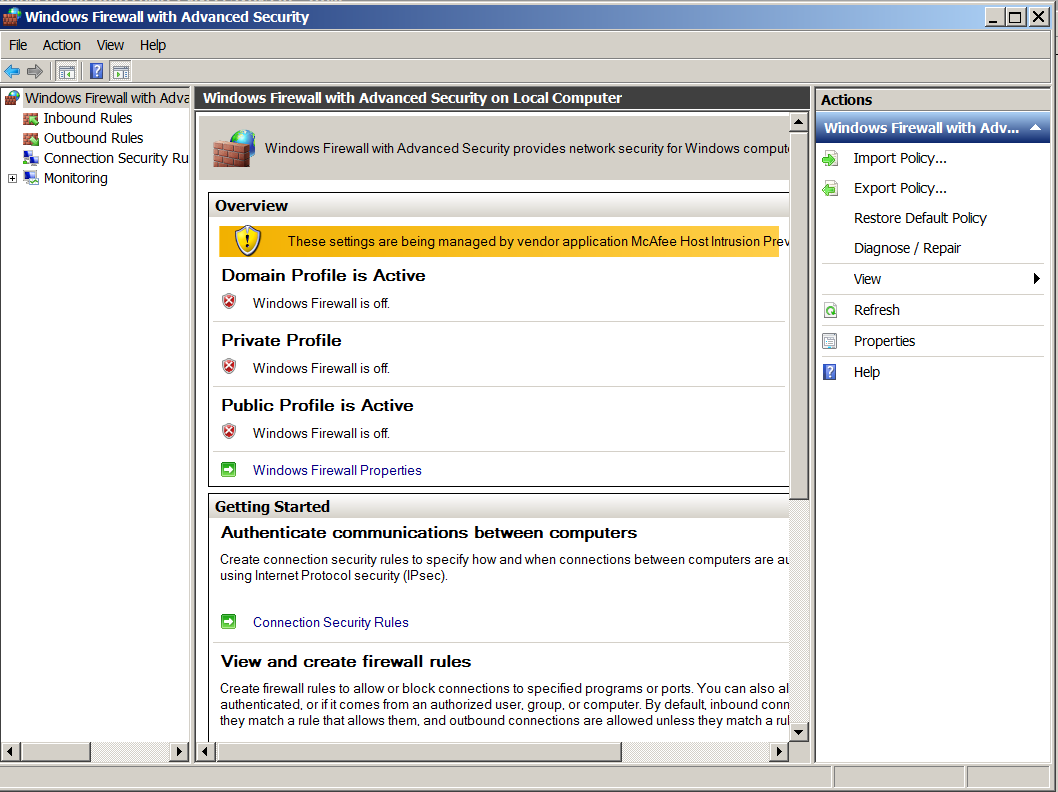
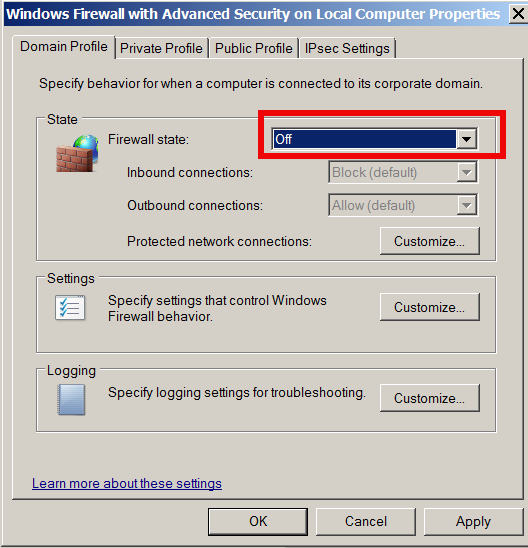
Finally I found this post and this thread talking that reason for "General Failure" might be firewall related. After checking my firewall settings in Windows Firewall and Advanced Security, surprisingly I realized everything related to firewall – e.g. Default Profile, Inbound, Outbound connections are Turned off!!!

windows-firewall-off-reason-for-general-failure-no-internet

I switched everything back and my Internet and local connection came back! THANKS GOD! Pfuu, now I can continue working. It seems HP work computers are patched with software / configured to not allow Internet connection in case if Firewall is Off. If you happen to be an HP Employee and you get the PING: Transmit failed. General Failure, be sure the first place to check is whether Windows Firewall is enabled? – if not enable it and this will solve your connectivity issues. Cheers ! 🙂

What is IPMI (IPKVM), ILO and IDRAC – Remote management interfaces to server / PC on BIOS level

Friday, May 30th, 2014

IPMI-Block-Diagram-ILO-IPKVM-how-it-works
IPMI
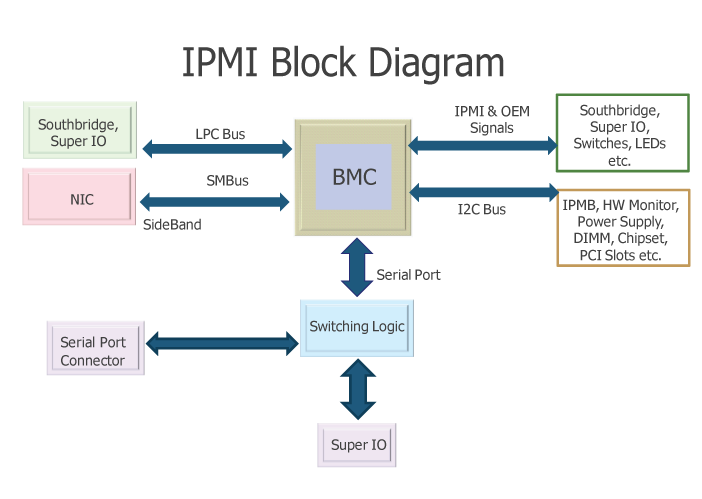
Intelligent Platform Management Interface is a standardized computer interface also accessible remotely via Java applet allowing remote management and monitoring access to PC BIOS. IPMI is a way to manage a computer that may be powered off or otherwise unresponsive by using a network connection to the hardware rather than to an operating system or a keyboard physical / screen login shell. The IPMI server standard was introduced by Intel and nowadays supported by more than 200 computer vendors i.e. – Super Micro, Hewlett Packard, Cisco, Dell etc.

Intelligent Platform Management Interface is an open, industry-standard interface that was designed for the management of server systems over network. IPMI interfaces by various vendors have also Virtual Media support (i.e. – Operating System  ISO files could be mounted remotely to a Virtual CD / DVD rom and you can approach installing a bare-metal server without physical presense to it). Just like Power Off / Restart, BIOS Entrance and Virtual Media access is done directly through a web-browser interface over the network or the internet.

HP_IPMI_ILO-screenshot-remote-management-server-console

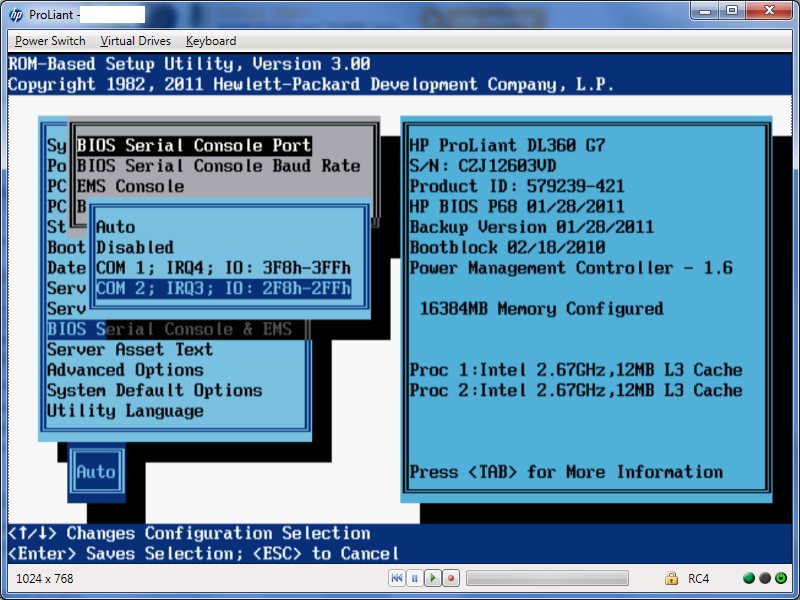
ILO – stands for Integrated Lights-Out and is  HP Proliant servers remote console to PC / server physical screen. ILO is server integrated chip on HP servers and doesn't need further installations. It gives you a web console using Java showing you server screen just like there is a Monitor connected to the server it is precious for remote system administration purposes as often when there is no SSH  or Remote Desktop to server you can see directly whether the server has completed hanged and try to recover or see a failing hardware notification on the screen to a server with a partially accessible services. Using ILO console access to an HP server one can have a BIOS access remotely to machines already colocated in data canters. In other words ILO is HP's variation of IPMI remote interface also known under business buzz word IPKVM.

DRAC-Dell-Remote-Acccess-console-IPMI-tools-remote-management-bios-interface

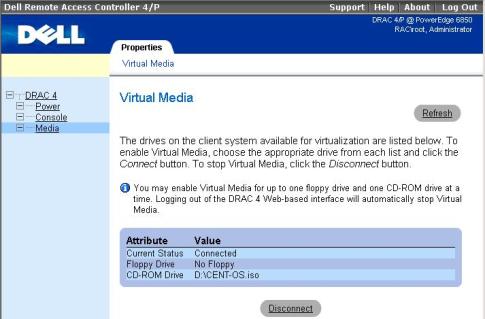
DRAC (iDRAC)- Dell's Remote Access Controller is interface card from Dell Inc. offering remote access (out-of-band) management facilities – i.e. DRAC is Dell's variant of HP's ILO – an implementation of Intel's IPMI out-of-band standard. DRAC is also giving you remote way to access no other means accessible server on a software level. Interesting and nice things is Dell provides their DRAC source code, so if you're a developer you can learn how DRAC technology works on a lower level.

ILO, iDRAC (Dell's new generation DRAC for Blade servers) and ILO's remote management interfaces's (IPMI tools) most valuable features is it allows remote system Power On / Shutdown and Remote Restart while monitoring the server screen (hardware output) messages and allowing you see critical hardware issue messages on pre-OS boot time, failure with memory, hard disks etc. and remote interface to do BIOS tuning.

Creating Dynamic SSH Tunnel on Windows with Plink – Scriptable SSH Tunnels on Windows

Friday, July 4th, 2014

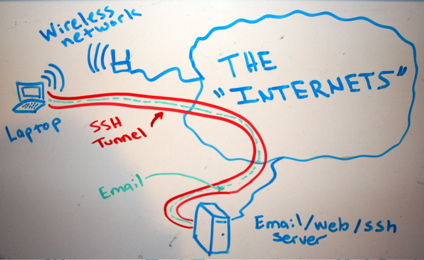
creating-ssh-tunnel-on-windows-with-plink-ssh-tunnel-diagram-tunnel-email-traffic

In my earlier articles I've explained about Creating SSH Tunnels on Linux and BSD and how to create SSH Tunnels with Putty Terminal client on Windows.

Creating SSH Tunnels is a precious knowledge every advanced computer user, a system administrator or security expert should be well aware of.

Probably still there are plenty of people for which the SSH Tunnelling is something never heard of or even if heard it is a mythical term covered by ancient shadows 🙂

So What is an SSH Tunnel? – SSH Tunnels shortly explained.

A SSH tunnel consists of an encrypted tunnel created through a SSH protocol
connection
.

An SSH tunnel can be used to transfer unencrypted traffic over a
network through an encrypted channel
between two hosts (host A and Host B) usually using remote and local port.

Requirements for SSH tunnel

Where Host B has to be running a version of OpenSSH server on some reachable port from Host B, (lets say 22).
Host B OpenSSH server has to be with (enabled X11Forwarding X11Forwarding yes in /etc/ssh/sshd_config) and Host A needs to have some SSH client supporting port forwarding (ssh command on Linux – part of (openssh-client package) and on Windows – Putty / Plink or any other of the many available ssh tunneling clients).

Probably most common SSH Tunnel use is to bypass firewalls that prohibits or filter certain internet services.
In other words SSH Tunnels can be used to get around firewall filtering. If you never heard of Bypassing firewalls with port forwarding I recommend to check this article

We can use a ssh tunnel to securely transfer files between a FTP server and a client even though the FTP
protocol itself is not encrypted
, Tnnel traffic to an SQL server, Tunnel traffic from your Desktop PC to a Proxy
SSH tunnels can be used to tunnel outbound E-mail traffic back to your work PC to avoid having to change SMTP servers etc.

A very common SSH Tunnel use is by office workers who don't want their Custom Web browsing habbits and Web history be tracked,

For people who has to travel a lot tunneling SSH traffic from notebook to your home based SMTP is mandatory, otherwise your e-mail passwords, might end up captured by someone who manages the Free WI-FI used by you somewhere on the road or cafeteria. Another good case use of SSH Tunnel is to tunnel VNC traffic.

SSH Tunneling was historically very famous in days where IRC (Internet Relay Chat) and used to be common way (for people who want to prevent their real IP address from publicly visible) on the Internet.
SSH Tunneling is great way to maintain high communication security, however because it requires some basic technical knowledge most people neglect it or never heard of it, so I hope this article will give at least basic ideas to people new to tunneling.

How to create SSH Tunnels on Microsoft Windows

SSH Tunneling has been originally invented on UNIX / Linux platform, luckily nowdays it is easily possible to create SSH tunnels on almost any moden OS (including Mac OS X and M$ Windows).

Using Plink it is possible to create easily (batch) scriptable SSH tunnels on Windows

Generally here is example of basic plink use syntax:
 

plink.exe {remote-host} -P 22 -C -D 10080 -l username -pw password
 

To make a Tunnel with Plink to remote SSH Server (remote-ssh-server.com) listening for connections on port 22 on localhost 10022

"C:Program Files (x86)PuTTYplink.exe" -ssh remote-username@tunnel-to-ssh-server-host.com -pw PASSWORD123 -C -T -D 127.0.0.1:10022 -N

-D – option instructs Plink to make "Dynamic SOCKS-based port forwarding"
Dynamic Socks-based port forwarding will make your ssh client a simple socks server which listen to port 10022 for incoming connections.
-Ttells plink not to open interactive shell on remote server (disable pty allocation)
-Cenables traffic compression

Using the -D option you can prepare tunnel to traffic all your outgoing server traffic via the SSH tunneling host.

E. g. -D allows you to use the remote ssh server as a proxy server with no need for remote server to run anything except SSH service and have Internet connection.

-N – stands for "don't start shell/command SSH-2 only"

On success of SSH Tunnel establishing you will get a pop-up window similar to below screenshot (note that some of the messages in cmd line are from a batch script – if no batch script is used you wil only get a window with "Using Username":
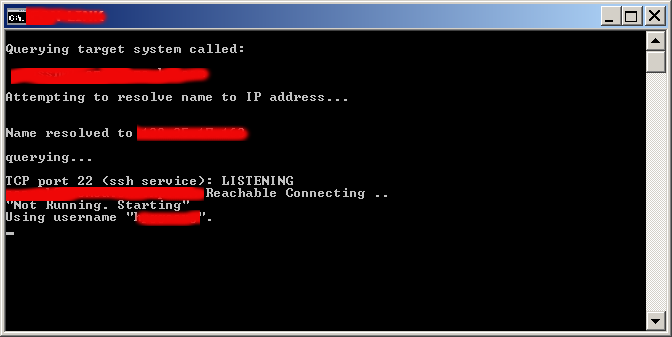
plink_establishing_ssh_tunnel-on-microsoft-windows-screenshot

Note: That if you're about to be using Plink command frequently add it to your Windows SYSTEM PATH (check my previous article – how to add Putty to System PATH) to enable it invokable without writting the full command path location.

Once this Window is open if you still have doubt, where the tunnel is established, the quickest way to test whether tunnel is working is to open telnet to localhost port 10022.

In Windows command prompt type:
 

C:> telnet localhost 10022


You will get a remote server SSH version printed, like on below shot:
windows-testing-whether-ssh-tunnel-is-working-with-telnet-screenshot-black-screen

Now lets say now you would like to access the internet via just created SSH tunnel.
You can do it by simply setting Socks Proxy in your Firefox / Opera (or whatever browser you use).

Whether you want to run the SSH Tunnel permanent and periodically check whether tunnel is allve and respawn it in case plink quit, you can use a very simple batch script like one below:
 

@ECHO OFF
tasklist /FI "IMAGENAME eq plink.exe" 2>NUL | find /I /N "plink.exe">NUL

if "%ERRORLEVEL%"=="0"  ( echo Programm is running exiting
exit
)
echo "Not Running"
start /b "C:Program Files (x86)PuTTYplink.exe" -ssh remote-username@tunnel-to-ssh-server-host.com -pw Password123 -T -C -D 127.0.0.1:10022 -N"


If you're a Linux guy and you don't want to mess around with Plink but still want to create your SSH tunnels following SSH client UNIX command line syntax, setup the Cygwin port of OpenSSH for Windows.

Or if you're unsure whether remote server is always reachable (you're moving with your notebook from (Country) network to network), you can use also portqry – windows port scanner to check whether remote ssh server port is opened:
 

@ECHO OFF
tasklist /FI "IMAGENAME eq plink.exe" 2>NUL | find /I /N "plink.exe">NUL
if "%ERRORLEVEL%"=="0"  ( echo Programm is running exiting
pause
exit
)
portqry -n tunnel-to-ssh-server-host.com -p tcp -e 22
if %ERRORLEVEL%==0 echo tunnel-to-ssh-server-host.com Reachable Connecting ..
if NOT %ERRORLEVEL%==0 (echo tunnel-to-ssh-server-host.com.com Unreachable
exit)
echo "Not Running. Starting"
"C:Program Files (x86)PuTTYplink.exe" -ssh remote-username@tunnel-to-ssh-server-host.com -pw Password123 -T -C -D 127.0.0.1:10080 –N


Here is another sample use of Plink to create tunnel via SSH host tunnel-to-ssh-server-host.com  to listen for connections on localhost port 1234 and forward all incoming traffic to squid proxy server on 192.168.1.5 on port 3128.
 

C:Usersgeorgi>plink.exe -v -x -a -T -C -noagent -ssh -L 127.0.0.1:1234:192.168.1.5:3128 remote-username@tunnel-to-ssh-server-host.com

Setting then 127.0.0.1:1234 in  Firefox Proxy browser settings will make all traffic from your browser to flow securily to your own proxy server (letting you hide your "custom traffic" from company Web sniffers (Proxying) and Web filtering.
A remark to make here is 192.168.1.5 is (a internal server with Squid Proxy, configured to pass traffic to the internet ).

Here is a way to make tunnel between your remote SSH server and local Desktop PC to make Google queries without being logged by your ISP or company where you're working:

plink.exe "-v -x -a -T -C -noagent -ssh -L 127.
0.0.1:1234:95.158.130.242:443 -pw SecretPassword123 -l hipo www.pc-freak.net"

95.158.130.242 – is one of the IPs www.google.com resolves to
www.pc-freak.net – is name of my home router.

To make tunneled queries to Google then open in browser https://127.0.0.1:1234
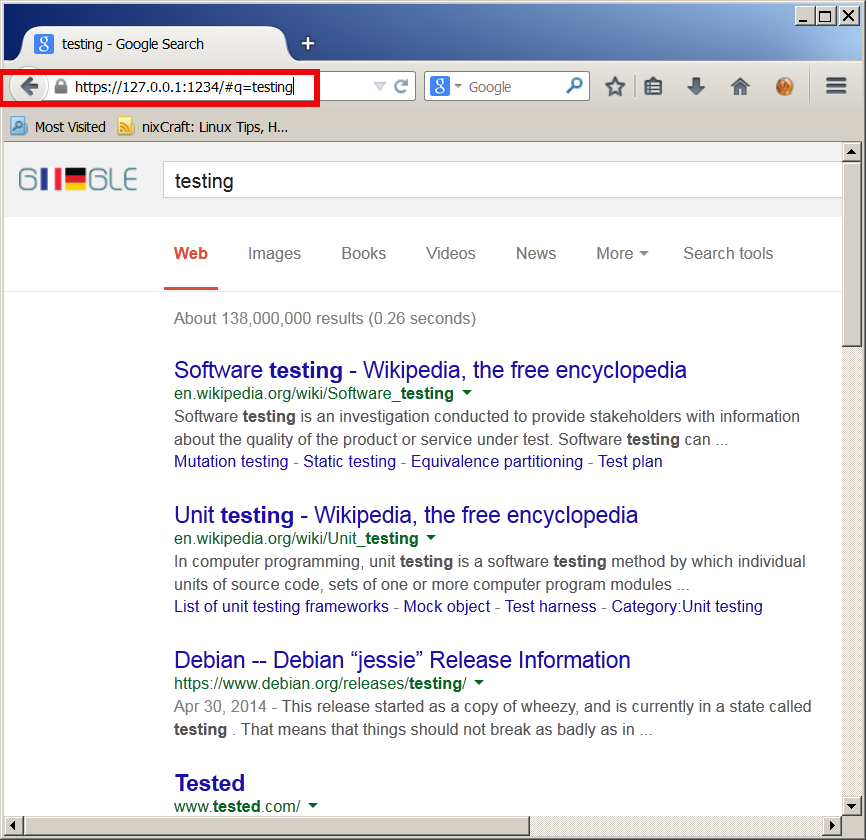
using_localhost_ssh_tunnel_to_anonymously-search-in-google-plink-tunnel-for-security


If you're a lazy windows user and don't want to bother to make your tunnels from command line and you want need nice gui way to manage multiple tunnels – check out putty-tunnel-manager.

I myself am not a SSH Tunnel expert and thus Iwould be happy to learn further from people for some interesting cases and custom ways to do  SSH Tunnels. If you know of better advantageous ways to tunnel traffic, please share.

Happy tunneling ! 🙂