Posts Tagged ‘IIS’

Set Domain multiple alias (Aliases) in IIS on Windows server howto

Saturday, October 24th, 2020

https://www.pc-freak.net/images/microsoft-iis-logo

On Linux as mentioned in my previous article it is pretty easy to use the VirtualHost Apache directive etc. to create ServerName and ServerAlias but on IIS Domain multiple alias add too me a while to google.

<VirtualHost *>
ServerName whatevever-server-host.com
ServerAlias www.whatever-server-host.com whatever-server-host.com
</VirtualHost>


In click and pray environments as Winblows, sometimes something rather easy to be done can be really annoying if you are not sure what to do and where to click and you have not passed some of the many cryptic microsoft offered ceritification programs offer for professional sysadmins, I'll name a few of them as to introduce UNIX guys like me to what you might ask a M$ admin during an interview if you want to check his 31337 Windows Sk!lls 🙂


  • Microsoft Certified Professional (MCP)
  • Microsoft Technology Associate (MTA) –
  • Microsoft Certified Solutions Expert (MCSE)-
  • Microsoft Specialist (MS) etc. –

A full list of Microsoft Certifed Professsional program here

Ok enough of  balling.

Here is  how to  create a domain alias in IIS on Windows server.

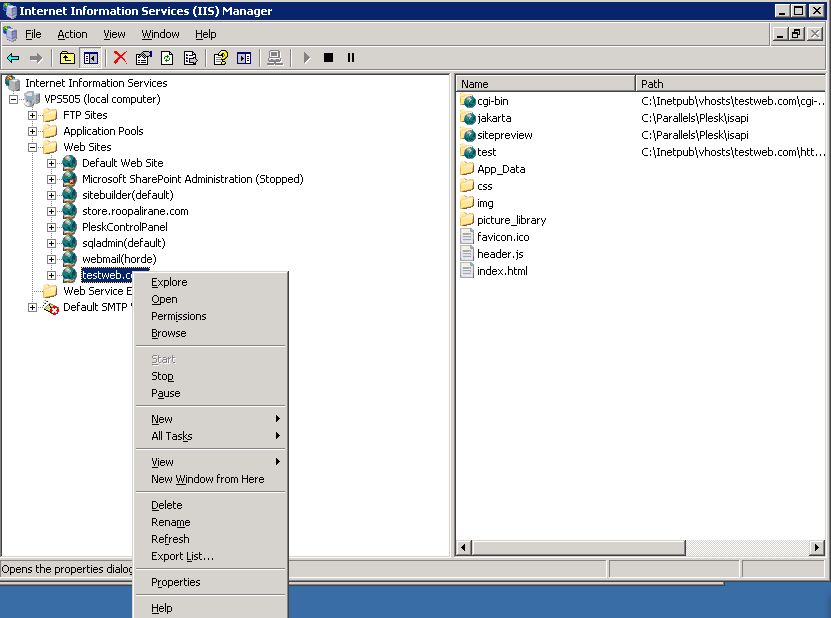
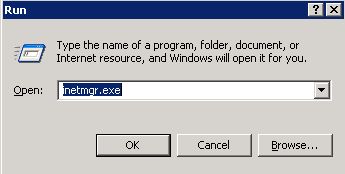
Login to your server and click on the START button then ‘Run’¦’, and then type ‘inetmgr.exe’.

Certainly you can go and click trough the Administrative tools section to start ISS manager, but for me this is fastest and easiest way.

create-domain-alias-on-windows-server-1a
 

Now expand the (local computer), then ‘Web Sites’ and locate the site for which you want to add alias (here it is called additional web site identification).

Right click on the domain and choose ‘Properties’ option at the bottom.

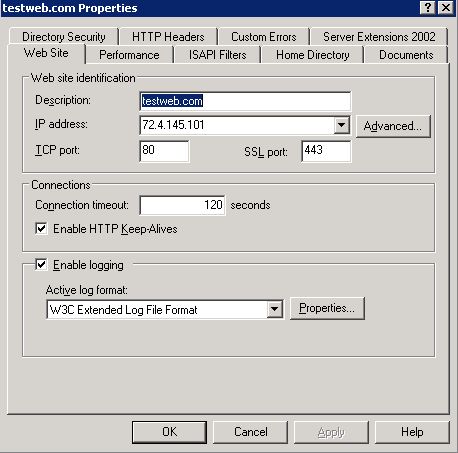
This will open the properties window where you have to choose ‘Web Site’ and then to locate ‘Website identification‘ section. Click on the ‘Advanced’¦’ button which stands next to the IP of the domain.

create-domain-alias-on-windows-server-2a
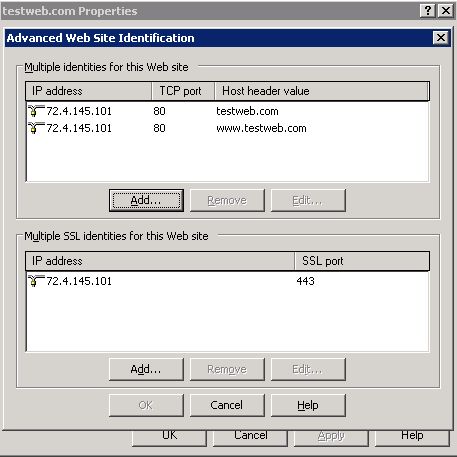
Advanced Web site identification window (Microsoft likes to see the word ‘Advanced’ in all of the management menus) will be opened, where we are going to add a new domain alias.

create-domain-alias-on-windows-server-3a.png

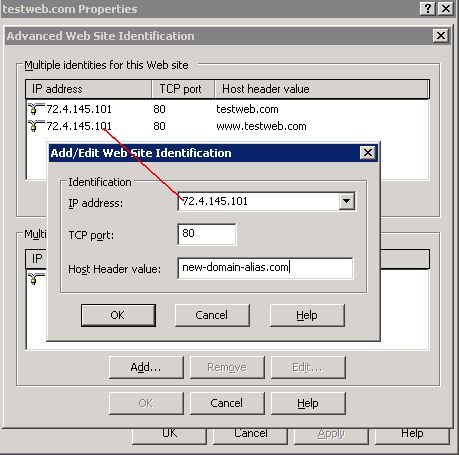
Click on the ‘Add’¦’ button and ‘Add/Edit website (alias)identification’ window will appear.

create-domain-alias-on-windows-server-4a.png

Make sure that you will choose the same IP address from the dropdown menu, then set the port number on which your web server is running (the default is 80), write the domain you want, and click ‘OK’ to create the new domain alias.

Actually click ‘OK’ until you have ‘Advanced Web site identification’ and the domain properties windows closed.

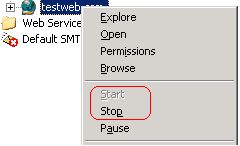
Right click on the domain again and ‘Stop’ and ‘Start’ the service.
This will be enough the IIS domain alias to start working.

create-domain-alias-on-windows-server-5a


Another useful thing for novice IIS admins that come from UNIX is a domain1 to domain2 redirect, this is done with writting an IIS rule which is an interesting but long topic for a limited post as like this, but just for the reference of fun to let you know this exist.

Domain 1 to Domain 2 Redirect
This rule comes handy when you change the name of your site or may be when you need to catch and alias and direct it to your main site. If the new and the old URLs share some elements, then you could just use this rule to have the matching pattern together with the redirect target being

domain1-to-domain2-redirect-iis

That's all folks, if you enjoyed the clicking laziness you're ready to retrain yourself to become a successful lazy Windows admin who calls Microsoft Support everyday as many of the errors and problems Windows sysadmins experience as I heard from a friend can only be managed by M$ Support (if they can be managed at all). 

Yes that's it the great and wonderful life of the avarage sysadmin. Long live computing … it's great! Everyday something broken needs to get fixed everyday something to rethink / relearn / reupdate and restructure or migrate a never ending story of weirdness.

A remark to  make, the idea for this post is originated based on a task I had to do long time ago on IIS, the images and the description behind them are taking from a post originally written on Domain Aliasing in IIS originally written by Anthony Gee unfortunately his blog is not available anymore so credits goes to him.

How to restart Microsoft IIS with command via Windows command line

Friday, August 19th, 2011

I'm tuning a Windows 2003 for better performance and securing it against DoS of service attacks. After applying all the changes I needed to restart the WebServer for the new configurations to take effect.
As I'm not a GUI kind of guy I found it handy there is a fast command to restart the Microsoft Internet Information Server. The command to restart IIS is:

c:> iisreset

Start Stop Restart Microsoft IIS Webserver from command line and GUI

Thursday, April 17th, 2014

start-stop-restart-microsoft-iis-howto-iis-server-logo
For a decomissioning project just recently I had the task to stop Microsoft IIS  on Windows Server system.
If you have been into security for a while you know well how many vulnerabilities Microsoft (Internet Information Server) Webserver used to be. Nowadays things with IIS are better but anyways it is better not to use it if possible …

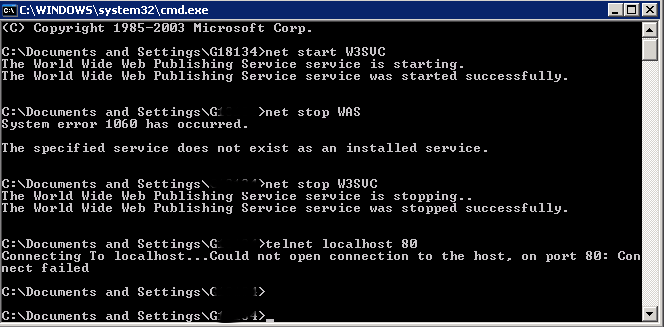
Nomatter what the rason if you need to make IIS stop serving web pages here is how to do it via command line:

At Windows Command Prompt, type:

net stop WAS

If the command returns error message to stop it type:

net stop W3SVC

stop-microsoft-IIS-webservice
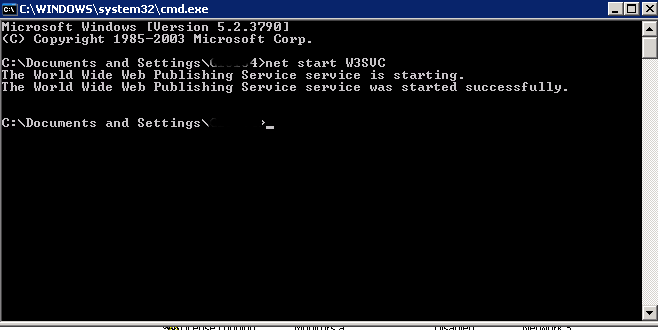
Just in case you have to start it again run:

net start W3SVC

start-restart-IIS-webserver-screenshot

For those who prefer to do it from GUI interface, launch services.msc command from Windows Run:

> services.msc

services-msc-stop-microsoft-iis-webserver

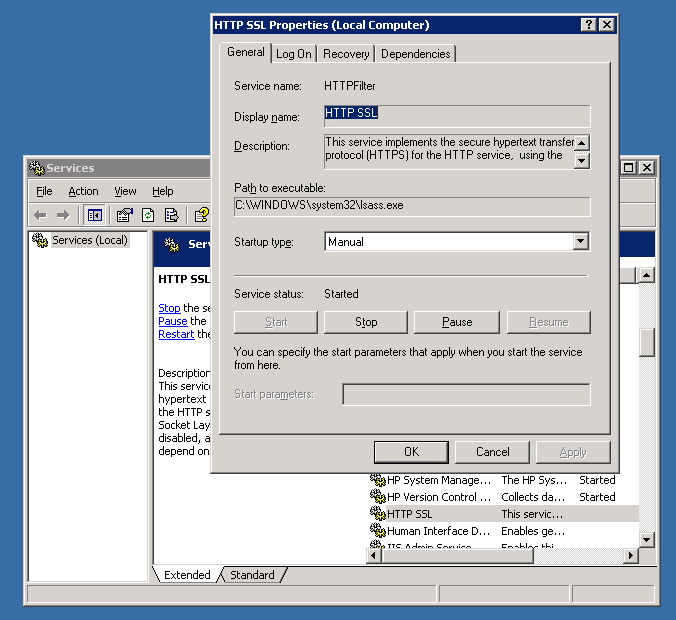
In list of services lookup for
IIS Admin Service and HTTP SSL
a) (Click over it with right mouse button -> Properties)
b) Set Startup type to Manual
c) Click Stop Button

You're done now IIS is stopped to make sure it is stopped you can run from cmd.exe:

telnet localhost 80

when not working you should get 'Could not open connection to the host. on port 80: Connection failed' like shown up in screenshot.

How to check Microsoft IIS webserver version

Monday, July 21st, 2014

If you have to tune some weirdly behaviour Microsoft IIS (Internet Information Services) webserver, the first thing to do is to collect information about the system you're dealing with – get version of installed Windows and check what kind of IIS version is running on the Windows server?

To get the version of installed Windows on the system you just logged in, the quickest way I use is:
 

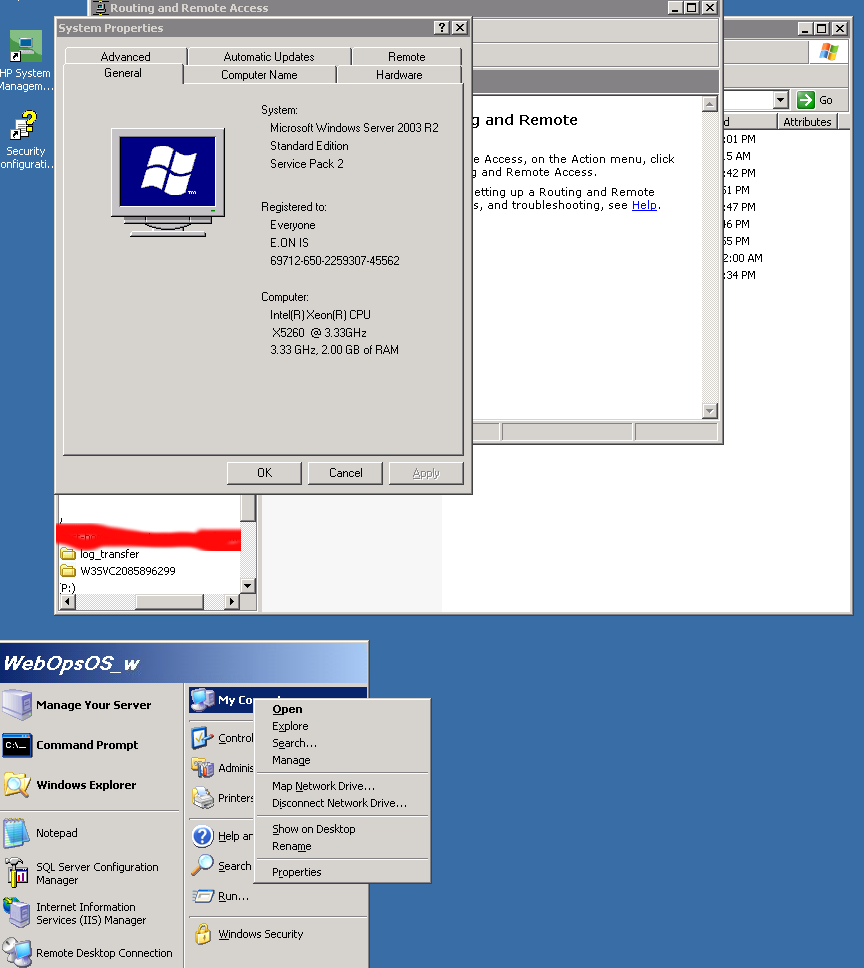
Start -> My Computer (right mouse button) Properties

check-windows-server-version-screenshot-windows-2003-r2

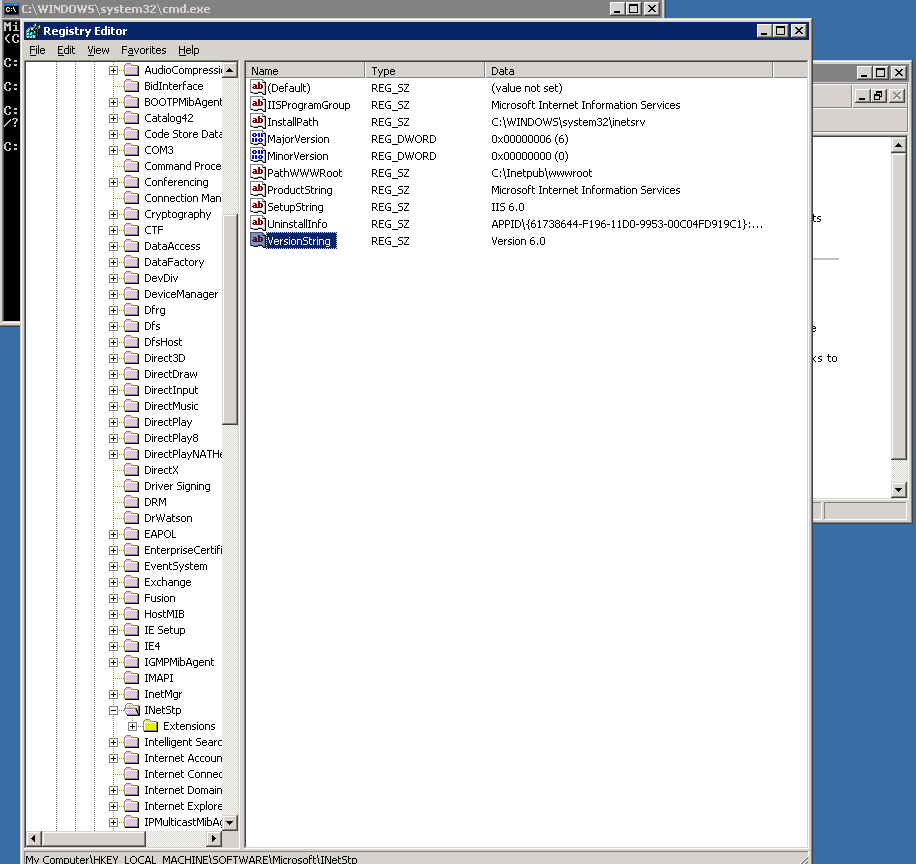
Run regedit from cmd.exe and go and check value of registry value:


HKEY_LOCAL_MACHINE\SOFTWARE\MicrosoftInetStp\VersionString


check-iis-webserver-version-with-windows-registry-screenshot

As you can see in screenshot in this particular case it is IIS version 6.0.

An alternative way to check the IIS version in some cases (if IIS version return is not disabled) is to telnet to webserver:

telnet your-webserver 80


Once connected Send:

HEAD / HTTP/1.0


Also on some Windows versions it is possible to check IIS webserver version from Internet Information Services Management Cosnole:

To check IIS version from IIS Manager:

Start (button) -> Control Panel -> Administrative Tools -> "Internet Information Services" IIS Manager

From IIS Manager go to:

Help -> About Microsoft Management Console


Here is a list with most common IIS version output you will get depending on the version of Windows server:


Windows NT 3.51 1.0
Windows NT 4 2.0-4.0
Windows Server 2000 5.0
Windows XP Professional 5.1
Windows Server 2003 6.0
Windows Vista 7.0
Windows Server 2008 7.0
Windows Server 2008 R2 7.5
Windows 7 7.5
Windows Server 2012 8.0
Windows 8 8.0
Windows Server 2012 R2 8.5
Windows 8.1 8.5

If you have only an upload FTP access to a Folder served by IIS Webserver – i.e. no access to the Win server running IIS, you can also grasp the IIS version with following .ASP code:
 

<%
response.write(Request.ServerVariables("SERVER_SOFTWARE"))
%>


Save the file as anyfile.asp somewhere in IIS docroot and invoke it in browser.

Use multiple certificates using one IP address (same IP address) on IIS Windows web server

Saturday, October 24th, 2020

If you had to administer some Windows webservers based on IIS and you're coming from the Linux realm, it would be really confusing on how you can use a single IP address to have binded multiple domain certificates.

For those who have done it on linux, they know Apache and other webservers in recent versions support the configuration Directive of a Wildcard instead of IP through the SNI extension capble to capture in the header of the incoming SSL connection the exact domain and match it correctly against the domain with the respective certificate.  Below is what I mean, lets say you have a website called yourdomain.com and you want this domain to be pointing to another location for example to yourdomain1.com

For example in Apache Webserver this is easily done by defining 2 separate virtualhost configuration files similar to below:

/etc/apache2/sites-available/yourdomain.com

<Virtualhost *>

Servername yourdomain.com
ServerAlias www.yourdomain.com
….

        SSLCertificateFile /etc/letsencrypt/live/yourdomain1.com/fullchain.pem
SSLCertificateKeyFile /etc/letsencrypt/live/yourdomain1.com/privkey.pem
</VirtualHost>


/etc/apache2/sites-available/yourdomain1.com

<Virtualhost *>

Servername yourdomain1.com
ServerAlias yourdomain1.com


        SSLCertificateFile /etc/letsencrypt/live/yourdomain1.com/fullchain.pem
SSLCertificateKeyFile /etc/letsencrypt/live/yourdomain1.com/privkey.pem
</VirtualHost>


Unfortunately for those who still run legacy Windows servers  with IIS version 7 / 7.5 your only option is to use separate IP addresses (or ports, but not really acceptable for public facing sites) and to bind each site with it's SSL certificate to that IP address.

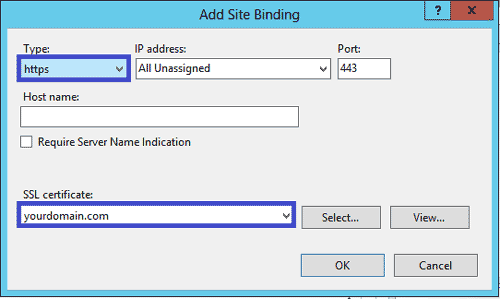
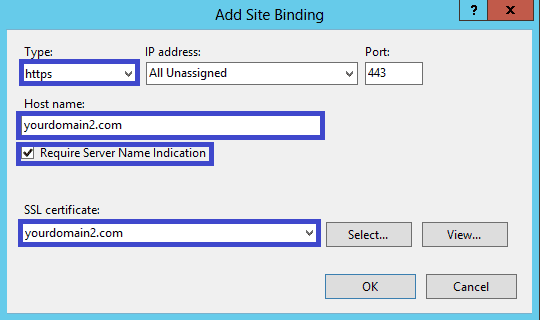
IIS ver. 8+ supports the Server Name Indication extension of TLS which will allow you to bind multiple SSL sites to the same IP address/port based on the host name. It will be transparent and the binding will work the same as with non-HTTPS sites.

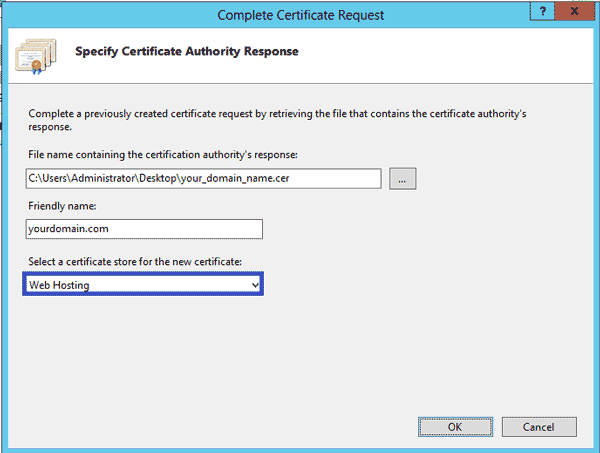
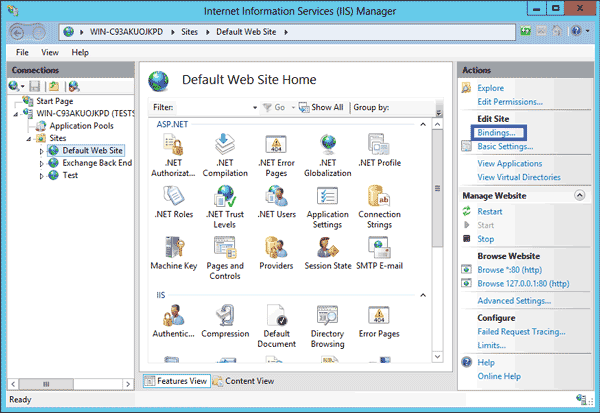
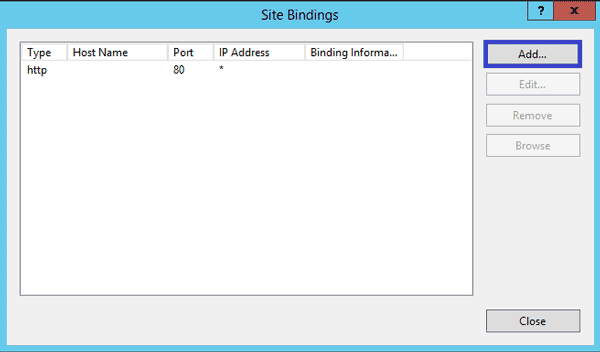
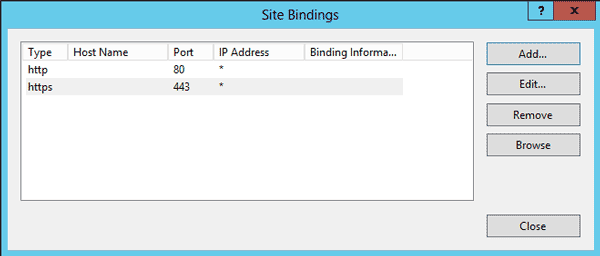
In Microsoft IIS Webserver to configure, it is not possible to simply edit some configurations but you have to do it the clicking way as usually happen in Windows. thus you will need to have generated the Domain Certificate requests and so on and then you can simply do as pointed in below screenshots.

howto-install-iis-8-webserver-ssl-sni-certificate-windows-screenshot
 

iis-config-domain-alias-windows-server-iis-8-webserver

iis-config-domain-alias-windows-server-iis-8-webserver-1

iis-config-domain-alias-windows-server-iis-8-webserver-2

iis-config-domain-alias-windows-server-iis-8-webserver-3

iis-config-domain-alias-windows-server-iis-8-webserver-4
 

Converting .crt .cer .der to PEM, converting .PEM to .DER and convert .PFX PKCS#12 (.P12) to .PEM file using OpenSSL

Friday, September 1st, 2017

openssl_check_verify_crt_csr_key_certificate_consistency-with-openssl-command-openssl-logo

These commands allow you to convert certificates and keys to different formats to make them compatible with specific types of servers or software. For example, you can convert a normal PEM file that would work with Apache to a PFX (PKCS#12) file and use it with Tomcat or IIS.

  • Convert a DER file (.crt .cer .der) to PEM


    openssl x509 -inform der -in certificate.cer -out certificate.pem
    
  • Convert a PEM file to DER


    openssl x509 -outform der -in certificate.pem -out certificate.der
    
  • Convert a PKCS#12 file (.pfx .p12) containing a private key and certificates to PEM


    openssl pkcs12 -in keyStore.pfx -out keyStore.pem -nodes


    You can add -nocerts to only output the private key or add -nokeys to only output the certificates.

  • Convert a PEM certificate file and a private key to PKCS#12 (.pfx .p12)


    openssl pkcs12 -export -out certificate.pfx -inkey privateKey.key \
    -in certificate.crt -certfile CACert.crt

Monitoring Windows hosts with Nagios on Debian GNU/Linux

Tuesday, August 30th, 2011

Nagios logo install and configure nagios to monitor Windows hosts with on Debian GNU/Linux

In this article in short, I’ll explain how I configured Nagios on a Debian GNU/Linux release (Squeeze 6) to monitor a couple of Windows hosts running inside a local network. Now let’s start.

1. Install necessery nagios debian packages

apt-get install nagios-images nagios-nrpe-plugin nagios-nrpe-server nagios-plugins nagios-plugins-basic nagios-plugins-standard
nagios3 nagios3-cgi nagios3-common nagios3-core

2. Edit /etc/nagios-plugins/config/nt.cfg

In the File substitute:

define command { command_name check_nt command_line /usr/lib/nagios/plugins/check_nt -H '$HOSTADDRESS$' -v '$ARG1$' }

With:

define command {
command_name check_nt
command_line /usr/lib/nagios/plugins/check_nt -H '$HOSTADDRESS$' -p 12489 -v $ARG1$ $ARG2$
}

3. Modify nrpe.cfg to put in allowd hoss to connect to the Nagions nrpe server

vim /etc/nagios/nrpe.cfg

Lookup inside for nagios’s configuration directive:

allowed_hosts=127.0.0.1

In order to allow more hosts to report to the nagios nrpe daemon, change the value to let’s say:

allowed_hosts=127.0.0.1,192.168.1.4,192.168.1.5,192.168.1.6

This config allows the three IPs 192.168.1.4-6 to be able to report for nrpe.

For the changes to nrpe server to take effect, it has to be restrarted.

debian:~# /etc/init.d/nagios-nrpe-server restart

Further on some configurations needs to be properly done on the nrpe agent Windows hosts in this case 192.168.1.4,192.168.1.5,192.168.1.6

4. Install the nsclient++ on all Windows hosts which CPU, Disk, Temperature and services has to be monitored

Download the agent from http://sourceforge.net/projects/nscplus and launch the installer, click twice on it and follow the installation screens. Its necessery that during installation the agent has the NRPE protocol enabled. After the installation is complete one needs to modify the NSC.ini
By default many of nsclient++ tracking modules are not enabled in NSC.ini, thus its necessery that the following DLLs get activated in the conf:

FileLogger.dll
CheckSystem.dll
CheckDisk.dll
NSClientListener.dll
SysTray.dll
CheckEventLog.dll
CheckHelpers.dll

Another requirement is to instruct the nsclient++ angent to have access to the Linux installed nagios server again with adding it to the allowed_hosts config variable:

allowed_hosts=192.168.1.1

In my case the Nagios runs on Debian Lenny (Squeeze) 6 and possess the IP address of 192.168.1.1
To test the intalled windows nsclient++ agents are properly installed a simple telnet connection from the Linux host is enough:

5. Create necessery configuration for the nagios Linux server to include all the Windows hosts which will be monitored

There is a window.cfg template file located in /usr/share/doc/nagios3-common/examples/template-object/windows.cfg on Debian.

The file is a good start point for creating a conf file to be understand by nagios and used to periodically refresh information about the status of the Windows hosts.

Thus it’s a good idea to copy the file to nagios3 config directory:

debian:~# mkdir /etc/nagios3/objects
debian:~# cp -rpf /usr/share/doc/nagios3-common/examples/template-object/windows.cfg /etc/nagios3/objects/windows.cfg

A sample windows.cfg content, (which works for me fine) and monitor a couple of Windows nodes running MS-SQL service and IIS and makes sure the services are up and running are:

define host{
use windows-server ; Inherit default values from a template
host_name Windows1 ; The name we're giving to this host
alias Iready Server ; A longer name associated with the host
address 192.168.1.4 ; IP address of the host
}
define host{
use windows-server ; Inherit default values from a template
host_name Windows2 ; The name we're giving to this host
alias Iready Server ; A longer name associated with the host
address 192.168.1.4 ; IP address of the host
}
define hostgroup{
hostgroup_name windows-servers ; The name of the hostgroup
alias Windows Servers ; Long name of the group
}
define hostgroup{
hostgroup_name IIS
alias IIS Servers
members Windows1,Windows2
}
define hostgroup{
hostgroup_name MSSQL
alias MSSQL Servers
members Windows1,Windows2
}
define service{
use generic-service
host_name Windows1
service_description NSClient++ Version
check_command check_nt!CLIENTVERSION
}
define service{ use generic-service
host_name Windows1
service_description Uptime
check_command check_nt!UPTIME
}
define service{ use generic-service
host_name Windows1
service_description CPU Load
check_command check_nt!CPULOAD!-l 5,80,90
}
define service{
use generic-service
host_name Windows1
service_description Memory Usage
check_command check_nt!MEMUSE!-w 80 -c 90
define service{
use generic-service
host_name Windows1
service_description C: Drive Space
check_command check_nt!USEDDISKSPACE!-l c -w 80 -c 90
}
define service{
use generic-service
host_name Windows1
service_description W3SVC
check_command check_nt!SERVICESTATE!-d SHOWALL -l W3SVC
}
define service{
use generic-service
host_name Windows1
service_description Explorer
check_command check_nt!PROCSTATE!-d SHOWALL -l Explorer.exe
}
define service{
use generic-service
host_name Windows2
service_description NSClient++ Version
check_command check_nt!CLIENTVERSION
}
define service{ use generic-service
host_name Windows2
service_description Uptime
check_command check_nt!UPTIME
}
define service{ use generic-service
host_name Windows2
service_description CPU Load
check_command check_nt!CPULOAD!-l 5,80,90
}
define service{
use generic-service
host_name Windows2
service_description Memory Usage
check_command check_nt!MEMUSE!-w 80 -c 90
define service{
use generic-service
host_name Windows2
service_description C: Drive Space
check_command check_nt!USEDDISKSPACE!-l c -w 80 -c 90
}
define service{
use generic-service
host_name Windows2
service_description W3SVC
check_command check_nt!SERVICESTATE!-d SHOWALL -l W3SVC
}
define service{
use generic-service
host_name Windows2
service_description Explorer
check_command check_nt!PROCSTATE!-d SHOWALL -l Explorer.exe
}
define service{ use generic-service
host_name Windows1
service_description SQL port Check
check_command check_tcp!1433
}
define service{
use generic-service
host_name Windows2
service_description SQL port Check
check_command check_tcp!1433
}
The above config, can easily be extended for more hosts, or if necessery easily setup to track more services in nagios web frontend.
6. Test if connectivity to the nsclient++ agent port is available from the Linux server

debian:~# telnet 192.168.58.6 12489
Trying 192.168.58.6...
Connected to 192.168.58.6.
Escape character is '^]'.
asd
ERROR: Invalid password.

Another good idea is to launch on the Windows host the NSClient++ (system tray) , e.g.:

Start, All Programs, NSClient++, Start NSClient++ (system tray).

Test Nagios configuration from the Linux host running nagios and nrpe daemons to check if the check_nt, can succesfully authenticate and retrieve data generated from the nsclient++ on the Windows host:

debian:~# /usr/lib/nagios/plugins/check_nt -H 192.168.1.5 -p 12489 -v CPULOAD -w 80 -c 90 -l 5,80,90,10,80,90

If everything is okay and the remote Windows system 192.168.1.5 has properly configured and running NSClient++ the above command should return an output like:

CPU Load 1% (5 min average) 1% (10 min average) | '5 min avg Load'=1%;80;90;0;100 '10 min avg Load'=1%;80;90;0;100

In case of the command returns:

could not fetch information from server

instead this means that probably there is some kind of problem with authentication or handshake of the Linux host’s nagios check_nt to the Windows server’s running on 12489.

This is sometimes caused by misconfigured NSC.ini file, however in other occasions this error is caused by misconfigured Windows Firewall or because the NSClient++ is not running with Administrator user.

By the way important note to make about Windows 2008r2 is that if NSClient++ is running there it’s absolutely required to Login with Windows Administrator and run the NSClient++ /start , if it’s run through the Run As Adminsitrator with an admin privileged user the aforementioned error might appear, so be careful.
I’ve experienced this error myself and it took me about 40 minutes to find that I have to run it directly with Administrator user after logging as Administrator.

7. Create nagios web iface Apache configuration

nagios debian pachage is shipped with a config which is suitable to be set debian:~# cp -rpf /usr/share/doc/nagios3-common/examples/apache2.conf /etc/apache2/sites-avalable/nagios
debian:~# ln -sf /etc/apache2/sites-available/nagios /etc/apache2/sites-enabled/nagios

The /etc/apache2/sites-available/nagios can easily be configured to work on Virtualhost, to do so the above copied file need to be wrapped inside a VirtualHost directive. For that put in the beginning of the file;

<VirtualHost *:80>

and in the end of the file:

<VirtualHost *:80>

8. Restart nagios server and Apache for the new settings to take effect

debian:~# /etc/init.d/apache2 restart
...
debian:~# /etc/init.d/nagios3 restart

If some custom configuration about tracking the Debian Linux nagios host running services needs to be made, its also helpful for one to check in /etc/nagios3/conf.d

Well that’s mostly what I had to do to make the Nagios3 server to keep track of a small Windows network on Debian GNU/Linux Squeeze 6, hope this small article helps. Cheers 😉

How to make NAT enable hosts in a local network to access the internet, create port forwarding to local IPs behind the router using iptables

Tuesday, August 23rd, 2011

I’m bulding new iptables firewall on one Linux server. The Debian GNU/Linux is required to act as firewall do Network Adress Translation for a small network of office PCs as well as forward some of the inbound ports to hosts from the local network located behind the router.

The local network besides the router had an IP addressing in the class C network e.g. (192.168.1.1-255)

First I procceded and enabled the Network Address Translation via the Linux kernel variable:

linux:~# sysctl -w net.ipv4.ip_forward=1
linux:~# echo 'net.ipv4.ip_forward=1' >> /etc/sysctl.conf

Initially I even forgot to switch on the net.ipv4.ip_forward to 1 (by default this value is set to 0) – GNU/Linux’s default network behaviour is not predetermined to act as network router.
However, since I haven’t configured Network Address Translation for quite some time it completely slipped my mind!

Anyways next the actual iptables rule which makes NAT possible I used is:

linux:~# /sbin/iptables -t nat -A POSTROUTING -s 192.168.1.0/24 ! -d 192.168.1.0/24 -j SNAT --to-source xxx.xxx.xxx.xxx

Whether xxx.xxx.xxx.xxx is the External IP address assigned to the router on eth0

With this very simple rules now Network the local network is capable of accessing the Internet withotu problem.

It’s a good time to say that still many system administrators, still erroneously use MASQUERADE rules instead of SNAT .
IP MASQUERADING is an ancestry from ipchains and these days should be completely abandonded, especially where no often change of primary IP address to access the internet is made.
For dial-ups or other kind of networking, where the IP addresses are often changed still IP MASQUERADING might be a good idea though.

My next goal was to make the Linux router to do port forwarding of Traffic which arrives on port 80 to a IIS server assigned with a local IP address of 192.168.1.5
I did the webserver (port 80), port forwarding from IP xxx.xxx.xxx.xxx to 192.168.1.5 with the iptables rule:

linux:~# /sbin/iptables -t nat -A PREROUTING -d xxx.xxx.xxx.xxx/32 -p tcp -m tcp --dport 80 -j DNAT --to-destination 192.168.1.5:80

There was a requirement to do port forwarding for a Windows remote Desktop running on standard port 3389 from the router to the internal Windows IP address running the IIS webserver, however the company required me to only allow access to the rdesktop 3389 port to certain real IP addresses.
Initially I thought about using the above PREROUTING rule which makes the port redirection to the IIS server and only change port 80 to port 3389 , and then use filter table INPUT chain rules like:

/sbin/iptables -A INPUT -s xx1.xx2.xx3.xx4,1xx,2xx,3xx,4xx,xxx.xxx.xxx.xxx -p tcp -m tcp --dport 3389 -j ACCEPT/sbin/iptables -A INPUT -p tcp -m tcp --dport 3389 -j REJECT --reject-with icmp-port-unreachable
32

However this did not work out, so I decided to give a try to do the same within the filter table using the FORWARD chain, like so:

FORWARD/sbin/iptables -A FORWARD -p tcp -m tcp -s xx1.xx2.xx3.xx4,1xx,2xx,3xx,4xx,xxx.xxx.xxx.xxx -p tcp -m tcp --dport 3389 -j ACCEPT
/sbin/iptables -A FORWARD -p tcp -m tcp --dport 3389 -j REJECT --reject-with icmp-port-unreachable

Adding this rules did not added any filtering to the forwarded remote desktop port. I suspected that somehow probably my above PREROUTING nat rules are read before any other rules and therefore automatically allows any IP address to port fortward traffic.
I’ve checked the iptables documentation and it seems my guess was partially right.

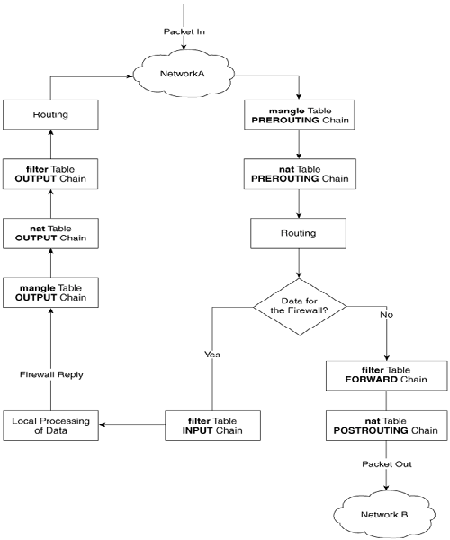
When some kind of network traffic enters the iptables firewall it first goes through the PREROUTING channel and then the traffic flows in a certain order.
iptables packet flow diagram

The iptables network packets flow is clearly seen in above’s diagram a thorough looks gives a very good idea on how packet is being processed by iptables

Finally as I couldn’t think about a good solution on how to only filter the port redirected traffic, which always firstly entered in the POSTROUTING chain, I’ve consulted with the guys in irc.freenode.net in #Netfilter.

I’m quite thanksful as a guy nicknamed Olipro has given me a pretty good picture on the port forwarding POSTROUTING problem and has provided me with a very logical easy and great fix.
He suggested that I only do port forwarding for certain IP addresses instead of allowing all IP addresses and then lookup for a way to allow only some of them and filter the rest.

The iptables rule to restrict the incoming traffic to the remote desktop forwarded port 3389 to few only allowed IP addresses looks like so:

linux:~# /sbin/iptables -t nat -A PREROUTING -d xxx.xxx.xxx.xxx/32 -s xx1.xx2.xx3.xx4,1xx,2xx,3xx,4xx,xxx.xxx.xxx.xxx -p tcp -m tcp –dport 3389 -j DNAT –to-destination 192.168.1.5:3389

Now the three sample IPs passed xx1.xx2.xx3.xx4,1xx,2xx,3xx,4xx,xxx.xxx.xxx.xxx has added to port forward traffic on 3389 to 192.168.1.5

By the way I did not know that newer versions of iptables support passing by multiple IP addresses to the –source or –destination IP. This is really great feature I’ve learned from the good guys from #Netfilter. However one should be careful when using the multiple IPs with -s or -d, it’s really important that the passed consequent IPs has no space between the , delimiter.

Now that’s all my task is completed. All computerse inside the Network 192.168.1.1-255 on the Linux router freely can access the Internet, all IPs are also capable to access the IIS server located behind the NAT as well as only certain IPs are capable of accessing to the IIS remote desktop.
Hope the article helps somebody 😉

How to set up Path to .exe GNUWin32 binary files in Windows XP / Vista / 2003 / 2008 (Setting PATH to executables on Windows)

Tuesday, August 23rd, 2011

I’ve been working on a servers running Windows 2003 and Windows 2008 these days.
As I wanted to be more flexible on what I can do from the command line I decided to install GNUwin (provides port of GNU tools), most of which are common part of any Linux distribution).
Having most of the command line flexibility on a Windows server is a great thing, so I would strongly recommend GNUWin to any Windows server adminsitrator out there.

Actually it’s a wonderful thing that most of the popular Linux tools can easily be installed and used on Windows for more check GnuWin32 on sourceforge

One of the reasons I installed Gnuwin was my intention to use the good old Linux tail command to keep an eye interactive on the IIS server access log files, which by the way for IIS webserver are stored by default in C:WindowsSystem32LogFilesW3SVC1*.log

I’ve managed to install the GNUWin following the install instructions, not with too much difficulties. The install takes a bit of time, cause many packs containing different parts of the GNUWin has to be fetched.

To install I downloaded the GNUWin installer available from GNUWin32’s website and instructed to extracted the files into C:Program FilesGnuwin
Then I followed the install instructions suggestions, e.g.:

C:> cd c:Program FilesGnuWin
C:Program FilesGnuWin> download.bat
...
C:Program FilesGnuWin> install c:gnuwin32
...

After the installation was succesfully completed on the two Windows machines, both of which by the way are running 64 bit Windows, it was necessery to add the newly installed GNU .exe files to my regular cmd.exe PATH variable in order to be able to access the sed, tail and the rest of the gnuwin32 command line tools.

In order to add C:GnuWin32bin directory to the windows defined Command line Path , I had to do the following:

a. Select (Properties) for My Computer

Start (button) -> My Computer (choose properties)

b. Select the My Computer Advanced (tab)

Then, from the My Computer pane press on Advanced tab

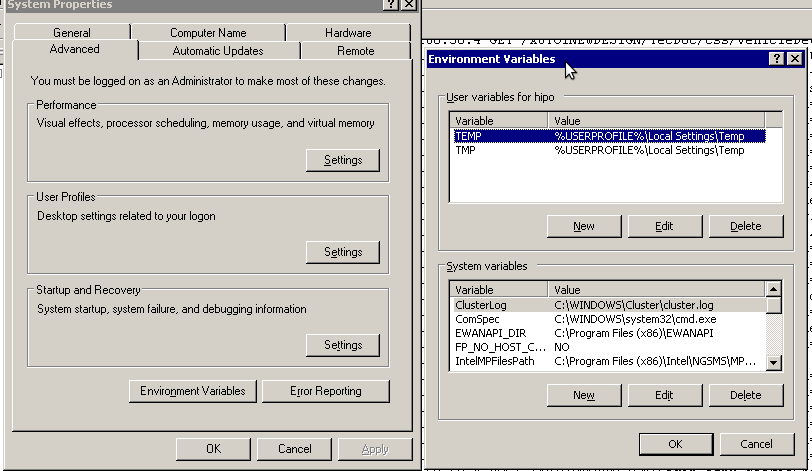
c. Next press on Environment Variables

Windows environment variables screenshot

You see in above’s screenshot the Environment Variables config dialog, to add the new path location in System Variables sectiom, between the list I had to add the c:GNUwin32bin path locatiion. To find I pressed on Edit button scrolled down to find the Variable and hence added at the end of the long list defined paths.
After adding in GNUwin, the Windows path looks like this:

C:Program Files (x86)EWANAPI;C:WINDOWSsystem32;C:WINDOWS;C:WINDOWSSystem32Wbem;C:Program Files (x86)IntelNGSMSMPFiles;C:Program Files (x86)Microsoft SQL Server100ToolsBinn;C:Program FilesMicrosoft SQL Server100ToolsBinn;C:Program FilesMicrosoft SQL Server100DTSBinn;C:Program Files (x86)Microsoft SQL Server100ToolsBinnVSShellCommon7IDE;C:Program Files (x86)Microsoft Visual Studio 9.0Common7IDEPrivateAssemblies;C:Program Files (x86)Microsoft SQL Server100DTSBinn;C:WINDOWSsystem32WindowsPowerShellv1.0;C:gnuwin32bin

Further on, I launched the tail command to intercatively take an eye on who is accessing the IIS webserver.
Sadly this worked not, trying to use tail with the IIS ex10116.log log;

C:WindowsSystem32LogfilesW3SVC1> tail -f ex10116.log

Spit an error tail: ex10116.log: Bad file descriptor

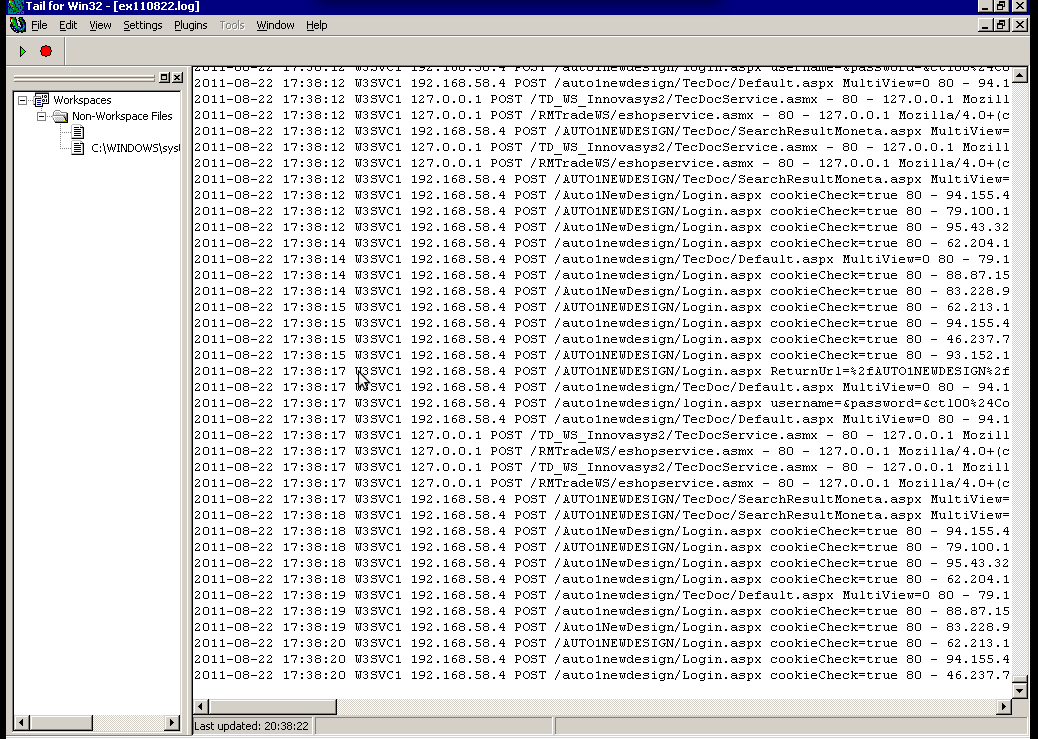
Since I couldn’t use tail -f I looked for alternative and a quick search led me to Tail 4 Win32 . Lest the name suggests it is supposed to work on 32 bit arch Windows the version on tailforwin32’s website is working perfectly fine on 64 bit Windows as well.
What it does is to simulate a normal tail -f command inside a very simplistic window interface. You see it in action with opened IIS log on below’s screenshot:

GUI Tail for Windows screenshot

Finally my goal is achieved and I can take an eye interactively on IIS logs. End of the article, hope it wasn’t too boring 😉