Posts Tagged ‘Image’

How to Add sub-menus to Joomla main navigation buttons (Making dropdown menus) in Joomla

Tuesday, December 7th, 2010

I’m using a template youbizz just recently for a website. The website is already configured to use Joomla as a CMS.
This is a website related to the university so joomla was the perfect choice for a quick and easy to configure Content Management System

The youbizz template really makes difference and make the website layout look & feel quite a business looking.

However I needed a way to make my general configured menu buttons on the website to have a dropdown sub-menus in it

I even didn’t know if Joomla is supporting this, but by a chance I’ve made a submenu to the website Home buttom menu and thus I learned it how I can make submenus.

It actually appears creating the submenus to a menu in Joomla is a piece of cake, all you have to do in joomla administrator is go to to:

Menus -> Main Menu

From there you can configure as website buttons and link them to the ones already prepared in Article Manager

Just in case if you don’t know to add a buttons to a new joomla installation it’s necessary from admin to first go to:

Content -> Article Manager

Next press the New button (a green button with an image of a plus sign)

Thereon put a Title , Alias and in the input box put on everything you want this button pressed to show up in ur website.

Completing that simply press the Apply button and it should be done.
Next step to make the article appear in Menus -> Main Menu is to go this section and respectively from there use the green button with the plus sign to add up a new element to the main menu.

Right after you will have the Menu Item: [ New ] to appear it looks like in the pic below:

Joomla menu add new element screenshot

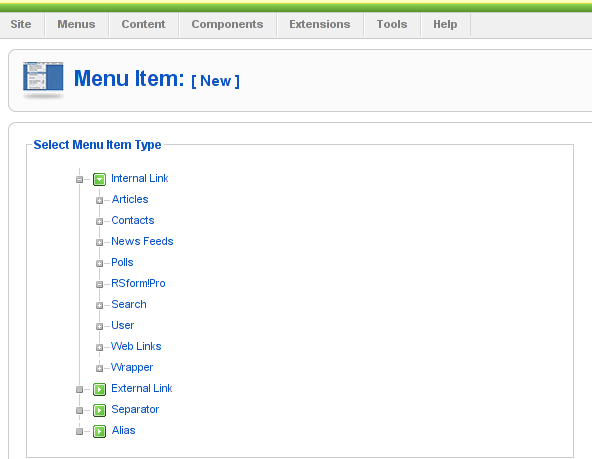
From the list of items to select you need to select the Article menu element. A submenu will appear in your browser to the Articles reading:

Article Layout
Article Submission Layout
etc.

From this menu you will have to select the Article Layout

The next screen to appear will look like the pic below:

Joomla main menu add new button through article, article layout

Here in article layout few things needs to be adjusted, again you will need to place the Title and the Alias, further after from the Parameters (Basic) located on the right you will have to select an article to link the new menu you’re just creating in Joomla’s new menu.
This is achieved via pressing the Select button located nearby the Select Article
Here it’s important to note the existence of Parent Item scrolldown field. This field will have all the created menu buttons in Main Menu . In case if this is the first one to create in main menu then it could be also empty.

The Parent Item field is really an important field and through it the menu’s submenus are created in Joomla.

For instance let’s say you want the current creating article to be listing as a sub-benu button to another already existing category, instead of listing as a separate button to the Joomla’s main menu navigation.

Well it’s pretty easy just choose from the Parent Item the name of an already existing menu button in Joomla main menu to be the parent of the sub-menu button you want to have.
That’s it now you will have the sub-menu button to appear as a drop down button (if of course your template supports dropdown menus).
There are few more options to choose in between which I found to be quite self explanatory, so I want explain them

But I hope I was able to explain at least the basics how menu subbuttons can be created in Joomla 1.5I find it a bit harder to explain in a bit plain way, but anyways if some of my dear readers is not understanding how to achieve the sub-menus I’m more than willing to help out further via the comments.

How to substitute default TinyMCE Joomla Content editor with JCE Content Editor

Tuesday, May 31st, 2011

This content editor is really awesome compared to the default editor TinyMCE. If you want to have an options rich content editor for Joomla, then this is the one for you 🙂
download JCE Content Editor here

After installing the JCE Joomla content editor in order to enable it as a default editor you need to go to the following location:

Site -> Global Configuration -> Default WYSIWYG Editor

There place on Editor TinyMCE and change it with Editor – JCE

Now go to edit some article, and you will see the difference in the editor 🙂

7. Add gallery Joomla capabilities with sigplus (Image Gallery Plus) and Very Simple Image Gallery

sigplus Image Gallery Plus is a straightforward way to add image or photo galleries to a Joomla article with a simple syntax. It takes a matter of minutes to set up a gallery but those who are looking for a powerful gallery solution will not be disappointed either: sigplus is suitable for both beginner and advanced users.
 

How to install Microsoft Windows XP SP3 on Debian GNU / Linux Squeeze

Thursday, December 1st, 2011

Windows XP Service Pack 3 QEMU Debian Squeeze

I have never did a proper install of Windows XP on Debian before hand. Even though I experimented once long time ago. I had zero success with installing Windows XP Service Pack 2 . The only Windows I can make correctly working before hand on these early days on my Debian powered notebook with qemu virtual machine emulator was Windows 2000 .

I decided to give it another go today as I hoped the qemu has advanced and I’ve seen many reports online of people who were able to correctly make Windows XP SP2 work out.

As I’ve seen many blog posts online of people who succesfully run with qemu Windows XP SP2, in order to escape from repeating the other guys experience and conduct a fresh experiment, I decided to give qemu a try with Microsoft.Windows.XP.Professional.SP3.Integrated.June.2011.Corporate

Before I proceed with using latest qemu I,

1. Installed qemu using the usual:

debian:~# apt-get install --yes qemu qemu-keymaps qemu-system qemu-user qemu-utils uml-utilities
...

Afterwards,

2. Created a new directory where the qemu Windows image will be stored:

debian:~# su hipo
hipo@noah:~$ mkdir windows
hipo@noah:~$ cd windows
hipo@noah:/home/hipo/windows$

As a following step I loaded the tun kernel module which is necessery for Qemu to properly handle the Windows LAN networking.

3. Load and set proper permissions for tun kernel module

In case if /dev/net is not existing first step is to create the proper device, however in most cases /dev/net should be there:

debian:~# mkdir -p /dev/net
debian:~# mknod /dev/net/tun c 10 200

As a next step its necessery to load tun kernel module and set the proper permissions:

debian:~# modprobe tun
debian:~# echo 'tun' >> /etc/modules
debian:~# chgrp users /dev/net/tun
debian:~# chmod g+w /dev/net/tun

Next step is to create an image file with dd or with qemu-img which will be holding the Virtual Machine Windows installation.

4. Create image file for Windows using dd

I decided to create a the image file to be with a size of 5 Gigabytes, this is of course custom so other people might prefer having it less or more the absolute minimum for a proper Windows XP SP3 install is 2000 Megabytes.

debian:~# su hipo -; cd windows;
debian:/home/hipo/windows$ dd of=hd.img bs=1024 seek=5000000 count=0
0+0 records in
0+0 records out
0 bytes (0 B) copied, 1.5505e-05 s, 0.0 kB/s

Notice here that the file dd will create will appear like 0 kb file until the Windows install from a BootCD is run with qemu.

5. Download an image of Microsoft.Windows.XP.Professional.SP3.Integrated.June.2011.Corporate from thepiratebay.org

Microsoft.Windows.XP.Professional.SP3.Integrated.June.2011.Corporate is currently available for download from the thepiratebay.org if in the times to come it is not available it will most likely be available from torrentz.net, isohunt.com etc. so I’ll skip more explanations with this step and let you use your favourite torrent program of choice to download the MS Windows iso. Just to make a note here I used transmission as this is my favourite torrent client. After downloading the iso I used K3B to burn the Image file as Bootable ISO. I’m naturally a GNOME user so to burn it as Image I just open it with K3B by using the GNOME menu and selecting Open with K3B

Next I instructed qemu to boot from the just burnt CD.

6. Boot windows Installation with Qemu from the Boot CD

debian:/home/hipo/windows$ qemu -boot d -cdrom /dev/cdrom -hda hd.img

Notice here that I’m running the qemu virtual machine emulator with a non-privileged reasons. This is important as qemu might have holes in the emulation of Windows Networking stack which if executed as root superuser. Can allow some malicious attacker to remotely compromise your GNU / Linux PC …

Qemu window will pop-up where one installs the Windows as it will install it using an ordinary PC. To switch qemu to fullscreen mode to have the complete feeling like installing Windows on an non-emulated PC ctrl + alt + f can be pressed.

The Windows installation took like 1 hour 20 minutes on my dual core 1.8 Ghz notebook with 2 GB of RAM. But I should say while installing I had multiple applications running; xmms, transmission, epiphany, icedove, evince etc. probably if I just run the Virtual Machine with no other applications to extra load my PC, probably the Windows install would have been done in max 50 minutes time.

After the installation is complete. To

7. Further run the installed Windows debian:/home/hipo/windows$ qemu -hda hd.img -boot c
...

As a next step its necessery to;

8. Bring up the tap0 interface and configure it for the user

I’m running my qemu emulator with my user hipo , so I run cmds:

debian:/home/hipo/windows$ su - root
debian:~# tunctl -u hipo
Set 'tap0' persistent and owned by uid 1000

9. Enable ip_forwarding and arp proxy and for wlan0 and tap0

debian:~# echo 1 > /proc/sys/net/ipv4/conf/wlan0/proxy_arp
debian:~# echo 1 > /proc/sys/net/ipv4/conf/tap0/proxy_arp

10. Install the proper Network Drivers inside Windows

That’s just in case, if they’re not supported by the Windows default existing drivers.
To do so, I downloaded my LAN drivers from the Vendor and put it on USB and sticked the USB drive to my laptop. In order to make the Kingston USB drive I used to transfer my LAN and Video drivers. I had to restart qemu with the parameter -usb -usbdevice host:0951:1625 , where I used lsusb to check and get the correct USB ID 0951:1625, like shown in the command below:

debian:~# lsusb |grep -i kingston
Bus 001 Device 006: ID 0951:1625 Kingston Technology DataTraveler 101 II

After on I booted again the Windows XP with the following command line in order to make qemu detect the USB Drive:

debian:/home/hipo/windows# sudo qemu -boot c -hda hd.img -usb -usbdevice host:0951:1625

One oddity here is that in order for qemu to detect the USB stick, I had to run it via sudo with super user privileges.Don’t ask me why this is the only way it worked …
Next on used the Windows device manager from Control Panel -> System -> Device Manager to point my undetected hardware to the correct Win drivers.

For the GUI preferring user qemu has a nice GNOME GUI interface called qemu-launcher, if you like to use qemu via it instead of scripting the qemu launcher commands, you can install and use via:

debian:~# apt-get install --yes qemu-launcher qemuctl
...
debian:/home/hipo/windows$ qemu-launcher

QEMU-Launcher Debian Squeeze Screenshot

Another GUI alternative to qemu-launcher, which easifys the work with qemu is qemulator; here is a screenshot:

Qemulator 0.5 - Qemu GUI Screenshot Debian Squeeze

How to copy CD or DVD on GNU/Linux and FreeBSD using console or terminal

Monday, November 14th, 2011

CD Burning Console Terminal Linux / FreeBSD picture

These days more and more people start to forget the g* / Linux old times when we used to copy CDs from console using dd in conjunction with mkisofs .

Therefore to bring some good memories back of the glorious console times I decided to come up with this little post.

To copy a CD or DVD the first thing one should do is to make an image copy of the present inserted CD into the CD-drive with dd :

1. Make copy of the CD/DVD image using dd

# dd if=/dev/cdrom of=/tmp/mycd.iso bs=2048 conv=notrunc

/dev/cdrom is the location of the cdrom device, on many Linuces including (Debian) /dev/cdrom is just a link to the /dev/ which corresponds to the CD drive. Note on FreeBSD the location for the CD Drive is /dev/acd0
/tmp/mycd.iso instructs dd CD image creation to be placed in /tmp/ directory.
bs argument instructs it about the byte size portions by which the content of the CD-Drive inserted CD will be read. bs value of 2048 is actually only 2KB per dd read, increasing this value will decrease the time required for the CD image to be extracted.

2. Prepare CD image file to be ready for burning

After dd completes the image copy operation, next to prepare the extracted image / ISO to be ready for burning mkisofs is used:

# mkisofs -J -L -r -V TITLE -o /tmp/imagefile.iso /tmp/mycd.iso

The -J option makes the CD compatible for Pcs running Microsoft Windows. The -V TITLE option should be changed to whatever title the new CD should have, -r will add up status bar for the mkisofs operation.
-r is passed to create specific file permissions on the newly created CD, -o specifies the location where mkisofs will produce its file based on the CD image /tmp/mycd.iso .

3. Burning the mkisofs image file to a CD/DVD on GNU / Linux

linux:~# cdrecord -scanbus
linux:~# cdrecord dev=1,0,0 /tmp/imagefile.iso

If all wents okay with cdrecord operation, after a while the CD should be ready.

4. Burning the mkisofs image file to CD on FreeBSD

freebsd# burncd -f /dev/acd0 data /tmp/imagefile.iso fixate

How to make wicd systray to appear in GNOME on Ubuntu 11.10 / How to fix missing wicd network manager systray on Ubuntu

Monday, November 7th, 2011

After upgrading my sis’s notebook from Ubuntu 11.04 to Ubuntu 11.10 on her Acer Aspire 5736Z the default gnome wireless network manager started behaving oddly.
The Network Manager did not show any networks, even though the network drivers showed that are loaded properly on the Linux host and using the normal commands like iwlist or iwconfig I could list and see the networks and even connect to a network.

As my sister is not a console geek like me it was necessery of course to have an easy way to connect herself to the Internet with nice GUI application. I personally love WICD Network Manager and as the default gnome manager was misbehaving I immediately installed her wicd.
With wicd , the wireless networks were properly listed and there was no connection issues to the wireless networks, however the wicd system tray was missing and hence everytime she wanted to connect to a wireless network, she had to keep wicd-client running active in the Dock or run it manually every time on connect, when she had to change her physical location and connect to another wireless network.
This of course is quite unhandy and gives her a bad image of Linux and I definitely want to make her love free software and GNU / Linux. Thus I want to give her a GNU / Linux she will be easy to use.

To make her more satisfied with her Ubuntu I googled around to see what causes the wicd systray to be missing after some research online I found out, its probably due to either wicd bug or some kind of interface changes in unity newer versions of Ubuntu. Some people online suggested a fix via changing values in gconf-editor but this work around by changing the values in gconf-editor:

'desktop' -> 'unity' -> 'panel'

I tried this suggested fix which was reported to work on Ubuntu 11.04 but the gconf registry suggested pathway was missing at all so this solution did not worked.

I further read some other suggested solution using wicd-client by invoking it with two args like so:

stanimira@ubuntu:~$ wicd-client -n &
...stanimira@ubuntu:~$ wicd-client -a &

This proposed solution did not worked either, then I found in one of the Ubuntu bugs reports, a little shell script (add-wicd-to-whitelist.sh) that changes some values in gconf so I proceeded downloaded and give it a try:

stanimira@ubuntu:~$ wget https://www.pc-freak.net/files/add-wicd-to-whitelist.sh
...
stanimira@ubuntu:~$ sh add-wicd-to-whitelist.sh
...

For my surprise running the script doesn’t immediately changed nothing and wicd wireless connectivity indicator was still missing from the tray.
I thought it might need to reload gnome so I give it a restart and HOORAY! after the restart the WICD connected wireless strength show up, like you can see in the screenshot below 😉

Wicd indicator running in systray on GNOME in Ubuntu 11.10

Now hope this fix will, help out there experiencing the same issues to work around his wireless network connectivity issues 😉 Cheers.