Posts Tagged ‘incoming connections’

Webserver farm behind Load Balancer Proxy or how to preserve incoming internet IP to local net IP Apache webservers by adding additional haproxy header with remoteip

Monday, April 18th, 2022

logo-haproxy-apache-remoteip-configure-and-check-to-have-logged-real-ip-address-inside-apache-forwarded-from-load-balancer

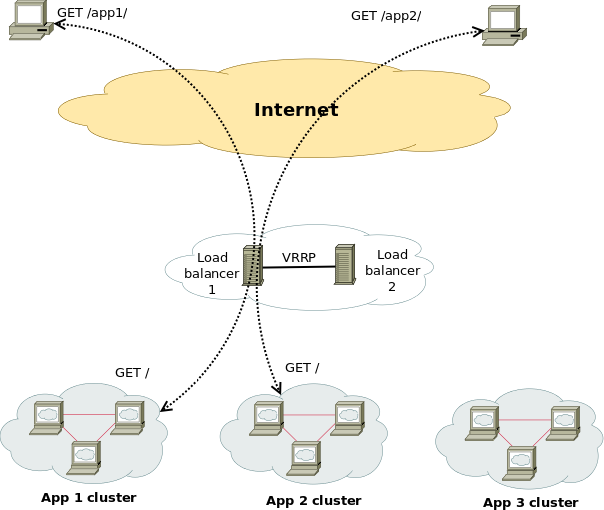
Having a Proxy server for Load Balancing is a common solutions to assure High Availability of Web Application service behind a proxy.
You can have for example 1 Apache HTTPD webservers serving traffic Actively on one Location (i.e. one city or Country) and 3 configured in the F5 LB or haproxy to silently keep up and wait for incoming connections as an (Active Failure) Backup solution

Lets say the Webservers usually are set to have local class C IPs as 192.168.0.XXX or 10.10.10.XXX and living in isolated DMZed well firewalled LAN network and Haproxy is configured to receive traffic via a Internet IP 109.104.212.13 address and send the traffic in mode tcp via a NATTed connection (e.g. due to the network address translation the source IP of the incoming connections from Intenet clients appears as the NATTed IP 192.168.1.50.

The result is that all incoming connections from haproxy -> webservers will be logged in Webservers /var/log/apache2/access.log wrongly as incoming from source IP: 192.168.1.50, meaning all the information on the source Internet Real IP gets lost.
load-balancer-high-availailibility-haproxy-apache
 

How to pass Real (Internet) Source IPs from Haproxy "mode tcp" to Local LAN Webservers  ?
 

Usually the normal way to work around this with Apache Reverse Proxies configured is to use HTTP_X_FORWARDED_FOR variable in haproxy when using HTTP traffic application that is proxied (.e.g haproxy.cfg has mode http configured), you have to add to listen listener_name directive or frontend Frontend_of_proxy

option forwardfor
option http-server-close

However unfortunately, IP Header preservation with X_FORWADED_FOR  HTTP-Header is not possible when haproxy is configured to forward traffic using mode tcp.

Thus when you're forced to use mode tcp to completely pass any traffic incoming to Haproxy from itself to End side, the solution is to
 

  • Use mod_remoteip infamous module that is part of standard Apache installs both on apache2 installed from (.deb) package  or httpd rpm (on redhats / centos).


1. Configure Haproxies to send received connects as send-proxy traffic


The idea is very simple all the received requests from outside clients to Haproxy are to be send via the haproxy to the webserver in a PROXY protocol string, this is done via send-proxy

             send-proxy  – send a PROXY protocol string

Rawly my current /etc/haproxy/haproxy.cfg looks like this:
 

global
        log /dev/log    local0
        log /dev/log    local1 notice
        chroot /var/lib/haproxy
        user haproxy
        group haproxy
        daemon
        maxconn 99999
        nbproc          1
        nbthread 2
        cpu-map         1 0
        cpu-map         2 1


defaults
        log     global
       mode    tcp


        timeout connect 5000
        timeout connect 30s
        timeout server 10s

    timeout queue 5s
    timeout tunnel 2m
    timeout client-fin 1s
    timeout server-fin 1s

                option forwardfor

    retries                 15


frontend http-in
                mode tcp

                option tcplog
        log global

                option logasap
                option forwardfor
                bind 109.104.212.130:80
    fullconn 20000
default_backend http-websrv
backend http-websrv
        balance source
                maxconn 3000

stick match src
    stick-table type ip size 200k expire 30m
        stick on src


        server ha1server-1 192.168.0.205:80 check send-proxy weight 254 backup
        server ha1server-2 192.168.1.15:80 check send-proxy weight 255
        server ha1server-3 192.168.2.30:80 check send-proxy weight 252 backup
        server ha1server-4 192.168.1.198:80 check send-proxy weight 253 backup
                server ha1server-5 192.168.0.1:80 maxconn 3000 check send-proxy weight 251 backup


frontend https-in
                mode tcp

                option tcplog
                log global

                option logasap
                option forwardfor
        maxconn 99999
           bind 109.104.212.130:443
        default_backend https-websrv
                backend https-websrv
        balance source
                maxconn 3000
        stick on src
    stick-table type ip size 200k expire 30m


                server ha1server-1 192.168.0.205:443 maxconn 8000 check send-proxy weight 254 backup
                server ha1server-2 192.168.1.15:443 maxconn 10000 check send-proxy weight 255
        server ha1server-3 192.168.2.30:443 maxconn 8000 check send-proxy weight 252 backup
        server ha1server-4 192.168.1.198:443 maxconn 10000 check send-proxy weight 253 backup
                server ha1server-5 192.168.0.1:443 maxconn 3000 check send-proxy weight 251 backup

listen stats
    mode http
    option httplog
    option http-server-close
    maxconn 10
    stats enable
    stats show-legends
    stats refresh 5s
    stats realm Haproxy\ Statistics
    stats admin if TRUE


After preparing your haproxy.cfg and reloading haproxy in /var/log/haproxy.log you should have the Real Source IPs logged in:
 

root@webserver:~# tail -n 10 /var/log/haproxy.log
Apr 15 22:47:34 pcfr_hware_local_ip haproxy[2914]: 159.223.65.16:58735 [15/Apr/2022:22:47:34.586] https-in https-websrv/ha1server-2 1/0/+0 +0 — 7/7/7/7/0 0/0
Apr 15 22:47:34 pcfr_hware_local_ip haproxy[2914]: 20.113.133.8:56405 [15/Apr/2022:22:47:34.744] https-in https-websrv/ha1server-2 1/0/+0 +0 — 7/7/7/7/0 0/0
Apr 15 22:47:35 pcfr_hware_local_ip haproxy[2914]: 54.36.148.248:15653 [15/Apr/2022:22:47:35.057] https-in https-websrv/ha1server-2 1/0/+0 +0 — 7/7/7/7/0 0/0
Apr 15 22:47:35 pcfr_hware_local_ip haproxy[2914]: 185.191.171.35:26564 [15/Apr/2022:22:47:35.071] https-in https-websrv/ha1server-2 1/0/+0 +0 — 8/8/8/8/0 0/0
Apr 15 22:47:35 pcfr_hware_local_ip haproxy[2914]: 213.183.53.58:42984 [15/Apr/2022:22:47:35.669] https-in https-websrv/ha1server-2 1/0/+0 +0 — 6/6/6/6/0 0/0
Apr 15 22:47:35 pcfr_hware_local_ip haproxy[2914]: 159.223.65.16:54006 [15/Apr/2022:22:47:35.703] https-in https-websrv/ha1server-2 1/0/+0 +0 — 7/7/7/7/0 0/0
Apr 15 22:47:36 pcfr_hware_local_ip haproxy[2914]: 192.241.113.203:30877 [15/Apr/2022:22:47:36.651] https-in https-websrv/ha1server-2 1/0/+0 +0 — 4/4/4/4/0 0/0
Apr 15 22:47:36 pcfr_hware_local_ip haproxy[2914]: 185.191.171.9:6776 [15/Apr/2022:22:47:36.683] https-in https-websrv/ha1server-2 1/0/+0 +0 — 5/5/5/5/0 0/0
Apr 15 22:47:36 pcfr_hware_local_ip haproxy[2914]: 159.223.65.16:64310 [15/Apr/2022:22:47:36.797] https-in https-websrv/ha1server-2 1/0/+0 +0 — 6/6/6/6/0 0/0
Apr 15 22:47:36 pcfr_hware_local_ip haproxy[2914]: 185.191.171.3:23364 [15/Apr/2022:22:47:36.834] https-in https-websrv/ha1server-2 1/1/+1 +0 — 7/7/7/7/0 0/0


2. Enable remoteip proxy protocol on Webservers

Login to each Apache HTTPD and to enable remoteip module run:
 

# a2enmod remoteip


On Debians, the command should produce a right symlink to mods-enabled/ directory
 

# ls -al /etc/apache2/mods-enabled/*remote*
lrwxrwxrwx 1 root root 31 Mar 30  2021 /etc/apache2/mods-enabled/remoteip.load -> ../mods-available/remoteip.load


3. Modify remoteip.conf file and allow IPs of haproxies or F5s


Configure RemoteIPTrustedProxy for every Source IP of haproxy to allow it to send X-Forwarded-For header to Apache,

Here are few examples, from my apache working config on Debian 11.2 (Bullseye):
 

webserver:~# cat remoteip.conf
RemoteIPHeader X-Forwarded-For
RemoteIPTrustedProxy 192.168.0.1
RemoteIPTrustedProxy 192.168.0.205
RemoteIPTrustedProxy 192.168.1.15
RemoteIPTrustedProxy 192.168.0.198
RemoteIPTrustedProxy 192.168.2.33
RemoteIPTrustedProxy 192.168.2.30
RemoteIPTrustedProxy 192.168.0.215
#RemoteIPTrustedProxy 51.89.232.41

On RedHat / Fedora other RPM based Linux distrubutions, you can do the same by including inside httpd.conf or virtualhost configuration something like:
 

<IfModule remoteip_module>
      RemoteIPHeader X-Forwarded-For
      RemoteIPInternalProxy 192.168.0.0/16
      RemoteIPTrustedProxy 192.168.0.215/32
</IfModule>


4. Enable RemoteIP Proxy Protocol in apache2.conf / httpd.conf or Virtualhost custom config
 

Modify both haproxy / haproxies config as well as enable the RemoteIP module on Apache webservers (VirtualHosts if such used) and either in <VirtualHost> block or in main http config include:

RemoteIPProxyProtocol On


5. Change default configured Apache LogFormat

In Domain Vhost or apache2.conf / httpd.conf

Default logging Format will be something like:
 

LogFormat "%h %l %u %t \"%r\" %>s %O \"%{Referer}i\" \"%{User-Agent}i\"" combined


or
 

LogFormat "%v:%p %h %l %u %t \"%r\" %>s %O \"%{Referer}i\" \"%{User-Agent}i\"" combined


Once you find it in /etc/apache2/apache2.conf / httpd.conf or Vhost, you have to comment out this by adding shebang infont of sentence make it look as follows:
 

LogFormat "%v:%p %a %l %u %t \"%r\" %>s %O \"%{Referer}i\" \"%{User-Agent}i\"" vhost_combined
LogFormat "%a %l %u %t \"%r\" %>s %O \"%{Referer}i\" \"%{User-Agent}i\"" combined
LogFormat "%a %l %u %t \"%r\" %>s %O" common
LogFormat "%{Referer}i -> %U" referer
LogFormat "%{User-agent}i" agent


The Changed LogFormat instructs Apache to log the client IP as recorded by mod_remoteip (%a) rather than hostname (%h). For a full explanation of all the options check the official HTTP Server documentation page apache_mod_config on Custom Log Formats.

and reload each Apache server.

on Debian:

# apache2ctl -k reload

On CentOS

# systemctl restart httpd


6. Check proxy protocol is properly enabled on Apaches


remoteip module will enable Apache to expect a proxy connect header passed to it otherwise it will respond with Bad Request, because it will detect a plain HTML request instead of Proxy Protocol CONNECT, here is the usual telnet test to fetch the index.htm page.

root@webserver:~# telnet localhost 80
Trying 127.0.0.1…
Connected to localhost.
Escape character is '^]'.
GET / HTTP/1.1

HTTP/1.1 400 Bad Request
Date: Fri, 15 Apr 2022 19:04:51 GMT
Server: Apache/2.4.51 (Debian)
Content-Length: 312
Connection: close
Content-Type: text/html; charset=iso-8859-1

<!DOCTYPE HTML PUBLIC "-//IETF//DTD HTML 2.0//EN">
<html><head>
<title>400 Bad Request</title>
</head><body>
<h1>Bad Request</h1>
<p>Your browser sent a request that this server could not understand.<br />
</p>
<hr>
<address>Apache/2.4.51 (Debian) Server at grafana.pc-freak.net Port 80</address>
</body></html>
Connection closed by foreign host.


root@webserver:~# telnet localhost 80
Trying 127.0.0.1…
Connected to localhost.
Escape character is '^]'.
HEAD / HTTP/1.1

HTTP/1.1 400 Bad Request
Date: Fri, 15 Apr 2022 19:05:07 GMT
Server: Apache/2.4.51 (Debian)
Connection: close
Content-Type: text/html; charset=iso-8859-1

Connection closed by foreign host.


To test it with telnet you can follow the Proxy CONNECT syntax and simulate you're connecting from a proxy server, like that:
 

root@webserver:~# telnet localhost 80
Trying 127.0.0.1…
Connected to localhost.
Escape character is '^]'.
CONNECT localhost:80 HTTP/1.0

HTTP/1.1 301 Moved Permanently
Date: Fri, 15 Apr 2022 19:13:38 GMT
Server: Apache/2.4.51 (Debian)
Location: https://zabbix.pc-freak.net
Cache-Control: max-age=900
Expires: Fri, 15 Apr 2022 19:28:38 GMT
Content-Length: 310
Connection: close
Content-Type: text/html; charset=iso-8859-1

<!DOCTYPE HTML PUBLIC "-//IETF//DTD HTML 2.0//EN">
<html><head>
<title>301 Moved Permanently</title>
</head><body>
<h1>Moved Permanently</h1>
<p>The document has moved <a href="https://zabbix.pc-freak.net">here</a>.</p>
<hr>
<address>Apache/2.4.51 (Debian) Server at localhost Port 80</address>
</body></html>
Connection closed by foreign host.

You can test with curl simulating the proxy protocol CONNECT with:

root@webserver:~# curl –insecure –haproxy-protocol https://192.168.2.30

<!DOCTYPE HTML PUBLIC "-//W3C//DTD HTML 4.01 Transitional//EN"
"http://w3.org/TR/html4/loose.dtd">
<html>
<head>
<meta name="generator" content="pc-freak.net tidy">
<script src="https://ssl.google-analytics.com/urchin.js" type="text/javascript">
</script>
<script type="text/javascript">
_uacct = "UA-2102595-3";
urchinTracker();
</script>
<script type="text/javascript">
var gaJsHost = (("https:" == document.location.protocol) ? "https://ssl." : "http://");
document.write(unescape("%3Cscript src='" + gaJsHost + "google-analytics.com/ga.js' type='text/javascript'%3E%3C/script%3E"));
</script>
<script type="text/javascript">
try {
var pageTracker = _gat._getTracker("UA-2102595-6");
pageTracker._trackPageview();
} catch(err) {}
</script>


      –haproxy-protocol
              (HTTP) Send a HAProxy PROXY protocol v1 header at the beginning of the connection. This is used by some load balancers and reverse proxies
              to indicate the client's true IP address and port.

              This option is primarily useful when sending test requests to a service that expects this header.

              Added in 7.60.0.


7. Check apache log if remote Real Internet Source IPs are properly logged
 

root@webserver:~# tail -n 10 /var/log/apache2/access.log

213.183.53.58 – – [15/Apr/2022:22:18:59 +0300] "GET /proxy/browse.php?u=https%3A%2F%2Fsteamcommunity.com%2Fmarket%2Fitemordershistogram%3Fcountry HTTP/1.1" 200 12701 "https://www.pc-freak.net" "Mozilla/5.0 (Windows NT 10.0; Win64; x64; rv:98.0) Gecko/20100101 Firefox/98.0"
88.198.48.184 – – [15/Apr/2022:22:18:58 +0300] "GET /blog/iq-world-rank-country-smartest-nations/?cid=1330192 HTTP/1.1" 200 29574 "-" "Mozilla/5.0 (compatible; DataForSeoBot/1.0; +https://dataforseo.com/dataforseo-bot)"
213.183.53.58 – – [15/Apr/2022:22:19:00 +0300] "GET /proxy/browse.php?u=https%3A%2F%2Fsteamcommunity.com%2Fmarket%2Fitemordershistogram%3Fcountry
HTTP/1.1" 200 9080 "https://www.pc-freak.net" "Mozilla/5.0 (Windows NT 10.0; Win64; x64; rv:98.0) Gecko/20100101 Firefox/98.0"
159.223.65.16 – – [15/Apr/2022:22:19:01 +0300] "POST //blog//xmlrpc.php HTTP/1.1" 200 5477 "-" "Mozilla/5.0 (Windows NT 10.0; Win64; x64) AppleWebKit/537.36 (KHTML, like Gecko) Chrome/89.0.4389.114 Safari/537.36"
159.223.65.16 – – [15/Apr/2022:22:19:02 +0300] "POST //blog//xmlrpc.php HTTP/1.1" 200 5477 "-" "Mozilla/5.0 (Windows NT 10.0; Win64; x64) AppleWebKit/537.36 (KHTML, like Gecko) Chrome/89.0.4389.114 Safari/537.36"
213.91.190.233 – – [15/Apr/2022:22:19:02 +0300] "POST /blog/wp-admin/admin-ajax.php HTTP/1.1" 200 1243 "https://www.pc-freak.net/blog/wp-admin/post.php?post=16754&action=edit" "Mozilla/5.0 (Windows NT 6.1; Win64; x64; rv:89.0) Gecko/20100101 Firefox/89.0"
46.10.215.119 – – [15/Apr/2022:22:19:02 +0300] "GET /images/saint-Paul-and-Peter-holy-icon.jpg HTTP/1.1" 200 134501 "https://www.google.com/" "Mozilla/5.0 (Windows NT 10.0; Win64; x64) AppleWebKit/537.36 (KHTML, like Gecko) Chrome/100.0.4896.75 Safari/537.36 Edg/100.0.1185.39"
185.191.171.42 – – [15/Apr/2022:22:19:03 +0300] "GET /index.html.latest/tutorials/tutorials/penguins/vestnik/penguins/faith/vestnik/ HTTP/1.1" 200 11684 "-" "Mozilla/5.0 (compatible; SemrushBot/7~bl; +http://www.semrush.com/bot.html)"

116.179.37.243 – – [15/Apr/2022:22:19:50 +0300] "GET /blog/wp-content/cookieconsent.min.js HTTP/1.1" 200 7625 "https://www.pc-freak.net/blog/how-to-disable-nginx-static-requests-access-log-logging/" "Mozilla/5.0 (compatible; Baiduspider-render/2.0; +http://www.baidu.com/search/spider.html)"
116.179.37.237 – – [15/Apr/2022:22:19:50 +0300] "GET /blog/wp-content/plugins/google-analytics-dashboard-for-wp/assets/js/frontend-gtag.min.js?ver=7.5.0 HTTP/1.1" 200 8898 "https://www.pc-freak.net/blog/how-to-disable-nginx-static-requests-access-log-logging/" "Mozilla/5.0 (compatible; Baiduspider-render/2.0; +http://www.baidu.com/search/spider.html)"


You see from above output remote Source IPs in green are properly logged, so haproxy Cluster is correctly forwarding connections passing on in the Haproxy generated Initial header the Real IP of its remote connect IPs.


Sum it up, What was done?


HTTP_X_FORWARD_FOR is impossible to set, when haproxy is used on mode tcp and all traffic is sent as received from TCP IPv4 / IPv6 Network stack, e.g. modifying any HTTP sent traffic inside the headers is not possible as this might break up the data.

Thus Haproxy was configured to send all its received data by sending initial proxy header with the X_FORWARDED usual Source IP data, then remoteip Apache module was used to make Apache receive and understand haproxy sent Header which contains the original Source IP via the send-proxy functionality and example was given on how to test the remoteip on Webserver is working correctly.

Finally you've seen how to check configured haproxy and webserver are able to send and receive the End Client data with the originator real source IP correctly and those Internet IP is properly logged inside both haproxy and apaches.
How to redirect TCP port traffic from Internet Public IP host to remote local LAN server, Redirect traffic for Apache Webserver, MySQL, or other TCP service to remote host

Thursday, September 23rd, 2021


Linux-redirect-forward-tcp-ip-port-traffic-from-internet-to-remote-internet-LAN-IP-server-rinetd-iptables-redir


1. Use the good old times rinetd – internet “redirection server” service


Perhaps, many people who are younger wouldn't remember rinetd's use was pretty common on old Linuxes in the age where iptables was not on the scene and its predecessor ipchains was so common.
In the raise of mass internet rinetd started loosing its popularity because the service was exposed to the outer world and due to security holes and many exploits circulating the script kiddie communities
many servers get hacked "pwned" in the jargon of the script kiddies.

rinetd is still available even in modern Linuxes and over the last years I did not heard any severe security concerns regarding it, but the old paranoia perhaps and the set to oblivion makes it still unpopular soluttion for port redirect today in year 2021.
However for a local secured DMZ lans I can tell you that its use is mostly useful and I chooes to use it myself, everynow and then due to its simplicity to configure and use.
rinetd is pretty standard among unixes and is also available in old Sun OS / Solaris and BSD-es and pretty much everything on the Unix scene.

Below is excerpt from 'man rinetd':


DESCRIPTION
     rinetd redirects TCP connections from one IP address and port to another. rinetd is a single-process server which handles any number of connections to the address/port pairs
     specified in the file /etc/rinetd.conf.  Since rinetd runs as a single process using nonblocking I/O, it is able to redirect a large number of connections without a severe im‐
     pact on the machine. This makes it practical to run TCP services on machines inside an IP masquerading firewall. rinetd does not redirect FTP, because FTP requires more than
     one socket.
     rinetd is typically launched at boot time, using the following syntax:      /usr/sbin/rinetd      The configuration file is found in the file /etc/rinetd.conf, unless another file is specified using the -c command line option.

To use rinetd on any LInux distro you have to install and enable it with apt or yum as usual. For example on my Debian GNU / Linux home machine to use it I had to install .deb package, enable and start it it via systemd :


server:~# apt install –yes rinetd

server:~#  systemctl enable rinetd


server:~#  systemctl start rinetd


server:~#  systemctl status rinetd
● rinetd.service
   Loaded: loaded (/etc/init.d/rinetd; generated)
   Active: active (running) since Tue 2021-09-21 10:48:20 EEST; 2 days ago
     Docs: man:systemd-sysv-generator(8)
    Tasks: 1 (limit: 4915)
   Memory: 892.0K
   CGroup: /system.slice/rinetd.service
           └─1364 /usr/sbin/rinetd


rinetd is doing the traffic redirect via a separate process daemon, in order for it to function once you have service up check daemon is up as well.

root@server:/home/hipo# ps -ef|grep -i rinet
root       359     1  0 16:10 ?        00:00:00 /usr/sbin/rinetd
root       824 26430  0 16:10 pts/0    00:00:00 grep -i rinet

+ Configuring a new port redirect with rinetd


Is pretty straight forward everything is handled via one single configuration – /etc/rinetd.conf

The format (syntax) of a forwarding rule is as follows:

     [bindaddress] [bindport] [connectaddress] [connectport]


Besides that rinetd , could be used as a primitive firewall substitute to iptables, general syntax of allow deny an IP address is done with (allow, deny) keywords:
 

allow 192.168.2.*
deny 192.168.2.1?


To enable logging to external file ,you'll have to include in the configuration:

# logging information
logfile /var/log/rinetd.log

Here is an example rinetd.conf configuration, redirecting tcp mysql 3306, nginx on port 80 and a second web service frontend for ILO to server reachable via port 8888 and a redirect from External IP to local IP SMTP server.


#
# this is the configuration file for rinetd, the internet redirection server
#
# you may specify global allow and deny rules here
# only ip addresses are matched, hostnames cannot be specified here
# the wildcards you may use are * and ?
#
# allow 192.168.2.*
# deny 192.168.2.1?


#
# forwarding rules come here
#
# you may specify allow and deny rules after a specific forwarding rule
# to apply to only that forwarding rule
#
# bindadress    bindport  connectaddress  connectport


# logging information
logfile /var/log/rinetd.log
83.228.93.76        80            192.168.0.20       80
192.168.0.2        3306            192.168.0.19        3306
83.228.93.76        443            192.168.0.20       443
# enable for access to ILO
83.228.93.76        8888            192.168.1.25 443

127.0.0.1    25    192.168.0.19    25


83.228.93.76 is my external ( Public )  IP internet address where 192.168.0.20, 192.168.0.19, 192.168.0.20 (are the DMZ-ed Lan internal IPs) with various services.

To identify the services for which rinetd is properly configured to redirect / forward traffic you can see it with netstat or the newer ss command
 

root@server:/home/hipo# netstat -tap|grep -i rinet
tcp        0      0 www.pc-freak.net:8888   0.0.0.0:*               LISTEN      13511/rinetd      
tcp        0      0 www.pc-freak.n:http-alt 0.0.0.0:*               LISTEN      21176/rinetd        
tcp        0      0 www.pc-freak.net:443   0.0.0.0:*               LISTEN      21176/rinetd      


+ Using rinetd to redirect External interface IP to loopback's port (127.0.0.1)


If you have the need to redirect an External connectable living service be it apache mysql / privoxy / squid or whatever rinetd is perhaps the tool of choice (especially since there is no way to do it with iptables.

If you want to redirect all traffic which is accessed via Linux's loopback interface (localhost) to be reaching a remote host 11.5.8.1 on TCP port 1083 and 1888, use below config

# bindadress    bindport  connectaddress  connectport
11.5.8.1        1083            127.0.0.1       1083
11.5.8.1        1888            127.0.0.1       1888


For a quick and dirty solution to redirect traffic rinetd is very useful, however you'll have to keep in mind that if you want to redirect traffic for tens of thousands of connections constantly originating from the internet you might end up with some disconnects as well as notice a increased use of rinetd CPU use with the incrased number of forwarded connections.


2. Redirect TCP / IP port using DNAT iptables firewall rules


Lets say you have some proxy, webservice or whatever service running on port 5900 to be redirected with iptables.
The easeiest legacy way is to simply add the redirection rules to /etc/rc.local​. In newer Linuxes rc.local so if you decide to use,
you'll have to enable rc.local , I've written earlier a short article on how to enable rc.local on newer Debian, Fedora, CentOS


# redirect 5900 TCP service 
sysctl -w net.ipv4.conf.all.route_localnet=1
iptables -t nat -I PREROUTING -p tcp –dport 5900 -j REDIRECT –to-ports 5900
iptables -t nat -I OUTPUT -p tcp -o lo –dport 5900 -j REDIRECT –to-ports 5900
iptables -t nat -A OUTPUT -o lo -d 127.0.0.1 -p tcp –dport 5900 -j DNAT  –to-destination 192.168.1.8:5900
iptables -t nat -I OUTPUT –source 0/0 –destination 0/0 -p tcp –dport 5900 -j REDIRECT –to-ports 5900


Here is another two example which redirects port 2208 (which has configured a bind listener for SSH on Internal host 192.168.0.209:2208) from External Internet IP address (XXX.YYY.ZZZ.XYZ) 
 

# Port redirect for SSH to VM on openxen internal Local lan server 192.168.0.209 
-A PREROUTING  -p tcp –dport 2208 -j DNAT –to-destination 192.168.0.209:2208
-A POSTROUTING -p tcp –dst 192.168.0.209 –dport 2208 -j SNAT –to-source 83.228.93.76


3. Redirect TCP traffic connections with redir tool


If you look for an easy straight forward way to redirect TCP traffic, installing and using redir (ready compiled program) might be a good idea.


root@server:~# apt-cache show redir|grep -i desc -A5 -B5
Version: 3.2-1
Installed-Size: 60
Maintainer: Lucas Kanashiro <kanashiro@debian.org>
Architecture: amd64
Depends: libc6 (>= 2.15)
Description-en: Redirect TCP connections
 It can run under inetd or stand alone (in which case it handles multiple
 connections).  It is 8 bit clean, not limited to line mode, is small and
 light. Supports transparency, FTP redirects, http proxying, NAT and bandwidth
 limiting.
 .
 redir is all you need to redirect traffic across firewalls that authenticate
 based on an IP address etc. No need for the firewall toolkit. The
 functionality of inetd/tcpd and "redir" will allow you to do everything you
 need without screwy telnet/ftp etc gateways. (I assume you are running IP
 Masquerading of course.)

Description-md5: 2089a3403d126a5a0bcf29b22b68406d
Homepage: https://github.com/troglobit/redir
Tag: interface::daemon, network::server, network::service, role::program,
 use::proxying
Section: net
Priority: optional


server:~# apt-get install –yes redir

Here is a short description taken from its man page 'man redir'


DESCRIPTION
     redir redirects TCP connections coming in on a local port, [SRC]:PORT, to a specified address/port combination, [DST]:PORT.  Both the SRC and DST arguments can be left out,
     redir will then use 0.0.0.0.

     redir can be run either from inetd or as a standalone daemon.  In –inetd mode the listening SRC:PORT combo is handled by another process, usually inetd, and a connected
     socket is handed over to redir via stdin.  Hence only [DST]:PORT is required in –inetd mode.  In standalone mode redir can run either in the foreground, -n, or in the back‐
     ground, detached like a proper UNIX daemon.  This is the default.  When running in the foreground log messages are also printed to stderr, unless the -s flag is given.

     Depending on how redir was compiled, not all options may be available.


+ Use redir to redirect TCP traffic one time


Lets say you have a MySQL running on remote machine on some internal or external IP address, lets say 192.168.0.200 and you want to redirect all traffic from remote host to the machine (192.168.0.50), where you run your Apache Webserver, which you want to configure to use
as MySQL localhost TCP port 3306.

Assuming there are no irewall restrictions between Host A (192.168.0.50) and Host B (192.168.0.200) is already permitting connectivity on TCP/IP port 3306 between the two machines.

To open redirection from localhost on 192.168.0.50 -> 192.168.0.200:


server:~# redir –laddr=127.0.0.1 –lport=3306 –caddr=192.168.0.200 –cport=3306


If you need other third party hosts to be additionally reaching 192.168.0.200 via 192.168.0.50 TCP 3306.

root@server:~# redir –laddr=192.168.0.50 –lport=3306 –caddr=192.168.0.200 –cport=3306


Of course once you close, the /dev/tty or /dev/vty console the connection redirect will be cancelled.


+ Making TCP port forwarding from Host A to Host B permanent


One solution to make the redir setup rules permanent is to use –rinetd option or simply background the process, nevertheless I prefer to use instead GNU Screen.
If you don't know screen is a vVrtual Console Emulation manager with VT100/ANSI terminal emulation to so, if you don't have screen present on the host install it with whatever Linux OS package manager is present and run:


root@server:~#screen -dm bash -c 'redir –laddr=127.0.0.1 –lport=3306 –caddr=192.168.0.200 –cport=3306'


That would run it into screen session and detach so you can later connect, if you want you can make redir to also log connections via syslog with ( -s) option.

I found also useful to be able to track real time what's going on currently with the opened redirect socket by changing redir log level.

Accepted log level is:


  -l, –loglevel=LEVEL
             Set log level: none, err, notice, info, debug.  Default is notice.


root@server:/ # screen -dm bash -c 'redir –laddr=127.0.0.1 –lport=3308 –caddr=192.168.0.200 –cport=3306 -l debug'


To test connectivity works as expected use telnet:
 

root@server:/ # telnet localhost 3308
Trying 127.0.0.1…
Connected to localhost.
Escape character is '^]'.
g
5.5.5-10.3.29-MariaDB-0+deb10u1-log�+c2nWG>B���o+#ly=bT^]79mysql_native_password

6#HY000Proxy header is not accepted from 192.168.0.19 Connection closed by foreign host.

once you attach to screen session with


root@server:/home #  screen -r


You will get connectivity attempt from localhost logged : .
 

redir[10640]: listening on 127.0.0.1:3306
redir[10640]: target is 192.168.0.200:3306
redir[10640]: Waiting for client to connect on server socket …
redir[10640]: target is 192.168.0.200:3306
redir[10640]: Waiting for client to connect on server socket …
redir[10793]: peer IP is 127.0.0.1
redir[10793]: peer socket is 25592
redir[10793]: target IP address is 192.168.0.200
redir[10793]: target port is 3306
redir[10793]: Connecting 127.0.0.1:25592 to 127.0.0.1:3306
redir[10793]: Entering copyloop() – timeout is 0
redir[10793]: Disconnect after 1 sec, 165 bytes in, 4 bytes out

The downsides of using redir is redirection is handled by the separate process which is all time hanging in the process list, as well as the connection redirection speed of incoming connections might be about at least 30% slower to if you simply use a software (firewall ) redirect such as iptables. If you use something like kernel IP set ( ipsets ). If you hear of ipset for a first time and you wander whta it is below is short package description.


root@server:/root# apt-cache show ipset|grep -i description -A13 -B5
Maintainer: Debian Netfilter Packaging Team <pkg-netfilter-team@lists.alioth.debian.org>
Architecture: amd64
Provides: ipset-6.38
Depends: iptables, libc6 (>= 2.4), libipset11 (>= 6.38-1~)
Breaks: xtables-addons-common (<< 1.41~)
Description-en: administration tool for kernel IP sets
 IP sets are a framework inside the Linux 2.4.x and 2.6.x kernel which can be
 administered by the ipset(8) utility. Depending on the type, currently an
 IP set may store IP addresses, (TCP/UDP) port numbers or IP addresses with
 MAC addresses in a  way which ensures lightning speed when matching an
 entry against a set.
 .
 If you want to
 .
  * store multiple IP addresses or port numbers and match against the
    entire collection using a single iptables rule.
  * dynamically update iptables rules against IP addresses or ports without
    performance penalty.
  * express complex IP address and ports based rulesets with a single
    iptables rule and benefit from the speed of IP sets.

 .
 then IP sets may be the proper tool for you.
Description-md5: d87e199641d9d6fbb0e52a65cf412bde
Homepage: http://ipset.netfilter.org/
Tag: implemented-in::c, role::program
Section: net
Priority: optional
Filename: pool/main/i/ipset/ipset_6.38-1.2_amd64.deb
Size: 50684
MD5sum: 095760c5db23552a9ae180bd58bc8efb
SHA256: 2e2d1c3d494fe32755324bf040ffcb614cf180327736c22168b4ddf51d462522

Is it possible mail server to work on alternative port to 25?

Thursday, February 28th, 2013

If you're running a small home based Linux or BSD server with Qmail, Exim or Postfix and it happens your ISP has filtered incoming connections to TCP/IP port 25 and you wonder if it is possible to use other alternative port to 25 for example the (Secure SMTP) SMTPS 465 supported by all major SMTP servers, the answer unfortunately is it is not possible.

The only accepted and working mail transmission port works on TCP/IP Port 25, thus the only option to make the mail server working fine is contact your ISP and convince them to remove filtering for port 25 to your custom IP. Many ISPs set a Firewall filter for 25, because nowadays many Windows XP / Vista / 7 PCs get infected with Viruses and Trojans running a tiny SMTP server on the host and trying to send million of SPAM messages via the poor unknowing victim. This congests the network and often even creates ISP network overloads, thus ISPs prefer to filter Port 25 to get rid of such eventual problems.

Once again,  alternative port to 25 for Mail is impossible !