1. First it’s necessery to have the mrtg debian package installed.
If it’s not installed then we have to install it:
debian-server:~# apt-get install mrtg
2. Second download the qmailmrtg source binary
To download the latest current source release of qmailmrtg execute:
debian-server:~# wget http://www.inter7.com/qmailmrtg7/qmailmrtg7-4.2.tar.gz
It’s a pity qmailmrtg is not available for download via debian repositories.
3. Third download the qmail.mrtg.cfg configuration file
debian-server~# wget https://www.pc-freak.net/files/qmail.mrtg.cfg
Now you have to put the file somewhere, usually it’s best to put it in the /etc/ directory.
Make sure the file is existing in /etc/qmail.mrtg.cfg
4. Untar compile and install qmailmrtg binary
debian-server:~# tar -xzvvf qmailmrtg7-4.2.tar.gz

...

debian-server:~# make && make install
strip qmailmrtg7
cp qmailmrtg7 /usr/local/bin
rm -rf *.o qmailmrtg7 checkq core
cc checkq.c -o checkq
./checkq
cc -s -O qmailmrtg7.c -o qmailmrtg7
qmailmrtg7.c: In function ‘main’:
qmailmrtg7.c:69: warning: incompatible implicit declaration of
built-in function ‘exit’
qmailmrtg7.c:93: warning: incompatible implicit declaration of
built-in function ‘exit’
qmailmrtg7.c:131: warning: incompatible implicit declaration of
built-in function ‘exit’
qmailmrtg7.c:137: warning: incompatible implicit declaration of
built-in function ‘exit’
5. Set proper file permissions according to the user you indent to execute qmailmrtg as
I personally execute it as root user, if you intend to do so as well set a permissions to
/etc/qmail.mrtg.cfg of 700.
In order to do that issue the command:
debian-server:~# chmod 700 /etc/qmail.mrtg.cfg
6. You will now need to modify the qmail.mrtg.cfg according to your needs
There you have to set a proper location where the qmailmrtg shall generate it’s html data files.
I use the /var/www/qmailmrtg qmailmrtg log file location. If you will do so as wellyou have to create the directory.
7. Create qmailmrtg html log files directory
debian-server:~# mkdir /var/log/qmailmrtg
8. Now all left is to set a proper cron line to periodically invoke qmailmrtg in order to generate qmail activity statistics.
Before we add the desired root’s crontab instructions we have to open the crontab for edit, using the command.
debian-server:~# crontab -u root -e
I personally use and recommend the following line as a line to be added to root’s crontab.
0-55/5 * * * * env LANG=C /usr/bin/mrtg /etc/qmail.mrtg.cfg > /dev/null
9. Copy index.html from qmailmrtg source directory to /var/log/qmailmrtg
debian-server:/usr/local/src/qmailmrtg7-4.2# cp -rpf index.html /var/log/qmailmrtg
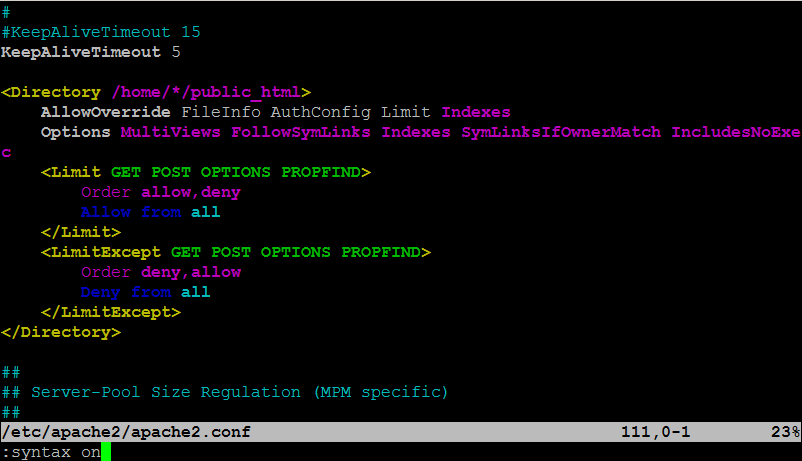
10. Last step is to make sure Apache’s configuration contains lines that will enable you to access the qmail activity statistics.
The quickest way to do that in Debian running Apache 2.2 is to edit /etc/apache2/apache2.conf and add a directory Alias as follows
Alias /qmailmrtg/ "/var/www/qmailmrtg/"
Now after Apache restart
/etc/init.d/apache2 restart
You should be now able to access the qmail mrtg qmail log statistics through your Apache’s default configured host.
For instance, assuming your default configured Apache host is domain.com. You’ll be able to reach the qmailmrtg statistics through an url like:
http://domain.com/qmailmrtg/
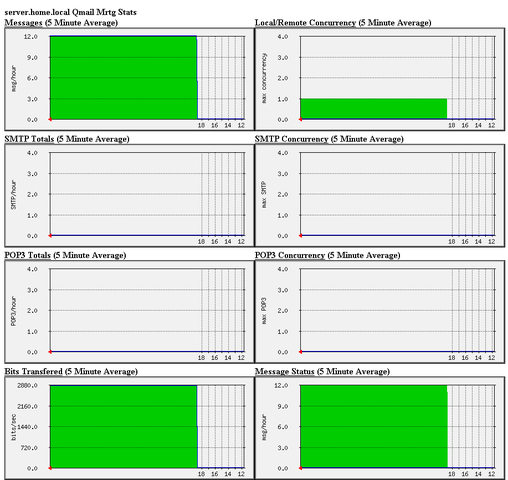
After I verified and ensured myself qmail mrtg is working correctly after all the above explained steps partook I wasn’t happy with some headlines in the index.html and the html tile of qmailmrtg,
so as a last step I manually edited the /var/www/qmailmrtg/index.html to attune it to my likings.
Here is a screenshot of the qmailmrtg web statistics in action.