I've bought a new "second hand" refurbished EIZO Flexscan Monitor EV2760 S1 K1 awesome monitor re from Kvant Serviz a company reseller of Second Hand electronics that is located on the territy of Bulgarian Academy of Sciences (BAN / BAS) and was created by BAS people originally for the BAS people and am pretty happy with it for doing my daily job as system administrator, especially as the monitor has been used on very short screen time for only 256 use hours (which is less than a year of full-use time), whether EIZO does guarantee their monitors to be able to serve up to 5 Full years monitor use time.
For those who deals with Graphics such as Designers and people into art working with Computers knows EIZO brand Monitors for quite some time now and it seems as much of those people are using Windows or Macintoshes, these monitors have been mainly created to work optimally with Windows / Mac computers on a higher resolution.
My work PC that is Dell Latitude 5510 with its HDMI cable has been running perfect with The EIZO with Windows 10, however as I'm using a Virtualbox virutal machines with CentOS Linux, the VM does not automatically detected the highest resolution 2K that this monitors supports 2560×1440 at 60 Hz is the best one can use to get more things fit into the screen and hopefully also good for the Eyes, the Ecoview shoulk also be a good idea for the eyes, as the Ecoview by EIZO tries to adjust the monitor brightness to lower levels according to the light in the room to try to minimize the eye strain on the eyes. The Ecoview mode is a little bit I guess like the famous BENQ's monitors Eye care.
I'm talking about all this Displays specifics as I spend quite a lot of time to learn the very basics about monitors as my old old 24 Inch EIZO Monitor Flexscan model 2436W started to wear off with time and doesn't support HDMI cable input, so I had to use a special. cable connector that modifies the signal from HDMI to DVI (and I'm not sure how this really effects the eyes), plus the DVI quality is said to be a little bit worse than HDMI as far as I read a bit on the topic online.
Well anyways currently I'm a happy owner of the EIZO EV2760 Monitor which has a full set of inputs of:
- 27" In-Plane Switching (IPS) Panel
- DisplayPort | HDMI | DVI-D | 3.5mm Audio
- 2560 x 1440 Native Resolution
- 1000:1 Typical Contrast Ratio
I've tried to make the monitor work with Linux and my first assumption from what I've read was that I have to reinstall the Guess Addition Tools on the Virtualbox with additing the Guest Addition Tools via the Vbox GUI interface:
Devices -> Insert Guest Additions CD Image

But got an error that the Guest additions tools iso is missing
So eventually resolved it by remounting and reinstalling the guest addition tools with the following set of commands:
[root@localhost test]# yum install perl gcc dkms kernel-devel kernel-headers make bzip2
[root@localhost test]# cd /mnt/cdrom/
[root@localhost cdrom]# ls
AUTORUN.INF runasroot.sh VBoxSolarisAdditions.pkg
autorun.sh TRANS.TBL VBoxWindowsAdditions-amd64.exe
cert VBoxDarwinAdditions.pkg VBoxWindowsAdditions.exe
NT3x VBoxDarwinAdditionsUninstall.tool VBoxWindowsAdditions-x86.exe
OS2 VBoxLinuxAdditions.run
[root@localhost cdrom]# ./VBoxLinuxAdditions.runVerifying archive integrity… All good.
Uncompressing VirtualBox 6.1.34 Guest Additions for Linux……..
VirtualBox Guest Additions installer
Removing installed version 6.1.34 of VirtualBox Guest Additions…
Copying additional installer modules …
Installing additional modules …
VirtualBox Guest Additions: Starting.
VirtualBox Guest Additions: Building the VirtualBox Guest Additions kernel
modules. This may take a while.
VirtualBox Guest Additions: To build modules for other installed kernels, run
VirtualBox Guest Additions: /sbin/rcvboxadd quicksetup <version>
VirtualBox Guest Additions: or
VirtualBox Guest Additions: /sbin/rcvboxadd quicksetup all
VirtualBox Guest Additions: Building the modules for kernel
3.10.0-1160.80.1.el7.x86_64.
ERROR: Can't map '//etc/selinux/targeted/policy/policy.31': Invalid argumentERROR: Unable to open policy //etc/selinux/targeted/policy/policy.31.
libsemanage.semanage_read_policydb: Error while reading kernel policy from /etc/selinux/targeted/active/policy.kern. (No such file or directory).
OSError: No such file or directory
VirtualBox Guest Additions: Running kernel modules will not be replaced until
the system is restarted
The solution to that was to reinstal the security policy-target was necessery
[root@localhost test]# yum install selinux-policy-targeted –reinstall
And of course rerun the reinstall of Guest addition tools up to the latest
[root@localhost cdrom]# ./VBoxLinuxAdditions.run
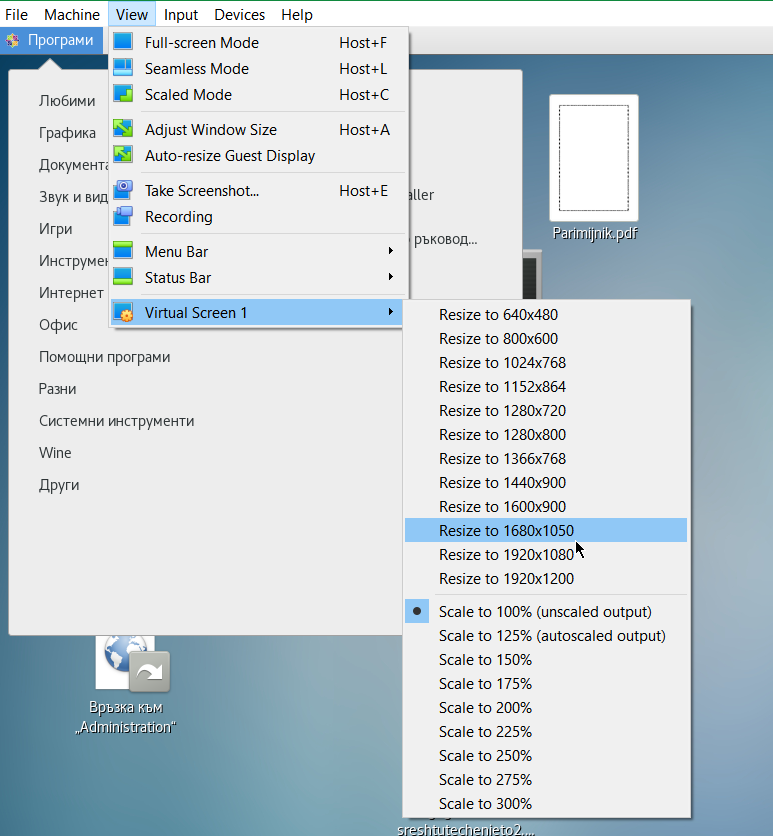
Unfortunately that doesn't make it resolve it and even shutting down the VM machine and reloading it again with Raised Video Memory for the simulated hardware from settings from 16 MB to 128MB for the VM does not give the option from the Virtualbox interface to set the resolution from
View -> Virtual Screen 1 (Resize to 1920×1200)
to any higher than that.
After a bit of googling I found some newer monitors doesn't seem to be seen by xrandr command and few extra commands with xrandr need to be run to make the 2K resolution 2560×1440@60 Herzes work under the Linux virtual machine.
These are the extra xranrd command that make it happen
# xrandr –newmode "2560x1440_60.00" 311.83 2560 2744 3024 3488 1440 1441 1444 1490 -HSync +Vsync
# xrandr –addmode Virtual1 2560x1440_60.00
# xrandr –output Virtual1 –mode "2560x1440_60.00"
As this kind of settings needs to be rerun on next time the Virtual Machine runs it is a good idea to place the commands in a tiny shell script:
[test@localhost ~]$ cat xrandr-set-resolution-to-2560×1440.sh
#!/bin/bash
xrandr –newmode "2560x1440_60.00" 311.83 2560 2744 3024 3488 1440 1441 1444 1490 -HSync +Vsync
xrandr –addmode Virtual1 2560x1440_60.00
xrandr –output Virtual1 –mode "2560x1440_60.00"
You can Download the xrandr-set-resolution-to-2560×1440.sh script from here
Once the commands are run, to make it affect the Virtualbox, you can simply put it in FullScreen mode via
View -> Full-Screen Mode (can be teriggered from keyboard by pressing Right CTRL + F) together
[test@localhost ~]$ xrandr –addmode Virtual1 2560x1440_60.00
[test@localhost ~]$ xrandr –output Virtual1 –mode "2560x1440_60.00"
[test@localhost ~]$ xrandr
Screen 0: minimum 1 x 1, current 2560 x 1440, maximum 8192 x 8192
Virtual1 connected primary 2560×1440+0+0 (normal left inverted right x axis y axis) 0mm x 0mm
1920×1200 60.00 + 59.88
2560×1600 59.99
1920×1440 60.00
1856×1392 60.00
1792×1344 60.00
1600×1200 60.00
1680×1050 59.95
1400×1050 59.98
1280×1024 60.02
1440×900 59.89
1280×960 60.00
1360×768 60.02
1280×800 59.81
1152×864 75.00
1280×768 59.87
1024×768 60.00
800×600 60.32
640×480 59.94
2560x1440_60.00 60.00*
Virtual2 disconnected (normal left inverted right x axis y axis)
Virtual3 disconnected (normal left inverted right x axis y axis)
Virtual4 disconnected (normal left inverted right x axis y axis)
Virtual5 disconnected (normal left inverted right x axis y axis)
Virtual6 disconnected (normal left inverted right x axis y axis)
Virtual7 disconnected (normal left inverted right x axis y axis)
Virtual8 disconnected (normal left inverted right x axis y axis)Tadadadam ! That's all folks, enjoy having your 27 Inch monitor running at 2560×1440 @ 60 Hz 🙂


