Posts Tagged ‘lftp’

How to synchronize with / from Remote FTP server using LFTP like with rsync

Sunday, October 15th, 2017

how-to-synchronize-from-remote-ftp-server-easily-like-rsync.jpg

Have you ever been in a need to easily synchronize with a remote host which only runs FTP server?

Or are you in a local network and you need to mirror a directory or a couple of directories in a fast and easy to remember way?

If so then you'll be happy to use below LFTP command that is doing pretty much the same as Rsync, with only difference that it can mirror files over FTP (old but gold File Transfer Protocol).
 

lftp -u FTP_USERNAME,FTP_PASSWORD -e 'mirror REMOTE_DIRECTORY LOCAL_DIRECTORY' FTP_SERVER_HOSTNAME


Enjoy and thanks to my dear friend Amridikon for the tip ! 🙂

Check your Server Download / Upload Internet Speed from Console on Linux / BSD / Unix howto

Tuesday, March 17th, 2015

tux-check-internet-network-download-upload-speed-on-linux-console-terminal-linux-bsd-unix
If you've been given a new dedicated server from a New Dedicated-Server-Provider or VPS with Linux and you were told that a certain download speed to the Server is guaranteed from the server provider, in order to be sure the server's connection to the Internet told by service provider is correct it is useful to run a simple measurement console test after logging in remotely to the server via SSH.

Testing connection from Terminal is useful because as you probably know most of Linux / UNIX servers doesn't have a GUI interface and thus it is not possible to test Internet Up / Down Bandwidth through speedtest.net.
 

1. Testing Download Internet Speed given by ISP / Dedi-Server Provider from Linux Console

For the download speed (internet) test the historical approach was to just try downloading the Linux kernel source code from www.kernel.org with some text browser such as lynx or links count the seconds for which the download is completed and then multiple the kernel source archive size on the seconds to get an approximate bandwidth per second, however as nowdays internet connection speeds are much higher, thus it is better to try to download some Linux distribution iso file, you can still use kernel tar archive but it completed too fast to give you some good (adequate) statistics on Download bandwidth.

If its a fresh installed Linux server probably you will probably not have links / elinks and lynx text internet browers  installed so install them depending on deb / rpm distro with:

If on Deb Linuz distro:


root@pcfreak:/root# apt-get install –yes links elinks lynx


On RPM Based Linuz distro:


[root@fedora ~]# yum install -y lynx elinks links


Conduct Internet  Download Speed with links
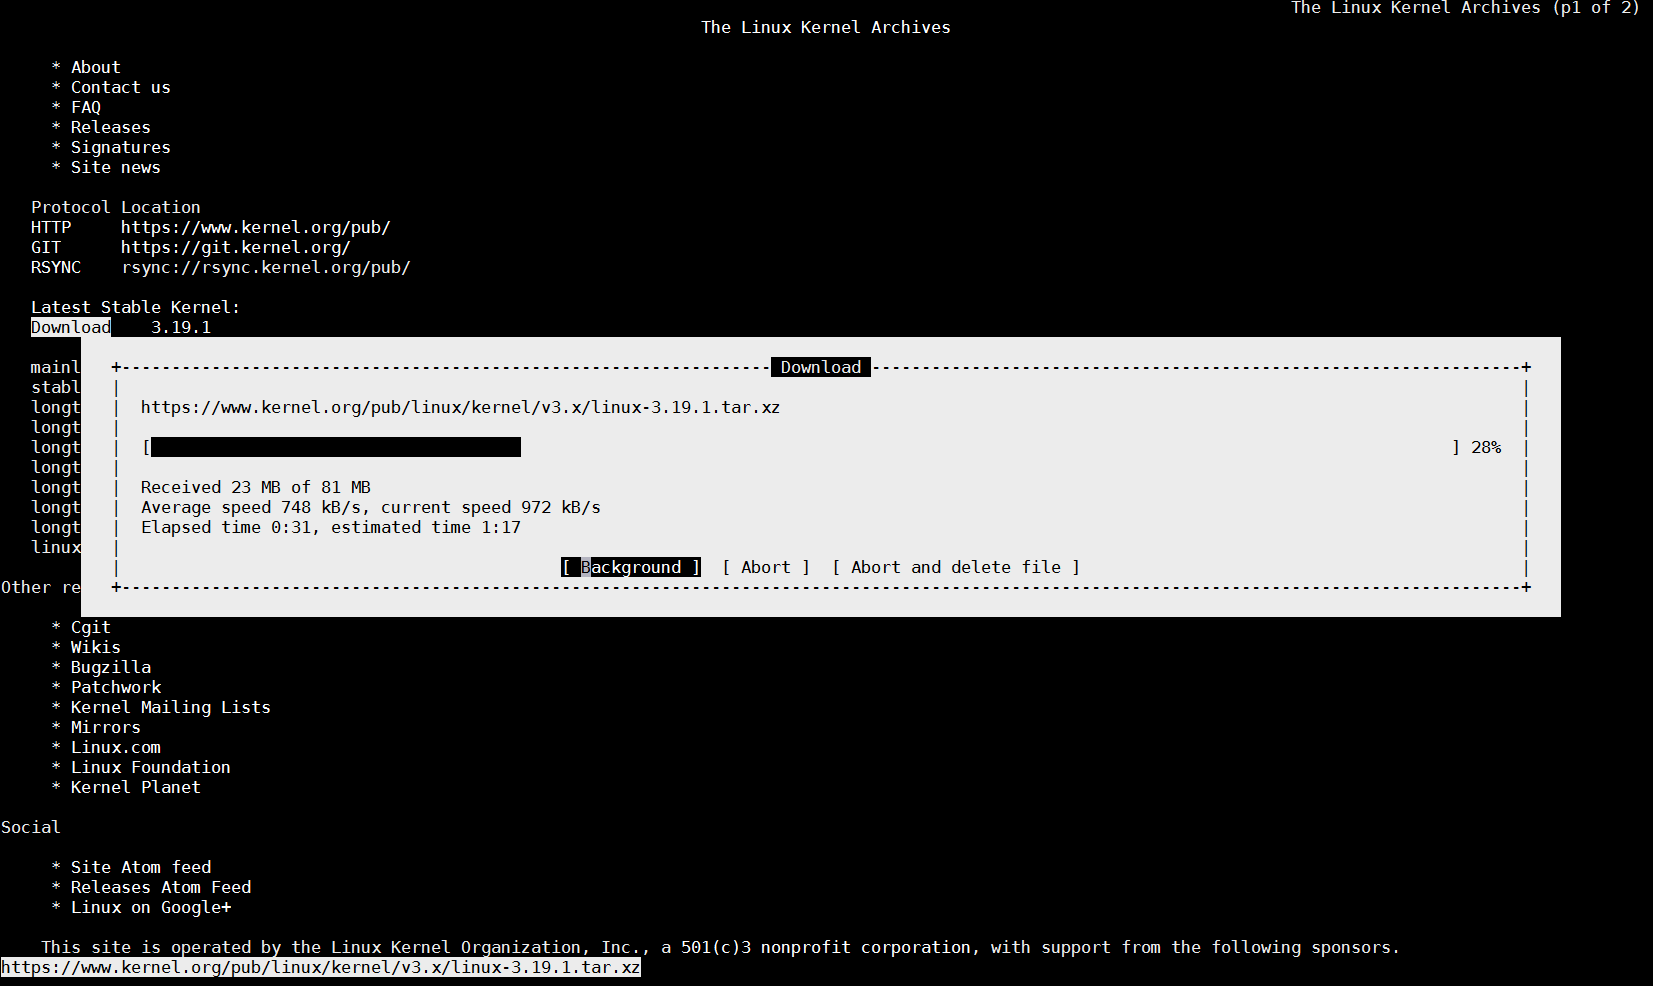
root@pcfreak:/root# links https://www.kernel.org/pub/linux/kernel/v3.x/linux-3.19.1.tar.xz

check_your_download_speed-from-console-linux-with-links-text-browser

(Note that the kernel link is current latest stable Kernel source code archive in future that might change, so try with latest archive.)

You can also use non-interactive tool such as wget curl or lftp to measure internet download speed

To test Download Internet Speed with wget without saving anything to disk set output to go to /dev/null 


root@pcfreak:~# wget -O /dev/null https://www.pc-freak.net//~hipo/hirens-bootcd/HirensBootCD15/Hirens.BootCD.15.0.zip


check_bandwidth_download-internet-speed-with-wget-from-console-non-interactively-on-linux

You see the Download speed is 104 Mbit/s this is so because I'm conducting the download from my local 100Mbit network.

For the test you can use my mirrored version of Hirens BootCD

2. Testing Uplink Internet speed provided by ISP / Server Provider from Linux (SSH) Console

To test your uplink speed you will need lftp or iperf command tool.


root@pcfreak:~# apt-cache show lftp|grep -i descr -A 12
Description: Sophisticated command-line FTP/HTTP client programs
 Lftp is a file retrieving tool that supports FTP, HTTP, FISH, SFTP, HTTPS
 and FTPS protocols under both IPv4 and IPv6. Lftp has an amazing set of
 features, while preserving its interface as simple and easy as possible.
 .
 The main two advantages over other ftp clients are reliability and ability
 to perform tasks in background. It will reconnect and reget the file being
 transferred if the connection broke. You can start a transfer in background
 and continue browsing on the ftp site. It does this all in one process. When
 you have started background jobs and feel you are done, you can just exit
 lftp and it automatically moves to nohup mode and completes the transfers.
 It has also such nice features as reput and mirror. It can also download a
 file as soon as possible by using several connections at the same time.


root@pcfreak:/root# apt-cache show iperf|grep -i desc -A 2
Description: Internet Protocol bandwidth measuring tool
 Iperf is a modern alternative for measuring TCP and UDP bandwidth performance,
 allowing the tuning of various parameters and characteristics.


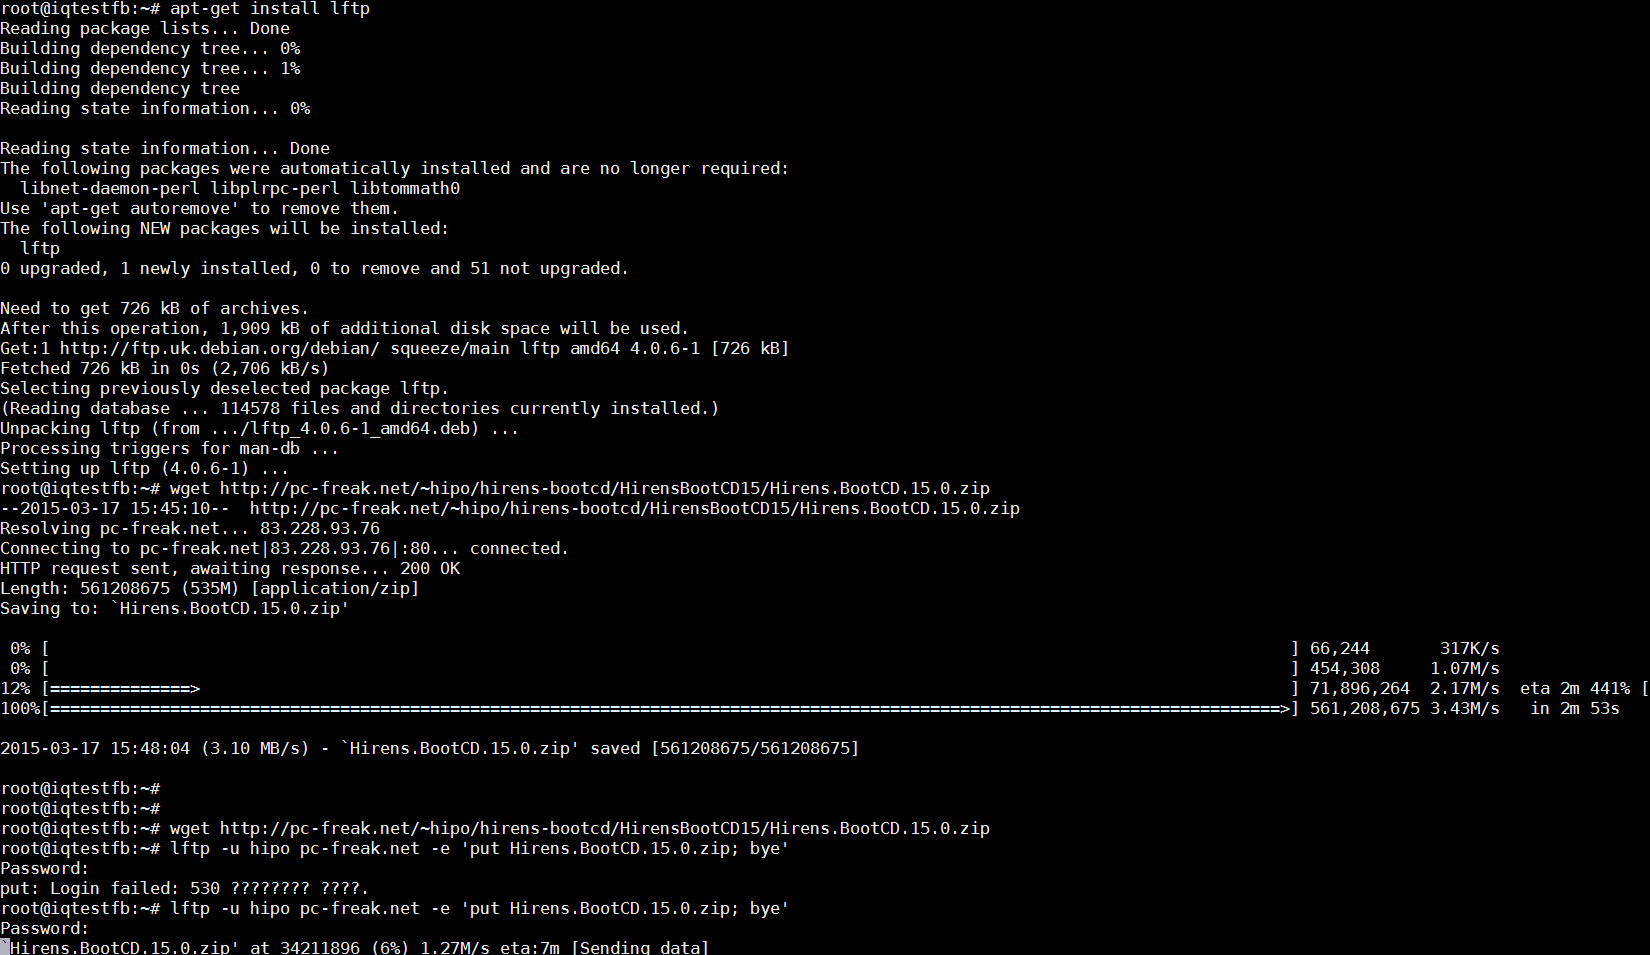
To test Upload Speed to Internet connect remotely and upload any FTP file:


root@pcfreak:/root# lftp -u hipo www.pc-freak.net -e 'put Hirens.BootCD.15.0.zip; bye'


uploading-file-with-lftp-screenshot-test-upload-internet-speed-linux

On Debian Linux to install iperf:


root@pcfreak:/root# apt-get install –yes iperf


On latest CentOS 7 and Fedora (and other RPM based) Linux, you will need to add RPMForge repository and install with yum


[root@centos ~]# rpm -ivh  rpmforge-release-0.5.3-1.el7.rf.x86_64.rpm

[root@centos ~]# yum -y install iperf


Once having iperf on the server the easiest way currently to test it is to use
serverius.net speedtest server –  located at the Serverius datacenters, AS50673 and is running on a 10GE connection with 5GB cap.


root@pcfreak:/root# iperf -c speedtest.serverius.net -P 10
————————————————————
Client connecting to speedtest.serverius.net, TCP port 5001
TCP window size: 16.0 KByte (default)
————————————————————
[ 12] local 83.228.93.76 port 54258 connected with 178.21.16.76 port 5001
[  7] local 83.228.93.76 port 54252 connected with 178.21.16.76 port 5001
[  5] local 83.228.93.76 port 54253 connected with 178.21.16.76 port 5001
[  9] local 83.228.93.76 port 54251 connected with 178.21.16.76 port 5001
[  3] local 83.228.93.76 port 54249 connected with 178.21.16.76 port 5001
[  4] local 83.228.93.76 port 54250 connected with 178.21.16.76 port 5001
[ 10] local 83.228.93.76 port 54254 connected with 178.21.16.76 port 5001
[ 11] local 83.228.93.76 port 54255 connected with 178.21.16.76 port 5001
[  6] local 83.228.93.76 port 54256 connected with 178.21.16.76 port 5001
[  8] local 83.228.93.76 port 54257 connected with 178.21.16.76 port 5001
[ ID] Interval       Transfer     Bandwidth
[  9]  0.0-10.2 sec  4.05 MBytes  3.33 Mbits/sec
[ 10]  0.0-10.2 sec  3.39 MBytes  2.78 Mbits/sec
[ 11]  0.0-10.3 sec  3.75 MBytes  3.06 Mbits/sec
[  4]  0.0-10.3 sec  3.43 MBytes  2.78 Mbits/sec
[ 12]  0.0-10.3 sec  3.92 MBytes  3.18 Mbits/sec
[  3]  0.0-10.4 sec  4.45 MBytes  3.58 Mbits/sec
[  5]  0.0-10.5 sec  4.06 MBytes  3.24 Mbits/sec
[  6]  0.0-10.5 sec  4.30 MBytes  3.42 Mbits/sec
[  8]  0.0-10.8 sec  3.92 MBytes  3.03 Mbits/sec
[  7]  0.0-10.9 sec  4.03 MBytes  3.11 Mbits/sec
[SUM]  0.0-10.9 sec  39.3 MBytes  30.3 Mbits/sec


You see currently my home machine has an Uplink of 30.3 Mbit/s per second, that's pretty nice since I've ordered a 100Mbits from my ISP (Unguaranteed Bandwidth Connection Speed) and as you might know it is a standard practice for many Internet Proviers to give Uplink speed of 1/4 from the ISP provided overall bandwidth 1/4 would be 25Mbi/s, meaning my ISP (Bergon.NET) is doing pretty well providing me with even more than promised (ordered) bandwidth.

Iperf is probably the choice of most sysadmins who have to do regular bandwidth in local networks speed between 2 servers or test  Internet Bandwidth speed on heterogenous network with Linux / BSDs / AIX / HP-UX (UNIXes). On HP-UX and AIX and other UNIXes for which iperf doesn't have port you have to compile it yourself.

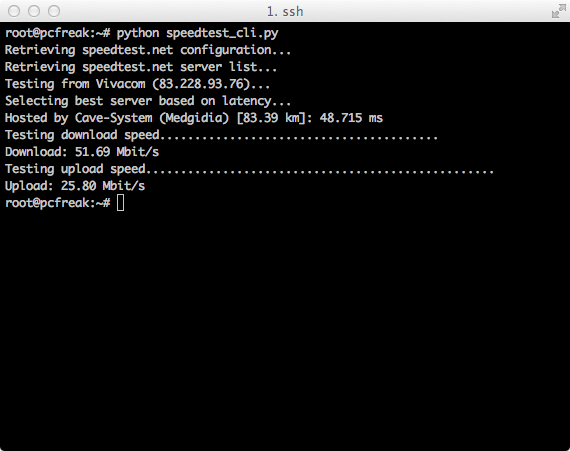
If you don't have root /admin permissions on server and there is python language enterpreter installed you can use speedtest_cli.py script to test internet throughput connectivity
speedtest_cli uses speedtest.net to test server up / down link just in case if script is lost in future I've made ownload mirror of speedtest_cli.py is here

Quickest way to test net speed with speedtest_cli.py:


$ lynx -dump https://raw.github.com/sivel/speedtest-cli/master/speedtest_cli.py > speedtest_cli.py
$ chmod +x speedtest_cli.py
python speedtest_cli.py

speedtest_cli_pyhon_script_screenshot-on-gnu-linux-test-internet-network-speed-on-unix

How to copy / clone installed packages from one Debian server to another

Friday, April 13th, 2012

1. Dump all installed server packages from Debian Linux server1

First it is necessery to dump a list of all installed packages on the server from which the intalled deb packages 'selection' will be replicated.

debian-server1:~# dpkg --get-selections \* > packages.txt

The format of the produced packages.txt file will have only two columns, in column1 there will be the package (name) installed and in column 2, the status of the package e.g.: install or deinstall

Note that you can only use the –get-selections as root superuser, trying to run it with non-privileged user I got:

hipo@server1:~$ dpkg --set-selections > packages.txt
dpkg: operation requires read/write access to dpkg status area

2. Copy packages.txt file containing the installed deb packages from server1 to server2

There is many way to copy the packages.txt package description file, one can use ftp, sftp, scp, rsync … lftp or even copy it via wget if placed in some Apache directory on server1.

A quick and convenient way to copy the file from Debian server1 to server2 is with scp as it can also be used easily for an automated script to do the packages.txt file copying (if for instance you have to implement package cloning on multiple Debian Linux servers).

root@debian-server1:~# scp ./packages.txt hipo@server-hostname2:~/packages.txt
The authenticity of host '83.170.97.153 (83.170.97.153)' can't be established. RSA key fingerprint is 38:da:2a:79:ad:38:5b:64:9e:8b:b4:81:09:cd:94:d4. Are you sure you want to continue connecting (yes/no)? yes Warning: Permanently added '83.170.97.153' (RSA) to the list of known hosts. hipo@83.170.97.153's password:
packages.txt

As this is the first time I make connection to server2 from server1, I'm prompted to accept the host RSA unique fingerprint.

3. Install the copied selection from server1 on server2 with apt-get or dselect

debian-server2:/home/hipo# apt-get update
...
debian-server2:/home/hipo# apt-get upgrade
Reading package lists... Done
Building dependency tree
Reading state information... Done
debian-server2:/home/hipo# dpkg --set-selections < packages.txt
debian-server2:/home/hipo# apt-get -u dselect-upgrade --yes

The first apt-get update command assures the server will have the latest version of the packages currently installed, this will save you from running an outdated versions of the installed packages on debian-server2

Bear in mind that using apt-get sometimes, might create dependency issues. This is depending on the exact package names, being replicated in between the servers

Therefore it is better to use another approach with bash for loop to "replicate" installed packages between two servers, like so:

debian-server2:/home/hipo# for i in $(cat packages.txt |awk '{ print $1 }'); do aptitude install $i; done

If you want to automate the questioning about aptitude operations pass on the -y

debian-server2:/home/hipo# for i in $(cat packages.txt |awk '{ print $1 }'); do aptitude -y install $i; done

Be cautious if the -y is passed as sometimes some packages might be removed from the server to resolve dependency issues, if you need this packages you will have to again install them manually.

4. Mirroring package selection from server1 to server2 using one liner

A quick one liner, that does replicate a set of preselected packages from server1 to server2 is also possible with either a combination of apt, ssh, awk and dpkg or with ssh + dpkg + dselect :

a) One-liner code with apt-get unifying the installed packages between 2 or more servers

debian-server2:~# apt-get --yes install `ssh root@debian-server1 "dpkg -l | grep -E ^ii" | awk '{print $2}'`
...

If it is necessery to install on more than just debian-server2, copy paste the above code to all servers you want to have identical installed packages as with debian-server1 or use a shor for loop to run the commands for each and every host of multiple servers group.

In some cases it might be better to use dselect instead as in some situations using apt-get might not correctly solve the package dependencies, if encountering problems with dependencies better run:

debian-server2:/home/hipo# ssh root@debian-server1 'dpkg --get-selections' | dpkg --set-selections && dselect install

As you can see using this second dselect installed "package" mirroring is also way easier to read and understand than the prior "cryptic" method with apt-get, hence I personally think using dselect method is a better.

Well that's basically it. If you need to synchronize also configurations, either an rsync/scp shell script, should be used with all defined server1 config files or in case if a cloning of packages between identical server machines is necessery dd or some other tool like Norton Ghost could be used.
Hope this helps, someone.