Posts Tagged ‘liner’

How to make sure your Linux system users won’t hide or delete their .bash_history / Securing .bash_history file – Protect Linux system users shell history

Monday, July 19th, 2010

linux-bin-bash-600x600logo
If you're running multi user login Linux system, you have probably realized that there are some clever users that prefer to prevent their command line executed commands to be logged in .bash_history.
To achieve that they use a number of generally known methodologist to prevent the Linux system from logging into their $HOME/.bash_history file (of course if running bash as a default user shell).
This though nice for the user is a real nightmare for the sysadmin, since he couldn't keep track of all system command events executed by users. For instance sometimes an unprivilegd user might be responsible for executing a malicious code which crashes or breaks your server.
This is especially unpleasent, because you will find your system crashed and if it's not some of the system services that causes the issue you won’t even be able to identify which of all the users is the malicious user account and respectively the code excecuted which fail the system to the ground.
In this post I will try to tell you a basic ways that some malevolent users might use to hide their bash history from the system administrator.
I will also discuss a few possible ways to assure your users .bash_history keeps intact and possibly the commands executed by your users gets logged in in their.
The most basic way that even an unexperienced shell user will apply if he wants to prevent his .bash_history from sys admins review would be of directly wiping out the .bash_history file from his login account or alternatively emptying it with commands like:

malicious-user@server:~$ rm -f. bash_history
ormalicious-user@server:~# cat /dev/null > ~/.bash_history

In order to prevent this type of attack against cleaning the .bash_history you can use the chattr command.
To counter attack this type of history tossing method you can set your malicious-user .bash_history’s file the (append only flag) with chattr like so:

root@server:~# cd /home/malicious-user/
root@server:~# chattr +a .bash_history

It’s also recommended that the immunable flag is placed to the file ~/.profile in user home

root@server:~# chattr +i ~/.profile

It would be probably also nice to take a look at all chattr command attributes since the command is like swiss army knife for the Linux admin:
Here is all available flags that can be passed to chattr
append only (a)
compressed (c)
don~@~Yt update atime (A)
synchronous directory updates (D)
synchronous updates (S)
data journalling (j)
no dump (d)
top of directory hierarchy (T)
no tail-merging (t)
secure deletion (s)
undeletable (u)
immutable (i)

It’s also nice that setting the “append only” flag in to the user .bash_history file prevents the user to link the .bash_history file to /dev/null like so:

malicious-user@server:~$ ln -sf /dev/null ~/.bash_history
ln: cannot remove `.bash_history': Operation not permitted

malicious-user@server:~$ echo > .bash_history
bash: .bash_history: Operation not permitted

However this will just make your .bash_history append only, so the user trying to execute cat /dev/null > .bash_history won’t be able to truncate the content of .bash_history.

Unfortunately he will yet be able to delete the file with rm so this type of securing your .bash_history file from being overwritten is does not completely guarantee you that user commands will get logged.
Also in order to prevent user to play tricks and escape the .bash_history logging by changing the default bash shell variables for HISTFILE an d HISTFILESIZE, exporting them either to a different file location or a null file size.
You have to put the following bash variables to be loaded in /etc/bash.bashrc or in /etc/profile
# #Prevent unset of histfile, /etc/profile
HISTFILE=~/.bash_history
HISTSIZE=10000
HISTFILESIZE=999999
# Don't let the users enter commands that are ignored# in the history file
HISTIGNORE=""
HISTCONTROL=""
readonly HISTFILE
readonly HISTSIZE
readonly HISTFILESIZE
readonly HISTIGNORE
readonly HISTCONTROL
export HISTFILE HISTSIZE HISTFILESIZE HISTIGNORE HISTCONTROL

everytime a user logs in to your Linux system the bash commands above will be set.
The above tip is directly taken from Securing debian howto which by the way is quite an interesting and nice reading for system administrators 🙂

If you want to apply an append only attribute to all user .bash_history to all your existing Linux server system users assuming the default users directory is /home in bash you can execute the following 1 liner shell code:

#Set .bash_history as attr +a
2. find /home/ -maxdepth 3|grep -i bash_history|while read line; do chattr +a "$line"; done

Though the above steps will stop some of the users to voluntary clean their .bash_history history files it won’t a 100% guaranttee that a good cracker won’t be able to come up with a way to get around the imposed .bash_history security measures.

One possible way to get around the user command history prevention restrictions for a user is to simply using another shell from the ones available on the system:
Here is an example:

malicious-user:~$ /bin/csh
malicious-user:~>

csh shell logs by default to the file .history

Also as far as I know it should be possible for a user to simply delete the .bash_history file overwritting all the .bash_history keep up attempts up-shown.
If you need a complete statistics about accounting you’d better take a look at The GNU Accounting Utilities

In Debian the GNU Accounting Utilities are available as a package called acct, so installation of acct on Debian is as simple as:

debian:~# apt-get install acct

I won’t get into much details about acct and would probably take a look at it in my future posts.
For complete .bash_history delete prevention maybe the best practice is to useg grsecurity (grsec)

Hopefully this article is gonna be a step further in tightening up your Server or Desktop Linux based system security and will also give you some insight on .bash_history files 🙂 .

Virtual Keyboard for Linux and other Freedom respecting operating Systems

Monday, July 30th, 2018

How to install and Use Linux Virtual Keyboard and other freedom respecting Operating Systems

  •  Looking for a quick way to use VIRTUAL KEYBOARD ON LINUX COMPUTER OPERATING SYSTEM, you can do it just this 1 task in 3 simple steps  ???
    – Logical question emerges, WHY ??? would you need a virtual keyboard on Free Software OS such as Linux?
    Well, just because sometimes it is much more secure to use a Virtual Keyboard, especially if you have doubt that your keyboard has been tapped or a Key Logger (Sniffer), intercepting the Keyboard IN / OUT jacks, is installed on the computer or you might have sit on a computer of ,a friend running Linux, and you want to make sure he did not install sniffer to intercept your ,SSH login passwords and ,later hack into your Servers, after stealing, the password


  • Assuming you're on : – Debian / Ubuntu Linux, or other of the numerous IT systems such as ,FreeBSD / OpeBSD etc. out there, you can run simply this commands:


  •  apt-get install –yes florence
    * A. To make it, easily invokable for laters, create a small bash, shell script in directory; – location /usr/bin/virtual-keyboard like, the one below:

    vim /usr/bin/virtual-keyboard

    * B.. INside the file Place following 1 liner code
     

    #!/bin/sh
    /usr/bin/florence


    * C… To later invoke it any time:
    Press ALT + F2 (or use Run Command Dialog in GNOME / KDE / Windomaker / IceWM whatever or any other crazy graphic environment of your choice and run:

    /usr/bin/virtual-keyboard


Mimino 1977 – A classic Russian Commedy from the Soviet Union Era

Wednesday, June 5th, 2013

Mimino movie soviet commedy cover picture

Mimino (Мимино) is a nice Russian Movie from the Soviet Era directed by Georgiy Daneliva. As most of Russian Soviet Classic movies it is produced by the infamous Mosfilm and Gruziya-film. A big part of movie is played by Gruzian actors and suspectedly captured in Gruzia. Big part of the movie language is also Gruzian. The movie has been nominated with Golden Prize at 10th Moscow International Film Festival

imino (Russian: Мимино) is a 1977 comedy film by Soviet director Georgiy Daneliya produced by Mosfilm and Gruziya-film, starring Vakhtang Kikabidze and Frunzik Mkrtchyan. Anatoliy Petritskiy served as the film's Director of Photography. The Soviet era comedy won the 1977 Golden Prize at the 10th Moscow International Film Festival.


Мимино / Mimino – 1977 (A Russian Commedy from the Soviet Union Era )

The story plot of Mimino is like this. The main actor Mimino is operating Helicopter bringing goods between villages 🙂 Though he is a Helicopter pilot his big dream is to work in Aviation one day so he follows his dream and goes to Moscow. In hotel there he meets Armenian Truck driver Roobik Khachikyan (this interesting meeting occurs by accident since Roobik is given a wrong hotel room). The two have a multitude of adventures together in Moscow. Though Mimino never cannot identify himself with the big city, he succeeds to be a pilot of supersonic jet liner! 🙂 Consequently he rides all around the world on his supersonic jet Tupolev TU-144. After a period of homesickness finally Mimino arrives back to his hometown in Telavi in Georgia. It is curios fact that nickname of Mimino მიმინო means falcon. Enjoy the movie 🙂

Show directory structure bash script on Linux howto – See hierarchical directory tree structure one liner shell script

Friday, February 24th, 2017

show-directory-structure-see-hierarchical-directory-tree-structure-on-linux-with-tree-command-and-with-bash-shell-scripts

If you have Sys Adminned Linux or *Nix OS like, whether for some shell scripting purpose or just for sake of keeping a backup you should have definitely come
into some need to list a tree of a directories content in a hierarchical order.

The most obvious way to do that on Linux is by simply using:

1.  "tree" command (not installed by default on most Linux distributions so in order to have it on Deb / Debian based Linux do:
 

# apt-get install –yes tree


On Fedora / CentOS Redhat Linux (RHEL) etc. install with:

# yum –yes install tree


By the way for those that needs tree on FreeBSD / BSD UNIX, tree is also available on that platform you can install it with:
 

pkg_add -vr tree


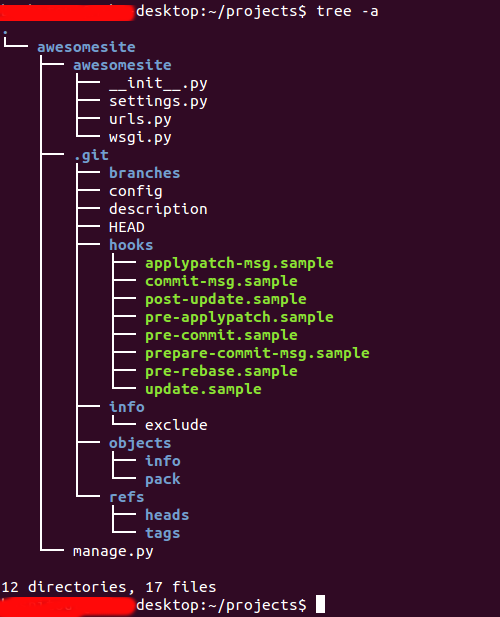
Then simply check man tree to get idea on how to use it, the easiest way to use the command tree once package is installed is to run tree inside directory of choice, i.e.


$ cd /somedir
$ tree -a

.
├── acpi
│   ├── events
│   │   └── powerbtn-acpi-support
│   └── powerbtn-acpi-support.sh
├── adduser.conf
├── adjtime
├── aliases
├── alternatives
│   ├── ABORT.7.gz -> /usr/share/postgresql/9.5/man/man7/ABORT.7.gz
│   ├── aclocal -> /usr/bin/aclocal-1.11
│   ├── aclocal.1.gz -> /usr/share/man/man1/aclocal-1.11.1.gz
│   ├── ALTER_AGGREGATE.7.gz -> /usr/share/postgresql/9.5/man/man7/ALTER_AGGREGATE.7.gz
│   ├── ALTER_COLLATION.7.gz -> /usr/share/postgresql/9.5/man/man7/ALTER_COLLATION.7.gz
│   ├── ALTER_CONVERSION.7.gz -> /usr/share/postgresql/9.5/man/man7/ALTER_CONVERSION.7.gz


To get a list of only directories with tree use:
 

$ tree -d /


  │   ├── bin
│   │   ├── boot
│   │   │   └── grub
│   │   │       └── locale
│   │   ├── disk
│   │   │   ├── Books
│   │   │   │   ├── 200 E-BOOKS
│   │   │   │   │   ├── McGraw-Hill – Windows Server 2003
│   │   │   │   │   ├── Oreilly.Access.Cookbook.2nd.Edition-LiB
│   │   │   │   │   ├── Oreilly.ActionScript.Cookbook.eBook-LiB
│   │   │   │   │   ├── OReilly.ActionScript.The.Definative.Guide.WinAll.Retail-EAT
│   │   │   │   │   ├── Oreilly.Active.Directory.2nd.Edition.eBook-LiB
│   │   │   │   │   ├── Oreilly.Active.Directory.Cookbook.eBook-LiB
│   │   │   │   │   ├── Oreilly.ADO.Dot.NET.Cookbook.eBook-LiB
│   │   │   │   │   ├── Oreilly.Amazon.Hacks.eBook-LiB
│   │   │   │   │   ├── OREILLY.ANT.THE.DEFINITIVE.GUIDE-JGT
│   │   │   │   │   ├── Oreilly.Apache.Cookbook.eBook-LiB
│   │   │   │   │   ├── Oreilly.AppleScript.The.Definitive.Guide.eBook-LiB
│   │   │   │   │   ├── Oreilly.ASP.Dot.NET.In.A.Nutshell.2nd.Edition.eBook-LiB
│   │   │   │   │   ├── OReilly.Better.Faster.Lighter.Java.Jun.2004.eBook-DDU
│   │   │   │   │   ├── Oreilly.BLAST.eBook-LiB
│   │   │   │   │   ├── OReilly.BSD.Hacks.May.2004.eBook-DDU
│   │   │   │   │   ├── Oreilly.Building.Embedded.Linux.Systems.eBook-LiB

If you have a colorful terminal and you like colors for readability the -C option is quite handy


$ tree -C /


tree-command-linux-hierarchical-structure-directory-tree
 

To list the directory tree with permissions included use tree cmd like so:


$ tree -L 2 -p /usr

/usr/
├── [drwxr-xr-x]  bin
│   ├── [-rwxr-xr-x]  [
│   ├── [lrwxrwxrwx]  2to3 -> 2to3-2.6
│   ├── [-rwxr-xr-x]  2to3-2.6
│   ├── [-rwxr-xr-x]  411toppm
│   ├── [-rwxr-xr-x]  7z
│   ├── [-rwxr-xr-x]  7za
│   ├── [-rwxr-xr-x]  a2p
│   ├── [-rwxr-xr-x]  ab
│   ├── [-rwxr-xr-x]  ac
│   ├── [lrwxrwxrwx]  aclocal -> /etc/alternatives/aclocal
│   ├── [-rwxr-xr-x]  aclocal-1.11
│   ├── [-rwxr-xr-x]  acpi


Another truly handy option of tree is to list the directory structure index with included file sizes information


$ tree -L 2 -sh /bin

/bin
├── [903K]  bash
├── [147K]  bsd-csh
├── [ 30K]  bunzip2
├── [681K]  busybox
├── [ 30K]  bzcat
├── [   6]  bzcmp -> bzdiff
├── [2.1K]  bzdiff
├── [   6]  bzegrep -> bzgrep
├── [4.8K]  bzexe
├── [   6]  bzfgrep -> bzgrep
├── [3.6K]  bzgrep
├── [ 30K]  bzip2
├── [ 14K]  bzip2recover
├── [   6]  bzless -> bzmore
├── [1.3K]  bzmore
├── [ 51K]  cat
├── [ 59K]  chgrp
├── [ 55K]  chmod
├── [ 63K]  chown
├── [ 10K]  chvt
├── [127K]  cp
├── [134K]  cpio
├── [  21]  csh -> /etc/alternatives/csh
├── [104K]  dash


To list a directory tree of a search pattern, lets say all files with .conf extensions use:
 

$ tree -P *.conf

/etc/ca-certificates.conf [error opening dir]
/etc/dante.conf [error opening dir]
/etc/debconf.conf [error opening dir]
/etc/deluser.conf [error opening dir]
/etc/discover-modprobe.conf [error opening dir]
/etc/fuse.conf [error opening dir]
/etc/gai.conf [error opening dir]
/etc/gpm.conf [error opening dir]
/etc/gssapi_mech.conf [error opening dir]
/etc/hdparm.conf [error opening dir]
/etc/host.conf [error opening dir]
/etc/idmapd.conf [error opening dir]
/etc/inetd.conf [error opening dir]
/etc/insserv.conf [error opening dir]
/etc/irssi.conf [error opening dir]
/etc/kernel-img.conf [error opening dir]
/etc/ld.so.conf [error opening dir]
/etc/libao.conf [error opening dir]
/etc/libaudit.conf [error opening dir]
/etc/logrotate.conf [error opening dir]
/etc/memcached.conf [error opening dir]
/etc/mke2fs.conf [error opening dir]
/etc/mongodb.conf [error opening dir]
/etc/mtools.conf [error opening dir]
/etc/multitail.conf [error opening dir]
/etc/nsswitch.conf [error opening dir]
/etc/ntp.conf [error opening dir]
/etc/ocamlfind.conf [error opening dir]


tree -I option does exclude all petterns you don't want tree to list

Here are few other tree useful options:

  • tree -u /path/to/file – displays the users owning the files
  • tree -g /path/to/file – display the groups owning the files
  • tree -a /path/to/file – display the hidden files/folders
  • tree -d /path/to/file – display only the directories in the hierarchy


However there might be some cases where you have to support a Linux server or you just have to write a script for a non-root user and you might not have the permissins to install the tree command to make your life confortable. If that's the case then you can still use a couple of command line tools and tricks (assuming you have permissions) to list a log a directory / files and subdirectories tree structure in a hierarchical tree like command order

2. Print a list of all sub-directories and files within a directory tree

To print all directories within any path of choise on a server use
 

$ find /path/ -type d -print


To print all files within a root filesystem hierarchically with find command

Another way to do it in a more beautiful output is by using find in conjunction with awk
 

$ find . -type d -print 2>/dev/null|awk '!/\.$/ {for (i=1;i<NF;i++){d=length($i);if ( d < 5  && i != 1 )d=5;printf("%"d"s","|")}print "—"$NF}'  FS='/'


|—bashscripts
|          |—not-mine
|          |—various
|          |—output
|          |—examples
|          |—fun
|          |—educational
|          |—backdoor-cgi
|          |—fork-bombs
|          |—tmp
|          |    |—old
|          |—bullshits
|—packages
|       |—ucspi-ssl-0.70.2
|       |               |—package
|       |               |—compile
|       |               |      |—rts-tmp
|       |               |—command
|       |               |—src
|—bin
|—package
|      |—host
|      |    |—superscript.com
|      |    |              |—command
|—mnt
|    |—tmpfs
|    |—disk
|    |—flash_drive
|    |—ramfs
|    |—cdrom

3. Get a list of the directories on filesystem structure with one-liner ls + sed script
 

$ ls -R | grep ":$" | sed -e 's/:$//' -e 's/[^-][^\/]*\//–/g' -e 's/^/ /' -e 's/-/|/'


 |-bin
 |-boot
 |-dev
 |—net
 |—pts
 |-downloads
 |—autorespond-2.0.5
 |—–debian
 |—deb-packages
 |—–IP-Country-2.28
 |——-bin
 |——-blib
 |———arch
 |———–auto

….
 

4. Print all files within root filesystem and issue any command on each of the files
 

ls -R1 / |    while read l; do case $l in *:) d=${l%:};; "") d=;; *) echo "$d/$l";; esac; done


Above command just prints all the found files with full-path if you want to check the file size or file type you just check echo command with any command you need to execute on each of the listed file

5. Get a list hierarchical directory Linux tree with bash shell scripts: Assuming that the server where you need to have a list of the directory filesystem structure in a tree fashion has bash you could use this little script called tree.sh to do the job or for a full filesystem hierarchical tree like directory structure use fulltree.sh

Linux watch Windows equivalent command bat script – How to Run a command every XXX seconds on Windows

Tuesday, May 27th, 2014

windows-watch-command-linux-watch-windows-equivalent-run-script-every-xxx-seconds-on-microsoft-windows
If you're a Linux administrator you're probably already quite used to watch command which allows to execute a program periodically, showing output fullscreen. Watch is very useful to run a specific command every XXX seconds, and see the results constantly updated. watch is very useful to keep an eye on growing files, i.e.: lets say keep an eye on SQL dump:

watch "ls -al some-dump-file.sql"

or keep an eye on how a directory keeps growing in real time

watch -n 5 "du -hsc /tmp"


Above command would tell watch to refresh du -hsc /tmp on a 5 seconds interval.

So a logical question pops up "Is there a command line equivalent to Linux's watch?" In Windows there is no native command equivalent of Linux watch but there is one liner bat (Batch) script to equivalent to emulate Linux watch in Windows. The Watch like script in Windows OS looks like so:

@ECHO OFF
:loop
tasklist timeout /t 2
goto loop


Use notepad and paste above batch script to any file and save it as whateverfile.bat, running it will make all processes to get listed occuring every 2 seconds (/t 2 – is an argumeent telling the loop to expire on every 2 seconds).

Modify the script to monitor whatever Windows command you like 🙂
Enjoy


Monitoring CPU load and memory usage on Mac OS X command line (Terminal)

Thursday, July 3rd, 2014

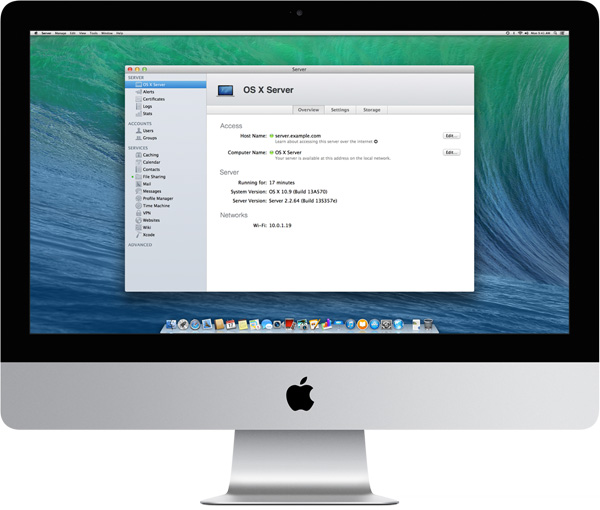
macosx-server-screenshot-server-assistant-apple-tool
You might be stunned to find out Mac OS X has a server variant called Mac OS X server. For the usual admin having to administer a Mac OS X based server is something rarely to do, however it might happen some day, and besides that nowadays Mac OS X has about 10% percentage share of PC desktop and laptops used on the Internet (data collected from w3cschools log files). Thus cause it is among popular OSes, it very possible sooner or later as a sysadmin you will have to troubleshoot issues on at least Mac OS X notebook. Mac has plenty of instruments to debug OS issues as it is UNIX (BSD) based

Mac OS X has already a GUI tool called Activity Monitor (existing in Mac OS 10.3 onwards) in earlier verions, there was tool called Process Viewer and CPU Monitor.

To start Activity Monitor open Finder and launch it via:

Applications -> Utilities -> Activity Monitor

As a Linux guy, I like to use command line and there Mac OS X is equipped with a good arsenal of tools to check CPU load and Memory. Mac OS X comes with sar – (system activity reporter), top (process monitor) and vm_stat (virtual memory statistics) command – these ones are equivalent of Linux's sar (from sysstats package), top and Linux vmstat (report virtual memory statistics).

1. Check out Mac OS X HDD Input / Output statistics
 

$ sar -d -f ~/output.sar

20:43:18   device    r+w/s    blks/s
New Disk: [disk0] IODeviceTree:/PCI0@0/RP06@1C,5/SSD0@0/PRT0@0/PMP@0/@0:0
New Disk: [disk1] IOService:/IOResources/IOHDIXController/IOHDIXHDDriveOutKernel@1/IODiskImageBlockStorageDeviceOutKernel/IOBlockStorageDriver/Apple UDIF, только для чтения, сжатый (zlib)
New Disk: [disk2] IOService:/IOResources/IOHDIXController/IOHDIXHDDriveOutKernel@3/IODiskImageBlockStorageDeviceOutKernel/IOBlockStorageDriver/Apple UDIF, только для чтения, сжатый (bzip2)
New Disk: [disk3] IOService:/IOResources/IOHDIXController/IOHDIXHDDriveOutKernel@4/IODiskImageBlockStorageDeviceOutKernel/IOBlockStorageDriver/Apple UDIF, только для чтения, сжатый (bzip2)
New Disk: [disk4] IOService:/IOResources/IOHDIXController/IOHDIXHDDriveOutKernel@6/IODiskImageBlockStorageDeviceOutKernel/IOBlockStorageDriver/Apple UDIF, только для чтения, сжатый (zlib)
20:43:28   disk0        7        312
20:43:28   disk1        0          0
20:43:28   disk2        0          0
20:43:28   disk3        0          0
20:43:28   disk4        0          0
20:43:38   disk0       12        251
20:43:38   disk1        0          

2. Checking Mac OS X CPU Load from terminal

To check Load from Mac OS command line use:
 

$ sar -o ~/output.sar 10 10

That gathers 10 sets of metrics at 10 second intervals. You can then extract useful information from the output file (even while it's still running), this will get you cpu load on Mac OS system spitting stats every 10 seconds.


21:22:33  %usr  %nice   %sys   %idle
21:22:43    7      0      2     90
21:22:53    8      0      3     89
21:23:03   11      0      4     85
21:23:13    9      0      3     88
21:23:23    9      0      3     88
21:23:33    7      0      3     90
21:23:43   10      0      3     87
21:23:53   10      0      4     85
21:24:03   10      0      5     85
21:24:13    8      0      3     88
Average:      8      0      3     87   


3. Checking Free memory on  Mac OS X

Use this obscure one liner to free -m Linux memory command like output from Mac terminal

$ vm_stat | perl -ne '/page size of (d+)/ and $size=$1; /Pagess+([^:]+)[^d]+(d+)/ and printf("%-16s % 16.2f Min", "$1:", $2 * $size / 1048576);'
 

free: 43.38 Mi
active: 1762.00 Mi
inactive: 1676.91 Mi
speculative: 3.29 Mi
wired down: 609.38 Mi
copy-on-write: 29431.01 Mi
zero filled: 4687689.80 Mi
reactivated: 30288.86 Mi


To show inactive memory in Gigabytes every 10 seconds

$ vm_stat 10 | awk 'NR>2 {gsub("K","000");print ($1+$4)/256000}'

1.70532
1.70455
1.70389
1.6904


It is also possible to get memory statistics on Mac PC running top in non-interactive mode and grepping it from output:

$ top -l 1 | head -n 10 | grep PhysMem | sed 's/, /n /g'


PhysMem: 599M wired, 1735M active, 1712M inactive, 4046M used, 47M free.


4. Quick command to get Kernel / how many CPUs, available memory and load avarage on Mac OS X

From y. 2003 onwards of Mac OS have hostinfo(host information) command, providing admin with quick way to get System Info on Mac OS

$ hostinfo


Mach kernel version:
Darwin Kernel Version 12.5.0: Sun Sep 29 13:33:47 PDT 2013; root:xnu-2050.48.12~1/RELEASE_X86_64
Kernel configured for up to 4 processors.
2 processors are physically available.
4 processors are logically available.
Processor type: i486 (Intel 80486)
Processors active: 0 1 2 3
Primary memory available: 4.00 gigabytes
Default processor set: 98 tasks, 621 threads, 4 processors
Load average: 1.63, Mach factor: 2.54


If you need more verbose information on system hardware and resources, check out system_profiler. As the manual describes it, system_profiler(reports system hardware and software configuration.) cmd:

$ system_profiler Here is a link to output file generated by system_prifler


How to quickly check unread Gmail emails on GNU / Linux – one liner script

Monday, April 2nd, 2012

I've hit an interesting article explaining how to check unread gmail email messages in Linux terminal. The original article is here

Being able to read your latest gmail emails in terminal/console is great thing, especially for console geeks like me.
Here is the one liner script:

curl -u GMAIL-USERNAME@gmail.com:SECRET-PASSWORD \
--silent "https://mail.google.com/mail/feed/atom" | tr -d '\n' \
| awk -F '' '{for (i=2; i<=NF; i++) {print $i}}' \
| sed -n "s/

Linux Users Group M. – [7] discussions, [10] comments and [2] jobs on LinkedIn
Twitter – Lynn Serafinn (@LynnSerafinn) has sent you a direct message on Twitter!
Facebook – Sys, you have notifications pending
Twitter – Email Marketing (@optinlists) is now following you on Twitter!
Twitter – Lynn Serafinn (@LynnSerafinn) is now following you on Twitter!
NutshellMail – 32 New Messages for Sat 3/31 12:00 PM
Linux Users Group M. – [10] discussions, [5] comments and [8] jobs on LinkedIn
eBay – Deals up to 60% OFF + A Sweepstakes!
LinkedIn Today – Top news today: The Magic of Doing One Thing at a Time
NutshellMail – 29 New Messages for Fri 3/30 12:00 PM
Linux Users Group M. – [16] discussions, [8] comments and [8] jobs on LinkedIn
Ervan Faizal Rizki . – Join my network on LinkedIn
Twitter – LEXO (@LEXOmx) retweeted one of your Tweets!
NutshellMail – 24 New Messages for Thu 3/29 12:00 PM
Facebook – Your Weekly Facebook Page Update
Linux Users Group M. – [11] discussions, [9] comments and [16] jobs on LinkedIn

As you see this one liner uses curl to fetch the information from mail.google.com's atom feed and then uses awk and sed to parse the returned content and make it suitable for display.

If you want to use the script every now and then on a Linux server or your Linux desktop you can download the above code in a script file -quick_gmail_new_mail_check.sh here

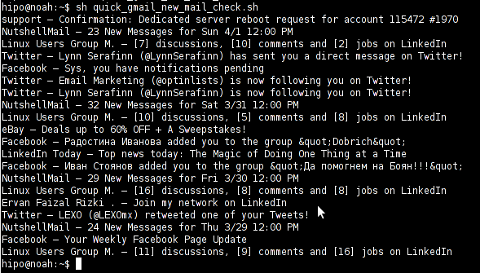
Here is a screenshot of script's returned output:

Quick Gmail New Mail Check bash script screenshot

A good use of a modified version of the script is in conjunction with a 15 minutes cron job to launch for new gmail mails and launch your favourite desktop mail client.
This method is useful if you don't want a constant hanging Thunderbird or Evolution, pop3 / imap client on your system to just take up memory or dangle down the window list.
I've done a little modification to the script to simply, launch a predefined email reader program, if gmail atom feed returns new unread mails are available, check or download my check_gmail_unread_mail.sh here
Bear in mind, on occasions of errors with incorrect username or password, the script will not return any errors. The script is missing a properer error handling.Therefore, before you use the script make sure:

gmail_username='YOUR-USERNAME';
gmail_password='YOUR-PASSWORD';

are 100% correct.

To launch the script on 15 minutes cronjob, put it somewhere and place a cron in (non-root) user:

# crontab -u root -e
...
*/15 * * * * /path/to/check_gmail_unread_mail.sh

Once you read your new emails in lets say Thunderbird, close it and on the next delivered unread gmail mails, your mail client will pop up by itself again. Once the mail client is closed the script execution will be terminated.
Consised that if you get too frequently gmail emails, using the script might be annoying as every 15 minutes your mail client will be re-opened.

If you use any of the shell scripts, make sure there are well secured (make it owned only by you). The gmail username and pass are in plain text, so someone can steal your password, very easily. For a one user Linux desktops systems as my case, security is not such a big concern, putting my user only readable script permissions (e.g. chmod 0700)is enough.

Convert Windows / MS-DOS end of line characters (CR/LF) to UNIX (LF) with sed

Tuesday, November 29th, 2011

I guess everyone has ended up with problems into a script files written under Windows using some text editor which incorrectly placed into the end of lines Windows (rn) end of lines instead of the UNIX (r).
Those who have have already take advantage of the nice tiny utility dos2unix which is capable of convert the Windows end of lines to UNIX. However some older UNIXes, like SunOS or HP-UX does not have the dos2unix utility into the list of packages one can install or even if its possible to install dos2unix it takes quite a hassle.
In that cases its good to say convertion of end of lines can be done without using external end programs by simply using UNIX sed .
The way to remove the incorrect Windows ^M (as seen in unix text editors) is by using the sed one liner:

server# sed 's/.$//' file-with-wrong-windows-eol.txt > file-with-fixed-unix-eol.txt