Posts Tagged ‘localhost’

Create SSH Tunnel to MySQL server to access remote filtered MySQL port 3306 host through localhost port 3308

Friday, February 27th, 2015

create_ssh_tunnel_to-mysql_server-to-access-remote-filtered-mysql-on-port-3306-secure_ssh_traffic
On our Debian / CentOS / Ubuntu Linux and Windows servers we're running multiple MySQL servers and our customers sometimes need to access this servers.
This is usually problem because MySQL Db  servers are running in a DMZ Zone with a strong firewall and besides that for security reasons SQLs are configured to only listen for connections coming from localhost, I mean in config files across our Debian Linux servers and CentOS / RHEL Linux machines the /etc/mysql/my.cnf and /etc/my.cnf the setting for bind-address is 127.0.0.1:
 

[root@centos ~]# grep -i bind-address /etc/my.cnf 
bind-address            = 127.0.0.1
##bind-address  = 0.0.0.0


For source code developers which are accessing development SQL servers only through a VPN secured DMZ Network there are few MySQL servers witha allowed access remotely from all hosts, e.g. on those I have configured:
 

[root@ubuntu-dev ~]# grep -i bind-address /etc/my.cnf 

bind-address  = 0.0.0.0


However though clients insisted to have remote access to their MySQL Databases but since this is pretty unsecure, we decided not to configure MySQLs to listen to all available IP addresses / network interfaces. 
MySQl acess is allowed only through PhpMyAdmin accessible via Cleint's Web interface which on some servers is CPanel  and on other Kloxo (This is open source CPanel like very nice webhosting platform).

For some stubborn clients which wanted to have a mysql CLI and MySQL Desktop clients access to be able to easily analyze their databases with Desktop clients such as MySQL WorkBench there is a "hackers" like work around to create and use a MySQL Tunnel to SQL server from their local Windows PCs using standard OpenSSH Linux Client from Cygwin,  MobaXterm which already comes with the SSH client pre-installed and has easy GUI interface to create SSH tunnels or eventually use Putty's Plink (Command Line Interface) to create the tunnel

Anyways the preferred and recommended (easiest) way to achieve a tunnel between MySQL and local PC (nomatter whether Windows or Linux client system) is to use standard ssh client and below command:
 

ssh -o ServerAliveInterval=10 -M -T -M -N -L 3308:localhost:3306 your-server.your-domain.com


By default SSH tunnel will keep opened for 3 minutes and if not used it will automatically close to get around this issue, you might want to raise it to (lets say 15 minutes). To do so in home directory user has to add in:
 

~/.ssh/config

ServerAliveInterval 15
ServerAliveCountMax 4


Note that sometimes it is possible ven though ssh tunnel timeout value is raised to not take affect if there is some NAT (Network Adress Translation) with low timeout setting on a firewall level. If you face constant SSH Tunnel timeouts you can use below bash few lines code to auto-respawn SSH tunnel connection (for Windows users use MobaXterm or install in advance bash shell cygwin package):
 

while true
do
 
ssh -o ServerAliveInterval=10 -M -T -M -N -L 3308:localhost:3306 your-server.your-domain.com
  sleep 15
done


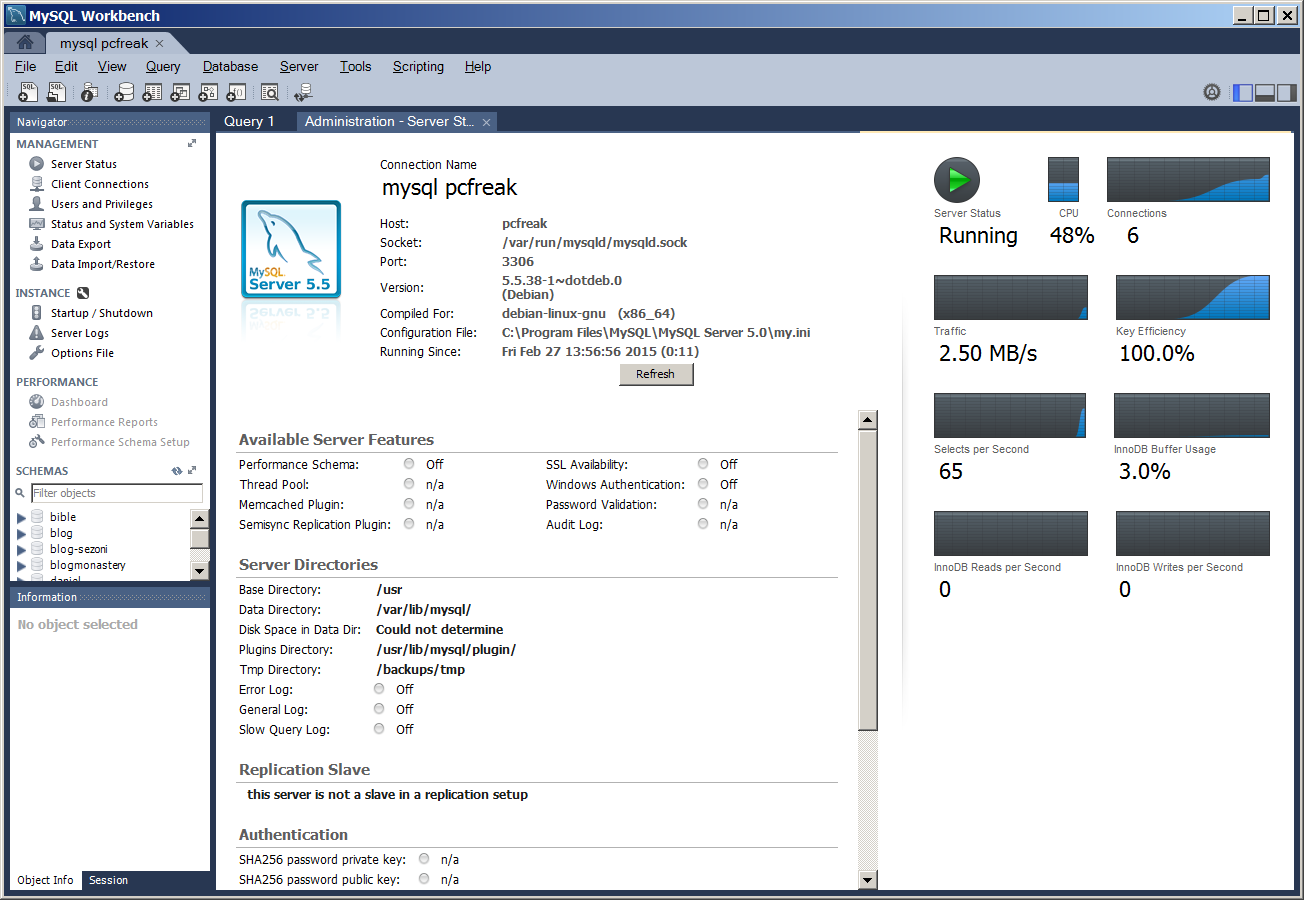
Below is MySQLBench screenshot connected through server where this blog is located after establishing ssh tunnel to remote mysql server on port 3308 on localhost

mysql-workbench-database-analysis-and-management-gui-tool-convenient-for-data-migratin-and-queries-screenshot-

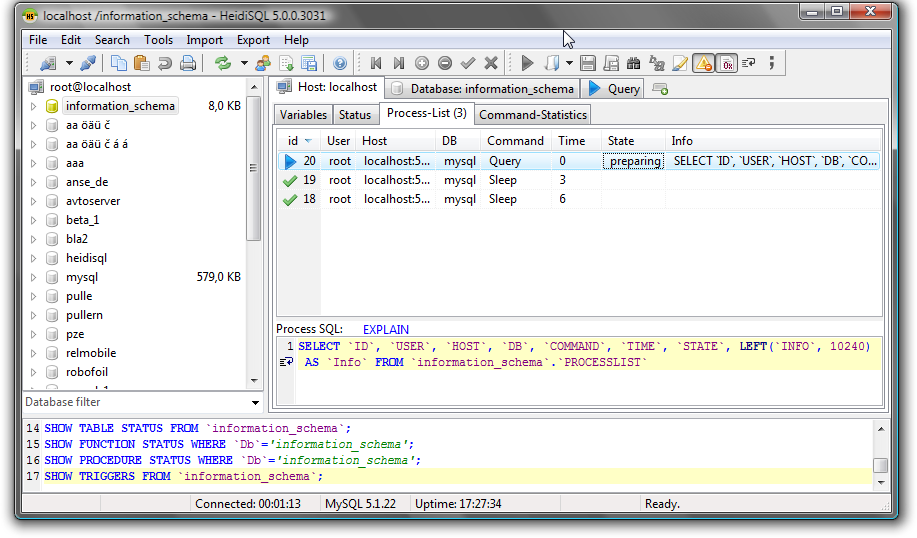
There is also another alternative way to access remote firewall filtered mysql servers without running complex commands to Run a tunnel which we recommend for clients (sql developers / sql designers) by using HeidiSQL (which is a useful tool for webdevelopers who has to deal with MySQL and MSSQL hosted Dbs).

heidisql-show-host_processlist-screenshot

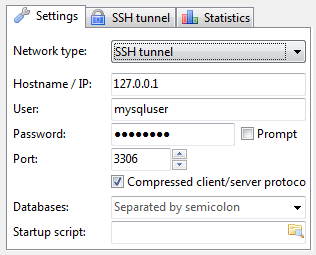
To connect to remote MySQL server through a Tunnel using Heidi:

mysql_connection_configuration-heidi-mysql-gui-connect-tool


In the ‘Settings’ tab

1. In the dropdown list of ‘Network type’, please select SSH tunnel

2. Hostname/IP: localhost (even you are connecting remotely)

3. Username & Password: your mysql user and password

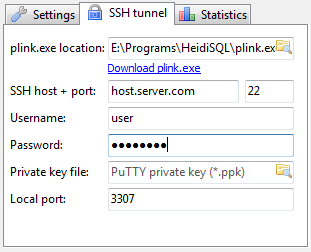
Next, in the tab SSH Tunnel:

1. specify plink.exe or you need to download it and specify where it’s located

2. Host + port: the remote IP of your SSH server(should be MySQL server as well), port 22 if you don’t change anything

3. Username & password: SSH username (not MySQL user)


heidi-connection_ssh_tunnel_configuration-heidi-sql-tool-screenshot
 

Allowing MySQL users access from all hosts – Fixing mysql ERROR 1045 (28000): Access denied for user ‘root’@’remote-admin.com’ (using password: YES)

Friday, June 20th, 2014

mysql_allow_access-from-remote-any-host-fix-access-error-after-sql-migration

I recently migrated MySQL database server from host A to host B (remotesystemadministration.com), because I wanted to have the mysql database server on a separate machine (have separation of server running services and have a dedicated mysql server).

MySQL server host (running on localhost previously was set from my mysql config my.cnf to listen and serve connections on localhost with

bind-address = 127.0.0.1

). MySQL is used by a Tomcat running Java application on localhost and my task was to set the Tomcat to use the MySQL database remotely to MySQL host B (new remote hostname where MySQL is moved is  remotesystemadminsitration.com and is running on IP 83.228.93.76).

Migration from MySQL Db server 1 (host A) to MySQL Db server 2 (host B) is done by binary copying the mysql database directory which in this case is (as it is a Debian server installed MySQL), the standard directory where mysql stores its database data is /var/lib/mysql ( datadir = /var/lib/mysql in /etc/mysql/my.cnf)

Binary copying of data from MySQL db (host A) to MySQL Db (host B) is done with rsync

After migrating and trying to login on migrated mysql  database on remotesystemadministration.net with mysql cli client:

remotesysadmin:~$ mysql -u root -p

I got following error:
 

ERROR 1045 (28000): Access denied for user 'root'@'remotesystemadministration.com' (using password: YES)


To fix the issue I had to login remotely from old migration server mysql (host A) cli:

mysql:~$ mysql -u root -p -h remotesystemadministration.com

and  run SQL commands:

GRANT ALL PRIVILEGES ON *.* TO 'root'@'remotesystemadministration.com' WITH GRANT OPTION;
GRANT USAGE ON *.* TO 'root'@'remotesystemadministration.com' IDENTIFIED BY 'secret-mysql-pass';
FLUSH PRIVILEGES;

Query OK, 0 rows affected (0.03 sec)
Query OK, 0 rows affected (0.00 sec)


Another way to solve the problem is to add the root user to be able to connect from any host (Enable MySQL root access from all host), to do so issue:

GRANT ALL PRIVILEGES ON *.* TO 'root'@'%' IDENTIFIED BY 'password';
FLUSH PRIVILEGES;

Note: In newer version of MySQL, flush privileges could be omitted.

Another approach if you want to substitute access from localhost for all users and enable all users to be able to authenticate to mysql remotely is to execute SQL Query:

UPDATE USER SET host='%' WHERE host='localhost';

Allowing all users to be able to connect from anywhere on the internet is a very bad security practice anyways, if you already have a tight firewall setup and you can only access the server via specific remote IP addresses allowing MySQL access from all hosts / ips should be ok.

Make MySQL existing users to have access from any or particular host after SQL migration

Tuesday, July 1st, 2014

make_mysql_existing_users_have-access-from-any-or-particular-host-after-SQL-migration
Recently I've done a migration of MySQL server from host A (running and configured to serve requests on (localhost – 127.0.0.1) to host B (server2.host.com)
There are already existing users in mysql which are allowed to only access the database server from localhost as until now the applciation was sending SQL queries straight on localhost. Now the architecture has to change to use the MySQL Database remotely.

Hence I've migrated the MySQL server by dumping all the existing the databases on MySQL host A  with:

mysqldump -u root -p --all-databases > alldbs_dump.sql


And then importing the databases on host B with

mysql -u root -p < alldbs_dump.sql

Though this migrated the data from Host A to Host B, still the application on Host A was failing to succesfully use its data from database on Host B, because of inability to properly authenticate. It couldn't authenticate because MySQL on Host B's users are not configured to have access from IP address of Host A, but only allowed the application users to be able to connect on localhost..

I've used following SQL CLI query to check Hosts allowed to connect to MySQL (in this case localhost):

# mysql -u root -p
mysql> use mysql;
mysql> select * from user where user like '%eameiotest%' and Host='localhost';


To fix that I logged on MySQL server on Host B with mysql cli and issued for each of the users the application was using:

UPDATE mysql.user SET Host='%' WHERE Host='localhost' AND User='eameiotest';
 

UPDATE mysql.user SET Host='%' WHERE Host='localhost' AND User='eameiotest2';
 

UPDATE mysql.user SET Host='%' WHERE Host='localhost' AND User='eameiotest3';


On execution, If you get errors like:
 

ERROR 1062 (23000): Duplicate entry '%-eameiotest' for key 'PRIMARY'


Don't think that there is no solution, as I've read some threads online claiming the only way to get around this issue is to dump mysql database and re-import it, this is not necessery. There is a work around to this MySQL bug.

To work-around the error, you will first have to set the user allowed access host to empty – ' ' :


UPDATE mysql.user SET Host='' WHERE Host='localhost' AND User='eameiotest';
 

UPDATE mysql.user SET Host='' WHERE Host='localhost' AND User='eameiotest2';
 

UPDATE mysql.user SET Host='' WHERE Host='localhost' AND User='eameiotest3';


And re-issue again commands:
 

UPDATE mysql.user SET Host='%' WHERE Host='localhost' AND User='eameiotest';
 

UPDATE mysql.user SET Host='%' WHERE Host='localhost' AND User='eameiotest2';
 

UPDATE mysql.user SET Host='%' WHERE Host='localhost' AND User='eameiotest3';


You might want to also issue:
 

GRANT ALL PRIVILEGES ON yourdatabase-name.* TO 'eameiotest1'@'server-host';

GRANT ALL PRIVILEGES ON yourdatabase-name.* TO 'eameiotest2'@'server-host';

GRANT ALL PRIVILEGES ON yourdatabase-name.* TO 'eameiotest3'@'server-host';
 

This should have solve the app connection issues, Cheers 🙂


Monitoring MySQL server queries and debunning performance (slow query) issues with native MySQL commands and with mtop, mytop

Thursday, May 10th, 2012

If you're a Linux server administrator running MySQL server, you need to troubleshoot performance and bottleneck issues with the SQL database every now and then. In this article, I will pinpoint few methods to debug basic issues with MySQL database servers.

1. Troubleshooting MySQL database queries with native SQL commands

a)One way to debug errors and get general statistics is by logging in with mysql cli and check the mysql server status:

# mysql -u root -p
mysql> SHOW STATUS;
+-----------------------------------+------------+
| Variable_name | Value |
+-----------------------------------+------------+
| Aborted_clients | 1132 |
| Aborted_connects | 58 |
| Binlog_cache_disk_use | 185 |
| Binlog_cache_use | 2542 |
| Bytes_received | 115 |
.....
.....
| Com_xa_start | 0 |
| Compression | OFF |
| Connections | 150000 |
| Created_tmp_disk_tables | 0 |
| Created_tmp_files | 221 |
| Created_tmp_tables | 1 |
| Delayed_errors | 0 |
| Delayed_insert_threads | 0 |
| Delayed_writes | 0 |
| Flush_commands | 1 |
.....
.....
| Handler_write | 132 |
| Innodb_page_size | 16384 |
| Innodb_pages_created | 6204 |
| Innodb_pages_read | 8859 |
| Innodb_pages_written | 21931 |
.....
.....
| Slave_running | OFF |
| Slow_launch_threads | 0 |
| Slow_queries | 0 |
| Sort_merge_passes | 0 |
| Sort_range | 0 |
| Sort_rows | 0 |
| Sort_scan | 0 |
| Table_locks_immediate | 4065218 |
| Table_locks_waited | 196 |
| Tc_log_max_pages_used | 0 |
| Tc_log_page_size | 0 |
| Tc_log_page_waits | 0 |
| Threads_cached | 51 |
| Threads_connected | 1 |
| Threads_created | 52 |
| Threads_running | 1 |
| Uptime | 334856 |
+-----------------------------------+------------+
225 rows in set (0.00 sec)

SHOW STATUS; command gives plenty of useful info, however it is not showing the exact list of queries currently processed by the SQL server. Therefore sometimes it is exactly a stucked (slow queries) execution, you need to debug in order to fix a lagging SQL. One way to track this slow queries is via enabling mysql slow-query.log. Anyways enabling the slow-query requires a MySQL server restart and some critical productive database servers are not so easy to restart and the SQL slow queries have to be tracked "on the fly" so to say.
Therefore, to check the exact (slow) queries processed by the SQL server (without restarting it), do
 

mysql> SHOW processlist;
+——+——+—————+——+———+——+————–+——————————————————————————————————+
| Id | User | Host | db | Command | Time | State | Info |
+——+——+—————+——+———+——+————–+——————————————————————————————————+
| 609 | root | localhost | blog | Sleep | 5 | | NULL |
| 1258 | root | localhost | NULL | Sleep | 85 | | NULL |
| 1308 | root | localhost | NULL | Query | 0 | NULL | show processlist |
| 1310 | blog | pcfreak:64033 | blog | Query | 0 | Sending data | SELECT comment_author, comment_author_url, comment_content, comment_post_ID, comment_ID, comment_aut |
+——+——+—————+——+———+——+————–+——————————————————————————————————+
4 rows in set (0.00 sec)
mysql>

SHOW processlist gives a good view on what is happening inside the SQL.

To get more complete information on SQL query threads use the full extra option:

mysql> SHOW full processlist;

This gives pretty full info on running threads, but unfortunately it is annoying to re-run the command again and again – constantly to press UP Arrow + Enter keys.

Hence it is useful to get the same command output, refresh periodically every few seconds. This is possible by running it through the watch command:

debian:~# watch "'show processlist' | mysql -u root -p'secret_password'"

watch will run SHOW processlist every 2 secs (this is default watch refresh time, for other timing use watch -n 1, watch -n 10 etc. etc.

The produced output will be similar to:

Every 2.0s: echo 'show processlist' | mysql -u root -p'secret_password' Thu May 10 17:24:19 2012

Id User Host db Command Time State Info
609 root localhost blog Sleep 3 NULL1258 root localhost NULL Sleep 649 NULL1542 blog pcfreak:64981 blog Query 0 Copying to tmp table \
SELECT p.ID, p.post_title, p.post_content,p.post_excerpt, p.pos
t_date, p.comment_count, count(t_r.o
1543 root localhost NULL Query 0 NULL show processlist

Though this "hack" is one of the possible ways to get some interactivity on what is happening inside SQL server databases and tables table. for administering hundred or thousand SQL servers running dozens of queries per second – monitor their behaviour few times aday using mytop or mtop is times easier.

Though, the names of the two tools are quite similar and I used to think both tools are one and the same, actually they're not but both are suitable for monitoring sql database execution in real time.

As a sys admin, I've used mytop and mtop, on almost each Linux server with MySQL server installed.
Both tools has helped me many times in debugging oddities with sql servers. Therefore my personal view is mytop and mtop should be along with the Linux sysadmin most useful command tools outfit, still I'm sure many administrators still haven't heard about this nice goodies.

1. Installing mytop on Debian, Ubuntu and other deb based GNU / Linux-es

mytop is available for easy install on Debian and across all debian / ubuntu and deb derivative distributions via apt.

Here is info obtained with apt-cache show

debian:~# apt-cache show mytop|grep -i description -A 3
Description: top like query monitor for MySQL
Mytop is a console-based tool for monitoring queries and the performance
of MySQL. It supports version 3.22.x, 3.23.x, 4.x and 5.x servers.
It's written in Perl and support connections using TCP/IP and UNIX sockets.

Installing the tool is done with the trivial:

debian:~# apt-get --yes install mytop
....

mtop used to be available for apt-get-ting in Debian Lenny and prior Debian releases but in Squeeze onwards, only mytop is included (probably due to some licensing incompitabilities with mtop??).

For those curious on how mtop / mytop works – both are perl scripts written to periodically connects to the SQL server and run commands similar to SHOW FULL PROCESSLIST;. Then, the output is parsed and displayed to the user.

Here how mytop running, looks like:
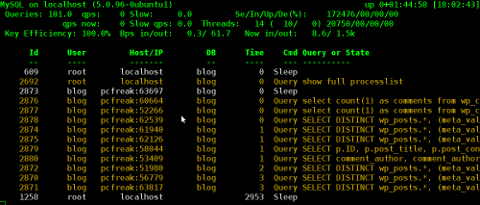
MyTOP showing queries running on Ubuntu 8.04 Linux - Debugging interactively top like MySQL

2. Installing mytop on RHEL and CentOS

By default in RHEL and CentOS and probably other RedHat based Linux-es, there is neither mtop nor mytop available in package repositories. Hence installing the tools on those is only available from 3rd parties. As of time of writting an rpm builds for RHEL and CentOS, as well as (universal rpm distros) src.rpm package is available on http://pkgs.repoforge.org/mytop/. For the sake of preservation – if in future those RPMs disappear, I made a mirror of mytop rpm's here

Mytop rpm builds depend on a package perl(Term::ReadKey), my attempt to install it on CentOS 5.6, returned following err:

[root@cenots ~]# rpm -ivh mytop-1.4-2.el5.rf.noarch.rpm
warning: mytop-1.4-2.el5.rf.noarch.rpm: Header V3 DSA signature: NOKEY, key ID 6b8d79e6
error: Failed dependencies:
perl(Term::ReadKey) is needed by mytop-1.4-2.el5.rf.noarch

The perl(Term::ReadKey package is not available in CentOS 5.6 and (probably other centos releases default repositories so I had to google perl(Term::ReadKey) I found it on http://rpm.pbone.net/ package repository, the exact url to the rpm dependency as of time of writting this post is:

ftp://ftp.pbone.net/mirror/yum.trixbox.org/centos/5/old/perl-Term-ReadKey-2.30-2.rf.i386.rpm

Quickest, way to install it is:

[root@centos ~]# rpm -ivh ftp://ftp.pbone.net/mirror/yum.trixbox.org/centos/5/old/perl-Term-ReadKey-2.30-2.rf.i386.rpmRetrieving ftp://ftp.pbone.net/mirror/yum.trixbox.org/centos/5/old/perl-Term-ReadKey-2.30-2.rf.i386.rpmPreparing... ########################################### [100%]
1:perl-Term-ReadKey ########################################### [100%]

This time mytop, install went fine:

[root@centos ~]# rpm -ivh mytop-1.4-2.el5.rf.noarch.rpm
warning: mytop-1.4-2.el5.rf.noarch.rpm: Header V3 DSA signature: NOKEY, key ID 6b8d79e6
Preparing... ########################################### [100%]
1:mytop ########################################### [100%]

To use it further, it is the usual syntax:

mytop -u username -p 'secret_password' -d database

CentOS Linux MyTOP MySQL query benchmark screenshot - vpopmail query

3. Installing mytop and mtop on FreeBSD and other BSDs

To debug the running SQL queries in a MySQL server running on FreeBSD, one could use both mytop and mtop – both are installable via ports:

a) To install mtop exec:

freebsd# cd /usr/ports/sysutils/mtop
freebsd# make install clean
....

b) To install mytop exec:

freebsd# cd /usr/ports/databases/mytop
freebsd# make install clean
....

I personally prefer to use mtop on FreeBSD, because once run it runs prompts the user to interactively type in the user/pass

freebsd# mtop

Then mtop prompts the user with "interactive" dialog screen to type in user and pass:

Mtop interactive type in username and password screenshot on FreeBSD 7.2

It is pretty annoying, same mtop like syntax don't show user/pass prompt:

freebsd# mytop
Cannot connect to MySQL server. Please check the:

* database you specified "test" (default is "test")
* username you specified "root" (default is "root")
* password you specified "" (default is "")
* hostname you specified "localhost" (default is "localhost")
* port you specified "3306" (default is 3306)
* socket you specified "" (default is "")
The options my be specified on the command-line or in a ~/.mytop
config file. See the manual (perldoc mytop) for details.
Here's the exact error from DBI. It might help you debug:
Unknown database 'test'

The correct syntax to run mytop instead is:

freebsd# mytop -u root -p 'secret_password' -d 'blog'

Or the longer more descriptive:

freebsd# mytop --user root --pass 'secret_password' --database 'blog'

By the way if you take a look at mytop's manual you will notice a tiny error in documentation, where the three options –user, –pass and –database are wrongly said to be used as -user, -pass, -database:

freebsd# mytop -user root -pass 'secret_password' -database 'blog'
Cannot connect to MySQL server. Please check the:

* database you specified "atabase" (default is "test")
* username you specified "ser" (default is "root")
* password you specified "ass" (default is "")
* hostname you specified "localhost" (default is "localhost")
* port you specified "3306" (default is 3306)
* socket you specified "" (default is "")a
...
Access denied for user 'ser'@'localhost' (using password: YES)

Actually it is interesting mytop, precededed historically mtop.
mtop was later written (probably based on mytop), to run on FreeBSD OS by a famous MySQL (IT) spec — Jeremy Zawodny .
Anyone who has to do frequent MySQL administration tasks, should already heard Zawodny's name.
For those who haven't, Jeremy used to be a head database administrators and developer in Yahoo! Inc. some few years ago.
His website contains plenty of interesting thoughts and writtings on MySQL server and database management
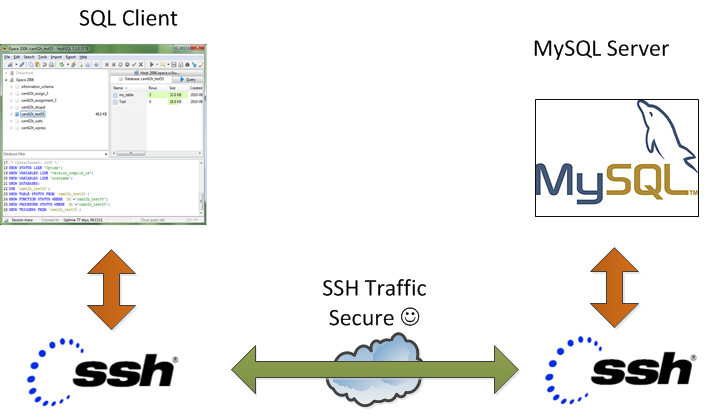
 

How to create ssh tunnels / ssh tunneling on Linux and FreeBSD with openssh

Saturday, November 26th, 2011

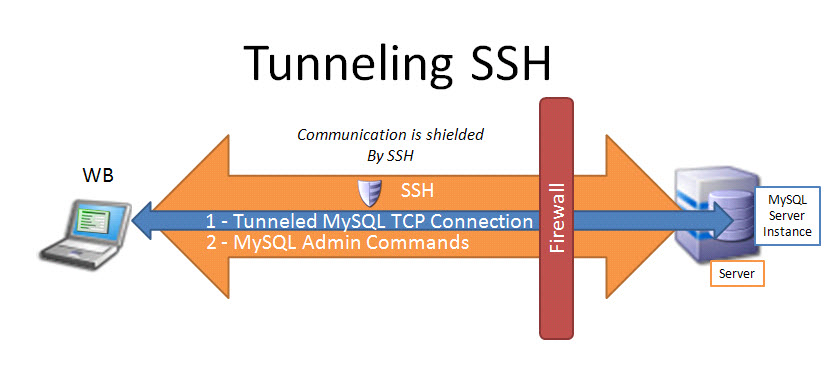
ssh-tunnels-port-forwarding-windows-linux-bypassing-firewall-diagram
SSH tunneling
allows to send and receive traffic using a dedicated port. Using an ssh traffic can have many reasons one most common usage reason is to protect the traffic from a host to a remote server or to access port numbers which are by other means blocked by firewall, e.g.: (get around firewall filtering)
SSH tunneling works only with TCP traffic. The way to make ssh tunnel is with cmds:

host:/root# ssh -L localhost:deshost:destport username@remote-server.net
host:/root# ssh -R restport:desthost:localport username@remote-server.net
host:/root# ssh -X username@remote-server.net

This command will make ssh to bind a port on localhost of the host host:/root# machine to the host desthost:destport (destination host : destinationport). Important to say deshost is the host destination visible from the remote-server.net therefore if the connection is originating from remote-server.net this means desthost will be localhost.
Mutiple ssh tunnels to multiple ports using the above example commands is possible. Here is one example of ssh tunneling
Let’s say its necessery to access an FTP port (21) and an http port (80), listening on remote-server.net In that case desthost will be localhost , we can use locally the port (8080) insetad of 80, so it will be no necessery to make the ssh tunnel with root (admin privileges). After the ssh session gets opened both services will be accessible on the local ports.

host:/home/user$ ssh -L 21:localhost:21 -L 8080:localhost:80 user@remote-server.net

That’s all enjoy 😉

Preserve Session IDs of Tomcat cluster behind Apache reverse proxy / Sticky sessions with mod_proxy and Tomcat

Wednesday, February 26th, 2014

apache_and_tomcat_merged_logo_prevent_sticky_sessions
Having a combination of Apache webservice Reverse Proxy to redirect invisibly traffic to a number of Tomcat server positioned in a DMZ is a classic task in big companies Corporate world.
Hence if you work for company like IBM or HP sooner or later you will need to configure Apache Webserver cluster with few running Jakarta Tomcat Application servers behind. Scenario with necessity to access a java based application via Tomcat which requires logging (authentication) relaying on establishing and keeping a session ID is probably one of the most common ones and if you do it for first time you will probably end up with Session ID issues.  Session ID issues are hard to capture at first as on first glimpse application will seem to be working but users will have to re-login all the time even though the programmers might have coded for a session to expiry in 30 minutes or so.

… I mean not having configured Session ID prevention to Tomcats will cause random authentication session expiries and users using the Tomcat app will be unable to normally access below application with authenticated credentials. The solution to these is known under term "Sticky sessions"
To configure Sticky sessions you need to already have configured Apache/s with following minimum configuration:

  • enabled mod_proxy, proxy_balancer_module, proxy_http_module and or mod_proxy_ajp (in Apache config)

  LoadModule proxy_module modules/mod_proxy.so
LoadModule proxy_balancer_module modules/mod_proxy_balancer.so
LoadModule proxy_http_module modules/mod_proxy_http.so

  • And configured and tested Tomcats running an Application reachable via AJP protocol

Below example assumes there is Reverse Proxy Load Balancer Apache which has to forward all traffic to 2 tomcats. The config can easily be extended for as many as necessary by adding more BalancerMembers.

In Apache webserver (apache2.conf / httpd.conf) you need to have JSESSIONID configured. These JSESSIONID is going to be appended to each client request from Reverse Proxy to each of Tomcat servers with value opened once on authentication to first Tomcat node to each of the other ones.

<Proxy balancer://mycluster>
BalancerMember ajp://10.16.166.53:11010/ route=delivery1
BalancerMember ajp://10.16.166.66:11010/ route=delivery2
</Proxy>

ProxyRequests Off
ProxyPass / balancer://mycluster/ stickysession=JSESSIONID
ProxyPassReverse / balancer://mycluster/

The two variables route=delivery1 and route=delivery2 are routed to hosts identificators that also has to be present in Tomcat server configurations
In Tomcat App server First Node (server.xml)

<Engine name="Catalina" defaultHost="localhost" jvmRoute="delivery1">

In Tomcat App server Second Node (server.xml)

<Engine name="Catalina" defaultHost="localhost" jvmRoute="delivery2">

Once Sticky Sessions are configured it is useful to be able to track they work fine this is possible through logging each of established JESSSIONIDs, to do so add in httpd.conf

LogFormat "%h %l %u %t \"%r\" %>s %b \"%{Referer}i\" \"%{User-Agent}i\"\"%{JSESSIONID}C\"" combined

After modifications restart Apache and Tomcat to load new configs. In Apache access.log the proof should be the proof that sessions are preserved via JSESSIONID, there should be logs like:
 

127.0.0.1 - - [18/Sep/2013:10:02:02 +0800] "POST /examples/servlets/servlet/RequestParamExample HTTP/1.1" 200 662 "http://localhost/examples/servlets/servlet/RequestParamExample" "Mozilla/5.0 (X11; Linux x86_64; rv:17.0) Gecko/20130807 Firefox/17.0""B80557A1D9B48EC1D73CF8C7482B7D46.server2"

127.0.0.1 - - [18/Sep/2013:10:02:06 +0800] "GET /examples/servlets/servlet/RequestInfoExample HTTP/1.1" 200 693 "http://localhost/examples/servlets/" "Mozilla/5.0 (X11; Linux x86_64; rv:17.0) Gecko/20130807 Firefox/17.0""B80557A1D9B48EC1D73CF8C7482B7D46.server2"

That should solve problems with mysterious session expiries 🙂

How to make SSH tunnel with PuTTY terminal client

Monday, November 18th, 2013

Create-how to make ssh tunnel with Putty on microsoft windows Vista / 7 XP / 2000
Earlier I blogged how to create SSH tunnels on Linux. Another interesting thing is how to make SSH tunnels on Windows. This can be done with multiple SSH clients but probably quickest and most standard way is to do create SSH tunnel with Putty. So why would one want to make SSH tunnel to a Windows host? Lets say your remote server has a port filtered to the Internet but available to a local network to which you don't have direct access, the only way to access the port in question then is to create SSH tunnel between your computer and remote machine on some locally binded port (lets say you need to access port 80 on remote host and you will access it through localhost tunneled through 8080). Very common scenario where tunneling comes handy if you have a Tomcat server behind firewalled DMZ| / load balancer or Reverse Proxy. Usually on well secured networks direct access to Tomcat application server will be disabled to its listen port (lets say 11444). Another important great think of SSH tunnels is all information between Remote server and local PC are transferred in strong SSH crypted form so this adds extra security level to your communication.
Once "real life" case of SSH tunnel is whether you have to deploy an application which fails after deployment with no meaningful message but error is returned by Apache Reverse Proxy. To test directly tomcat best thing is to create SSH tunnel between remote host 11444 and local host through 11444 (or any other port of choice). Other useful case would be if you have to access directly via CLI interface an SQL server lets say MySQL (remote port 3306 filtered) and inaccessible with mysql cli or Oracle DB with Db listener on port 1521 (needed to accessed via sqlplus).

In that case Putty's Tunneling capabilities comes handy especially if you don't have a Linux box at hand.
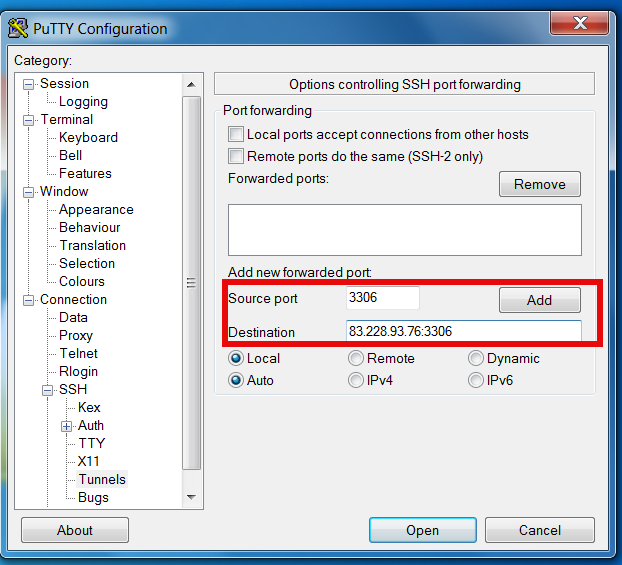
To create new SSH tunnel in putty to MySQL port 3306 on localhost (3306) – be sure MySQL is not running on localhost 😉
Open Putty Navigate in left pane config bar to:

SSH -> Tunnels

Type in

Source Port

– port on which SSH tunnel will be binded on your Windows (localhost / 127.0.0.1) in this example case 3306.

Then for

Destination
– IP address or host of remote host with number of port to which SSH tunnel will be opened.

N.B. ! in order to make tunneling possible you will need to have opened access to SSH port of remote (Destination) host

make ssh tunnel on Microsoft Windows putty to remote filtered mysql shot

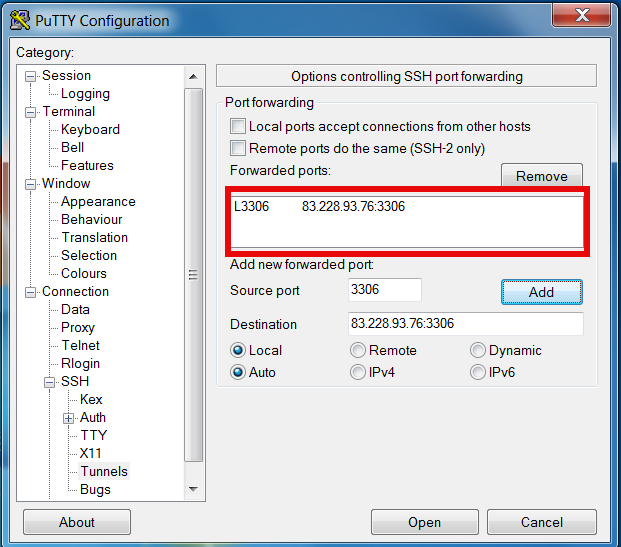
make ssh tunnels on Microsoft windows putty to remote filtered mysql 2 screenshot

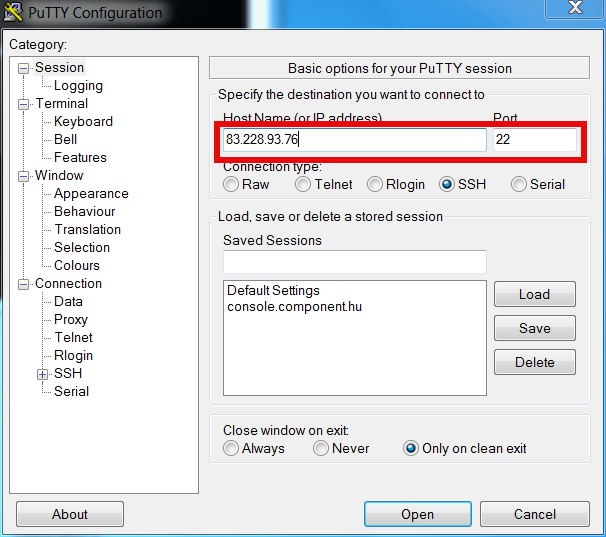
open ssh tunnel via WINDOWS port 22 on microsoft windows 7 screenshot

Once click Open you will be prompted for username on remote host in my case to my local router 83.228.93.76. Once you login to remote host open command prompt and try to connect Windows Command prompt Start -> Run (cmd.exe) ;

C:\Users\\hipo> telnet localhost 3306

Connection should be succesful and you from there on assuming you have the MySQL cli version for windows installed you can use to login to remote SQL via SSH tunnel with;

C:\Users\\hipo> mysql -u root -h localhost -p

To later remove existing SSH Tunnel go again to SSH -> Tunnels press on SSH tunnel and choose Remove

Further you can craete multiple SSH tunnels for all services to remote host where access is needed. Important think to remember when creating multiple SSH connections is source port on localhost to remote machine should be unique

How to add a new MySQL user to have INSERT,UPDATE,DELETE permissions to a Database

Tuesday, October 25th, 2011

I needed to add a newly created MySQL user with no access to any database with no special permissions (user is created from phpmyadmin) with some permissions to a specific database which is used for the operation of a website, here are the MySQL CLI client commands I issued to make it work:

# mysql -u root -p
mysql> GRANT ALL ON Sql_User_DB.* TO Sql_User@localhost;
mysql> FLUSH PRIVILEGES;

Where in the Example Sql_User_DB is my example database to which the user is granted access and my sample user is Sql_User .
Note that without FLUSH PRIVILEGES; new privileges might not be active. 

To test further if all is fine login with Sql_User and try to list database tables.

$ mysql -u Sql_User -p
password:
mysql> USE Sql_User_DB;
mysql> SHOW TABLES;
...

How to make a mysql root user to login interactive with mysql cli passwordless

Wednesday, June 29th, 2011

MySQL Logo Passwordless root login .my.cnf

I’m using access to the mysql servers via localhost with mysql cli on daily basis.
With time I’ve figured out that it’s pretty unahandy to always login with my root mysql password, I mean each time to enter it, e.g.:

root@mysql-server:~# mysql -u root
Enter password:
...

Thus to make my life a way easier I decided to store my mysql root password in order to allow my root admin user to be able to login to my mysql server without asking for password. This saves time and nerves, as I’m not supposed to look up for the password file I store my server mysql root pass.

To allow my mysql cli interface, to login passwordless to the SQL server I had to create the file /root/.my.cnf readable only for my root user and store my MySQL username and password there.

Here is a sample /root/.my.cnf file:

root@mysql-server:~# cat /root/.my.cnf
[client]
user="root"
pass="mysecretMySQLPasswordgoeshere"

Now next time I use the mysql console interface to access my mysql server I don’t have to supply the password, here is how easier is the mysql login afterwards:

root@mysql-server:~# mysql -u root
Welcome to the MySQL monitor. Commands end with ; or g.
Your MySQL connection id is 3520
Server version: 5.0.77 Source distribution

Type ‘help;’ or ‘h’ for help. Type ‘c’ to clear the buffer.

mysql>

The only downside of using .my.cnf to store permanently the mysql server root and password is from security standpoint.
If for instance somebody roots my servers, where I have stored my root user/pwds in .my.cnf , he will be able immediately to get access to the MySQL server.

Another possible security flaw with using the mysql passwordless login “trick” is if somebody forgets to set proper file permissions to, .my.cnf

Once again the file should possess the permissons of:

root@mysql-server:~# ls -al /root/.my.cnf
-rw------- 1 root root 90 Apr 2 00:05 /root/.my.cnf

Any other permissons might allow non-privileged users to read the file and gain unathorized admin access to the SQL server.
 

How to fix “ERROR 1577 (HY000) at line 1: Cannot proceed because system tables used by Event Scheduler were found damaged at server start”

Saturday, May 12th, 2012

After migrating databases data from FreeBSD MySQL 5.0.83 server to a Debian Squeeze Linux MySQL version 5.1.61, below is a mysql –version issued on both the FreeBSD and the Debian servers

freebsd# mysql --version
mysql Ver 14.12 Distrib 5.0.83, for portbld-freebsd7.2 (i386) using 5.2

debian:~# mysql --version
mysql Ver 14.14 Distrib 5.1.61, for debian-linux-gnu (i486) using readline 6.1

The data SQL dump from the FreeBSD server was dumped with following command arguments:

freebsd# mysqldump --opt --allow-keywords --add-drop-table --all-databases -u root -p > complete_db_dump.sql

Then I used sftp to transfer complete_db_dump.sql dump to the a brand new installed latest Debian Squeeze 6.0.2. The Debian server was installed using a "clean Debian install" without graphical environment with CD downloaded from debian.org's site.

On the Debian machine I imported the dump with command:

debian:~# mysq -u root -p < complete_db_dump.sql

Right After the dump was imported I re-started SQL server which was previously installed with:

debian:~# apt-get install mysql-server
The error I got after restarting the mysql server:

debian:~# #/etc/init.d/mysql restart

was:

ERROR 1577 (HY000) at line 1: Cannot proceed because system tables used by Event Scheduler were found damaged at server start
ERROR 1547 (HY000) at line 1: Column count of mysql.proc is wrong. Expected 20, found 16. The table is probably corrupted

This error cost me a lot of nerves and searching in google to solve. It took me like half an hour of serious googling ,until I finally found the FIX!!!:

debian:~# mysql_upgrade -u root -h localhost -p --verbose --force
Enter password:
Looking for 'mysql' as: mysql
Looking for 'mysqlcheck' as: mysqlcheck
Running 'mysqlcheck' with connection arguments: '--port=3306' '--socket=/var/run/mysqld/mysqld.sock' '--host=localhost'
bible.holy_bible OK
bible.holybible OK
bible.quotes_meta OK

Afterwards finally I had to restart the mysql server once again in order to finally get rid of the shitty:

ERROR 1547 (HY000) at line 1: Column count of mysql.proc is wrong. Expected 20, found 16. The table is probably corrupted error!

debian:~# /etc/init.d/mysql restart
Stopping MySQL database server: mysqld.
Starting MySQL database server: mysqld.
Checking for corrupt, not cleanly closed and upgrade needing tables..

This solved the insane Column count of mysql.proc is wrong. Expected 20, found 16 once and for all!

Before I came with this fix I tried all kind of forum suggested fixes like:

debian:~# mysql_upgrade -u root -p
Looking for 'mysql' as: mysql
Looking for 'mysqlcheck' as: mysqlcheck
This installation of MySQL is already upgraded to 5.1.61, use --force if you still need to run mysql_upgrade

debian:~# mysql_upgrade -p
Looking for 'mysql' as: mysql
Looking for 'mysqlcheck' as: mysqlcheck
This installation of MySQL is already upgraded to 5.1.61, use --force if you still need to run mysql_upgrade

And few more, none of them worked the only one that worked was:

debian:~# #mysql_upgrade -u root -h localhost -p --verbose --force

I have to say big thanks to Mats Lindth wonderful blog post which provided me with the solution.

It seems, since Oracle bought the Community edition of MySQL thinks with this database server are getting more and more messy and backwards incompatible day by day.
Lately, I'm experiencing too much hassles with MySQL version incompitabilities. Maybe I should think for migrating permanently to Postgre …

By the way the ERROR 1547 (HY000) at line 1: Column count of mysql.proc is wrong. is most probably caused of some kind of password hashing incompitability between the password hashing between the BSD and Debian SQL versions, as mysql -u root -p < dump.sql, does override default stored user passwords in the mysql database tables… Such password, hashing issues were common in prior MySQL 4 to MySQL 5 migrations I've done, however since MySQL 5+ is already storing its password strings encrypted with md5 encryption I wonder why on earth this mess happens ….