Posts Tagged ‘location’
Saturday, March 3rd, 2012 I've recently had to make a copy of one /usr/local/nginx directory under /usr/local/nginx-bak, in order to have a working copy of nginx, just in case if during my nginx update to new version from source mess ups.
I did not check the size of /usr/local/nginx , so just run the usual:
nginx:~#  cp -rpf /usr/local/nginx /usr/local/nginx-bak

...
Execution took more than 20 seconds, so I check the size and figured out /usr/local/nginx/logs has grown to 120 gigabytes.
I didn't wanted to extra load the production server with copying thousands of gigabytes so I asked myself if this is possible with normal Linux copy (cp) command?. I checked cp manual e.g. man cp, but there is no argument like –exclude or something.
Even though the cp command exclude feature is not implemented by default there are a couple of ways to copy a directory with exclusion of subdirectories of files on G / Linux.
Here are the 3 major ones:
1. Copy directory recursively and exclude sub-directories or files with GNU tar
Maybe the quickest way to copy and exclude directories is through a littke 'hack' with GNU tar
nginx:~# mkdir /usr/local/nginx-new;

nginx:~# cd /usr/local/nginx#

nginx:/usr/local/nginx# tar cvf - \. --exclude=/usr/local/nginx/logs/* \

| (cd /usr/local/nginx-new; tar -xvf - )
Copying that way however is slow, in my case it fits me perfectly but for copying large chunks of data it is better not to use pipe and instead use regular tar operation + mv
# cd /source_directory

# tar cvf test.tar --exclude=dir_to_exclude/*\--exclude=dir_to_exclude1/* . \

# mv test.tar /destination_directory

# cd /destination# tar xvf test.tar
2. Copy folder recursively excluding some directories with rsync
P>eople who has experience with rsync , already know how invaluable this tool is. Rsync can completely be used as for substitute=de.a# rsync -av –exclude='path1/to/exclude' –exclude='path2/to/exclude' source destination
This example, can also be used as a solution to my copy nginx and exclude logs directory casus like so:
nginx:~# rsync -av --exclude='/usr/local/nginx/logs/' /usr/local/nginx/ /usr/local/nginx-new
As you can see for yourself, this is a way more readable for the tar, however it will not work on servers, where rsync is not installed and it is unusable if you have to do operations as a regular users on such for that case surely the GNU tar hack is more 'portable' across systems.
rsync has also Windows version and therefore, the same methodology should be working on MS Windows and good for batch scripting.
I've not tested it myself, yet as I've never used rsync on Windows, if someone has tried and it works pls drop me a short msg in comments.
3. Copy directory and exclude sub directories and files with find
Find in collaboration with cp can also be used to exclude certain directories while copying. Actually this method is better than the GNU tar hack and surely more efficient. For machines, where rsync is not installed it is just a perfect way to copy files from location to location, while excluding some directories, here is an example use of find and cp, for the above nginx case:
nginx:~# cd /usr/local/nginx

nginx:~# mkdir /usr/local/nginx

nginx:/usr/local/nginx# find . -type d \( ! -name logs \) -print -exec cp -rpf '{}' /usr/local/nginx-bak \;
This will find all directories inside /usr/local/nginx with find command print them on the screen, then execute recursive copy over each found directory and copy to /usr/local/nginx-bak
This example will work fine in the nginx case because /usr/local/nginx does not contain any files but only sub-directories. In other occwhere the directory does contain some files besides sub-directories the files had to also be copied e.g.:
# for i in $(ls -l | egrep -v '^d'); do\

cp -rpf $i /destination/directory
This will copy the files from source directory (for instance /usr/local/nginx/my_file.txt, /usr/local/nginx/my_file1.txt etc.), which doesn't belong to a subdirectory.
The cmd expression:
# ls -l | egrep -v '^d'
Lists only the files while excluding all the directories and in a for loop each of the files is copied to /destination/directory
If someone has better ideas, please share with me 🙂
Tags: argument, Auto, copy, copy cp, copy directory, copy folder, copying, destination directory, directory cd, Draft, eople, exclusion, feature, file, g man, gigabytes, gnu linux, gnu tar, linux linux, littke, location, man cp, mess, mess ups, msg, operation, p eople, production, production server, recursively, rpf, rsync, someone, something, source directory, subdirectories, substitute, tar cvf, tar xvf, test, tool, ups, xvf
Posted in Linux, Linux and FreeBSD Desktop, System Administration | 2 Comments »
Tuesday, May 31st, 2011 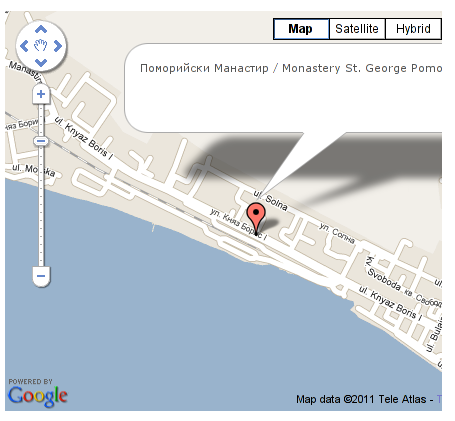
It’s a wise idea that every website has a address location map on it’s website, for that reason Google maps is just great.
To install Google maps capability to joomla one can use a plugin called Google Maps .
You can straighly download Joomla’s Googlemap plugin from here
Afterwards use Extension Manager to install the plugin e.g. follow:
Extensions -> Install/Uninstall (Choose File)
and click on Upload File & Install button.
To further enable and configure the Joomla Googlemap plugin you will have to go to the location:
Extensions -> Plugin Manager
Therein you will have to find and enable the Google Maps plugin which is to be found in the column named Plugin Manager
On my Joomla installation the plugin was located in the second page with modules, so if you don’t find the module on the listing with modules on the first page, make sure you scroll to the bottom of the page and click on Next button.
Therein in the list you will most likely notice Google Maps use the Enable button to enable it.
Next step is to configure the plugin, to do so press on the plugin name Google Maps
All configuration necessery here is to place Googlemaps API Key in the respective field (you will see it among config options).
Issuing a new Google Maps api key takes just few seconds, if you already have a gmail account just go to http://code.google.com/apis/maps/signup.html and take few seconds to issue the key.
You will get the key right on your gmail account after being issued (to repeat myself issuing takes few seconds so no worrier here).
Once having the key place it in the Googlemaps API Key field and configuring Address (which is one of the list of many options the plugin provides) you will be done with configuration.
To display a google map the location you just configured go to the Article Manager , select the article where you want the google mapslocation picture of your address to appear and type in the Article something like:
{mosmap|text='Exact street address location'|zoom='15'|zoomType='Large'|zoomNew='0'}
After you saved the article a very nice Google map showing you the location’s streets will appear on your web page in the article link where placed.
You can further conifgure a number of things related to the google maps just embedded into joomla, one thing you might want to play with is the zoom level.You see in below’s code is equal to 15, e.g. zoom=’15’
Set it to another one if you want to regulate your googlemaps zoom level.
For more thoroughful options take a look at the extensive plugin documentation and play with the many settings
Tags: address location, amp, article manager, Button, capability, config, config options, download, Extension, Gmail, gmail account, google, google map, google maps, Googlemap, Googlemaps, Install, installation, key, key field, level, location, ManagerTherein, Maps, necessery, page, plugin, plugin name, reason, street, type, upload, wise idea, worrier
Posted in Joomla, Various, Web and CMS | 2 Comments »
Tuesday, May 31st, 2011 This content editor is really awesome compared to the default editor TinyMCE. If you want to have an options rich content editor for Joomla, then this is the one for you 🙂
download JCE Content Editor here
After installing the JCE Joomla content editor in order to enable it as a default editor you need to go to the following location:
Site -> Global Configuration -> Default WYSIWYG Editor
There place on Editor TinyMCE and change it with Editor – JCE
Now go to edit some article, and you will see the difference in the editor 🙂
7. Add gallery Joomla capabilities with sigplus (Image Gallery Plus) and Very Simple Image Gallery
sigplus Image Gallery Plus is a straightforward way to add image or photo galleries to a Joomla article with a simple syntax. It takes a matter of minutes to set up a gallery but those who are looking for a powerful gallery solution will not be disappointed either: sigplus is suitable for both beginner and advanced users.
Tags: beginner, capabilities, Configuration, content, content editor, default editor, download, EditorThere, gallery, Global, global configuration, Image, image gallery, JCE, location, location site, matter, matter of minutes, nbsp, order, photo, photo galleries, place, Plus, site, solution, syntax, TinyMCE, way, WYSIWYG
Posted in Joomla, Various, Web and CMS | 1 Comment »
Thursday, June 2nd, 2011 he Joomla CMS default behaviour is that Page titles of the Joomla Articles created are always set to the page Title assigned to each of the articles.
This is not very good behaviour in terms of SEO, as the page title of each link on the main page is different and there is no continuous repeating pattern in all of the joomla pages.
Everyone that has even basic idea of SEO knows that page titles are very important weight factor to make indexing inside Search Engines succesful.
There is a well know SEO rule which is the more reoccuring pattern one has in his page titles, more is stressed on the keywords contained in the title.
As I said for some weird reason Joomla has no common page Title for all my the created Article pages linked via the Main Menu*
Thus in order to improve this bad default Joomla SEO behaviour one has to change the default auto assigned titles for created pages, manually.
Two things are necessery to change each of the joomla already existing TITLES.
1. Go to each of the pages (.e.g. Home etc.) and change the Parameters System Page Title settings
After logging in with administrator in Joomla, navigate to
Menus -> Main Menu*
Further on choose a menu item from all your existing items, let’s say Home and click on it.
On the left side below the Save, Apply, Close and Help buttons you will notice the menus:
Parameters (Basic), Parameters (Component), Parameters (System)
When clicked on Parameters (System) a submenu will appear:
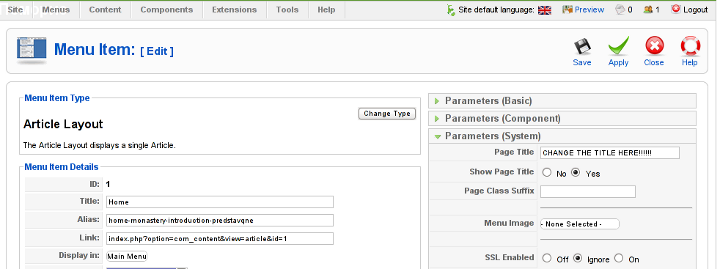
Above is a screenshot of the up-described Parameters (System) [Page Title] location
You need to change where it reads on the screenshot CHANGE THE TITLE HERE !!!!!! 😉
After entering your own desired page title go and save the article via the Apply or Save button (also visible in the screenshot).
Now as the custom Page Title is set, next step is to enable the custom Page Title for the respective Article in Article Manager
2. Enable custom Page Title for created pages in Joomla
Go to the Article Manager by following the menus:
Content -> Article Manager
Select the Article of which you want to change the Page Title to some custom text and click over it.
As the article opens for edit in an html editor, navigate to Parameters (Advanced) tab and therein change the Show Title from default setting value:
Use Global
to
Yes
Once again use the Save or Apply button to confirm the new settings and open your website in a new tab, try to browse and check the title of the articles parameters just edited. It should show up in the Title (page heading) the custom input Title.
Now repeat the same procedure for all pages (Articles), existing in Joomla to attune the Page Titles to some Google friendly strings and enjoy the better Search engine indexing which should likely follow.
Tags: article manager, Auto, Button, cms, Component, component parameters, custom, default behaviour, Draft, everyone, Global, good behaviour, home, indexing, location, menu, menus, necessery, page, page titles, Parameters, reason, screenshot, Search, search engines, SEO, show, submenu, tab, text, value, weird reason
Posted in Joomla, Various, Web and CMS | No Comments »
Tuesday, April 5th, 2011 For a number of time I’ve been planning to change my blog comments placement. Until this very day however I’ve kept the default wordpress theme’s Comments button placement.
I realize the default Comments button placement is a bit hard to see and not that much intuitive for the user that enters my blog for a first time.
My first guess was that there might be somewhere a wordpress plugin which will allow me to adjust my comments button placement.
After some research online and a realization that probably there is no such plugin existing yet. I’ve forced myself to tune it up myself.
It was clear to me that in order to change the it will be necessery to edit the WordPress templates files. I’m not a designer and when I hear about templates I usually get scared, however I took the time to take a look at the default wordpress template and find out actually that template modifications is actually rather easier than I thought.
My previous idea was that in order to edit templates you have to be some kind of CSS and HTML guru (which I’m not). Nevertheless it seems that in order to play and adjust in a good way the templates you don’t need ot be a pro.
Even an uneducated fool like myself can easily do almost everything he thinks of throughout few lines of code in the wp templates.
To get back to the major topic thanks God after a bit of review and reading of wordpress.org documentation and some user forums. I’ve figured out that in order to change my Comments placement you need to modify the file:
- blog/wp-content/themes/default/index.php
In index.php find the line starting with:
You will notice within this opened paragraph the php code:
<?php the_tags('Tags: ', ', ', '

'); ?> Posted in <?php the_category(', ') ?>

| <?php edit_post_link('Edit', '', ' | '); ?>

<?php comments_popup_link('No Comments »', '1 Comment »', '% Comments »'); ?>
This is the actual default theme php code that makes the wordpress Comments or No Comments that maes the comments appear on the blog.
Now I’ve decided to let this be as it is but add one more Comment button to wordpress on a different location that is more appealing to my blog visitors
After quick evaluation I’ve determined that probably the best location that the Comments button should have is right after the end of the post text
If you think my idea for button placement is appropriate, to set this location for the Comments button, you will have to find the follwoing code in index.php:
<div class="entry">

<?php the_content('Read the rest of this entry »'); ?>

</div>
Right after the end of this code place the following code:
<?php comments_popup_link('No Comments »', '1 Comment »', '% Comments »'); ?>

</div>
Tags: amp, Auto, blog, Button, button placement, code lt, Comment, content themes, CSS, default theme, Draft, everything, file, fool, god, guess, guru, HTML, idea, index, kind, line, link, location, lt, nbsp, necessery, online, order, org, paragraph, php, php code, place, placement, plugin, quot, reading, realization, right, template, text, textIf, time, topic, way, Wordpress, wordpress plugin, wordpress templates
Posted in Various, Web and CMS, Wordpress | 1 Comment »
Friday, September 16th, 2011 By the default wordpress does not have support for changing the exact font, therefore copying and pasting a text made in Open Office or MS Word often places in the Post or Page wp edit fonts different from the default one set for articles.
Hence some articles after being published on a wordpress blog show up with improper font and the only way to fix that is to change the font first in Open Office and then copy back to wordpress instead of simply being able to change the font from within the wordpress article.
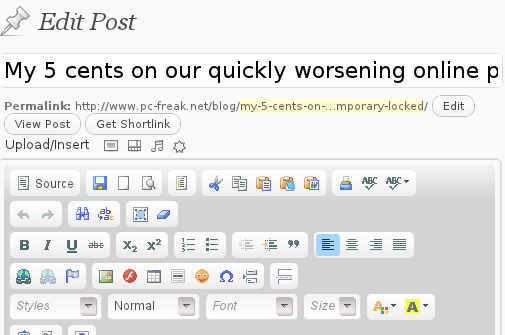
To get around this problem, there is a nice plugin fckeditor-for-wordpress-plugin which aids wordpress with an awesome Word like edit functionalities.
, downhload location for FCKEdit for WordPress is here
Here is a screenshot of the extra nice functionality the FCKEditor for wordpress providces.
Installing the plugin is like installing any other wordpress plugin and comes easily to:
debian:/~# cd /var/www/blog/wp-content/plugins

debian:/plugins# wget http://downloads.wordpress.org/plugin/fckeditor-for-wordpress-plugin.3.3.1.zip

...

debian:/plugins# unzip fckeditor-for-wordpress-plugin.3.3.1.zip

...

debian:/plugins# cd fckeditor-for-wordpress-plugin/
And further enabling the plugin from:
Plugins -> Inactive -> (Dean's FCKEditor For WordPress) Enable
fckeditor for wordpress will replace the default wordpress editor TinyMCE straight after being enabled.
I’ve done also a mirror of the current version as of time of writting of this article, one can download the fckeditor for wordpress mirrored here
Now really file editting inside wordpress admin panel is way easier and convenient 😉 Cheers
Tags: admin panel, aids, blog, Cheers, current version, dean, download, exact font, FCKEdit, FCKEditor, freak, functionality, hereHere, Inactive, Installing, location, lt, Microsoft, microsoft word, mirror, ms word, Open, open office, page, panel, plugin, post, quot, screenshot, show, time, unzip, var, version, way, wget, Word, Wordpress, wp, writting, www
Posted in Everyday Life, Various, Web and CMS, Wordpress | 2 Comments »
Thursday, September 22nd, 2011 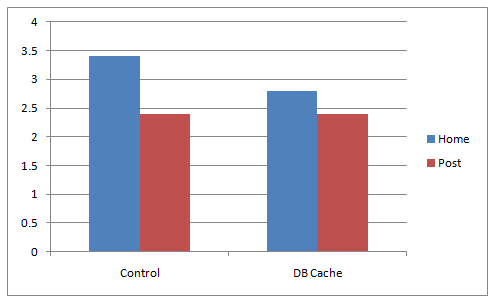
A combination of two wordpress caching plugins (Hyper Cache and Db Cachesignificantly improves the access times of a wordpress based blogs and websites.
Installing the two websites has drastically improved my blog opening times, so in my view having the two plugins on every wordpress install out there is a must! 🙂
The plugins installation is straight forward, here is how I installed them.
1. Installing Hyper Cache on WordPress
To install Hyper Cache all I had to do is download and enable the plugin, the plugin doesn’t require any configuration. I always love it when I don’t have to bother with reading configuration options and pondering for some 20 minutes on the plugin features, so in that perspective Hyper Cache in my view is a good alternative to WordPress Super Cache
Besides that WordPress Super Cache was having issues when enabled on few wordpress based websites I manage these days. For comparison Hyper Cache worked just great on all wordpress install I tried the plugin so far.
To install all I had to do is download the plugin unzip and enable it:
a. Download and unzip it
debian:/var/www/blog# wget http://downloads.wordpress.org/plugin/hyper-cache.zip

...

debian:/var/www/blog# cd wp-content/plugins

debian:/var/www/blog/wp-content/plugins# unzip hyper-cache.zip
b. Enable Hyper Cache plugin
To enable the plugin follow to standard plugin location;
Plugins -> Inactive -> Hyper Cache (Enable)
To enable the plugin follow to standard plugin location;
Plugins -> Inactive -> Hyper Cache (Enable)
A mirror of current version of hyper-cache.zip plugin is here
2. Installing Wodpress Db Cache
What Db Cache, does it does caching of last queries made to MySQL for specified time, so if the query has to be refetched again from wordpress’s php frontend the queries results are fetched straight for the memory. This decreases the load towards the MySQL server and increases the webpages loading time.
As the plugin page suggests it’s way faster than other html caching-plugins like WP-Cache or WP Super Cache
However, I think its still slower than using a combination of WP Super Cache’s alternative Hyper Cache and Db Cache . Combining this two could rise the webpage opening times according to some statisticonline at best cases up to 830% !! 😉 Let me proceed with how I did the install of Db Cache .
a. Download and Install Db Cache
debian:/var/www/blog/wp-content/plugins# wget http://downloads.wordpress.org/plugin/db-cache.0.6.zip
...
debian:/var/www/blog/wp-content/plugins# unzip db-cache.0.6.zip
b. Enable the plugin
Plugins -> Inactive -> Db Cache (Enable)
c. Make sure the permissions for Db Cache are correct
On Debian to enable Db Cache, the permissions should be changed for Apache to have a read/write permissions to plugin directory, on Debian to fix the permissions I used the commands:
debian:/var/www/blog# chown www-data:www-data wp-content
debian:/var/www/blog# chown -R www-data:www-data wp-content/plugins/db-cache
On other GNU/Linux distributions the above commands (user and group) www-data:www-data, should be set to whatever user/group Apache is running with, on Slackware this would be nobody:nobody, on CentOS and RHEL it would be apache:apache.
Finally to enable Db Cache go to
Settings -> Db Cache -> (Tick Enable) -> Save
I’ve also made a mirror of Db Cache plugin here
Enjoy the speed boost 😉
Tags: blog, blogs, CacheBesides, Cachesignificantly, CentOS, configuration options, current version, doesn, download, frontend, Inactive, Install, installation, Installing, itdebian, load time, loading, location, mirror, nbsp, nobody, page, perspective, php, plugin, pluginsdebian, queries, server load, Super, time, unzip, var, wget, Wordpress, WP-Cache, www, zipb
Posted in Linux, SEO, Various, Web and CMS, Wordpress | 2 Comments »
Saturday, October 15th, 2011 Since some time, I don’t know exactly where, after some updates of my WordPress running on a small server with FreeBSD 7.2. I’ve started getting a lot of Apache crashes. Often the wordpress scripts stopped working completely and I got only empty pages when trying to process the wordpress blog in a browser.
After a bunch of reading online, I’ve figured out that the cause might be PHP APC stands for Alternative PHP Cache .
I was not sure if the PHP running on the server had an APC configured at all so I used a phpinfo(); script to figure out if I had it loaded. I saw the APC among the loaded to show off in the list of loaded php modules, so this further led me to the idea the APC could be really causing the unexpected troubles.
Thus first I decided to disable the APC on a Virtualhost level for the domain where the crashing wordpress was hosted, to do I placed in the VirtualHost section in the Apache configuration /usr/local/etc/apache2/httpd.conf the following config directive:
php_flag apc.cache_by_default Off
These get me rid of the multiple errors:
PHP Warning: require_once() [function.require-once]: Unable to allocate memory for pool. in /usr/local/www/data-dist/blog/wp-content/plugins/tweet-old-post/top-admin.php on line 6
which constantly were re-occuring in php_error.log:
Further after evaluating all the websites hosted on the server and making sure none of which was really depending on APC , I’ve disabled the APC completely for PHP. To do so I issued:
echo 'apc.enabled = 0' >> /usr/local/etc/php.ini
Similarly on GNU/Linux to disable globally APC from PHP only the correct location to php.ini should be provided on Debian this is /etc/php5/apache2/php.ini .
Tags: apache, apache configuration, apc, blog, browser, cause, conf, config, configured, correct location, domain, error messages, freebsd, function, gnu linux, httpd, idea, ini, level, line, line 6, Linux, location, memory, OffThese, online, php cache, php error, pool, reading, scripts, time, virtualhost section, Warning, Wordpress, wordpress blog, www, www data
Posted in System Administration, Various, Wordpress | 1 Comment »
Thursday, February 2nd, 2012 I'm managing few wordpress installations which requires me to type in:
Hostname , FTP Username and FTP Password , every single time a plugin update is issued and I want to upgrade to the new version.
Below is a screenshot of this annoying behaviour:
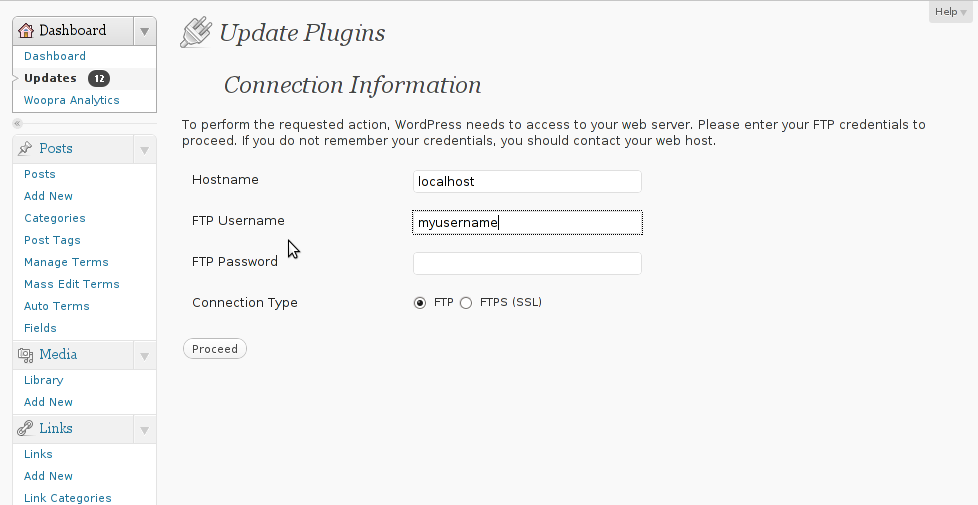
As you can see in the above screenshot, there is no way through Update Plugins web interface to store the password permanently. Hence the only option to store it permanently is to manually edit wp-config.php (file located in wordpress docroot, e.g. /path/to/wordpress/wp-config.php , inside the file find the line:
define ('WPLANG', '');
Right after it put a code similar to:
define('FS_METHOD', 'ftpsockets');

define('FTP_BASE', '/path/to/wordpress/');

define('FTP_CONTENT_DIR', '/path/to/wordpress/wp-content/');

define('FTP_PLUGIN_DIR ', '/path/to/wordpress/wp-content/plugins/');

define('FTP_USER', 'Username');

define('FTP_PASS', 'Password');

define('FTP_HOST', 'localhost');
Change the above defines:
path/to/wordpress/ – with your wordpress location directory.
Username and Password – with your respective FTP username and password. The localhost
That's all, from now onwards the User/Password prompt will not appear anymore. Consider there is a security downside of storing the FTP User/Pass in wp-config.php , if someone is able to intrude the wordpress install and access the documentroot of the wordpress install he we'll be able to obtain the ftp user/pass and log in the server directly via FTP protocol.
Tags: Auto, base path, behaviour, config, content, documentroot, downside, Draft, file, g path, host, line, localhost, location, location directory, password, Path, php, plugin, Protocol, screenshot, security, someone, time, type, update, User, version, way, web interface
Posted in System Administration, Web and CMS, Wordpress | 1 Comment »
Thursday, August 11th, 2011 I’ve completed a qmail installation few days ago on a fresh installed Debian Squeeze 64 bit server. All is configured and works fine, except qmailadmin and vqadmin.
As the mail server was missing any kind of web mail administration panel, I needed to make at least one of the two above to make with qmail.
I decided to concentrate on qmailadmin and took the time to make it work. I used the following command lines and got the compile failure during make compilation:
debian:/usr/local/src/qmailadmin-1.2.15# ./configure --enable-cgibindir=/usr/lib/cgi-bin --enable-htmldir=/var/www/qmailadmin/ --enable-modify-quota

...

debian:/usr/local/src/qmailadmin-1.2.15# make

...
The source make failed with the following error:
In file included from template.c:45:

qmailadmin.h:37:1: warning: "MAX_FILE_NAME" redefined

In file included from template.c:28:

/home/vpopmail/include/vpopmail.h:146:1: warning: this is the location of the previous definition

template.c: In function "send_template_now":

template.c:505: error: "VERSION" undeclared (first use in this function)

template.c:505: error: (Each undeclared identifier is reported only once

template.c:505: error: for each function it appears in.)

make[1]: *** [template.o] Error 1

make[1]: Leaving directory `/usr/local/src/qmailadmin-1.2.15'

make: *** [all] Error 2
To workaround these compile issues, I’ve had to modify the C source file belonging to qmailadmin ( template.c ), e.g.:
debian:/usr/local/src/qmailadmin-1.2.15# vim template.c
In the file I had to add besides the line:
#include "util.h"
The code:
#define VERSION ""
Aterwards qmailadmin’s compile and install via make && make install-strip succeeded and now works perfectly fine 😉
Tags: Administration, administration panel, amp, bit, c source, code, compilation, configure, configured, failure, few days, file, function, identifier, installation, lib, Linux, location, mail administration, mail server, make, name, oncetemplate, panel, qmail installation, qmailadmin, quot, Quota, source file, squeeze, template, template c, time, undeclared identifier, util, version, vim, vqadmin
Posted in Linux, Qmail, System Administration, Web and CMS | 13 Comments »


How to change default Comments and No Comments location in WordPress in wordpress default theme
Tuesday, April 5th, 2011For a number of time I’ve been planning to change my blog comments placement. Until this very day however I’ve kept the default wordpress theme’s Comments button placement.
I realize the default Comments button placement is a bit hard to see and not that much intuitive for the user that enters my blog for a first time.
My first guess was that there might be somewhere a wordpress plugin which will allow me to adjust my comments button placement.
After some research online and a realization that probably there is no such plugin existing yet. I’ve forced myself to tune it up myself.
It was clear to me that in order to change the it will be necessery to edit the WordPress templates files. I’m not a designer and when I hear about templates I usually get scared, however I took the time to take a look at the default wordpress template and find out actually that template modifications is actually rather easier than I thought.
My previous idea was that in order to edit templates you have to be some kind of CSS and HTML guru (which I’m not). Nevertheless it seems that in order to play and adjust in a good way the templates you don’t need ot be a pro.
Even an uneducated fool like myself can easily do almost everything he thinks of throughout few lines of code in the wp templates.
To get back to the major topic thanks God after a bit of review and reading of wordpress.org documentation and some user forums. I’ve figured out that in order to change my Comments placement you need to modify the file:
In index.php find the line starting with:
You will notice within this opened paragraph the php code:
<?php the_tags('Tags: ', ', ', ''); ?> Posted in <?php the_category(', ') ?>
| <?php edit_post_link('Edit', '', ' | '); ?>
<?php comments_popup_link('No Comments »', '1 Comment »', '% Comments »'); ?>
This is the actual default theme php code that makes the wordpress Comments or No Comments that maes the comments appear on the blog.
Now I’ve decided to let this be as it is but add one more Comment button to wordpress on a different location that is more appealing to my blog visitors
After quick evaluation I’ve determined that probably the best location that the Comments button should have is right after the end of the post text
If you think my idea for button placement is appropriate, to set this location for the Comments button, you will have to find the follwoing code in index.php:
<div class="entry"><?php the_content('Read the rest of this entry »'); ?>
</div>
Right after the end of this code place the following code:
<?php comments_popup_link('No Comments »', '1 Comment »', '% Comments »'); ?></div>
Tags: amp, Auto, blog, Button, button placement, code lt, Comment, content themes, CSS, default theme, Draft, everything, file, fool, god, guess, guru, HTML, idea, index, kind, line, link, location, lt, nbsp, necessery, online, order, org, paragraph, php, php code, place, placement, plugin, quot, reading, realization, right, template, text, textIf, time, topic, way, Wordpress, wordpress plugin, wordpress templates
Posted in Various, Web and CMS, Wordpress | 1 Comment »