Posts Tagged ‘machine’

How rescue unbootable Windows PC, Windows files through files Network copy to remote server shared Folder using Hirens Boot CD

Saturday, November 12th, 2011

hirens-boot-cd-logo-how-to-rescue-unbootable-pc-with-hirens-bootcd
I'm rescuing some files from one unbootable Windows XP using a livecd with Hirens Boot CD 13

In order to rescue the three NTFS Windows partitions files, I mounted them after booting a Mini Linux from Hirens Boot CD.

Mounting NTFS using Hirens BootCD went quite smoothly to mount the 3 partitions I used cmds:

# mount /dev/sda1 /mnt/sda1
# mount /dev/sda2 /mnt/sda2
# mount /dev/sdb1 /mnt/sdb1

After the three NTFS file partitions are mounted I used smbclient to list all the available Network Shares on the remote Network Samba Shares Server which by the way possessed the NETBIOS name of SERVER 😉

# smbclient -L //SERVER/
Enter root's password:
Domain=[SERVER] OS=[Windows 7 Ultimate 7600] Server=[Windows 7 Ultimate 6.1]

Sharename Type Comment
——— —- ——-
!!!MUSIC Disk
ADMIN$ Disk Remote Admin
C$ Disk Default share
Canon Inkjet S9000 (Copy 2) Printer Canon Inkjet S9000 (Copy 2)
D$ Disk Default share
Domain=[SERVER] OS=[Windows 7 Ultimate 7600] Server=[Windows 7 Ultimate 6.1]
Server Comment
——— ——-
Workgroup Master
——— ——-

Further on to mount the //SERVER/D network samba drive – (the location where I wanted to transfer the files from the above 3 mounted partitions):

# mkdir /mnt/D
# mount //192.168.0.100/D /mnt/D
#

Where the IP 192.168.0.100 is actually the local network IP address of the //SERVER win smb machine.

Afterwards I used mc to copy all the files I needed to rescue from all the 3 above mentioned win partitions to the mounted //SERVER/D
 

Reset Windows (NT, 2000, XP, Vista and Windows 7) password / Reset Windows Forgotten Password / Reset Windows Administrator password

Friday, March 12th, 2010

Recently I was in the Pomorie’s Monastery – St. George .
One layman left his notebook (maybe as a donation) to the monks. However the notebook was protected by both: fingerprint check, as well as administrator password and therefore the notebook was completely unusable and was thrown away with many other unused belongings.
When the abbot of the monastery found out I’m adept with computers, he asked if I can fix up the notebook and somehow remove the password, or reinstall the machine to make it usable.
So here I decided to blog what I undertook to reset the windows password with the hope somebody else could benefit from that as well.

1. Go to Offline NT Password & Registry Editor, Bootdisk / CD website

2. Download the bootable CD image zip archive of Offline NT Password & Registry Editor and burn the iso to a CD using K3b (on Linux), Nero or CDBurnerXP on (Windows).

3. Follow the step by step walkthrough manual (here) to either change Some Windows user password or completely reset administrator or any other user password.

Following the walkthrough literally prooved to be quite succesful for me and I was able to properly reset the administrator password!
So Hooray it works again! The monks can now benefit of the cute Toshiba satellite machine.

Text Monitoring of connection server (traffic RX / TX) business in ASCII graphs with speedometer / Easy Monitor network traffic performance

Friday, May 4th, 2012

While reading some posts online related to MS-Windows TcpViewnetwork traffic analyzing tool. I've came across very nice tool for tracking connection speed for Linux (Speedometer). If I have to compare it, speedometer is somehow similar to nethogs and iftop bandwidth network measuring utilities .

What differentiates speedometer from iftop / nethogs / iptraf is it is more suitable for visualizing a network file or data transfers.
The graphs speedometer draws are way easier to understand, than iftop graphs.

Even complete newbies can understand it with no need for extraordinary knowledge in networking. This makes Speedometer, a top tool to visually see the amount of traffic flowing through server network interface (eth0) … (eth1) etc.

What speedometer shows is similar to the Midnight Commander's (mc) file transfer status bar, except the statistics are not only for a certain file transfer but can show overall statistics over server passing network traffic amount (though according to its manual it can be used to also track individual file transfers).

The simplicity for basic use makes speedometer nice tool to track for network congestion issues on Linux. Therefore it is a  must have outfit for every server admin. Below you see a screenshot of my terminal running speedometer on a remote server.
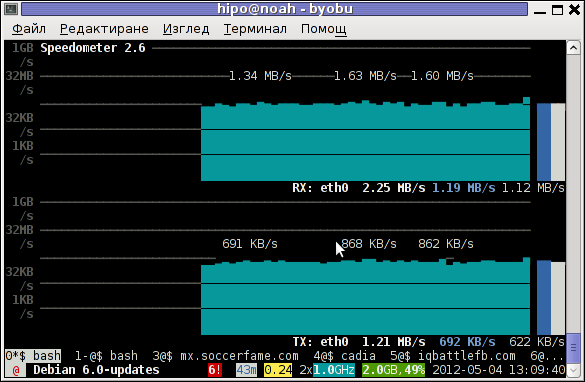
Speedometer ascii traffic track server network business screenshot in byobu screen like virtual terminal emulator

1. Installing speedometer on Debian / Ubuntu and Debian derivatives

For Debian and Ubuntu server administrators speedometer is already packaged as a deb so its installation is as simple as:

debian:~# apt-get --yes install speedometer
....

2. Installing speedometer from source for other Linux distributions CentOS, Fedora, SuSE etc.

Speedometer is written in python programming language, so in order to install and use on other OS Linux platforms, it is necessery to have installed (preferably) an up2date python programming language interpreter (python ver. 2.6 or higher)..
Besides that it is necessary to have installed the urwid -( console user interface library for Python) available for download via excess.org/urwid/


Hence to install speedometer on RedHat based Linux distributions one has to follow these steps:

a) Download & Install python urwid library

[root@centos ~]# cd /usr/local/src
[root@centos src]# wget -q http://excess.org/urwid/urwid-1.0.1.tar.gz
[root@centos src]# tar -zxvvf urwid-1.0.1.tar.gz
....
[root@centos src]# cd urwid-1.0.1
[root@centos urwid-1.0.1]# python setup.py install
running install
running build
running build_py
creating build
creating build/lib.linux-i686-2.4
creating build/lib.linux-i686-2.4/urwid
copying urwid/tests.py -> build/lib.linux-i686-2.4/urwid
copying urwid/command_map.py -> build/lib.linux-i686-2.4/urwid
copying urwid/graphics.py -> build/lib.linux-i686-2.4/urwid
copying urwid/vterm_test.py -> build/lib.linux-i686-2.4/urwid
copying urwid/curses_display.py -> build/lib.linux-i686-2.4/urwid
copying urwid/display_common.py -> build/lib.linux-i686-2.4/urwid
....

b) Download and install python-setuptools

python-setuptools is one other requirement of speedometer, happily on CentOS and Fedora the rpm package is already there and installable with yum:

[root@centos ~]# yum -y install python-setuptools
....

c) Download and install Speedometer

[root@centos urwid-1.0.1]# cd /usr/local/src/
[root@centos src]# wget -q http://excess.org/speedometer/speedometer-2.8.tar.gz
[root@centos src]# tar -zxvvf speedometer-2.8.tar.gz
.....
[root@centos src]# cd speedometer-2.8
[root@centos speedometer-2.8]# python setup.py install
Traceback (most recent call last):
File "setup.py", line 26, in ?
import speedometer
File "/usr/local/src/speedometer-2.8/speedometer.py", line 112
n = n * granularity + (granularity if r else 0)
^

While running the CentOS 5.6 installation of speedometer-2.8, I hit the
"n = n * granularity + (granularity if r else 0)
error.

After consultation with some people in #python (irc.freenode.net), I've figured out this error is caused due the outdated version of python interpreter installed by default on CentOS Linux 5.6. On CentOS 5.6 the python version is:

[root@centos ~]# python -V
Python 2.4.3

As I priorly said speedometer 2.8's minimum requirement for a python to be at v. 2.6. Happily there is quick way to update python 2.4 to python 2.6 on CentOS 5.6, as there is an RPM repository maintained by Chris Lea which contains RPM binary of python 2.6.

To update python 2.4 to python 2.6:

[root@centos speedometer-2.8]# rpm -Uvh http://yum.chrislea.com/centos/5/i386/chl-release-5-3.noarch.rpm[root@centos speedometer-2.8]# rpm --import /etc/pki/rpm-gpg/RPM-GPG-KEY-CHL[root@centos speedometer-2.8]# yum install python26

Now the newly installed python 2.6 is executable under the binary name python26, hence to install speedometer:

[root@centos speedometer-2.8]# python26 setup.py install
[root@centos speedometer-2.8]# chown root:root /usr/local/bin/speedometer
[root@centos speedometer-2.8]# chmod +x /usr/local/bin/speedometer

[root@centos speedometer-2.8]# python26 speedometer -i 1 -tx eth0

The -i will instruct speedometer to refresh the screen graphs once a second.

3. Using speedometer to keep an eye on send / received traffic network congestion

To observe, the amount of only sent traffic via a network interface eth0 with speedometer use:

debian:~# speedometer -tx eth0

To only keep an eye on received traffic through eth0 use:

debian:~# speedometer -rx eth0

To watch over both TX and RX (Transmitted and Received) network traffic:

debian:~# speedometer -tx eth0 -rx eth0

If you want to watch in separate windows TX and RX traffic while  running speedometer you can run in separate xterm windows speedometer -tx eth0 and speedometer -rx eth0, like in below screenshot:
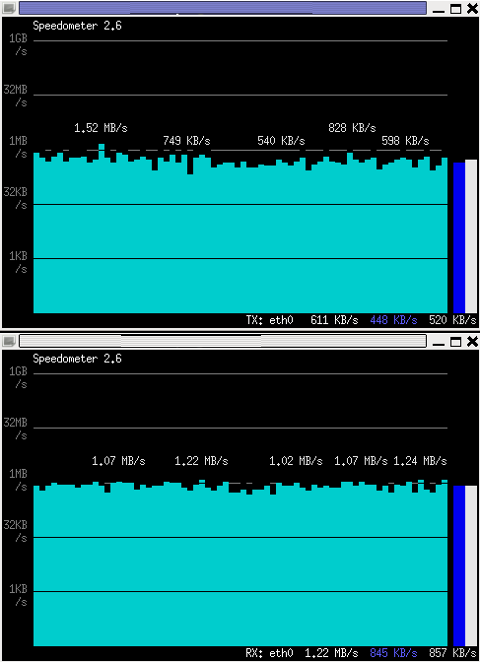
Monitor Received and Transmitted server Network traffic in two separate xterm windows with speedometer ascii graphs

4. Using speedometer to test network maximum possible transfer speed between server (host A) and server (host B)

The speedometer manual suggests few examples one of which is:

How fast is this LAN?

host-a$ cat /dev/zero | nc -l -p 12345
host-b$ nc host-a 12345 > /dev/null
host-b$ speedometer -rx eth0

When I red this example in speedometer's manual, it wasn't completely clear to me what the author really meant, but a bit after when I thought over the example I got his point.

The idea behind this example is that a constant stream of zeros taken from /dev/zero will be streamed over via a pipe (|) to nc which will bind a port number 12345, anyone connecting from another host machine, lets say a server with host host-b to port 12345 on machine host-a will start receiving the /dev/zero streamed content.

Then to finally measure the streamed traffic between host-a and host-b machines a speedometer is started to visualize the received traffic on network interface eth0, thus measuring the amount of traffic flowing from host-a to host-b

I give a try to the exmpls, using for 2 test nodes my home Desktop PC, Linux running  arcane version of Ubuntu and my Debian Linux notebook.

First on the Ubuntu PC I issued
 

hipo@hip0-desktop:~$ cat /dev/zero | nc -l -p 12345
 

Note that I have previously had installed the netcat, as nc is not installed by default on Ubuntu and Debian. If you, don't have nc installed yet, install it with:

apt-get –yes install netcat

"cat /dev/zero | nc -l -p 12345" will not produce any output, but will display just a blank line.

Then on my notebook I ran the second command example, given in the speedometer manual:
 

hipo@noah:~$ nc 192.168.0.2 12345 > /dev/null

Here the 192.168.0.2 is actually the local network IP address of my Desktop PC. My Desktop PC is connected via a normal 100Mbit switch to my routing machine and receives its internet via  NAT. The second test machine (my laptop), gets its internet through a WI-FI connection received by a Wireless Router connected via a UTP cable to the same switch to which my Desktop PC is connected.

Finally to test / get my network maximum thoroughput I had to use:

hipo@noah:~$ speedometer -rx wlan0

Here, I  monitor my wlan0 interface, as this is my (laptop) wireless card interface over which I have connectivity to my local network and via which through the the WI-FI router I get connected to the internet.

Below is a snapshot captured showing approximately what is the max network thoroughput from:

Desktop PC -> to my Thinkpad R61 laptop
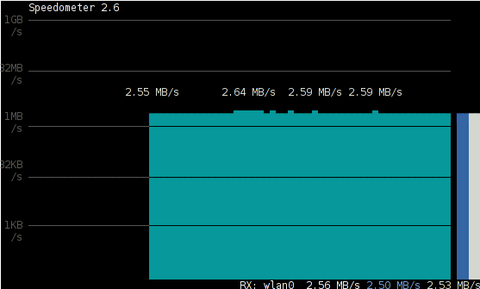
Using Speedometer to test network thorougput between two network server hosts screenshot Debian Squeeze Linux

As you can see in the shot approximately the maximum network thoroughput is in between:
2.55MB/s min and 2.59MB/S max, the speed is quite low for a 100 MBit local network, but this is normal as most laptop wireless adapters hardly transfer traffic in more than 10 to 20 MBits per sec.

If the same nework thoroughput test is conducted between two machines both connected to a same 100 M/bit switch, the traffic should be at least a 8 MB/sec.

There is something, else to take in consideration that probably makes the provided example network thoroughput measuring a bit inaccurate. The fact that the /dev/zero content is stremed over is slowing down the zeroes sent over network because of the  pipe ( | ) use slows down the stream.

5. Using speedometer to visualize maximum writting speed to a local hard drive on Linux

In the speedometer manual, I've noticed another interesting application of this nifty tool.

speedometer can be used to track and visualize the maximum writing speed a hard disk drive or hard drive partition can support on Linux OS:

A copy paster from the manual text is as follows:

How fast can I write data to my filesystem? (with at least 1GB free)
dd bs=1000000 count=1000 if=/dev/zero of=bigfile &
speedometer bigfile

However, when I tried copy/pasting the example in terminal, to test the maximum writing speed to an external USB hard drive, only dd command was started and speedometer failed to initialize and display graphs of the file creation speed.

I've found a little "hack" that makes the man example work by adding a 3 secs sleep like so:

debian:/media/Expansion Drive# dd bs=1000000 count=1000 if=/dev/zero of=bigfile & sleep 3; speedometer bigfile

Here is a screenshot of the bigfile created by dd and tracked "in real time" by speedometer:
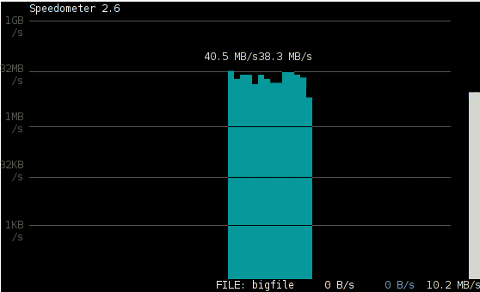
How fast is writting data to local USB expandable hard disk Debian Linux speedometer screenshot

Actually the returned results from this external USB drive are, quite high, the possible reason for that is it is connected to my laptop over an USB protocol verion 3.

6. Using Speedometer to keep an eye on file download in progress

This application of speedometer is mostly useless especially on Linux where it is used as a Desktop.

However in some occasions if files are transferred over ssh or in non interactive FTP / Samba file transfers between Linux servers it can come handy.

To visualize the download and writing speed of lets say FTP transferred .AVI movie (during the actual file transfer) on the download host issue:

# speedometer Download-Folder/What-goes-around-comes-around.avi

7. Estimating approximate time for file transfer

There is another section in the speedometer manual pointing of the program use to calculate the time remaining for a file transfer.

The (man speedometer) provided example text is:

How long it will take for my 38MB transfer to finish?
speedometer favorite_episode.rm $((38*1024*1024))

At first glimpse it hard to understand (like the other manual example). A bit of reasoning and I comprehend what the man author meant by the obscure calculation:

$((38*1024*1024))

This is a formula used in which 38 has to be substituted with the exact file size amount of the transferred file. The author manual used a 38MB file so this is why he put $((38* … in the formula.

I give it a try – (just for the sake to see how it works) with a file with a size of 2500MB, in below two screenshot pictures I show my preparation to copy the file and the actual copying / "real time" transfer tracking with speedometer's status percentage completion bar.
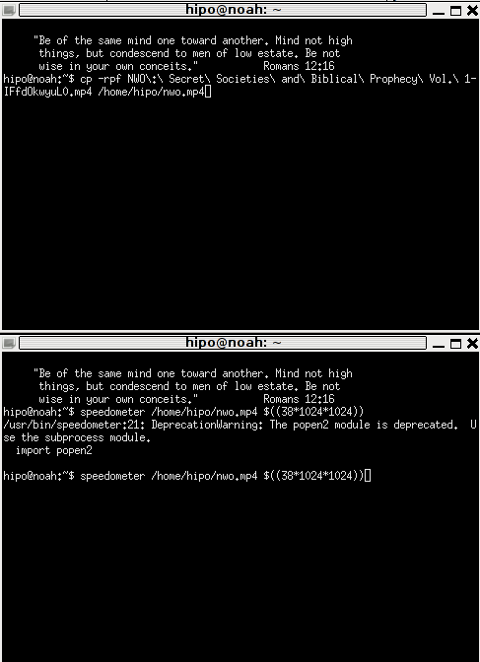
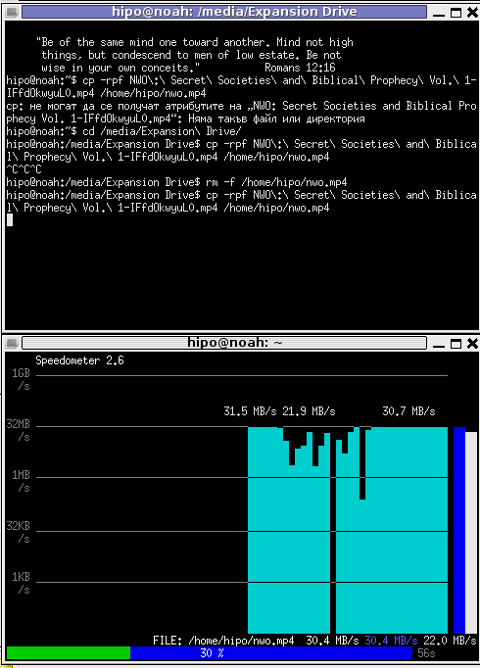
xterm terminal copy file and estimate file copying operation speed on linux with speedometer preparation

Two xterm terminals one is copying a file the other one uses speedometer to estimate the time remaining to complete the file transfer from expansion USB hard drive to my laptop harddrive


How to create ssh tunnels / ssh tunneling on Linux and FreeBSD with openssh

Saturday, November 26th, 2011

ssh-tunnels-port-forwarding-windows-linux-bypassing-firewall-diagram
SSH tunneling
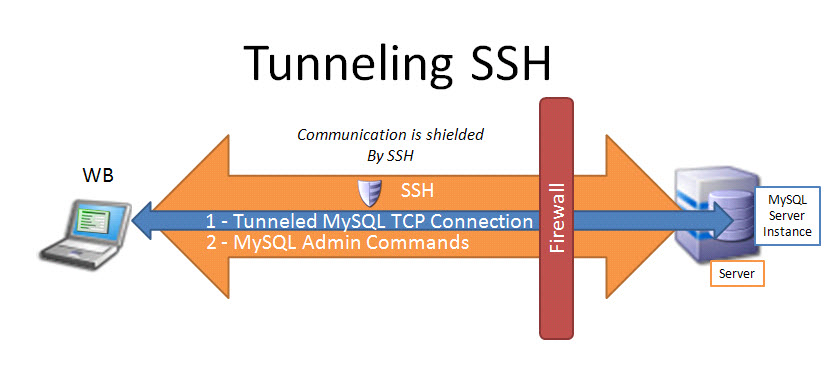
allows to send and receive traffic using a dedicated port. Using an ssh traffic can have many reasons one most common usage reason is to protect the traffic from a host to a remote server or to access port numbers which are by other means blocked by firewall, e.g.: (get around firewall filtering)
SSH tunneling works only with TCP traffic. The way to make ssh tunnel is with cmds:

host:/root# ssh -L localhost:deshost:destport username@remote-server.net
host:/root# ssh -R restport:desthost:localport username@remote-server.net
host:/root# ssh -X username@remote-server.net

This command will make ssh to bind a port on localhost of the host host:/root# machine to the host desthost:destport (destination host : destinationport). Important to say deshost is the host destination visible from the remote-server.net therefore if the connection is originating from remote-server.net this means desthost will be localhost.
Mutiple ssh tunnels to multiple ports using the above example commands is possible. Here is one example of ssh tunneling
Let’s say its necessery to access an FTP port (21) and an http port (80), listening on remote-server.net In that case desthost will be localhost , we can use locally the port (8080) insetad of 80, so it will be no necessery to make the ssh tunnel with root (admin privileges). After the ssh session gets opened both services will be accessible on the local ports.

host:/home/user$ ssh -L 21:localhost:21 -L 8080:localhost:80 user@remote-server.net

That’s all enjoy 😉

How to make SSH tunnel with PuTTY terminal client

Monday, November 18th, 2013

Create-how to make ssh tunnel with Putty on microsoft windows Vista / 7 XP / 2000
Earlier I blogged how to create SSH tunnels on Linux. Another interesting thing is how to make SSH tunnels on Windows. This can be done with multiple SSH clients but probably quickest and most standard way is to do create SSH tunnel with Putty. So why would one want to make SSH tunnel to a Windows host? Lets say your remote server has a port filtered to the Internet but available to a local network to which you don't have direct access, the only way to access the port in question then is to create SSH tunnel between your computer and remote machine on some locally binded port (lets say you need to access port 80 on remote host and you will access it through localhost tunneled through 8080). Very common scenario where tunneling comes handy if you have a Tomcat server behind firewalled DMZ| / load balancer or Reverse Proxy. Usually on well secured networks direct access to Tomcat application server will be disabled to its listen port (lets say 11444). Another important great think of SSH tunnels is all information between Remote server and local PC are transferred in strong SSH crypted form so this adds extra security level to your communication.
Once "real life" case of SSH tunnel is whether you have to deploy an application which fails after deployment with no meaningful message but error is returned by Apache Reverse Proxy. To test directly tomcat best thing is to create SSH tunnel between remote host 11444 and local host through 11444 (or any other port of choice). Other useful case would be if you have to access directly via CLI interface an SQL server lets say MySQL (remote port 3306 filtered) and inaccessible with mysql cli or Oracle DB with Db listener on port 1521 (needed to accessed via sqlplus).

In that case Putty's Tunneling capabilities comes handy especially if you don't have a Linux box at hand.
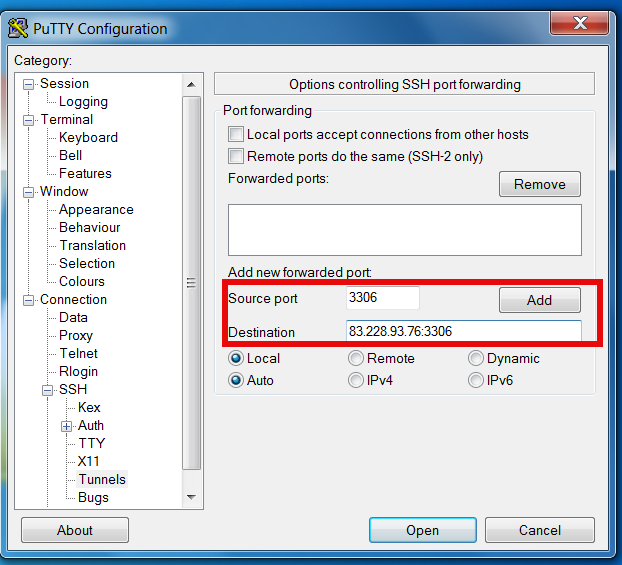
To create new SSH tunnel in putty to MySQL port 3306 on localhost (3306) – be sure MySQL is not running on localhost 😉
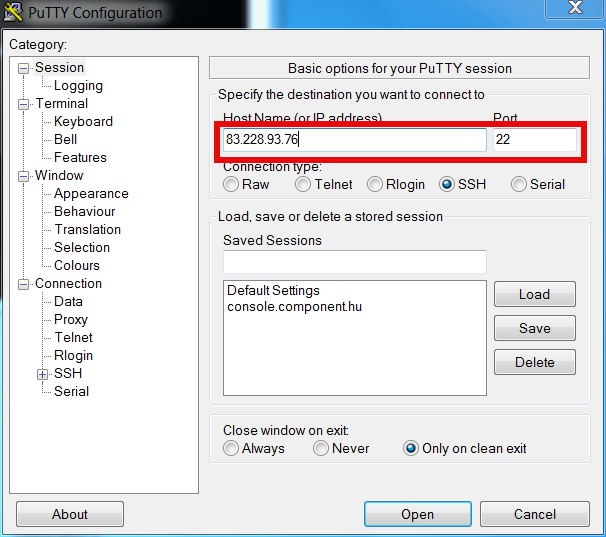
Open Putty Navigate in left pane config bar to:

SSH -> Tunnels

Type in

Source Port

– port on which SSH tunnel will be binded on your Windows (localhost / 127.0.0.1) in this example case 3306.

Then for

Destination
– IP address or host of remote host with number of port to which SSH tunnel will be opened.

N.B. ! in order to make tunneling possible you will need to have opened access to SSH port of remote (Destination) host

make ssh tunnel on Microsoft Windows putty to remote filtered mysql shot

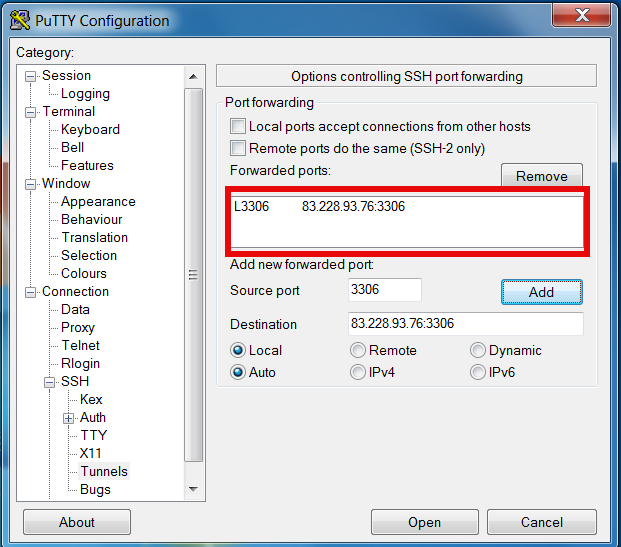
make ssh tunnels on Microsoft windows putty to remote filtered mysql 2 screenshot

open ssh tunnel via WINDOWS port 22 on microsoft windows 7 screenshot

Once click Open you will be prompted for username on remote host in my case to my local router 83.228.93.76. Once you login to remote host open command prompt and try to connect Windows Command prompt Start -> Run (cmd.exe) ;

C:\Users\\hipo> telnet localhost 3306

Connection should be succesful and you from there on assuming you have the MySQL cli version for windows installed you can use to login to remote SQL via SSH tunnel with;

C:\Users\\hipo> mysql -u root -h localhost -p

To later remove existing SSH Tunnel go again to SSH -> Tunnels press on SSH tunnel and choose Remove

Further you can craete multiple SSH tunnels for all services to remote host where access is needed. Important think to remember when creating multiple SSH connections is source port on localhost to remote machine should be unique

How to disable ACPI on productive Linux servers to decrease kernel panics and increase CPU fan lifespan

Tuesday, May 15th, 2012

Linux TUX ACPI logo / Tux Hates ACPI logohttps://www.pc-freak.net/images/linux_tux_acpi_logo-tux-hates-acpi.png

Why would anyone disable ACPI support on a server machine??
Well  ACPI support kernel loaded code is just another piece of code constantly being present in the memory,  that makes the probability for a fatal memory mess up leading to  a fatal bug resulting in system crash (kernel panic) more likely.

Many computers ship with buggy or out of specifications ACPI firmware which can cause a severe oddities on a brand new bought piece of comp equipment.

One such oddity related to ACPI motherboard support problems is if you notice your machine randomly powering off or failing to boot with a brand new Linux installed on it.

Another reason to switch off ACPI code will would to be prevent the CPU FAN rotation from being kernel controlled.

If the kernel controls the CPU fan on  high CPU heat up it will instruct the fan to rotate quickly and on low system loads it will bring back the fan to loose speed.
 This frequent switch of FAN from high speed to low speed  increases the probability for a short fan damage due to frequent changes of fan speed. Such a fan damage leads often to  system outage due to fan failure to rotate properly.

Therefore in my view it is better ACPI support is switched off completely on  servers. On some servers ACPI is useful as it can be used to track CPU temperature with embedded motherboard sensors with lm_sensors or any piece of hardwre vendor specific software provided. On many machines, however lm_sensors will not properly recognize the integrated CPU temperature sensors and hence ACPI is mostly useless.

There are 3 ways to disable fully or partially ACPI support.

- One is to disable it straight for BIOS (best way IMHO)
- Disable via GRUB or LILO passing a kernel parameter
- Partial ACPI off-ing - /disabling the software that controls the CPU fan/

1. Disable ACPI in BIOS level

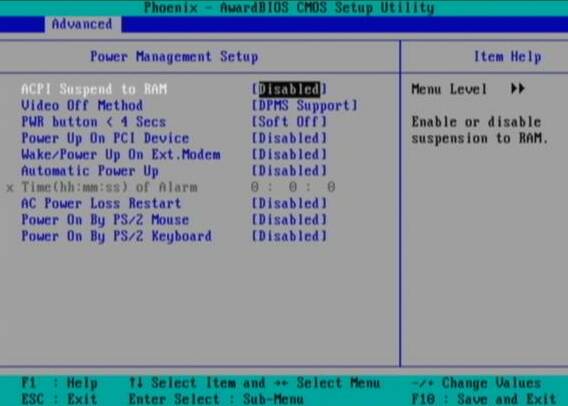
Press DEL, F1, F2, F10 or whatever the enter bios key combination is go through all the different menus (depending on the vios BENDOR) and make sure every occurance of ACPI is set to off / disable whatever it is called.

Below is a screenshot of menus with ACPI stuff on a motherboard equipped with Phoenix AwardBIOS:

BIOS ACPI Disable power Off Phoenix BIOS

This is the in my opinon best and safest way to disable ACPI power saving, Unfortunately some newer PCs lack the functionality to disable ACPI; (probably due to the crazy "green" policy the whole world is nowdays mad of).

If that's the case with you, thanksfully there is a "software way" to disable ACPI via passing kernel options via GRUB and LILO boot loaders.

2. Disabling ACPI support on kernel boot level through GRUB boot loader config

There is a tiny difference in command to pass in order to disable  ACPI depending on the Linux installed  GRUB ver. 1.x or GRUB 2.x.

a) In GRUB 0.99 (GRUB version 1)

Edit file /etc/grub/menu.lst or /etc/grub/grub.conf (location differs across Linux distribution). Therein append:

acpi=off

to the end of kernel command line.

Here is an example of a kernel command line with ACPI not disabled (example taken from CentOS server grub.conf):

[root@centos ~]# grep -i title -A 4 /etc/grub/grub.conf
title Red Hat Enterprise Linux Server (2.6.18-36.el5)
root (hd0,0)
kernel /vmlinuz-2.6.18-36.el5 ro root=/dev/VolGroup00/LogVol00 console=ttyS0,115200n8
initrd /initrd-2.6.18-36.el5.img

The edited version of the file with acpi=off included should look like so:

title Red Hat Enterprise Linux Server (2.6.18-36.el5)
root (hd0,0)
kernel /vmlinuz-2.6.18-36.el5 ro root=/dev/VolGroup00/LogVol00 console=ttyS0,115200n8 acpi=off
initrd /initrd-2.6.18-36.el5.img

The kernel option root=/dev/VolGroup00/LogVol00 means the the server is configured to use LVM (Logical Volume Manager).

b) Disabling ACPI on GRUB version 1.99 +

This version is by default installed on newer Ubuntu and Debian Linux-es.

In grub 1.99 on latest Debian Squeeze, the file to edit is located in /boot/grub/grub.cfg. The file is more messy than with its predecessor menu.lst (grub 0.99).
Thanks God there is no need to directly edit the file (though this is possible), but on newer Linuces (as of time of writting the post), there is another simplied grub config file /etc/grub/config

Hence to add the acpi=off to 1.99 open /etc/grub/config find the line reading:

GRUB_CMDLINE_LINUX_DEFAULT="quiet"

and append the "acpi=off" option, e.g. the line has to change to:

GRUB_CMDLINE_LINUX_DEFAULT="quiet acpi=off"

On some servers it might be better to also disable APIC along with ACPI:

Just in case you don't know what is the difference between ACPI and APIC, here is a short explanation:

ACPI = Advanced Configuration and Power Interface

APIC = Advanced Programmable Interrupt Controllers

ACPI is the system that controls your dynamic speed fans, the power button behavior, sleep states, etc.

APIC is the replacement for the old PIC chip that used to come imbedded on motherboards that allowed you to setup interrupts for your soundcard, ide controllers, etc.

Hence on some machines experiencing still problems with even ACPI switched off, it is helpful  to disable the APIC support too, by using:

acpi=off noapic noacpi

Anyways, while doing the changes, be very very cautious or you might end up with un-boot-able server. Don't blame me if this happens :); be sure you have a backup option if server doesn't boot.

To assure faultless kernel boot, GRUB has ability to be configured to automatically load up a second kernel if 1st one fails to boot, if you need that read the grub documentation on that.

To load up the kernel with the new setting, give it a restart:

[root@centos ~]# shutdown -r now
....

3. Disable ACPI support on kernel boot time on Slackware or other Linuxes still booting kernel with LILO

Still, some Linux distros like Slackware, decided to keep the old way and use LILO (LInux LOader) as a default boot loader.

Disabling ACPI support in LILO is done through /etc/lilo.conf

By default in /etc/lilo.conf, there is a line:

append= acpi=on

it should be changed to:

append= acpi=off

Next to load up the new acpi disabled setting, lilo has to be reloaded:

slackware:~# /sbin/lilo -c /etc/lilo.conf
....

Finally a reboot is required:

slackware:~# reboot
....

(If you don't have a physical access or someone near the server you better not 🙂 )

4. Disable ACPI fan control support on a running Linux server without restart

This is the most secure work-around, to disabling the ACPI control over the machine CPU fan, however it has a downside that still the ACPI code will be loaded in the kernel and could cause kernel issues possibly in the long run – lets say the machine has uptime of more than 2 years…

The acpi support on a user level  is controlled by acpid or haldaemon (depending on the Linux distro), hence to disable the fan control on servers this services has to be switched off:

a) disabling ACPI on Debian and deb based Linux-es

As of time of writting on Debian Linux servers acpid (Advanced Configuration and Power Interface event daemon) is there to control how power management will be handled. To disable it stop it as a service (if running):

debian:~# /etc/init.d/acpid stop

To permanently remove acpid from boot up on system boot disable it with update-rc.d:

debian:~# update-rc.d acpid disable 2 3 4 5
update-rc.d: using dependency based boot sequencing
insserv: Script iptables is broken: incomplete LSB comment.
insserv: missing `Required-Start:' entry: please add even if empty.
insserv: warning: current start runlevel(s) (empty) of script `acpid' overwrites defaults (2 3 4 5).
insserv: warning: current stop runlevel(s) (2 3 4 5) of script `acpid' overwrites defaults (empty).
insserv: missing `Required-Start:' entry: please add even if empty.

b) disabling ACPI on RHEL, Fedora and other Redhat-s (also known as RedHacks 🙂 )

I'm not sure if this is safe,as many newer rpm based server system services,  might not work properly with haldaemon disabled.

Anyways you can give it a try if when it is stopped there are issues just bring it up again.

[root@rhel ~]# /etc/init.d/haldaemon stop

If all is fine with the haldaemon switched off (hope so), you can completely disable it to load on start up with:

[root@centos ~]# /sbin/chkconfig --level 2 3 4 5 haldaemon off

Disabling ACPI could increase a bit your server bills, but same time decrease losses from downtimes, so I guess it worths its costs 🙂


How to fix “ERROR 1577 (HY000) at line 1: Cannot proceed because system tables used by Event Scheduler were found damaged at server start”

Saturday, May 12th, 2012

After migrating databases data from FreeBSD MySQL 5.0.83 server to a Debian Squeeze Linux MySQL version 5.1.61, below is a mysql –version issued on both the FreeBSD and the Debian servers

freebsd# mysql --version
mysql Ver 14.12 Distrib 5.0.83, for portbld-freebsd7.2 (i386) using 5.2

debian:~# mysql --version
mysql Ver 14.14 Distrib 5.1.61, for debian-linux-gnu (i486) using readline 6.1

The data SQL dump from the FreeBSD server was dumped with following command arguments:

freebsd# mysqldump --opt --allow-keywords --add-drop-table --all-databases -u root -p > complete_db_dump.sql

Then I used sftp to transfer complete_db_dump.sql dump to the a brand new installed latest Debian Squeeze 6.0.2. The Debian server was installed using a "clean Debian install" without graphical environment with CD downloaded from debian.org's site.

On the Debian machine I imported the dump with command:

debian:~# mysq -u root -p < complete_db_dump.sql

Right After the dump was imported I re-started SQL server which was previously installed with:

debian:~# apt-get install mysql-server
The error I got after restarting the mysql server:

debian:~# #/etc/init.d/mysql restart

was:

ERROR 1577 (HY000) at line 1: Cannot proceed because system tables used by Event Scheduler were found damaged at server start
ERROR 1547 (HY000) at line 1: Column count of mysql.proc is wrong. Expected 20, found 16. The table is probably corrupted

This error cost me a lot of nerves and searching in google to solve. It took me like half an hour of serious googling ,until I finally found the FIX!!!:

debian:~# mysql_upgrade -u root -h localhost -p --verbose --force
Enter password:
Looking for 'mysql' as: mysql
Looking for 'mysqlcheck' as: mysqlcheck
Running 'mysqlcheck' with connection arguments: '--port=3306' '--socket=/var/run/mysqld/mysqld.sock' '--host=localhost'
bible.holy_bible OK
bible.holybible OK
bible.quotes_meta OK

Afterwards finally I had to restart the mysql server once again in order to finally get rid of the shitty:

ERROR 1547 (HY000) at line 1: Column count of mysql.proc is wrong. Expected 20, found 16. The table is probably corrupted error!

debian:~# /etc/init.d/mysql restart
Stopping MySQL database server: mysqld.
Starting MySQL database server: mysqld.
Checking for corrupt, not cleanly closed and upgrade needing tables..

This solved the insane Column count of mysql.proc is wrong. Expected 20, found 16 once and for all!

Before I came with this fix I tried all kind of forum suggested fixes like:

debian:~# mysql_upgrade -u root -p
Looking for 'mysql' as: mysql
Looking for 'mysqlcheck' as: mysqlcheck
This installation of MySQL is already upgraded to 5.1.61, use --force if you still need to run mysql_upgrade

debian:~# mysql_upgrade -p
Looking for 'mysql' as: mysql
Looking for 'mysqlcheck' as: mysqlcheck
This installation of MySQL is already upgraded to 5.1.61, use --force if you still need to run mysql_upgrade

And few more, none of them worked the only one that worked was:

debian:~# #mysql_upgrade -u root -h localhost -p --verbose --force

I have to say big thanks to Mats Lindth wonderful blog post which provided me with the solution.

It seems, since Oracle bought the Community edition of MySQL thinks with this database server are getting more and more messy and backwards incompatible day by day.
Lately, I'm experiencing too much hassles with MySQL version incompitabilities. Maybe I should think for migrating permanently to Postgre …

By the way the ERROR 1547 (HY000) at line 1: Column count of mysql.proc is wrong. is most probably caused of some kind of password hashing incompitability between the password hashing between the BSD and Debian SQL versions, as mysql -u root -p < dump.sql, does override default stored user passwords in the mysql database tables… Such password, hashing issues were common in prior MySQL 4 to MySQL 5 migrations I've done, however since MySQL 5+ is already storing its password strings encrypted with md5 encryption I wonder why on earth this mess happens ….
 

30 years anniversary of the first mass produced portable computer COMPAQ Grid Compass 1011

Thursday, July 19th, 2012

Grid Notebook Big screen logo

Today it is considered the modern laptop (portable computers) are turning 30 years old. The notebook grandparent is a COMPAQGRiD Compass 1011 – a “mobile computer” with a electroluminescent display (ELD) screen supporting resolution of 320×240 pixels. The screen allowed the user to use the computer console in a text resolution of 80×24 chars. This portable high-tech gadget was equipped with magnesium alloy case, an Inten 8086 CPU (XT processor) at 8Mhz (like my old desktop pravetz pc 😉 ), 340 kilobyte (internal non-removable magnetic bubble memory and even a 1,200 bit/s modem!

COMPAQ Grid Compass considered first laptop / notebook on earthy 30 anniversary of the portable computer

The machine was uniquely compatible for its time as one could easily attach devices such as floppy 5.25 inch drives and external (10 Meg) hard disk via IEEE-488 I/O compatible protocol called GPiB (General Purpose instrumental Bus).

First mass prdocued portable computer laptop grid COMPAQ 11011 back side input peripherals

The laptop had also unique small weight of only 5 kg and a rechargable batteries with a power unit (like modern laptops) connectable to a normal (110/220 V) room plug.

First notebook in World ever the COMPAQ grid Compass 1101,br />
The machine was bundled with an own specificly written OS GRiD-OS. GRID-OS could only run a specialized software so this made the application available a bit limited.
Shortly after market introduction because of the incompitablity of GRID-OS, grid was shipped with MS-DOS v. 2.0.
This primitive laptop computer was developed for serve mainly the needs of business users and military purposes (NASA, U.S. military) etc.

GRID was even used on Space Shuttles during 1980 – 1990s.
The price of the machine in April 1982 when GriD Compass was introduced was the shockingly high – $8150 dollars.

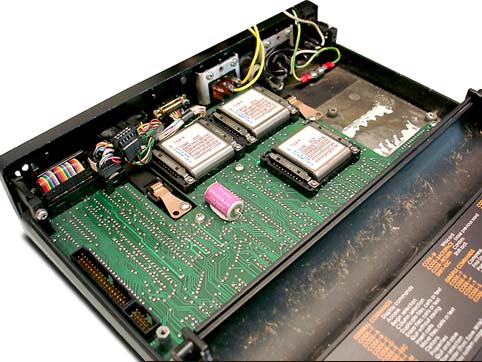
The machine hardware design is quite elegant as you can see on below pic:

 COMPAQ grid laptop 1101 bubbles internal memory

As a computer history geek, I’ve researched further on GRID Compass and found a nice 1:30 hour video telling in detailed presentation retelling the history.

Shortly after COMPAQ’s Grid Compass 1011’s introduction, many other companies started producing similar sized computers; one example for this was the Epson HX-20 notebook. 30 years later, probably around 70% of citizens on the globe owns a laptop or some kind of portable computer device (smartphone, tablet, ultra-book etc.).

Most of computer users owning a desktop nowdays, owns a laptop too for mobility reasons. Interestengly even 30 years later the laptop as we know it is still in a shape (form) very similar to its original predecessor. Today the notebook sales are starting to be overshadowed by tablets and ultra-books (for second quarter laptop sales raised 5% but if compared with 2011, the sales rise is lesser 1.8% – according to data provided by Digital Research agency). There are estimations done by (Forrester Research) pointing until the end of year 2015, sales of notebook substitute portable devices will exceed the overall sales of notebooks. It is manifested today the market dynamics are changing in favour of tabets and the so called next generation laptopsULTRA-BOOKS. It is a mass hype and a marketing lie that Ultra-Books are somehow different from laptops. The difference between a classical laptop and Ultra-Books is the thinner size, less weight and often longer battery use time. Actually Ultra-Books are copying the design concept of Mac MacBook Air trying to resell under a lound name.
Even if in future Ipads, Android tablets, Ultra-Books or whatever kind of mambo-jambo portable devices flood the market, laptops will still be heavily used in future by programmers, office workers, company employees and any person who is in need to do a lot of regular text editting, email use and work with corporative apps. Hence we will see a COMPAC Grid Compass 1011 notebook likes to be dominant until end of the decade.