Posts Tagged ‘mail’

Stop haproxy log requests to /var/log/messages / Disable haproxy double logging

Friday, June 25th, 2021

haproxy-logo

On a CentOS Linux release 7.9.2009 (Core) I've running haproxies on two KVM virtual machines that are configured in a High Avaialability cluster with Corosync and Pacemaker, the machines are inherited from another admin (I did not install the servers hardware) and OS but have been received the system for support.
The old sysadmins seems to not care much about the system so they've left the haprxoy with Double logging one time under separate configured log in /var/log/haproxy/haproxyprod.log and each Haproxy TCP mode flown request has been double logged to /var/log/messages as well. As you can guess this shouldn't be so because we're wasting Hard drive space so to fix that I had to stop haproxy doble logging to /var/log/messages.

The logging is done under a separate local pointer local6 the /etc/haproxy/haproxyprod.cfg goes as follows:
 

[root@haproxy01 ~]# cat /etc/haproxy/haproxyprod.cfg

global
    # log <address> [len ] [max level [min level]]
    log 127.0.0.1 local6 debug


The logging is handled by rsyslog via the local6, so obviously to keep out the logging from /var/log/messages
The logging to the separate log file configuration in rsyslog is as follows:

local6.*                                                /var/log/haproxy/haproxyprod.log

It turned to be really easy to prevent haproxy get its requests log to /var/log/messages all I had to change is under /etc/rsyslogd.conf

local6.none config has to be placed for /var/log/messages the full line configuration in /etc/rsyslog.conf that stopped double logging is:

# Don't log private authentication messages!
*.info;mail.none;authpriv.none;cron.none;local5.none;local6.none                /var/log/messages


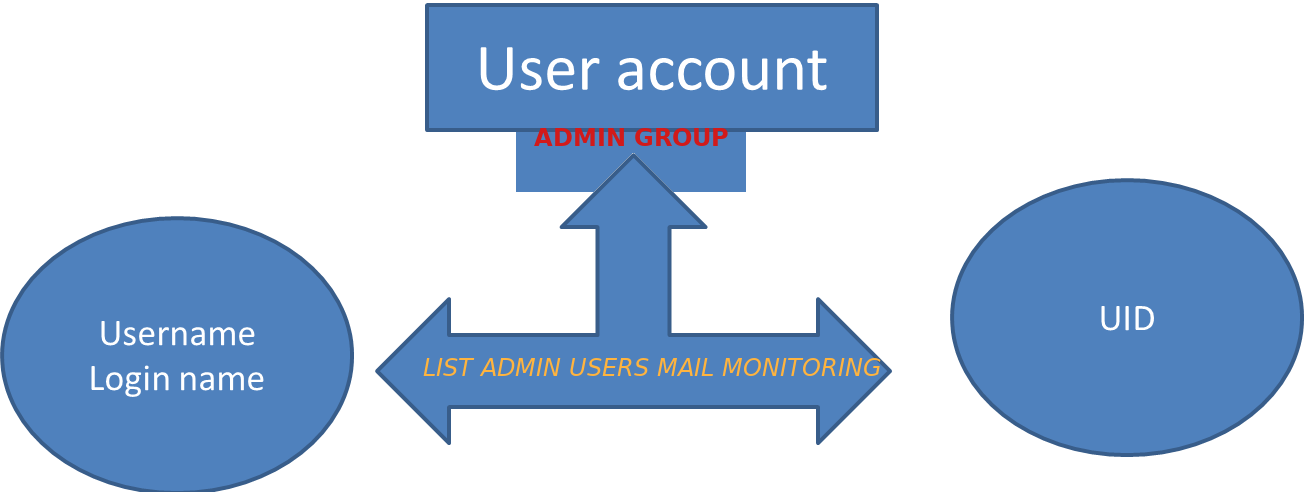
List all existing local admin users belonging to admin group and mail them to monitoring mail box

Monday, February 8th, 2021

local-user-account-creation-deletion-change-monitor-accounts-and-send-them-to-central-monitoring-mail

If you have a bunch of servers that needs to have a tight security with multiple Local users superuser accounts that change over time and you need to frequently keep an have a long over time if some new system UNIX local users in /etc/passwd /etc/group has been added deleted e.g. the /etc/passwd /etc/group then you might have the task to have some primitive monitoring set and the most primitive I can think of is simply routinely log users list for historical purposes to a common mailbox over time (lets say 4 times a month or even more frequently) you might send with a simple cron job a list of all existing admin authorized users to a logging sysadmin mailbox like lets say:
 

Local-unix-users@yourcompanydomain.com


A remark to make here is the common sysadmin practice scenario to have local existing non-ldap admin users group members of whom are authorized to use sudo su – root via /etc/sudoers  is described in my previous article how to add local users to admin group superuser access via sudo I thus have been managing already a number of servers that have user setup using the above explained admin group.

Thus to have the monitoring at place I've developed a tiny shell script that does check all users belonging to the predefined user group dumps it to .csv format that starts with a simple timestamp on when user admin list was made and sends it to a predefined email address as well as logs sent mail content for further reference in a local directory.

The task is a relatively easy but since nowadays the level of competency of system administration across youngsters is declinging -that's of course in my humble opinion (just like it happens in every other profession), below is the developed list-admin-users.sh


#!/bin/bash
# dump all users belonging to a predefined admin user / group in csv format 
# with a day / month year timestamp and mail it to a predefined admin
# monitoring address
TO_ADDRESS="Local-unix-users@yourcompanydomain.com";
HOSTN=$(hostname);
# root@server:/# grep -i 1000 /etc/passwd
# username:x:username:1000:username,,,:/home/username:/bin/bash
# username1:x:username1:1000:username1,,,:/home/username1:/bin/bash
# username5:x:username1:1000:username5,,,:/home/username5:/bin/bash

ADMINS_ID='4355';
#
# root@server # group_id_ID='4355'; grep -i group_id_ID /etc/passwd
# …
# username1:x:1005:4355:username1,,,:/home/username1:/bin/bash
# username5:x:1005:4355,,,:/home/username5:/bin/bash


group_id_ID='215';
group_id='group_id';
FIL="/var/log/userlist-log-dir/userlist_$(date +"%d_%m_%Y_%H_%M").txt";
CUR_D="$HOSTN: Current admin users $(date)"; >> $FIL; echo -e "##### $CUR_D #####" >> $FIL;
for i in $(cat /etc/passwd | grep -i /home|grep /bin/bash|grep -e "$ADMINS_ID" -e "$group_id_ID" | cut -d : -f1); do \
if [[ $(grep $i /etc/group|grep $group_id) ]]; then
f=$(echo $i); echo $i,group_id,$(id -g $i); else  echo $i,admin,$(id -g $i);
fi
done >> $FIL; mail -s "$CUR_D" $TO_ADDRESS < $FIL


list-admin-users.sh is ready for download also here

To make the script report you will have to place it somewhere for example in /usr/local/bin/list-admin-users.sh ,  create its log dir location /var/log/userlist-log-dir/ and set proper executable and user/group script and directory permissions to it to be only readable for root user.

root@server: # mkdir /var/log/userlist-log-dir/
root@server: # chmod +x /usr/local/bin/list-admin-users.sh
root@server: # chmod -R 700 /var/log/userlist-log-dir/


To make the script generate its admin user reports and send it to the central mailbox  a couple of times in the month early in the morning (assuming you have a properly running postfix / qmail / sendmail … smtp), as a last step you need to set a cron job to routinely invoke the script as root user.

root@server: # crontab -u root -e
12 06 5,10,15,20,25,1 /usr/local/bin/list-admin-users.sh


That's all folks now on 5th 10th, 15th, 20th 25th and 1st at 06:12 you'll get the admin user list reports done. Enjoy 🙂

Set all logs to log to to physical console /dev/tty12 (tty12) on Linux

Wednesday, August 12th, 2020

tty linux-logo how to log everything to last console terminal tty12

Those who administer servers from the days of birth of Linux and who used actively GNU / Linux over the years or any other UNIX knows how practical could be to configure logging of all running services / kernel messages / errors and warnings on a physical console.

Traditionally from the days I was learning Linux basics I was shown how to do this on an old Debian Sarge 3.0 Linux without systemd and on all Linux distributions Redhat 9.0 / Calderas and Mandrakes I've used either as a home systems or for servers. I've always configured output of all messages to go to the last easy to access console /dev/tty12 (for those who never use it console switching under Linux plain text console mode is done with key combination of CTRL + ALT + F1 .. F12.

In recent times however with the introduction of systemd pretty much things changed as messages to console are not handled by /etc/inittab which was used to add and refresh physical consoles tty1, tty2 … tty7 (the default added one on Linux were usually 7), but I had to manually include more respawn lines for each console in /etc/inittab.
Nowadays as of year 2020 Linux distros /etc/inittab is no longer there being obsoleted and console print out of INPUT / OUTPUT messages are handled by systemd.
 

1. Enable Physical TTYs from TTY8 till TTY12 etc.


The number of default consoles existing in most Linux distributions I've seen is still from tty1 to tty7. Hence to add more tty consoles and be ready to be able to switch out  not only towards tty7 but towards tty12 once you're connected to the server via a remote ILO (Integrated Lights Out) / IdRAC (Dell Remote Access Controller) / IPMI / IMM (Imtegrated Management Module), you have to do it by telling systemd issuing below systemctl commands:


 # systemctl enable getty@tty8.service Created symlink /etc/systemd/system/getty.target.wants/getty@tty8.service -> /lib/systemd/system/getty@.service.

systemctl enable getty@tty9.service

Created symlink /etc/systemd/system/getty.target.wants/getty@tty9.service -> /lib/systemd/system/getty@.service.

systemctl enable getty@tty10.service

Created symlink /etc/systemd/system/getty.target.wants/getty@tty10.service -> /lib/systemd/system/getty@.service.

systemctl enable getty@tty11.service

Created symlink /etc/systemd/system/getty.target.wants/getty@tty11.service -> /lib/systemd/system/getty@.service.

systemctl enable getty@tty12.service

Created symlink /etc/systemd/system/getty.target.wants/getty@tty12.service -> /lib/systemd/system/getty@.service.


Once the TTYS tty7 to tty12 are enabled you will be able to switch to this consoles either if you have a physical LCD / CRT monitor or KVM switch connected to the machine mounted on the Rack shelf once you're in the Data Center or will be able to see it once connected remotely via the Management IP Interface (ILO) remote console.
 

2. Taking screenshot of the physical console TTY with fbcat


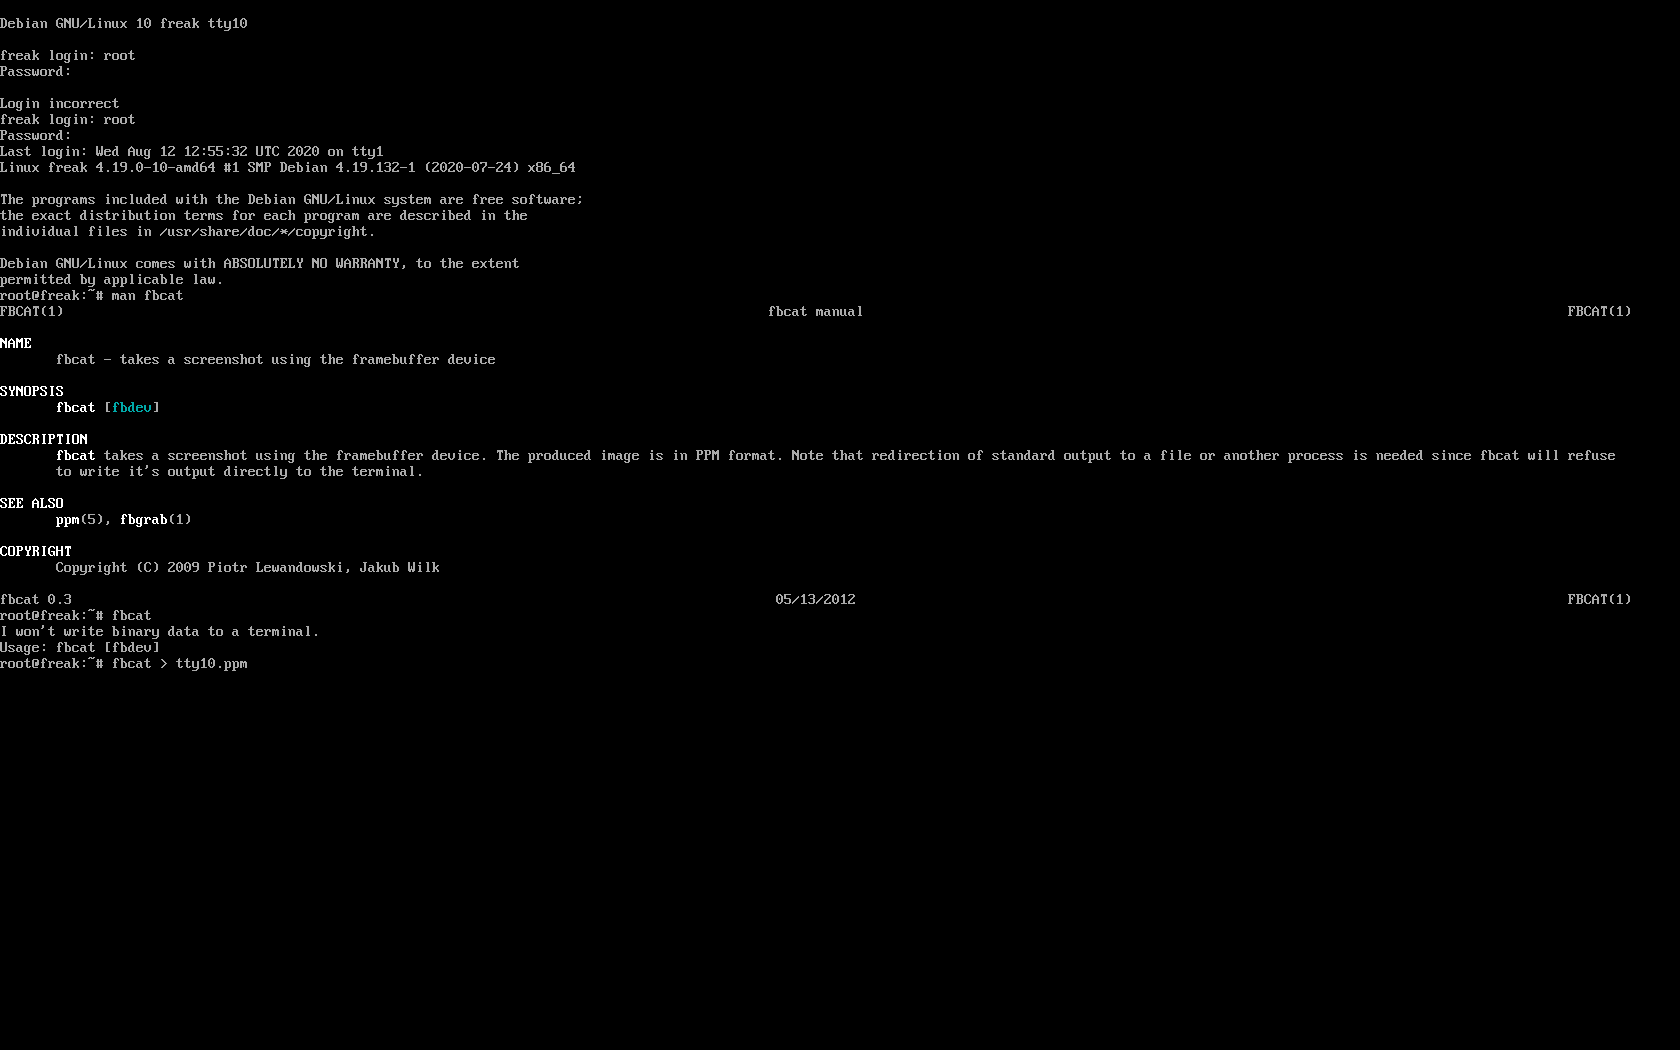
For example below is a screenshot of the 10th enabled tty10:

tty10-linux-screenshot-fbcat-how-to-screenshot-console

As you can in the screenshot I've used the nice tool fbcat that can be used to make a screenshot of remote console. This is very useful especially if remote access via a SSH client such as PuTTY / MobaXterm is not there but you have only a physical attached monitor access on a DCs that are under a heavy firewall that is preventing anyone to get to the system remotely. For example screenshotting the physical console in case if there is a major hardware failure occurs and you need to dump a hardware error message to a flash drive that will be used to later be handled to technicians to analyize it and exchange the broken server hardware part.

Screenshots of the CLI with fbcat is possible across most Linux distributions where as usual.

In Debian you have to first instal the tool via :
 

# apt install –yes fbcat


and on RedHats / CentOS / Fedoras

# yum install -y fbcat


Taking screenshot once tool is on the server of whatever you have printed on console is as easy as

# fbcat > tty_name.ppm


Note that you might want to convert the .ppm created picture to png with any converter such as imagemagick's convert command or if you have a GUI perhaps with GNU Image Manipulation Tool (GIMP).

3. Enabling every rsyslog handled message to log to Physical TTY12


To make everything such as errors, notices, debug, warning messages  become instantly logging towards above added new /dev/tty12.

Open /etc/rsyslog.conf and to the end of the file append below line :
 

daemon,mail.*;\
   news.=crit;news.=err;news.=notice;\
   *.=debug;*.=info;\
   *.=notice;*.=warn   /dev/tty12


To make rsyslog load its new config restart it:


# systemctl status rsyslog


rsyslog.service – System Logging Service
   Loaded: loaded (/lib/systemd/system/rsyslog.service; enabled; vendor preset: enabled)
   Active: active (running) since Mon 2020-08-10 04:09:36 EEST; 2 days ago
     Docs: man:rsyslogd(8)
           https://www.rsyslog.com/doc/
 Main PID: 671 (rsyslogd)
    Tasks: 4 (limit: 4915)
   Memory: 12.5M
   CGroup: /system.slice/rsyslog.service
           └─671 /usr/sbin/rsyslogd -n -iNONE


авг 12 00:00:05 pcfreak rsyslogd[671]:  [origin software="rsyslogd" swVersion="8.1901.0" x-pid="671" x-info="https://www.rsyslo
Warning: Journal has been rotated since unit was started. Log output is incomplete or unavailable.


systemctl restart rsyslog


That's all folks navigate by pressing simultaneously CTRL + ALT + F12 to get to TTY12 or use ALT + LEFT / ALT + RIGHT ARROW (console switch commands) till you get to the console where everything should be now logged.

Enjoy and if you like this article share to tell your sysadmin friends about this nice hack  ! 🙂


Get daily E-Mail Reports statistics on postfix Linux mail server

Tuesday, July 14th, 2020

https://www.pc-freak.net/images/Postfix-email-server-logo.svg-1

I've had today a task at work to monitor a postfix mail send and received emails (MAIL FROM / RPCT TO) and get out a simple statistics on what kind of emails are coming and going out from the Postfix SMTP on a server?

Below is shortly explained how I did it plus you will learn how you can use something more advanced to get server mail count, delivery status, errors etc. daily.
 

1. Using a simple script to process /var/log/messages

For that I made a small script to do the trick, the script simply checks mail delivery logged information from /var/log/maillog process a bit sort and logs in a separate log daily.

#!/bin/sh
# Process /var/log/maillog extract from= and to= mails sort
# And log mails to $LOGF
# Author Georgi Georgiev 14.07.2020

DATE_FORM=$(date +'%m_%d_%y_%H_%M_%S_%h_%m');
LOG='/home/gge/mail_from_to-mails';
LOGF="$LOG.$DATE_FORM.log";
CUR_DATE=$(date +'%m_%d_%y_%T');
echo "Processing /var/log/maillog";
echo "Processing /var/log/maillog" > $LOGF;
echo >>$LOGF
echo "!!! $CUR_DATE # Sent MAIL FROM: addresses: !!!" >> $LOGF;
grep -E 'from=' /var/log/maillog|sed -e 's#=# #g'|awk '{ print $8 }'|sed -e 's#<# #g' -e 's#># #g' -e 's#\,##'|sort -rn|uniq >> $LOGF;

echo "!!! $CUR_DATE # Receive RCPT TO: addresses !!!" >>$LOGF;
grep -E 'to=' /var/log/maillog|sed -e 's#=# #g'|awk '{ print $8 }'|sed -e 's#<# #g' -e 's#># #g' -e 's#\,##'|sort -rn|uniq >> $LOGF;


You can get a copy of the mail_from_to_collect_mails_postfix.sh script here.

I've set the script to run via a crond scheduled job once early in the mornthing and I'll leave it like that for 5 days or so to get a good idea on what are the mailboxes that are receiving incoming mail.

The cron I've set to use is as follows:

# crontab -u root -l 
05 03 * * *     sh /home/gge/mail_from_to.sh >/dev/null 2>&1


This will be necessery later for a Email Server planned migration to relay its mail via another MTA host.


2. Getting More Robust Postifx Mail Statistics from logs


My little script is of course far from best solution to get postfix mail statistics from logs.

If you want something more professional and you need to have a daily report on what mails sent to mail server and mails sent from the MTA to give you information about the Email delivery queue status, number of successful and failed emails from a mail sender / recipient and a whole bunch of useful info you can use something more advanced such as pflogsumm perl script to get daily / weekly monthly mail delivery statistics.

What can pflogsumm do for you ?


Pflogsumm is a log analyzer/summarizer for the Postfix MTA. It is
designed to provide an overview of Postfix activity, with just enough
detail to give the administrator a “heads up” for potential trouble
spots and fixing any SMTP and email related issues.

Pflogsumm generates summaries and, in some cases, detailed reports of
mail server traffic volumes rejected and bounced email and server
warnings, errors, and panics.

At the time of writting this article it is living on jimsun.linxnet.com just in case if pflogsumm.pl's official download location disappears at some time in future here is pflogsumm-1.1.3.tar.gz mirror stored on www.pc-freak.net

– Install pflogsumm

Use of pflogsumm is pretty straight forward, you download unarchive the script to some location such as /usr/local/bin/pflogsumm.pl  add the script executable flag and you run it to create a Postfix Mail Log statistics report for you

wget http://jimsun.linxnet.com/downloads/pflogsumm-1.1.3.tar.gz -O /usr/local/src/pflogsumm-1.1.3.tar.gz


# mkdir -p /usr/local/src/
# cd /usr/local/src/
# tar -zxvf pflogsumm-1.1.3.tar.gz
# cd pflogsumm-1.1.3/

# mv /usr/local/pflogsumm-1.1.3/pflogsumm.pl /usr/local/bin/pflogsumm
# chmod a+x /usr/local/bin/pflogsumm


That's all, assuming you have perl installed on the system with some standard modules, we're now good to go: 

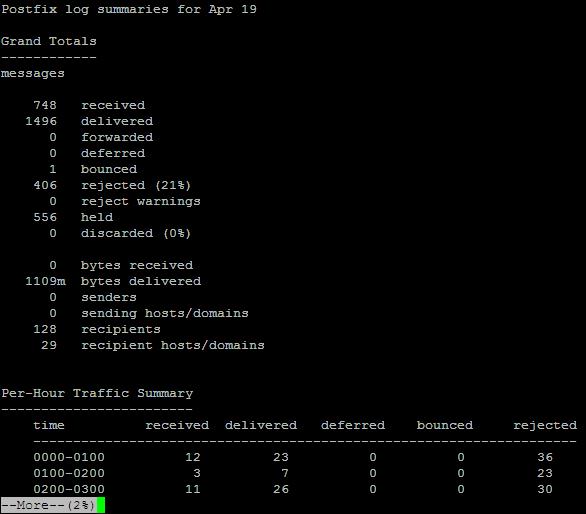
To give it a test report to the command line:

# /usr/local/bin/pflogsumm -d today /var/log/maillog

pflogsumm-log-summary-screenshot-linux-received-forwarded-bounced-rejected

To generate mail server use report and launch to some email of choice do:

# /usr/local/bin/pflogsumm -d today /var/log/maillog | mail -s Mailstats your-mail@your-domain.com


To make pflogsumm report everyday various interesting stuff such as (message deferrals, message bounce, details, smtp delivery failures, fatal errors, recipients by message size etc. add some cronjob like below to the server:

# /usr/sbin/pflogsumm -d yesterday /var/log/maillog | mail -s Mailstats | mail -s Mailstats your-mail@your-domain.com

If you need a GUI graphical mail monitoring in a Web Browser, you will need to install a webserver with a perl / cgi support,  RRDTools and MailGraph.

linux-monitoring-mail-server-with-mailgraph.cgi

Linux Send Monitoring Alert Emails without Mail Server via relay SMTP with ssmtp / msmtp

Friday, July 10th, 2020

ssmtp-linux-server-sending-email-without-a-local-mail-server-mta-relay-howto

If you have to setup a new Linux server where you need to do a certain local running daemons monitoring with a custom scripts on the local machine Nagios / Zabbix / Graphana etc. that should notify about local running custom programs or services in case of a certain criteria is matched or you simply want your local existing UNIX accounts to be able to send outbound Emails to the Internet.

Then usually you need to install a fully functional SMTP Email server that was Sendmail or QMAIL in old times in early 21st century andusually postfix or Exim in recent days and configure it to use as as a Relay mail server some Kind of SMTP.

The common Relay smtp setting would be such as Google's smtp.gmail.com, Yahoo!'s  smtp.mail.yahoo.com relay host, mail.com or External configured MTA Physical server with proper PTR / MX records or a SMTP hosted on a virtual machine living in Amazon's AWS or m$ Azure that is capable to delivere EMails to the Internet.

Configuring the local installed Mail Transport Agent (MTA) as a relay server is a relatively easy task to do but of course why should you have a fully stacked MTA service with a number of unnecessery services such as Email Queue, Local created mailboxes, Firewall rules, DNS records, SMTP Auth, DKIM keys etc. and even the ability to acccept any emails back in case if you just want to simply careless send and forget with a confirmation that remote email was send successfully?

This is often the case for some machines and especially with the inclusion of technologies such as Kubernettes / Clustered environments / VirtualMachines small proggies such as ssmtp / msmtp that could send mail without a Fully functional mail server installed on localhost ( 127.0.0.1 ) is true jams.

ssmtp program is Simple Send-only sendMail emulator  has been around in Debian GNU / Linux, Ubuntu, CentOS and mostly all Linuxes for quite some a time but recently the Debian package has been orphaned so to install it on a deb based server host you need to use instead msmtp.
 

1. Install ssmtp on CentOS / Fedora / RHEL Linux

In RPM distributions you can't install until epel-release repository is enabled.

[root@centos:~]# yum –enablerepo=extras install epel-release

[root@centos:~]# yum install ssmtp


2. Install ssmp / msmtp Debian / Ubuntu Linux

If you run older version of Debian based distribution the package to install is ssmtp, e.g.:

root@debian:~# apt-get install –yes ssmtp


On Newer Debians as of Debian 10.0 Buster onwards install instead

root@debian:~# apt install –yes msmtp-mta

can save you a lot of effort to keep an eye on a separately MTA hanging around and running as a local service eating up resources that could be spared.
 

3. Configure Relay host for ssmtp


A simple configuration to make ssmtp use gmail.com SMTP servers as a relay host below:

linux:~# cat << EOF > /etc/ssmtp/ssmtp.conf
# /etc/ssmtp/ssmtp.conf
# The user that gets all the mails (UID < 1000, usually the admin)
root=user@host.name
# The full hostname.  Must be correctly formed, fully qualified domain name or GMail will reject connection.
hostname=host.name
# The mail server (where the mail is sent to), both port 465 or 587 should be acceptable
# See also https://support.google.com/mail/answer/78799
mailhub=smtp.gmail.com:587
#mailhub=smtp.host.name:465

# The address where the mail appears to come from for user authentication.
rewriteDomain=gmail.com
# Email 'From header's can override the default domain?

FromLineOverride=YES

# Username/Password
AuthUser=username@gmail.com
AuthPass=password
AuthMethod=LOGIN
# Use SSL/TLS before starting negotiation
UseTLS=YES
UseTLS=Yes
UseSTARTTLS=Yes
logfile        ~/.msmtp.log

EOF

This configuration is very basic and it is useful only if you don't want to get delivered mails back as this functionality is also supported even though rarely used by most.

One downside of ssmtp is mail password will be plain text, so make sure you set proper permissions to /etc/ssmtp/ssmtp.conf
 

– If your Gmail account is secured with two-factor authentication, you need to generate a unique App Password to use in ssmtp.conf. You can do so on your App Passwords page. Use Gmail username (not the App Name) in the AuthUser line and use the generated 16-character password in the AuthPass line, spaces in the password can be omitted.

– If you do not use two-factor authentication, you need to allow access to unsecure apps.
 

4. Configuring different msmtp for separate user profiles


SSMTP is capable of respecting multiple relays for different local UNIX users assuming each of whom has a separate home under /home/your-username

To set a certain user lets say georgi to relay smtp sent emails with mail or mailx command create ~/.msmtprc


linux:~# vim ~/.msmtprc


Append configuration like:

# Set default values for all following accounts.
defaults
port 587
tls on
tls_trust_file /etc/ssl/certs/ca-certificates.crt
account gmail
host smtp.gmail.com
from <user>@gmail.com
auth on
user <user>
passwordeval gpg –no-tty -q -d ~/.msmtp-gmail.gpg
# Set a default account

account default : gmail


To add it for any different user modify the respective fields and set the different Mail hostname etc.
 

5. Using mail address aliases


msmtp also supports mail aliases, to make them work you will need to have file /etc/msmptrc with
 

aliases               /etc/aliases


Standard aliasses them should work 

linux:~# cat /etc/aliases
# Example aliases file
     
# Send root to Joe and Jane
root: georgi_georgiev@example.com, georgi@example.com
   
# Send everything else to admin
default: admin@domain.example


6. Get updated when your Debian servers have new packages to update 

msmpt can be used for multiple stuff one example use would be to use it together with cron to get daily updates if there are new debian issued security or errata update pending packages, to do so you can use the apticron shell script.

To use it on debian install the apticron pack:
 

root@debian:~# apt-get install –yes apticron

apticron has the capability to:

 * send daily emails about pending upgrades in your system;
 * give you the choice of receiving only those upgrades not previously notified;
 * automatically integrate to apt-listchanges in order to give you by email the
   new changes of the pending upgrade packages;
 * handle and warn you about packages put on hold via aptitude/dselect,
   avoiding unexpected package upgrades (see #137771);
 * give you all these stuff in a simple default installation;


To configure it you have to place a config copy the one from /usr/lib/apticron/apticron.conf to /etc/apticron/apticron.conf

The only important value to modify in the config is the email address to which an apt-listchanges info for new installable debs from the apt-get dist-upgrade command. Output from them will be be send to the configured EMAIL field  in apticron.conf.
 

EMAIL="<your-user@email-addr-domain.com>"


The timing at which the offered new pending package update reminder will be sent is controlled by /etc/cron.d/apticron
 

debian:~# cat /etc/cron.d/apticron
# cron entry for apticron

48 * * * * root if test -x /usr/sbin/apticron; then /usr/sbin/apticron –cron; else true; fi

apticron will use the local previous ssmtp / msmpt program to deliver to configured mailbox.
To manually trigger apticron run:
 

root@debian:~# if test -x /usr/sbin/apticron; then /usr/sbin/apticron –cron; else true; fi


7. Test whether local mail send works to the Internet

To test mail sent we can use either mail / mailx or sendmail command or some more advanced mailer as alpine or mutt.

Below is few examples.

linux:~$ echo -e "Subject: this is the subject\n\nthis is the body" | mail user@your-recipient-domain.com

To test attachments to mail also works run:

linux:~$ mail -s "Subject" recipient-email@domain.com < mail-content-to-attach.txt

or

Prepare the mail you want to send and send it with sendmail

linux:~$ vim test-mail.txt
To:username@example.com
From:youraccount@gmail.com
Subject: Test Email
This is a test mail.

linux:~$ sendmail -t < test-mail.txt

Sending encoded atacchments with uuencode is also possible but you will need sharutils Deb / RPM package installed.

To attach lets say 2 simple text files uuencoded:

linux:~$ uuencode file.txt myfile.txt | sendmail user@example.com

echo "

To: username@domain.com From: username@gmail.com Subject: A test Hello there." > test.mail

linux:~$ cat test.mail | msmtp -a default <username>@domain.com


That's all folks, hope you learned something, if you know of some better stuff like ssmtp please shar e it.

How to build Linux logging bash shell script write_log, logging with Named Pipe buffer, Simple Linux common log files logging with logger command

Monday, August 26th, 2019

how-to-build-bash-script-for-logging-buffer-named-pipes-basic-common-files-logging-with-logger-command

Logging into file in GNU / Linux and FreeBSD is as simple as simply redirecting the output, e.g.:
 

echo "$(date) Whatever" >> /home/hipo/log/output_file_log.txt


or with pyping to tee command


echo "$(date) Service has Crashed" | tee -a /home/hipo/log/output_file_log.txt


But what if you need to create a full featured logging bash robust shell script function that will run as a daemon continusly as a background process and will output
all content from itself to an external log file?
In below article, I've given example logging script in bash, as well as small example on how a specially crafted Named Pipe buffer can be used that will later store to a file of choice.
Finally I found it interesting to mention few words about logger command which can be used to log anything to many of the common / general Linux log files stored under /var/log/ – i.e. /var/log/syslog /var/log/user /var/log/daemon /var/log/mail etc.
 

1. Bash script function for logging write_log();


Perhaps the simplest method is just to use a small function routine in your shell script like this:
 

write_log()
LOG_FILE='/root/log.txt';
{
  while read text
  do
      LOGTIME=`date "+%Y-%m-%d %H:%M:%S"`
      # If log file is not defined, just echo the output
      if [ “$LOG_FILE” == “” ]; then
    echo $LOGTIME": $text";
      else
        LOG=$LOG_FILE.`date +%Y%m%d`
    touch $LOG
        if [ ! -f $LOG ]; then echo "ERROR!! Cannot create log file $LOG. Exiting."; exit 1; fi
    echo $LOGTIME": $text" | tee -a $LOG;
      fi
  done
}


  •  Using the script from within itself or from external to write out to defined log file


echo "Skipping to next copy" | write_log


2. Use Unix named pipes to pass data – Small intro on what is Unix Named Pipe.


Named Pipe –  a named pipe (also known as a FIFO (First In First Out) for its behavior) is an extension to the traditional pipe concept on Unix and Unix-like systems, and is one of the methods of inter-process communication (IPC). The concept is also found in OS/2 and Microsoft Windows, although the semantics differ substantially. A traditional pipe is "unnamed" and lasts only as long as the process. A named pipe, however, can last as long as the system is up, beyond the life of the process. It can be deleted if no longer used.
Usually a named pipe appears as a file, and generally processes attach to it for IPC.


Once named pipes were shortly explained for those who hear it for a first time, its time to say named pipe in unix / linux is created with mkfifo command, syntax is straight foward:
 

mkfifo /tmp/name-of-named-pipe


Some older Linux-es with older bash and older bash shell scripts were using mknod.
So idea behind logging script is to use a simple named pipe read input and use date command to log the exact time the command was executed, here is the script.


#!/bin/bash
named_pipe='/tmp/output-named-pipe';
output_named_log='
/tmp/output-named-log.txt ';

if [ -p $named_pipe ]; then
rm -f $named_pipe
fi
mkfifo $named_pipe

while true; do
read LINE <$named_pipe
echo $(date): "$LINE" >>/tmp/output-named-log.txt
done


To write out any other script output and get logged now, any of your output with a nice current date command generated output write out any output content to the loggin buffer like so:


echo 'Using Named pipes is so cool' > /tmp/output-named-pipe
echo 'Disk is full on a trigger' > /tmp/output-named-pipe

  • Getting the output with the date timestamp

# cat /tmp/output-named-log.txt
Mon Aug 26 15:21:29 EEST 2019: Using Named pipes is so cool
Mon Aug 26 15:21:54 EEST 2019: Disk is full on a trigger


If you wonder why it is better to use Named pipes for logging, they perform better (are generally quicker) than Unix sockets.


3. Logging files to system log files with logger


If you need to do a one time quick way to log any message of your choice with a standard Logging timestamp, take a look at logger (a part of bsdutils Linux package), and is a command which is used to enter messages into the system log, to use it simply invoke it with a message and it will log your specified output by default to /var/log/syslog common logfile


root@linux:/root# logger 'Here we go, logging'
root@linux:/root # tail -n 3 /var/log/syslog
Aug 26 15:41:01 localhost CRON[24490]: (root) CMD (chown qscand:qscand -R /var/run/clamav/ 2>&1 >/dev/null)
Aug 26 15:42:01 localhost CRON[24547]: (root) CMD (chown qscand:qscand -R /var/run/clamav/ 2>&1 >/dev/null)
Aug 26 15:42:20 localhost hipo: Here we go, logging


If you have took some time to read any of the init.d scripts on Debian / Fedora / RHEL / CentOS Linux etc. you will notice the logger logging facility is heavily used.

With logger you can print out message with different priorities (e.g. if you want to write an error message to mail.* logs), you can do so with:
 

 logger -i -p mail.err "Output of mail processing script"


To log a normal non-error (priority message) with logger to /var/log/mail.log system log.


 logger -i -p mail.notice "Output of mail processing script"


A whole list of supported facility named priority valid levels by logger (as taken of its current Linux manual) are as so:


FACILITIES AND LEVELS
       Valid facility names are:

              auth
              authpriv   for security information of a sensitive nature
              cron
              daemon
              ftp
              kern       cannot be generated from userspace process, automatically converted to user
              lpr
              mail
              news
              syslog
              user
              uucp
              local0
                to
              local7
              security   deprecated synonym for auth

       Valid level names are:

              emerg
              alert
              crit
              err
              warning
              notice
              info
              debug
              panic     deprecated synonym for emerg
              error     deprecated synonym for err
              warn      deprecated synonym for warning

       For the priority order and intended purposes of these facilities and levels, see syslog(3).


If you just want to log to Linux main log file (be it /var/log/syslog or /var/log/messages), depending on the Linux distribution, just type', even without any shell quoting:


logger 'The reason to reboot the server Currently was a System security Update


So what others is logger useful for?

 In addition to being a good diagnostic tool, you can use logger to test if all basic system logs with its respective priorities work as expected, this is especially
useful as I've seen on a Cloud Holsted OpenXEN based servers as a SAP consultant, that sometimes logging to basic log files stops to log for months or even years due to
syslog and syslog-ng problems hungs by other thirt party scripts and programs.
To test test all basic logging and priority on system logs as expected use the following logger-test-all-basic-log-logging-facilities.sh shell script.


#!/bin/bash
for i in {auth,auth-priv,cron,daemon,kern, \
lpr,mail,mark,news,syslog,user,uucp,local0 \
,local1,local2,local3,local4,local5,local6,local7}

do        
# (this is all one line!)


for k in {debug,info,notice,warning,err,crit,alert,emerg}
do

logger -p $i.$k "Test daemon message, facility $i priority $k"

done

done

Note that on different Linux distribution verions, the facility and priority names might differ so, if you get

logger: unknown facility name: {auth,auth-priv,cron,daemon,kern,lpr,mail,mark,news, \
syslog,user,uucp,local0,local1,local2,local3,local4, \
local5,local6,local7}

check and set the proper naming as described in logger man page.


4. Using a file descriptor that will output to a pre-set log file


Another way is to add the following code to the beginning of the script

#!/bin/bash
exec 3>&1 4>&2
trap 'exec 2>&4 1>&3' 0 1 2 3
exec 1>log.out 2>&1
# Everything below will go to the file 'log.out':

The code Explaned

  •     Saves file descriptors so they can be restored to whatever they were before redirection or used themselves to output to whatever they were before the following redirect.
    trap 'exec 2>&4 1>&3' 0 1 2 3
  •     Restore file descriptors for particular signals. Not generally necessary since they should be restored when the sub-shell exits.

          exec 1>log.out 2>&1

  •     Redirect stdout to file log.out then redirect stderr to stdout. Note that the order is important when you want them going to the same file. stdout must be redirected before stderr is redirected to stdout.

From then on, to see output on the console (maybe), you can simply redirect to &3. For example
,

echo "$(date) : Do print whatever you want logging to &3 file handler" >&3


I've initially found out about this very nice bash code from serverfault.com's post how can I fully log all bash script actions (but unfortunately on latest Debian 10 Buster Linux  that is prebundled with bash shell 5.0.3(1)-release the code doesn't behave exactly, well but still on older bash versions it works fine.

Sum it up


To shortlysummarize there is plenty of ways to do logging from a shell script logger command but using a function or a named pipe is the most classic. Sometimes if a script is supposed to write user or other script output to a a common file such as syslog, logger command can be used as it is present across most modern Linux distros.
If you have a better ways, please drop a common and I'll add it to this article.


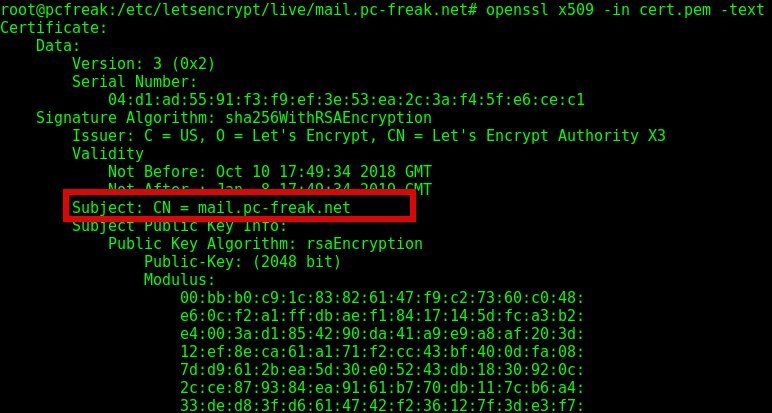
Display Content of SSL certificate .pem file with openssl command

Thursday, October 11th, 2018

display-content-of-pem-der-and-scr-file-how-to-view-pem-file-linux

If you have generated a .pem formatted SSL certificate or you have multiple .pem SSL certificates and you're not sure which .pem file is generated for which domain / subdomain it is useful to Display content of SSL Certificate .PEM file with openssl command.

Viewing certificate's content is also very useful if you have hosted multiple websites hosted on a server and you want to check which of the SSLs assigned in the Virtualhosts has Expired (for example if you have domains that expire in short term period (365 days).


1. How to Display Content of SSL certificate .pem file?


root@pcfreak:~# openssl x509 -in cert.pem -text
Certificate:
    Data:
        Version: 3 (0x2)
        Serial Number:
            04:d1:ad:55:91:f3:f9:ef:3e:53:ea:2c:3a:f4:5f:e6:ce:c1
    Signature Algorithm: sha256WithRSAEncryption
        Issuer: C = US, O = Let's Encrypt, CN = Let's Encrypt Authority X3
        Validity
            Not Before: Oct 10 17:49:34 2018 GMT
            Not After : Jan  8 17:49:34 2019 GMT
        Subject: CN = mail.www.pc-freak.net

        Subject Public Key Info:
            Public Key Algorithm: rsaEncryption
                Public-Key: (2048 bit)
                Modulus:
                    00:bb:b0:c9:1c:83:82:61:47:f9:c2:73:60:c0:48:
                    e6:0c:f2:a1:ff:db:ae:f1:84:17:14:5d:fc:a3:b2:
                    e4:00:3a:d1:85:42:90:da:41:a9:e9:a8:af:20:3d:
                    12:ef:8e:ca:61:a1:71:f2:cc:43:bf:40:0d:fa:08:
                    7d:d9:61:2b:ea:5d:30:e0:52:43:db:18:30:92:0c:
                    2c:ce:87:93:84:ea:91:61:b7:70:db:11:7c:b6:a4:
                    33:de:d8:3f:d6:61:47:42:f2:36:12:7f:3d:e3:f7:
                    5b:11:3e:1c:f0:af:96:cd:61:8a:1a:a0:f0:b5:23:
                    65:73:b6:b4:9c:19:a7:09:dd:43:96:37:ac:48:fc:
                    21:07:02:52:67:26:2c:81:24:f4:d7:10:e6:f4:12:
                    69:53:ef:91:2a:15:6a:21:06:22:ea:fe:31:38:82:
                    b4:5a:b5:9b:67:90:16:b8:31:e8:27:38:f2:41:b9:
                    19:02:8f:c7:6e:e1:2c:84:75:19:6d:bb:30:3b:d2:
                    02:f0:65:f1:76:82:15:9c:ce:31:3a:d4:7c:83:ca:
                    d1:f9:e1:b7:76:f6:78:93:47:d2:00:f9:63:aa:94:
                    41:d4:78:d0:ee:bc:e6:e9:14:14:e4:ae:54:31:88:
                    f8:58:8d:7b:3e:9f:87:5c:f2:04:e5:07:e0:4c:9a:
                    81:eb
                Exponent: 65537 (0x10001)
        X509v3 extensions:
            X509v3 Key Usage: critical
                Digital Signature, Key Encipherment
            X509v3 Extended Key Usage:
                TLS Web Server Authentication, TLS Web Client Authentication
            X509v3 Basic Constraints: critical
                CA:FALSE
            X509v3 Subject Key Identifier:
                DB:AB:81:E3:14:5F:6D:BE:B4:78:7B:5E:7D:FB:66:BF:56:37:C5:1D
            X509v3 Authority Key Identifier:
                keyid:A8:4A:6A:63:04:7D:DD:BA:E6:D1:39:B7:A6:45:65:EF:F3:A8:EC:A1


            Authority Information Access:
                OCSP – URI:http://ocsp.int-x3.letsencrypt.org
                CA Issuers – URI:http://cert.int-x3.letsencrypt.org/

            X509v3 Subject Alternative Name:
                DNS:mail.www.pc-freak.net
            X509v3 Certificate Policies:
                Policy: 2.23.140.1.2.1
                Policy: 1.3.6.1.4.1.44947.1.1.1
                  CPS: http://cps.letsencrypt.org
                  User Notice:
                    Explicit Text: This Certificate may only be relied upon by Relying Parties and only in accordance with the Certificate Policy found at https://letsencrypt.org/repository/

            CT Precertificate SCTs:
                Signed Certificate Timestamp:
                    Version   : v1 (0x0)
                    Log ID    : E2:69:4B:AE:26:E8:E9:40:09:E8:86:1B:B6:3B:83:D4:
                                3E:E7:FE:74:88:FB:A4:8F:28:93:01:9D:DD:F1:DB:FE
                    Timestamp : Oct 10 18:49:34.453 2018 GMT
                    Extensions: none
                    Signature : ecdsa-with-SHA256
                                30:46:02:21:00:D6:DE:47:AD:D2:32:BE:BE:DD:B3:EB:
                                EE:84:9E:02:8A:4F:33:E2:63:21:D5:F7:4D:47:82:92:
                                AB:B9:0A:49:62:02:21:00:E8:7D:17:81:32:E3:4F:CF:
                                2D:79:8C:97:46:E1:EF:5E:99:F4:8A:8B:B5:6D:23:5F:
                                05:84:E2:14:6A:56:8E:A0
                Signed Certificate Timestamp:
                    Version   : v1 (0x0)
                    Log ID    : 29:3C:51:96:54:C8:39:65:BA:AA:50:FC:58:07:D4:B7:
                                6F:BF:58:7A:29:72:DC:A4:C3:0C:F4:E5:45:47:F4:78
                    Timestamp : Oct 10 18:49:34.451 2018 GMT
                    Extensions: none
                    Signature : ecdsa-with-SHA256
                                30:44:02:20:6C:8E:E7:E2:70:AD:33:A6:5C:E0:89:84:
                                FB:0B:F6:E1:5C:05:06:0A:A8:DB:8B:1C:7A:D0:52:99:
                                5F:3F:A2:64:02:20:4B:CD:0B:E7:A0:27:04:31:19:18:
                                58:99:51:73:49:6B:77:25:A7:E7:5B:10:8C:BD:ED:54:
                                03:DD:40:E4:2D:31
    Signature Algorithm: sha256WithRSAEncryption
         9c:86:b3:34:64:af:ac:9d:c4:d3:a7:cc:fc:8a:32:18:75:95:
         95:47:9b:9c:3c:0e:3b:61:f9:88:61:38:1a:a6:92:69:3d:14:
         6a:53:13:14:65:e6:ca:fa:b9:8e:48:c9:d4:73:f6:e4:74:8a:
         1f:2b:f2:14:86:f1:18:55:26:1b:a0:97:89:15:0b:62:c6:2b:
         27:81:6f:60:af:55:68:b3:2c:5b:10:56:a2:7d:28:cb:8e:fc:
         f0:21:65:78:9b:3a:52:d3:9d:27:ff:d7:24:95:de:0f:d8:3d:
         a2:43:6e:fc:a5:2d:f2:ad:37:e9:ea:db:b5:75:b8:7c:ad:23:
         45:1d:bd:fe:4e:36:c7:f4:e2:3d:47:c9:06:fc:cb:75:ba:d4:
         0a:90:17:ea:e1:7f:49:e6:68:27:97:8a:70:c7:50:e9:19:4a:
         8a:21:18:26:79:a3:61:ff:1b:26:9e:fe:85:8f:20:ed:c6:4d:
         c1:0e:04:21:a8:05:d4:29:69:99:53:63:81:c7:d5:58:71:df:
         02:b5:94:c9:36:48:c9:35:80:ab:71:78:d9:12:f6:f5:10:25:
         3d:38:c5:40:75:25:b1:95:18:d8:1c:96:f1:c6:1a:d2:c4:99:
         f5:01:2e:f4:e1:4a:1f:10:42:0e:34:ed:92:8e:53:9f:c2:7b:
         11:51:78:6a
—–BEGIN CERTIFICATE—–
MIIGDTCCBPWgAwIBAgISBNGtVZHz+e8+U+osOvRf5s7BMA0GCSqGSIb3DQEBCwUA
MEoxCzAJBgNVBAYTAlVTMRYwFAYDVQQKEw1MZXQncyBFbmNyeXB0MSMwIQYDVQQD
ExpMZXQncyBFbmNyeXB0IEF1dGhvcml0eSBYMzAeFw0xODEwMTAxNzQ5MzRaFw0x
OTAxMDgxNzQ5MzRaMBwxGjAYBgNVBAMTEW1haWwucGMtZnJlYWsubmV0MIIBIjAN
BgkqhkiG9w0BAQEFAAOCAQ8AMIIBCgKCAQEAu7DJHIOCYUf5wnNgwEjmDPKh/9uu
8YQXFF38o7LkADrRhUKQ2kGp6aivID0S747KYaFx8sxDv0AN+gh92WEr6l0w4FJD
2xgwkgwszoeThOqRYbdw2xF8tqQz3tg/1mFHQvI2En894/dbET4c8K+WzWGKGqDw
tSNlc7a0nBmnCd1DljesSPwhBwJSZyYsgST01xDm9BJpU++RKhVqIQYi6v4xOIK0
WrWbZ5AWuDHoJzjyQbkZAo/HbuEshHUZbbswO9IC8GXxdoIVnM4xOtR8g8rR+eG3
dvZ4k0fSAPljqpRB1HjQ7rzm6RQU5K5UMYj4WI17Pp+HXPIE5QfgTJqB6wIDAQAB
o4IDGTCCAxUwDgYDVR0PAQH/BAQDAgWgMB0GA1UdJQQWMBQGCCsGAQUFBwMBBggr
BgEFBQcDAjAMBgNVHRMBAf8EAjAAMB0GA1UdDgQWBBTbq4HjFF9tvrR4e159+2a/
VjfFHTAfBgNVHSMEGDAWgBSoSmpjBH3duubRObemRWXv86jsoTBvBggrBgEFBQcB
AQRjMGEwLgYIKwYBBQUHMAGGImh0dHA6Ly9vY3NwLmludC14My5sZXRzZW5jcnlw
dC5vcmcwLwYIKwYBBQUHMAKGI2h0dHA6Ly9jZXJ0LmludC14My5sZXRzZW5jcnlw
dC5vcmcvMBwGA1UdEQQVMBOCEW1haWwucGMtZnJlYWsubmV0MIH+BgNVHSAEgfYw
gfMwCAYGZ4EMAQIBMIHmBgsrBgEEAYLfEwEBATCB1jAmBggrBgEFBQcCARYaaHR0
cDovL2Nwcy5sZXRzZW5jcnlwdC5vcmcwgasGCCsGAQUFBwICMIGeDIGbVGhpcyBD
ZXJ0aWZpY2F0ZSBtYXkgb25seSBiZSByZWxpZWQgdXBvbiBieSBSZWx5aW5nIFBh
cnRpZXMgYW5kIG9ubHkgaW4gYWNjb3JkYW5jZSB3aXRoIHRoZSBDZXJ0aWZpY2F0
ZSBQb2xpY3kgZm91bmQgYXQgaHR0cHM6Ly9sZXRzZW5jcnlwdC5vcmcvcmVwb3Np
dG9yeS8wggEEBgorBgEEAdZ5AgQCBIH1BIHyAPAAdwDiaUuuJujpQAnohhu2O4PU
Puf+dIj7pI8okwGd3fHb/gAAAWZfUA/1AAAEAwBIMEYCIQDW3ket0jK+vt2z6+6E
ngKKTzPiYyHV901HgpKruQpJYgIhAOh9F4Ey40/PLXmMl0bh716Z9IqLtW0jXwWE
4hRqVo6gAHUAKTxRllTIOWW6qlD8WAfUt2+/WHopctykwwz05UVH9HgAAAFmX1AP
8wAABAMARjBEAiBsjuficK0zplzgiYT7C/bhXAUGCqjbixx60FKZXz+iZAIgS80L
56AnBDEZGFiZUXNJa3clp+dbEIy97VQD3UDkLTEwDQYJKoZIhvcNAQELBQADggEB
AJyGszRkr6ydxNOnzPyKMhh1lZVHm5w8Djth+YhhOBqmkmk9FGpTExRl5sr6uY5I
ydRz9uR0ih8r8hSG8RhVJhugl4kVC2LGKyeBb2CvVWizLFsQVqJ9KMuO/PAhZXib
OlLTnSf/1ySV3g/YPaJDbvylLfKtN+nq27V1uHytI0Udvf5ONsf04j1HyQb8y3W6
1AqQF+rhf0nmaCeXinDHUOkZSoohGCZ5o2H/Gyae/oWPIO3GTcEOBCGoBdQpaZlT
Y4HH1Vhx3wK1lMk2SMk1gKtxeNkS9vUQJT04xUB1JbGVGNgclvHGGtLEmfUBLvTh
Sh8QQg407ZKOU5/CexFReGo=
—–END CERTIFICATE—–


Same way a .der files content / encryption algorithm and domain name could be grasped.
 

root@pcfreak:~# openssl x509 -in cert.der -inform der -text
Certificate:
    Data:
        Version: 3 (0x2)
        Serial Number:
            ad:c2:96:6f:4b:db:31:5c
    Signature Algorithm: sha256WithRSAEncryption
        Issuer: CN = example.com
        Validity
            Not Before: Jun 22 04:00:37 2015 GMT
            Not After : Jul 22 04:00:37 2015 GMT

        Subject: CN = example.com
        Subject Public Key Info:
            Public Key Algorithm: rsaEncryption
                Public-Key: (512 bit)

                Modulus:
                    00:ac:75:73:b4:51:ed:1f:dd:ae:70:52:43:fc:df:
                    c7:5b:d0:2c:75:1b:14:b8:75:01:04:10:e5:1f:03:
                    65:45:dd:df:a7:9f:34:ae:fd:be:e9:05:84:df:47:
                    16:81:d9:89:4b:ce:8e:6d:1c:fa:95:44:e8:af:84:
                    74:4f:ed:c2:e5
                Exponent: 65537 (0x10001)
        X509v3 extensions:
            X509v3 Subject Key Identifier:
                26:CF:C8:ED:4B:D7:94:B2:E4:25:03:58:24:8F:04:C0:74:D5:97:8A
            X509v3 Authority Key Identifier:
                keyid:26:CF:C8:ED:4B:D7:94:B2:E4:25:03:58:24:8F:04:C0:74:D5:97:8A


            X509v3 Basic Constraints:
                CA:TRUE
    Signature Algorithm: sha256WithRSAEncryption
         0c:8b:ff:12:80:9e:4c:90:bc:26:b0:96:20:ab:76:0c:64:71:
         d2:15:48:a5:33:f6:47:e4:03:df:76:5e:0f:cd:e1:1b:5e:d1:
         4d:c2:1f:8d:b8:63:2f:c9:7d:6e:5c:3b:cb:cd:a3:d0:d8:27:
         74:66:a3:76:06:a5:fb:81:3a:b6
—–BEGIN CERTIFICATE—–
MIIBdTCCAR+gAwIBAgIJAK3Clm9L2zFcMA0GCSqGSIb3DQEBCwUAMBYxFDASBgNV
BAMMC2V4YW1wbGUuY29tMB4XDTE1MDYyMjA0MDAzN1oXDTE1MDcyMjA0MDAzN1ow
FjEUMBIGA1UEAwwLZXhhbXBsZS5jb20wXDANBgkqhkiG9w0BAQEFAANLADBIAkEA
rHVztFHtH92ucFJD/N/HW9AsdRsUuHUBBBDlHwNlRd3fp580rv2+6QWE30cWgdmJ
S86ObRz6lUTor4R0T+3C5QIDAQABo1AwTjAdBgNVHQ4EFgQUJs/I7UvXlLLkJQNY
JI8EwHTVl4owHwYDVR0jBBgwFoAUJs/I7UvXlLLkJQNYJI8EwHTVl4owDAYDVR0T
BAUwAwEB/zANBgkqhkiG9w0BAQsFAANBAAyL/xKAnkyQvCawliCrdgxkcdIVSKUz
9kfkA992Xg/N4Rte0U3CH424Yy/JfW5cO8vNo9DYJ3Rmo3YGpfuBOrY=
—–END CERTIFICATE—–


2. How to display content and info about .CSR (Certificate Signing request)


root@pcfreak:~# openssl req -in cert.csr -noout -text
 

Certificate Request:
    Data:
        Version: 1 (0x0)
        Subject: C = BG, ST = BG, L = Dobrich, O = Pc Freak, CN = mail.www.pc-freak.net, emailAddress = hipo@www.pc-freak.net
        Subject Public Key Info:
            Public Key Algorithm: rsaEncryption
                Public-Key: (2048 bit)
                Modulus:
                    00:b1:83:a7:07:62:19:d4:60:95:58:49:de:b3:48:
                    a8:39:31:fa:5a:bd:2b:d6:73:94:50:36:72:74:18:
                    58:b6:27:d3:0b:26:75:15:a8:ba:1b:77:a7:c9:54:
                    96:1f:c7:8d:da:bd:c9:17:91:53:85:9e:0a:f4:71:
                    3c:fb:d6:e4:75:41:c1:95:32:e1:22:fc:7b:1f:36:
                    23:12:00:ca:37:27:d5:f9:9b:29:48:4a:51:95:d1:
                    40:d0:ea:94:51:98:98:6b:d3:d9:79:1d:a1:65:bb:
                    a9:d1:ab:c9:46:6e:03:ee:24:45:e5:f2:73:e5:f4:
                    82:4a:08:57:b1:06:52:c3:cc:42:9a:02:5b:7a:7c:
                    bd:34:d5:5f:d7:ba:ef:27:d5:3d:97:16:69:06:c7:
                    c1:06:5e:d9:07:16:3f:a3:61:50:9d:dd:ea:95:32:
                    f1:ee:93:82:48:df:20:8b:ae:d2:95:89:05:e4:3d:
                    0c:d7:e1:cf:07:ae:55:84:11:06:92:be:34:b4:a2:
                    a1:ce:07:06:bf:21:bc:80:e2:03:d2:85:b4:64:02:
                    8d:cd:d2:86:1c:49:41:52:43:a8:12:f8:ef:2c:f4:
                    be:a0:dc:ac:ea:27:3a:f9:ab:ab:27:da:28:63:1d:
                    10:5a:4f:b8:51:42:40:ae:be:c0:2d:e9:a3:5a:5a:
                    23:7f
                Exponent: 65537 (0x10001)
        Attributes:
            a0:00
    Signature Algorithm: sha256WithRSAEncryption
         47:f0:54:cd:5e:46:6f:2c:cc:48:7e:85:f0:a8:96:10:ca:a3:
         15:98:77:d3:02:95:8c:67:84:e3:55:d2:0c:e8:d5:a7:ba:82:
         95:fb:ce:73:4c:bc:8f:da:85:97:0c:a8:59:32:b3:a4:af:0a:
         80:4c:78:7f:62:cd:1b:00:01:e8:51:27:9c:eb:75:29:80:e9:
         99:24:fc:86:e2:09:28:be:47:5a:1d:bf:b1:b4:c4:29:4e:6e:
         f3:70:b4:58:f8:d9:a6:63:03:8b:a1:ef:ee:6d:1a:35:33:1e:
         b2:32:25:c1:33:37:3d:46:82:37:9b:0d:4c:40:20:ae:ff:e0:
         cc:51:a2:6b:dd:74:26:d6:93:26:89:c7:76:29:13:cf:6e:5a:
         0f:7c:1b:f5:80:be:3b:6a:a3:c0:10:cd:07:1e:a2:31:8b:49:
         94:d7:63:cf:93:8d:80:03:75:4a:76:b4:cd:14:fe:96:62:61:
         6b:96:8f:c0:a5:ef:67:c7:5e:c0:a5:4b:4f:95:57:b6:43:03:
         8b:6d:10:5f:ab:f2:95:54:ba:85:8e:8b:c1:99:ea:fd:3f:5e:
         23:01:d4:27:f3:e9:20:37:c4:05:47:30:67:94:53:f0:87:27:
         48:73:57:55:f2:70:04:b1:e9:29:eb:2e:2c:9a:cc:55:f4:cc:
         a4:71:c2:5a


That's all folks 🙂


Linux “bash: mail: command not found” error fix – Installing mail cli on Fedora, Debian, CentOS, Ubuntu

Friday, September 7th, 2018

bash-mail-command-not-found-error-fix-linux-installing-bsd-mailx-linux-fedora-debian-centos

If you just hired a cheap VPS with some kind of Linux OS installed or just installed a home Linux test system environment inside a Virtual Machine (such as VirtualBox) on your notebook and you want to read system email reports delivered by services (e.g. track possible errors with the OS) or simply test whether Email relaying is configured properly

and you end up with shell error:

bash: mail: command not found

because mail command is missing and you wonder what Linux package you have to install in order to have the lovely mail / mailx command back on the OS … this article will help you how you can easily solve it by installing the mailx binary file (e.g. install the package providing it depending on the Linux Distribution Operating System you face the problem on.

1.  Install mailx command on Debian / Ubuntu / Mint and other .deb based Linux
 

root@linux:~# apt-get install –yes bsd-mailx


An alternative way to install the mailx system binary is to install  mailutils package

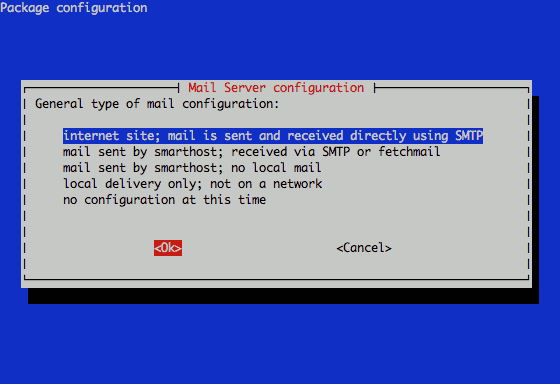
which will set up the system with essential mail related programs and set up a light Exim MTA and common server Email surrounding  so you can easily configure default installed Exim Mail Server to serve as an SMTP relay (through dpkg-reconfigure exim4-config) command


root@linux~:# apt-get install mailutils
Reading package lists… Done
Building dependency tree       
Reading state information… Done
The following additional packages will be installed:
  exim4-base exim4-config exim4-daemon-light guile-2.0-libs libgsasl7
  libkyotocabinet16v5 libmailutils5 libmariadbclient18 libntlm0
  mailutils-common mysql-common
Suggested packages:
  eximon4 exim4-doc-html | exim4-doc-info spf-tools-perl swaks mailutils-mh
  mailutils-doc
The following NEW packages will be installed:
  exim4-base exim4-config exim4-daemon-light guile-2.0-libs libgsasl7
  libkyotocabinet16v5 libmailutils5 libmariadbclient18 libntlm0 mailutils


root@linux:~# dpkg-reconfigure exim4-config


dpkg-reconfigure-exim4-config-debian-linux-exim4-email-server-screenshot

2. Install mailx Linux command on Fedora / CentOS / RHEL e.g. Redhat based distros


On RPM based distrubutions the package name is different from debians to install it there you have to fetch and install current distro mailx .rpm

To install mail command on older CentOS / Redhat 7/6/5 distributions


[root@centos:~]# yum install -y mailx


On Fedora 22+ version yum auto-dependency tool was substituted with dnf:


[root@fedora:~]# dnf install -y mailx


3. Send Test Email with mail command


root@linux:~# echo "Sample Message Body" | mail -s "Whatever … Message Subject" remote_receiver@remote-server-email-address.com


Check the mailbox, you just sent the sample email, hopefully if MTA is relaying correctly and the SMTP relay is properly delivering the email should be at the recipient address.

How to force logrorate process logs / Make logrotate changes take effect immediately

Sunday, April 10th, 2016

how-to-force-logrorate-to-process-logs-make-logrorate-changes-take-effect-immediately-log-rotate-300x299

Dealing with logrorate as admins we need to change or add new log-rorate configurations (on most Linux distributions configs are living uder
/etc/logrotate.d/
 

logrotate uses crontab to work. It's scheduled work, not as daemon, so usually no need to reload its configuration.
When the crontab executes logrotate, it will use your new config file automatically.

Most of the logrotate setups I've seen on various distros runs out of the /etc/cron.daily

$ ls -l /etc/cron.daily/logrotate 
-rwxr-xr-x 1 root root 180 May 18  2014 /etc/cron.daily/logrotate

Here is content of cron job scheduled script:

$ cat /etc/cron.daily/logrorate

#!/bin/sh /usr/sbin/logrotate /etc/logrotate.conf EXITVALUE=$? if [ $EXITVALUE != 0 ]; then /usr/bin/logger -t logrotate "ALERT exited abnormally with [$EXITVALUE]" fi exit 0

Configurations change to lograte configs takes effect on next crontab run,
but what If you need to test your config you can also execute logrotate
on your own with below ommand:


logrotate -vf /etc/logrotate.conf 

If you encounter some issues with just modified or newly added logrorate script to check out the status of last logrorate executing bunch of log-rotate scripts run on Debian  / Ubuntu etc. deb based Linux:

cat /var/lib/logrotate/status

Or on RHEL, Fedora, CentOS Linux


cat /var/lib/logrotate.status

logrotate state -- version 2


"/var/log/syslog" 2016-4-9
"/var/log/dpkg.log" 2016-4-1
"/var/log/unattended-upgrades/unattended-upgrades.log" 2012-9-20
"/var/log/unattended-upgrades/unattended-upgrades-shutdown.log" 2013-5-17
"/var/log/apache2/mailadmin.www.pc-freak.net-access.log" 2012-9-19
"/var/log/snort/portscan.log" 2012-9-12
"/var/log/apt/term.log" 2016-4-1
"/var/log/squid/access.log" 2015-3-21
"/var/log/mysql/mysql-slow.log" 2016-4-9
"/var/log/debug" 2016-4-3
"/var/log/mysql.log" 2016-4-9
"/var/log/squid/store.log" 2015-3-21
"/var/log/apache2/mailadmin.www.pc-freak.net-error.log" 2012-9-19
"/var/log/daemon.log" 2016-4-3
"/var/log/munin/munin-update.log" 2016-4-9
"/var/log/unattended-upgrades/unattended-upgrades*.log" 2013-5-16
"/var/log/razor-agent.log" 2015-2-19
"/var/log/btmp" 2016-4-1
"/var/log/squid/*.log" 2014-11-24
"/var/log/munin/munin-graph.log" 2016-4-9
"/var/log/mysql/mysql.log" 2012-9-12
"/var/log/munin/munin-html.log" 2016-4-9
"/var/log/clamav/freshclam.log" 2016-4-3
"/var/log/munin/munin-node.log" 2016-1-23
"/var/log/mail.info" 2016-4-3
"/var/log/apache2/other_vhosts_access.log" 2016-4-3
"/var/log/exim4/rejectlog" 2012-9-12
"/var/log/squid/cache.log" 2015-3-21
"/var/log/messages" 2016-4-3
"/var/log/stunnel4/stunnel.log" 2012-9-19
"/var/log/apache2/php_error.log" 2012-10-21
"/var/log/ConsoleKit/history" 2016-4-1
"/var/log/rsnapshot.log" 2013-4-15
"/var/log/iptraf/*.log" 2012-9-12
"/var/log/snort/alert" 2012-10-17
"/var/log/privoxy/logfile" 2016-4-3
"/var/log/auth.log" 2016-4-3
"/var/log/postgresql/postgresql-8.4-main.log" 2012-10-21
"/var/log/apt/history.log" 2016-4-1
"/var/log/pm-powersave.log" 2012-11-1
"/var/log/proftpd/proftpd.log" 2016-4-3
"/var/log/proftpd/xferlog" 2016-4-1
"/var/log/zabbix-agent/zabbix_agentd.log" 2016-3-25
"/var/log/alternatives.log" 2016-4-7
"/var/log/mail.log" 2016-4-3
"/var/log/kern.log" 2016-4-3
"/var/log/privoxy/errorfile" 2013-5-28
"/var/log/aptitude" 2015-5-6
"/var/log/apache2/access.log" 2016-4-3
"/var/log/wtmp" 2016-4-1
"/var/log/pm-suspend.log" 2012-9-20
"/var/log/snort/portscan2.log" 2012-9-12
"/var/log/mail.warn" 2016-4-3
"/var/log/bacula/log" 2013-5-1
"/var/log/lpr.log" 2012-12-12
"/var/log/mail.err" 2016-4-3
"/var/log/tor/log" 2016-4-9
"/var/log/fail2ban.log" 2016-4-3
"/var/log/exim4/paniclog" 2012-9-12
"/var/log/tinyproxy/tinyproxy.log" 2015-3-25
"/var/log/munin/munin-limits.log" 2016-4-9
"/var/log/proftpd/controls.log" 2012-9-19
"/var/log/proftpd/xferreport" 2012-9-19
"/var/spool/qscan/qmail-queue.log" 2013-5-15
"/var/log/user.log" 2016-4-3
"/var/log/apache2/error.log" 2016-4-3
"/var/log/exim4/mainlog" 2012-10-16
"/var/log/privoxy/jarfile" 2013-5-28
"/var/log/cron.log" 2016-4-3
"/var/log/clamav/clamav.log" 2016-4-3


The timestamp date next to each of the rotated service log is when the respective log was last rorated

It is also a handy thing to rorate only a certain service log, lets say clamav-server, mysql-server, apache2 and nginx


logrorate /etc/logrorate.d/clamav-server
logrorate /etc/logrorate.d/mysql-server
logrotate /etc/logrotate.d/nginx