Posts Tagged ‘make’

What Every Body is Saying – one of Best books on Body Language ever written

Tuesday, August 14th, 2018

how-to-learn-to-read-people-and-become-a-better-communicator-What-every-body-is-saying-book-cover

Those interested in People Reading or holding a Management position position job inside some Small or Mid sized corporation could benefit greatly of a Book called
What Every Body is Saying

What Every Body is Saing is written by an ex-FBI Agent (JOE NAVANNO), probablythere are no actually ex-FBI agents, but that's a topic for another post.

The book is quick to read, especially if you follow the pictures of Body postures shown with their little description below.
Many of the Body Languages so commonly adopted by multitudes of people, thanks to the American of the Culture world-wide are being practiced
in some degree in mostly all people you might know (mostly unconsciously) …


What Every Body is Saying could be of a great help to people who want to make through in life and for Start-up company CEOs, Human Resource Managers, or anyone who want to better learn to communicate and Influence People.

Even in a normal family relations, being able to properly identify the Body Language of your Wife or kids would seriously benefit you and if you keep attention (focus) would reveal there short term-plans.

what-sitting-posture-is-sayingbook-what-every-body-is-saying

Adopting some of the suggested body languages in the book would definitely help you improve how people perceive you and practising some so called "Confident postures" could even boost your Confidence levels dramatically both when you're alone or when you are in a group of people or A Company Team Meeting.

Reading the Person Body language is of a great help also to understand the approximate Emotional / Spiritual state the person in front of you is and even if applied proparly could help you make the person or group of people be positively influenced to change from a negative to positive mindset
or when working on a project, could help you dramatically to make the people work more efficiently and boost their motivation / mood about the things, they have to someday do anyways.

The reader has to know of course that most of the mentioned body language cues are generalizations and in order to find out the exact messages being sent on non-verbal communication level depends on a multiple factors and many of the Body languages talked might be in a modified form and even some could be totally different from any of the described of the book.

However the observation practice (at least mine) shows that at least 60-70% of the described Body Language postures are adopted and used by mostly anyone out there.
To check the validity of the things described in the books just sit somewhere in a park or in a bar / caffeteria and watch carefully how people interact, you will be surprised how many things are being communicated non-verbally and how often the lack of one of the two, or two have severe communication issues, just because they couldn't synchronize their body language or lack the ability to read the other interlocutor's processed and communicated intentions.

The book when red at least for me was a wide eyes opener and even though as a Christian, I've always been doubting that any-generalization model trying to frame up people is very untrue and trying to influence people with your Body Language is bad sinful (kinda of satanic) practice, realizing that even Christians does communicate and do use body language (because they're conditioned by the society they lived in), that means that improving your Body Language to be more convincing in mostly anti-christian society we live can do you good favour to be adequate in society, or at least you can be aware of the existence of the Body Language and its meaning.

By the way, many of the models and gestures as translated described as a behaviour body interpretations are perhaps highly used nowadays by Agents across all the major Secret Services agencies such as CIA, MI6, KGB, Mussad etc.

book-what-every-body-is-saying_or-how-to-improve-your-daily-relations-by-reading-people

This kind of things are learned in most business universities nowadays, but the way the Body Reading / Influencing knowledge is communicated in Business universities is a disaster, because it is usually compiled by Professors who alone are not expert or haven't been advanced enough in body language.
Thus even like that if you read the book, I'm sure you will benefit and perhaps reread it at least a couple of times in the coming years …

A summary of the book goes like this:

1. It starts with a short story on how the author get acquainted to the knowledge of body language and his personal life events

The author Joe Navarro was an emigrant from Cuba to US as the age of 8, because the author inability to speak English at all, his best way to understand what the other was saying or communicating in the first few years in US was to observe closely what the person in front was communicating non-verbally and makes guesses, what that could be.
His family and grandmother also played a key role to help him learn the craft of Body Language reaading.

Growing up and graduating college in the age of Baby Boomers, Joe Navarro was hired in FBI where he spend the following years as an agent specializing in Counter Intelligence
and behavior assessment.

2. It continues as the knowledge on Body interprations is being served in a very stuffed manner


what-everybody-is-saying-back-book-cover

The 3 key things to remember out of the book goes like that:

    A. At least 60% of what you say is not coming out of your mouth.
    B. There’s one more option next to fight or flight responce our brain does automatically
    C. To become a master at reading body language, you have to develop situational awareness.

The book claims that people tend to be stuck into 3 main states (as a result of the evolutionary development of species (Creationists and Christian fundamentalists could argue seriously here 🙂 ) , whenever facing a difficult situation these are:

  • Freeze
  • Fight
  • Flight

To sum up if you're looking for new ways to improve your current relationships with people and build a new ones, the book would definitely help you tremendously.
I've found the book in a PDF format with few simple searches online so those who can't afford it could also download it from the internet (at least as of time of writting this article).
A lot of the exampled Body confidence / influence postures described in the book you will find on mostly any Kids Cartoon and Internet top shows and in mostly everybody from TED Talks show and mostly all Youtube educational videos and podcasterers.

That's all Folks, Enjoy reading!


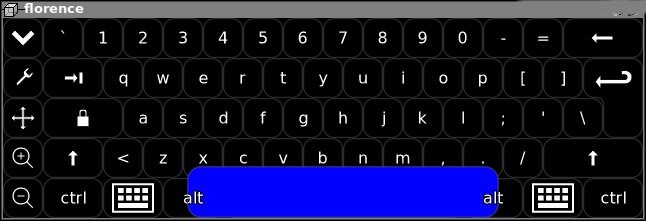
Virtual Keyboard for Linux and other Freedom respecting operating Systems

Monday, July 30th, 2018

How to install and Use Linux Virtual Keyboard and other freedom respecting Operating Systems

  •  Looking for a quick way to use VIRTUAL KEYBOARD ON LINUX COMPUTER OPERATING SYSTEM, you can do it just this 1 task in 3 simple steps  ???
    – Logical question emerges, WHY ??? would you need a virtual keyboard on Free Software OS such as Linux?
    Well, just because sometimes it is much more secure to use a Virtual Keyboard, especially if you have doubt that your keyboard has been tapped or a Key Logger (Sniffer), intercepting the Keyboard IN / OUT jacks, is installed on the computer or you might have sit on a computer of ,a friend running Linux, and you want to make sure he did not install sniffer to intercept your ,SSH login passwords and ,later hack into your Servers, after stealing, the password


  • Assuming you're on : – Debian / Ubuntu Linux, or other of the numerous IT systems such as ,FreeBSD / OpeBSD etc. out there, you can run simply this commands:


  •  apt-get install –yes florence
    * A. To make it, easily invokable for laters, create a small bash, shell script in directory; – location /usr/bin/virtual-keyboard like, the one below:

    vim /usr/bin/virtual-keyboard

    * B.. INside the file Place following 1 liner code
     

    #!/bin/sh
    /usr/bin/florence


    * C… To later invoke it any time:
    Press ALT + F2 (or use Run Command Dialog in GNOME / KDE / Windomaker / IceWM whatever or any other crazy graphic environment of your choice and run:

    /usr/bin/virtual-keyboard


How to make for loop (cycles) in KSH useful for FreeBSD / UNIX system administrators

Friday, November 3rd, 2017

korn-shell-how-to-make-loops-easily-for-sys-admin-purposes

Sometimes we have to administrate this operating systems such as FreeBSD / AIX / HP UX or even Mac OS server where by default due to historical reasons or for security bash shell is not avialable. That's not a common scenario but it happens so if as sysadmin we need to create for loops on ksh it is useful to know how to do that, as for loop cycles are one of the most important command line tools the sysadmin swiss army knife kind of.

So how to create a for loop (cycle) in ksh (Korn Shell)?

The most basic example for a KSH loop shell is below:
 

#!/bin/ksh
for i in 1 2 3 4 5
do
  echo "Welcome $i times"
done


Add the content to any file lets say ksh_loop.ksh then make it executable as you do in bash shells


$ chmod +x ksh_loop.ksh
$ ksh ksh_loop.ksh


The overall syntax of the for loop ksh command is as follows:


for {Variable} in {lists}
do
    echo ${Variable}
done


Hence to list lets say 20 iterations in a loop in ksh you can use something like:
 

#!/bin/ksh
for i in {1..20}
do
  echo "Just a simple echo Command $i times";
# add whatever system commands you like here
done


Example for some useful example with KSH loop is to list a directory content so you can execute whatever command you need on each of the files or directories inside


#!/bin/ksh
for f in $(ls /tmp/*)
do
        print "Iterating whatever command you like on /tmp dir : $f"
done


Other useful for loop iteration would be to print a file content line by line just like it is done in bash shell, you can do that with a small loop like belows:


#!/bin/ksh
for iteration_variable in $(cat  file_with-your-loved-content-to-iterate.txt)
do
        print "Current iteration like is : $iteration_variable"
done


How to turn keyboard backlight on GNU / Linux, keyboard no backlight solution

Friday, October 20th, 2017

how-to-make-CM_Storm_Devastator-keyboard_backlight-work-on-linux-enabled-disable-keyboard-glowing-gnu-linux

If you're a GNU / Linux user and you happen to buy a backlighted keyboard, some nice new laptop whose keyboard supports the more and more modern keyboard growing or if you happen to install a GNU / Linux for a Gamer friend no matter the Linux distribution, you might encounter sometimes  problem even in major Linux distributions Debian / Ubuntu / Mint / Fedora with keyboard backlight not working.

Lets say you buy a Devastator II backlighted keyboard or any other modern keyboard you plug it into the Linux machine and there is no nice blinking light coming out of the keyboard, all the joy is gone yes I know. The free software coolness would have been even more grandiose if your keyboard was shiny and glowing in color / colors 🙂

But wait, there is hope for your joy to be made complete.

To make the keyboard backlight switch on Just issue commands:


xmodmap -e 'add mod3 = Screen_Lock'


# Turn on the keyboard bright lamps
xset led on

# Turns off the keyboard bright lamps
xset led off


If you want to make the keyboard backlight be enabled permanent the easiest solution is to

– add the 3 command lines to /etc/rc.local

E.g. to do so open /etc/rc.local and before exit 0 command just add the lines:


vim /etc/rc.local


xmodmap -e 'add mod3 = Screen_Lock'

# Turn on the keyboard bright lamps
xset led on

# Turns off the keyboard bright lamps
xset led off


If you prefer to have the keyboard colorful backlight enable and disabled from X environment on lets say GNOME , here is how to make yourself an icon that enabled and disables the colors.

That's handy because at day time it is a kind of meaningless for the keyboard to glow.

Here is the shell script:

#!/bin/bash
sleep 1
xset led 3
xmodmap -e 'add mod3 = Scroll_Lock'


I saved it as /home/hipo/scripts/backlight.sh

(don't forget to make it executable!, to do so run):


chmod +x /home/hipo/scripts/backlight.sh


Then create  the .desktop file at /etc/xdg/autostart/backlight.desktop so that it runs the new shell script, like so:

[Desktop Entry]
Type=Application
Name=Devastator Backlight
Exec=/home/hipo/scripts/backlight.sh
Icon=system-run
X-GNOME-Autostart-enabled=true

How to check who is flooding your Apache, NGinx Webserver – Real time Monitor statistics about IPs doing most URL requests and Stopping DoS attacks with Fail2Ban

Wednesday, August 20th, 2014

check-who-is-flooding-your-apache-nginx-webserver-real-time-monitoring-ips-doing-most-url-requests-to-webserver-and-protecting-your-webserver-with-fail2ban

If you're Linux ystem administrator in Webhosting company providing WordPress / Joomla / Drupal web-sites hosting and your UNIX servers suffer from periodic denial of service attacks, because some of the site customers business is a target of competitor company who is trying to ruin your client business sites through DoS or DDOS attacks, then the best thing you can do is to identify who and how is the Linux server being hammered. If you find out DoS is not on a network level but Apache gets crashing because of memory leaks and connections to Apache are so much that the CPU is being stoned, the best thing to do is to check which IP addresses are causing the excessive GET / POST / HEAD requests in logged.
 

There is the Apachetop tool that can give you the most accessed webserver URLs in a refreshed screen like UNIX top command, however Apachetop does not show which IP does most URL hits on Apache / Nginx webserver. 


1. Get basic information on which IPs accesses Apache / Nginx the most using shell cmds


Before examining the Webserver logs it is useful to get a general picture on who is flooding you on a TCP / IP network level, with netstat like so:
 

# here is howto check clients count connected to your server
netstat -ntu | awk '{print $5}' | cut -d: -f1 | sort | uniq -c | sort -n


If you get an extensive number of connected various IPs / hosts (like 10000 or something huge as a number), depending on the type of hardware the server is running and the previous scaling planned for the system you can determine whether the count as huge as this can be handled normally by server, if like in most cases the server is planned to serve a couple of hundreds or thousands of clients and you get over 10000 connections hanging, then your server is under attack or if its Internet server suddenly your website become famous like someone posted an article on some major website and you suddenly received a tons of hits.


There is a way using standard shell tools, to get some basic information on which IP accesses the webserver the most with:

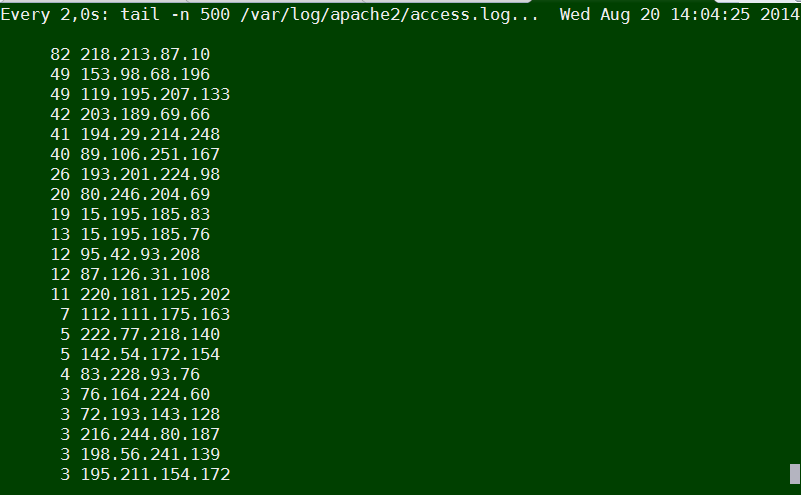
tail -n 500 /var/log/apache2/access.log | cut -d' ' -f1 | sort | uniq -c | sort -gr

Or if you want to keep it refreshing periodically every few seconds run it through watch command:

watch "tail -n 500 /var/log/apache2/access.log | cut -d' ' -f1 | sort | uniq -c | sort -gr"

monioring-access-hits-to-webserver-by-ip-show-most-visiting-apache-nginx-ip-with-shell-tools-tail-cut-uniq-sort-tools-refreshed-with-watch-cmd


Another useful combination of shell commands is to Monitor POST / GET / HEAD requests number in access.log :
 

 awk '{print $6}' access.log | sort | uniq -c | sort -n

     1 "alihack<%eval
      1 "CONNECT
      1 "fhxeaxb0xeex97x0fxe2-x19Fx87xd1xa0x9axf5x^xd0x125x0fx88x19"x84xc1xb3^v2xe9xpx98`X'dxcd.7ix8fx8fxd6_xcdx834x0c"
      1 "x16x03x01"
      1 "xe2
      2 "mgmanager&file=imgmanager&version=1576&cid=20
      6 "4–"
      7 "PUT
     22 "–"
     22 "OPTIONS
     38 "PROPFIND
   1476 "HEAD
   1539 "-"
  65113 "POST
 537122 "GET


However using shell commands combination is plenty of typing and hard to remember, plus above tools does not show you, approximately how frequenty IP hits the webserver


2. Real-time monitoring IP addresses with highest URL reqests with logtop


Real-time monitoring on IP addresses with highest URL requests is possible with no need of "console ninja skills"  through – logtop.


2.1 Install logtop on Debian / Ubuntu and deb derivatives Linux


a) Installing Logtop the debian way

LogTop is easily installable on Debian and Ubuntu in newer releases of Debian – Debian 7.0 and Ubuntu 13/14 Linux it is part of default package repositories and can be straightly apt-get-ed with:

apt-get install –yes logtop

b) Installing Logtop from source code (install on older deb based Linuxes)

On older Debian – Debian 6 and Ubuntu 7-12 servers to install logtop compile from source code – read the README installation instructions or if lazy copy / paste below:

cd /usr/local/src
wget https://github.com/JulienPalard/logtop/tarball/master
mv master JulienPalard-logtop.tar.gz
tar -zxf JulienPalard-logtop.tar.gz

cd JulienPalard-logtop-*/
aptitude install libncurses5-dev uthash-dev

aptitude install python-dev swig

make python-module

python setup.py install

make

make install


mkdir -p /usr/bin/
cp logtop /usr/bin/


2.2 Install Logtop on CentOS 6.5 / 7.0 / Fedora / RHEL and rest of RPM based Linux-es

b) Install logtop on CentOS 6.5 and CentOS 7 Linux

– For CentOS 6.5 you need to rpm install epel-release-6-8.noarch.rpm
 

wget http://dl.fedoraproject.org/pub/epel/6/x86_64/epel-release-6-8.noarch.rpm
rpm -ivh epel-release-6-8.noarch.rpm
links http://dl.fedoraproject.org/pub/epel/6/SRPMS/uthash-1.9.9-6.el6.src.rpm
rpmbuild –rebuild
uthash-1.9.9-6.el6.src.rpm
cd /root/rpmbuild/RPMS/noarch
rpm -ivh uthash-devel-1.9.9-6.el6.noarch.rpm


– For CentOS 7 you need to rpm install epel-release-7-0.2.noarch.rpm


links http://download.fedoraproject.org/pub/epel/beta/7/x86_64/repoview/epel-release.html
 

Click on and download epel-release-7-0.2.noarch.rpm

rpm -ivh epel-release-7-0.2.noarch
rpm –import /etc/pki/rpm-gpg/RPM-GPG-KEY-EPEL-7
yum -y install git ncurses-devel uthash-devel
git clone https://github.com/JulienPalard/logtop.git
cd logtop
make
make install


2.3 Some Logtop use examples and short explanation


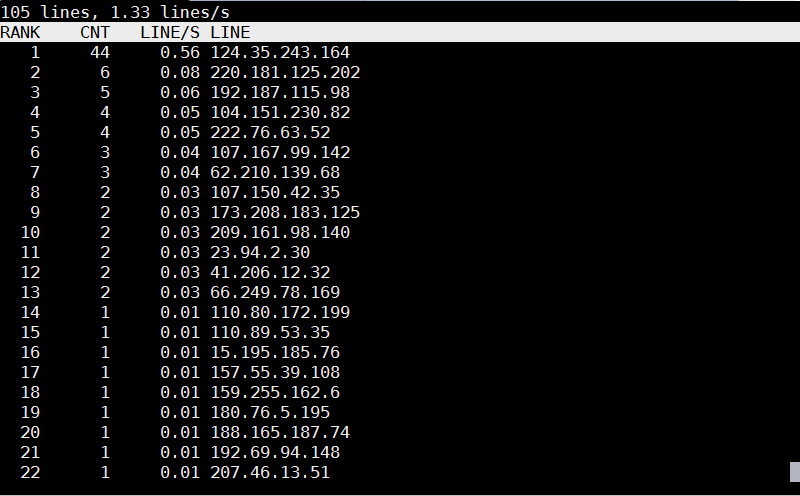
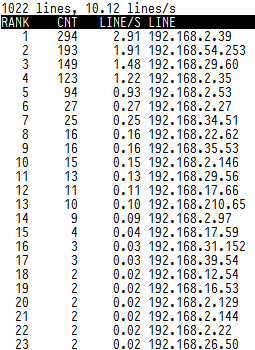
logtop shows 4 columns as follows – Line number, Count, Frequency, and Actual line


The quickest way to visualize which IP is stoning your Apache / Nginx webserver on Debian?


tail -f access.log | awk {'print $1; fflush();'} | logtop


logtop-check-which-ip-is-making-most-requests-to-your-apache-nginx-webserver-linux-screenshot

On CentOS / RHEL

tail -f /var/log/httpd/access_log | awk {'print $1; fflush();'} | logtop


Using LogTop even Squid Proxy caching server access.log can be monitored.
To get squid Top users by IP listed:


tail -f /var/log/squid/access.log | awk {'print $1; fflush();'} | logtop


logtop-visualizing-top-users-using-squid-proxy-cache
 

Or you might visualize in real-time squid cache top requested URLs
 

tail -f /var/log/squid/access.log | awk {'print $7; fflush();'} | logtop


visualizing-top-requested-urls-in-squid-proxy-cache-howto-screenshot


3. Automatically Filter IP addresses causing Apache / Nginx Webservices Denial of Service with fail2ban
 

Once you identify the problem if the sites hosted on server are target of Distributed DoS, probably your best thing to do is to use fail2ban to automatically filter (ban) IP addresses doing excessive queries to system services. Assuming that you have already installed fail2ban as explained in above link (On Debian / Ubuntu Linux) with:
 

apt-get install –yes fail2ban


To make fail2ban start filtering DoS attack IP addresses, you will have to set the following configurations:
 

vim /etc/fail2ban/jail.conf


Paste in file:
 

[http-get-dos]
 
enabled = true
port = http,https
filter = http-get-dos
logpath = /var/log/apache2/WEB_SERVER-access.log
# maxretry is how many GETs we can have in the findtime period before getting narky
maxretry = 300
# findtime is the time period in seconds in which we're counting "retries" (300 seconds = 5 mins)
findtime = 300
# bantime is how long we should drop incoming GET requests for a given IP for, in this case it's 5 minutes
bantime = 300
action = iptables[name=HTTP, port=http, protocol=tcp]


Before you paste make sure you put the proper logpath = location of webserver (default one is /var/log/apache2/access.log), if you're using multiple logs for each and every of hosted websites, you will probably want to write a script to automatically loop through all logs directory get log file names and automatically add auto-modified version of above [http-get-dos] configuration. Also configure maxtretry per IP, findtime and bantime, in above example values are a bit low and for heavy loaded websites which has to serve thousands of simultaneous connections originating from office networks using Network address translation (NAT), this might be low and tuned to prevent situations, where even the customer of yours can't access there websites 🙂

To finalize fail2ban configuration, you have to create fail2ban filter file:

vim /etc/fail2ban/filters.d/http-get-dos.conf


Paste:
 

# Fail2Ban configuration file
#
# Author: http://www.go2linux.org
#
[Definition]
 
# Option: failregex
# Note: This regex will match any GET entry in your logs, so basically all valid and not valid entries are a match.
# You should set up in the jail.conf file, the maxretry and findtime carefully in order to avoid false positives.
 
failregex = ^<HOST> -.*"(GET|POST).*
 
# Option: ignoreregex
# Notes.: regex to ignore. If this regex matches, the line is ignored.
# Values: TEXT
#
ignoreregex =


To make fail2ban load new created configs restart it:
 

/etc/init.d/fail2ban restart


If you want to test whether it is working you can use Apache webserver Benchmark tools such as ab or siege.
The quickest way to test, whether excessive IP requests get filtered – and make your IP banned temporary:
 

ab -n 1000 -c 20 http://your-web-site-dot-com/

This will make 1000 page loads in 20 concurrent connections and will add your IP to temporary be banned for (300 seconds) = 5 minutes. The ban will be logged in /var/log/fail2ban.log, there you will get smth like:

2014-08-20 10:40:11,943 fail2ban.actions: WARNING [http-get-dos] Ban 192.168.100.5
2013-08-20 10:44:12,341 fail2ban.actions: WARNING [http-get-dos] Unban 192.168.100.5

Play Midis on Linux / Make Linux MIDI Ready for the Future – Enable embedded MIDI music to play in a Browser, Play MIDIs with VLC and howto enjoy Midis in Text Console

Wednesday, October 4th, 2017

how-to-play-midi-on-gnu-linux-in-graphic-environment-console-and-browser-midi-synthesizer-and-linux-tux-together


Play Midis on Linux or Make Linux MIDI Ready for the Future – Enable embedded MIDI music to play in a Browser, Play MIDIs with VLC and howto enjoy Midis in Text Console HOWTO


Playing MIDI has been quite a lot of fun historically,

if you grow up in the days when personal computers were still young and the Sound Blaster was a luxury, before the raise of Mp3 music format, you have certainly enjoyed the beeping of PC Speaker and later on during 386 and 486 / 586 computers the enjoyment of playing tracked music such as S3M and MOD,

in that good days playing MIDI music was the only alternative for PC maniacs who doesn't own a CD Drive (which itself) was another luxury and even thouse who had a CD ROM device, were mainly playing music in CD audio format (.CDA).
Anyhow MIDI was a cheap and a CPU unintensive way to listen to equivalent of favourite popular Audio Songs and for those who still remember many of the songs were recreated in MIDI format, just with a number of synthesized instruments without any voice (as MIDI is usually).

The same was true also for the good old days of raise of Mobile Phones, when polyphonic was a standard as CPU power was low MIDI was a perfect substitute for the CPU heavy Encoded MP3s / OGG and other formats that required a modern for that time Intel CPU running in 50+ Mhz usually 100 / 166Mhz was perfect for the days to play Mp3 but still even on that PCs we listened to Midi songs.

Therefore if you're one of those people like me who still enjoy to play some Midi Music in the year 2017 and feel a bit like Back into the Future movie and a Free Software fan and user, especially if you're a novice GNU  / Linux Free Software user, you will be unpleasently surprised that most today's default Linux distributions doesn't have an easy way to play Midi music format out of the box right after install.

Hence below article aims to give you an understanding on

How you can play Midi Music on GNU / Linux Operating System

First, lets Prepare to load necessery Linux kernel modules to make sure MIDI can be played by soundcard:

In /etc/modules make sure you have the following list of modules loaded:
 

linux-desktop:~# cat /etc/modules
3c59x
snd-emu10k1
snd-pcm-oss
snd-mixer-oss
snd-seq-oss

!Note the modules are working as of time of writting and in time can change to some other modules, depending on how the development of ALSA (Advanced Linux Sound Architecture) goes, and if the developers decide to rename the upmentioned modules

If you just have added the modules to /etc/modules with vim / nano to reload modules into the Linux kernel run:


linux-desktop:~# modprobe -a


Secondly, Installing a whole bunch of MIDI music related program tools can be achieved in Debian by installing the multimedia-midi package, e.g.:


linux-desktop:~# apt-get install –yes multimedia-midi


1. Playing Midi in Graphical environment with a double click using VLC


How to make MIDI easy listanable in Linux graphical environment like GNOME / KDE / XFCE desktop ?


If you want to make Midi music execution sa easy as  just clicking on the .MIDI file format on Linux you can do that with a midi extension available for VLC (Video Lan Client) Universal Multi Platform Media Player player

To install it on Debian Ubuntu GNU / Linux
 

# apt-get install –yes vlc-plugin-fluidsynth


Необходимо е да се изтеглят 6754 B архиви.
След тази операция ще бъде използвано 35,8 kB допълнително дисково пространство.
Изт:1 http://deb.debian.org/debian stretch/main amd64 vlc-plugin-fluidsynth amd64 2.2.6-1~deb9u1 [6754 B]
Изтеглени 6754 B за 0с (33,6 kB/сек)           
Selecting previously unselected package vlc-plugin-fluidsynth:amd64.
(Reading database … 382976 files and directories currently installed.)
Preparing to unpack …/vlc-plugin-fluidsynth_2.2.6-1~deb9u1_amd64.deb …
Unpacking vlc-plugin-fluidsynth:amd64 (2.2.6-1~deb9u1) …
Setting up vlc-plugin-fluidsynth:amd64 (2.2.6-1~deb9u1) …
Processing triggers for libvlc-bin:amd64 (2.2.6-1~deb9u1) …


Besides making your MIDI play on the GUI environment easy as a a point and click VLC will also be able to play MIDIs on GNU / Linux from your favourite browser (nomatter Firefox / Chrome or Opera), even though the player would play in a new PopUP Window it is easy to select once MIDI file from a random website for example – here is a directory listing of Webserver with Doom II Soundtrack in MIDI format , click over any file from list and Choose option for VLC to always remember that MIDI files has to be opened with VLC player.


2. Enable Firefox / IceWeasel browser to Support Website embedded MIDI files


So VLC could make you listen the downloadable MIDIs from Web pages but,
 

What if you have stumbled on an old website which was configured with very OLD HTML Code to play some nice music (or even different MIDI songs) for each part of the website (for each webpage) and you want to have the Websites created with embedded MIDIs to automatically play on Linux oncce you visit the site?


Sadly default support in Browser for MIDI across all GNU / Linux, I've used so far never worked out of the box, not that still anyone is developing modern websites with MIDIs, but still for the sake of backward compitability and for sake of interactivity it is worthy to enable embedded MIDI support in Linux

But with a couple of tunings as usual GNU / Linux can do almost everything, so here is how to enable embedded browser support for Midi on Linux (That should work with minor modifications not only on Debian / Ubuntu / ArchLinux but also on Fedoras, CentOS etc.
If you try it on any of this distributions, please drop a short comment and tell me in few lines how you made embedded midi worked on that distros.


apt-get install –yes timidity mozplugger

Next do restart firefox

Sometimes in order to work you might need to delete /home/[YOUR_USERNAME]/.mozilla/pluginreg.dat and restart firefox again, e.g. make a backup and give it a try:


cp -rpf /home/hipo/.mozilla/pluginreg.dat /home/hipo/.mozilla/pluginreg.dat.bak
rm -f /home/hipo/.mozilla/pluginreg.dat


Another good tip as talking for embedding MIDI support is to embed XPDF to render PDF pages inside the Browser, by default this is done by GNOME's Evince PDF reader but as it is sometimes buggy and might crash it is generally a good idea to switch to xpdf instead, if for some reason PDF is not directly displaying in browser or suddenly stopped working after some distro uipgrade, you might want to do below as well:
 

apt-get install xpdf

vim /etc/mozpluggerrc

Fin d and Comment out the line starting with:

It should look like this afterwards:

 Repeat Swallow ….
 

text/x-pdf: pdf: PDF file
#      repeat swallow(documentShell) fill: acroread -geometry +9000+9000 +useFrontEndProgram "$file"
        repeat noisy swallow(Xpdf) fill: xpdf -g +9000+9000 "$file"
        repeat noisy swallow(gv) fill: gv –safer –quiet –antialias -geometry +9000+9000 "$file"


3. Play Midi music in Linux text console / terminal


There is a console tool that historically has been like the Linux standard for playing midis over the years as I remember, its called timidity


To install timidity on .Deb based Linux:
 

linux-desktop:~$ su root
Password:
linux-desktop:~# apt-get install –yes timidity

Необходимо е да се изтеглят 0 B/580 kB архиви.
След тази операция ще бъде използвано 0 B допълнително дисково пространство.
(Reading database … 382981 files and directories currently installed.)
Preparing to unpack …/timidity_2.13.2-40.5_amd64.deb …
Unpacking timidity (2.13.2-40.5) over (2.13.2-40.5) …
Processing triggers for menu (2.1.47+b1) …
Processing triggers for man-db (2.7.6.1-2) …
Setting up timidity (2.13.2-40.5) …
Processing triggers for menu (2.1.47+b1) …


To test your new MIDI Synthesizer tool and make the enjoyment full you can download Doom 2 extracted MIDI Soundtrack from here
 

Once you have downloaded above Metal MIDI DOOM old school arcade soundtrack and untarred it into your home directory be it ~/doom-midis

A remark to make here is timidity is quite CPU intensive, but on modern Dual and Quad-Core PC Notebooks, the CPU load is not of a big concern.

To test and play with timidity:
 

linux-desktop~$ timidity ~/mp3/midis/*
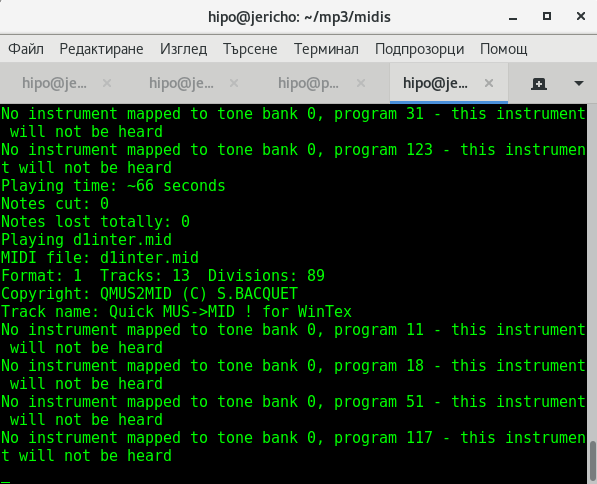

timidity-playing-doom-midi-bunny-song-on-debian-stretch-gnome-terminal-screenshot
 

hipo@jericho:~/mp3/midis$ aplaymidi -l
 Port    Client name                      Port name
 14:0    Midi Through                     Midi Through Port-0
128:0    TiMidity                         TiMidity port 0
128:1    TiMidity                         TiMidity port 1
128:2    TiMidity                         TiMidity port 2
128:3    TiMidity                         TiMidity port 3


We have also the playmidi  (simple midi text console terminal player), which historically was working quite decent and I use it to in the past on my RedHat 6.0 and RedHat 7.0 to listen to my .MID format files but unfortunately as of time of writting something is wrong with it, so when I try to play MIDIs with it instead of timidity I get this erro:


$ playmidi *.mid
Playmidi 2.4 Copyright (C) 1994-1997 Nathan I. Laredo, AWE32 by Takashi Iwai
This is free software with ABSOLUTELY NO WARRANTY.
For details please see the file COPYING.
open /dev/sequencer: No such file or directory

Even though I tried hard to resolve that error by loading various midi related MIDI modules and following a lot of the suggestions online on how to  make /dev/sequencer work again it was all no luck.
 

Some people back in the distant year 2005, reported the problem was solved by simply loading snd-seq

But as of time of writting:


# modprobe snd-seq


Some people said in archlinux's Forum

/dev/sequencer sequencer: No such file or directory


is solved by loading snd-seq-oss kernel module, but on my Debian Linux 9.1 Stretch, this ain't work as well :


root@jericho:/home/hipo/mp3/midis# modprobe snd-seq-oss
modprobe: FATAL: Module snd-seq-oss not found in directory /lib/modules/4.9.0-3-amd64
root@jericho:/home/hipo/mp3/midis# uname -a;
Linux jericho 4.9.0-3-amd64 #1 SMP Debian 4.9.30-2+deb9u5 (2017-09-19) x86_64 GNU/Linux


Another invention of mine was to try to also link /dev/snd/seq to /dev/sequencer but this produced no positive result either:


# ln -sf /dev/snd/seq /dev/sequencer
# ls -al /dev/sequencer
lrwxrwxrwx 1 root root 12 окт  4 16:48 /dev/sequencer -> /dev/snd/seq


Note that after lining in that way I got following error with my attempt to play MIDIs with playmidi

# playmidi *.mid
Playmidi 2.4 Copyright (C) 1994-1997 Nathan I. Laredo, AWE32 by Takashi Iwai
This is free software with ABSOLUTELY NO WARRANTY.
For details please see the file COPYING.
there is no soundcard


Anyhow on some other Linux distributions (especially with Older Kernel versions), some of the above 3 suggested Fix might work perfectly fine so if you have some time give it a try please and drop me  a comment on how it went, you will help the GNU / Linux community out there that way.

Well never mind the bollocks, so

Now back to where I started timidity even though it will play fine it will not give any indication on the lenght of the midi song (precious information such as how much time is left until the end is over).

Hence if you prefer a player that gives you an indicator on how much is left towards the end length of each of the played MIDI file you can give a try to wildmidi:


linux-desktop:~$ apt-cache show wildmidi|grep -i description -A 2

Description-en: software MIDI player
 Minimal MIDI player implementation based on the wildmidi library that
 can either dump to WAV or playback over ALSA. It is intended to

Description-md5: b4b34070ae88e73e3289b751230cfc89
Homepage: http://www.mindwerks.net/projects/wildmidi/
Tag: implemented-in::c, role::program, sound::midi, sound::player,

Description: software MIDI player
Description-md5: 4673a7051f104675c73eb344bb045607
Homepage: http://wildmidi.sourceforge.net/
Bugs: https://bugs.launchpad.net/ubuntu/+filebug


If yet not installed install it after becoming admin user:


linux-desktop:~$ su root
Password:

linux-desktop:~# apt-get install –yes wildmidi


wildmidi is much less CPU intensive (it uses gstreamer to play (Gstreamer – open source multimedia framework)

And next give it a try by running:


linux-desktop:~$ wildmidi ~/mp3/midis/*
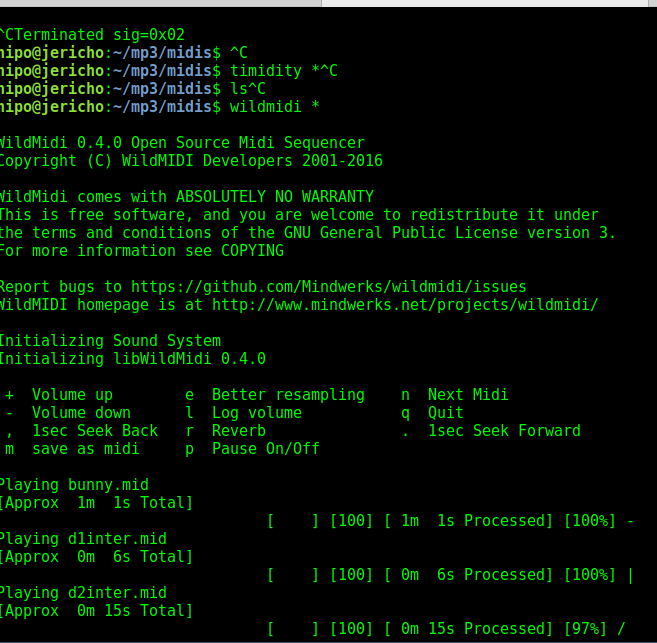
 

wildmidi-midi-lenght-status-text-console-player-for-linux-ubuntu-debian-fedora-suse


4. Editting MIDI files with Free Software and Proprietary MIDI Editor Programs


If you want a professional software that can play Midi in a fuzzy interactive GUI way and have some extra possibilities to edit MIDIs and other format give a try to Muse Sequencer:


linux-desktop:~$ sudo apt-get install –yes muse

The following NEW packages will be installed:
  muse
0 upgraded, 1 newly installed, 0 to remove and 38 not upgraded.
Need to get 5814 kB of archives.
After this operation, 21.0 MB of additional disk space will be used.
Get:1 http://deb.debian.org/debian stretch/main amd64 muse amd64 2.1.2-3+b1 [5814 kB]
Fetched 5814 kB in 2s (2205 kB/s)                             
    are supported and installed on your system.
Preconfiguring packages …
Selecting previously unselected package muse.
(Reading database … 382981 files and directories currently installed.)
Preparing to unpack …/muse_2.1.2-3+b1_amd64.deb …
Unpacking muse (2.1.2-3+b1) …
Processing triggers for mime-support (3.60) …
Processing triggers for desktop-file-utils (0.23-1) …
Processing triggers for doc-base (0.10.7) …
Processing 1 added doc-base file…
Registering documents with scrollkeeper…
Processing triggers for man-db (2.7.6.1-2) …
Processing triggers for shared-mime-info (1.8-1) …
Unknown media type in type 'all/all'
Unknown media type in type 'all/allfiles'
Processing triggers for gnome-menus (3.13.3-9) …
Setting up muse (2.1.2-3+b1) …
Processing triggers for hicolor-icon-theme (0.15-1) …


Below is short description what Muse can do for you:


MusE is a MIDI/audio sequencer with recording and editing capabilities.
 Some Highlights:
 

  * Standard midifile (smf) import-/export.
  * Organizes songs in tracks and parts which you can arrange with
    the part editor.
  * MIDI editors: pianoroll, drum, list, controller.
  * Score editor with high quality postscript printer output.
  * Realtime: editing while playing.
  * Unlimited number of open editors.
  * Unlimited undo/redo.
  * Realtime and step-recording.
  * Multiple MIDI devices.
  * Unlimited number of tracks.
  * Sync to external devices: MTC/MMC, Midi Clock, Master/Slave.
  * Audio tracks, LADSPA host for master effects.
  * Multithreaded.
  * Uses raw MIDI devices.
  * XML project file.
  * Project file contains complete app state (session data).
  * Application spanning Cut/Paste Drag/Drop.


linux-desktop~:$ muse
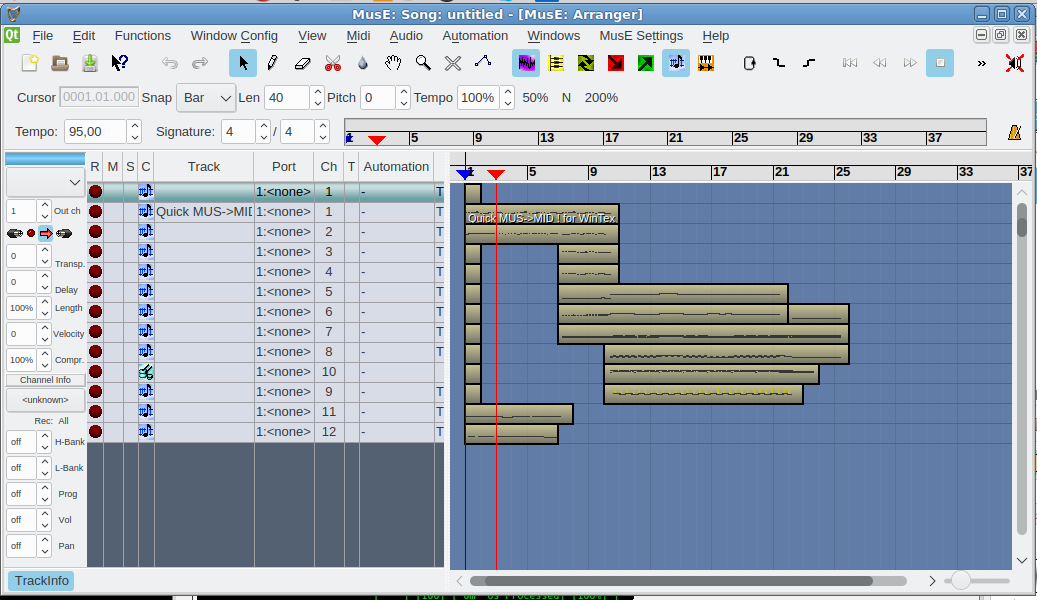
muse-advanced-midi-editor-free-software-for-linux


Below is another non-free program that you might, try if MusE doesn't fit your needs (is not rich enough for editting capabilities is bitwig (though I don't recommend since it is not free software)

bitwig – Bitwig Studio is a multi-platform music-creation system for production, performance and DJing, with a focus on flexible editing tools and a super-fast workflow.
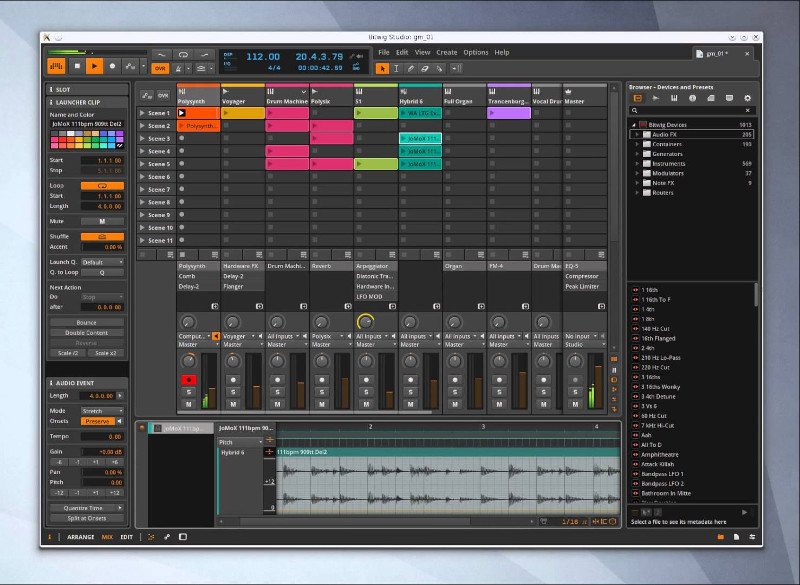


bitwig-midi-and-audio-non-free-software-advanced-useful-sound-editor-for-linx


5. Some examples for Text editing and MIDI Conversion to CSV and ABC file formats There is pretty much more

For the MIDI Extremists who or people that create MIDIs and want to learn how a MIDI is made (the content of it etc.), I suggest you take a look at these 3 command line MIDI editing / conversion tools
 

  • midi2abc – A little tool to create MIDI formats to ABC format
  • midi2csv – Conver tour Favourite MIDI files to CSV for educational purposes so see what Channels, Tracks and Time Intervals is a MIDI song mad
  • midicopy – Copy selected, track, channel, time interval of MIDI file to another MIDI file3


Well, that's all folks now enjoy your MIDIs and don't forget to donate, as I'm jobless at the moment and the only profit I make is just a few bucks out of advertisement on this blog.
 

Block Web server over loading Bad Crawler Bots and Search Engine Spiders with .htaccess rules

Monday, September 18th, 2017

howto-block-webserver-overloading-bad-crawler-bots-spiders-with-htaccess-modrewrite-rules-file

In last post, I've talked about the problem of Search Index Crawler Robots aggressively crawling websites and how to stop them (the article is here) explaning how to raise delays between Bot URL requests to website and how to completely probhit some bots from crawling with robots.txt.

As explained in article the consequence of too many badly written or agressive behaviour Spider is the "server stoning" and therefore degraded Web Server performance as a cause or even a short time Denial of Service Attack, depending on how well was the initial Server Scaling done.

The bots we want to filter are not to be confused with the legitimate bots, that drives real traffic to your website, just for information

 The 10 Most Popular WebCrawlers Bots as of time of writting are:
 

1. GoogleBot (The Google Crawler bots, funnily bots become less active on Saturday and Sundays :))

2. BingBot (Bing.com Crawler bots)

3. SlurpBot (also famous as Yahoo! Slurp)

4. DuckDuckBot (The dutch search engine duckduckgo.com crawler bots)

5. Baiduspider (The Chineese most famous search engine used as a substitute of Google in China)

6. YandexBot (Russian Yandex Search engine crawler bots used in Russia as a substitute for Google )

7. Sogou Spider (leading Chineese Search Engine launched in 2004)

8. Exabot (A French Search Engine, launched in 2000, crawler for ExaLead Search Engine)

9. FaceBot (Facebook External hit, this crawler is crawling a certain webpage only once the user shares or paste link with video, music, blog whatever  in chat to another user)

10. Alexa Crawler (la_archiver is a web crawler for Amazon's Alexa Internet Rankings, Alexa is a great site to evaluate the approximate page popularity on the internet, Alexa SiteInfo page has historically been the Swift Army knife for anyone wanting to quickly evaluate a webpage approx. ranking while compared to other pages)

Above legitimate bots are known to follow most if not all of W3C – World Wide Web Consorium (W3.Org) standards and therefore, they respect the content commands for allowance or restrictions on a single site as given from robots.txt but unfortunately many of the so called Bad-Bots or Mirroring scripts that are burning your Web Server CPU and Memory mentioned in previous article are either not following /robots.txt prescriptions completely or partially.

Hence with the robots.txt unrespective bots, the case the only way to get rid of most of the webspiders that are just loading your bandwidth and server hardware is to filter / block them is by using Apache's mod_rewrite through


.htaccess


file

Create if not existing in the DocumentRoot of your website .htaccess file with whatever text editor, or create it your windows / mac os desktop and transfer via FTP / SecureFTP to server.

I prefer to do it directly on server with vim (text editor)


vim /var/www/sites/your-domain.com/.htaccess


RewriteEngine On

IndexIgnore .htaccess */.??* *~ *# */HEADER* */README* */_vti*

SetEnvIfNoCase User-Agent "^Black Hole” bad_bot
SetEnvIfNoCase User-Agent "^Titan bad_bot
SetEnvIfNoCase User-Agent "^WebStripper" bad_bot
SetEnvIfNoCase User-Agent "^NetMechanic" bad_bot
SetEnvIfNoCase User-Agent "^CherryPicker" bad_bot
SetEnvIfNoCase User-Agent "^EmailCollector" bad_bot
SetEnvIfNoCase User-Agent "^EmailSiphon" bad_bot
SetEnvIfNoCase User-Agent "^WebBandit" bad_bot
SetEnvIfNoCase User-Agent "^EmailWolf" bad_bot
SetEnvIfNoCase User-Agent "^ExtractorPro" bad_bot
SetEnvIfNoCase User-Agent "^CopyRightCheck" bad_bot
SetEnvIfNoCase User-Agent "^Crescent" bad_bot
SetEnvIfNoCase User-Agent "^Wget" bad_bot
SetEnvIfNoCase User-Agent "^SiteSnagger" bad_bot
SetEnvIfNoCase User-Agent "^ProWebWalker" bad_bot
SetEnvIfNoCase User-Agent "^CheeseBot" bad_bot
SetEnvIfNoCase User-Agent "^Teleport" bad_bot
SetEnvIfNoCase User-Agent "^TeleportPro" bad_bot
SetEnvIfNoCase User-Agent "^MIIxpc" bad_bot
SetEnvIfNoCase User-Agent "^Telesoft" bad_bot
SetEnvIfNoCase User-Agent "^Website Quester" bad_bot
SetEnvIfNoCase User-Agent "^WebZip" bad_bot
SetEnvIfNoCase User-Agent "^moget/2.1" bad_bot
SetEnvIfNoCase User-Agent "^WebZip/4.0" bad_bot
SetEnvIfNoCase User-Agent "^WebSauger" bad_bot
SetEnvIfNoCase User-Agent "^WebCopier" bad_bot
SetEnvIfNoCase User-Agent "^NetAnts" bad_bot
SetEnvIfNoCase User-Agent "^Mister PiX" bad_bot
SetEnvIfNoCase User-Agent "^WebAuto" bad_bot
SetEnvIfNoCase User-Agent "^TheNomad" bad_bot
SetEnvIfNoCase User-Agent "^WWW-Collector-E" bad_bot
SetEnvIfNoCase User-Agent "^RMA" bad_bot
SetEnvIfNoCase User-Agent "^libWeb/clsHTTP" bad_bot
SetEnvIfNoCase User-Agent "^asterias" bad_bot
SetEnvIfNoCase User-Agent "^httplib" bad_bot
SetEnvIfNoCase User-Agent "^turingos" bad_bot
SetEnvIfNoCase User-Agent "^spanner" bad_bot
SetEnvIfNoCase User-Agent "^InfoNaviRobot" bad_bot
SetEnvIfNoCase User-Agent "^Harvest/1.5" bad_bot
SetEnvIfNoCase User-Agent "Bullseye/1.0" bad_bot
SetEnvIfNoCase User-Agent "^Mozilla/4.0 (compatible; BullsEye; Windows 95)" bad_bot
SetEnvIfNoCase User-Agent "^Crescent Internet ToolPak HTTP OLE Control v.1.0" bad_bot
SetEnvIfNoCase User-Agent "^CherryPickerSE/1.0" bad_bot
SetEnvIfNoCase User-Agent "^CherryPicker /1.0" bad_bot
SetEnvIfNoCase User-Agent "^WebBandit/3.50" bad_bot
SetEnvIfNoCase User-Agent "^NICErsPRO" bad_bot
SetEnvIfNoCase User-Agent "^Microsoft URL Control – 5.01.4511" bad_bot
SetEnvIfNoCase User-Agent "^DittoSpyder" bad_bot
SetEnvIfNoCase User-Agent "^Foobot" bad_bot
SetEnvIfNoCase User-Agent "^WebmasterWorldForumBot" bad_bot
SetEnvIfNoCase User-Agent "^SpankBot" bad_bot
SetEnvIfNoCase User-Agent "^BotALot" bad_bot
SetEnvIfNoCase User-Agent "^lwp-trivial/1.34" bad_bot
SetEnvIfNoCase User-Agent "^lwp-trivial" bad_bot
SetEnvIfNoCase User-Agent "^Wget/1.6" bad_bot
SetEnvIfNoCase User-Agent "^BunnySlippers" bad_bot
SetEnvIfNoCase User-Agent "^Microsoft URL Control – 6.00.8169" bad_bot
SetEnvIfNoCase User-Agent "^URLy Warning" bad_bot
SetEnvIfNoCase User-Agent "^Wget/1.5.3" bad_bot
SetEnvIfNoCase User-Agent "^LinkWalker" bad_bot
SetEnvIfNoCase User-Agent "^cosmos" bad_bot
SetEnvIfNoCase User-Agent "^moget" bad_bot
SetEnvIfNoCase User-Agent "^hloader" bad_bot
SetEnvIfNoCase User-Agent "^humanlinks" bad_bot
SetEnvIfNoCase User-Agent "^LinkextractorPro" bad_bot
SetEnvIfNoCase User-Agent "^Offline Explorer" bad_bot
SetEnvIfNoCase User-Agent "^Mata Hari" bad_bot
SetEnvIfNoCase User-Agent "^LexiBot" bad_bot
SetEnvIfNoCase User-Agent "^Web Image Collector" bad_bot
SetEnvIfNoCase User-Agent "^The Intraformant" bad_bot
SetEnvIfNoCase User-Agent "^True_Robot/1.0" bad_bot
SetEnvIfNoCase User-Agent "^True_Robot" bad_bot
SetEnvIfNoCase User-Agent "^BlowFish/1.0" bad_bot
SetEnvIfNoCase User-Agent "^JennyBot" bad_bot
SetEnvIfNoCase User-Agent "^MIIxpc/4.2" bad_bot
SetEnvIfNoCase User-Agent "^BuiltBotTough" bad_bot
SetEnvIfNoCase User-Agent "^ProPowerBot/2.14" bad_bot
SetEnvIfNoCase User-Agent "^BackDoorBot/1.0" bad_bot
SetEnvIfNoCase User-Agent "^toCrawl/UrlDispatcher" bad_bot
SetEnvIfNoCase User-Agent "^WebEnhancer" bad_bot
SetEnvIfNoCase User-Agent "^TightTwatBot" bad_bot
SetEnvIfNoCase User-Agent "^suzuran" bad_bot
SetEnvIfNoCase User-Agent "^VCI WebViewer VCI WebViewer Win32" bad_bot
SetEnvIfNoCase User-Agent "^VCI" bad_bot
SetEnvIfNoCase User-Agent "^Szukacz/1.4" bad_bot
SetEnvIfNoCase User-Agent "^QueryN Metasearch" bad_bot
SetEnvIfNoCase User-Agent "^Openfind data gathere" bad_bot
SetEnvIfNoCase User-Agent "^Openfind" bad_bot
SetEnvIfNoCase User-Agent "^Xenu’s Link Sleuth 1.1c" bad_bot
SetEnvIfNoCase User-Agent "^Xenu’s" bad_bot
SetEnvIfNoCase User-Agent "^Zeus" bad_bot
SetEnvIfNoCase User-Agent "^RepoMonkey Bait & Tackle/v1.01" bad_bot
SetEnvIfNoCase User-Agent "^RepoMonkey" bad_bot
SetEnvIfNoCase User-Agent "^Zeus 32297 Webster Pro V2.9 Win32" bad_bot
SetEnvIfNoCase User-Agent "^Webster Pro" bad_bot
SetEnvIfNoCase User-Agent "^EroCrawler" bad_bot
SetEnvIfNoCase User-Agent "^LinkScan/8.1a Unix" bad_bot
SetEnvIfNoCase User-Agent "^Keyword Density/0.9" bad_bot
SetEnvIfNoCase User-Agent "^Kenjin Spider" bad_bot
SetEnvIfNoCase User-Agent "^Cegbfeieh" bad_bot


<Limit GET POST>
order allow,deny
allow from all
Deny from env=bad_bot
</Limit>


Above rules are Bad bots prohibition rules have RewriteEngine On directive included however for many websites this directive is enabled directly into VirtualHost section for domain/s, if that is your case you might also remove RewriteEngine on from .htaccess and still the prohibition rules of bad bots should continue to work
Above rules are also perfectly suitable wordpress based websites / blogs in case you need to filter out obstructive spiders even though the rules would work on any website domain with mod_rewrite enabled.

Once you have implemented above rules, you will not need to restart Apache, as .htaccess will be read dynamically by each client request to Webserver

2. Testing .htaccess Bad Bots Filtering Works as Expected


In order to test the new Bad Bot filtering configuration is working properly, you have a manual and more complicated way with lynx (text browser), assuming you have shell access to a Linux / BSD / *Nix computer, or you have your own *NIX server / desktop computer running
 

Here is how:


lynx -useragent="Mozilla/5.0 (compatible; MegaIndex.ru/2.0; +http://megaindex.com/crawler)" -head -dump http://www.your-website-filtering-bad-bots.com/


Note that lynx will provide a warning such as:

Warning: User-Agent string does not contain "Lynx" or "L_y_n_x"!

Just ignore it and press enter to continue.

Two other use cases with lynx, that I historically used heavily is to pretent with Lynx, you're GoogleBot in order to see how does Google actually see your website?
 

  • Pretend with Lynx You're GoogleBot


lynx -useragent="Mozilla/5.0 (compatible; Googlebot/2.1; +http://www.google.com/bot.html)" -head -dump http://www.your-domain.com/


  • How to Pretend with Lynx Browser You are GoogleBot-Mobile


lynx -useragent="Mozilla/5.0 (iPhone; U; CPU iPhone OS 4_1 like Mac OS X; en-us) AppleWebKit/532.9 (KHTML, like Gecko) Version/4.0.5 Mobile/8B117 Safari/6531.22.7 (compatible; Googlebot-Mobile/2.1; +http://www.google.com/bot.html)" -head -dump http://www.your-domain.com/


Or for the lazy ones that doesn't have Linux / *Nix at disposal you can use WannaBrowser website

Wannabrowseris a web based browser emulator which gives you the ability to change the User-Agent on each website req1uest, so just set your UserAgent to any bot browser that we just filtered for example set User-Agent to CheeseBot

The .htaccess rule earier added once detecting your browser client is coming in with the prohibit browser agent will immediately filter out and you'll be unable to access the website with a message like:
 

HTTP/1.1 403 Forbidden


Just as I've talked a lot about Index Bots, I think it is worthy to also mention three great websites that can give you a lot of Up to Date information on exact Spiders returned user-agent, common known Bot traits as well as a a current updated list with the Bad Bots etc.

Bot and Browser Resources information user-agents, bad-bots and odd Crawlers and Bots specifics

1. botreports.com
2. user-agents.org
3. useragentapi.com


An updated list with robots user-agents (crawler-user-agents) is also available in github here regularly updated by Caia Almeido

There are also a third party plugin (modules) available for Website Platforms like WordPress / Joomla / Typo3 etc.

Besides the listed on these websites as well as the known Bad and Good Bots, there are perhaps a hundred of others that might end up crawling your webdsite that might or might not need  to be filtered, therefore before proceeding with any filtering steps, it is generally a good idea to monitor your  HTTPD access.log / error.log, as if you happen to somehow mistakenly filter the wrong bot this might be a reason for Website Indexing Problems.

Hope this article give you some valueable information. Enjoy ! 🙂


How to fully recover deleted files on ext3 Debian Linux partition – undelete files from ext3 filesystems with ext3grep

Monday, March 7th, 2011

In order to recover fully data by mistake or on purpose deleted on Debian GNU/Linux there is a tool called ext3grep which is able to completely recover data by innodes.

Recovering the deleted files data is very easy and can be done via some livecd after installing the ext3grep tool.

In my case I used the Back Track Linux distribution to recover my data. Recovery is still in process and it appears all or at least most of my data is about to be recovered.

For the recovery procedure all necessary is an external partition in ext3 or ext3 where the recovered data from the ext3 device can be stored.

My partition was about 20GB and since I had no external hard dive to store the data to I used the sshfs to mount remotely a hard drive via the networking using the sshfs program to make the ssh mount for more see my previous post Howto mount remote server ssh filesystem using sshfs

The Backtrack livecd linux security distribution is missing the ext3grep tool thus I had to first install the tool after booting the livecd on the notebook to succeed in that it was necessary to install the e2fslibs-dev package through the command:

debian:~# apt-get install e2fslibs-dev

Further on I've downloaded the latest version of the ext3grep and untarred the archive and compiled it with the commands:

debian:~# ./configure && make && make install
Then I used the simple commands:

debian:~# cd /mnt/res
debian:~# ext3grep --restore-all /dev/sda8

to launch the recovery.
Where in the above commands /mnt/res is the mountpoint location where I wanted to have all my data recovered and the /dev/sda8 is the device from which I wanted to recover my data.

It takes a bit long until the recovery is completed and with 20 gigabytes of data about 5, 6 hours might be necessary for the data to be recovered but the main point is it recovers.

Converting .crt .cer .der to PEM, converting .PEM to .DER and convert .PFX PKCS#12 (.P12) to .PEM file using OpenSSL

Friday, September 1st, 2017

openssl_check_verify_crt_csr_key_certificate_consistency-with-openssl-command-openssl-logo

These commands allow you to convert certificates and keys to different formats to make them compatible with specific types of servers or software. For example, you can convert a normal PEM file that would work with Apache to a PFX (PKCS#12) file and use it with Tomcat or IIS.

  • Convert a DER file (.crt .cer .der) to PEM


    openssl x509 -inform der -in certificate.cer -out certificate.pem
    
  • Convert a PEM file to DER


    openssl x509 -outform der -in certificate.pem -out certificate.der
    
  • Convert a PKCS#12 file (.pfx .p12) containing a private key and certificates to PEM


    openssl pkcs12 -in keyStore.pfx -out keyStore.pem -nodes


    You can add -nocerts to only output the private key or add -nokeys to only output the certificates.

  • Convert a PEM certificate file and a private key to PKCS#12 (.pfx .p12)


    openssl pkcs12 -export -out certificate.pfx -inkey privateKey.key \
    -in certificate.crt -certfile CACert.crt

Windows: Create quick screenshot and import it to Outlook Email – A great Outlook tip everybody should know

Saturday, October 3rd, 2015

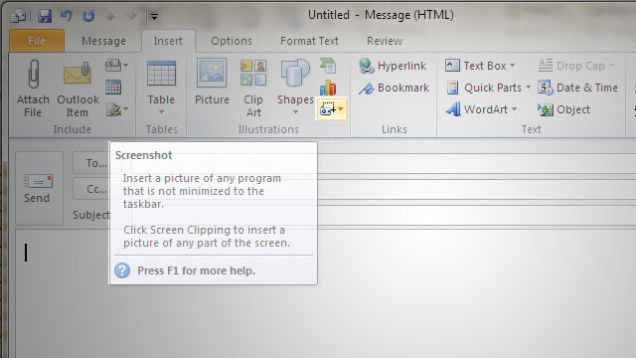
https://www.pc-freak.net/images/make-quick-screenshot-from-your-windows-screen-with-microsoft-outlook-2010-embedded-feature

If you're into a huge company like IBM (no it doesn't stand for I Blame You butInternational Business Machines ) or Hewlett Packard – where using Microsoft Windows mailing is almost mandatory and you have to write tons of mails daily, you will certainly need to do plenty of screenshots.
Screenshotting in MS Windows is a very trivial thing, you press Prt + Scr (Print Screen Button), open Microsoft Paint and paste (CTRL+V) the file into it then Save the file as a lets say JPEG extension. However if you have to do that regularly, each time to create a screenshot you will have to loose a minute or two. Also it is quite annoying to open Paint and
Outlook version 2010 has a very useful feature Take screenshot from any existing opened Window on Windows host.
To make screenshot directly from Outlook mail client. Click the Write new mail Button

New E-mail -> Insert (tab) -> (click Screenshot)
Depending on your ribbon menu setup, this might be a tiny icon—specifically, a little camera icon with a dotted rectangle.
You will be offered to choose along all opened Windows, for the Window from which you would like to have screenshot, choose one and enjoy
If you don't see a window you want to insert, make sure the program isn't minimized to the taskbar.
Alternatively, if you want just a portion of the screen, click on the Screen Clipping button at the bottom of the Screenshot dropdown. This will bring up a crosshair cursor for you to drag around the area of the screen you want to select.
Your selection should then be inserted into your emailscreenshot ready to share with your mates.