Posts Tagged ‘match’

Install Zabbix Proxy configure and connect to Zabbix server on CentOS Linux

Thursday, May 4th, 2023

Install Zabbix Proxy configure and connect to Zabbix server on CentOS Linux

1. Why use Zabbix-Proxy hidden advantages of using Zabbix-Proxy ?
 

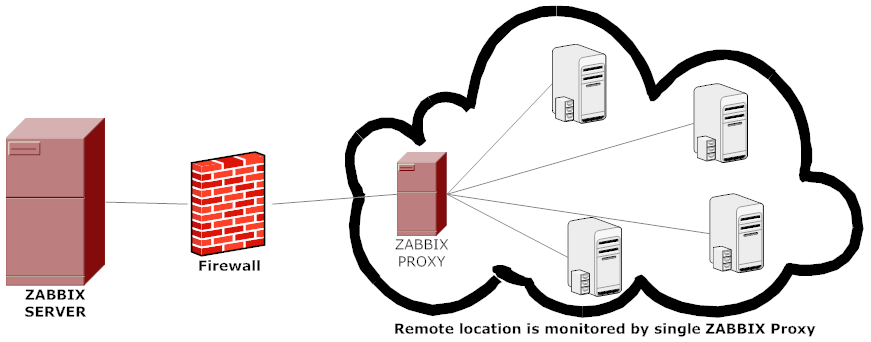
Proxy can be used for many purposes and can provide many hidden benefits, just to name few of them:

  • Offload Zabbix Server when monitoring thousands of devices
  • Monitor remote locations
  • Monitor locations having unreliable communications
  • Simplify maintenance of distributed monitoring
  • Improved Security (Zabbix server can be restricted to be connectable only by the set of connected Zabbix Proxy / Proxies

advantages-of-using-zabbix-proxy-instead-of-direct-connect-monitored-hosts-to-zabbix-server-diagram


A Zabbix proxy is the ideal solution if you have numerous hosts with multiple slow items that are affecting the performance of the server simply because processes are spending most of the time simply waiting for a response. A proxy can collect information from all hosts using its internal processes and then send raw historical data to the server. The time needed to connect and receive the host response will be on the proxy site, and the server performance will not be affected at all. A proxy just sends raw values to the server, and the server itself does not have to connect to the host to get the data.
 

2. Install zabbix-proxy-sqlite3 rpm package from Zabbix Official Repositories download page

Zabbix repository provides choice of 3 packages named as follows:

zabbix-proxy-mysql
zabbix-proxy-pgsql
zabbix-proxy-sqlite3

where the last value of the name (after zabbix-proxy) represents database type of the package — MySQL, PostgreSQL and SQLite respectively.

To not bother installing MySQL / PostgreSQL separate database servers, a lightweight choice is to use the sqlite3 db version. 
As I prefer zabbix-proxy data to be stored inside a flat database, thus I choose to use zabbix-proxy-sqlite3.

[root@sysadminshelp:/root ]# yum info zabbix-proxy-sqlite3-5.0.31-1.el7.x86_64
Заредени плъгини: fastestmirror
Loading mirror speeds from cached hostfile
 * base: mirrors.netix.net
 * epel: fedora.ipacct.com
 * extras: mirrors.netix.net
 * remi: remi.mirror.karneval.cz
 * remi-php74: remi.mirror.karneval.cz
 * remi-safe: remi.mirror.karneval.cz
 * updates: mirrors.netix.net
Инсталирани пакети
Име         : zabbix-proxy-sqlite3
Архитект.   : x86_64
Версия      : 5.0.31
Издание     : 1.el7
Обем        : 4.4 M
Хранилище   : installed
Обобщение   : Zabbix proxy for SQLite3 database
URL         : http://www.zabbix.com/
Лиценз      : GPLv2+
Описание    : Zabbix proxy with SQLite3 database support.

My experience to try to install thethe default CentOS RPM package for zabbix-proxy-sqlite3 provided by default
RPM package that came with CentOS did not work as expected and trying to install / configure and use it via

[root@sysadminshelp:/root ]# yum install zabbix-proxy-sqlite3.x86_64 -y

[root@sysadminshelp:/root ]# vi /etc/zabbix/zabbix_proxy.conf


Led me to a nasty errors seen in /var/log/zabbixsrv/zabbix_proxy.log like:

May 1st 2023, 08:42:45.020 zabbix_server cannot set list of PSK ciphersuites: file ssl_lib.c line 1314: error:1410D0B9:SSL routines:SSL_CTX_set_cipher_list:no cipher match
May 1st 2023, 08:42:45.018 zabbix_server cannot set list of PSK ciphersuites: file ssl_lib.c line 1314: error:1410D0B9:SSL routines:SSL_CTX_set_cipher_list:no cipher match
May 1st 2023, 08:42:45.013 zabbix_server cannot set list of PSK ciphersuites: file ssl_lib.c line 1314: error:1410D0B9:SSL routines:SSL_CTX_set_cipher_list:no cipher match
May 1st 2023, 08:42:45.011 zabbix_server cannot set list of PSK ciphersuites: file ssl_lib.c line 1314: error:1410D0B9:SSL routines:SSL_CTX_set_cipher_list:no cipher match


After some googling and reading some threads came upon this one https://support.zabbix.com/browse/ZBXNEXT-3604, there is exmplaed errors preventing the configured zabbix-proxy
to start are caused by the zabbix-proxy-sqlite3 package provided by Redhat (due to openssl incompitability bug or something ).

As one of people in the discussion pointed out the quickest workaround suggested is simply to use the official Zabbix Repository packages for zabbix-proxy-sqlite3, in order to not waste anymore time on this
trivial stuff to install it, simply run:

[root@sysadminshelp:/root ]# rpm -Uvh \
https://repo.zabbix.com/zabbix/5.0/rhel/7/x86_64/zabbix-proxy-sqlite3-5.0.31-1.el7.x86_64.rpm

Alternative way if you seem to not have the machine connected to the internet is simply download the package with wget / lynx / curl / w3m from another machine 
that can reach the Internet upload the package via the local LAN or VPN and install it:

# wget https://repo.zabbix.com/zabbix/5.0/rhel/7/x86_64/zabbix-proxy-sqlite3-5.0.31-1.el7.x86_64.rpm

[root@sysadminshelp:/root ]# rpm -ivh zabbix-proxy-sqlite3-5.0.31-1.el7.x86_64.rpm

NOTE ! Before you install proxy, keep in mind that your proxy version must match the Zabbix server version !

3. Generate a PSK random secret key and set proper permissions for zabbix-proxy directories


[root@sysadminshelp:/root ]# cd /etc/zabbix/
    
[root@sysadminshelp:/root ]# openssl rand -hex 32 >> /etc/zabbix/zabbix_proxy.psk     
[root@sysadminshelp:/root ]# chown root:zabbix zabbix_proxy.psk [root@sysadminshelp:/root ]# vi /etc/zabbix/zabbix_proxy.conf [root@sysadminshelp:/root ]# mkdir -p /var/lib/zabbix-proxy/sqlite3db
[root@sysadminshelp:/root ]# chown -R zabbix:zabbix /var/lib/zabbix-proxy
[root@sysadminshelp:/var/lib/zabbixsrv/sqlite3db]# sqlite3 zabbix_proxy
SQLite version 3.7.17 2013-05-20 00:56:22
Enter ".help" for instructions
Enter SQL statements terminated with a ";"
sqlite> .databases
seq  name             file
—  —————  ———————————————————-
0    main             /var/lib/zabbixsrv/sqlite3db/zabbix_proxy
sqlite>
[root@sysadminshelp:/root ]# vi /etc/zabbix_proxy.conf
#DBName=zabbix_proxy
DBName=/var/lib/zabbixsrv/sqlite3db/zabbix_proxy

4. Configure zabbix proxy to be able to connect to Zabbix Server

[root@sysadminshelp:/root ]#  vi /etc/zabbix/zabbix_proxy.conf     ############ GENERAL PARAMETERS #################
    ProxyMode=0
    Server=192.168.1.28
    ServerPort=10051
    Hostname=zabbix-proxy
    ListenPort=10051
    SourceIP=10.168.1.55
    LogFile=/var/log/zabbix/zabbix_proxy.log
    LogFileSize=1
    DebugLevel=2
    PidFile=/var/run/zabbix/zabbix_proxy.pid
    DBName=/var/lib/zabbix-proxy/sqlite3db/zabbix_proxy.db
    DBUser=zabbix
    
    ######### PROXY SPECIFIC PARAMETERS #############
    ProxyOfflineBuffer=24
    HeartbeatFrequency=60
    ConfigFrequency=120
    
    ############ ADVANCED PARAMETERS ################
    StartPollersUnreachable=3
    StartHTTPPollers=3
    JavaGateway=127.0.0.1
    JavaGatewayPort=10052
    StartJavaPollers=5
    SNMPTrapperFile=/var/log/snmptrap/snmptrap.log
    StartSNMPTrapper=1
    CacheSize=32M
    Timeout=4
    ExternalScripts=/usr/lib/zabbix/externalscripts
    LogSlowQueries=3000
    
    ####### TLS-RELATED PARAMETERS #######
    TLSConnect=psk
    TLSAccept=psk
    TLSPSKIdentity=PSK zabbix-proxy-fqdn-hostname
    TLSPSKFile=/etc/zabbix/zabbix_proxy.psk

5. Check and make sure the installed zabbix proxy as well as the zabbix_proxy server zabbix_agentd client and zabbix_server are at the same major version release

a) Check zabbix proxy version

[root@sysadminshelp:/etc/zabbix]# zabbix_proxy -V
zabbix_proxy (Zabbix) 5.0.31
Revision f64a07aefca 30 January 2023, compilation time: Jan 30 2023 09:55:10

Copyright (C) 2023 Zabbix SIA
License GPLv2+: GNU GPL version 2 or later <https://www.gnu.org/licenses/>.
This is free software: you are free to change and redistribute it according to
the license. There is NO WARRANTY, to the extent permitted by law.

This product includes software developed by the OpenSSL Project
for use in the OpenSSL Toolkit (http://www.openssl.org/).

Compiled with OpenSSL 1.0.1e-fips 11 Feb 2013
Running with OpenSSL 1.0.1e-fips 11 Feb 2013

[root@sysadminshelp:/etc/zabbix]#

b) check zabbix_agentd version

[root@sysadminshelp:/etc/zabbix]# zabbix_agentd -V
zabbix_agentd (daemon) (Zabbix) 5.0.30
Revision 2c96c38fb4b 28 November 2022, compilation time: Nov 28 2022 11:27:43

Copyright (C) 2022 Zabbix SIA
License GPLv2+: GNU GPL version 2 or later <https://www.gnu.org/licenses/>.
This is free software: you are free to change and redistribute it according to
the license. There is NO WARRANTY, to the extent permitted by law.

This product includes software developed by the OpenSSL Project
for use in the OpenSSL Toolkit (http://www.openssl.org/).

Compiled with OpenSSL 1.0.1e-fips 11 Feb 2013
Running with OpenSSL 1.0.1e-fips 11 Feb 2013

c) Check zabbix server version

[root@zabbix:~]# zabbix_server -V
zabbix_server (Zabbix) 5.0.30
Revision 2c96c38fb4b 28 November 2022, compilation time: Nov 28 2022 09:19:03

Copyright (C) 2022 Zabbix SIA
License GPLv2+: GNU GPL version 2 or later <https://www.gnu.org/licenses/>.
This is free software: you are free to change and redistribute it according to
the license. There is NO WARRANTY, to the extent permitted by law.

This product includes software developed by the OpenSSL Project
for use in the OpenSSL Toolkit (http://www.openssl.org/).

Compiled with OpenSSL 1.1.1d  10 Sep 2019
Running with OpenSSL 1.1.1n  15 Mar 2022

6. Starting the zabbix-proxy for a first time

Before beginning with installation make sure selinux is disabled, as it might cause some issues with Zabbix

[root@sysadminshelp:/etc/zabbix]# sestatus
SELinux status:                 disabled

If you need to have the selinux enabled you will have to allow the zabbix-proxy into selinux as well:

cd /tmp
# grep zabbix_proxy /var/log/audit/audit.log | grep denied | audit2allow -m zabbix_proxy > zabbix_proxy.te
grep zabbix_proxy /var/log/audit/audit.log | grep denied | audit2allow -M zabbix_proxy
semodule -i zabbix_proxy.pp


[root@sysadminshelp:/etc/zabbix]# systemctl start zabbix-proxy

Also lets enable zabbix-proxy to automatically start it on next server reboot / boot.

root@sysadminshelp:/etc/zabbix]# systemctl enable zabbix-proxy

Normally running zabbix-proxy should provide a status messages like:

[root@sysadminshelp:/etc/zabbix]# systemctl status zabbix-proxy
● zabbix-proxy.service – Zabbix Proxy
   Loaded: loaded (/usr/lib/systemd/system/zabbix-proxy.service; disabled; vendor preset: disabled)
   Active: active (running) since чт 2023-05-04 14:58:36 CEST; 2h 59min ago
  Process: 8500 ExecStop=/bin/kill -SIGTERM $MAINPID (code=exited, status=0/SUCCESS)
  Process: 8504 ExecStart=/usr/sbin/zabbix_proxy -c $CONFFILE (code=exited, status=0/SUCCESS)
 Main PID: 8506 (zabbix_proxy)
   CGroup: /system.slice/zabbix-proxy.service
           ├─8506 /usr/sbin/zabbix_proxy -c /etc/zabbix/zabbix_proxy.conf
           ├─8507 /usr/sbin/zabbix_proxy: configuration syncer [synced config 40521 bytes in 0.0…
           ├─8508 /usr/sbin/zabbix_proxy: trapper #1 [processed data in 0.000808 sec, waiting fo…
           ├─8509 /usr/sbin/zabbix_proxy: trapper #2 [processed data in 0.005028 sec, waiting fo…
           ├─8510 /usr/sbin/zabbix_proxy: trapper #3 [processed data in 0.001240 sec, waiting fo…
           ├─8511 /usr/sbin/zabbix_proxy: trapper #4 [processed data in 0.004378 sec, waiting fo…
           ├─8512 /usr/sbin/zabbix_proxy: trapper #5 [processed data in 0.004991 sec, waiting fo…
           ├─8513 /usr/sbin/zabbix_proxy: preprocessing manager #1 [queued 0, processed 3 values…
           ├─8514 /usr/sbin/zabbix_proxy: preprocessing worker #1 started
           ├─8515 /usr/sbin/zabbix_proxy: preprocessing worker #2 started
           ├─8516 /usr/sbin/zabbix_proxy: preprocessing worker #3 started
           ├─8517 /usr/sbin/zabbix_proxy: heartbeat sender [sending heartbeat message success in…
           ├─8518 /usr/sbin/zabbix_proxy: data sender [sent 0 values in 0.005241 sec, idle 1 sec…
           ├─8519 /usr/sbin/zabbix_proxy: housekeeper [deleted 4501 records in 0.011462 sec, idl…
           ├─8520 /usr/sbin/zabbix_proxy: http poller #1 [got 0 values in 0.000248 sec, idle 5 s…
           ├─8521 /usr/sbin/zabbix_proxy: http poller #2 [got 0 values in 0.000239 sec, idle 5 s…
           ├─8522 /usr/sbin/zabbix_proxy: http poller #3 [got 0 values in 0.000328 sec, idle 5 s…
           ├─8523 /usr/sbin/zabbix_proxy: discoverer #1 [processed 0 rules in 0.000261 sec, idle…
           ├─8524 /usr/sbin/zabbix_proxy: history syncer #1 [processed 0 values in 0.000009 sec,…
           ├─8525 /usr/sbin/zabbix_proxy: history syncer #2 [processed 0 values in 0.000007 sec,…
           ├─8526 /usr/sbin/zabbix_proxy: history syncer #3 [processed 0 values in 0.000014 sec,…
           ├─8527 /usr/sbin/zabbix_proxy: history syncer #4 [processed 0 values in 0.000021 sec,…
           ├─8528 /usr/sbin/zabbix_proxy: java poller #1 [got 0 values in 0.000017 sec, idle 5 s…
           ├─8529 /usr/sbin/zabbix_proxy: java poller #2 [got 0 values in 0.000019 sec, idle 5 s…
           ├─8530 /usr/sbin/zabbix_proxy: java poller #3 [got 0 values in 0.000019 sec, idle 5 s…
           ├─8531 /usr/sbin/zabbix_proxy: java poller #4 [got 0 values in 0.000018 sec, idle 5 s…
           ├─8532 /usr/sbin/zabbix_proxy: java poller #5 [got 0 values in 0.000013 sec, idle 5 s…
           ├─8533 /usr/sbin/zabbix_proxy: snmp trapper [processed data in 0.000026 sec, idle 1 s…
           ├─8534 /usr/sbin/zabbix_proxy: self-monitoring [processed data in 0.000034 sec, idle …
           ├─8535 /usr/sbin/zabbix_proxy: task manager [processed 0 task(s) in 0.000169 sec, idl…
           ├─8536 /usr/sbin/zabbix_proxy: poller #1 [got 0 values in 0.000012 sec, idle 5 sec]
           ├─8537 /usr/sbin/zabbix_proxy: poller #2 [got 0 values in 0.000021 sec, idle 5 sec]
           ├─8538 /usr/sbin/zabbix_proxy: poller #3 [got 0 values in 0.000039 sec, idle 5 sec]
           ├─8539 /usr/sbin/zabbix_proxy: poller #4 [got 0 values in 0.000024 sec, idle 5 sec]
           ├─8540 /usr/sbin/zabbix_proxy: poller #5 [got 0 values in 0.000019 sec, idle 5 sec]
           ├─8541 /usr/sbin/zabbix_proxy: unreachable poller #1 [got 0 values in 0.000011 sec, i…
           ├─8542 /usr/sbin/zabbix_proxy: unreachable poller #2 [got 0 values in 0.000018 sec, i…
           ├─8543 /usr/sbin/zabbix_proxy: unreachable poller #3 [got 0 values in 0.000041 sec, i…
           └─8544 /usr/sbin/zabbix_proxy: icmp pinger #1 [got 0 values in 0.000022 sec, idle 5 s…

май 04 14:58:36 sysadminshelp systemd[1]: Stopped Zabbix Proxy.
май 04 14:58:36 sysadminshelp systemd[1]: Starting Zabbix Proxy…
май 04 14:58:36 sysadminshelp systemd[1]: Started Zabbix Proxy.
zabbix-server-zabbix-proxy-and-zabbix-clients-overview-diagram

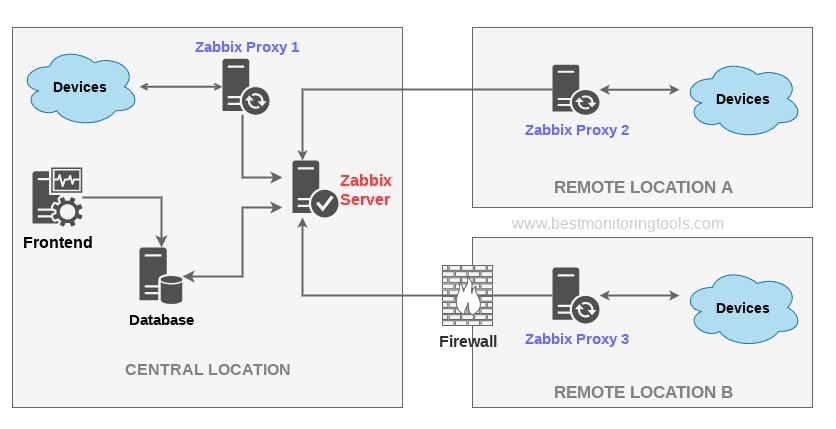
7. Configure zabbix-agentd to use your just new brand new zabbix-proxy

Here is my sample configuration file:

[root@sysadminshelp:/etc/zabbix]# grep -v \# /etc/zabbix/zabbix_agentd.conf | sed '/^$/d'
PidFile=/var/run/zabbix/zabbix_agentd.pid
LogFile=/var/log/zabbix/zabbix_agentd.log
LogFileSize=0
Server=zabbix-proxy
ServerActive=zabbix-proxy:10051
ListenIP
Hostname=sysadminshelp
BufferSend=30
BufferSize=100
Include=/etc/zabbix/zabbix_agentd.d/*.conf


Note that the ServerActive given "zabbix-proxy" should be resolvable from the host, or even better you might want to put the IP of the Proxy if
you don't have at least a pseudo Hostname already configured inside /etc/hosts or actual DNS 'A' Active record configured inside a properly resolving
DNS server configured on the host via /etc/resolv.conf.


8. Create and Configure new proxy into the Zabbix-server host
 

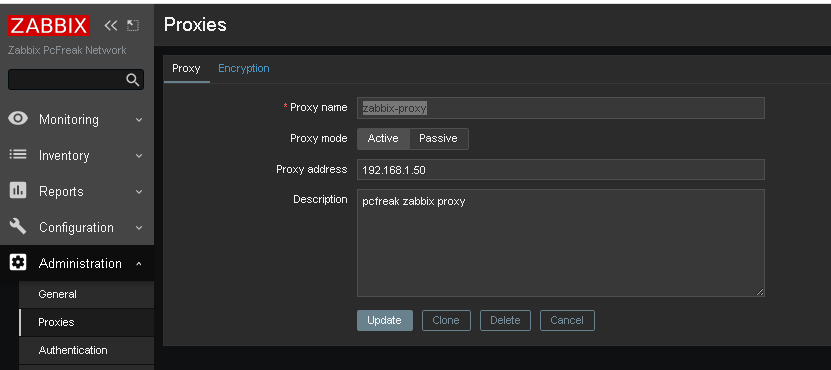
Go to the zabbix server web interface URL into menus:
zabbix-administration-proxy-config
 

Administration -> Proxies (Proxy) 


Click on ;

Create Proxy button (uppper right corner)

*Proxy name: usually-your-host-pingable-fqdn
Proxy mode: Active
Proxy address: 192.168.1.50
Description: pcfreak zabbix proxy


Administration -> Proxies -> Encryption


From "Connection to proxy"

Untick "No encryption"

and

Tick "PSK"
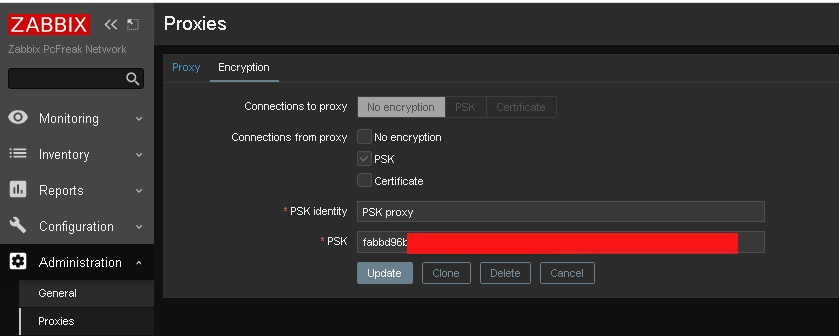

zabbix-administration-proxy-config-encryption

*PSK Identity: PSK proxy
*PSK: Put the key here (copy from /etc/zabbix/zabbix_proxy.psk generated steps earlier with openssl)

[root@sysadminshelp:/etc/zabbix]# cat zabbix_proxy.psk
faddbd96be00ac42c892fda5201634df25d51f3ndbbbf6cee9d354b2817092a28

Press the "Update" Button

zabbix-administration-proxy-config-encryption1

and go again to Proxies and check the zabbix-proxy is connected to the server and hosts configured to use the zabbix proxy reporting frequently.

To make sure that the configured new hosts to use the Zabbix Proxy instead of direct connection to Zabbix Server, go to Latest Data and check whether the configured Hostnames to connect to the Zabbix-Proxy continues to sent Data still.

9. Debugging problems with zabix-proxy and zabbix-agentd connectivity to proxy

In case of troubles check out what is going on inside the Zabbix Proxy / Agent and Server log files
 

[root@sysadminshelp:/etc/zabbix]# tail -n 50 /var/log/zabbix/zabbix_proxy.log

 6832:20230504:134032.281 Starting Zabbix Proxy (active) [zabbix-proxy]. Zabbix 5.0.31 (revision f
64a07aefca).
  6832:20230504:134032.281 **** Enabled features ****
  6832:20230504:134032.281 SNMP monitoring:       YES
  6832:20230504:134032.281 IPMI monitoring:       YES
  6832:20230504:134032.281 Web monitoring:        YES
  6832:20230504:134032.281 VMware monitoring:     YES
  6832:20230504:134032.281 ODBC:                  YES
  6832:20230504:134032.281 SSH support:           YES
  6832:20230504:134032.281 IPv6 support:          YES
  6832:20230504:134032.281 TLS support:           YES
  6832:20230504:134032.281 **************************
  6832:20230504:134032.281 using configuration file: /etc/zabbix/zabbix_proxy.conf
  6832:20230504:134032.291 current database version (mandatory/optional): 05000000/05000005
  6832:20230504:134032.291 required mandatory version: 05000000
  6832:20230504:134032.292 proxy #0 started [main process]
  6833:20230504:134032.292 proxy #1 started [configuration syncer #1]
  6833:20230504:134032.329 received configuration data from server at "192.168.1.28", datalen 40521
  6834:20230504:134032.392 proxy #2 started [trapper #1]
  6835:20230504:134032.401 proxy #3 started [trapper #2]
  6836:20230504:134032.402 proxy #4 started [trapper #3]
  6838:20230504:134032.405 proxy #6 started [trapper #5]
  6837:20230504:134032.409 proxy #5 started [trapper #4]
  6843:20230504:134032.409 proxy #11 started [heartbeat sender #1]
  6845:20230504:134032.412 proxy #13 started [housekeeper #1]
  6847:20230504:134032.412 proxy #15 started [discoverer #1]
  8526:20230504:145836.512 proxy #20 started [history syncer #3]
  8517:20230504:145836.512 proxy #11 started [heartbeat sender #1]
  8530:20230504:145836.515 proxy #24 started [java poller #3]
  8531:20230504:145836.517 proxy #25 started [java poller #4]
  8532:20230504:145836.520 proxy #26 started [java poller #5]
  8536:20230504:145836.522 proxy #30 started [poller #1]
  8527:20230504:145836.525 proxy #21 started [history syncer #4]
  8535:20230504:145836.525 proxy #29 started [task manager #1]
  8533:20230504:145836.528 proxy #27 started [snmp trapper #1]
  8539:20230504:145836.528 proxy #33 started [poller #4]
  8538:20230504:145836.529 proxy #32 started [poller #3]
  8534:20230504:145836.532 proxy #28 started [self-monitoring #1]
  8544:20230504:145836.532 proxy #38 started [icmp pinger #1]
  8543:20230504:145836.532 proxy #37 started [unreachable poller #3]
  8542:20230504:145836.535 proxy #36 started [unreachable poller #2]
  8541:20230504:145836.537 proxy #35 started [unreachable poller #1]
  8540:20230504:145836.540 proxy #34 started [poller #5]
  8507:20230504:150036.453 received configuration data from server at "192.168.1.28", datalen 40521
  8507:20230504:150236.503 received configuration data from server at "192.168.1.28", datalen 40521
  8507:20230504:150436.556 received configuration data from server at "192.168.1.28", datalen 40521
  8507:20230504:150636.608 received configuration data from server at "192.168.1.28", datalen 40521
  8507:20230504:150836.662 received configuration data from server at "192.168.1.28", datalen 40521


[root@sysadminshelp:/etc/zabbix]# tail -n 10  /var/log/zabbix-agent/zabbix_agentd.log
3096166:20230504:182840.461 agent #1 started [collector]
3096167:20230504:182840.462 agent #2 started [listener #1]
3096168:20230504:182840.463 agent #3 started [listener #2]
3096169:20230504:182840.464 agent #4 started [listener #3]
3096170:20230504:182840.464 agent #5 started [active checks #1]

If necessery to Debug further and track some strange errors, you might want to increase the DebugLevel to lets say DebugLevel=5

5 – extended debugging (produces even more information)

If checking both zabbix_agentd.log and zabbix_proxy.log cannot give you enough of a hint on what might be the issues you face with your userparameter scripts or missing Monitored data etc. and hopefully you have access to the zabbix-server machine, check out the zabbix server log as well

[root@zabbix:~]# tail -n 100 /var/log/zabbix/zabbix_server.log

3145027:20230504:182641.556 sending configuration data to proxy "zabbix-proxy" at "192.168.1.50", datalen 40521, bytes 6120 with compression ratio 6.6
3145029:20230504:182716.529 cannot send list of active checks to "192.168.1.30": host [pcfrxenweb] not found
3145028:20230504:182731.959 cannot send list of active checks to "192.168.1.30": host [pcfrxenweb] not found
3145029:20230504:182756.634 cannot send list of active checks to "192.168.1.30": host [pcfrxenweb] not found

Wrapping it up

In this article, we have learned how to install and configure a zabbix-proxy server and prepare a PSK encryption secret key for it.
We learned also  how to connect this server to the central zabbix monitoring host machine in Active mode, so both Zabbix proxy and server can communicate in a secure crypted form,
as well as how to set zabbix_agentd clients to connect to the zabbix proxy
which will from itself send its data to the Central Zabbix server host as well as how to Debug and hopefully solve issues with communication between Zabbix client -> Zabbix Proxy -> Zabbix server.

I know this article, does not say anything revolutionary and there is plenty of posts online talking about how to run yourself a zabbix proxy and make in your home or corporate network,
but I thought to write it down as by writting it and reading a bit more on the topic of Zabbix Server / Proxy / Agent, that give myself a better overview on how this technologies work and such an article will give myself an easier step by step guide to follow,
in future when I have to configure Zabbix Environments for personal hobby or professionally for customers.
Hope you enjoyed. Cheers ! 🙂

How to move transfer binary files encoded with base64 on Linux with Copy Paste of text ASCII encoded string

Monday, October 25th, 2021

base64-encode-decode-binary-files-to-transfer-between-servers-base64-artistic-logo

If you have to work on servers in a protected environments that are accessed via multiple VPNs, Jump hosts or Web Citrix and you have no mean to copy binary files to your computer or from your computer because you have all kind of FTP / SFTP or whatever Data Copy clients disabled on remote jump host side or CITRIX server and you still are looking for a way to copy files between your PC and the Remote server Side.
Or for example if you have 2 or more servers that are in a special Demilitarized Network Zones ( DMZ ) and the machines does not have SFTP / FTP / WebServer or other kind of copy protocol service that can be used to copy files between the hosts and you still need to copy some files between the 2 or more machines in a slow but still functional way, then you might not know of one old school hackers trick you can employee to complete the copy of files between DMZ-ed Server Host A lets say with IP address (192.168.50.5) -> Server Host B (192.168.30.7). The way to complete the binary file copy is to Encode the binary on Server Host A and then, use cat  command to display the encoded string and copy whole encoded cat command output  to your (local PC buffer from where you access the remote side via SSH via the CITRIX or Jump host.). Then decode the encoded file with an encoding tool such as base64 or uuencode. In this article, I'll show how this is done with base64 and uuencode. Base64 binary is pretty standard in most Linux / Unix OS-es today on most Linux distributions it is part of the coreutils package.
The main use of base64 encoding to encode non-text Attachment files to Electronic Mail, but for our case it fits perfectly.
Keep in mind, that this hack to copy the binary from Machine A to Machine B of course depends on the Copy / Paste buffer being enabled both on remote Jump host or Citrix from where you reach the servers as well as your own PC laptop from where you access the remote side.

base64-character-encoding-string-table

Base64 Encoding and Decoding text strings legend

The file copy process to the highly secured PCI host goes like this:
 

1. On Server Host A encode with md5sum command

[root@serverA ~]:# md5sum -b /tmp/inputbinfile-to-encode
66c4d7b03ed6df9df5305ae535e40b7d *inputbinfile-to-encode


As you see one good location to encode the file would be /tmp as this is a temporary home or you can use alternatively your HOME dir

but you have to be quite careful to not run out of space if you produce it anywhere 🙂


2. Encode the binary file with base64 encoding

 [root@serverB ~]:# base64 -w0 inputbinfile-to-encode > outputbin-file.base64

The -w0 option is given to disable line wrapping. Line wrapping is perhaps not needed if you will copy paste the data.

base64-encoded-binary-file-text-string-linux-screenshot

Base64 Encoded string chunk with line wrapping

For a complete list of possible accepted arguments check here.

3. Cat the inputbinfile-to-encode just generated to display the text encoded file in your SecureCRT / Putty / SuperPutty etc. remote ssh access client

[root@serverA ~]:# cat /tmp/inputbinfile-to-encode
f0VMRgIBAQAAAAAAAAAAAAMAPgABAAAAMGEAAAAAAABAAAAAAAAAACgXAgAAAAAAAAAAA
EAAOAALAEAAHQAcAAYAAAAEAAA ……………………………………………………………… cTD6lC+ViQfUCPn9bs


4. Select the cat-ted string and copy it to your PC Copy / Paste buffer


If the bin file is not few kilobytes, but few megabytes copying the file might be tricky as the string produced from cat command would be really long, so make sure the SSH client you're using is configured to have a large buffer to scroll up enough and be able to select the whole encoded string until the end of the cat command and copy it to Copy / Paste buffer.


5. On Server Host B paste the bas64 encoded binary inside a newly created file

Open with a text editor vim / mc or whatever is available

[root@serverB ~]:# vi inputbinfile-to-encode

Some very paranoid Linux / UNIX systems might not have even a normal text editor like 'vi' if you happen to need to copy files on such one a useful thing is to use a simple cat on the remote side to open a new File Descriptor buffer, like this:

[root@server2 ~]:# cat >> inputbinfile-to-encode <<'EOF'
Paste the string here


6. Decode the encoded binary with base64 cmd again

[root@serverB ~]:# base64 –decode outputbin-file.base64 > inputbinfile-to-encode


7. Set proper file permissions (the same as on Host A)

[root@serverB ~]:#  chmod +x inputbinfile-to-encode


8. Check again the binary file checksum on Host B is identical as on Host A

[root@serverB ~]:# md5sum -b inputbinfile-to-encode
66c4d7b03ed6df9df5305ae535e40b7d *inputbinfile-to-encode

As you can md5sum match on both sides so file should be OK.


9. Encoding and decoding files with uuencode


If you are lucky and you have uuencode installed (sharutils) package is present on remote machine to encode lets say an archived set of binary files in .tar.gz format do:

Prepare the archive of all the files you want to copy with tar on Host A:

[root@Machine1 ~]:#  tar -czvf /bin/whatever /usr/local/bin/htop /usr/local/bin/samhain /etc/hosts archived-binaries-and-configs.tar.gz

[root@Machine1 ~]:# uuencode archived-binaries-and-configs.tar.gz archived-binaries-and-configs.uu

Cat / Copy / paste the encoded content as usual to a file on Host B:

Then on Machine 2 decode:

[root@Machine2 ~]:# uuencode -c < archived-binaries-and-configs.tar.gz.uu


Conclusion


In this short method I've shown you a hack that is used often by script kiddies to copy over files between pwn3d machines, a method which however is very precious and useful for sysadmins like me who has to admin a paranoid secured servers that are placed in a very hard to access environments.

With the same method you can encode or decode not only binary file but also any standard input/output file content. base64 encoding is quite useful stuff to use also in bash scripts or perl where you want to have the script copy file in a plain text format . Datas are encoded and decoded to make the data transmission and storing process easier. You have to keep in mind always that Encoding and Decoding are not similar to encryption and decryption as encr. deprytion gives a special security layers to the encoded that. Encoded data can be easily revealed by decoding, so if you need to copy between the servers very sensitive data like SSL certificates Private RSA / DSA key, this command line utility tool better to be not used for sesitive data copying.


Remove string line from file on Linux and BSD – Delete entire line with string from file

Tuesday, March 15th, 2016

linux-remove-lines-containing-string-with-sed

If you're already used too using grep -v "sometring" filename to print everything from a file without the certain grepped string output and you want to do the same to delete lines based on strings without having to output the grepped string to a file and then overwritting the original file:
 

grep -v 'whatever' filename > filename1
mv filename1 filename


A much better way to delete an whole line containing a string match from a file is to use sed
sed
should be the tool of choice especially if you're scripting because sed is especially made for such batch edittings.

Here is how to do delete an entire line based on a given string:


sed –in-place '/some string to search and delete/d' myfilename


It might be a good idea to also create backups just to make sure something doesn't get deleted incidently to do use:

sed –in-place=.bak '/some string to search and delete/d' myfilename

If you need to wipe out an exact string from all files within a folder you might use a for loop or perl (some good examples check my previous article here)

In short to use bash's for loop here is how to backup and remove all lines with a string match within all files within a Linux directory:


for f in *.txt; do sed –in-place '/some string/d'
"$f"; done
find -name '*.txt' -exec sed –in-place=.bak '/some
string/d' "{}" ';'


BTW SED is really rich editor and some people got so much into it that there is even a sed written text (console) version of arkanoid 🙂

sed-text-editor-written-arkanoid-game-linux-bsd

If you want to break the ice and get some fun in your boring sysadmin life get sed arkanoid code from here.
I have it installed under pc-freak.net free ASCII Games entertainment service, so if you want to give it a try just login and give a try.

Enjoy 🙂

MySQL: How to check user privileges and allowed hosts to connect with mysql cli

Wednesday, April 2nd, 2014

how-to-check-user-privileges-and-allowed-hosts-to-connect-with-mysql-cli

On a project there are some issues with root admin user unable to access the server from remote host and the most probable reason was there is no access to the server from that host thus it was necessary check mysql root user privilegse and allowed hosts to connect, here SQL query to do it:
 

mysql> select * from `user` where  user like 'root%';
+——————————–+——+——————————————-+————-+————-+————-+————-+————-+———–+————-+—————+————–+———–+————+—————–+————+————+————–+————+———————–+——————+————–+—————–+——————+——————+—————-+———————+——————–+——————+————+————–+———-+————+————-+————–+—————+————-+—————–+———————-+
| Host                           | User | Password                                  | Select_priv | Insert_priv | Update_priv | Delete_priv | Create_priv | Drop_priv | Reload_priv | Shutdown_priv | Process_priv | File_priv | Grant_priv | References_priv | Index_priv | Alter_priv | Show_db_priv | Super_priv | Create_tmp_table_priv | Lock_tables_priv | Execute_priv | Repl_slave_priv | Repl_client_priv | Create_view_priv | Show_view_priv | Create_routine_priv | Alter_routine_priv | Create_user_priv | Event_priv | Trigger_priv | ssl_type | ssl_cipher | x509_issuer | x509_subject | max_questions | max_updates | max_connections | max_user_connections |
+——————————–+——+——————————————-+————-+————-+————-+————-+————-+———–+————-+—————+————–+———–+————+—————–+————+————+————–+————+———————–+——————+————–+—————–+——————+——————+—————-+———————+——————–+——————+————+————–+———-+————+————-+————–+—————+————-+—————–+———————-+
| localhost                      | root | *5A07790DCF43AC89820F93CAF7B03DE3F43A10D9 | Y           | Y           | Y           | Y           | Y           | Y         | Y           | Y             | Y            | Y         | Y          | Y               | Y          | Y          | Y            | Y          | Y                     | Y                | Y            | Y               | Y                | Y                | Y              | Y                   | Y                  | Y                | Y          | Y            |          |            |             |              |             0 |           0 |               0 |                    0 |
| server737                        | root | *5A07790DCF43AC89820F93CAF7B03DE3F43A10D9 | Y           | Y           | Y           | Y           | Y           | Y         | Y           | Y             | Y            | Y         | Y          | Y               | Y          | Y          | Y            | Y          | Y                     | Y                | Y            | Y               | Y                | Y                | Y              | Y                   | Y                  | Y                | Y          | Y            |          |            |             |              |             0 |           0 |               0 |                    0 |
| 127.0.0.1                      | root | *5A07790DCF43AC89820F93CAF7B03DE3F43A10D9 | Y           | Y           | Y           | Y           | Y           | Y         | Y           | Y             | Y            | Y         | Y          | Y               | Y          | Y          | Y            | Y          | Y                     | Y                | Y            | Y               | Y                | Y                | Y              | Y                   | Y                  | Y                | Y          | Y            |          |            |             |              |             0 |           0 |               0 |                    0 |
| server737.server.myhost.net | root | *5A07790DCF43FC89820A93CAF7B03DE3F43A10D9 | Y           | Y           | Y           | Y           | Y           | Y         | Y           | Y             | Y            | Y         | Y          | Y               | Y          | Y          | Y            | Y          | Y                     | Y                | Y            | Y               | Y                | Y                | Y              | Y                   | Y                  | Y                | Y          | Y            |          |            |             |              |             0 |           0 |               0 |                    0 |
| server4586                        | root | *5A07790DCF43AC89820F93CAF7B03DE3F43A10D9 | N           | N           | N           | N           | N           | N         | N           | N             | N            | N         | N          | N               | N          | N          | N            | N          | N                     | N                | N            | N               | N                | N                | N              | N                   | N                  | N                | N          | N            |          |            |             |              |             0 |           0 |               0 |                    0 |
| server4586.myhost.net              | root | *5A07790DCF43AC89820F93CAF7B03DE3F43A10D9 | N           | N           | N           | N           | N           | N         | N           | N             | N            | N         | N          | N               | N          | N          | N            | N          | N                     | N                | N            | N               | N                | N                | N              | N                   | N                  | N                | N          | N            |          |            |             |              |             0 |           0 |               0 |                    0 |
+——————————–+——+——————————————-+————-+————-+————-+————-+————-+———–+————-+—————+————–+———–+————+—————–+————+————+————–+————+———————–+——————+————–+—————–+——————+——————+—————-+———————+——————–+——————+————+————–+———-+————+————-+————–+—————+————-+—————–+———————-+
6 rows in set (0.00 sec)

mysql> exit


Here is query explained:

select * from `user` where  user like 'root%'; query means:

select * – show all
from `user` – from user database
where user like 'root%' – where there is match in user column to any string starting with 'root*',
 

find text strings recursively in Linux and UNIX – find grep in sub-directories command examples

Tuesday, May 13th, 2014

unix_Linux_recursive_file_search_string_grep
GNU Grep
is equipped with a special option "-r" to grep recursively. Looking for string in a file in a sub-directories tree with the -r option is a piece of cake. You just do:

grep -r 'string' /directory/

or if you want to search recursively non-case sensitive for text

grep -ri 'string' .
 

Another classic GNU grep use (I use almost daily) is whether you want to match all files containing (case insensitive) string  among all files:

grep -rli 'string' directory-name
 

Now if you want to grep whether a string is contained in a file or group of files in directory recursively on some other UNIX like HP-UX or Sun OS / Solaris where there is no GNU grep installed by default here is how to it:

find /directory -exec grep 'searched string' {} dev/null ;

Note that this approach to look for files containing string on UNIX is very slowThus on not too archaic UNIX systems for some better search performance it is better to use xargs;

find . | xargs grep searched-string


A small note to open here is by using xargs there might be weird results when run on filesystems with filenames starting with "-".

Thus comes the classical (ultimate) way to grep for files containing string with find + grep, e.g.

find / -exec grep grepped-string {} dev/null ;

Another way to search a string recursively in files is by using UNIX OS '*' (star) expression:

grep pattern * */* */*/* 2>/dev/null

Talking about recursive directory text search in UNIX, should mention  another good GNU GREP alternative ACK – check it on betterthangrep.com 🙂 . Ack is perfect for programmers who have to dig through large directory trees of code for certain variables, functions, objects etc.


10 must know and extremely useful Linux commands that every sys admin should know

Tuesday, July 30th, 2013

10 must know extremely useful gnu linux command line tools tips and tricks
There are plenty of precious command line stuff every admin should be aware on Linux. In this article I just decided to place some I use often and are interesting to know. Below commands are nothing special and probably many of experienced sys admins already know them. However I'm pretty sure novice admins and start-up Linux enthusiasts will find it useful. I know there much more to be said on the topic. So anyone is mostly welcome to share his used cmds.
 
1. Delete all files in directory except files with certain file extension

It is good trick to delete all files in directory except certain file formats, to do so:

root@linux:~# rm !(*.c|*.py|*.txt|*.mp3)

2. Write command output to multiple files (tee)

The normal way to write to file is by using redirect (to overwrite file) ">" or (to append to file) ">>";. However when you need to write output to multiple files there is a command called tee, i.e.:

root@linux:~# ps axuwwf | tee file1 file2 file3

3. Search for text in plain text file printing number of lines after match

Whether you need to print all number of lines after match of "search_text" use:

root@linux:~# grep -A 5 -i "search_text" text_file.txt

4. Show all files where text string is matched with GREP (Search for text recursively)

Searching for text match is extremely helpful for system administration. I use  grep recursive (capability) almost on daily basis:

root@websrv:/etc/dovecot# grep -rli text *
conf.d/10-auth.conf
conf.d/10-mail.conf
dovecot.conf

-l (instructs to only print file names matching string), -r (stands for recursive search), and -i flag (instructs grep to print all matches  inogoring case-sensitivity ( look for text nomatter if with capital or small letters)

5. Finding files and running command on each file type matched

In Linux with find command it is possible to search for files and run command on each file matched.
Lets say you we want to look in current directory for all files .swp (temporary) files produced so often by VIM and wipe them out:

root@linux:~# find . -iname '*.swp*' -exec rm -f {} \;

6. Convert DOS end of file (EOF) to UNIX with sed

If it happens you not have dos2unix command installed on Linux shell and you need to translate DOS end of file (\r\n – return carriage, new line) to UNIX's (\r – return carriage)), do it with sed:

root@linux:~# sed 's/.$//' filename

7. Remove file duplicate lines with awk:

cat test.txt
test
test
test duplicate
The brown fox jump over ...
Richard Stallman rox

root@linux:~# awk '!($0 in array) { array[$0]; print }' test.txt
test
test duplicate
The brown fox jump over ...
Richard Stallman rox

To remove duplicate text from all files in directory same can be easily scripped with bash for loop:

root@linux:~# for i in *; do
awk '!($0 in array) { array[$0]; print }' $i;
done

8. Print only selected columns from text file

To print text only in 1st and 7th column in plain text file with awk:

root@linux:~# awk '{print $1,$6;}' filename.txt ...

To print only all existing users on Linux with their respective set shell type:

root@linux:~# cat /etc/passwd|sed -e 's#:# #g'|awk '{print $1,$6;}'

9. Open file with VIM text editor starting from line

I use only vim for console text processing, and I often had to edit and fix file which fail to compile on certain line number. Thus use vim to open file for writing from necessary line num. To open file and set cursor to line 35 root@linux:~# vim +35 /home/hipo/current.c

10. Run last command with "!!" bash shorcut

Lets say last command you run is uname -a:

root@websrv:/home/student# uname -a
Linux websrv 3.2.0-4-686-pae #1 SMP Debian 3.2.46-1 i686 GNU/Linux

To re-run it simply type "!!":

root@websrv:/home/student# !!
uname -a
Linux websrv 3.2.0-4-686-pae #1 SMP Debian 3.2.46-1 i686 GNU/Linux

root@websrv:/home/student#


6 days in sickness

Friday, August 10th, 2007

My physical health was quite not good during the last 6 / 7 days. Today it was a quiet day.I haven’t prayed seriously for few days but I can’t. Since my life looks like going nowhere.There is almost nothing in this town which keeps me still. I went to the Old Dobrich inMino’s coffee. But after a little argue and being a little rude to a girl I leavedthis awful mess. This guys are not a good company/match for me. It seems I don’t have friendsexcept Lily. Well I hope at least I haven’t builded all the time for nothing.Thanks Goodness that at least at work there isn’t a lot of work so I’m in a period of recovery.The world is going mad. I’m starting to scare my self. Seems like, life is created to be livednot to think about it’s purpose.END—–