Posts Tagged ‘memory’

How much memory users uses in GNU / Linux and FreeBSD – Commands and Scripts to find user memory usage on Linux

Tuesday, February 17th, 2015


how-much-memory-users-use-in-gnu-linux-freebsd-command-to-find-and-show-ascending-descending-usage-of-system-memory-tux-memory-logo


If you have to administrate a heterogenous network with Linux and FreeBSD or other UNIX like OSes you should sooner or later need for scripting purposes to have a way to list how much memory separate users take up on your system. Listing memory usage per user is very helpful for admins who manager free-shells or for companies where you have developers, developing software directly on the server via ssh. Being able to check which process eats up most memory is essential for every UNIX / Linux sysadmin, because often we as admins setup (daemons) on servers and we forgot about their existence, just to remember they exist 2 years later and see the server is crashing because of memory exhaustion. Tracking server bottlenecks where RAM memory and Swapping is the bottleneck is among the main swiss amry knives of admins. Checking which user occupies all server memory is among the routine tasks we're forced to do as admins, but because nowdays servers have a lot of memory and we put on servers often much more memory than ever will be used many admins forget to routinely track users / daemons memory consumption or even many probably doesn't know how.  Probably all are aware of the easiest wy to get list of all users memory in console non interactively with free command, e.g.:
 

free -m
             total       used       free     shared    buffers     cached
Mem:         32236      26226       6010          0        983       8430
-/+ buffers/cache:      16812      15424
Swap:        62959        234      62725


but unfortunately free command only shows overall situation with memory and doesn't divide memory usage by user

Thus probably to track memory users the only known way for most pepole is to (interactively) use good old top command or if you like modern (colorful) visualization with htop:

debian:~# top
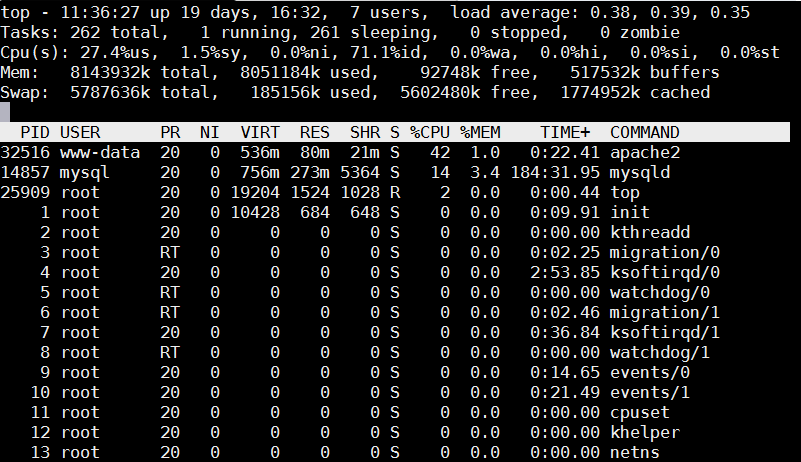
 

linux-check_memory_usage_by_logged-in-user-with-top-process-command-gnu-linux-freebsd-screenshot

Once top runs interactive press 'm' to get ordered list of processes which occupy most system memory on Linux server.Top process use status statistics will refresh by default every '3.0' seconds to change that behavior to '1' second press  s and type '1.0'. To get Sort by Memory Use in htop also press 'm'
 

[root@mail-server ~]# htop
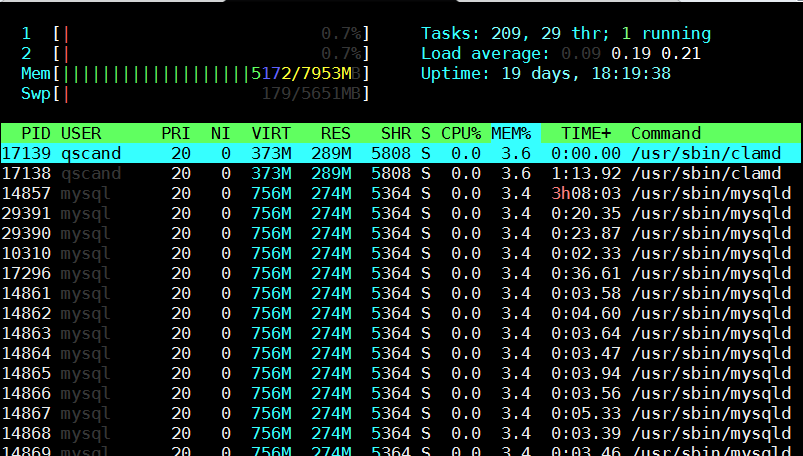

htop_show_users_memory_usage_order_ascending-gnu-linux-screenshot


However if you need to be involved in scripting and setting as a cron job tasks to be performed in case if high memroy consumption by a service you will need to use few lines of code. Below are few examples on how Linux user memory usage can be shown with ps cmd.

Probably the most universal way to see memory usage by users on Debian / Ubuntu / CentOS / RHEL and BSDs (FreeBSD / NetBSD) is with below one liner:


server:~# ps hax -o rss,user | awk '{a[$2]+=$1;}END{for(i in a)print i” “int(a[i]/1024+0.5);}' | sort -rnk2
daemon 0
debian-tor 63
dnscache 1
dnslog 0
hipo 21
messagebus 1
mysql 268
ntp 2
privoxy 1
proftpd 1
qmaill 0
qmailq 0
qmailr 0
qmails 0
qscand 291
root 94
shellinabox 1
snmp 1
statd 1
vpopmail 80
www-data 6765


Output is in MBs

Below is output from machine where this blog is running, the system runs ( Apache + PHP + MySQL Webserver + Qmail Mail server and Tor) on Debian GNU / Linux.

 To get more human readable (but obscure to type – useful for scripting) output list of which user takes how much memory use on deb / rpm etc. based Linux :


server:~# echo "USER                 RSS      PROCS" ; echo "——————– ——– —–" ; \
ps hax -o rss,user | awk '{rss[$2]+=$1;procs[$2]+=1;}END{for(user in rss) printf “%-20s %8.0f %5.0f\n”, user, rss[user]/1024, procs[user];}' | sort -rnk2


USER                 RSS      PROCS
——————– ——– —–
www-data                 6918   100
qscand                    291     2
mysql                     273     1
root                       95   120
vpopmail                   81     4
debian-tor                 63     1
hipo                       21    15
ntp                         2     1
statd                       1     1
snmp                        1     1
shellinabox                 1     2
proftpd                     1     1
privoxy                     1     1
messagebus                  1     1
dnscache                    1     1
qmails                      0     2
qmailr                      0     1
qmailq                      0     2
qmaill                      0     4
dnslog                      0     1
daemon                      0     2


It is possible to get the list of memory usage listed in percentage proportion, with a tiny for bash loop and some awk + process list command
 

TOTAL=$(free | awk '/Mem:/ { print $2 }')
for USER in $(ps haux | awk '{print $1}' | sort -u)
do
    ps hux -U $USER | awk -v user=$USER -v total=$TOTAL '{ sum += $6 } END { printf "%s %.2f\n", user, sum / total * 100; }'
done

107 1.34
115 2.10
119 1.34
daemon 1.32
dnscache 1.34
dnslog 1.32
hipo 1.59
mysql 4.79
ntp 1.34
privoxy 1.33
proftpd 1.32
qmaill 1.33
qmailq 1.33
qmailr 1.32
qmails 1.33
qscand 4.98
root 1.33
snmp 1.33
statd 1.33
vpopmail 2.35
www-data 86.48

Also a raw script which can be easily extended to give you some custom information on memory use by user list_memory_use_by_user.sh is here.
You can also want to debug further how much memory a certain users (lets say user mysql and my username hipo) is allocating, this can easily be achieved ps like so:
 

root@pcfreak:~# ps -o size,pid,user,command -u mysql –sort -size
 SIZE   PID USER     COMMAND
796924 14857 mysql   /usr/sbin/mysqld –basedir=/usr –datadir=/var/lib/mysql –plugin-dir=/usr/lib/mysql/plugin –user=mysql –pid-file=/var/run/mysqld/mysqld.pid –socket=/var/run/mysqld/mysqld.sock –port=3306


root@pcfreak~# ps -o size,pid,user,command -u hipo –sort -size|less
 SIZE   PID USER     COMMAND
13408 19063 hipo     irssi
 3168 19020 hipo     SCREEN
 2940  2490 hipo     -bash
 1844 19021 hipo     /bin/bash
 1844 19028 hipo     /bin/bash
 1844 19035 hipo     /bin/bash
 1844 19042 hipo     /bin/bash
 1844 19491 hipo     /bin/bash
 1844 22952 hipo     /bin/bash
  744  2487 hipo     sshd: hipo@pts/0
  744  2516 hipo     sshd: hipo@notty
  524  2519 hipo     screen -r
  412  2518 hipo     /usr/lib/openssh/sftp-server

You see from below output user running with www-data (this is Apache Webserver user in Debian) is eating 86.48% of overall system memory and MySQL server user is using only 4.79% of available memory

Output is shown in Megabytes per username memory usage, and user memory usage is ordered (stepping-down / descentive) from top to bottom

Getting more thoroughful and easier to read reporting without beeing a 31337 bash coder you can install and use on Linux smem – memory reporting tool .

SMEM can provide you with following memory info:

  • system overview listing
  • listings by process, mapping, user
  • filtering by process, mapping, or user
  • configurable columns from multiple data sources
  • configurable output units and percentages
  • configurable headers and totals
  • reading live data from /proc
  • reading data snapshots from directory mirrors or compressed tarballs
  • lightweight capture tool for embedded systems
  • built-in chart generation


Installing smem on Debian 6 / 7 / Ubuntu 14.04 / Turnkey Linux etc. servers is done with standard:


debian:~# apt-get install –yes smem
….


To install smem on CentOS 6 / 7:


[root@centos ~ ]# yum -y install smem
….


On Slackware and other Linux-es where smem is not available as a package you can install it easily from binary archive with:


cd /tmp/
wget http://www.selenic.com/smem/download/smem-1.3.tar.gz
tar xvf smem-1.3.tar.gz
sudo cp /tmp/smem-1.3/smem /usr/local/bin/
sudo chmod +x /usr/local/bin/smem


Two most common smem uses are:


root@mail:~# smem -u
User     Count     Swap      USS      PSS      RSS
dnslog       1       44       48       54      148
qmaill       4      232      124      145      464
hipo        11    13552     8596     9171    13160
qscand       2     4500   295336   295602   297508
root       188   217312  4521080  4568699  7712776


Below command shows (-u – Report memory usage by user, -t – show totals, -k – show unix suffixes)

root@mail:~# smem -u -t -k
User     Count     Swap      USS      PSS      RSS
dnslog       1    44.0K    48.0K    54.0K   148.0K
qmaill       4   232.0K   124.0K   145.0K   464.0K
hipo        11    13.2M     8.4M     9.0M    12.9M
qscand       2     4.4M   288.4M   288.7M   290.5M
root       188   212.2M     4.3G     4.4G     7.4G
—————————————————
           206   230.1M     4.6G     4.6G     7.7G


To get users memory use by percentage with smem:
 

root@mail:~# smem -u -p
User     Count     Swap      USS      PSS      RSS
dnslog       1    0.00%    0.00%    0.00%    0.00%
qmaill       4    0.00%    0.00%    0.00%    0.01%
hipo        11    0.17%    0.11%    0.11%    0.16%
qscand       2    0.05%    3.63%    3.63%    3.66%
root       194    2.64%   56.18%   56.77%   95.56%

It is also useful sometimes when you want to debug system overloads caused by external hardware drivers loaded into kernel causing issues to get list of system wide memory use sorted by user


 root@mail:~# smem -w -p
Area                           Used      Cache   Noncache
firmware/hardware             0.00%      0.00%      0.00%
kernel image                  0.00%      0.00%      0.00%
kernel dynamic memory        38.30%     36.01%      2.28%
userspace memory             60.50%      0.98%     59.53%
free memory                   1.20%      1.20%      0.00%


smem is very nice as if you're running it on a Desktop Linux system with Xserver installed you can see also graphical output of memory use by application:
 

root@desktop-pc:~# smem –bar pid -c "pss uss"
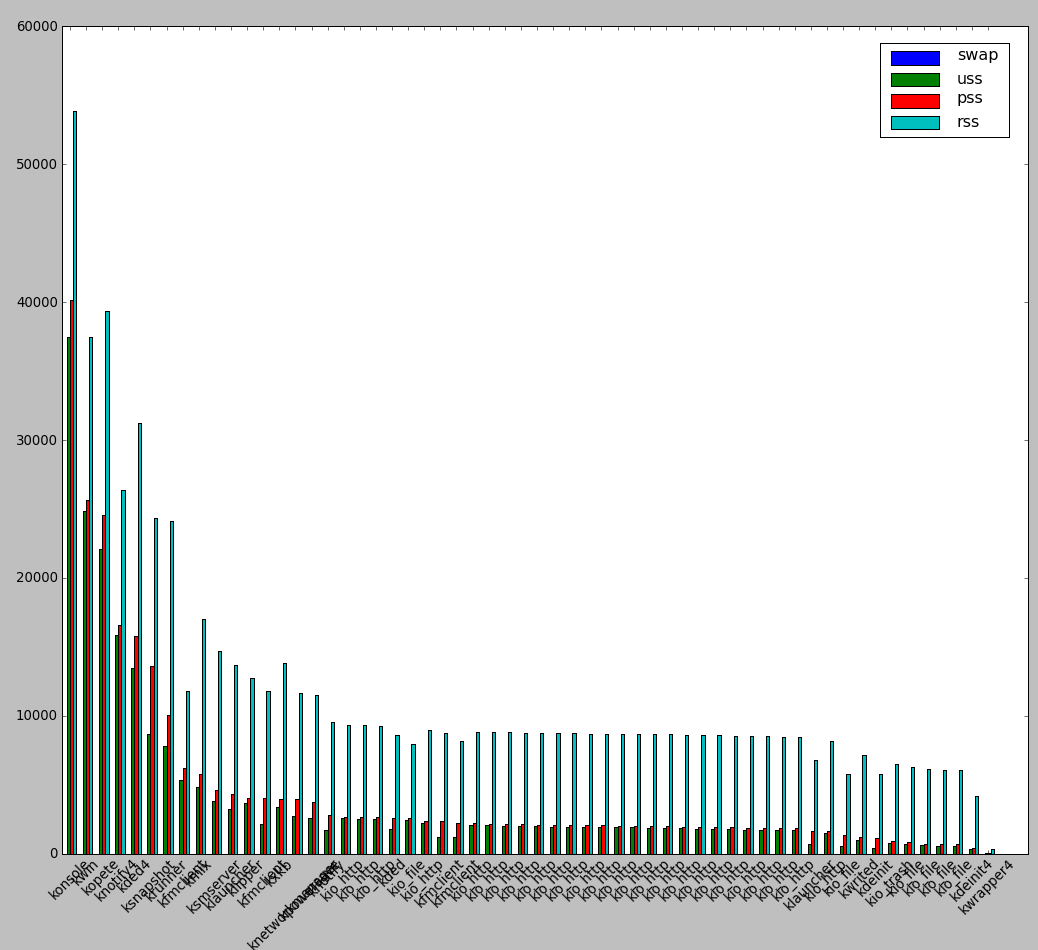

smem_graphical_representation-of-which-user-application-is-consuming-most-memory-gnu-linux-kde-screenshot-smem-command-line-tool

smem can even generate graphical pie charts to visualize better memory use
 

root@desktop-pc:~# smem -P '^k' –pie=name
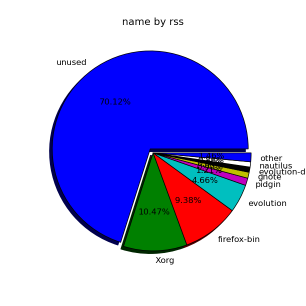
 

generate-graphical-staticstics-linux-memory-use-by-pie-chart

If there is a high percentage shown in firmware/hardware this means some buggy module is loaded in kernel eating up memory, to fix it debug further and remove the problematic module.
userspace memory actually shows the percantage of memory out of all server available RAM that is being consumed by applications (non kernel and other system processes which make the system move). You see in above example the kernel itself is consuming about 40% of system overall available memory. 

We all know the SWAP field stands for hard disk drive used as a memory when system is out, but there are 3 fields which smem will report which will be probably unclear for most here is also explanation on what USS / PSS / RSS means?

RSS is the Resident Set Size and is used to show how much memory is allocated to that process and is in RAM. It does not include memory that is swapped out. It does include memory from shared libraries as long as the pages from those libraries are actually in memory. It does include all stack and heap memory too.

There is also PSS (proportional set size). This is a newer measure which tracks the shared memory as a proportion used by the current process. So if there were two processes using the same shared library from before.

USS stands for Unique set size, USS is just the unshared page count, i.e. memory returned when process is killed 

PSS = Proportional set size, (PSS),  is a more meaningful representation of the amount of memory used by libraries and applications in a virtual memory system.  
Because large portions of physical memory are typically shared among multiple applications, the standard measure of memory usage known as resident set size (RSS) will significantly overestimate memory usage. The parameter PSS instead measures each application’s “fair share” of each shared area to give a realistic measure. For most admins checking out the output from RSS (output) should be enough, it will indicate which user and therefore which daemon is eating up all your memory and will help you to catch problematic services which are cause your server to run out of RAM and start swapping to disk.

Thomas Sunday – The day of Disbelievers

Monday, April 28th, 2014

Thomas-sunday-the-day-of-disbelieve-Thomas-reaching-to-Jesus-wounds

A week passed since we Christian celebrated Resurrection of Christ (Pascha). Each year on first Sunday after Easter in orthodox Church is celebrated the so called Thomas Sunday. So why is it called Thomas Sunday and why it is the day of disbelievers?
The root of this ancient Christian feast comes after commemoration of Christ desciple St. Thomas who disbelieved the testimony of ( 10 apostles ) and the Virgin Mary  that Jesus Christ is Risen from the Death.

The disbelieve of Thomas was logical and human cause even though Thomas was with the Apostles with Christ for 3 years, saw all Jesus miracles and shared the Secret Supper (Last Supper), and even knew in advance (heard by Jesus on Last supper) that Jesus will betrayed mocked, hanged on the Cross and Rise from the death on the third day, he disbelieved.

Thomas Sunday (Sundy of Thomas) is "the day of Disbelievers", because all are disbelievers in moments of their life not only those who believe God but all the humanity!  Even the most faithful Christian, be it a deacon, monk or priest has difficult moments in life where God's existence or providence for one's faith is seriously questioned.
The fallen nature of man is such that the initial belief in God given to man in Eden (Paradise garden) is broken, and only in Jesus's name through the Gift of Faith given by the Holy Spirit, believe in God is restored.

Thomas very much like unto everyone of us doubted the rumors of Christ resurrection and said he would only believe in Resurrected Christ only if he sees his hands nails print and put his fingers into Christ’s wounds to test he is not seeing a Ghost but Christ is alive in a body after his death.

Here is the Gospel reading re-telling the story in short:

“Then the same day at evening, being the first day of the week, when the doors were shut where the disciples were assembled for fear of the Jews, came Jesus and stood in the midst, and saith unto them, Peace be unto you.” (John 20:19)

“But Thomas, one of the twelve, called Didymus, was not with them when Jesus came. The other disciples therefore said unto him, We have seen the Lord. But he said unto them, Except I shall see in his hands the print of the nails, and put my finger into the print of the nails, and thrust my hand into his side, I will not believe.” (John 20:24-26)

And after eight days again his disciples were within, and Thomas with them: then came Jesus, the doors being shut, and stood in the midst, and said, Peace be unto you.
Then he said to Thomas, “Put your finger here; see my hands. Reach out your hand and put it into my side. Stop doubting and believe.”
Thomas said to him, “My Lord and my God!”
Then Jesus told him, “Because you have seen me, you have believed; blessed are those who have not seen and yet have believed.”
Jesus did many other miraculous signs in the presence of his disciples, which are not recorded in this book.
But these are written that you may believe that Jesus is the Christ, the Son of God, and that by believing you may have life in his name.” (John 20:31)

We Christians should be joyful for have not seen Christ in Flesh but have believed for we are blessed for his believe without seeing.

By same faith in God without seeing him even in old times the Jews were led by the Lord God in the desert have won wars by their believing without seeing God, prophets has prophecised, Simeon (The God receiver) hold The Savior (Christ) in his hands, by faith David won the battle with Goliath, by faith we understand the universe was formed at God’s command, by faith we know that the visible came out of the invisible.

o Kyrios mou kai o Theos mou (Greek) – My Lord and my God (Jn. 20:28) this declaration of faith clearly shows an unexpressable excitement of Thomas and his unexpectency to see Christ resurrected. Here it is interesting that here the son of God Jesus Christ is called by Thomas exactly how Jewish used to call God Yahweh (One and Only God) in the Old testament.

Today the evangical story is very accurate for our generation – a generation of disbelievers, even we who say we believe often doesn’t justify our believe with our deeds, we say we believe but we don’t keep God’s commandment “to love God and our neigbor like ourselves.” Often only difference between believers and disbelievers is on Sunday we believers visit Church and “play Christians”, but even but in daily life our deeds are same like unbelievers. Often many are disbelievers not because they reject God but because they never heard the Gospel or misheard it, also we disbelieve because we’re very much like st. Thomas, we often say “I will believe in God if I see him”, but even Thomas who saw God before the Crucifix and knew him disbelieved – a proof that often seing once could still leave space for doubt. The glorious event of Christ showing himself Alive to Thomas was made by Christ to establish the Church and strengthen faith of first Christians in resurrection. Nowadays there are plenty of people who question God’s existence saying that they will believe if they see but they’re not given to see the resurrected Christ because God knows that even if we see the Lord Jesus Christ resurrected we would try to rationally explain the phenomenon with holograms, modern technology or science.

Thomas Sunday is not only a day of Thomas disbelieve it is a day of disbelieve of all humanity. , St. Thomas should be an example even to all of us Christian disbelievers and non-believers that even if we disbelieve and doubt and strive to see God, He is powerful to come and appear Resurrected in His Glory to our souls.
Let us therefore have the Wisdom of the Holy Apostles and say together with them “Lord, Increase our faith.” Luke 17:5

Shutdown tomcat server node in case of memory depletion – Avoiding Tomcat Out of memory

Friday, June 6th, 2014

fix-avoid-tomcat-out-of-memory-logo

Out Of Memory Errors, or OOMEs, are one of the most common problems faced by Apache Tomcat users. Tomcat cluster behind Apache unreachable (causing customer downtimes). OOME errors occur on production servers that are experiencing an unusually high spike of traffic.

Out of memory errors are usually a problem of application and not of Tomcat server. OMEs have become such a persistent topic of discussion in the Apache Tomcat community cause its so difficult to trace to their root cause. Usually 'incorrect' web app code causing Tomcat to run out of memory is usually technically correct.

Most common reasons for Out of Memory errors in application code are:
 

  •     the heap size being too small
  •     running out of file descriptors
  •     more open threads than the host OS allows
  •     code with high amounts of recursion
  •     code that loads a very large file into memory
  •     code that retaining references to objects or classloaders
  •     a large number of web apps and a small PermGen


The following java option -XX:OnOutOfMemoryError= could be added to any of tomcat java application servers in setenv.sh in  JAVA_OPTS= variable in case of regular Out of Memory errors occur making an application unstable.

-XX:OnOutOfMemoryError=<path_to_tomcat_shutdown_script.sh>

Where < path_to tomcat_shutdown_script.sh > is shutdown script(which performs kill <tomcat_pid> if normal shutdown fails) for the tomcat instance.

With this setup if any tomcat instance run out of memory it will be shutdown (shutdown script invoked) – as result the Apache proxy infront of Tomcats should not pass any further requests to this instance and application will visualize / work properly for end customers.

Usually a tomcat_shutdown_script.sh to invoke in case of OOM would initiate a Tomcat server restart something like:

for i in `ps -ef |grep tomcat |grep /my_path_to_my_instance | awk '{print $2}'`
do
kill -9 "$i"
#path and script to start tomcat
done

To prevent blank pages returned to customer because of shutdown_script.sh starting stopping Tomcat you can set in Reverse Apache Proxy something like:
 

<Proxy balancer://mycluster>
   BalancerMember ajp://10.16.166.48:11010/ route=delivery1 timeout=30 retry=1
   BalancerMember ajp://10.16.166.70:11010/ route=delivery2 timeout=30 retry=1
</Proxy>

Where in above example I assume, there are only two tomcat nodes, for more just add respective ones.

Note that if the deployed application along all servers is having some code making it crash all tomcat nodes can get shutdown all time and you can get in a client havoc 🙂

The feast of 26 Zographou Bulgarian Holy Mount Athos Martyrs – burned alive by the Roman Catholic Crusaders

Friday, October 24th, 2014

holy-26-martyrs-of-holy-mount-athos-Zographos-zographou-monastery-martyrs-from-the-roman-catholic-crusaders

On 23 October (10 of October in Julian Calendar every year in Zograph Monastery in Holy Mount Athos is celebrated the martyrdom of the 26 Martyrs who were martyed by Latin crusaders in October 10, 1280. The 26 martyrs were burned alive after refusal to accept Union with the Roman Catholic Church as ordered by Byzantine emperor Michael VIII Paleologos. The then wanting to secure his throne emperor gave allowance for Crusaders together with his mercenaries Tatars and and Turks to go and “convert” the Orthodox Slavs to accept the union with the pope who wanted a primacy in the Church.

Mt. Athos stood in firm opposition to the Union. The Athonite monks sent a letter to Michael pointing out that the primacy of the Pope, his commemoration in the churches, celebrating the Eucharist with unleavened bread, the insertion of the “filioque” [“and from the Son”] into the Creed, could not be accepted by Orthodox, and they asked the emperor to change his mind. “We clearly see,” the letter said, “that you are becoming a heretic, but we implore you to forsake all this and abide in the teachings that were handed down to you…. Reject the unholy and novel teachings of a false knowledge, speculations, and additions to the Faith.”


Holy Theotokos – The Virgin Mary icon which spoke with a human voice to a Zographou monk

An icon spoke to an old monk warning that the “enemies of Christ” are coming. The monk went to forewarn the brothers (as he was living 30 minutes afar in a grave-yard), but for his surprise the Holy icon of the Theotokos which spoke to him was found on the monastic entrance.
The brother went and told the abbot (Igumen) Thomas who told to the brothers to either flew in the woods if they’re weak in spirit and to the strong he said to stay and cofess the Holy Orthodox faith. Abbot Thomas together with the 23 monks (24 monks including the abbot) toghet with 4 pilgrims decided to stay in the monastery and suffered martyrdom. The Crusaders who were returning from Jerusalem sent by the ungodly emperor tried to convince the 26 confessors to accept Roman Catholic doctrines such as “filioque” (The teaching that the Holy Spirit cames also from the Son) and to celebrate the eucharist with unleavened bread (like the Jewish) and wanted the confessors to accept the papal union accepted also by the emeror Michael. The 26 Martyrs rebuked these heresies and explained that the “filique” is against the decisions of the 7 Church Councils. Also they give the proof that the Holy Spirit doesn’t proceed from the Son by retelling how John The Baptist baptized Christ and how the Holy Spirit descent over the Lord Jesus Christ in form of a dove. This didn’t convince the papists and the truthful words of the Zographus monks rebuked their error the papists were angered and burned the tower with the holy Martyrs alive. One of the monks fall of the burning tower and the latin though he is dead left him behind however he survived more 30 days! – even though he was on a dying bed and later told what happened to the brothers which came from their hiding places to the monastery. The Holy Martyrs prayed from the fire their last prayer to God to save the Holy Mount Athos and every true Christian on earth from heresies. When they ended their prayer they heard a voice from heaven “Rejoice for great is your reward in heaven!”. The Roman Crusaders heard the voice and were scared howeveras their spiritual eyes were darkened by the lack of the Grace of the Holy Spirit, they kept in their heart tightening. The Martyrdom happened according to Greek chronicles on 10 of October 1280.

The names of the Martyrs for Christ were as follows:

Igumen Thomas, and the monks Barsanuphius, Cyril, Michael, Simon, Hilarion, James, Job, Cyprian, Sava, Jacob, Martinian, Cosmas, Sergius, Menas, Joasaph, Joannicius, Paul, Anthony, Euthymius, Dometian, Parthenius, and four laymen.

The tower building where the holy martyrs were burned was partially kept even though the fire until 1874 however the tower was already too old and it was about to ruin – that’s why it hadto be destroyed. To preserve the memory about the martyrdom of 26 martyrs all brothers of the Zographou monastry decided in one spirit to build on its place a monument.

monument-26-Zographou-martyrs-from-the_Latins-Bulgarian-Zograph-monastery-holy-mount-Athos

This happened the same year 1873. The monument had to be sanctified on the day when the memory of the martyrs is celebrated at the eve after sunrise began a night vigil. The night was moonless and on the heaven one could see only few stars. All around was silence. During the vigil exactly in midnight, after beginning the living and martyrdom of the the holy Zographos martyrs”, above the church all 600 hundred people saw a fire column. Column lighted up the whole monastery and the whole region with such a bright light, that even the small objects in the monastery could be seen. This divine column stayed over the Church for 3-4 minutes and moved and stayed above the monument for 3-4 minutes more and after that started ascending above and formed a ring like a crown, crowning the place where the holy martyrs suffered.

burning-of-26-bulgarian-martyrs-on-holy-mount-athos-zographou-monastery-by-the-crusaders roman catholiclatins

This unusual event continued for about 15 minutes. An eyesights of the miracle were all the brotherhood, guests and hermits who came from nearby Sketes for the feast.

That’s how the Almight God has shown by this miracle omen showing in front of everybody how Godly was the martyrdom of this great confessors of the true faith and loyalty to the Holy Orthodox Church.

Holy 26 Martyrs and Cofessors of the true faith pray the Lord Jesus Christ to save our souls!

How to remove and disable BlueTooth support on Debian GNU / Linux servers

Thursday, October 18th, 2012

How to remove / disable bluetooth support on Debian GNU / Linux servers
If you running Debian Squeeze Linux (as server Apache, MySQL, Qmail etc.) on brand new purchased hardware with bluetooth support; you will notice default Linux kernel will detect and load modules for Bluetooth

This would not be a problem only if Bluetooth does not pose possible errors or (even at cases even maybe system hangs ups?). The actual reason in my case to want to disable bluetooth on a productive Linux server operating like host was I found out in dmesg produced output, some errors related to Bluetooth, here they are:


root@deb:~# dmesg|grep -i 'call trace' -A 8
[323406.744439] Call Trace:
[323406.744440] [] ? lapic_next_event+0x18/0x1d
[323406.744450] [] ? __report_bad_irq+0x30/0x7d
[323406.744453] [] ? note_interrupt+0x105/0x16e
[323406.744455] [] ? handle_fasteoi_irq+0x93/0xb5
[323406.744458] [] ? handle_irq+0x17/0x1d
[323406.744460] [] ? do_IRQ+0x57/0xb6
[323406.744463] [] ? ret_from_intr+0x0/0x11
[323406.744464]

I saw this error and similar ones occuring, every now and then obviously displaying something wents wrongs with IRQs related to BlueTooth Communication with Kernel (as it keeps processing requests loaded in system memory) …

Well anyways having the bluetooth kernel module loaded on memory just takes up few chunks of useless assigned memory.
I don't have intention to use bluetoothever in future on these host so I decided to completely remove bluetooth support on those Debian.

1. Remove blueetoh support on Debian GNU / Linux

First to check info about the loaded kernel module bluetooth.ko and its assigned module load alias run:


root@deb:~# /sbin/modinfo bluetooth
filename: /lib/modules/2.6.32-5-amd64/kernel/net/bluetooth/bluetooth.ko
alias: net-pf-31
license: GPL
version: 2.15
description: Bluetooth Core ver 2.15
author: Marcel Holtmann
srcversion: 9FD5BF98FC88505DC637909
depends: rfkill
vermagic: 2.6.32-5-amd64 SMP mod_unload modversions

Secondly disable memory preloaded bluetooth.ko on the current host with cmds:


root@deb:~# rmmod -f bnep
root@deb:~# rmmod -f l2cap
root@deb:~# rmmod -f sco
root@deb:~# rmmod -f bluetooth

Default way to control if Bluetooth (on host support is ON or OFF) is through /etc/default/bluetooth. Inside /etc/default/bluetooth is a control variable:


BLUETOOTH_ENABLED=1

To shut it off change its value to 0:


BLUETOOTH_ENABLED=0

Then to permanently prevent bluetooth.ko from being ever in future loaded its also good idea to blacklist modules – bnep, btusb, bluetooth:


root@deb:~# echo 'blacklist bnep' >> /etc/modprobe.d/bluetooth.conf
root@deb:~# echo 'blacklist btusb' >> /etc/modprobe.d/bluetooth.conf
root@deb:~# echo 'blacklist bluetooth' >> /etc/modprobe.d/bluetooth.conf

Onwards re-build, current kernel initramfs:


root@deb:~# update-initramfs -u -k `uname -r` -v
......
......

Next update boot init scripts with update-rc.d to make sure bluetooth (service / daemon) is not started:


root@deb:~# update-rc.d bluetooth remove
......

That's all bluetooth will not load up anymore on next boot and at present time will not take up useless mem space.

2. Re-enable disabled blueetooth on Debian Linux
 
I've been asked in one of comments, what to do If you need to re-enable bluetooth on your Debian Linux at some time in future, so here are the steps to turn back blueetooth on again


/etc/modprobe.d/bluetooth.conf

Change variable:

BLUETOOTH_ENABLED=0

to 

BLUETOOTH_ENABLED=1

Open  /etc/modprobe.d/bluetooth.conf and remove any blacklisted modules, e.g:

'blacklist bnep'
'blacklist btusb'
&39;blacklist bluetooth'

Rebuild again kernel ramfs

root@deb:~# update-initramfs -u -k `uname -r` -v
 
Enjoy 🙂

How to harden Linux Security and imprpove network efficiency on Kernel sysctl Level to Stop SYN flood

Friday, July 8th, 2011

Power up Linux and protect against DDoS with sysctl var optimization

Some long time ago I’ve written an article Optimizing Linux tcp/ip networking

In the article I’ve examined a number of Linux kernel sysctl variables, which significantly improve the way TCP/IP networking is handled by a non router Linux based servers.

As the time progresses I’ve been continuing to read materials on blogs and internet sites on various tips and anti Denial of Service rules which one could apply on newly installed hosting (Apache/MySql/Qmail/Proxy) server to improve webserver responce times and tighten the overall security level.

In my quest for sysctl 😉 I found a few more handy sysctl variables apart from the old ones I incorporate on every Linux server I adminstrate.
The sysctl variables improves the overall network handling efficiency and protects about common SYN/ACK Denial of service attacks.

Here are the extra sysctl variables I started incorporating just recently:

############ IPv4 Sysctl Settings ################
#Enable ExecShield protection (randomize virtual assigned space to protect against many exploits)
kernel.randomize_va_space = 1
#Increase the number of PIDs processes could assign this is very needed especially on more powerful servers
kernel.pid_max = 65536
# Prevent against the common 'syn flood attack'
net.ipv4.tcp_syncookies = 1
# Controls the use of TCP syncookies two is generally a better idea, though you might experiment
#net.ipv4.tcp_syncookies = 1
net.ipv4.tcp_synack_retries = 2
##################################################
#
############## IPv6 Sysctl Settings ################
# Number of Router Solicitations to send until assuming no routers are present.
net.ipv6.conf.default.router_solicitations = 0
# Accept Router Preference in RA? Again not necessery if the server is not a router
net.ipv6.conf.default.accept_ra_rtr_pref = 0
# Learn Prefix Information in Router Advertisement (Unnecessery) for non-routers
net.ipv6.conf.default.accept_ra_pinfo = 0
# disable accept of hop limit settings from other routers (could be used for DoS)
net.ipv6.conf.default.accept_ra_defrtr = 0
# disable ipv6 global unicasts server assignments
net.ipv6.conf.default.autoconf = 0
# neighbor solicitations to send out per address (better if disabled)
net.ipv6.conf.default.dad_transmits = 0
# disable assigning more than 1 address per network interface
net.ipv6.conf.default.max_addresses = 1
#####################################################


To use this settings paste the above sysctl variables in /etc/sysctl.conf and ask sysctl command to read and apply the newly added conf settings:

server:~# sysctl -p
...

Hopefully you should not get errors while applying the sysctl settings, if you get some errors, it’s possible some of the variable is differently named (depending on the Linux kernel version) or the Linux distribution on which sysctl’s are implemented.

For some convenience I’ve created unified sysctl variables /etc/sysct.conf containing the newly variables I started implementing to servers with the ones I already exlpained in my previous post Optimizing Linux TCP/IP Networking

Here is the optimized / hardened sysctl.conf file for download

I use this exact sysctl.conf these days on both Linux hosting / VPS / Mail servers etc. as well as on my personal notebook 😉

Here is also the the complete content of above’s sysctl.conf file, just in case if somebody wants to directly copy/paste it in his /etc/sysctl.conf

# Sysctl kernel variables to improve network performance and protect against common Denial of Service attacks
# It's possible that not all of the variables are working on all Linux distributions, test to make sure
# Some of the variables might need a slight modification to match server hardware, however in most cases it should be fine
# variables list compiled by hip0
### https://www.pc-freak.net
#### date 08.07.2011
############ IPv4 Sysctl Kernel Settings ################
net.ipv4.ip_forward = 0
# ( Turn off IP Forwarding )
net.ipv4.conf.default.rp_filter = 1
# ( Control Source route verification )
net.ipv4.conf.default.accept_redirects = 0
# ( Disable ICMP redirects )
net.ipv4.conf.all.accept_redirects = 0
# ( same as above )
net.ipv4.conf.default.accept_source_route = 0
# ( Disable IP source routing )
net.ipv4.conf.all.accept_source_route = 0
# ( - || - )net.ipv4.tcp_fin_timeout = 40
# ( Decrease FIN timeout ) - Useful on busy/high load server
net.ipv4.tcp_keepalive_time = 4000
# ( keepalive tcp timeout )
net.core.rmem_default = 786426
# Receive memory stack size ( a good idea to increase it if your server receives big files )
##net.ipv4.tcp_rmem = "4096 87380 4194304"
net.core.wmem_default = 8388608
#( Reserved Memory per connection )
net.core.wmem_max = 8388608
net.core.optmem_max = 40960
# ( maximum amount of option memory buffers )
# tcp reordering, increase max buckets, increase the amount of backlost
net.ipv4.tcp_max_tw_buckets = 360000
net.ipv4.tcp_reordering = 5
##net.core.hot_list_length = 256
net.core.netdev_max_backlog = 1024
#Enable ExecShield protection (randomize virtual assigned space to protect against many exploits)
kernel.randomize_va_space = 1
#Increase the number of PIDs processes could assign this is very needed especially on more powerful servers
kernel.pid_max = 65536
# Prevent against the common 'syn flood attack'net.ipv4.tcp_syncookies = 1
# Controls the use of TCP syncookies two is generally a better idea, though you might experiment
#net.ipv4.tcp_syncookies = 1
net.ipv4.tcp_synack_retries = 2
###################################################
############## IPv6 Sysctl Settings ################
# Number of Router Solicitations to send until assuming no routers are present.
net.ipv6.conf.default.router_solicitations = 0
# Accept Router Preference in RA? Again not necessery if the server is not a router
net.ipv6.conf.default.accept_ra_rtr_pref = 0
# Learn Prefix Information in Router Advertisement (Unnecessery) for non-routersnet.
ipv6.conf.default.accept_ra_pinfo = 0
# disable accept of hop limit settings from other routers (could be used for DoS)
net.ipv6.conf.default.accept_ra_defrtr = 0
# disable ipv6 global unicasts server assignmentsnet.
ipv6.conf.default.autoconf = 0
# neighbor solicitations to send out per address (better if disabled)
net.ipv6.conf.default.dad_transmits = 0
# disable assigning more than 1 address per network interfacenet.
ipv6.conf.default.max_addresses = 1
#####################################################
# Reboot if kernel panic
kernel.panic = 20

These sysctl settings will tweaken the Linux kernel default network settings performance and you will notice the improvements in website responsiveness immediately in some cases implementing this kernel level goodies will make the server perform better and the system load might decrease even 😉

This optimizations on a kernel level are not only handy for servers, their implementation on Linux Desktop should also have a positive influence on the way the network behaves and could improve significantly the responce times of opening pages in Firefox/Opera/Epiphany Torrent downloads etc.

Hope this kernel tweakenings are helpful to someone.
Cheers 😉

How to download books from Books Google with Google Book Download stand alone program and Greasemonkey with Google Books Downloader script

Thursday, February 7th, 2013

If you are student or just a researcher, you already know most of the good books you can find are on books.google.com. Google Books's is nice, but not all browsers support it well. Older mobile phones has big troubles with it, plus it is always nice to have a stored copy of book on your PC for later review or just to refresh your memory on books previously read.

Thus if you get to task to download Books from Google a quick research reveals few programs claiming to support downloading Books from Google in PDF;

1. Google Books Download standalone application for Windows and Mac OS X

Google Books Download is said to support Save of Google books in PDF, JPEG or PNG format.
This program works good whether you need to extract only certain book pages, however with complete books it often hangs. Other problem is it is  proprietary software, (freeware), so pages book pages it downloads in PDF had a big red color stamp complaining the program is trial.
There is a cracked version available on Piratebay.se's website. But as Piratebay is filtered from here. To test it I had to google it via piratebay proxy: –  with "piratebay  google books download"
.


Google Books Download
, standalone app from Piratebay is at current version 3.1.308.
As you can see from screenshot Google Book Download has two modes of work, one is;
Download Manually
– This is used for manual download a pages from a complete book and converting them to PDF.
Download Automatically – Is purposed to download a complete book from books.google.com and converting it to PDF. Downloading a complete copy of book using this mode is sometimes, hanging, plus it is really, really slow. The reason is each of the pages from the Book is first scanned using OCR (Optical Character Recognition) technology page by page and later after all pages are downloaded in pictures, they're converted to 1 PDF file.

Because Download Automatically loops at certain pages, this makes Google Books Download almost useless for people looking to store a full copy of books on Books.Google.com ….

2. Downloading PDFs from books.google.com with Firefox Greasemonkey and Google Book Downloaderjavascript

a. Install GreaseMonkey Firefox add-on

If you never before heard of Greasemonkey is a Mozilla Firefox Extension that allows users to install scripts that make on-the-fly changes to web page content after or before the page is loaded in the browser (also known as augmented browsing).

b. Install Google book downloader GreaseMonkey javascript

After a FF restart, you're ready to download any book from Books.Google.com.
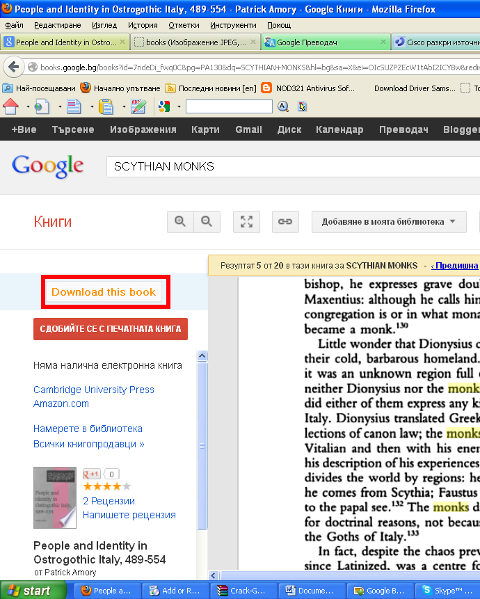
To use it open the book you want to download and on the left upper corner you will see a Download this book button, press it and the book will be scanned in OCR and saved in PNG picture format. Below is a screenshot showing a sample book to download from books.google.com;

how to download book from google in firefox web browser screenshot


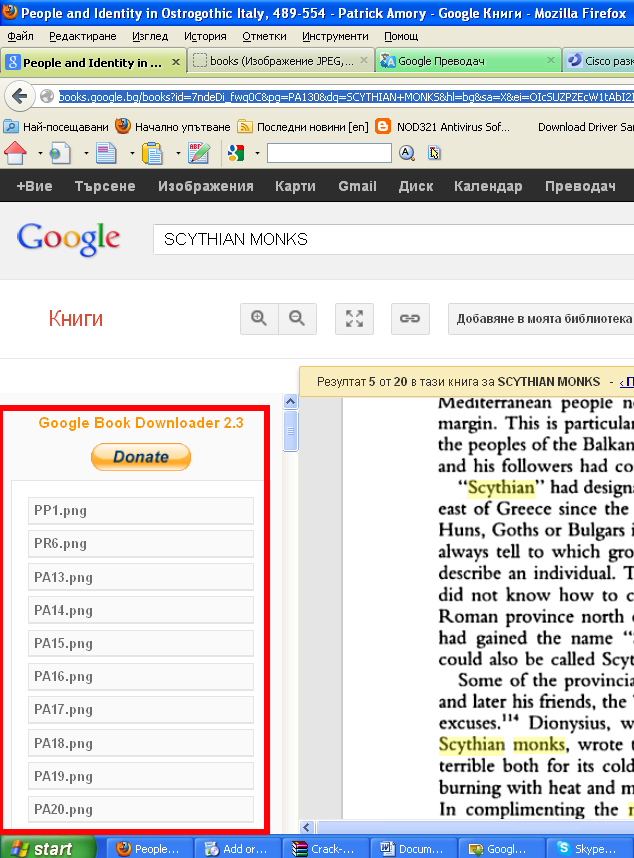
After each book page is succesfully download in page on the left pane you get a download status;

google book download firefox screenshot pictures - Scythian Monks download - how to download books to pictures from Google books on Windows XP, Windows 8

You should keep in mind that the download links of Google Book pages, will have a time expiry, so if you don't hurry up to save the pictures for later use soon links will become inaccessible and showing as broken from Google – I'm not sure how much exactly is google's max expiry time set of links but I guess it should be something 5-10 mins.

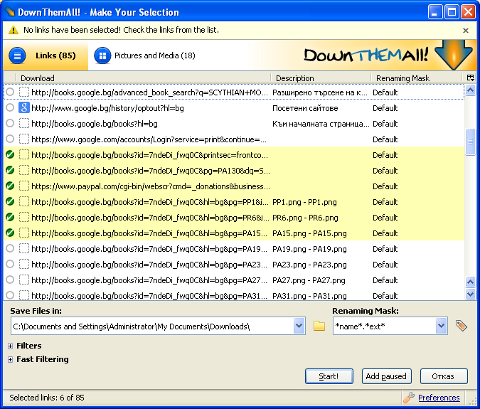
The pages of PDF, gets fetched as pictures one by one so it takes 20 secs or so to get all links to pages. Since Google Books Downloader only provides links to PDF pages it is necessery to either save each of the pictures manually (quite a lot of effort) or Install and use lets say DownThemAll! FF download extension. Using DownThemAll does not completely automates picture downloads, as you need to manually select all pictures for downloading, but at least selecting pages saves some time. To download all book pages with DownThemAll click with right mouse button on the left pane where links to pictures appears and choose download with DownThemAll!. After that tick on all links pointing to books.google.com……. to make them have the green tick as shown in below screenshot;

Once you have all PNGs saved on the PC you need to then convert them to unified PDF file. One way to do this is using ImageMagick's convert command line tool.
To do so install imagemagick for Windows downloading Win binaries from here
There are a bunch of binaries you will need to install named like ImageMagick-*-x86-static.exe

Run cmd.exe, change dir (cd) to folder where the just download book is saved in PNG and issue:


C:\Downloads> convert *.png pdf/my-book-from-pictures.pdf

How to speed up Linux Flash Player videos in Firefox on old Computers

Wednesday, January 30th, 2013

Firefox browser cache variables to tune for better Flash player performance Linux screenshot
 

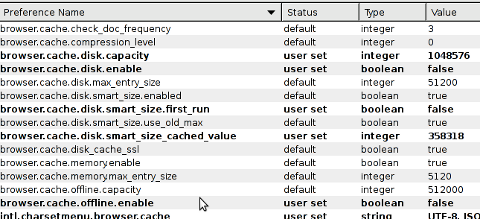
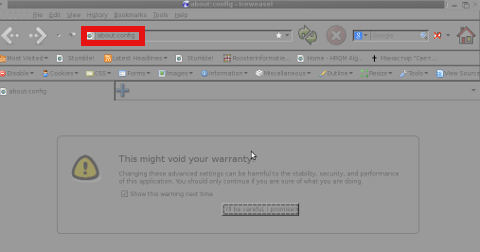
If you happen to run old Computer hardware with lets say 256 or 512 MB of memory, a CPU of 600-800Mhz and a small hard disk like 5 / 10 GB and you need to have Flash Player on Firefox play Videos in Youtube and Vimeo with as less obstructions as possible, it is useful to take a look and try tuning up browser caching values, to do so type in URL Address Bar


about:config

iceweasel about:config Iceweasel Firefox about:config screenshot in URL address bar

Then search for;

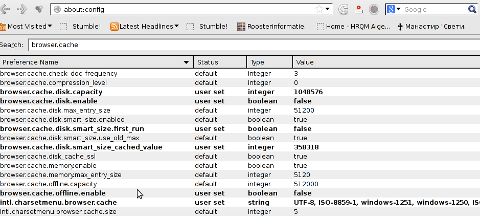
browser.cache

Iceweasel Firefox browser cache screenshot Debian Gnu Linux screenshot tiny

Raise (tune up) the values for:

browser.cache.disk.capacity 1048576

Try to raise this value with 50% (524288), (1048576 + 524288) = 1572864.

By default, as you see

browser.cache.disk.enable is set to false

Try to change it to true, as this might have positive effect on flash video buffering and thus improve a bit experience.

browser.cache.disk.smart_size_cached_value 358318

Again it is good practice to try raise it with 50% and test if Flash Player performs better. I.e. (358318/2) = 179159, (358318+179159) = 537477. Hence raise it too lets say 358318. I give the 50%, example because the cache size on Firefox (IceWeasel) will differ depending on the browser version Linux distro and architecture.

There are few other caching, variables to tune, though I doubt if they will have impact on Flash Player performance it is good to know they're there. To see all Mozilla caching variables in Search filed, type "cache". One other non Flash Player performance related variable to check and tune is:

image.cache.size

In time of writting on my Firefox ver. 18.0.1 it is set to 5242880.
I'm looking forward to hear if this little tuning tips helped improve Flash Player. If you happen to have some positive impact on Video flow, please drop a comment with Linux distribution type and version, Flash Player version and changed caching variables.
Hope this little post helps. Happy tuning 🙂
 

swap_pager_getswapspace: failed, MySQL troubles on FreeBSD 7.2 cause and solution

Tuesday, May 3rd, 2011

Every now and then my FreeBSD router dmesg ( /var/log/dmesg.today ) logs, gets filled with error messages like:

pid 86369 (httpd), uid 80, was killed: out of swap space
swap_pager_getswapspace(14): failed
swap_pager_getswapspace(16): failed
swap_pager_getswapspace(11): failed
swap_pager_getswapspace(12): failed
swap_pager_getswapspace(16): failed
swap_pager_getswapspace(14): failed
swap_pager_getswapspace(16): failed
swap_pager_getswapspace(8): failed

Using swapinfo during the swap_pager_getswapspace(16): failed messages were logged in, I figured out that definitely the swap memory over-use is the bottleneck for the troubles, to find this I used the command:

freebsd# swapinfo
Device 1K-blocks Used Avail Capacity Type
/dev/ad0s1b 49712 45920 3792 92% Interleaved

After some investigation, I’ve figured out that the MySQL server is causing the kernel exceeded swap troubles.

My current MySQL server version is installed from the ports tree, whether I’m using the bsd port /usr/ports/databases/mysql51-server/ and it appears to work just fine.

However I have noticed that the mysql-server is missing a my.cnf file!, which means the mysql server is running under a mode with some kind of default configurations.

Strangely in the system process list it appeared it is using a default my.cnf file located in /var/db/mysql/my.cnf

Below you see the paste from the ps command:

ps axuww freebsd# ps axuww | grep -i my.cnf | grep -v grep
mysql 7557 0.0 0.1 3464 1268 p1 I 12:03PM 0:00.01 /bin/sh /usr/local/bin/mysqld_safe --defaults-extra-file=/var/db/mysql/my.cnf --user=mysql --datadir=/var/db/mysql --pid-file=/var/db/mysql/pcfreak.pidmysql 7589 0.0 5.1 93284 52852 p1 I 12:03PM 0:59.01 /usr/local/libexec/mysqld --defaults-extra-file=/var/db/mysql/my.cnf --basedir=/usr/local --datadir=/var/db/mysql --user=mysql --pid-file=/var/db/mysql/pcfreak.pid --port=3306 --socket=/tmp/mysql.sock

Nevertheless it appeared the sql server is running the file /var/db/mysql/my.cnf conf was not existing! This was really weird for me as I’m used to have the default my.cnf from my previous experience with Linux servers!

Thus the next logical thing I did was to create my.cnf conf file in order to be able to have a proper limiting configuration for the sql server.

The FreeBSD my.cnf skele files are found in /usr/local/share/mysql/, here are the 4 files one can use as a starting basis for further configuration of the mysql-server.

freebsd# ls -al /usr/local/share/mysql/my-*.cnf
-r--r--r-- 1 root wheel 4948 Aug 12 2009 /usr/local/share/mysql/my-huge.cnf
-r--r--r-- 1 root wheel 20949 Aug 12 2009 /usr/local/share/mysql/my-innodb-heavy-4G.cnf
-r--r--r-- 1 root wheel 4924 Aug 12 2009 /usr/local/share/mysql/my-large.cnf
-r--r--r-- 1 root wheel 4931 Aug 12 2009 /usr/local/share/mysql/my-medium.cnf
-r--r--r-- 1 root wheel 2502 Aug 12 2009 /usr/local/share/mysql/my-small.cnf

I have chosen to use the my-medium.cnf as a skele to tune up, as my server is not high iron one e.g. the host I run the mysql is a (simple dual core 1.2Ghz system).

Further on I copied the /usr/local/share/mysql/my-medium.cnf to /var/db/mysql/my.cnf e.g.:

freebsd# cp -rpf /usr/local/share/mysql/my-medium.cnf /var/db/mysql/my.cnf

As a next step to properly tune up the default values of the newly copied my.cnf to my specific server I used the Tuning-Primer MySQL tuning script

Using tuning-primer.sh is really easy as all I did is download, launch it and follow the script suggestions to correct some of the values already in my.cnf

I have finally ended up with the following my.cnf after using tuning-primer.sh to optimize mysql server to work with my bsd host

Now I really hope the shitty swap_pager_getswapspace: failed errors would not haunt me once again by crashing my server and causing mem overheads.

Still I wonder why the port developer Alex Dupre – ale@FreeBSD.org choose not to provide the default mysql51-server conf with some kind of my.cnf file? I hope he had a good reason.

Why and how to fix when Debian Linux detects and shows only 3GB of memory even though 4 or more are present

Saturday, September 8th, 2012

I was quite shocked to find out free -m was showing 3GB of memory on a brand new purchased Lenovo ThinkCentre Edge71 (according to guarantee paper with 4GB). I got angry seeing this, I paid 350 EUR for a Desktop host and suddenly, there is one giga less …

Since I was not sure if by mistake someome shipped the system with 1 Gigabyte or there is something wrong with Linux unable to detect the whole amount of memory I entered BIOS (on Lenovo ThinkCentre Edge series – to enter BIOS press F1.

Interestingly in BIOS, I can see 4 GigaBytes of memory are present, well this was puzzling … :

Lenovo ThinkCentre Edge71 esktop PC BIOS picture

Still free -m show me 3GB:

# free -m
total used free shared buffers cached
Mem: 2989 186 2803 0 4 76

-/+ buffers/cache: 105 2884
Swap: 5651 0 5651

I checked also in top and htop, hoping maybe there 4 Gigas will show up but nope there also the whole amount of system memory was identified as 2989 MB.

I thought for a while and my first thought was probably, the memory is not detected because there might be integrated Videocard configured to use 1 GB of RAM. So next logical thing to do was check in BIOS, what kind of settings are set for the Video adapter.

possible settings for Video Setup menu are:

IGD,
PEG,
or AUTO

PEG stands for (PCI-e Graphics Device
– IDG is abbreviaton from (Internal Graphics Device)
I give a try to all of them, but I didn’t see any change in amount of detected memory. Debian Squeeze Linux 6.0.5 was always detecting 2989 max memory. I also tried also changing the amount of IGD Pre-allocated Memory Size from 128M to 32MB as well as decreasing the amount of Total Graphics Memory to 128MB. Unfortunately doing all kind of changes didn’t influenced the amount of detected memory by Linux kernel …

To make sure the 3GB detected memory is not because of some Debian Squeeze GNU / Linux bug I tried using a PuppyLinux 4.2.1 LiveCD just to see PuppyLinux was also detecting with 1 GIGA less…

Onwards after a quick research online I red people are experiencing similar problems on Linux, whether a 32 Bit kernel is used on 64 bit machines.
Weirdly it seems 32 Bit Linux kernels (even the new ones) are having troubles detecting more than 3GB of memory, but there is a need for some kind of bigmem supporting kernel .
Here is the exact Linux kernel version making the troubles:

# uname -a;Linux pcfreak 2.6.32-5-686 #1 SMP Sun May 6 04:01:19 UTC 2012 i686 GNU/Linux

Until checking the kernel release, I didn’t realized in the hurry installed a 32 bit version of Debian on the 64 bit machine so to fix up the situation installed 64 bit version kernel;

# apt-get install --yes linux-image-2.6.32-5-amd64

And Hooray! After restarting and booting with the new 64 bit (amd64) kernel, the missing 1 Gigabyte of memory started being detected:

# uname -a;
Linux pcfreak 2.6.32-5-amd64 #1 SMP Sun May 6 05:12:07 UTC 2012 x86_64 GNU/Linux
# free -m
total used free shared buffers cached
Mem: 3913 261 3651 0 4 71
-/+ buffers/cache: 186 3727
Swap: 5651 0 5651

Seeing system boot up fine with the amd64 bit kernel, I removed the old 32 bit kernel, e.g.:

# apt-get --yes remove linux-image-2.6.32-5-686

Well that’s all folks 🙂