Posts Tagged ‘menus’

Install Zabbix Proxy configure and connect to Zabbix server on CentOS Linux

Thursday, May 4th, 2023

Install Zabbix Proxy configure and connect to Zabbix server on CentOS Linux

1. Why use Zabbix-Proxy hidden advantages of using Zabbix-Proxy ?
 

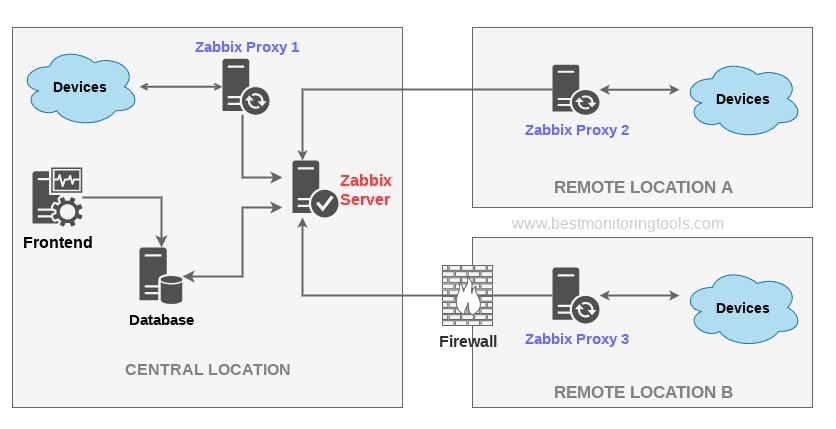
Proxy can be used for many purposes and can provide many hidden benefits, just to name few of them:

  • Offload Zabbix Server when monitoring thousands of devices
  • Monitor remote locations
  • Monitor locations having unreliable communications
  • Simplify maintenance of distributed monitoring
  • Improved Security (Zabbix server can be restricted to be connectable only by the set of connected Zabbix Proxy / Proxies
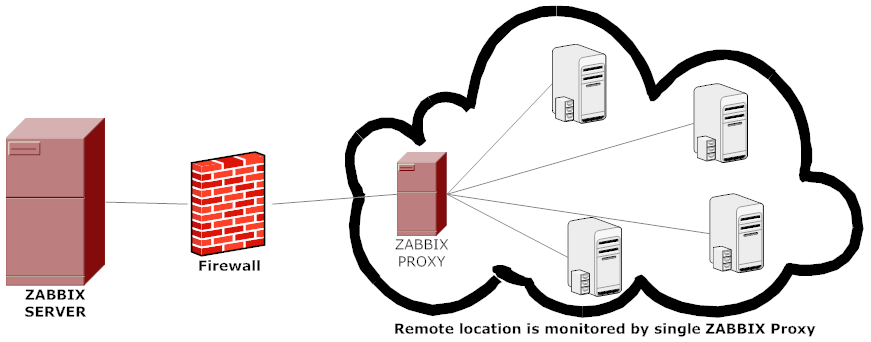

advantages-of-using-zabbix-proxy-instead-of-direct-connect-monitored-hosts-to-zabbix-server-diagram


A Zabbix proxy is the ideal solution if you have numerous hosts with multiple slow items that are affecting the performance of the server simply because processes are spending most of the time simply waiting for a response. A proxy can collect information from all hosts using its internal processes and then send raw historical data to the server. The time needed to connect and receive the host response will be on the proxy site, and the server performance will not be affected at all. A proxy just sends raw values to the server, and the server itself does not have to connect to the host to get the data.
 

2. Install zabbix-proxy-sqlite3 rpm package from Zabbix Official Repositories download page

Zabbix repository provides choice of 3 packages named as follows:

zabbix-proxy-mysql
zabbix-proxy-pgsql
zabbix-proxy-sqlite3

where the last value of the name (after zabbix-proxy) represents database type of the package — MySQL, PostgreSQL and SQLite respectively.

To not bother installing MySQL / PostgreSQL separate database servers, a lightweight choice is to use the sqlite3 db version. 
As I prefer zabbix-proxy data to be stored inside a flat database, thus I choose to use zabbix-proxy-sqlite3.

[root@sysadminshelp:/root ]# yum info zabbix-proxy-sqlite3-5.0.31-1.el7.x86_64
Заредени плъгини: fastestmirror
Loading mirror speeds from cached hostfile
 * base: mirrors.netix.net
 * epel: fedora.ipacct.com
 * extras: mirrors.netix.net
 * remi: remi.mirror.karneval.cz
 * remi-php74: remi.mirror.karneval.cz
 * remi-safe: remi.mirror.karneval.cz
 * updates: mirrors.netix.net
Инсталирани пакети
Име         : zabbix-proxy-sqlite3
Архитект.   : x86_64
Версия      : 5.0.31
Издание     : 1.el7
Обем        : 4.4 M
Хранилище   : installed
Обобщение   : Zabbix proxy for SQLite3 database
URL         : http://www.zabbix.com/
Лиценз      : GPLv2+
Описание    : Zabbix proxy with SQLite3 database support.

My experience to try to install thethe default CentOS RPM package for zabbix-proxy-sqlite3 provided by default
RPM package that came with CentOS did not work as expected and trying to install / configure and use it via

[root@sysadminshelp:/root ]# yum install zabbix-proxy-sqlite3.x86_64 -y

[root@sysadminshelp:/root ]# vi /etc/zabbix/zabbix_proxy.conf


Led me to a nasty errors seen in /var/log/zabbixsrv/zabbix_proxy.log like:

May 1st 2023, 08:42:45.020 zabbix_server cannot set list of PSK ciphersuites: file ssl_lib.c line 1314: error:1410D0B9:SSL routines:SSL_CTX_set_cipher_list:no cipher match
May 1st 2023, 08:42:45.018 zabbix_server cannot set list of PSK ciphersuites: file ssl_lib.c line 1314: error:1410D0B9:SSL routines:SSL_CTX_set_cipher_list:no cipher match
May 1st 2023, 08:42:45.013 zabbix_server cannot set list of PSK ciphersuites: file ssl_lib.c line 1314: error:1410D0B9:SSL routines:SSL_CTX_set_cipher_list:no cipher match
May 1st 2023, 08:42:45.011 zabbix_server cannot set list of PSK ciphersuites: file ssl_lib.c line 1314: error:1410D0B9:SSL routines:SSL_CTX_set_cipher_list:no cipher match


After some googling and reading some threads came upon this one https://support.zabbix.com/browse/ZBXNEXT-3604, there is exmplaed errors preventing the configured zabbix-proxy
to start are caused by the zabbix-proxy-sqlite3 package provided by Redhat (due to openssl incompitability bug or something ).

As one of people in the discussion pointed out the quickest workaround suggested is simply to use the official Zabbix Repository packages for zabbix-proxy-sqlite3, in order to not waste anymore time on this
trivial stuff to install it, simply run:

[root@sysadminshelp:/root ]# rpm -Uvh \
https://repo.zabbix.com/zabbix/5.0/rhel/7/x86_64/zabbix-proxy-sqlite3-5.0.31-1.el7.x86_64.rpm

Alternative way if you seem to not have the machine connected to the internet is simply download the package with wget / lynx / curl / w3m from another machine 
that can reach the Internet upload the package via the local LAN or VPN and install it:

# wget https://repo.zabbix.com/zabbix/5.0/rhel/7/x86_64/zabbix-proxy-sqlite3-5.0.31-1.el7.x86_64.rpm

[root@sysadminshelp:/root ]# rpm -ivh zabbix-proxy-sqlite3-5.0.31-1.el7.x86_64.rpm

NOTE ! Before you install proxy, keep in mind that your proxy version must match the Zabbix server version !

3. Generate a PSK random secret key and set proper permissions for zabbix-proxy directories


[root@sysadminshelp:/root ]# cd /etc/zabbix/
    
[root@sysadminshelp:/root ]# openssl rand -hex 32 >> /etc/zabbix/zabbix_proxy.psk     
[root@sysadminshelp:/root ]# chown root:zabbix zabbix_proxy.psk [root@sysadminshelp:/root ]# vi /etc/zabbix/zabbix_proxy.conf [root@sysadminshelp:/root ]# mkdir -p /var/lib/zabbix-proxy/sqlite3db
[root@sysadminshelp:/root ]# chown -R zabbix:zabbix /var/lib/zabbix-proxy
[root@sysadminshelp:/var/lib/zabbixsrv/sqlite3db]# sqlite3 zabbix_proxy
SQLite version 3.7.17 2013-05-20 00:56:22
Enter ".help" for instructions
Enter SQL statements terminated with a ";"
sqlite> .databases
seq  name             file
—  —————  ———————————————————-
0    main             /var/lib/zabbixsrv/sqlite3db/zabbix_proxy
sqlite>
[root@sysadminshelp:/root ]# vi /etc/zabbix_proxy.conf
#DBName=zabbix_proxy
DBName=/var/lib/zabbixsrv/sqlite3db/zabbix_proxy

4. Configure zabbix proxy to be able to connect to Zabbix Server

[root@sysadminshelp:/root ]#  vi /etc/zabbix/zabbix_proxy.conf     ############ GENERAL PARAMETERS #################
    ProxyMode=0
    Server=192.168.1.28
    ServerPort=10051
    Hostname=zabbix-proxy
    ListenPort=10051
    SourceIP=10.168.1.55
    LogFile=/var/log/zabbix/zabbix_proxy.log
    LogFileSize=1
    DebugLevel=2
    PidFile=/var/run/zabbix/zabbix_proxy.pid
    DBName=/var/lib/zabbix-proxy/sqlite3db/zabbix_proxy.db
    DBUser=zabbix
    
    ######### PROXY SPECIFIC PARAMETERS #############
    ProxyOfflineBuffer=24
    HeartbeatFrequency=60
    ConfigFrequency=120
    
    ############ ADVANCED PARAMETERS ################
    StartPollersUnreachable=3
    StartHTTPPollers=3
    JavaGateway=127.0.0.1
    JavaGatewayPort=10052
    StartJavaPollers=5
    SNMPTrapperFile=/var/log/snmptrap/snmptrap.log
    StartSNMPTrapper=1
    CacheSize=32M
    Timeout=4
    ExternalScripts=/usr/lib/zabbix/externalscripts
    LogSlowQueries=3000
    
    ####### TLS-RELATED PARAMETERS #######
    TLSConnect=psk
    TLSAccept=psk
    TLSPSKIdentity=PSK zabbix-proxy-fqdn-hostname
    TLSPSKFile=/etc/zabbix/zabbix_proxy.psk

5. Check and make sure the installed zabbix proxy as well as the zabbix_proxy server zabbix_agentd client and zabbix_server are at the same major version release

a) Check zabbix proxy version

[root@sysadminshelp:/etc/zabbix]# zabbix_proxy -V
zabbix_proxy (Zabbix) 5.0.31
Revision f64a07aefca 30 January 2023, compilation time: Jan 30 2023 09:55:10

Copyright (C) 2023 Zabbix SIA
License GPLv2+: GNU GPL version 2 or later <https://www.gnu.org/licenses/>.
This is free software: you are free to change and redistribute it according to
the license. There is NO WARRANTY, to the extent permitted by law.

This product includes software developed by the OpenSSL Project
for use in the OpenSSL Toolkit (http://www.openssl.org/).

Compiled with OpenSSL 1.0.1e-fips 11 Feb 2013
Running with OpenSSL 1.0.1e-fips 11 Feb 2013

[root@sysadminshelp:/etc/zabbix]#

b) check zabbix_agentd version

[root@sysadminshelp:/etc/zabbix]# zabbix_agentd -V
zabbix_agentd (daemon) (Zabbix) 5.0.30
Revision 2c96c38fb4b 28 November 2022, compilation time: Nov 28 2022 11:27:43

Copyright (C) 2022 Zabbix SIA
License GPLv2+: GNU GPL version 2 or later <https://www.gnu.org/licenses/>.
This is free software: you are free to change and redistribute it according to
the license. There is NO WARRANTY, to the extent permitted by law.

This product includes software developed by the OpenSSL Project
for use in the OpenSSL Toolkit (http://www.openssl.org/).

Compiled with OpenSSL 1.0.1e-fips 11 Feb 2013
Running with OpenSSL 1.0.1e-fips 11 Feb 2013

c) Check zabbix server version

[root@zabbix:~]# zabbix_server -V
zabbix_server (Zabbix) 5.0.30
Revision 2c96c38fb4b 28 November 2022, compilation time: Nov 28 2022 09:19:03

Copyright (C) 2022 Zabbix SIA
License GPLv2+: GNU GPL version 2 or later <https://www.gnu.org/licenses/>.
This is free software: you are free to change and redistribute it according to
the license. There is NO WARRANTY, to the extent permitted by law.

This product includes software developed by the OpenSSL Project
for use in the OpenSSL Toolkit (http://www.openssl.org/).

Compiled with OpenSSL 1.1.1d  10 Sep 2019
Running with OpenSSL 1.1.1n  15 Mar 2022

6. Starting the zabbix-proxy for a first time

Before beginning with installation make sure selinux is disabled, as it might cause some issues with Zabbix

[root@sysadminshelp:/etc/zabbix]# sestatus
SELinux status:                 disabled

If you need to have the selinux enabled you will have to allow the zabbix-proxy into selinux as well:

cd /tmp
# grep zabbix_proxy /var/log/audit/audit.log | grep denied | audit2allow -m zabbix_proxy > zabbix_proxy.te
grep zabbix_proxy /var/log/audit/audit.log | grep denied | audit2allow -M zabbix_proxy
semodule -i zabbix_proxy.pp


[root@sysadminshelp:/etc/zabbix]# systemctl start zabbix-proxy

Also lets enable zabbix-proxy to automatically start it on next server reboot / boot.

root@sysadminshelp:/etc/zabbix]# systemctl enable zabbix-proxy

Normally running zabbix-proxy should provide a status messages like:

[root@sysadminshelp:/etc/zabbix]# systemctl status zabbix-proxy
● zabbix-proxy.service – Zabbix Proxy
   Loaded: loaded (/usr/lib/systemd/system/zabbix-proxy.service; disabled; vendor preset: disabled)
   Active: active (running) since чт 2023-05-04 14:58:36 CEST; 2h 59min ago
  Process: 8500 ExecStop=/bin/kill -SIGTERM $MAINPID (code=exited, status=0/SUCCESS)
  Process: 8504 ExecStart=/usr/sbin/zabbix_proxy -c $CONFFILE (code=exited, status=0/SUCCESS)
 Main PID: 8506 (zabbix_proxy)
   CGroup: /system.slice/zabbix-proxy.service
           ├─8506 /usr/sbin/zabbix_proxy -c /etc/zabbix/zabbix_proxy.conf
           ├─8507 /usr/sbin/zabbix_proxy: configuration syncer [synced config 40521 bytes in 0.0…
           ├─8508 /usr/sbin/zabbix_proxy: trapper #1 [processed data in 0.000808 sec, waiting fo…
           ├─8509 /usr/sbin/zabbix_proxy: trapper #2 [processed data in 0.005028 sec, waiting fo…
           ├─8510 /usr/sbin/zabbix_proxy: trapper #3 [processed data in 0.001240 sec, waiting fo…
           ├─8511 /usr/sbin/zabbix_proxy: trapper #4 [processed data in 0.004378 sec, waiting fo…
           ├─8512 /usr/sbin/zabbix_proxy: trapper #5 [processed data in 0.004991 sec, waiting fo…
           ├─8513 /usr/sbin/zabbix_proxy: preprocessing manager #1 [queued 0, processed 3 values…
           ├─8514 /usr/sbin/zabbix_proxy: preprocessing worker #1 started
           ├─8515 /usr/sbin/zabbix_proxy: preprocessing worker #2 started
           ├─8516 /usr/sbin/zabbix_proxy: preprocessing worker #3 started
           ├─8517 /usr/sbin/zabbix_proxy: heartbeat sender [sending heartbeat message success in…
           ├─8518 /usr/sbin/zabbix_proxy: data sender [sent 0 values in 0.005241 sec, idle 1 sec…
           ├─8519 /usr/sbin/zabbix_proxy: housekeeper [deleted 4501 records in 0.011462 sec, idl…
           ├─8520 /usr/sbin/zabbix_proxy: http poller #1 [got 0 values in 0.000248 sec, idle 5 s…
           ├─8521 /usr/sbin/zabbix_proxy: http poller #2 [got 0 values in 0.000239 sec, idle 5 s…
           ├─8522 /usr/sbin/zabbix_proxy: http poller #3 [got 0 values in 0.000328 sec, idle 5 s…
           ├─8523 /usr/sbin/zabbix_proxy: discoverer #1 [processed 0 rules in 0.000261 sec, idle…
           ├─8524 /usr/sbin/zabbix_proxy: history syncer #1 [processed 0 values in 0.000009 sec,…
           ├─8525 /usr/sbin/zabbix_proxy: history syncer #2 [processed 0 values in 0.000007 sec,…
           ├─8526 /usr/sbin/zabbix_proxy: history syncer #3 [processed 0 values in 0.000014 sec,…
           ├─8527 /usr/sbin/zabbix_proxy: history syncer #4 [processed 0 values in 0.000021 sec,…
           ├─8528 /usr/sbin/zabbix_proxy: java poller #1 [got 0 values in 0.000017 sec, idle 5 s…
           ├─8529 /usr/sbin/zabbix_proxy: java poller #2 [got 0 values in 0.000019 sec, idle 5 s…
           ├─8530 /usr/sbin/zabbix_proxy: java poller #3 [got 0 values in 0.000019 sec, idle 5 s…
           ├─8531 /usr/sbin/zabbix_proxy: java poller #4 [got 0 values in 0.000018 sec, idle 5 s…
           ├─8532 /usr/sbin/zabbix_proxy: java poller #5 [got 0 values in 0.000013 sec, idle 5 s…
           ├─8533 /usr/sbin/zabbix_proxy: snmp trapper [processed data in 0.000026 sec, idle 1 s…
           ├─8534 /usr/sbin/zabbix_proxy: self-monitoring [processed data in 0.000034 sec, idle …
           ├─8535 /usr/sbin/zabbix_proxy: task manager [processed 0 task(s) in 0.000169 sec, idl…
           ├─8536 /usr/sbin/zabbix_proxy: poller #1 [got 0 values in 0.000012 sec, idle 5 sec]
           ├─8537 /usr/sbin/zabbix_proxy: poller #2 [got 0 values in 0.000021 sec, idle 5 sec]
           ├─8538 /usr/sbin/zabbix_proxy: poller #3 [got 0 values in 0.000039 sec, idle 5 sec]
           ├─8539 /usr/sbin/zabbix_proxy: poller #4 [got 0 values in 0.000024 sec, idle 5 sec]
           ├─8540 /usr/sbin/zabbix_proxy: poller #5 [got 0 values in 0.000019 sec, idle 5 sec]
           ├─8541 /usr/sbin/zabbix_proxy: unreachable poller #1 [got 0 values in 0.000011 sec, i…
           ├─8542 /usr/sbin/zabbix_proxy: unreachable poller #2 [got 0 values in 0.000018 sec, i…
           ├─8543 /usr/sbin/zabbix_proxy: unreachable poller #3 [got 0 values in 0.000041 sec, i…
           └─8544 /usr/sbin/zabbix_proxy: icmp pinger #1 [got 0 values in 0.000022 sec, idle 5 s…

май 04 14:58:36 sysadminshelp systemd[1]: Stopped Zabbix Proxy.
май 04 14:58:36 sysadminshelp systemd[1]: Starting Zabbix Proxy…
май 04 14:58:36 sysadminshelp systemd[1]: Started Zabbix Proxy.
zabbix-server-zabbix-proxy-and-zabbix-clients-overview-diagram

7. Configure zabbix-agentd to use your just new brand new zabbix-proxy

Here is my sample configuration file:

[root@sysadminshelp:/etc/zabbix]# grep -v \# /etc/zabbix/zabbix_agentd.conf | sed '/^$/d'
PidFile=/var/run/zabbix/zabbix_agentd.pid
LogFile=/var/log/zabbix/zabbix_agentd.log
LogFileSize=0
Server=zabbix-proxy
ServerActive=zabbix-proxy:10051
ListenIP
Hostname=sysadminshelp
BufferSend=30
BufferSize=100
Include=/etc/zabbix/zabbix_agentd.d/*.conf


Note that the ServerActive given "zabbix-proxy" should be resolvable from the host, or even better you might want to put the IP of the Proxy if
you don't have at least a pseudo Hostname already configured inside /etc/hosts or actual DNS 'A' Active record configured inside a properly resolving
DNS server configured on the host via /etc/resolv.conf.


8. Create and Configure new proxy into the Zabbix-server host
 

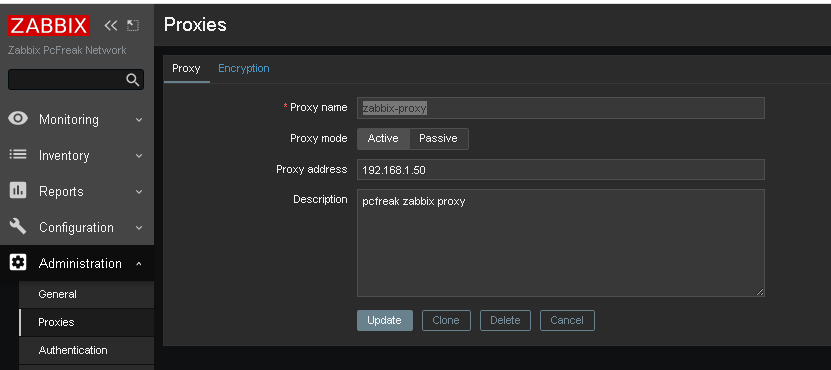
Go to the zabbix server web interface URL into menus:
zabbix-administration-proxy-config
 

Administration -> Proxies (Proxy) 


Click on ;

Create Proxy button (uppper right corner)

*Proxy name: usually-your-host-pingable-fqdn
Proxy mode: Active
Proxy address: 192.168.1.50
Description: pcfreak zabbix proxy


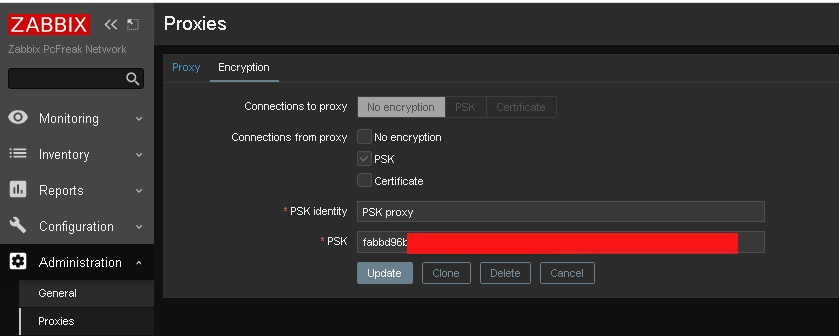
Administration -> Proxies -> Encryption


From "Connection to proxy"

Untick "No encryption"

and

Tick "PSK"

zabbix-administration-proxy-config-encryption

*PSK Identity: PSK proxy
*PSK: Put the key here (copy from /etc/zabbix/zabbix_proxy.psk generated steps earlier with openssl)

[root@sysadminshelp:/etc/zabbix]# cat zabbix_proxy.psk
faddbd96be00ac42c892fda5201634df25d51f3ndbbbf6cee9d354b2817092a28

Press the "Update" Button

zabbix-administration-proxy-config-encryption1

and go again to Proxies and check the zabbix-proxy is connected to the server and hosts configured to use the zabbix proxy reporting frequently.

To make sure that the configured new hosts to use the Zabbix Proxy instead of direct connection to Zabbix Server, go to Latest Data and check whether the configured Hostnames to connect to the Zabbix-Proxy continues to sent Data still.

9. Debugging problems with zabix-proxy and zabbix-agentd connectivity to proxy

In case of troubles check out what is going on inside the Zabbix Proxy / Agent and Server log files
 

[root@sysadminshelp:/etc/zabbix]# tail -n 50 /var/log/zabbix/zabbix_proxy.log

 6832:20230504:134032.281 Starting Zabbix Proxy (active) [zabbix-proxy]. Zabbix 5.0.31 (revision f
64a07aefca).
  6832:20230504:134032.281 **** Enabled features ****
  6832:20230504:134032.281 SNMP monitoring:       YES
  6832:20230504:134032.281 IPMI monitoring:       YES
  6832:20230504:134032.281 Web monitoring:        YES
  6832:20230504:134032.281 VMware monitoring:     YES
  6832:20230504:134032.281 ODBC:                  YES
  6832:20230504:134032.281 SSH support:           YES
  6832:20230504:134032.281 IPv6 support:          YES
  6832:20230504:134032.281 TLS support:           YES
  6832:20230504:134032.281 **************************
  6832:20230504:134032.281 using configuration file: /etc/zabbix/zabbix_proxy.conf
  6832:20230504:134032.291 current database version (mandatory/optional): 05000000/05000005
  6832:20230504:134032.291 required mandatory version: 05000000
  6832:20230504:134032.292 proxy #0 started [main process]
  6833:20230504:134032.292 proxy #1 started [configuration syncer #1]
  6833:20230504:134032.329 received configuration data from server at "192.168.1.28", datalen 40521
  6834:20230504:134032.392 proxy #2 started [trapper #1]
  6835:20230504:134032.401 proxy #3 started [trapper #2]
  6836:20230504:134032.402 proxy #4 started [trapper #3]
  6838:20230504:134032.405 proxy #6 started [trapper #5]
  6837:20230504:134032.409 proxy #5 started [trapper #4]
  6843:20230504:134032.409 proxy #11 started [heartbeat sender #1]
  6845:20230504:134032.412 proxy #13 started [housekeeper #1]
  6847:20230504:134032.412 proxy #15 started [discoverer #1]
  8526:20230504:145836.512 proxy #20 started [history syncer #3]
  8517:20230504:145836.512 proxy #11 started [heartbeat sender #1]
  8530:20230504:145836.515 proxy #24 started [java poller #3]
  8531:20230504:145836.517 proxy #25 started [java poller #4]
  8532:20230504:145836.520 proxy #26 started [java poller #5]
  8536:20230504:145836.522 proxy #30 started [poller #1]
  8527:20230504:145836.525 proxy #21 started [history syncer #4]
  8535:20230504:145836.525 proxy #29 started [task manager #1]
  8533:20230504:145836.528 proxy #27 started [snmp trapper #1]
  8539:20230504:145836.528 proxy #33 started [poller #4]
  8538:20230504:145836.529 proxy #32 started [poller #3]
  8534:20230504:145836.532 proxy #28 started [self-monitoring #1]
  8544:20230504:145836.532 proxy #38 started [icmp pinger #1]
  8543:20230504:145836.532 proxy #37 started [unreachable poller #3]
  8542:20230504:145836.535 proxy #36 started [unreachable poller #2]
  8541:20230504:145836.537 proxy #35 started [unreachable poller #1]
  8540:20230504:145836.540 proxy #34 started [poller #5]
  8507:20230504:150036.453 received configuration data from server at "192.168.1.28", datalen 40521
  8507:20230504:150236.503 received configuration data from server at "192.168.1.28", datalen 40521
  8507:20230504:150436.556 received configuration data from server at "192.168.1.28", datalen 40521
  8507:20230504:150636.608 received configuration data from server at "192.168.1.28", datalen 40521
  8507:20230504:150836.662 received configuration data from server at "192.168.1.28", datalen 40521


[root@sysadminshelp:/etc/zabbix]# tail -n 10  /var/log/zabbix-agent/zabbix_agentd.log
3096166:20230504:182840.461 agent #1 started [collector]
3096167:20230504:182840.462 agent #2 started [listener #1]
3096168:20230504:182840.463 agent #3 started [listener #2]
3096169:20230504:182840.464 agent #4 started [listener #3]
3096170:20230504:182840.464 agent #5 started [active checks #1]

If necessery to Debug further and track some strange errors, you might want to increase the DebugLevel to lets say DebugLevel=5

5 – extended debugging (produces even more information)

If checking both zabbix_agentd.log and zabbix_proxy.log cannot give you enough of a hint on what might be the issues you face with your userparameter scripts or missing Monitored data etc. and hopefully you have access to the zabbix-server machine, check out the zabbix server log as well

[root@zabbix:~]# tail -n 100 /var/log/zabbix/zabbix_server.log

3145027:20230504:182641.556 sending configuration data to proxy "zabbix-proxy" at "192.168.1.50", datalen 40521, bytes 6120 with compression ratio 6.6
3145029:20230504:182716.529 cannot send list of active checks to "192.168.1.30": host [pcfrxenweb] not found
3145028:20230504:182731.959 cannot send list of active checks to "192.168.1.30": host [pcfrxenweb] not found
3145029:20230504:182756.634 cannot send list of active checks to "192.168.1.30": host [pcfrxenweb] not found

Wrapping it up

In this article, we have learned how to install and configure a zabbix-proxy server and prepare a PSK encryption secret key for it.
We learned also  how to connect this server to the central zabbix monitoring host machine in Active mode, so both Zabbix proxy and server can communicate in a secure crypted form,
as well as how to set zabbix_agentd clients to connect to the zabbix proxy
which will from itself send its data to the Central Zabbix server host as well as how to Debug and hopefully solve issues with communication between Zabbix client -> Zabbix Proxy -> Zabbix server.

I know this article, does not say anything revolutionary and there is plenty of posts online talking about how to run yourself a zabbix proxy and make in your home or corporate network,
but I thought to write it down as by writting it and reading a bit more on the topic of Zabbix Server / Proxy / Agent, that give myself a better overview on how this technologies work and such an article will give myself an easier step by step guide to follow,
in future when I have to configure Zabbix Environments for personal hobby or professionally for customers.
Hope you enjoyed. Cheers ! 🙂

How to change / reset lost or forgot TightVNC administrator password

Tuesday, May 24th, 2011

how-to-change-reset-lost-TightVNC-administrator-password

I have installed TightVNC to a Windows host just a few weeks ago in order to be able to manage remotely a Windows host and forgot to write down the administrator password 🙂 (stoopid!)

I had to explain to a friend remotely how to change the TightVNC admin password and it was a complete nightmare!

Shortly here is the exact menus one who wants to reset the password of a TigthVNC server after forgotten:

Start -> All Programs -> TightVNC
-> TightVNC Server (Service Mode) ->
TightVNC Service - Offline Configuration.

In the configuration dialog to popup there are the Server and Administration tabs through which a new password can be set.

After the password is change either a restart of the TightVNC server is necessery or a restart of the Windows PC.

How to enable VirtualBox Windows XP FullScreen with VboxGuestAdditions.iso on Ubuntu 11.10 Linux

Tuesday, January 17th, 2012

Enable_VirtualBox_Windows_XP-fullscreen-with-vboxguest-additions-iso
Right after installing Windows XP inside VirtualBox, I've found out everything works fine except the screen. Even though pressing (Right CTRL + F) was changing the Windows XP running window to FullScreen the XP screen was taking only a part of the whole screen area, where almost half of the screen was visible as simply staying blank.

A bit of research and I found the issue is caused by missing VirtualBoxGuestAdditions .

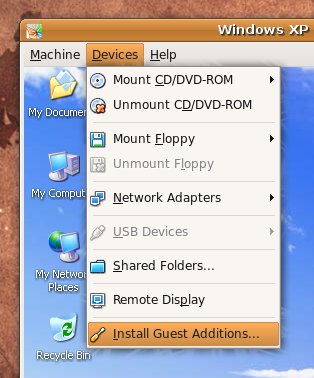
VBoxAdditions is a package which should be installed inside the VirtualBox by navigating to Devices -> Install Guest Additions

Virtualbox offers a download of a VboxGuestAdditions_4.1.2_Ubuntu.iso from url;
http://dlc.sun.edgesuite.net/virtualbox/4.1.2_Ubuntu/VBoxGuestAdditions_4.1.2_Ubuntu.iso, anyways this download fails since the URL is currently unavailable.

To fix this two ways are possible:

1. Download VBoxGuestAdditions.iso from here and put it in directory /usr/share/virtualbox , e.g.:

root@ubuntu:~# cd /usr/share/virtualbox
root@ubuntu:/usr/share/virtualbox# wget https://www.pc-freak.net/files/VBoxGuestAdditions.iso
...

2. Download and install virtualbox-guest-additions-iso_4.1.2-1_all.deb

root@ubuntu:~# wget https://www.pc-freak.net/files/virtualbox-guest-additions-iso_4.1.2-1_all.deb
...
root@ubuntu:~# dpkg -i virtualbox-guest-additions-iso_4.1.2-1_all.deb
...

Next to enable and install guest additions once again use menus:

Devices -> Install Guest Additions

VirtualBox Install Guest Additions Ubuntu Screenshot

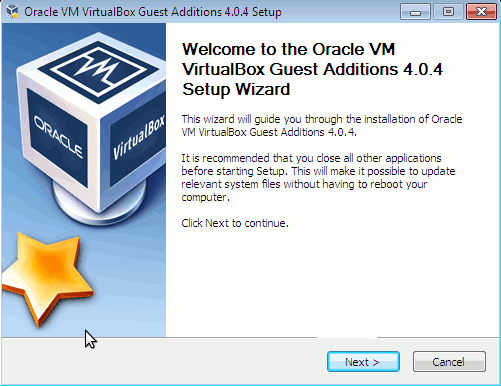
The screen to appear next will be similar to:

VBox guest Additions windows Ubuntu

Further on follow the few dialogs to complete the installations and integration of Guest Additions and restart the Virtual machine and hooray the Windows will appear in Full screen in VirtualBox ! 😉

12 must have Joomla extension plugins / Essential modules for new Joomla CMS install

Thursday, June 16th, 2011

Joomla bundle of must have extensions picture

These days very often I have to install, plain new Joomla based websites. I’ve realized that since there is no structured guide to follow describing the most essential plugins that every new fresh new joomla installation is required to have.
Thus I took the time and wrote this post, as it will be useful to myself in my future new joomla based websites establishment, I also believe these guide will be useful to other Joomla enthusiasts or administrators in their daily work.

Below I will describe in short the installation, configuration and oddities I’ve faced during installment of the above described bundle of plugins on a plan Joomla 1.5 install.These article will walk through 12 joomla essential plugins that I believe every fresh Joomla installation should be equipped with.
Hope this guide will be helpful to you. Now let’s start it up:

1. JoomlaXplorer – A sophisticated web file explorer for Joomla

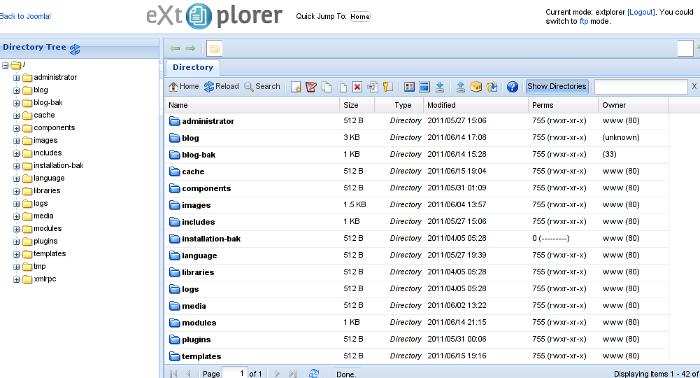
One of the basic modules, beneficial with a new joomla CMS install is Joomla Xptplorer . This module enables the joomla admin to browse files in a web file explorer, on the server where the joomla CMS is installed. Below you see how handy the joomla web explorer provided by the plugin is:

Joomla file explorer extplorer module

Installing and using the plugin is a piece of cake. To install the plugin:

a. download Joomla file Xplorer from here or from the official plugin website.

b. Install the plugin through the admin joomla menu:

Extensions -> Install/Uninstall

c. Start using the newly installed plugin by following to menus:

Components -> eXtplorer

2. JCrawler Generate easily sitemap.xml to aim the overall Joomla website SEO optimization

JCrawler logo plugin joomla

I have previously written a very through tutorial on how to install configure and generate website sitemap with Jcrawler module, You can read my article titled: How to build website sitemap.xml in Joomla here

3. sh404SEF – Make your Joomla links and content more user friendly

sh404sef Joomla Search Engine Optimization plugin

sh404SEF is a great Joomla plugin, which will seriously improve SEO and could contribute well for a website to be better indexed with major search engines.

I have previously written an article describing thoroughfully the install and use procedures for the module.
You can read the article Making your Joomla URLS Google friendly with sh404sef plugin / Simple Joomla link SEO here

4. Akeeba Backup Joomla solution

Akeeba backup Joomla Module

Installing a joomla backup solution is very essential if you does take care about your data, it often happens that server hard disk got crashes or a RAID massives got corrupted or some kind of other unexpected disaster hits the server. In these terrible times, having a website backup will save you nerves and data recovery funds, not to mention that in many cases data recovery is impossible.

Joomla has a very easy to use software for creating full website backup called Akeeba Backup

To start using the software one must:

a. Download Akeeba Backup and install it via:

Extensions -> Install/Uninstall

After the Akeeba Backup installation is over, to create your first backup, one needs to navigate to:

Components -> Akeeba Backup -> Backup Now

Each Akeeba backup (a version of the website’s files data and sql info) will be created in an archive file with the extension .jpa
The backup files are created under joomla’s website (main) root directory in directory location administrator/components/com_akeeba/backup

The Akeeba plugin also has capabilities to recover a (.jpa) backup restore point easily.
To recover a backup with the Akeeba plugin one needs to do it once again, via the plugin joomla web interface.
5. Google Analytics (place easy tracking code) in Joomla

Google Analytics Tracking Module for Joomla

a. Download the Google Analytics Tracking Module
The module is available from Joomla Extensions on joomla.org

At the current time of writting you need to download the analytics_tracking15,zip file

b. Install the Google Analytics Tracking Module;
Login as joomla admin and navigate to;

Extensions -> Install

Place the analytics_tracking15.zip url to the Install URL: field.
Again as of time of writting you need to place https://www.pc-freak.net/files/analytics_tracking15.zip;

c. Open the Module Manager

Extensions -> Module Manager

d. Click over Google Analytics Tracking Module
On the right pane you will notice in the Module Parameters the Analytics_uacct_code field. In the uacct_code field you need to paste your UA obtained from your created google-analytics account.
This code is usually something like UA-2101595-10
Now place your code their and press the save green button located near the right top of the screen. You should see the text in blue Item Saved which would indicate your UA code is stored already in the Google Analytics Tracking Module, now press the Cancel button located again on the right top.
As a last step before the Google analytics is set-up on the Joomla you need to enable the plugin to do you need to press over the tick left sided from the text reading Google Analytics Tracking Module in the Module Manager
e. Click over the Enabled button in Module Manager;
Google Analytics Tracking Module -> Enabled

6. Itprism (Facebook, Twitter etc.) Social Network share buttons Joomla plugin

ITPShare Large Social Buttons Joomla

a. to add the itpsocialbuttons to joomla Download the Itpsocialbuttons latest module files from http://itprism.com/free-joomla-extensions/social-buttons-plugin or use my mirrored module files below:

Download mod_itpsocialbuttons .zip file
Download plg_itpsocialbuttons .zip

After having the two files necessery to be installed to make the ITPSocialButtons appear on website, installation is done like with any other installation:

Extensions -> Install/Uninstall -> Upload Package File (Choose File)

Next its necessery to configure the plugin to do so, follow to menus:

Extensions -> Module Manager -> Share

You will notice the Share dialog in the list of Module Name column in Module Manager

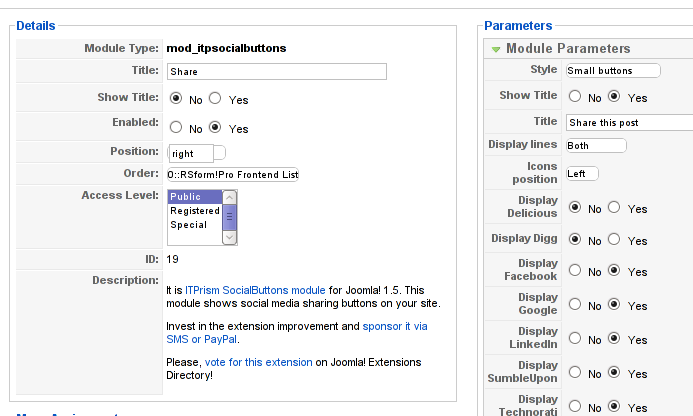
Here is a screenshot on how the settings options for ITpsocialbuttons will look like:

Mod ITpSocialButtons settings screen

The options which I personally changed was:

Show Title – I set this one to No as I wanted to omit the plugin title text to appear on my website.
Further on I’ve set the Enabled option to Yes to enable the plugin and choose the buttons Style option to be of a Small buttons type.
I’ve also found that the most suitable position for the Social Share buttons were to be of a right – Position .

Here is how the social network itprism share buttons looks like:

ITprism Joomla Social Share Plugin various button types

The plugin supports sharing of joomla pages to the following list of social networks:
 

  • Delicios.com
  • Digg.com
  • Facebook
  • Google Bookmarks
  • StumbleUpon
  • Technorati
  • Twitter
  • LinkedIn

The module configuration, also allows the user to configure the type of social network buttons, one wants to display on the website.

7. Joomla JCE Content Editor

This content editor is really awesome compared to the default editor TinyMCE. If you want to have an options rich content editor for Joomla, then this is the one for you 🙂
download JCE Content Editor here

After installing the JCE Joomla content editor in order to enable it as a default editor you need to go to the following location:

Site -> Global Configuration -> Default WYSIWYG Editor

There place on Editor TinyMCE and change it with Editor – JCE

Now go to edit some article, and you will see the difference in the editor 🙂

8. Add gallery Joomla capabilities with sigplus (Image Gallery Plus) and Very Simple Image Gallery

Image Gallery Plus sigplus Joomla Screenshot

Image Gallery Plus plugin (sigplus) gallery review screenshot

sigplus Image Gallery Plus is a straightforward way to add image or photo galleries to a Joomla article with a simple syntax. It takes a matter of minutes to set up a gallery but those who are looking for a powerful gallery solution will not be disappointed either: sigplus is suitable for both beginner and advanced users.

Download Sigplus Joomla Image Gallery plugin here
Using sigllus is quite easy all one has to do is use Joomla Media Manager from links:

Site -> Media Manager

Create new folder in the stories folder, let’s say New Pictures and further on use Media Manager to upload all desired pictures to be later displayed.

Being done with uploading the images you want to display, go to Article Manager :

Content -> Article Manager

From there choose your article where new uploaded pictures you want to display and type in the article:

{gallery}New Pictures{/gallery}.

Note that New Pictures is the directory just recently created as stated below, it’s important that there is no spacing between {gallery}and New Pictures, if one tries {gallery} New Pictures {/gallery} instead of {gallery}New Pictures{/gallery} an error will occur instead of the pictures being displayed in a scrolled gallery.

Sigplus Image Gallery has also a number of configuration options, which might make it look a bit more decent.
I have to say in my view the default way sigplus displays pictures is awful!

Another alternative if you don’t like Sigplus ‘s way of creating new galleries is to use Very Simple Image Gallery

Very Simple Image Gallery joomla screenshot

Here is a screenshot on a sample gallery created with Very Simple Image Gallery Joomla Plugin

You can download Very simple image gallery here

After installing the plugin. It’s use is analogous to the Sigplus . To use it likewise sigplus create new directory through Media Manager and in stories and upload your files in let’s say New Pictures1 . Later on in your article place, the code

{vsig}New Pictures1{/vsig}

Gallery will be generated automatically by the plugin. I think Simple Image Gallery is a bit more advanced and gives a better outlook to Galleries, though it’s configuration settings are much less than with SigPlus image gallery.

To add pictures comments e.g. img link alt=” and title=” tib you need to place a code within the Article manager similar to:

{vsig_c}0|Picture_1.JPG|Some sample text|Some other text{/vsig_c}
{vsig_c}0|Picture_2.JPG|Some example text|Some text{/vsig_c}
etc. ..

Note that the 0 in above example specifies the gallery number if you for instance are using a couple of galleries with Simple Image Gallery , the first one you used would be call 0 . The text specified as comments to the picture will also appear after you preview the gallery right below the picture when clicked on as a picture description in a really nice way.
9. Install Google maps plugin for Joomla

Google Maps plugin for Joomla screenshot

It’s a wise idea that every website has a location map on it’s website, for that reason Google maps is just great.
To install Google maps capability to joomla one can use a plugin called Google Maps .

You can straighly download Joomla’s Googlemap plugin from here

Afterwards use Extension Manager to install the plugin e.g. follow:

Extensions -&gr; Install/Uninstall (Choose File)

and click on Upload File & Install button.

To further enable and configure the Joomla Googlemap plugin you will have to go to the location:

Extensions -> Plugin Manager

Therein you will have to find and enable the Google Maps plugin which is to be found in the column named Plugin Manager
On my Joomla installation the plugin was located in the second page with modules, so if you don’t find the module on the listing with modules on the first page, make sure you scroll to the bottom of the page and click on Next button.

Therein in the list you will most likely notice Google Maps use the Enable button to enable it.

Next step is to configure the plugin, to do so press on the plugin name Google Maps
All configuration necessery here is to place Googlemaps API Key in the respective field (you will see it among config options).

Issuing a new Google Maps api key takes just few seconds, if you already have a gmail account just go to http://code.google.com/apis/maps/signup.html and take few seconds to issue the key.

You will get the key right on your gmail account after being issued (to repeat myself issuing takes few seconds so no worrier here).

One moreOnce having the key place it in the Googlemaps API Key field and configuring Address (which is one of the list of many options the plugin provides) you will be done with configuration.

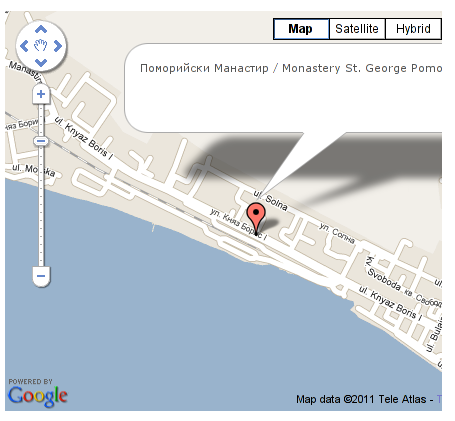
To display a google map the location you just configured go to the Article Manager , select the article where you want the google maps location picture of your address to appear and type in the Article:

{mosmap|text='Exact street address location'|zoom='15'|zoomType='Large'|zoomNew='0'}

After you save the article a very nice Google map showing you the location’s streets will appear.
You can further conifgure a number of things related to the google map to appear, one thing you might want to play with is the zoom option which as you see in below’s code is equal to 15, e.g. zoom=’15’
Set it to another one if you want to regulate your googlemaps zoom level. For more thoroughful options take a look at the extensive plugin documentation.

10. Joomla Xmap (generating static HTML sitemap) Download Xmap from here , install it the usual plugin way.

Right after installation on the plugin succesful install screen you will notice the link component menu .
Clicking on the component menu you will be leaded to a page showing you few links Sitemap’s URL :
 

  • XML Sitemap:
  • HTML Sitemap:
  • News Sitemap:
  • Images Sitemap:

11. Add Joomla donate Paypal capabilities with Joomla PAYPAL DONATION MODULE

Paypal Donation Module Joomla Screenshot

Just recently I’ve written a a post on how to add a paypal donation capabilities to joomla, you can read my previous post here

12. Install Joomla RSForms Module (Advanced Joomla Forms Support)

Simple Joomla RsForm contact form

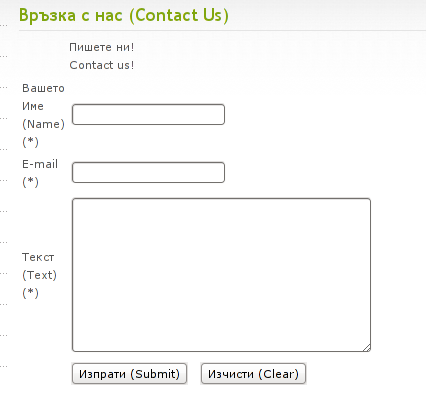
If you’re planning to add a complicated form support for Joomla, there are plenty of plugins, however one that was suggested by a friend of mine which is deep in Joomla world and moreover works good on my joomla installations is RSForms

Joomla – RSForms! is free to download and has great and easy interface to create new joomla forms.

At the time of writting I use these three RSForms components on new Joomla installations:

RSform Pro 1.1.0 com
Mod RsForm for Joomla 1.5
Mod Rsform list for Joomla

For latest release of RSForms! use the link http://www.rsjoomla.com/joomla-components/rsform.html

Installation is like any other module and is done through Extensions -> Install/Uninstall menu.

After installation, setting up a new form is available from the Joomla Menus:

Components -> RSform!Pro -> Manage Forms

I would not enter in details on how to edit the default RSForms or create a new RSForm. Just take some time and learn it by trying 😉

After the rsform is ready, to enable the new form, navigate to Joomla menus:

Menus -> Main Menu

Press the New button located in the buttons bar nearby the page header in the list of options in Select Menu item Type you will notice the RSForm!Pro as an option, press on it to establish the new form in the menus.

A follow up window will appear where one can set a Title: and Alias: for the new form as well as few other options.
After finalizing the settings press on Apply button to save the settings and the new form should appear in Joomla.

Probably there are many more handy plugins, which I’m missing here thus I’ll be glad if readers suggest some more helpful essential (must have plugins) for Joomla.
Feedback on this tutorial is very welcome!
Looking forward to hear for your opinions if my article was helpful to you 😉

Screenshot expanded menus on GNOME / KDE in Linux and BSD desktop

Thursday, June 19th, 2014

take-screenshot-of-expanded-menu-window-in-linux-and-freebsd-howto

If you're using actively Linux or FreeBSD on Desktop PC and experimenting with software, taking personal notes, developing software for Linux, writting documentation, participating in free software community etc., you will certainly need use screenshot heavily.

Taking a screenshot in Linux is done in same way as in any modern operating system by using the Print Screen (PrtScr) button, however there are few Nuts & Bolts of Linux screenshotting, to take advantage of full power of screenshot creation (i.e. be able to do some screenshot customization) which are not offered by default screenshot utilities (GNOMEgnome-screenshot and KDE's KSnapshot)

Here are few useful Linux /BSD Screenshot Tips and Tricks:


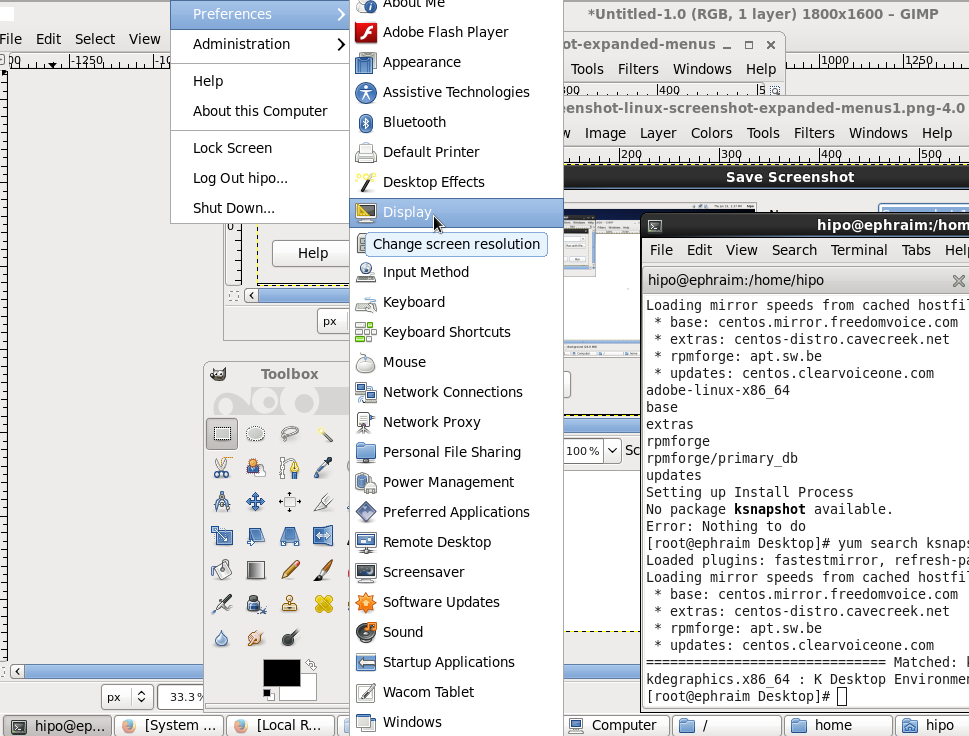
If you have done screenshots of Linux running programs more than few times already, you have probably noticed the usual way to screenshot by pressing Print Screen (PrtScr) button to take snapshot of the expanded GNOME / KDE menu is not working. In that order of thought you probably wondered whether it is possible to take a screenshot of an expanded menus? As a Linux user, I've been asking myself this question too, and feeling irritated that  I cannot prepare screenshot of a GNOME running application expanded menu. I've found two ways (though there are probably many more to make screenshot of an expanded Linux menu). Here is how:
 

Create screenshot of running application expanded menus
 

1. Taking screenshot of expanded menu using the command line

As with everything in Linux, there aremultiple ways to make screenshot of expanded Linux menus.

  • Make timed screenshot of the screen scheduled to screenshot after a set number of seconds.

The quickest way for to screenshot expanded menu is to use gnome-panel-screenshot or ksnapshot from command line. It is interesting pressing Prt Sc kbd button in GNOME invokes gnome-screenshot and in KDE uses ksnapshot


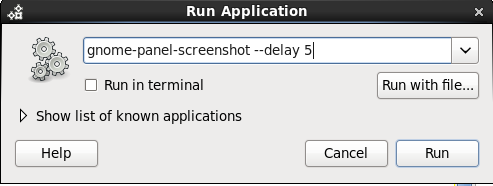
gnome-panel-screenshot --delay 5


To not spend time running it from gnome-terminal (in GNOME desktop), press Alt+F2 (simultaneously) and use the Run Application command shortcut.

gnome-panel-screenshot-linux-screenshot-expanded-menus

This will instruct Screenshot utility to wait for 5 seconds before capturing your desktop this should be enough time for you to go to navigate to expanded menu which you want to get screenshotted.

gnome-panel-screenshot-linux-screenshot-expanded-menus1

  • Make timed screenshot of the screen in GUI with GIMP


trisquel-free-software-linux-screenshot-gimp-create-screenshot-with-timing-take-screenshot-of-expanded-menu-on-linux-bsd

(If you're wonderhing what kind of Linux is on screenshot – this is Trisquel – Run Free! GNU / Linux. It is a Spanish distribution focused on providing 100% free software in it – without proprietary firmware or software. Trisquel is based on Debian and uses the dpkg / apt-get package managers. Trisquel is a recommended Linux to use by Richard Stallman and The Free Software Foundation).
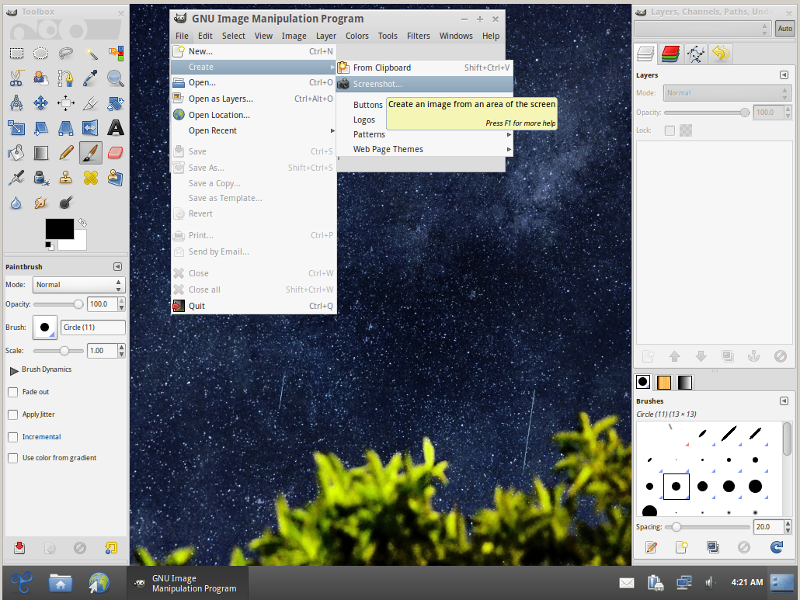
To make timed screenshot with GIMP use menus:


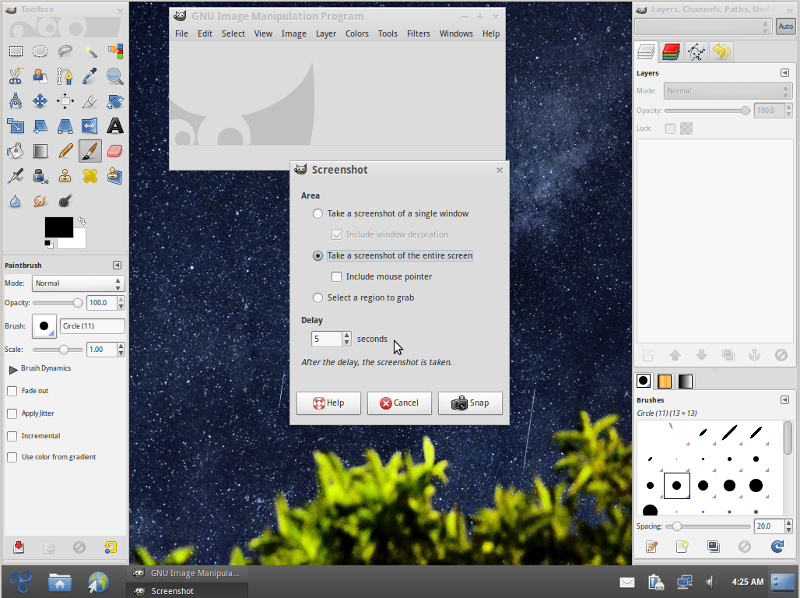
File -> Create -> Screenshot


linux-screenshot-gimp-create-screenshot-of-expanded-menus-in-gnome-kde-on-linux-bsd

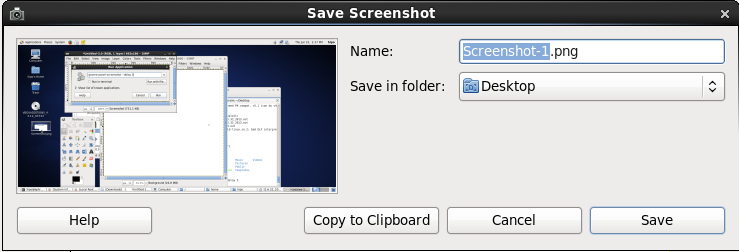
Chosee whether you want to Take screenshot of the entire screen or a Region to Grab and set your wanted Delay

Screenshot will be prepared on $HOME/Desktop, after set time.

Workrave – Preverve health from RSI (Computer caused Repetitive Strain Injury) on Linux and Windows

Tuesday, June 25th, 2013

Prevent and heal repetitive strain injury RSI with workrave on Windows and Linux

Huge part of people professions nowadays includes being in front of PC Screen for almost a day. Staying on computer is addictive and even after job is done many people came back in front of the PC screen to play some games or just read something. Many might not know that this computer hanging is a costly thing as it slowly reflects negative our health and living balance. For geeky people who work in IT profession the threat is even bigger as we ITs tend to spend even more time in front of computers. The risk therefore for catching RSI (Repetitive Strain Injury), whether you have to deal with computers daily is very real.

For those who hear for RSI for first time, here is what it is as described in Wikipedia:
 

Repetitive strain injuries (RSIs) are "injuries to the musculoskeletal and nervous systems that may be caused by repetitive tasks, forceful exertions, vibrations, mechanical compression, or sustained or awkward positions"

For more on RSI check out Wikipedia Article here.

Thanksfully RSI is possible to reverse as well as prevent by giving regular breaks from computer screen on timely base and even can be configured to limit time you will spend on the PC. 

Just recently I found out about existence of  Workrave – program which helps you in reminding, when you have to give breaks from computer and makes you limit yourself on how long you use the PC.

Workrave is available for both Windows and Linux OS.

debian:~# apt-cache show workrave | grep -i description -A 3

Description-en: Repetitive Strain Injury prevention tool
 Workrave is a program that assists in the recovery and prevention of
 Repetitive Strain Injury (RSI). The program frequently alerts you to
 take micro-pauses, rest breaks and restricts you to your daily limit.

To give it a try on Debian / Ubuntu Linux, install with usual:

debian:~# apt-get install --yes workrave
...

Launch it by running:

hipo@debian:~$ workrave

or via GNOME menus:

Applications -> Universal Access -> Workrave

Once launched Workrave applet appears right on in GNOME main panel. Below is screenshot of it.
Workrave applet in Gnome debian Linux screenshot

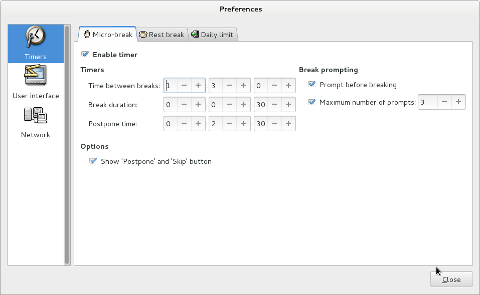
Clicking on the sheep image, there are plenty of configuration menus from which to choose how Workrave will further behave. Its default behavior is quite agressive and suggests breaks too often so if you choose to follow default configuration you will quickly be bored and probably remove it from computer. Hence re-configuring Workrave to remind for breaks every one hour is a good timing in my opinion:

Configuring workrave to remind for breaks from computer every one hour screenshot

Workrave time for micro break screenshot


Workrave includes reminder with neck movement exercises, which if followed can severely de-stress and keep your neck healthy.

workrave prevent repetitive strain injury neck exercises screenshot gnu / linux

workrave prevent repetitive strain injury neck exercises screenshot gnu / linux and windows

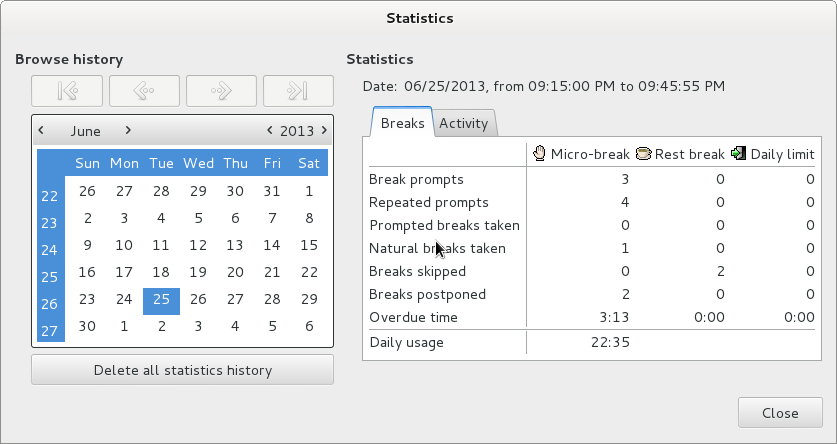
The program has even statistics on how much breaks you take, how long it was used and various other interesting info, below is screenshot from statistics window:

Workrave usage statistics GNU Linux screenshot


Linux: Configure Midnight Commander to use mcedit instead of nano or vi text editor

Friday, June 21st, 2013

reverting mc text editor to mcedit fix problem with mcedit not working in linux

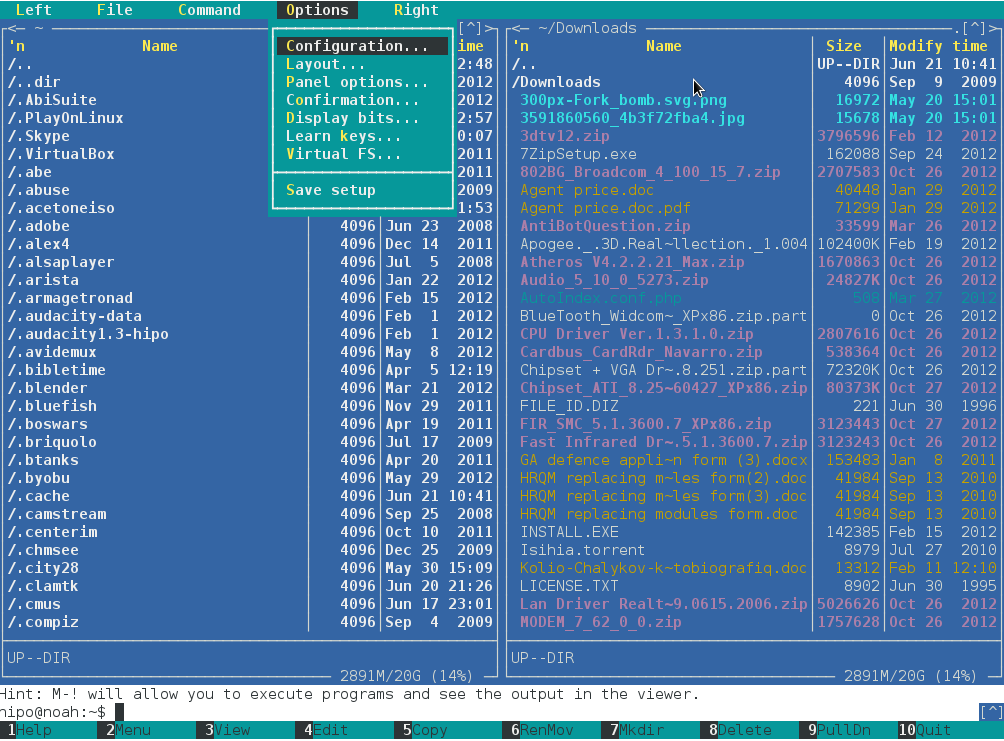
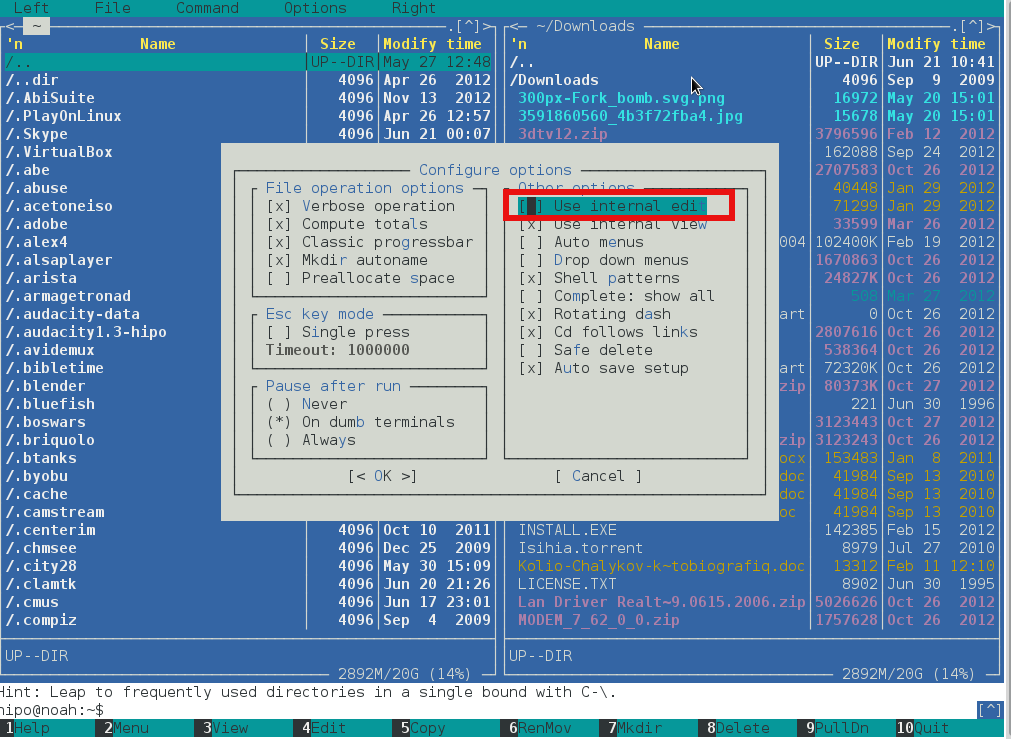
I use Midnight Commander console file manager on any UNIX like servers, since my early days as system administrator. mc comes with its own text editor mcedit which is often very handy for reading config files or pieces of source code. Many times I had to modify files which were spitting errors which I couldn't track in VIM, jor or whatever text editor had on server at hand and after checking file with mcedit I caught my config or source code mistake. I guess many other admins has similar nice experiences with mcedit Internal file editor of GNU Midnight Commander. Nowadays, I install mostly Debian Linux on new configured servers and using mc to navigate in file system is very useful. I prefer mc to open files for edit with F4 (Edit – kbd shortcut) with its default mcedit, however for some reasons most of Debian / Ubuntu and other Linuxes, nowadays has set global environment text editor to nano. I totally dislike this text editor and like changing mc always to use mcedit. This is done straight from MC menus by:

Pressing F9 -> Going to Options -> Configuration -> (Setting mark on) -> Use Inernal Edit
/code>

unix terminal file manager midnight commander configuration menu screenshot

linux console file manager midnight commander use internal edit menu unchecked screenshot

<

Show / Restore missing Gimp 2.8 Toolbox Menu on Debian Wheezy 7.0 Linux

Tuesday, May 28th, 2013

After installing latest Debian Wheezy Linux on my Lenovo Thinkpad Notebook. One of first packages after very basic GNOME install was of course GIMP.

I edit images with GIMP mostly on daily basis, so life without GIMP is impossible…
Debian 7 comes with shiny new version of GIMP – GIMP 2.8. So far so good, but the problem is when started it for a first time, the default configuration is made in a way that it miss essential Gimp Panel Window (The Toolbox Window). Missing Brushes and selectors, move, scissors etc. is something really terrible.

My first guess was I can display it somehow from GIMP's View menu but after few minutes of try/errs I figured out this is not possible.

One menu I managed to displayed Toolbox in some mostly unusubale form, since they were not fitting well my 1024×768 resolution screen is via menus:

Windows -> Toolbox

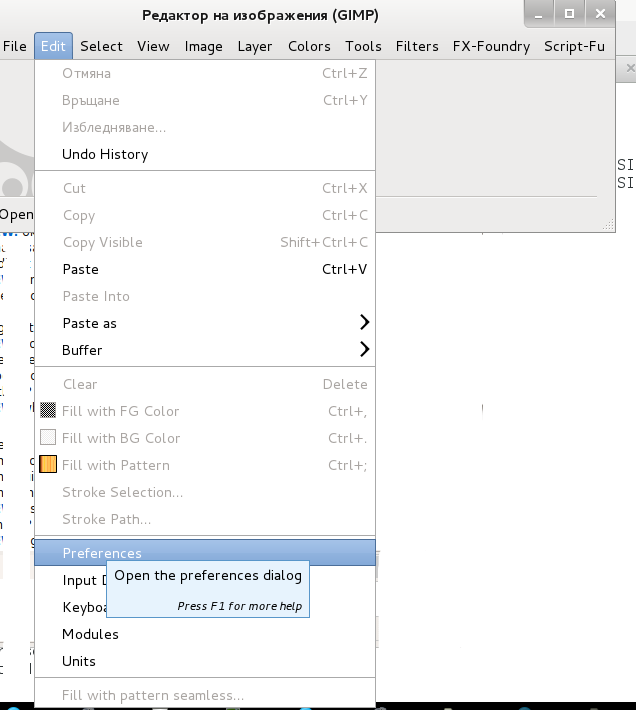
Since this wasn't what I was looking for I spend some 10 minutes until I finally found "the fix". from menus:

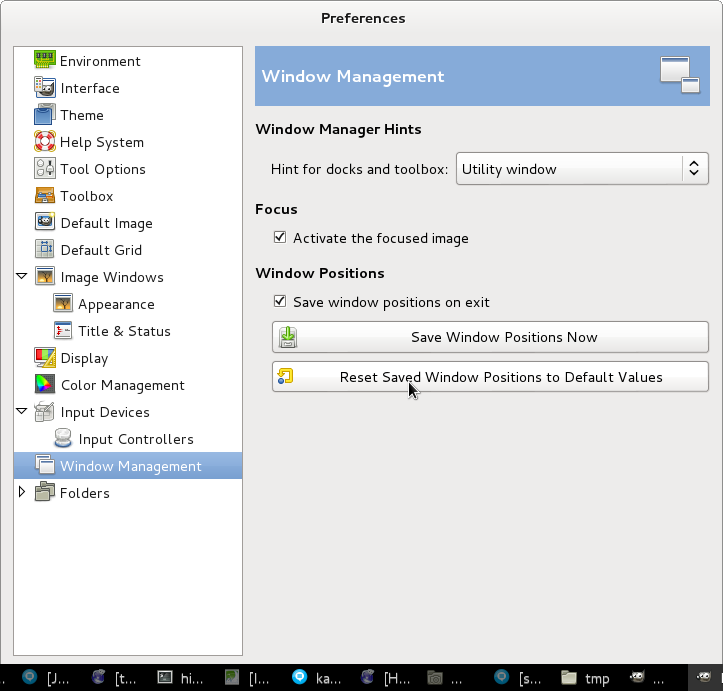
Preferences -> Window Management -> Reset Saved Window Positions to Default Values

gimp 2.8 preferences menu screenshot debian gnu linux 7 wheeze screenshot

gimp 2.8 preferences menu restore saved window position to default values screenshot / display missing GIMP menus

How to manually disable Windows Genuine Advantage on Windows XP SP2

Wednesday, May 25th, 2011

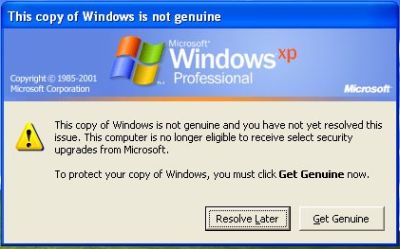
WGA Notification message popup message

I have a pirate version of Windows XP Pro 2 installer CD which does automatically turn on Windows Genuine Advantage

This is kind of annoying as the computer gets really slow and the hard disk drive activite gets intensive as well as an annoying popup message that the Windows XP copy is not genuine does appear periodically

In order to get rid of the message I had to do the following steps:

1. Get into Windows Safe Mode without Networking

As most of the people knows this is achieved by pressing F8 keyboard key right before the Windows bootup screen appears.

After in Safe mode it’s necessery to,

2. Run Windows Command Line (cmd.exe)

To do so follow, the menus:

Windows (Start Menu) -> Run -> cmd.exe

3. In the command prompt window issue the commands:

C:Documents and SettingsUser> cd WindowsSystem32
C:WindowsSystem32> taskkill -IM wgatray.exe
C:WindowsSystem32> del wgatray.exe
C:WindowsSystem32> move wgalogon.dll wgalogon.dll.old
C:WindowsSystem32> del wgalogon.dll.old

Something to mention is you have to be really quick, with deleting wgalogon.dll, cause wgatray.exe is scheduled to run every 1 / 2 seconds 🙂 It is a bit of situation of type “be quick or be dead” as Maiden used to sing 🙂
A Windows system restart and Hooray the Windows Genuine message is gone 🙂

deb Linux: How to add support for Bulgarian, Russian, Belarusian, Ukrainian, Serbian, Macedonian, Bosnian language cyrillic localization to Xfce, GNOME, KDE Desktop

Monday, March 18th, 2013

If just installed Ubuntu or Xubuntu and choose as a default language English by mistake and you happen to live in Bulgaria, Russia, Ukraine, Belarus or any other cyrillic speaking / writting country and you want to make the desktop graphical environment to display menus in mother language Cyrillic. Here is how;

To add cyrillic localization, native support in GUI environment for major Dsektop Graphic Environments (XFCE, GNOME, KDE …) run in terminal:

For Bulgarian Cyrillic language Desktop support:

linux:~# apt-get install language-pack-bg

Четене на списъците с пакети… Готово
Изграждане на дървото със зависимости      
Четене на информацията за състоянието… Готово
Следните допълнителни пакети ще бъдат инсталирани:
  firefox-locale-bg language-pack-bg-base
Следните НОВИ пакети ще бъдат инсталирани:
  firefox-locale-bg language-pack-bg language-pack-bg-base
0 актуализирани, 3 нови инсталирани, 0 за премахване и 2 без промяна.
Необходимо е да се изтеглят 0 B/1048 kB архиви.
След тази операция ще бъде използвано 3533 kB допълнително дисково пространство.
Искате ли да продължите [Y/n]? Y
Selecting previously unselected package language-pack-bg-base.
(Reading database … 287291 files and directories currently installed.)
Unpacking language-pack-bg-base (from …/language-pack-bg-base_1%3a12.04+20130128_all.deb) …
Selecting previously unselected package language-pack-bg.
Unpacking language-pack-bg (from …/language-pack-bg_1%3a12.04+20130128_all.deb) …
Selecting previously unselected package firefox-locale-bg.
Unpacking firefox-locale-bg (from …/firefox-locale-bg_19.0.2+build1-0ubuntu0.12.04.1_i386.deb) …
Processing triggers for software-center …
Updating software catalog…this may take a moment.
INFO:softwarecenter.db.pkginfo_impl.aptcache:aptcache.open()
Software catalog update was successful.
Инсталиране на firefox-locale-bg (19.0.2+build1-0ubuntu0.12.04.1) …
Инсталиране на language-pack-bg (1:12.04+20130128) …
Инсталиране на language-pack-bg-base (1:12.04+20130128) …
Generating locales…
  bg_BG.UTF-8… up-to-date
Generation complete.
 

Two packages language-pack-bg and language-pack-bg-base packages add to system localization files which in Linux are in the format of .mo files. Here is list of 2 packs file content:


linux:~# dpkg -L language-pack-bg

/.
/usr
/usr/share
/usr/share/doc
/usr/share/doc/language-pack-bg
/usr/share/doc/language-pack-bg/copyright
/usr/share/doc/language-pack-bg/changelog.gz
/usr/share/locale-langpack


linux:~# dpkg -L language-pack-bg-base

/.
/usr
/usr/share
/usr/share/doc
/usr/share/doc/language-pack-bg-base
/usr/share/doc/language-pack-bg-base/copyright
/usr/share/doc/language-pack-bg-base/changelog.gz
/usr/share/locale-langpack
/usr/share/locale-langpack/bg
/usr/share/locale-langpack/bg/LC_MESSAGES
/usr/share/locale-langpack/bg/LC_MESSAGES/Linux-PAM.mo
/usr/share/locale-langpack/bg/LC_MESSAGES/pidgin.mo
/usr/share/locale-langpack/bg/LC_MESSAGES/findutils.mo
/usr/share/locale-langpack/bg/LC_MESSAGES/mutt.mo
/usr/share/locale-langpack/bg/LC_MESSAGES/help2man.mo
/usr/share/locale-langpack/bg/LC_MESSAGES/pppconfig.mo
/usr/share/locale-langpack/bg/LC_MESSAGES/jade.mo
/usr/share/locale-langpack/bg/LC_MESSAGES/recode.mo
/usr/share/locale-langpack/bg/LC_MESSAGES/wdiff-gnulib.mo
/usr/share/locale-langpack/bg/LC_MESSAGES/software-properties.mo
/usr/share/locale-langpack/bg/LC_MESSAGES/grub.mo
/usr/share/locale-langpack/bg/LC_MESSAGES/cracklib.mo
/usr/share/locale-langpack/bg/LC_MESSAGES/ggzcore.mo
/usr/share/locale-langpack/bg/LC_MESSAGES/libapt-inst1.4.mo
/usr/share/locale-langpack/bg/LC_MESSAGES/system-service.mo
/usr/share/locale-langpack/bg/LC_MESSAGES/gwibber-service-sohu.mo
/usr/share/locale-langpack/bg/LC_MESSAGES/mlocate.mo
/usr/share/locale-langpack/bg/LC_MESSAGES/lynx.mo
/usr/share/locale-langpack/bg/LC_MESSAGES/dnsmasq.mo
/usr/share/locale-langpack/bg/LC_MESSAGES/apparmorapplet.mo
/usr/share/locale-langpack/bg/LC_MESSAGES/gettext-tools.mo
/usr/share/locale-langpack/bg/LC_MESSAGES/binutils.mo
/usr/share/locale-langpack/bg/LC_MESSAGES/hello.mo
/usr/share/locale-langpack/bg/LC_MESSAGES/quota.mo
/usr/share/locale-langpack/bg/LC_MESSAGES/ld.mo
/usr/share/locale-langpack/bg/LC_MESSAGES/libvisual-0.4.mo
/usr/share/locale-langpack/bg/LC_MESSAGES/friendly-recovery.mo
/usr/share/locale-langpack/bg/LC_MESSAGES/gnupg2.mo
/usr/share/locale-langpack/bg/LC_MESSAGES/git-gui.mo
/usr/share/locale-langpack/bg/LC_MESSAGES/bash.mo
/usr/share/locale-langpack/bg/LC_MESSAGES/apturl.mo
/usr/share/locale-langpack/bg/LC_MESSAGES/sharutils.mo
/usr/share/locale-langpack/bg/LC_MESSAGES/ubuntuone-control-panel.mo
/usr/share/locale-langpack/bg/LC_MESSAGES/pulseaudio.mo
/usr/share/locale-langpack/bg/LC_MESSAGES/hello-debhelper.mo
/usr/share/locale-langpack/bg/LC_MESSAGES/hunspell.mo
/usr/share/locale-langpack/bg/LC_MESSAGES/dctrl-tools.mo
/usr/share/locale-langpack/bg/LC_MESSAGES/gwibber-service-sina.mo
/usr/share/locale-langpack/bg/LC_MESSAGES/popt.mo
/usr/share/locale-langpack/bg/LC_MESSAGES/powertop.mo
/usr/share/locale-langpack/bg/LC_MESSAGES/xdiagnose.mo
/usr/share/locale-langpack/bg/LC_MESSAGES/ubuntuone-client.mo
/usr/share/locale-langpack/bg/LC_MESSAGES/gettext-runtime.mo
/usr/share/locale-langpack/bg/LC_MESSAGES/debian-tasks.mo
/usr/share/locale-langpack/bg/LC_MESSAGES/nano.mo
/usr/share/locale-langpack/bg/LC_MESSAGES/lvm2.mo
/usr/share/locale-langpack/bg/LC_MESSAGES/ecryptfs-utils.mo
/usr/share/locale-langpack/bg/LC_MESSAGES/duplicity.mo
/usr/share/locale-langpack/bg/LC_MESSAGES/ubuntu-wallpapers.mo
/usr/share/locale-langpack/bg/LC_MESSAGES/dselect.mo
/usr/share/locale-langpack/bg/LC_MESSAGES/debconf.mo
/usr/share/locale-langpack/bg/LC_MESSAGES/mountall.mo
/usr/share/locale-langpack/bg/LC_MESSAGES/JabberBot.mo
/usr/share/locale-langpack/bg/LC_MESSAGES/net-tools.mo
/usr/share/locale-langpack/bg/LC_MESSAGES/apport.mo
/usr/share/locale-langpack/bg/LC_MESSAGES/libidn.mo
/usr/share/locale-langpack/bg/LC_MESSAGES/newt.mo
/usr/share/locale-langpack/bg/LC_MESSAGES/tar.mo
/usr/share/locale-langpack/bg/LC_MESSAGES/gnupg.mo
/usr/share/locale-langpack/bg/LC_MESSAGES/coreutils.mo
/usr/share/locale-langpack/bg/LC_MESSAGES/make.mo
/usr/share/locale-langpack/bg/LC_MESSAGES/libapt-pkg4.12.mo
/usr/share/locale-langpack/bg/LC_MESSAGES/kerneloops.mo
/usr/share/locale-langpack/bg/LC_MESSAGES/ldm.mo
/usr/share/locale-langpack/bg/LC_MESSAGES/ufw.mo
/usr/share/locale-langpack/bg/LC_MESSAGES/pidgin-libnotify.mo
/usr/share/locale-langpack/bg/LC_MESSAGES/pppoeconf.mo
/usr/share/locale-langpack/bg/LC_MESSAGES/acl.mo
/usr/share/locale-langpack/bg/LC_MESSAGES/python-apt.mo
/usr/share/locale-langpack/bg/LC_MESSAGES/gutenprint.mo
/usr/share/locale-langpack/bg/LC_MESSAGES/MoinMoin.mo
/usr/share/locale-langpack/bg/LC_MESSAGES/usbcreator.mo
/usr/share/locale-langpack/bg/LC_MESSAGES/launchpad-integration.mo
/usr/share/locale-langpack/bg/LC_MESSAGES/example-content.mo
/usr/share/locale-langpack/bg/LC_MESSAGES/avahi.mo
/usr/share/locale-langpack/bg/LC_MESSAGES/transmission-gtk.mo
/usr/share/locale-langpack/bg/LC_MESSAGES/xkeyboard-config.mo
/usr/share/locale-langpack/bg/LC_MESSAGES/dpkg-dev.mo
/usr/share/locale-langpack/bg/LC_MESSAGES/libgpg-error.mo
/usr/share/locale-langpack/bg/LC_MESSAGES/human-theme.mo
/usr/share/locale-langpack/bg/LC_MESSAGES/grep.mo
/usr/share/locale-langpack/bg/LC_MESSAGES/sane-backends.mo
/usr/share/locale-langpack/bg/LC_MESSAGES/NetworkManager.mo
/usr/share/locale-langpack/bg/LC_MESSAGES/libvirt.mo
/usr/share/locale-langpack/bg/LC_MESSAGES/ubuntu-sso-client.mo
/usr/share/locale-langpack/bg/LC_MESSAGES/app-install-data.mo
/usr/share/locale-langpack/bg/LC_MESSAGES/dpkg.mo
/usr/share/locale-langpack/bg/LC_MESSAGES/whois.mo
/usr/share/locale-langpack/bg/LC_MESSAGES/system-config-kickstart.mo
/usr/share/locale-langpack/bg/LC_MESSAGES/gprof.mo
/usr/share/locale-langpack/bg/LC_MESSAGES/zeitgeist.mo
/usr/share/locale-langpack/bg/LC_MESSAGES/shared-mime-info.mo
/usr/share/locale-langpack/bg/LC_MESSAGES/virt-manager.mo
/usr/share/locale-langpack/bg/LC_MESSAGES/bison-runtime.mo
/usr/share/locale-langpack/bg/LC_MESSAGES/wget.mo
/usr/share/locale-langpack/bg/LC_MESSAGES/quilt.mo
/usr/share/locale-langpack/bg/LC_MESSAGES/command-not-found.mo
/usr/share/locale-langpack/bg/LC_MESSAGES/jockey.mo
/usr/share/locale-langpack/bg/LC_MESSAGES/attr.mo
/usr/share/locale-langpack/bg/LC_MESSAGES/ltsp-login.mo
/usr/share/locale-langpack/bg/LC_MESSAGES/kcm_gtk.mo
/usr/share/locale-langpack/bg/LC_MESSAGES/alsa-utils.mo
/usr/share/locale-langpack/bg/LC_MESSAGES/aspell.mo
/usr/share/locale-langpack/bg/LC_MESSAGES/fetchmail.mo
/usr/share/locale-langpack/bg/LC_MESSAGES/man-db-gnulib.mo
/usr/share/locale-langpack/bg/LC_MESSAGES/devscripts.mo
/usr/share/locale-langpack/bg/LC_MESSAGES/xscreensaver.mo
/usr/share/locale-langpack/bg/LC_MESSAGES/unity-2d.mo
/usr/share/locale-langpack/bg/LC_MESSAGES/compiz.mo
/usr/share/locale-langpack/bg/LC_MESSAGES/apt.mo
/usr/share/locale-langpack/bg/LC_MESSAGES/gODBCConfig.mo
/usr/share/locale-langpack/bg/LC_MESSAGES/libc.mo
/usr/share/locale-langpack/bg/LC_MESSAGES/plasma_applet_menubarapplet.mo
/usr/share/locale-langpack/bg/LC_MESSAGES/update-manager.mo
/usr/share/locale-langpack/bg/LC_MESSAGES/psmisc.mo
/usr/share/locale-langpack/bg/LC_MESSAGES/screen-resolution-extra.mo
/usr/share/locale-langpack/bg/LC_MESSAGES/unattended-upgrades.mo
/usr/share/locale-langpack/bg/LC_MESSAGES/adduser.mo
/usr/share/locale-langpack/bg/LC_MESSAGES/sysstat.mo
/usr/share/locale-langpack/bg/LC_MESSAGES/checkbox.mo
/usr/share/locale-langpack/bg/LC_MESSAGES/apt-listchanges.mo
/usr/share/locale-langpack/bg/LC_MESSAGES/ubuntuone-installer.mo
/usr/share/locale-langpack/bg/LC_MESSAGES/upstart.mo
/usr/share/locale-langpack/bg/LC_MESSAGES/upower.mo
/usr/share/locale-langpack/bg/LC_MESSAGES/tasksel.mo
/usr/share/locale-langpack/bg/LC_MESSAGES/byobu.mo
/usr/share/locale-langpack/bg/LC_MESSAGES/language-selector.mo
/var
/var/lib
/var/lib/locales
/var/lib/locales/supported.d
/var/lib/locales/supported.d/bg


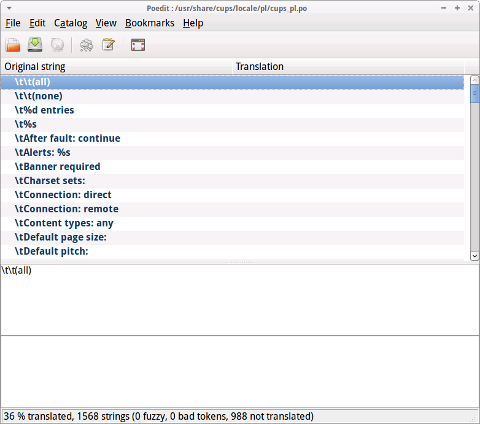
Above .mo files are  binary files, generated from plain text .po / .pod files. In free software OS .po files are the most common language translation files, where for each different language a set of .po files exist. Translators usually translate from English to respective language using a GUI text editor called poedit. Once translation is made from those .po files .mo binaries are generated and shipped as localizations for program or group of programs. Below is edit of one of Polish translation of lang file belonging to CUPS Printing service.

poedit gnu linux xubuntu screenshot editing cups .po language plain text file

Once .po files are created, generation of .mo files can be done in various way, however usually Linux system uses msgfmt – (compile message catalog to binary format). In order to generate .mo file out of lets say cups_pl.po;

hipo@linux:~$ msgfmt cups_pl.so
hipo@linux:~$ ls -al *.mo
-rw-rw-r-- 1 hipo hipo 31988 Mar 18 12:38 messages.mo

Anyways, here is how to add Cyrillic support for rest of Major cyrillic speaking countries, issue;

For Russian Cyrillic language Linux Desktop env support;

linux:~# apt-get install --yes language-pack-ru
...

For Belarusian Cyrillic Linux Desktop;

linux:~# apt-get install --yes language-pack-be

For Linux Desktop in Ukrainian;

linux:~# apt-get install --yes language-pack-uk

For Linux Desktop in Serbian language;

linux:~# apt-get install --yes language-pack-sr
...

For Graphic Environment in Macedonian;

linux:~# apt-get install --yes llanguage-pack-mk
...

For Linux GUI in Bosnian;

linux:~# apt-get install --yes language-pack-bs
...

For Kyrgyz language Linux localization;

linux:~# apt-get install --yes language-pack-ky

Whether, you are using Linux Desktop internationalization on some other Cyrillic related language, which I'm missing here please feel free to drop me a comment how you install it? I