Posts Tagged ‘mount’

CentOS 8 / Redhat 8 insert additional guests additions to VM to enable Fullscreen, Copy / Paste and Shared Folder from host OS

Monday, January 10th, 2022

virtualbox-guest-additions-install-on-centos-8.3-linux-oracle-logo

My experience with enabling virtualbox additions guest tools on many of the separate Linux distributions throughout time is pretty bad as it always is a pain in the ass to enable fully functional full screen and copy paste for Virtualbox…
 
For those who installed it for a first time vbox guest addition tools for Virtualbox are additional software components added so the Emulated Operating system
could allow better screen resolution and better mouse integration support.

So far I've installed virtualbox additions tools to CentOS 7 and Debian Linux various releases and faced complications there as well.
Few days ago my colleague Georgi Stoyanov have installed CentOS 8.3 with current version of VirtualBox 6.1 (vesrsion from beginning of 2022) and he has also shared had issues with enabling the CentOS 8.3 Linux to work with guestadditions but eventually found a resolution.

Thus he has shared with me the solution and I share it with you, so hopefully someone else could enable Guesttools on his CentOS 8.3 with less digging online.
The error received is:

# ./VBoxLinuxAdditions.run

Trying to install Guest Additions in RHEL 8.3.

VirtualBox Guest Additions: Starting.
VirtualBox Guest Additions: Building the VirtualBox Guest Additions kernel
modules. This may take a while.
VirtualBox Guest Additions: To build modules for other installed kernels, run
VirtualBox Guest Additions: /sbin/rcvboxadd quicksetup
VirtualBox Guest Additions: or
VirtualBox Guest Additions: /sbin/rcvboxadd quicksetup all
VirtualBox Guest Additions: Building the modules for kernel
4.18.0-193.el8.x86_64.

VirtualBox Guest Additions: Look at /var/log/vboxadd-setup.log to find out what
went wrong
ValueError: File context for /opt/VBoxGuestAdditions-6.0.20/other/mount.vboxsf already defined
VirtualBox Guest Additions: Running kernel modules will not be replaced until
the system is restarted
Press Return to close this window…

No idea what to do next. Been trying for sometime.


To enable guestaddtions in CentOS 8.3, e.g. get arount the error you have to:


1. Install all necessery dependncies RPMs required by GuestAddition tools


# dnf install tar bzip2 kernel-devel-$(uname -r) kernel-headers perl gcc make elfutils-libelf-devel

# dnf -y install gcc automake make kernel-headers dkms bzip2 libxcrypt-compat kernel-devel perl

2.  Run below semanage and restorecon commands


# semanage fcontext -d /opt/VBoxGuestAdditions-/other/mount.vboxsf
# restorecon /opt/VBoxGuestAdditions-/other/mount.vboxsf


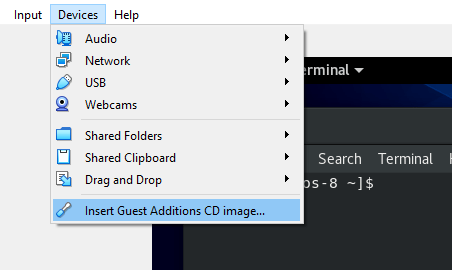
3.  Insert Virtualbox guest additions ISO and Run it


centos-insert-guest-additions-linux-virtualbox-screenshot
 

Devices -> Insert Guest Additions CD Image


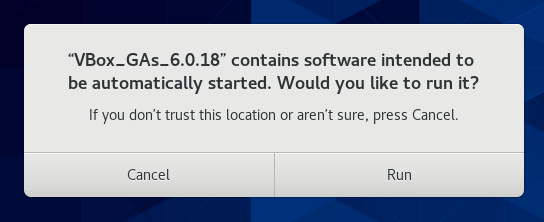
Click Run button to exec Vbox_GAs_6.0.18 script or run it manually

Run-Guest-Additions-screenshot-virtualbox-centos-8

or mount it manually with mount command and execute the VBoxLinuxAdditions.run to do so:


$ cd /run/media/`whoami`/VB*
$ su
# ./VBoxLinuxAdditions.run
Installing additional modules …
VirtualBox Guest Additions: Building the VirtualBox Guest Additions kernel modules.  This may take a while.
VirtualBox Guest Additions: Running kernel modules will not be replaced until the system is restarted
VirtualBox Guest Additions: Starting.


4. Reboot the VM
 

# reboot

5. Check and Confirm Virtualbox guest additions are properly installed and running
 

# lsmod | grep vbox


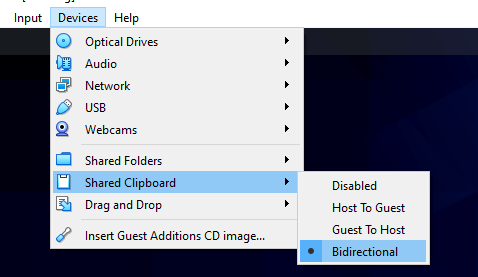
6. Enable Copy / Paste from to Virttual Machine e.g. Shared Clipboard / Shared Folder etc.


Share-Clipboard-in-Virtualbox-screenshot-centos-8


The three options most useful besides the support for FullScreen OS emulation by Virtualbox to enable right after
guesttools is on are:


1. Devices -> Shared Clipboard -> Bidirectional
2. Devices -> Drag and Drop -> Bidirectional
3. Devices -> Shared Folders -> Shared Folder Settings


Saint Martyr Antepas of Pergamum mentioned in the Book of Revelation of saint John the Apostle – 4th Sunday of Great Lent saint John the Climacus

Sunday, April 11th, 2021

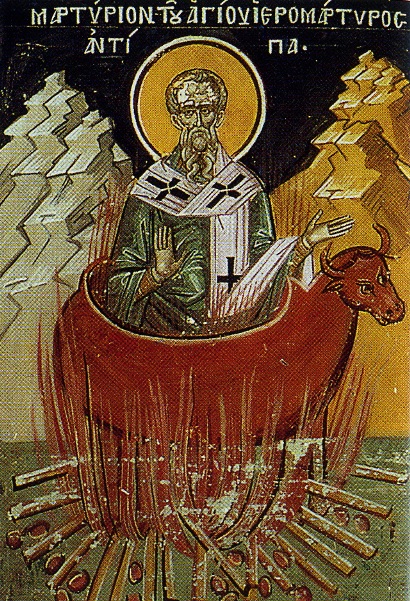
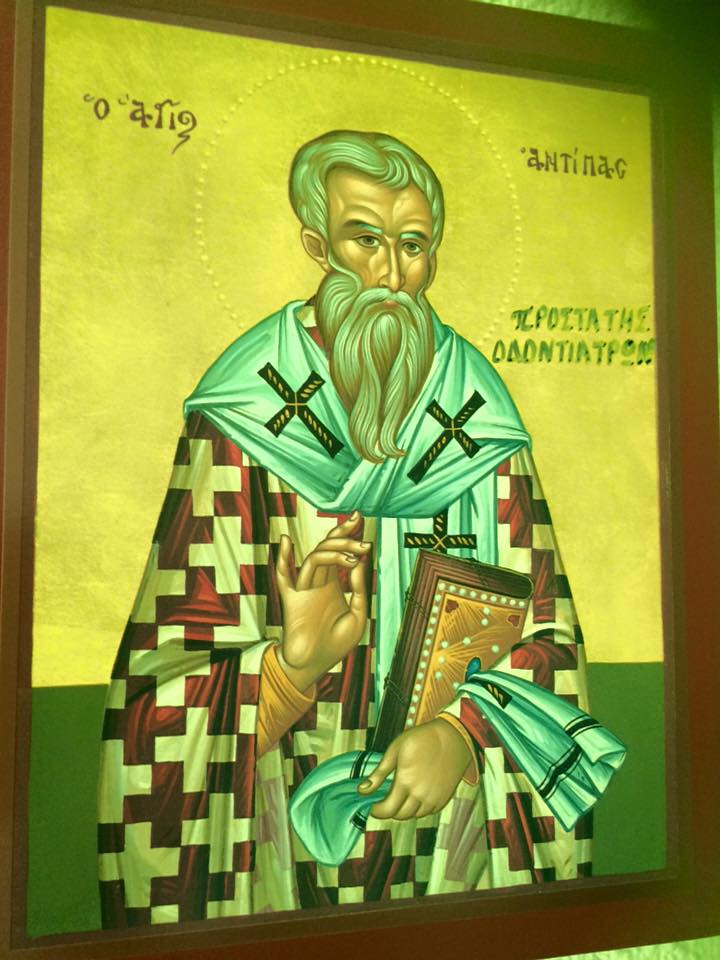
Saint_Antipas-of-Pergamum-burned-in-a-metal-bull

Saint Antepas of Pergamum

Saint Martyr Antepas commemoration in the One Holy Eastern Orthodox Church is on 11 of April. The veneration of this saint in the past centuries was great in both the Eastern Orthodox Church and the Western Church (The Roman Catholic Church), especially before the great schism in 1054. Saint Antepas was well known among people in the medieval times for being a saint invoked in troubles with a toothache and all kind of teech diseases which were a true plague in the prior ages as people did not have much knowledge on how to heal or recover teeths and usually in case when someone got a tooth ache the ultimate solution to remove the teeth. 

His Vitae (Living) is mostly interesting as he is a saint according to Orthodox Church tradition that was one of the spiritual titans in the first century, where the church was mainly troubled by persecusion by the jews who refused Christ as Messiah, by the pagan crowds and starting from second part of I-st century officially persecuted by the Roman Empire authorities. In this bloody century for the Church where martyrs lay down the foundation of the Church many saints become a victims of jewish fanatism and pagans atrocities. Saint Antepas is one of those saints who at that time was a bishop of the Church of Pergamum mentioned in the Prophetic boof The Book of Reveletaion (the last book) of the Holy Bible book cannon that is included in every (protestant, anglican, orthodox, catholic Holy Bible). Saint John the Apostle the author of Book Revalation has been exiled on mount Paphos (today Cyprus) at time of Martyrdom of Saint Antepas. St. John the Apostle while being in the cave exiled, received in a vision by Christ the revelation of the furute things to come before the end of the world and antichrists false messiah appearance. Before his revelation it is not known whether saint John knew physically his brethren in Christ antipas but this hypothesis is little likely as appearance the book of Revelation has been revealed to John in a single vision by The son of God Jesus Christ where in mystical vision in which the merits and the deficiency of the Church has been presented of the 7 Churches of Asia Minor present at the first century in the world. The Church of Pergamum was one of the Seven Churches of which the Revelation speaks which surrounded by all kind of uncleanness, idolatry and satanic deeds of the Pergamum people and this diseases partially started even plaguing members of the Church who with time had fallen away from faith due to their sinful deeds and undesire for repentance. The book of Revelation mentions the martyrdom of Antepas as a truthful witness of Christ who steadily kept the faith in the Risen Christ enduring martyrdom. "I know thy works, and where thou dwellest, even where Satan's seat is: and thou holdest fast my name, and hast not denied my faith, even in those days wherein Antipas was my faithful martyr, who was slain among you, where Satan dwelleth.". Book of Revelations 2:13.
The spiritual State of the Church of Pergamum is described as follows,

"I know thy works, and where thou dwellest, even where Satan's seat is: and thou holdest fast my name, and hast not denied my faith, even in those days wherein Antipas was my faithful martyr, who was slain among you, where Satan dwelleth." Rev. 2:13

Saint-Antepas-of-Pergam-mentioned-on-Book-of-Relevation-by-saint_John-the-apostle


Saint Antepas was a missionary bishop who lived in time of Roman Emperor Domition II-nd, By the Revelations book we found out that in the 1st century the Pergamum Church Bishop has been a pious saintly man firm in his faith. The Church tradition's memory give us a little more details on the Martyrdom of Antepas. 

According to tradition and history. The citizens of Pergamum (Pergam) were fanatic admirers of their pagan idols and spend their life in all kind of wickedness. Those who observed their lives got the impression that among them really lives satan himself. Among such uncleanness Antepas has been a true headlight in the dark night or like a rose among prickles, showing path to salvation through the three Christian main viritues of Faith, Pope and Love. Even though Antepas witnessed people ungodliness, he did not embarass from the malice of pagans, but on the contrary good heartedly and with a diligence performed his Christian obligations of a shepherd and preacher, revealing deceptions of idolatries and advised them to turn better for their good to the Truthful one God the creator and Ruler of Universe who has send his Only Begotten son to Cross on Golgotha to suffer for the sins of man and return the fallen man to the Holy Trinity God the Father the Son and the Holy spirit and by his suffering showing us the narrow but straight way to heaven of the Suffering by accepting one's personal Cross uniting and nailing it to Christ's cross by handing over all one's life to Christ.

Saint_martyr_Antipas-icon-on-Metal-Plate

St. Antepas preaching turned quickly many of the pagns to Christ's Church. The pagans lost many of their faithful admirers, worshippers of the idols decreased highly and the toll for the idols as well (monetary funds for the shamans) in Pagan temple decreases. Antipas was blamed for his missionary work and revealing the truth to the blind by envious and hard-hearted, greedy idolatries.

In the same time Domitian being loyal to the Roman gods also proclaimed a persecution announcing christians as enemies of the empire. Attaining bravery by that the pagan priests catched Antepas and brought him before the city ruler, blaming him that he become a reason for the gods to become angry and as a reason for the so-called idols (thought to be gods) to stop caring about Pergamon in which they no longer received the high honor for their service to the idols.

– Is that true? asked the ruler of Pergamon – that you have been not giving veneration to the gods, and you teach the others to despire the gods and not give them honour? 
This is why our city is suffering because the gods has been offended and no longer have mercy and take care about this place and our well being.
Leave out Christianity repent and give obbey our law. If you do not give honor to the idols and continue to despise the gods, we will torture you according to roman law.

Antipas replied:

– I AM CHRISTIAN ! And the unwise king's orded i cannot perform and to the false gods i will not obey.
To give you a concreate and clear answer I tell you, the so called gods are not gods and they have no power to protect the city.
Leave your delusions, repent for the wickedness and believe in Christ, who embodied from Heaven to save all humans.
He is the only true God and he is about to come again in the end of ages to Judge everyone according to their deeds – everyone will either receive a gift or punishment.


– What is that new teaching shouted enraged the city ruler. You do obey to some new invented by your own law and reject the ancient worships, given us by the fathers. Leave the new faith and stop venerating for God a man who was crucified shamefully as a villain in times of Pilates.
Obey the king order and live in peacefully. We'll help you everything, we'll love you as our sons, because your advanced age requires it – that we all love you and venerate you as a father.

Antepas replied:
– Nomatter what you tell me – I am not that reckless (foolish) for being lived until the old age and being near end of my earthly days, to leave the true faith and to retreat to the salvational faith. You will not deceive my mind because it is enlightened by the wisdom of the Divine books. If you do not repent and do not stop worshipping your idols and you do not believe in the True God you will perish (both physically and spiritually).

Maddened by raged, the pagans crow did not wanted to hear any more the words of the pious elder – bishop. They captured him and drag him to the pagan temple. There was an idol: a big bull, forged by copper. Heating him up till it become red and they throw in the Bishop Antipas. He did not feared but with joy made the Sigh of the Cross and reverently cry out in prayer:

– Oh God,m who have revealed the secret mystery of our our Lord Jesus Christ, thank you for all the good deeds to me in my life. Thank you, you have granted me in that hour to be written in the list of the martyrs for your teaching. Receive my departering from temporary life my soul and engift it with your Grace.

Enduring peacefully and with firmness the terrible torturs, saint Antepas prayed for his enemies and for the whole world. Gradually his bodily powers weakened and he quitly passed to Christ. 
Christians with great honor and according to Church tradition buried the body of the saint martyr. 
His Holy relics were saved and God has engifted them with the healing power. 

Saint-Martyr-Antipas-of_Pergamum

Fourth Sunday of The Great Lent Sunday of Saint John the Climacus.
Saint John Lestvichnik and his Book a Spiritual Ladder to Heaven (Lestvica)


Saint-John-The-Scholastic-Lestvichnik-writting-the-Ladder-guide-book-for-ascending-spiritually-to-heaven

Fourth Sunday of the Great Lent – Saint John Lestvichnik / John the Climacus and his Ladder to Heaven

This year the second year of the "Coronavirus pandemy" 2021 the 4th Sunday of the Great Lent which every year commemorates the glorious Holy father and "a commander" of the Monks Saint John the Climacus / Saint John The Sinaites / John the Scholastic that lived in the 6th-7th century. He is mostly known in Bulgaria / Russia and the Slavonic Churches as Saint John Lestvichnik.  Saint John was ascetic monk on the mount of Sinai born circa 579 and passed away to Christ year. 649 A.D. He is revered a saint in both Eastern Orthodox Church as well as the Roman Catholic Church and the rest of the Oriental Orthodox Churches, though he is lesser known in the in the Western world .e.g in Roman Catholic Church. Saint John eagered for a higher spiritual life and thus has spend 20 years in the desert in hermitage, studying and practicing the writtings of the holy fathers to advance his spiritual life and attain spiritual perfection by overcoming all the main passions that are a stopper for a man to become fully spiritually enlightened and reach "in the flesh" the kingdom of heaven and become a victor against the evil passions.  

Saint-John-the-Climacus-sveti-Ioan-Lestvichnik-orthodox-icon

A lot can be said about saint John Lestvichnik and his world famous book Lestvica (Ladder ) Κλῖμαξ known in Latin world as Scala Paradisi a ladder of divince ascent.

In Lestvica the later chosen Abbot of Raitha Monastery st. John Lesvichnik describes to brethren monks on how to overcome different temptations and the attached moving passions and is well known in his life time for being a light beam for good truthtful spiritual lifesaint John Lestvichnik. Even Pope Gregory the Great wrote to him recommend himself to his prayers, and sent him a sum of money for the hospital of Sinai, in which the pilgrims were wont to lodge.

In the Book Ladder that should be tabletop book for all Christians,we hear of the ascetic practice of carrying a small notebook to record the thoughts of the monk during contemplation. Some parts of the books sounds scary and completely strange for the modern readers as we're all sunken in comfort and excessness of things.
Κλῖμαξ is mostly known in the Eastern Orthodox Church and highly estimated by anyone who actiively practices orthodoxy for being the best guide for a person to check his current spiritual life.


The Ladder describes how to raise one's soul and body to God through the acquisition of ascetic virtues. Climacus uses the analogy of Jacob's Ladder as the framework for his spiritual teaching. Each chapter is referred to as a "step", and deals with a separate spiritual subject. There are thirty Steps of the ladder, which correspond to the age of Jesus at his baptism and the beginning of his earthly ministry. Within the general framework of a 'ladder', Climacus book falls into three sections. The first seven Steps concern general virtues necessary for the ascetic life, while the next nineteen (Steps 8–26) give instruction on overcoming vices and building their corresponding virtues. The final four Steps concern the higher virtues toward which the ascetic life aims. The final rung of the ladder – beyond prayer (προσευχή), stillness (ἡσυχία), and even dispassion (ἀπάθεια) – is love (ἀγάπη).

Let by the prayers of Saint Antepas, Saint John Lesvichnik and Saint John The Apostle, the All Merciful God to have mercy on our Souls and veliver us from temptations and all evils in present and coming and grant peace and relief to all suffering for the truth and enlighten man to turn back in repentance to Christ !
Amen

Howto debug and remount NFS hangled filesystem on Linux

Monday, August 12th, 2019

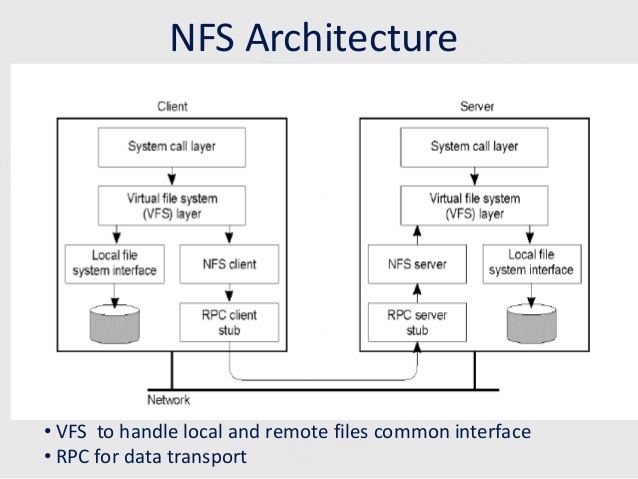
nfsnetwork-file-system-architecture-diagram

If you're using actively NFS remote storage attached to your Linux server it is very useful to get the number of dropped NFS connections and in that way to assure you don't have a remote NFS server issues or Network connectivity drops out due to broken network switch a Cisco hub or other network hop device that is routing the traffic from Source Host (SRC) to Destination Host (DST) thus, at perfect case if NFS storage and mounted Linux Network filesystem should be at (0) zero dropped connectios or their number should be low. Firewall connectivity between Source NFS client host and Destination NFS Server and mount should be there (set up fine) as well as proper permissions assigned on the server, as well as the DST NFS should be not experiencing I/O overheads as well as no DNS issues should be present (if NFS is not accessed directly via IP address).
In below article which is mostly for NFS novice admins is described shortly few of the nuances of working with NFS.
 

1. Check nfsstat and portmap for issues

One indicator that everything is fine with a configured NFS mount is the number of dropped NFS connections
or with a very low count of dropped connections, to check them if you happen to administer NFS

nfsstat


linux:~# nfsstat -o net
Server packet stats:
packets    udp        tcp        tcpconn
0          0          0          0  


nfsstat is useful if you have to debug why occasionally NFS mounts are getting unresponsive.

As NFS is so dependent upon portmap service for mapping the ports, one other point to check in case of Hanged NFSes is the portmap service whether it did not crashed due to some reason.


linux:~# service portmap status
portmap (pid 7428) is running…   [portmap service is started.]


linux:~# ps axu|grep -i rpcbind
_rpc       421  0.0  0.0   6824  3568 ?        Ss   10:30   0:00 /sbin/rpcbind -f -w


A useful commands to debug further rcp caused issues are:

On client side:


rpcdebug -m nfs -c


On server side:


rpcdebug -m nfsd -c


It might be also useful to check whether remote NFS permissions did not changed with the good old showmount cmd

linux:~# showmount -e rem_nfs_server_host


Also it is useful to check whether /etc/exports file was not modified somehow and whether the NFS did not hanged due to attempt of NFS daemon to reload the new configuration from there, another file to check while debugging is /etc/nfs.conf – are there group / permissions issues as well as the usual /var/log/messages and the kernel log with dmesg command for weird produced NFS client / server or network messages.

nfs-utils disabled serving NFS over UDP in version 2.2.1. Arch core updated to 2.3.1 on 21 Dec 2017 (skipping over 2.2.1.) If UDP stopped working then, add udp=y under [nfsd] in /etc/nfs.conf. Then restart nfs-server.service.

If the remote NFS server is running also Linux it is useful to check its /etc/default/nfs-kernel-server configuration

At some stall cases it might be also useful to remount the NFS (but as there might be a process on the Linux server) trying to read / write data from the remote NFS mounted FS it is a good idea to check (whether a process / service) on the server is not doing I/O operations on the NFS and if such is existing to kill the process in question with fuser
 

linux:~# fuser -k [mounted-filesystem]


2. Diagnose the problem interactively with htop


    Htop should be your first port of call. The most obvious symptom will be a maxed-out CPU.
    Press F2, and under "Display options", enable "Detailed CPU time". Press F1 for an explanation of the colours used in the CPU bars. In particular, is the CPU spending most of its time responding to IRQs, or in Wait-IO (wio)?
 

3. Get more extensive Mount info with mountstats


nfs-utils package contains mountstats command which is very useful in debugging further the issues identified

$ mountstats
Stats for example:/tank mounted on /tank:
  NFS mount options: rw,sync,vers=4.2,rsize=524288,wsize=524288,namlen=255,acregmin=3,acregmax=60,acdirmin=30,acdirmax=60,soft,proto=tcp,port=0,timeo=15,retrans=2,sec=sys,clientaddr=xx.yy.zz.tt,local_lock=none
  NFS server capabilities: caps=0xfbffdf,wtmult=512,dtsize=32768,bsize=0,namlen=255
  NFSv4 capability flags: bm0=0xfdffbfff,bm1=0x40f9be3e,bm2=0x803,acl=0x3,sessions,pnfs=notconfigured
  NFS security flavor: 1  pseudoflavor: 0


NFS byte counts:
  applications read 248542089 bytes via read(2)
  applications wrote 0 bytes via write(2)
  applications read 0 bytes via O_DIRECT read(2)
  applications wrote 0 bytes via O_DIRECT write(2)
  client read 171375125 bytes via NFS READ
  client wrote 0 bytes via NFS WRITE

RPC statistics:
  699 RPC requests sent, 699 RPC replies received (0 XIDs not found)
  average backlog queue length: 0

READ:
    338 ops (48%)
    avg bytes sent per op: 216    avg bytes received per op: 507131
    backlog wait: 0.005917     RTT: 548.736686     total execute time: 548.775148 (milliseconds)
GETATTR:
    115 ops (16%)
    avg bytes sent per op: 199    avg bytes received per op: 240
    backlog wait: 0.008696     RTT: 15.756522     total execute time: 15.843478 (milliseconds)
ACCESS:
    93 ops (13%)
    avg bytes sent per op: 203    avg bytes received per op: 168
    backlog wait: 0.010753     RTT: 2.967742     total execute time: 3.032258 (milliseconds)
LOOKUP:
    32 ops (4%)
    avg bytes sent per op: 220    avg bytes received per op: 274
    backlog wait: 0.000000     RTT: 3.906250     total execute time: 3.968750 (milliseconds)
OPEN_NOATTR:
    25 ops (3%)
    avg bytes sent per op: 268    avg bytes received per op: 350
    backlog wait: 0.000000     RTT: 2.320000     total execute time: 2.360000 (milliseconds)
CLOSE:
    24 ops (3%)
    avg bytes sent per op: 224    avg bytes received per op: 176
    backlog wait: 0.000000     RTT: 30.250000     total execute time: 30.291667 (milliseconds)
DELEGRETURN:
    23 ops (3%)
    avg bytes sent per op: 220    avg bytes received per op: 160
    backlog wait: 0.000000     RTT: 6.782609     total execute time: 6.826087 (milliseconds)
READDIR:
    4 ops (0%)
    avg bytes sent per op: 224    avg bytes received per op: 14372
    backlog wait: 0.000000     RTT: 198.000000     total execute time: 198.250000 (milliseconds)
SERVER_CAPS:
    2 ops (0%)
    avg bytes sent per op: 172    avg bytes received per op: 164
    backlog wait: 0.000000     RTT: 1.500000     total execute time: 1.500000 (milliseconds)
FSINFO:
    1 ops (0%)
    avg bytes sent per op: 172    avg bytes received per op: 164
    backlog wait: 0.000000     RTT: 2.000000     total execute time: 2.000000 (milliseconds)
PATHCONF:
    1 ops (0%)
    avg bytes sent per op: 164    avg bytes received per op: 116
    backlog wait: 0.000000     RTT: 1.000000     total execute time: 1.000000 (milliseconds)


nfs-utils disabled serving NFS over UDP in version 2.2.1. Arch core updated to 2.3.1 on 21 Dec 2017 (skipping over 2.2.1.) If UDP stopped working then, add udp=y under [nfsd] in /etc/nfs.conf. Then restart nfs-server.service.
 

4. Check for firewall issues
 

If all fails make sure you don't have any kind of firewall issues. Sometimes firewall changes on remote server or somewhere in the routing servers might lead to stalled NFS mounts.


To use properly NFS as you should know as a minimum you need to have opened as ports is Port 111 (TCP and UDP) and 2049 (TCP and UDP) on the NFS server (side) as well as any traffic inspection routers on the road from SRC (Linux client host) and NFS Storage destination DST server.

There are also ports for Cluster and client status (Port 1110 TCP for the former, and 1110 UDP for the latter) as well as a port for the NFS lock manager (Port 4045 TCP and UDP) but having this opened or not depends on how the NFS is configured. You can further determine which ports you need to allow depending on which services are needed cross-gateway.
 

5. How to Remount a Stalled unresponsive NFS filesystem mount


At many cases situation with remounting stalled NFS filesystem is not so easy but if you're lucky a standard mount and remount should do the trick.

Most simple way to remout the NFS (once you're sure this might not disrupt any service) – don't blame me if you break something is with:
 

umount -l /mnt/NFS_mnt_point
mount /mnt/NFS_mnt_point


Note that the lazy mount (-l) umount opt is provided here as very often this is the only way to unmount a stalled NFS mount.

Sometimes if you have a lot of NFS mounts and all are inacessible it is useful to remount all NFS mounts, if the remote NFS is responsive this should be possible with a simple for bash loop:

for P in $(mount | awk '/type nfs / {print $3;}'); do echo $P; echo "sudo umount $P && sudo mount $P" && echo "ok :)"; done


If you cd /mnt/NFS_mnt_point and try ls and you get

$ ls
.: Stale File Handle


You will need to unmount the FS with forceful mount flag

umount -f /mnt/NFS_mnt_point
 

Sum it up


In this article, I've shown you a few simple ways to debug what is wrong with a Stalled / Hanged NFS filesystem present on a NFS server mounted on a Linux client server.
Above was explained the common issues caused by NFS portmap (rpcbind) dependency, how to its status is fine, some further diagnosis with htop and mountstat was pointed. I've pointed the minimum amount of TCP / UDP ports 2049 and 111 that needs to be opened for the NFS communication to work and finally explained on how to remount a stalled NFS single or all attached mount on a NFS client to restore to normal operations.
As NFS is a whole ocean of things and the number of ways it is used are too extensive this article is just a general info useful for the NFS dummy admin for more robust configs read some good book on NFS such as Managing NFS and NIS, 2nd Edition – O'Reilly Media and for Kernel related NFS debugging make sure you check as a minimum ArchLinux's NFS troubleshooting guide and sourceforge's NFS Troubleshoting and Optimizing NFS Performance guides.


How to make Samba smbfs / cifs mount share location with user / pass credentials authenticate via file stored credentials

Friday, July 19th, 2019

how-to-use-username-and-password-to-authenticate-to-samba-share-server-or-linux-share-server-linux-samba-logo
That's pretty trivial and perhaps if you had to manage samba server or cifs on a Linux host you already know it but for beginners, that might be interesting.

So in this short article I will explain how to make configure smbfs / cifs authentication from Linux host A client to Linux host B server running smbd and nmbd samba server (which is the smfs / cifs share server) by using external authentication file for either mount command or if /etc/fstab used to automatically authenticate using a preconfigured mount saba share via /etc/fstab.

Before you start to do anything with samba on Linux host A client machine, you will need as a minimum to have installed cifs-utils or smbfs (assuming you're on Debian Linux like you can check with dpkg -l and if missing install it via:


apt-get install cifs-utils


Or on older systems or for smbfs support


apt-get install smbfs


The general mount smbfs share command without specified external credentials file would look like so:


mount //mynetworksharename/ /shares/data -o username=myusername, password=mypassword


So how to use external auth file to prevent samba shares  users and passwords to not be stored in root user history all the time?

To do so it is pretty straight forward all you need to do is to create a single user / pass credentials variable defined lets say to file called .smbcredentials or .cifs under some directory lets /root/.smbcredentials.

One note here is (many people prefer to store the password under /root) for security reasons as root directory is usually readable only by administrator and would prevent a non-privileged user to read the user / pass which are stored in plain text.

.smbcredentials is described in mount.cifs man page, here is what it says about credentials variable understood by mount / mount.cifs command  file syntax:


credentials=filename
    specifies a file that contains a username and/or password. The format of the file is:

         username=value
         password=value


For a CIFS (Common Internet File System) which is a new implementation of old Windows Share (SMB protocol) avaiable in newer Windows XP / 7 / 10 machines, to do the cifs mount manually:
 

mount -v -t cifs //WINSHARESERVER/topsecretfiles /mnt/network/ -o credentials=/mnt/creds-file

or use 


mount.cifs //WINSSHARE/topsecretfiles /mnt/network/ -o credentials=/root/.creds-file


For old smbfs protocol for backward compatibility so older Win 2000 or Winblows server XP PCs configured to also access the Linux samba mount.

mount -t smbfs //WINHARESERVER/topsecretfiles /mnt/network/ -o credentials=/mnt/.smbcredentials


Once you have the defined .smbcredentials file name, be sure to also protect it with properly set permissions like 0600 (rw) readable only for root user. 

chmod 0600 /root/.smbcredentials

Note that in that example .smbcredentials is set to be a hidden file on purpose as this is a hidden file it will make it slightly less seenable if introduder breaks on the server (an example of security through obscurity)


Next lets see how to mount the Windows Samba Share permanently with predefined user / pass server login

For many non secured Windows shares one can use /etc/fstab line definition as simple as:
 

//server-share-name/sharename  /mnt/shares/sharename  cifs  guest,uid=1000,iocharset=utf8  0


For password protected Win Share mounts however, the simplest way to do is via /etc/fstab line add like so:


//servername/sharename  /mnt/shares/sharename  cifs  username=msusername,password=mspassword,iocharset=utf8,sec=ntlm  0  0


Note that the sec=ntlm is optional and remote samba server or Windows Share server version has to support this kind of authentication and in some cases you could safely reove sec=ntlm, just use it, when you know what you're doing. iocharset is good to have as for Russian / Bulgarian e.g.  Cyrillic, Chineese, Indian and other exotic languages and other strange language encoding to be supported and properly shown on the mounted share it should be properly defined …, 

A good permissions would be:

chmod 600 ~/.smbcredentials

To use the external /root/.smbcredentials password it shold be like so:


# cat /root/.smbcredentials

username=msusername
password=mssecretpassword
56#


Finally /root/.smbcredentials record should be as so:
 

//share-server-name/sharename /mnt/shares/windowsshare cifs credentials=/home/ubuntuusername/.smbcredentials,iocharset=utf8,sec=ntlm 0 0


Note You should already have

/mnt/shares/windowshare created on server B (the ount client) with:

mkdir -p  /mnt/shares/windowshare


To mount /etc/fstab defined filesystem to mount on next server boot then do

mount /mnt/shares/windowshare


or completely mount / remount all present /etc/fstab filesystems with the common

mount -a


(but here be careful as this might cause you troubles already other NFS or whatever FS is mounted and being read by clients) :

And you the remote Samba Share (mount location) – should be reachable with ping command and traceroute and remote server ports 139, 445 etc. should be up running opened and connectable from server B share-server-name/sharename

If you face some issues when trying to mount remote share with mount -t smbfs / mount.cifs then you can use smbclient with debug option to find out some more on the connectivity / authentication issue by using the smb share server IP address instead of hostnae and lets say a debug level of 3 like so:


smbclient -d3 -L //10.5.8.118/Files -A /root/.smbcredentials

[0] smbclient -d3 -L //10.2.3.111/Files -A /home/acteam/.smbcredentials     lp_load_ex: refreshing parameters
Initialising global parameters
rlimit_max: increasing rlimit_max (1024) to minimum Windows limit (16384)
Processing section "[global]"
WARNING: The "syslog" option is deprecated
added interface eth0 ip=10.2.3.127 bcast=10.2.3.255 netmask=255.255.255.0
Client started (version 4.3.11-Ubuntu).
Connecting to 10.2.3.111 at port 445
Doing spnego session setup (blob length=120)
got OID=1.3.6.1.4.1.311.2.2.30
got OID=1.2.840.48018.1.2.2
got OID=1.2.840.113554.1.2.2
got OID=1.2.840.113554.1.2.2.3
got OID=1.3.6.1.4.1.311.2.2.10
got principal=not_defined_in_RFC4178@please_ignore
GENSEC backend 'gssapi_spnego' registered
GENSEC backend 'gssapi_krb5' registered
GENSEC backend 'gssapi_krb5_sasl' registered
GENSEC backend 'spnego' registered
GENSEC backend 'schannel' registered
GENSEC backend 'naclrpc_as_system' registered
GENSEC backend 'sasl-EXTERNAL' registered
GENSEC backend 'ntlmssp' registered
GENSEC backend 'ntlmssp_resume_ccache' registered
GENSEC backend 'http_basic' registered
GENSEC backend 'http_ntlm' registered
GENSEC backend 'krb5' registered
GENSEC backend 'fake_gssapi_krb5' registered
Got challenge flags:
Got NTLMSSP neg_flags=0x62898215
NTLMSSP: Set final flags:
Got NTLMSSP neg_flags=0x62088215
NTLMSSP Sign/Seal – Initialising with flags:
Got NTLMSSP neg_flags=0x62088215
NTLMSSP Sign/Seal – Initialising with flags:
Got NTLMSSP neg_flags=0x62088215
Domain=[TMGRID] OS=[Windows Server 2012 R2 Standard 9600] Server=[Windows Server 2012 R2 Standard 6.3]


        Sharename       Type      Comment
        ———       —-      ——-
        ADMIN$          Disk      Remote Admin
        C$              Disk      Default share
        Files           Disk
        IPC$            IPC       Remote IPC
        MappedDrive     Disk
Connecting to 10.2.3.111 at port 139
Connection to 10.2.3.111 failed (Error NT_STATUS_RESOURCE_NAME_NOT_FOUND)
NetBIOS over TCP disabled — no workgroup available


Sum it up

Lets Summarize a bit, here I described how to mount smbfs and cifs mount shares with mount command, how to define the auto mount on server boot via /etc/fstab, how to mount manually /etc/fstab defined mount and what should be the syntax of .smbcredentials user / pass file and also pointed how to debug problems on samba / windows server location share mounts with smbclient command.
 

Virtualbox Shared folder set up on Linux between Host and Guest OS – Set up Virtualbox shared folder to Copy files from PC Host to Guest

Wednesday, September 12th, 2018

mount-shares-between-host-OS-and-guest-virtual-machine-howto-virtualbox-vbox-logo

How to set-up Virtualbox shared folder to Copy files from PC Host  and Guest Virtualized OS?

Running VirtualBox Host is an easy thing to set-up across all Operating Systems.  Once you have it sooner or later you will need to copy files from the VM Host OS (that in my case is GNU / Linux) to the virtualized Guest operating system (again in my case that's again another Linux ISO running indide the Virtual Machine).

Below are steps to follow To use Virtualbox Shared Folder functionality to copy files between VBox and your Desktop / server Linux install.

1. Install Virtualbox Guest Additions CD Image ISO

I've explained how to add the Guest Additions CD image thoroughfully in my previous article Howto enable Copy / Paste Virtualbox betwen Linux guest and Host OS
Anyways I'll repeat myself below for sake of clarity:

To do so use Oracle VBox menus (on the booted virtualized OS VBox window):


Devices -> Insert Guest additions CD Image


Mount the ISO inside the Linux Virtual Machine:

root@debian:~# mount /media/cdrom1/
 

If the mount fails and there are no files inside the mount point it might be because the virtualbox-dkms and virtualbox-guest-dkms packages might be missing on the Host OS.

To install them (on Debian GNU / Linux) assuming that you're using virtualbox default distro packages /etc/apt/sources.list :
 

apt-get install –yes -qq virtualbox-dkms virtualbox-guest-dkms


and run:


root@debian:/media/cdrom1# cd /media/cdrom1; sh VBoxLinuxAdditions.run


2. Create directory for Shared Folder that will be used to access Host / OS files from the Guest Virtualized OS
 

root@debian:~# mkdir /mnt/shared_folder


3. Map from VBox program interface Shared folder settings and Mount /mnt/shared_folder location
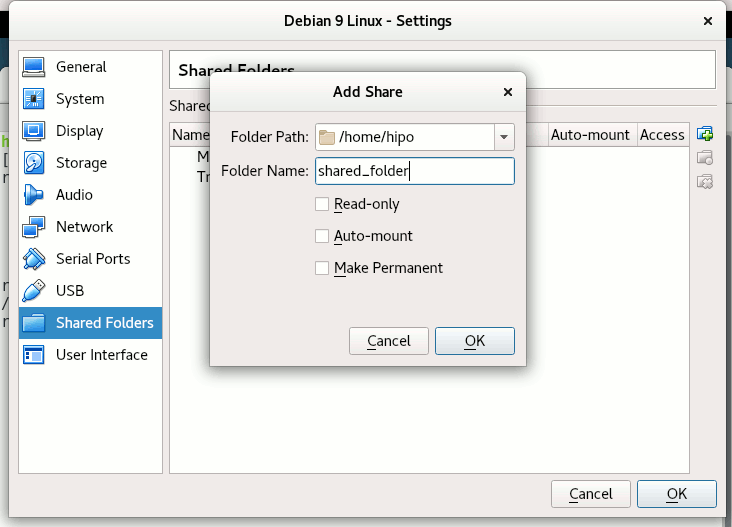
virtualbox-virtual-machine-devices-shared-folders-shared-folder-settings-linux-screenshot


Devices -> Shared Folder -> Shared Folder settings -> Transient Folders (click blue folder add small button right)


From Transient Folders add whatever directory you want to be shared from your local notebook / PC to the VM.
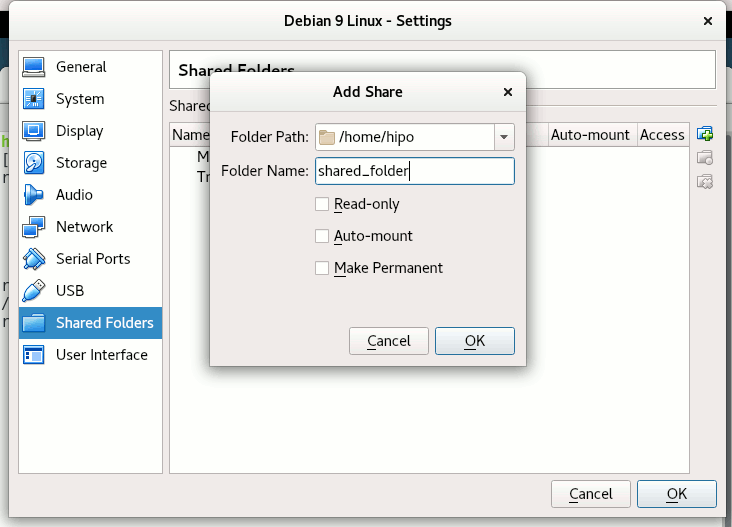
virtualbox-devices-Shared-Folder-Add-Shared-Folder-add-share-linux-screenshotDepending on whether you would like to mount the shared folder only for reading files (choose Read Only) to make it a permanent shared folder (and not just for the one session of current running Virtual Machine until its killed use Make Permanent) or check Auto-Mount tick if you want the shared_folder mapping to be mounted on every VM boot.

Once the shared_folder directory location is set-up from GUI menu click OK and in order for the settings to take effect, you'll need to restart the VM Guest with Linux (use halt command from terminal) or Power Off the Machine via the VBox menus.

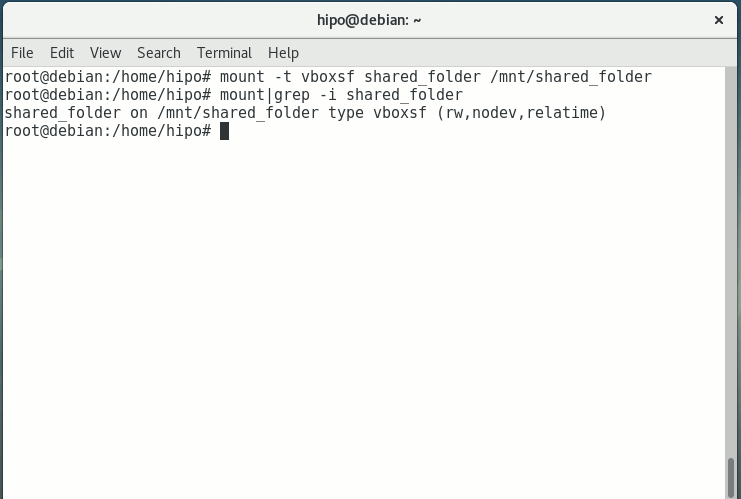
To mount use command like:

mount -t vboxsf name_of_folder_linked_from_vbox  /mnt/name_folder_guest_os/

mount-vboxsf-shared-folder-mnt-shared-linux-guest-screenshot

In my case I wanted to share home folder /home so the command I used is:

root@debian:~# mount -t vboxsf  shared_folder /mnt/shared_folder


If everything is fine your Host OS file content from /home will be visible (for read and write if you Mapped it so) 
under /mnt/shared_folder …

And as Turtles Ninja used to heavily say Cowabunga !!! 🙂
You have it mounted and ready for file share between Desktop -> Virtualized OS.


Bear in mind that above mount command has to run as root (superuser) to succeed.

You now could copy files from your Host OS (running the Virtual Machine) and the Guest OS (Virtualized OS) using /mnt/shared_folder mount point without problems.

The example is if you want to share files between VirtualBox installed Linux and the Guest (Desktop / server) OS, however at many cases mounting your Host OS directory for root users might be not very practical but, instead you might prefer to do the mount for specific non admin user, for example I prefer to do the shared folder mount with my pointed non-root username hipo.

Here is how to do above VM shared_folder mount for non-root user:

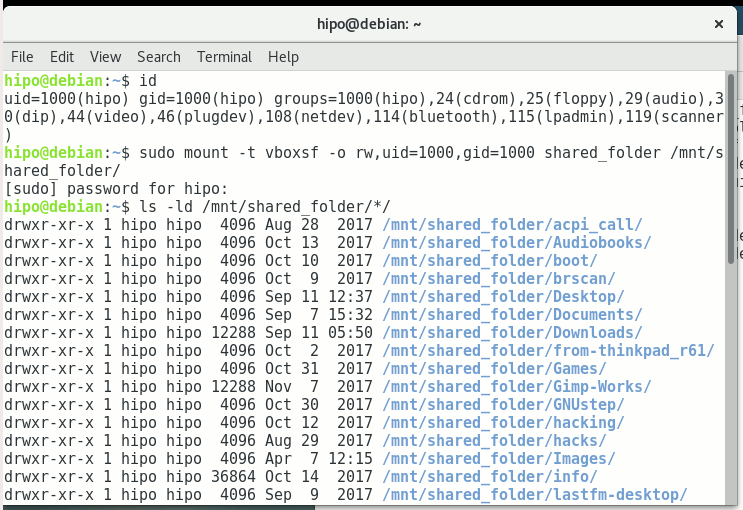
First you need to know the exact UID / GID (User ID / Group ID) of user, you can get that with id command:


hipo@linux:~$  id
uid=1000(hipo) gid=1000(hipo) groups=1000(hipo),24(cdrom),25(floppy),29(audio),30(dip),44(video),46(plugdev),108(netdev),114(bluetooth),115(lpadmin),119(scanner)


As you see UID / GID in my case are 1000 / 1000

hipo@linux:~$ sudo mount -t vboxsf -o rw,uid=1000,gid=1000 shared_folder /mnt/shared_folder
 

mount-virtual-box-shared_folder-with-non-administration-permissions-non-root-permissions-id-and-mount-command-screenshot-linux


4. Mounting configured shared_folder to automatically mount into the Guest OS Linux on every boot

a) Configuring shared_folder auto-mount using /etc/rc.local

If you need the shared_folder to automatically mount next-time you boot the virtual machine quickest way is to add the mount command to /etc/rc.local (on Debian 8 and Debian 9 and newer Ubuntu Linuxes rc.local is missing by default to enable it to work like it worked before read follow my previous article ).

b) Configuring auto-mount for shared_folder through /etc/fstab

The more professional way to auto-mount on emulated OS VM boot time,  you could add the vboxsf mount definitions to /etc/fstab with your favourite text-editor mcedit, nano, joe etc. … (for me that's vim).

Syntax of /etc/fstab is as follows:
 

<Device> <Mount Point> <Type> <Options> <Dump> <Pass>

root@linux:~# vim /etc/fstab


shared_folder /mnt/shared_folder                                vboxsf rw,uid=1000,gid=1000 0 0

Note that you will want to change 1000 / 1000, id / gid with the ones of the non-admin user you would like to add to mount it for.

A quick way to add it to /etc/fstab with a shell one-liner is with command
 

root@linux:~# echo 'shared_folder /mnt/shared_folder                                vboxsf rw,uid=1000,gid=1000 0  0' >> /etc/fstab

An alternative way to add a user to have permissions for vboxsf file system (without specifying the long -o uid=1000,gid=1000 options is to simply add the username in question to group vboxsf like so:

c) Adding non super user username to vboxsf group

root@linux:~# usermod -G vboxsf hipo
root@linux:~# grep -i vboxsf /etc/group
vboxsf:x:999:hipo


hipo@linux:~$ sudo mount -t vboxsf  shared_folder /mnt/shared_folder


without the extra arguments and the options to pass to /etc/fstab (for eventual requirement to auto mount the shared_folder) would be more simple e.g.:


echo 'shared_folder /mnt/shared_folder                                vboxsf ' >> /etc/fstab


One note to make here is if the uesr is added to vboxsf the line for /etc/fstab to auto mount to mount for root user and non-root will be identical.

Then you can get the /etc/fstab auto-mount configured tested by running:

c) Checking auto-mount is working

hipo@linux:~# mount -a
hipo@linux:~# mount |grep -i vboxsf
shared_folder on /mnt/shared_folder type vboxsf (rw,nodev,relatime)


5. What if you end up with mounting failed errors ? – What might be causing the mounting failed Protocol error (a few things to check to solve)


In case of troubles with the mount you might get an error like:

hipo@linux:~# mount -t vboxsf  share_folder /mnt/shared_folder

/sbin/mount.vboxsf: mounting failed with the error: Protocol error


This error might be caused because of Insert Guest Additions CD Image might be not properly enabled and installed using the ISO provided VBoxLinuxAdditions.sh shell script.
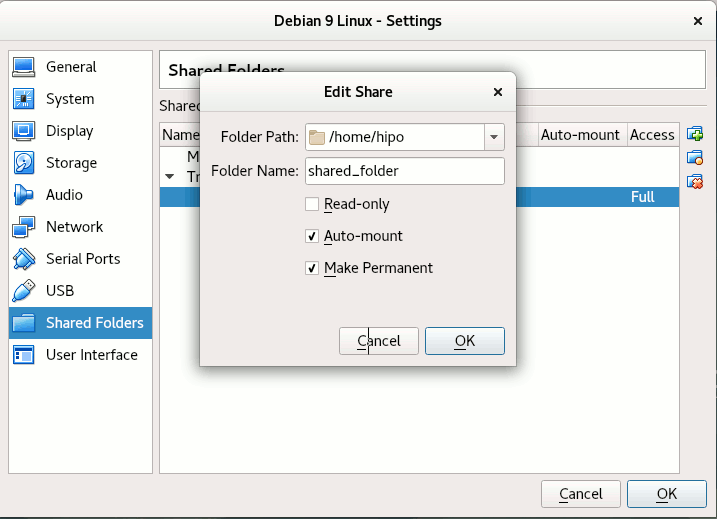
Other common reason you might get this error if you have mistyped the Folder name: given in Shared Folders -> Folder Path -> Add Share for example I have given shared_folder as a Map name but as you can see in above mount -t vboxsf, I've mistyped share_folder instead of the correct one shared_folder inserted.
In some VBox releases this error was caused by bugs in the Virtual Machine.
 

virtualbox-virtual-machine-shared-folder-transient-folder-add-folder-linux-VM-guest-linux

One useful tip is to be able to check whether a Virtualbox Virtual Machine has a configured shared_folder (if you're logging to manage the machine on remote server – nomatter whether you have logged in with VNC / Teamviewer / Citrix etc. or via SSH session.

To do so use VBoxControl as of time of writting usually located on most distributions under (/usr/bin/VBoxControl)


hipo@linux:~# VBoxControl sharedfolder list -automount
Oracle VM VirtualBox Guest Additions Command Line Management Interface Version 5.2.18
(C) 2008-2018 Oracle Corporation
All rights reserved.


Auto-mounted Shared Folder mappings (0):

No Shared Folders available.

You can use VBoxControl command to get set and list a number of settings on the VBox VM, here is an useful example with it where you get information about numerous VBox info values:


root@linux:~# VBoxControl guestproperty enumerate
Oracle VM VirtualBox Guest Additions Command Line Management Interface Version 5.2.18
(C) 2008-2018 Oracle Corporation
All rights reserved.


Name: /VirtualBox/GuestInfo/OS/Product, value: Linux, timestamp: 1536681633430852000, flags: <NULL>
Name: /VirtualBox/GuestInfo/Net/0/V4/IP, value: 10.0.2.15, timestamp: 1536681633438717000, flags: <NULL>
Name: /VirtualBox/HostInfo/GUI/LanguageID, value: en_US, timestamp: 1536697521395621000, flags: RDONLYGUEST
Name: /VirtualBox/GuestInfo/Net/0/MAC, value: 08002762FA1C, timestamp: 1536681633442120000, flags: <NULL>
Name: /VirtualBox/GuestInfo/OS/ServicePack, value: <NULL>, timestamp: 1536681633431259000, flags: <NULL>
Name: /VirtualBox/HostInfo/VBoxVerExt, value: 5.2.18, timestamp: 1536681619002646000, flags: TRANSIENT, RDONLYGUEST
Name: /VirtualBox/GuestInfo/Net/0/V4/Netmask, value: 255.255.255.0, timestamp: 1536681633440157000, flags: <NULL>
Name: /VirtualBox/GuestInfo/OS/Version, value: #1 SMP Debian 4.9.110-3+deb9u2 (2018-08-13), timestamp: 1536681633431125000, flags: <NULL>
Name: /VirtualBox/GuestAdd/VersionExt, value: 5.2.18, timestamp: 1536681633431582000, flags: <NULL>
Name: /VirtualBox/GuestAdd/Revision, value: 124319, timestamp: 1536681633432515000, flags: <NULL>
Name: /VirtualBox/HostGuest/SysprepExec, value: <NULL>, timestamp: 1536681619002355000, flags: TRANSIENT, RDONLYGUEST
Name: /VirtualBox/GuestInfo/OS/LoggedInUsers, value: 1, timestamp: 1536681673447293000, flags: TRANSIENT, TRANSRESET
Name: /VirtualBox/GuestInfo/Net/0/Status, value: Up, timestamp: 1536681633443911000, flags: <NULL>
Name: /VirtualBox/GuestInfo/Net/0/Name, value: enp0s3, timestamp: 1536681633445302000, flags: <NULL>
Name: /VirtualBox/HostGuest/SysprepArgs, value: <NULL>, timestamp: 1536681619002387000, flags: TRANSIENT, RDONLYGUEST
Name: /VirtualBox/GuestAdd/Version, value: 5.2.18, timestamp: 1536681633431419000, flags: <NULL>
Name: /VirtualBox/HostInfo/VBoxRev, value: 124319, timestamp: 1536681619002668000, flags: TRANSIENT, RDONLYGUEST
Name: /VirtualBox/GuestInfo/Net/0/V4/Broadcast, value: 10.0.2.255, timestamp: 1536681633439531000, flags: <NULL>
Name: /VirtualBox/HostInfo/VBoxVer, value: 5.2.18, timestamp: 1536681619002613000, flags: TRANSIENT, RDONLYGUEST
Name: /VirtualBox/GuestInfo/OS/LoggedInUsersList, value: hipo, timestamp: 1536681673446498000, flags: TRANSIENT, TRANSRESET
Name: /VirtualBox/GuestInfo/Net/Count, value: 1, timestamp: 1536698949773993000, flags: <NULL>
Name: /VirtualBox/GuestInfo/OS/Release, value: 4.9.0-7-amd64, timestamp: 1536681633431001000, flags: <NULL>
Name: /VirtualBox/GuestInfo/OS/NoLoggedInUsers, value: false, timestamp: 1536681673447965000, flags: TRANSIENT, TRANSRESET
Name: /VirtualBox/GuestAdd/HostVerLastChecked, value: 5.2.18, timestamp: 1536681702832389000, flags: <NULL>

Hope you enjoyed ! Have phun! 🙂

FreeBSD Desktop: Allow All system users to mount CDROM, DVD, USB Devices and other external devices

Friday, November 16th, 2012

freebsd allow all system users to mount CD DVD USB in GNOME and KDE desktop - freebsd power to serve logo

Users who use FreeBSD for multiple logins Desktop host or in universities multiple login Desktop  shared user PCs will have problems with mounting CD and DVD Roms, Usbs and other external devices. To mount any of those a root or toor superuser  will be required and this makes a really bad impression to the novice users, making them think FreeBSD is user unfriendly, where in reality it was just build to behave so with higher security in mind.
This ruins a whole user GNOME experience and disappoints the end user, especially if the user is just a person who needs to do some browsing and copy few files from and to the host.
This prevents udevd and auto mount in GNOME and  KDE GUI environments to be unable to automatically mount and unmount CD / DVDs and USBS where plugged or unplugged but instead just poping up permission errors whether CD or USB is attached.
Thanksfully, you can change this behavior to make FreeBSD a bit more user friendly and of course 'less secure' by few simple commands 🙂

Here is how:

freebsd# sysctl -w vfs.usermount=1

vfs.usermount: 0 -> 1

echo 'vfs.usermount=1' >> /etc/sysctl.conf

What is required next is to add all devices which will be mountable by all users in /dev/devfs.conf.

To get a list of devices do:
freebsd# camcontrol devlist

at scbus0 target 0 lun 0 (pass0,da0) at scbus1 target 3 lun 0 (pass1,sa0) at scbus1 target 6 lun 0 (pass2,cd0) #

Most USB devices are recognized and assigned as /dev/da0, and almost all CD and DVD Rom devices will be initialized by kernel as /dev/cd0, however if you get something different just set the appropriate vals.

a) Add permission records for CD / DVD ROM in /etc/devfs.conf
freebsd# echo 'own /dev/da0 root:operator' >> /etc/devfs.conf
freebsd# echo 'perm /dev/da00 0666' >> /etc/devfs.conf

b) Add permission records for USBs in /dev/devfs.conf

freebsd# echo '## allow member of operator to mount cdrom' >> /etc/devfs.conf
freebsd# echo 'own /dev/cd0 root:operator' >> /etc/devfs.conf
freebsd# echo 'perm /dev/cd0 0660' >> /etc/devfs.conf

To allow, all present system users to have access to mount USB, CD / DVD roms, it is necessery to add all users to the operator, group. This is a security bad practice as this will make allow all users to have extra permissions to binaries on the system owned or allowed to be accessed by operator group. However for home computers, where you, your sister and a bunch of good friends have accounts, security shouldn't be of a great concern.

If you know well all your users and you have disabled SSH on the system and security is not of top priority run:

freebsd# /usr/local/bin/bash
root@freebsd~# for i in /home/*; do user=$(echo $i|sed -e 's#/home/##g'); do \
pw groupmod operator -m $user; \
done

Onwards, you can check few users to see to see if they are added to operator group

freebsd$ id
uid=1001(hipo) gid=1001(hipo) groups=1001(hipo),0(wheel),5(operator)

Well that's all now your GNOME hal process – (Hardware Abstraction Layer) will be able to manage CD / DVDs and USBs with no more weird errors.

This article was inspired by cybercity's Allow normal users to mount CDROMs DVDs and USB devices. So thanks 'em for being a source of inspiration.

Enjoy 🙂

How to mount Windows share from command line (cmd.exe) on Microsoft Windows XP / Vista / 7

Wednesday, October 24th, 2012

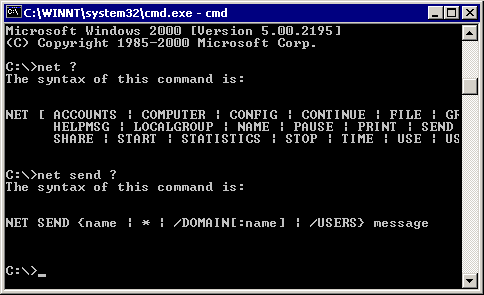
MS Windows net command mount map attach command how to windows xp 7 and vista, mount share name with net cmd
I’m rarely using computer from a Windows host, but sometimes I need to as well. I’m not a big fan of M$ Windows, Microsoft and their products. Though to be truthful lately their OS has improved significantly. BTW from purely “it works” perspective Windows 7 is quite succesfully made OS. Windows 7 is hard to infect with Viruses, looks to me it works much more stable compared to XP and so on. Well anyways back to my topic. I write this post just to shortly show how one can mount a share in Windows Command Line (cmd.exe)

In all Windows NT based Windows OSes (except maybe some Home releases), the way to attach / mount a Windows Network Share (Samba share / SMB share – as we Linux users call it) is done with command:

  • net

The net command has many options, but most important ones in most cases are:

net view – Using to list a share content
and
net


C:\> net view \\NetworkShare.Domain-name.com\ /All
Shared resources at \\NetworkShare.Domain-name.com\
Share name Type Used as Comment
---------------------------------------------------
ADMIN$ Disk Remote Admin
C$ Disk Default share
IPC$ IPC Remote IPC
NETLOGON Disk Logon server share
SYSVOL Disk Logon server share
The command completed successfully.

As you see in above output, net view \\IP_ADDRESS\ /All or net view \\Whateveer-Host-Name.com\ lists every Shared folder on a host.
Once you have the list choose of possible mount points, you can easily map / mount share by opening Windows command line, cmd.exe (Quickest way I know of is press simultaneously Windows button + R (key) and typing in command prompt:


C:\> net use h: \\NetworkShare.Domain-name.com\Share-Name\
Shared resources at \\NetworkShare.Domain-name.com\

BTW sometimes administrators forget to set password to Administrator account, it is generally good rule of thumb if you’re in position to check your Windows Sharing server security by trying intruding with adminsitrator user:


C:\> net user administrator admin
....

Hopefully if you set a password for your Administrator you will get:


C:\> net user adminsitrator admin
System error 5 has occcured.
Access is denied.

If you need to login to a ShareName from command line on Winblows with certain username use:


net use d:\ \\server-share-name\share /USER:UserName

Just change Username with whatever username you need …

If the “Domain name” is created so it contains few words without a space you will need to Connect the Windows Share putting windomain name in “” :


C:\> net use k: "\\share name with spaces name"\Users

.....

Removing mapped Share is done with:


C:\> net use f: \\share-name\public /delete
....

Another useful net variation is to once for all map a Share, just like you have option from Windows Control Panel -> Network and Sharing Center


c:\> net use k: "\\whatever share name"\Users
C:\> net use /persistent:yes

Then whilst restart-ing Windows PC on next boot K:\ Drive will be mapped to “whatever share name”\Users

net command is among the swiss army knife tools of Windows crackers, hence I think any person interested in Windows Security or supposed to write .VBS logon scripts for Windows DomainController should check it (if not already) 🙂

net supports also to send a password directly from command line (very bad idea from security perspective):


C:> net use * \\remotepc\share /u:domainname\username password

The meaning of * character above is to map the network drive in the last free one drive letter on the system. Lets say that last Drive Letter mounted on the Win host is W:/, then net use * will automatically assign the new drive a letter corresponding to consequential letter Z:\

Here is complete syntax as pointed from Microsoft resources net cmd documentation:

Syntax
net use [{DeviceName | *}] [\\ComputerName\ShareName[\volume]] [{Password | *}]] [/user:[DomainName\]UserName] [/user:[DottedDomainName\]UserName] [/user: [UserName@DottedDomainName] [/savecred] [/smartcard] [{/delete | /persistent:{yes | no}}]

net use [DeviceName [/home[{Password | *}] [/delete:{yes | no}]]

net use [/persistent:{yes | no}]

net command is one of the most important commands for the Windows SysAdmin. It gives one access to add / delete / modify existing users and many, many more. If you want to learn a bit more on Windows Command Line or interested in Windows Scripting, I suggest you check out net docs thouroughfully
That’s all hope this post helps someone.

Windows Daemontools like Linux GUI software or How to mount ISO files in Linux and BSD

Saturday, September 26th, 2009

Ever wondered if Linux allows you to open ISO’s with a nice graphic interface like the famousDaemontools on Windows. Cause I did and I found the software that enables you to do so:
First and most popular option especially for Gnome users is:
1. Acetoneiso , it’s really famous between mainly Ubuntu users
2. KDE users might be interesting into The kiso program 3. Another program I found being used among Ubuntu users is called gmountiso .
Still if you’re mostly a console guy like I am and want to mount your iso into some directory on Linux here is how:
# mkdir /mnt/disk# mount -o loop disk1.iso /mnt/disk
Now your iso is mounted in /mnt/disk.

The way to mount an iso file in FreeBSD is a bit different.
Here is how to do it in FreeBSD:
# mdconfig -a -t vnode -f /path/to/image.iso -u 1# mount -t cd9660 /dev/md1 /mnt/cdromNow your iso stays mounted in /mnt/cdromIn case you’d like to unmount it, you need to execute:# mount -u /mnt/cdrom# mdconfig -d -u 1
On FreeBSD there is one more oddity:
For instance if you’d like to mount some Windows FAT filesystem you need oralternatively an MSDOS file system, here is how:
# vnconfig /dev/vn0c ./image.iso# mount -t msdos /dev/vn0c /cdrom
The last method to mount your iso is said to be compatible with all type of filesystems, so youmight be a good idea to use it always
END—–