Posts Tagged ‘mouse button’

how to archive with Windows default zip (compress) algorithm

Tuesday, April 1st, 2014

windows-sent-to-compressed-file
I'm working on a decomissioning project (for those who hear decomissioning for a first time – in corporate world this means removal of service/s or assigned resources of a server or a physical server hardware that is not to be used in future or is obsolete). The decomissioning includes removal of Apache Tomcat (Software Configuration Item CI – in HP terms) from Microsoft Windows 2007 – Service Pack 2.
Part of decomissioning is of course to create backup of Tomcat Application server and for that I needed to create compressed archive of Tomcat instances. Usually I do archives on Windows using Winrar or Winzip but this time as the server productive server has the minimum installed there was no any external vendor produced archiving software available.

My memories from past were that there is a native compressing program embedded into Windows as I've unzipped compressed archives on Win hosts with no need for external WinZip. However until so far I never did .ZIP archive with no available external uncompress software.

Using Winzip or Winrar so far to make archive from a number of files I used to select files to enter Archive press right mouse button and select Create Archive (Add To Archive) so I expected this will work whenever no Winrar, however there was no obvious button like this, so I googled a bit to find out how is that possible ending up on Article from Microsoft titled "Compress and uncompress files (zip files)", there is a dumb proof video teaching Compressing files with Microsoft default ZIP program is done by the the weird "Send To" menu 🙂 

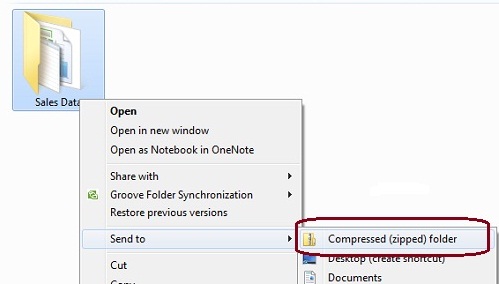
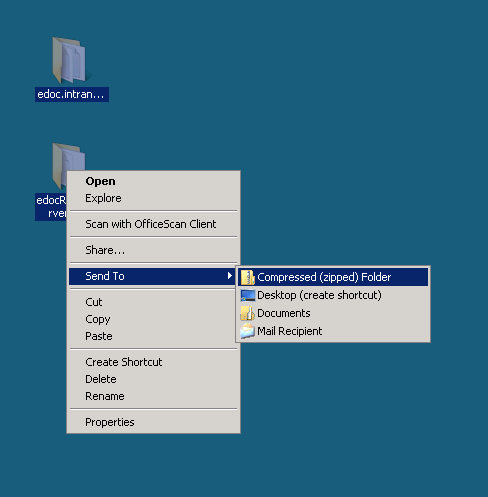
Selecting files to enter Archive;
> (Click Right Mouse Button) -> (Send To Compressed Zipped Folder)

compress_zipped_folder_with_windows_default_archive_algorithm how to archive with windows default compress archive

Honestly If I didn't checked the net probably I will never think of looking it there.

How to make Video from your Linux Desktop with xvidcap / Capture desktop output in a video on Linux

Wednesday, April 6th, 2011

If you have wondered on how to create videos aiming at manuals on how you do certain stuff on Linux, let’s say related to programming or system administration.
Then you should definitely check out

xvidcap

Below is the package description as taken from apt-cache show xvidcap

A screen capture enabling you to capture videos off your X-Window desktop
for illustration or documentation purposes. It is intended to be a
standards-based alternative to tools like Lotus ScreenCam.

On Debian based Linux systems (e.g. Debian Ubuntu) xvidcap is available straight from the package repositories. To install and test it you can straight issue:

linux:~# apt-get install xvidcap
...

To start using xvidcap, either by starting it with alt+f2 in gnome or straight launch it from the applications menu via:

Applications -> Sound & Video -> xvidcap

Here is how the xvidcap program looks like right after you start it;
xvidcap screenshot main menu

As you see in the screenshot xvidcap’s menu interface is extraordinary simple.

As you see it only has a stop, pause, rec, back and forward buttons, a capture selector and movie editor.
Pitily xvidcap does not support music capturing, but at least for me that’s not such an issue.

If you click over the field test-0000.mpeg[0000] with your last mouse button, you will notice a drop down menu with an option for preferences of xvidcap.

Take the time to play with the preferences, since there are quite a few of them.

The most important preference that you might like to straightly adjust in my view is in the:

Preferences -> Multi-Frame tab -> File Name:

The default file that xvidcap uses to store it’s content files as you will see in the preferences is utest-%04d.mpeg

If you want to change the type of the output file format to let’s say flv change the File Name: value to utest-%04d.flv
Next time you record with xvidcap, you will have the file stored in flv format.

The red lines which you see in the above screenshot is the capture area, you will have to also tune the screen capture area before you can proceed with recording a video from your desktop.

The way to capture your Desktop in fullscreen is a bit unusual, you first need to mark up all your visible Desktop and before that you will have to select from xvidcap’s preferences from:

Preferences -> General -> Minimize to System Tray

By selecting this option each time you press the xvidcap’s record button the xvidcap’s controller interface will be minimized to tray and capturing the video of the region previously selected with the capture selector will start up.